Hans Richter
-
Posts
493 -
Joined
-
Last visited
Content Type
Profiles
Forums
Articles
Gallery
Downloads
Events
Everything posted by Hans Richter
-
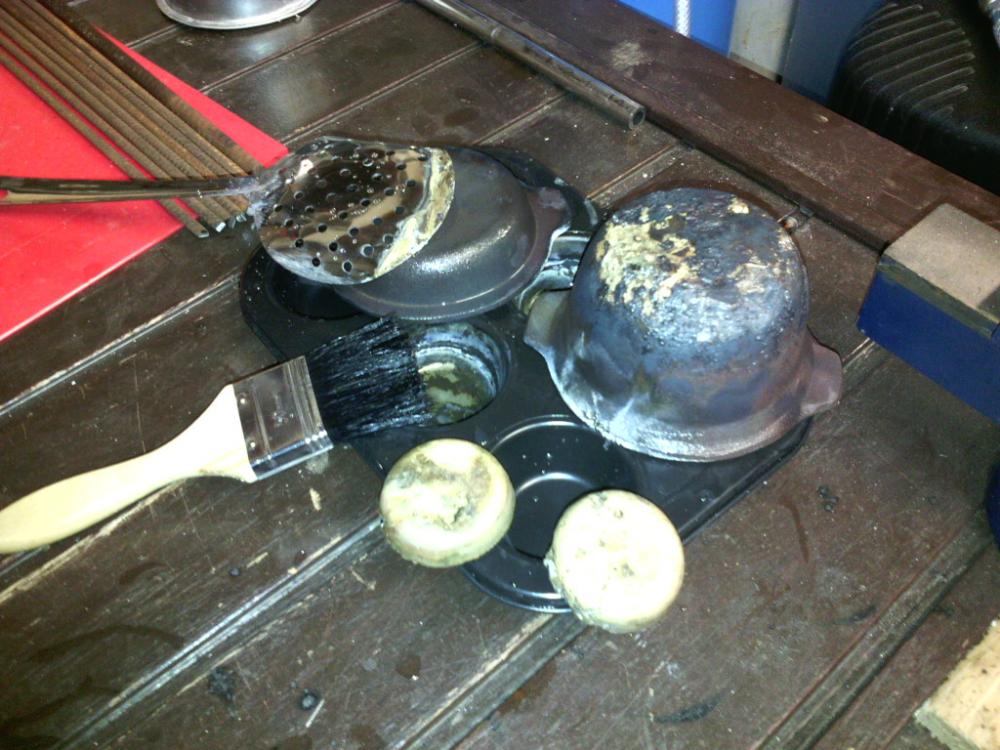
Power Hammer Base Pad
Hans Richter replied to knots's topic in Power Hammers, Treadle Hammers, Olivers
There are no spareparts you can order at KUHN???? If not, I used some thick pieces of textile re-enforced used conveyor belts (several layers) Let your thinks beat -
Gents, it's finally works -buy a new charger for about 40 bucks (probably from China) but with Amp-meter and selection switch for 5 till 20 Amps and 20 till 80. There is also an external fuse easy to change if overloaded. Very curious wat I will find tomorrow morning. However the rust is floating and the bubbles rise up. Dave keep the life 'sparkling' so there is no need on hair spray or a pacemaker Cheers, Hans

-
What did you do in the shop today?
Hans Richter replied to Mark Ling's topic in Blacksmithing, General Discussion
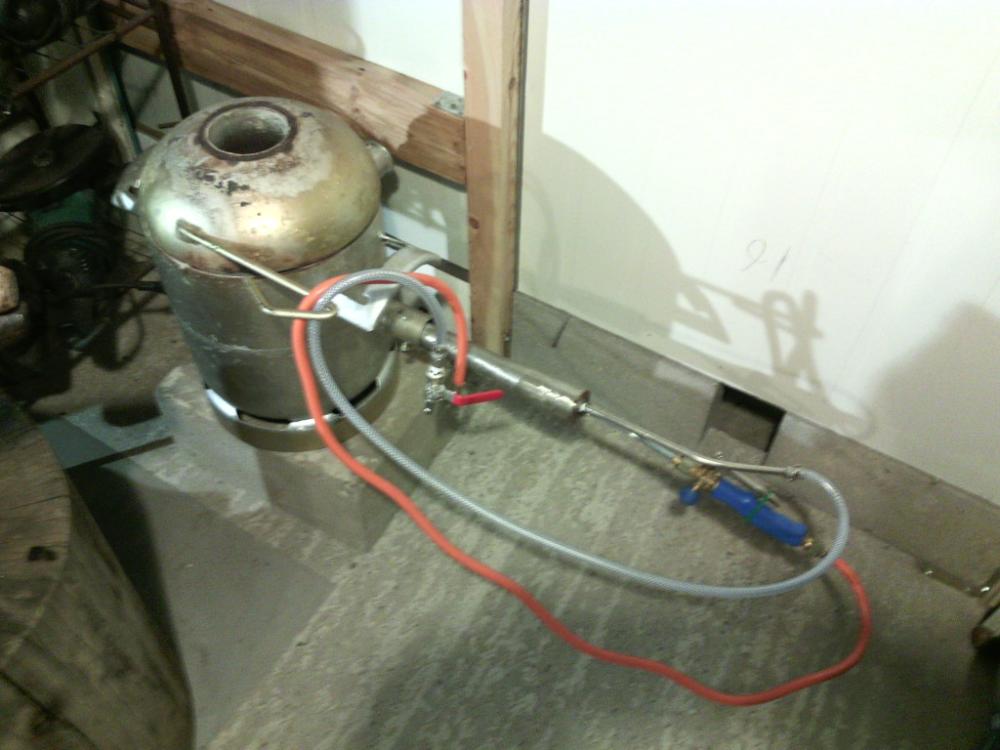
Pimped the other two SS 316 Ti burners with an orifice of #60 instead of #73 and supply them with a #60 pressured air injection (MIG-tip). Now they powerful enough to reach the temperatures on a second (brass, bronze or copper) melting furnace (maybe for sale) and the two gas forges I intend to use for damast welding. And YES I still use the TÜV- approved gas components like torch and connectors of the humble ‘weed’-burners instead of the galvanised 110lbn/in stuff from the local pluming shop. Do this to avoid damage on the rubber hoses and valves by crawling up heat to hoses and valves after shut down the devices. Any tips for assembling a simple damast packet are more than welcome. Cheers, Hans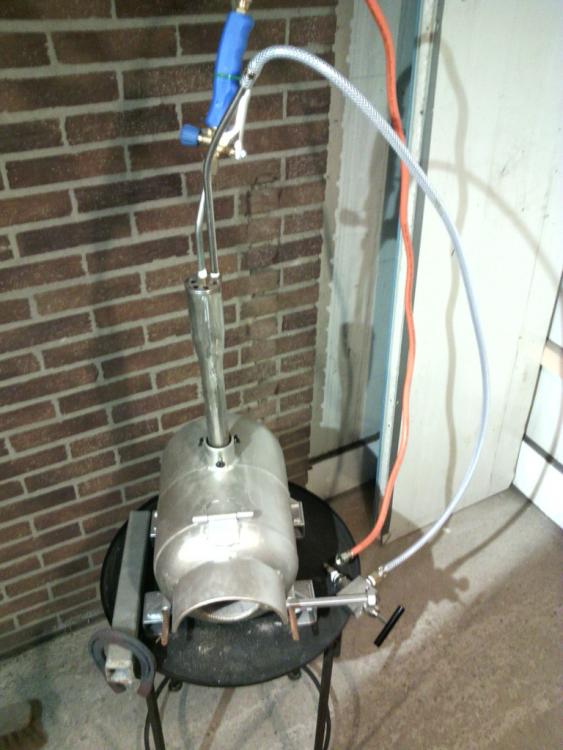

-
B.t.w. this porous block and the acetone is also the reason to transport and use acetylene cylinders always in a vertical position and never lay down.
-
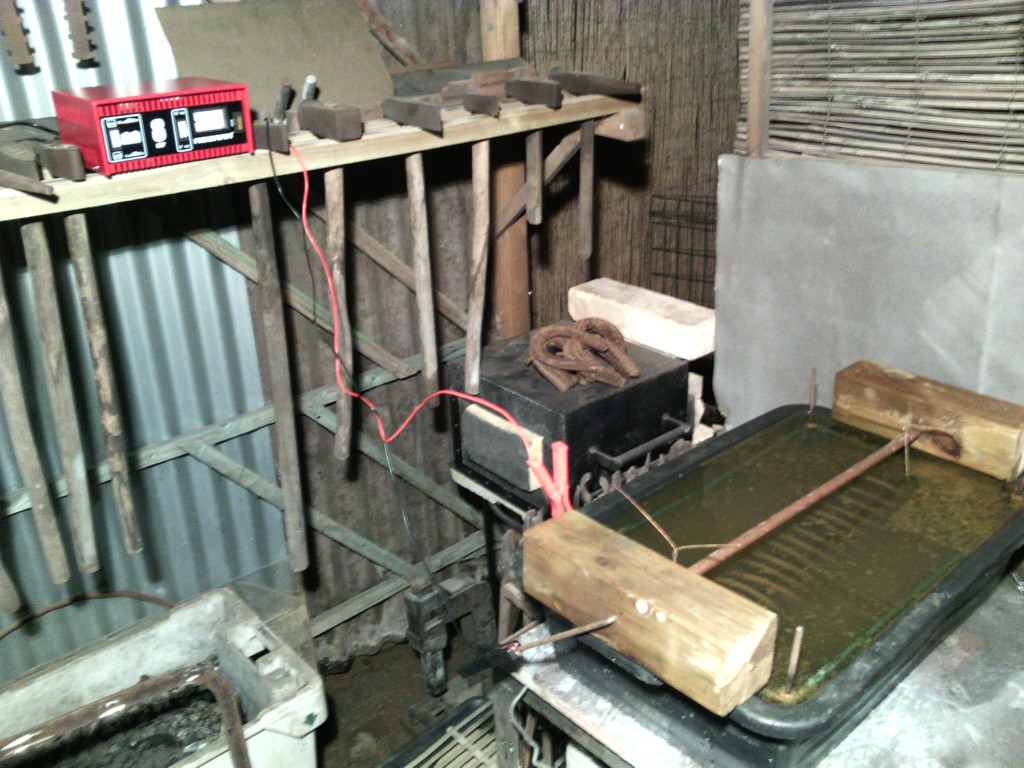
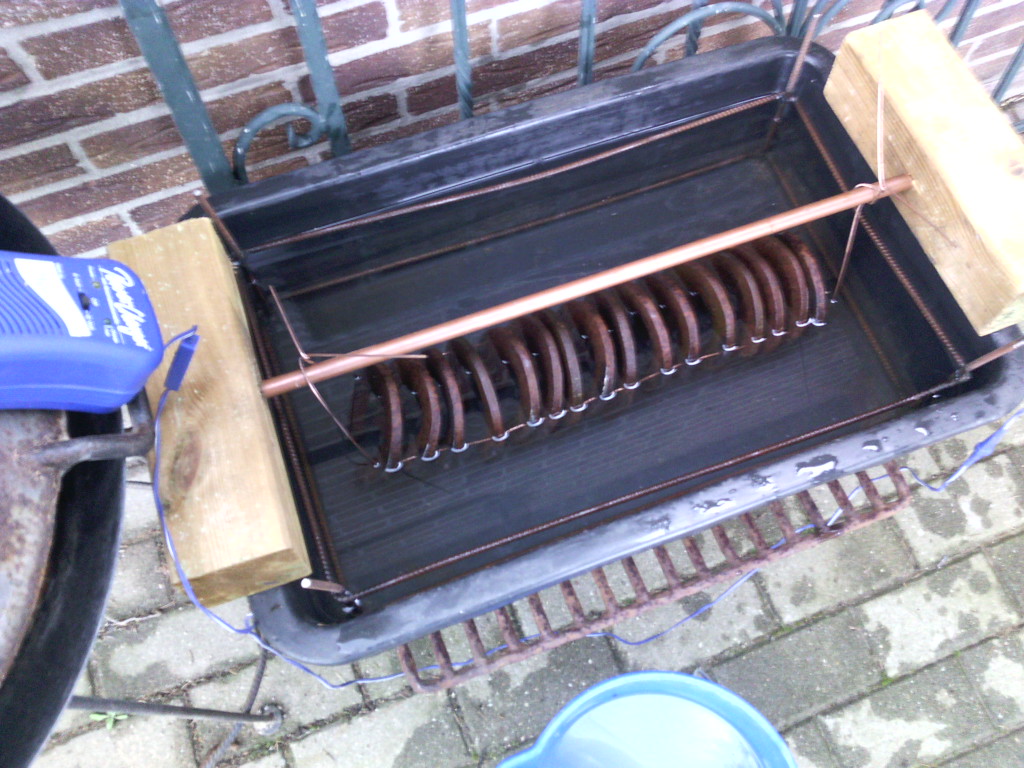
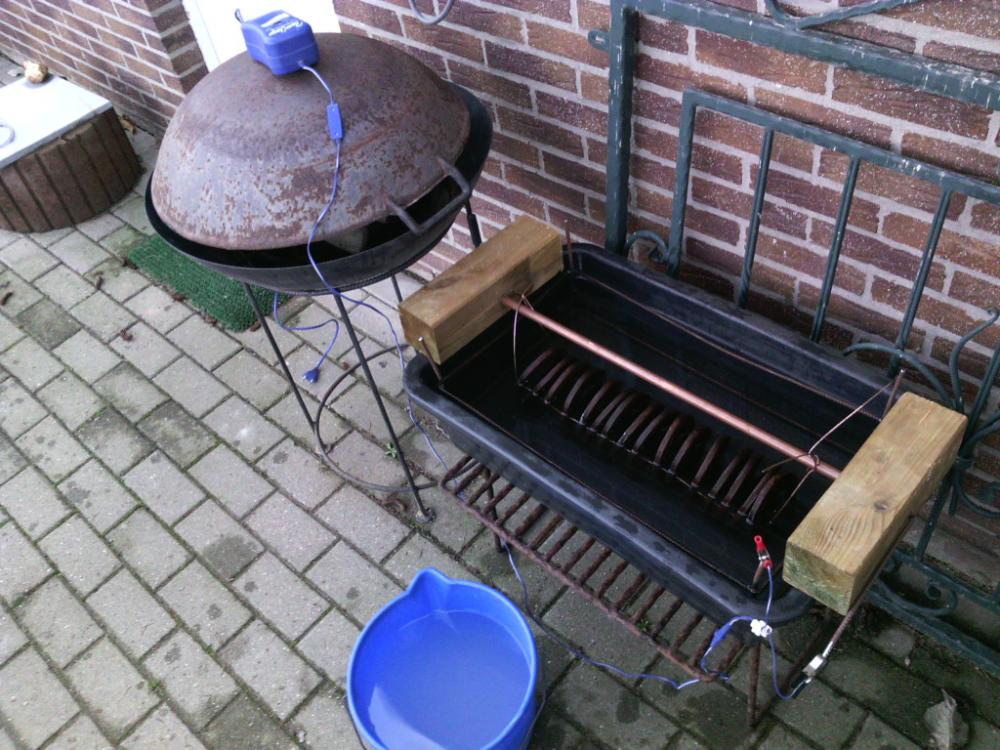
I was curious about the possibilities and the low aggressive method (no solvents, no acids) and tried to build my own de- rusting apparatus. Unfortunately the battery charger (motorcycle) turned out as not powerful enough. Build a cathode cage from rebar and start with a couple recovered raw horse shoes. Looking for a more powerful charger now on second hand sites. Greetings, Hans

-
My tire hammer finally finished - video
Hans Richter replied to Stitch's topic in Power Hammers, Treadle Hammers, Olivers
Congratulation Stich, wish you many happy forging hours with the new machine. Just get a Deja’vu, I also ask the boss at home to do the paint job. Maybe another tip, be aware that the dices (and you) can get hurt if you let them run ‘cold’ against each other. I usually try them out with some wood or a piece of rubber conveyor belt between them. Even when I not use the hammer I always have a wooden block between them. The dices are holy to me. Got two sets of dices and several hardy tools and able to do almost everything with them. Just busy to build some fuller tools to forge repeating pieces like balls, rosettes and leafs. Enjoy your hammer. Cheers, Hans
-
Hi Pr3ssure, If I look to the structure of the wood it looks like interlocked wood grain with crossing fibres like many long growing African trees have (to many sorts to define your 3x3 posts). It have not the long diagonal wood grain like ash or beech you normally use for many kind of handles. Ash or beech will act like a spring and absorb the shock of the hammer beats to your wrist. Interlock wood grain is very decorative ones polished and furnished but will not absorb shocks. There is another thing you have an eye on. If the wood ones used for packaging and transportation and came by shipping from Africa it must be compliant to the IPPC regulations and should be debarked and heat treaded or gas treaded by Methyl bromide (!). They do/require this to avoid migration of agriculture quarantine pests, termites, funguses and plant diseases. See links below. In your case -the posts are debarked and stored/air kiln for quit a long time that eventual leftovers of MB are long gone, but reconsider the use of the wood for hammer handles. Ware gloves during working on the wood because my experience after working with Wenge, Mahony en Azobe (fantastic wood with interlocked wood grain) result very often in annoying little infections on my hands caused by wood splinters. Have a good WE, and fun with your exotic wood source. Hans (The ‘Work safety pope’) https://www.ippc.int/largefiles/adopted_ISPMs_previousversions/en/ISPM_15_2009_En_2009-04-23.pdf http://www.ultimatetermitecontrol.com/methyl-bromide-fumigation/
-
Hi, welcome to the club. Have no experience of forging bronze or welding with process 141/142 (TIG), solder it ones with silver wire. The bronze guards I made are from ALU/Bronze witch is easier to drill, saw or hone down. Pure bronze is quit hard but easier to cast. But how several members already mentioned it depends what you are going to do. Here in Belgium the Bronze is also expensive between 6 and 10 USD/lbs scrap/pure certified ingots. Good luck, Hans
-
http://www.ebay.de/itm/1-SCHUHSCHABER-SCHUHPUTZER-SCHUHABSTREIFER-BURSTE-EISEN-FUssMATTE-STIEFEL-0120-/262457633752 Suggestion –forge a new scraper and use it like this: clean the soles of your boots (after gardening/planting/mining) and before you enter veranda of house –your wife will love you for this
-
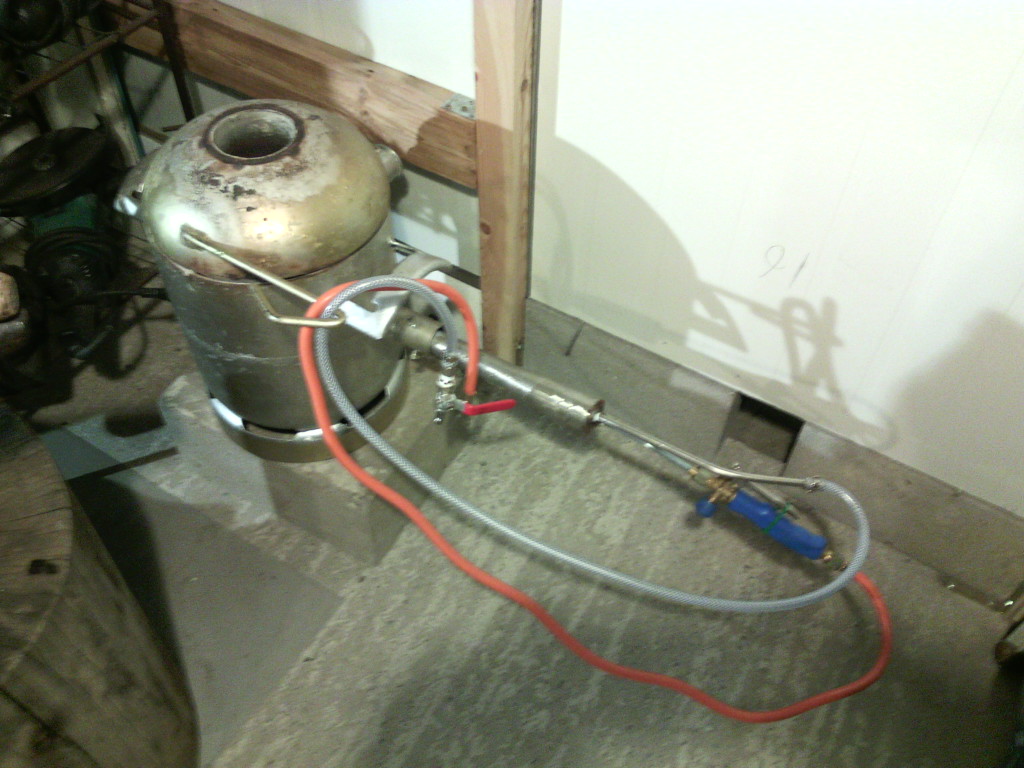
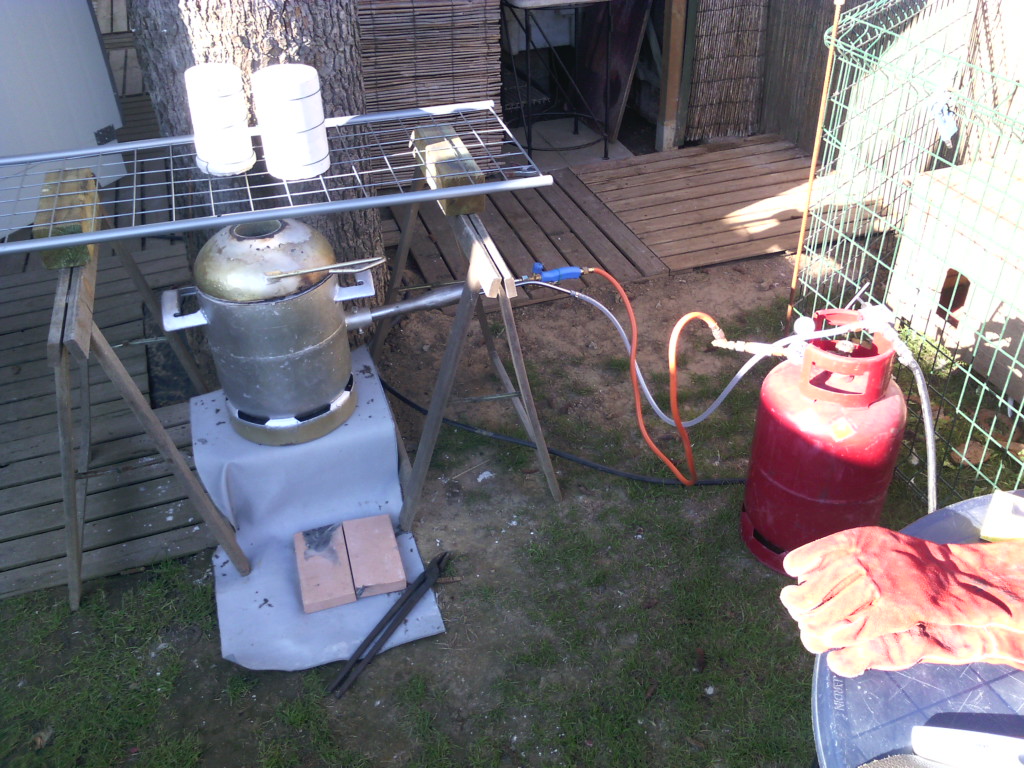
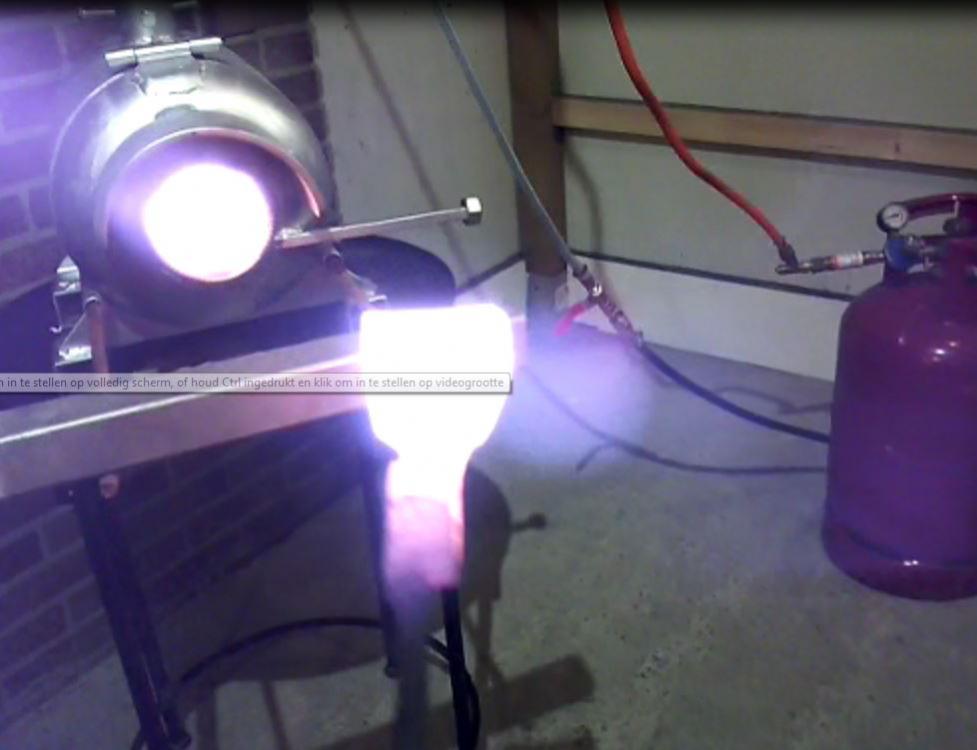
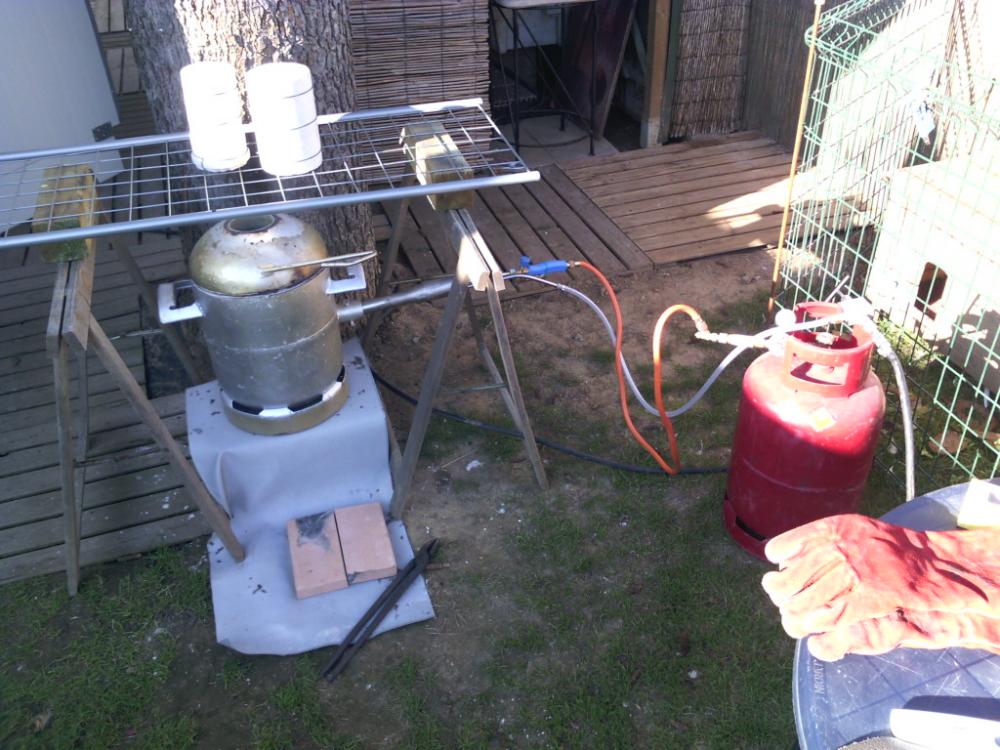
Have 2x 7gal tanks, to change them if one is empty. Since I use them with the air forced burner on 14psi I have 1/4 less consumption in comparison with the pure Venturi burners. One tank is good for 1 to 1 1/2 day forging or melting pleasure. Add next to the regulator/reducer also a hose break valve and an flame extinguish valve to avoid back flash to the tank after the earlier chimney effect on the Venturi's. Now I close first the gas supply an than the needle valve for pressurised air. Till now I mention only some frozen air condensation on/till the gas level remains in the cylinder and never a frozen reducer valve. After my knowledge its only become annoying when the reducer freeze in or even critical if the (propane) cylinder or environment reach a temperature below -47F. This is the reason to use propane instead of another gas like butane or LPG. Please correct me if I’m wrong.

-
Nice clean eye, made my first axe also from mild steel only. Next stage is forge welding or an harder material (in my case 13 ChroMo) with quenching an heat treatment/annealing. Good luck
-
What did you do in the shop today?
Hans Richter replied to Mark Ling's topic in Blacksmithing, General Discussion
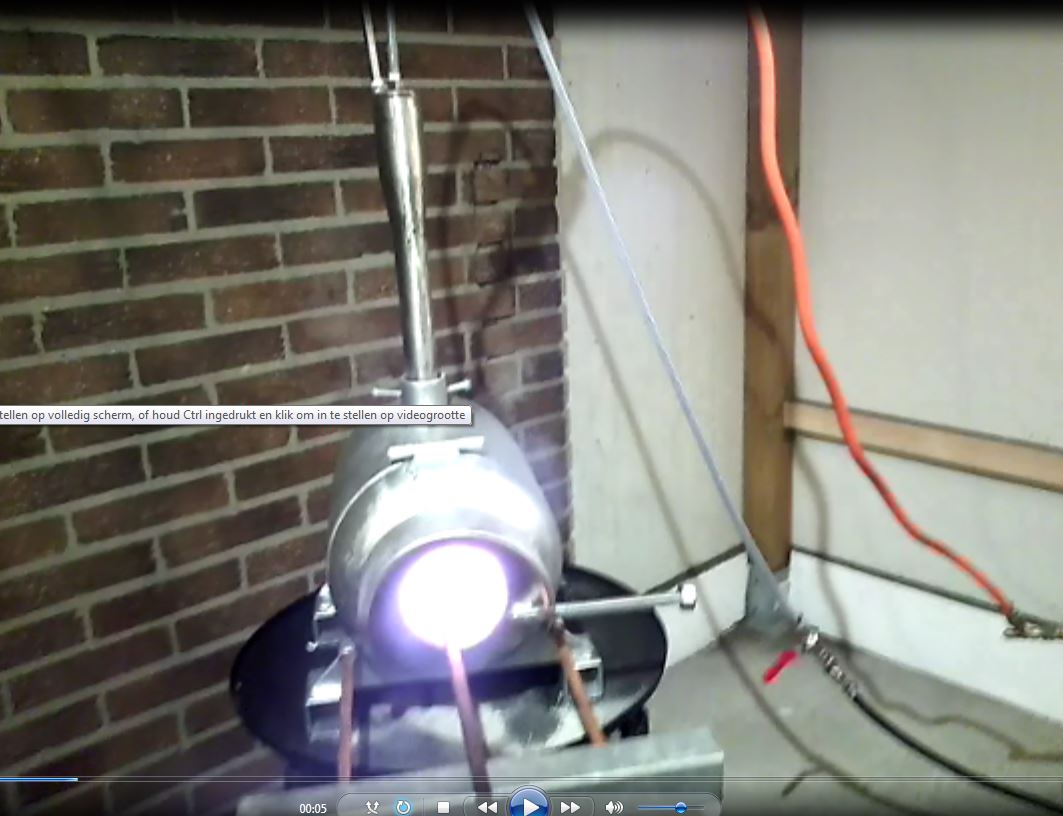
Listen to some wise guys on IFI and build another gas forge. This time smaller and with an air forced burner. Go’s much better with the power hammer and have less dragon breath on the exhaust. So the shop roof is lees in danger and speed and result are so much better. Call him tender Ms.Piggy. Also create multiple connectors in the shop for pressured air because of the needs of hammer, forge and melting furnace. So now it’s time to make some new stuff.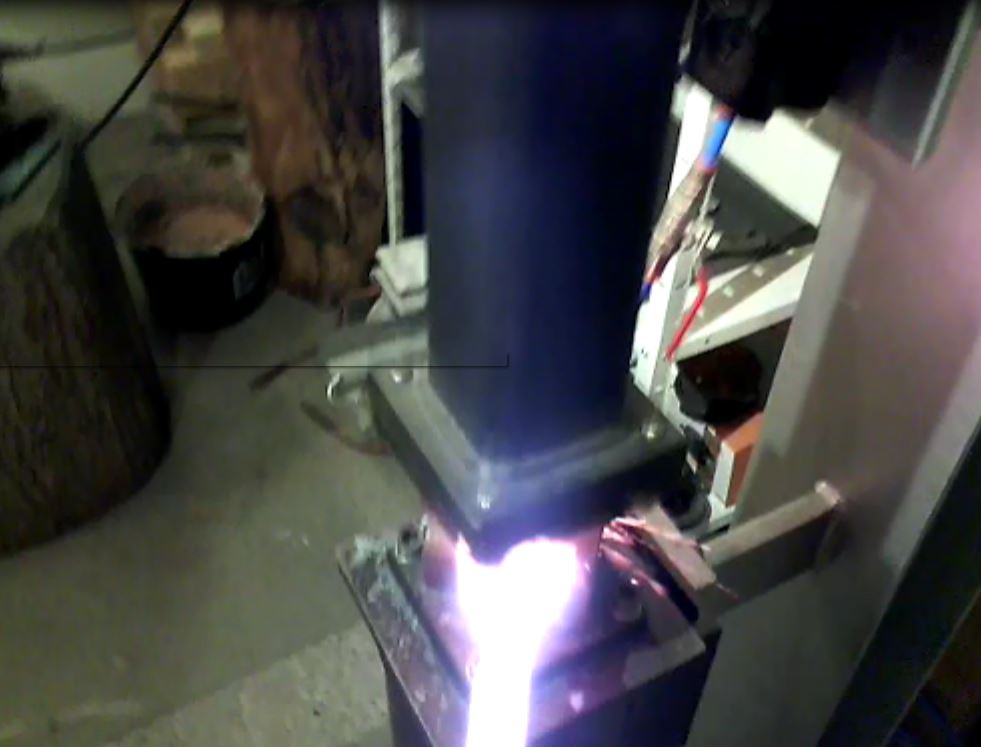

-
Nice job, wish I had the space for that. Wish you many happy forging hours on this exelent pice of work. And yes make him dity
-
What did you do in the shop today?
Hans Richter replied to Mark Ling's topic in Blacksmithing, General Discussion
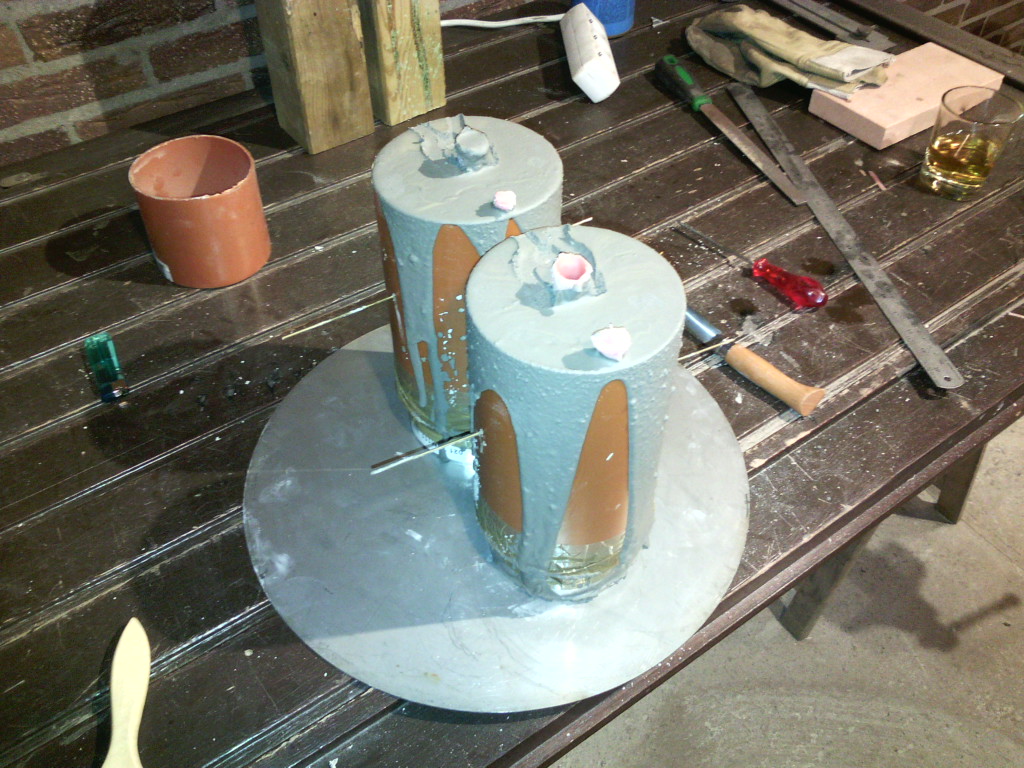
Hi folks, still busy with the first casting attempts, try ‘cire perdue’ or lost wax technic now, after the clay disaster. Ending up with to not fully filled moulds of an bronze age axe. However the parts I got from the lost wax moulds are good shaped with a smooth surface. Prepared two new moulds with a wider sprout an pouring funnel and will pour them after kiln and burning out the wax. Feedback, tips or tricks are more than welcome. Have a nice Sunday. Cheers Hans


-
Hi Chris, the things you made/create till now -are looking very good and well crafted. Know from my own experience that you will improve several things after using a while, like the handle of your hammer, space, positioning and output of the burner and forge and so on. Ones you are ‘infected’ with the ‘metal design and tool making virus’ it will become an addiction with all the consequences. Welcome to IFI and good luck with the future projects. Cheers, Hans
-
I’m ready for serious casting?
Hans Richter replied to Hans Richter's topic in Smelting, Melting, Foundry, and Casting
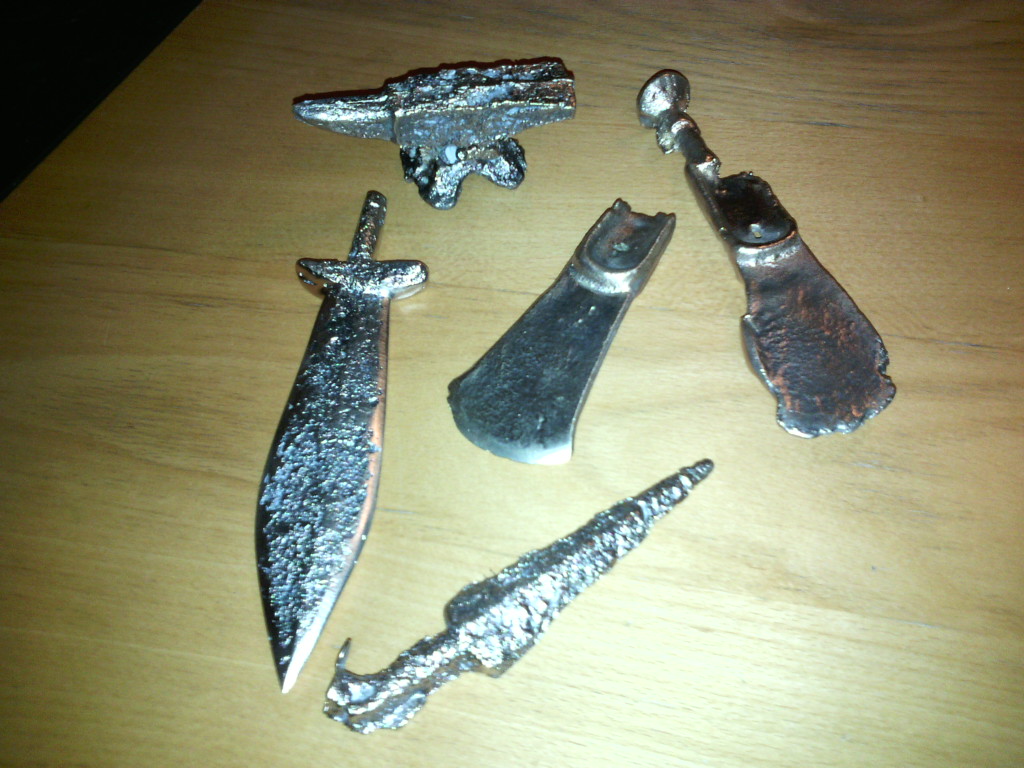
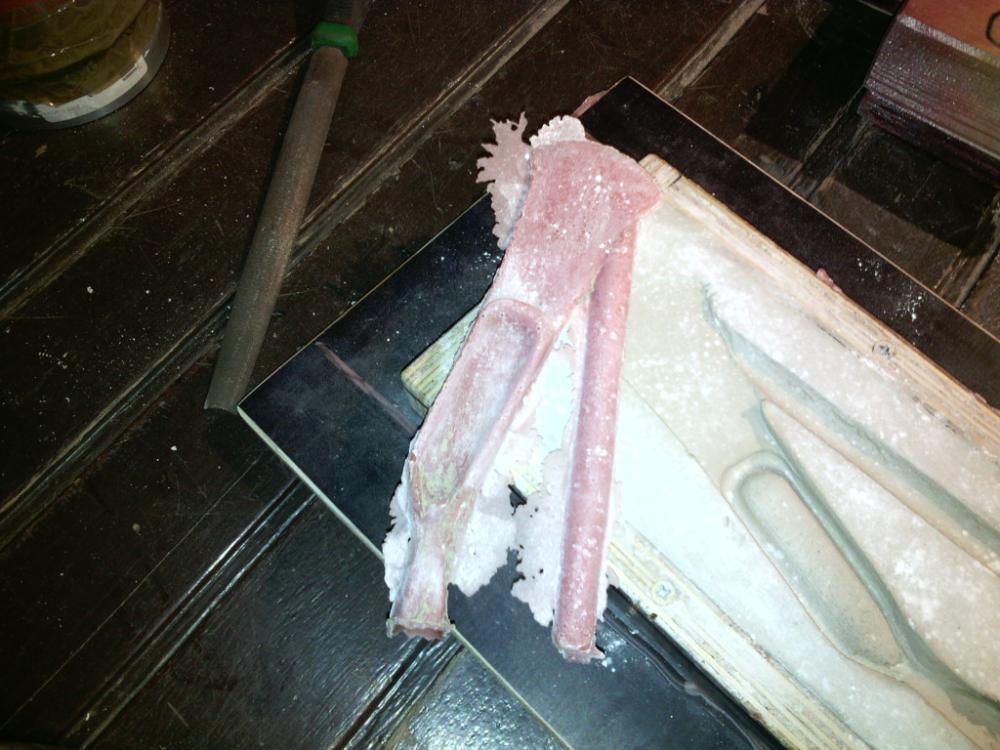
Hi gents, the question in the topic wasn’t only a rhetorical yell , thanks for feedback and tips, and of course the honest answers. Thomas –placed de moulds in an extra shell because they didn’t close well after kiln the clay so there are a lot of ‘organic’ vents all filled with bronze after pouring JN –used the setup of an historical mould shown at a local museum, when I step over (and I do) to lost sand I will use the method you describe Frosty –an honest answer and remark ;-) with one small addition from my side I’m not only ‘own’ the tools but made them by myself with exception of the PPE’s and crucibles. After all ‘the way is the goal’ isn’t it? Please see the results below –still a long way to a good cast and I will practice further, follow some classes and read your threats and tips on IFI. Keep the blank of the pugio as an reminder on my first cast.
-
Congratiulations, nice anvil, straight surface, sharp edges and I hoop de rebound en hardness is OK to.
-
A very good job, compliments on both, the iron work and the letters/board to
-
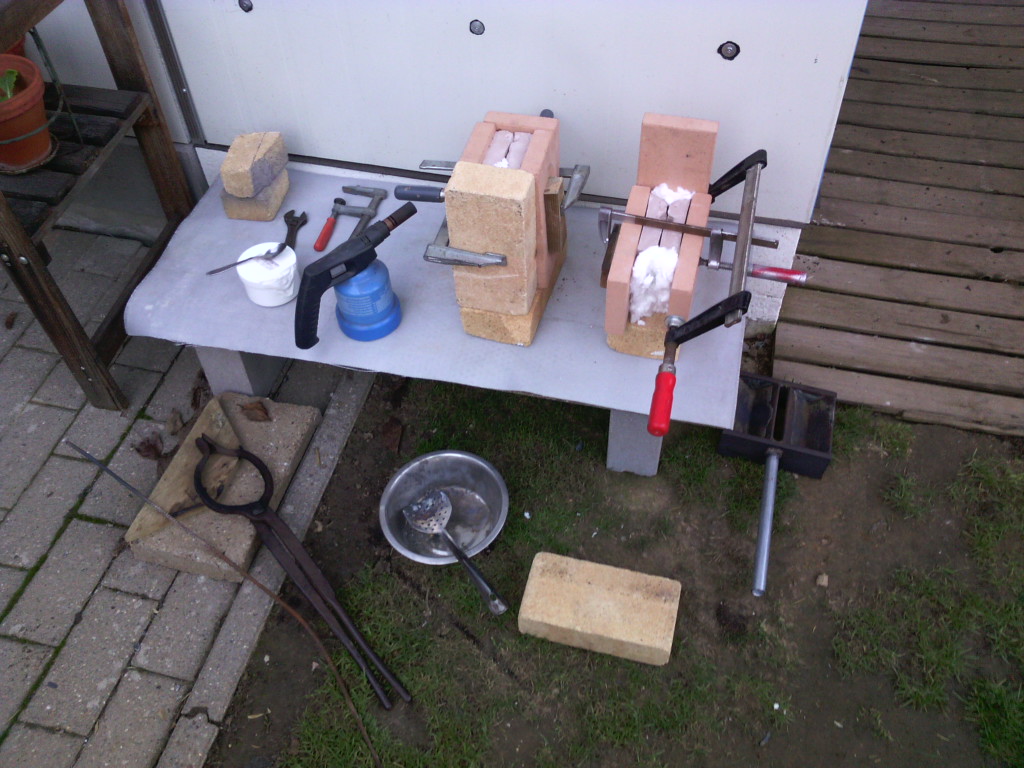
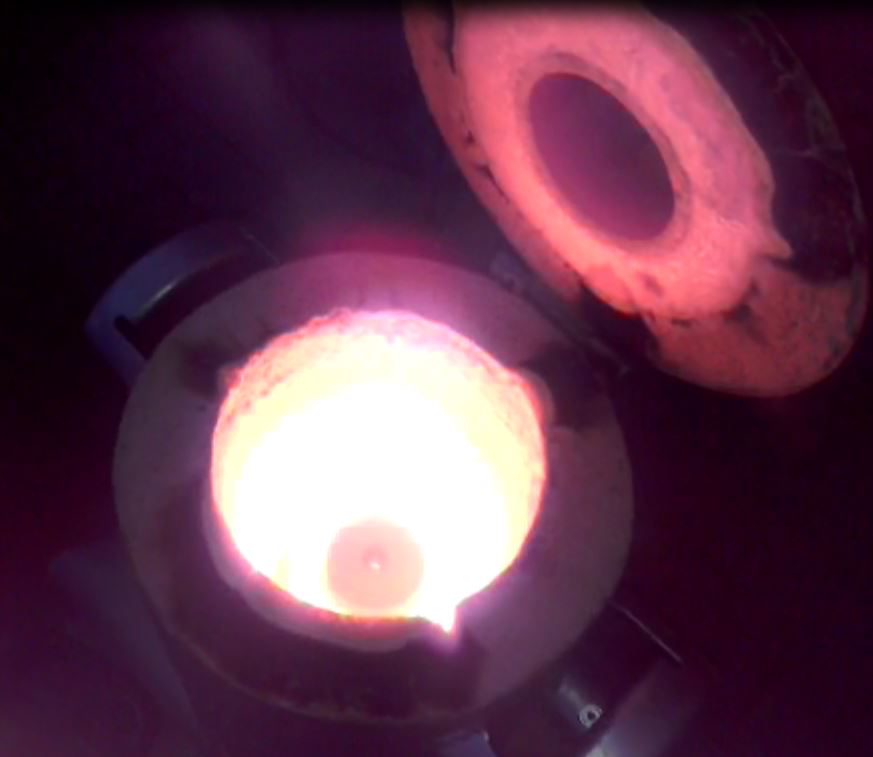
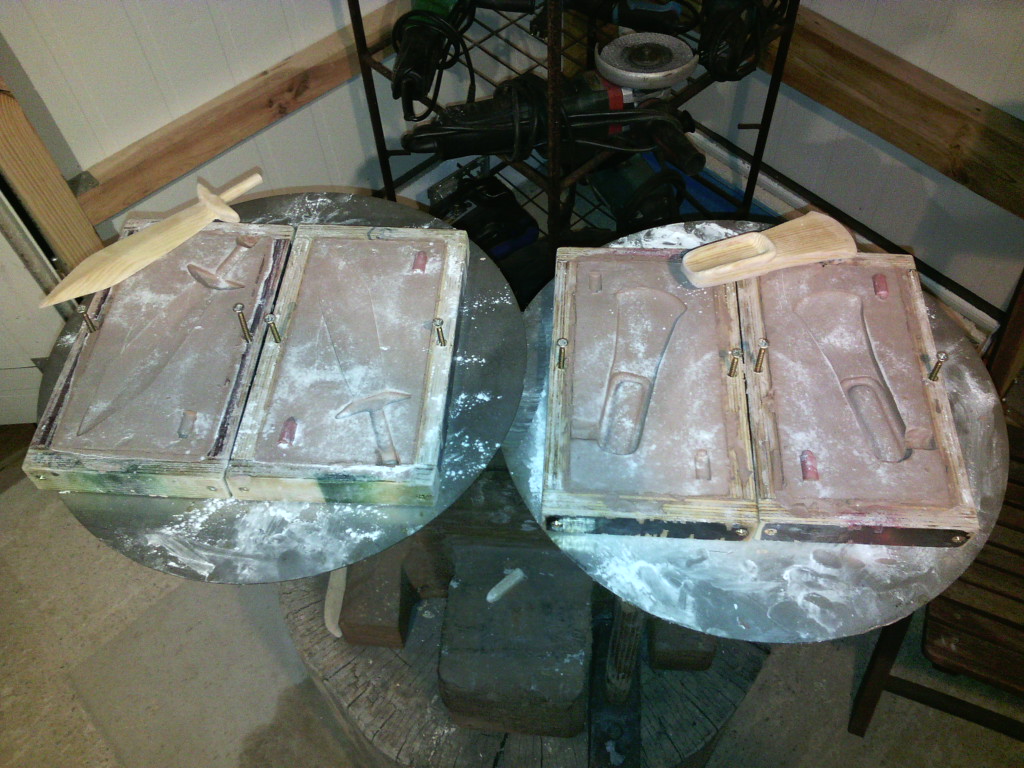
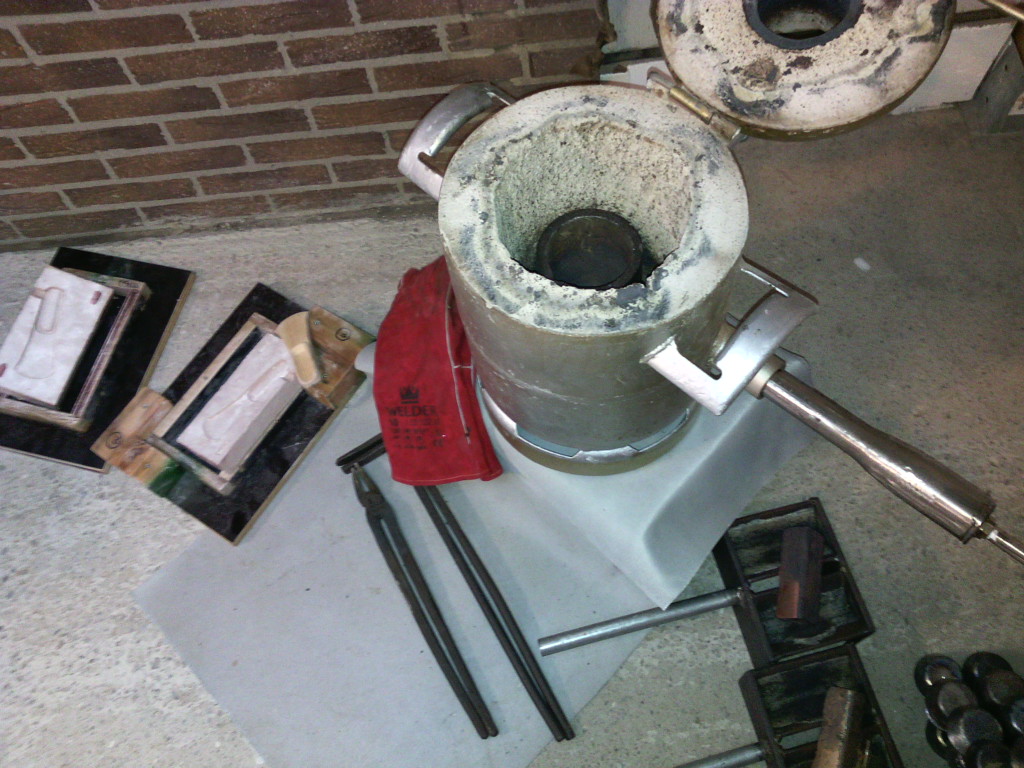
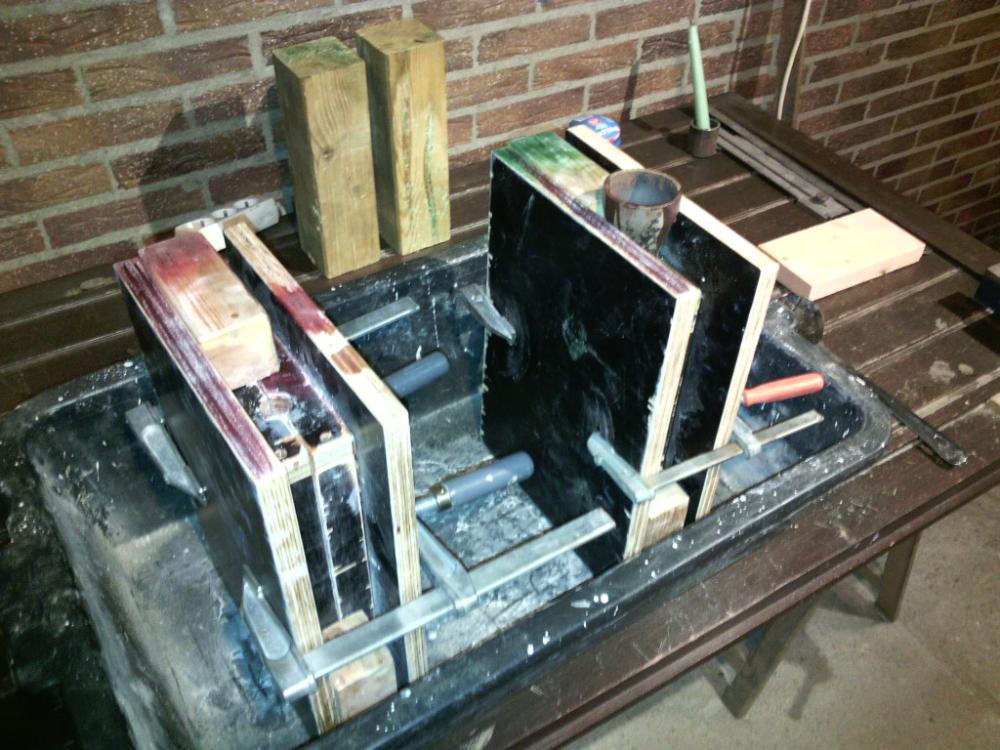
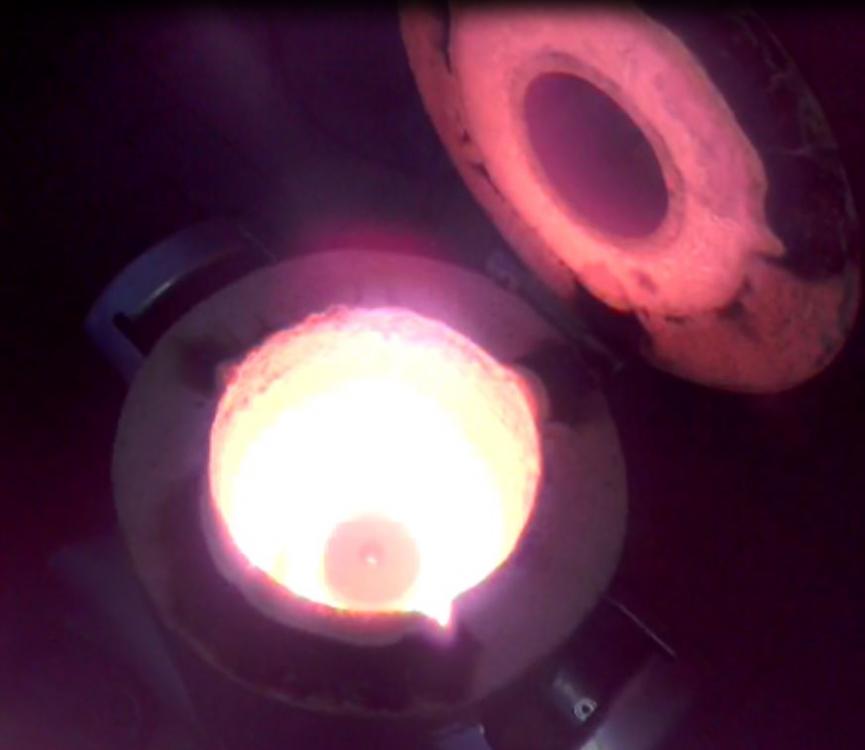
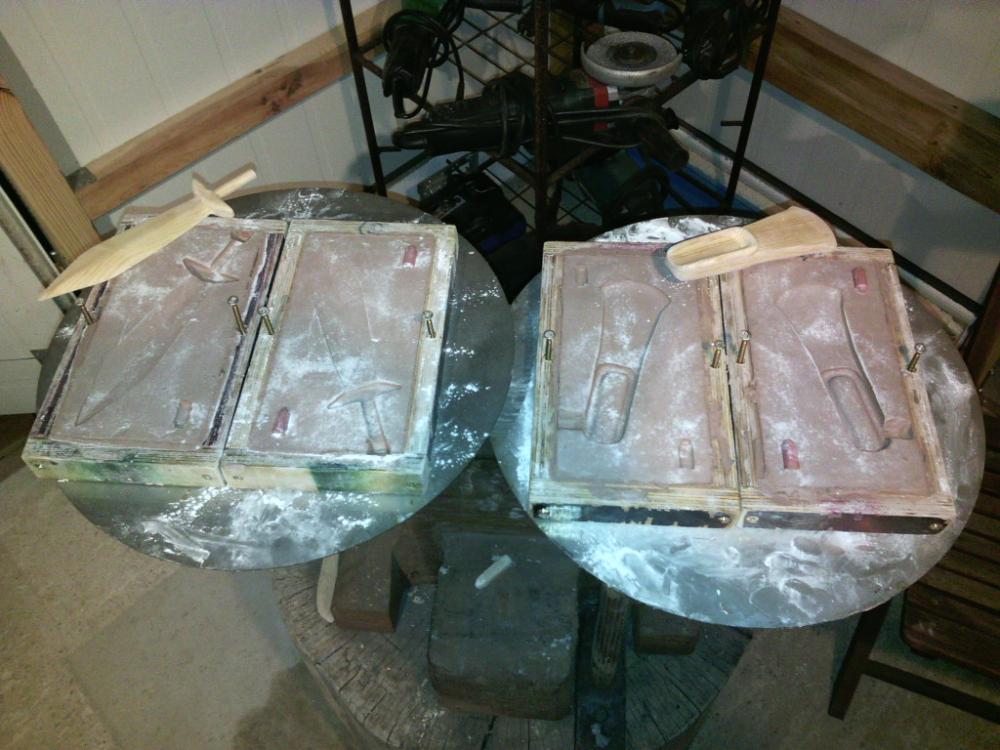
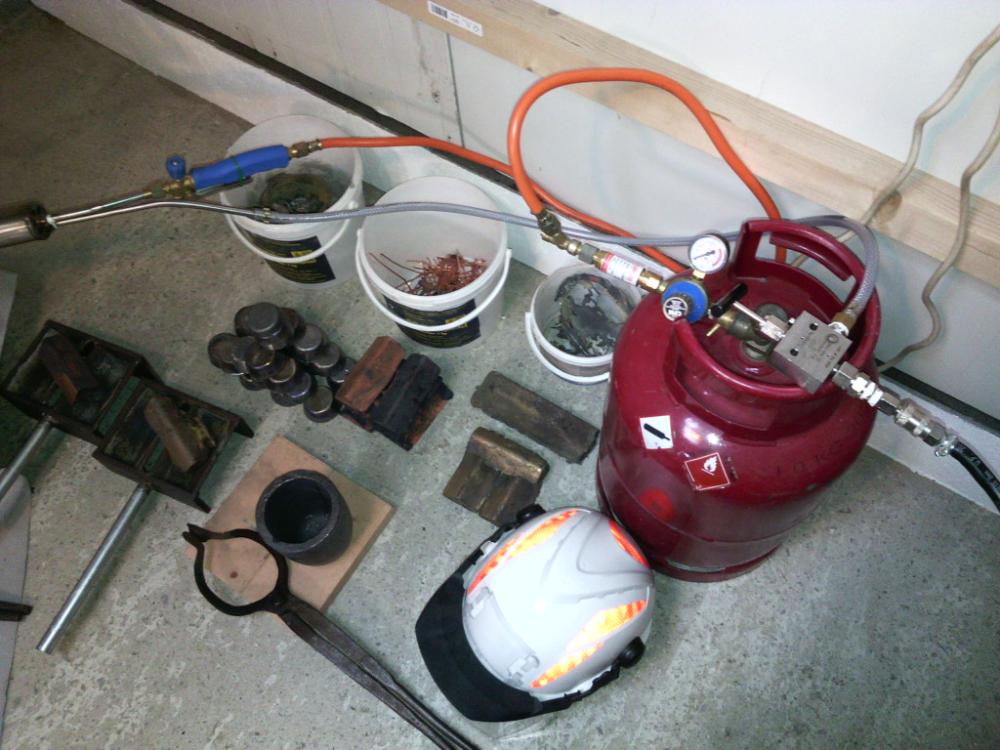
After buying 2 real crucibles (graphite, size A4), assembling two strong ingot moulds and melting several badges of pure bronze (then copper) badges. All to get the feeling for base material behaviour and consistence (no pyrometer). Also build 4 pure chamotte clay cast moulds with the negatives (wood models) of historical founding’s (axe, arrow point, dagger etc.) reusable instead of petrobond (at least I hope ;-) ) Carrie out my first cast this evening and keep you informed about the results. Cheers, Hans


-
Hi Charles, thanks for feedback and sorry for my delayed reaction. Of course if you have no other option, an upright part make sense. In my case I take advantage of this 3 beauty’s for heavier forging. B.t.w. after my information a rail road rail is hard on the surface and ductile (soft) in his foot section. How do you deal with that without beating deep dents in it (hardening!?)
-
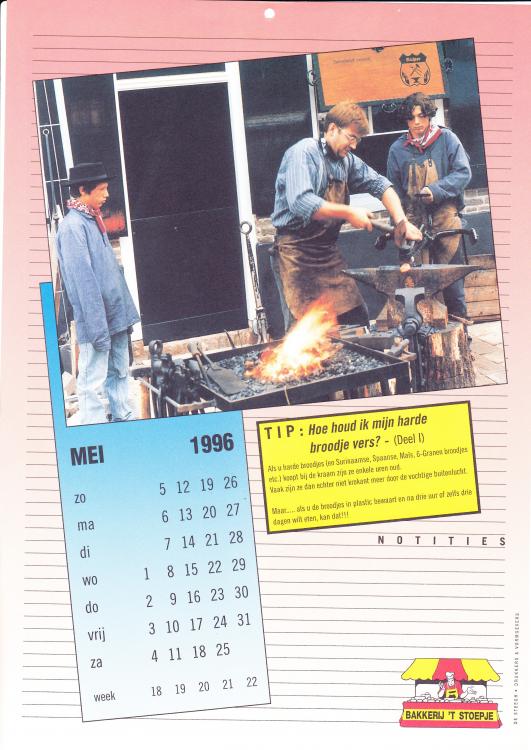
The last 15 years as an certified work safety advisor in petrochemical contracting and metal industry. Therefore 20 years all-round metalworker lock/blacksmith, welder (process 111, 135, 141) Next to that I carry out free-lance welding coordination as IWC-S on several small/midsize metalwork companies. Was running a blacksmith shop for 9 years, but my two blonde ‘investments’ at home (45 & 14 y/o) made me decide to work for an employer again ( fixed pay check, you know ……) See Hans more then 20 years ago below (the handsome guy in the middle ) as 'Mr. May' on the local calender of this year finishing a four arms 60 lbs anchor.
-
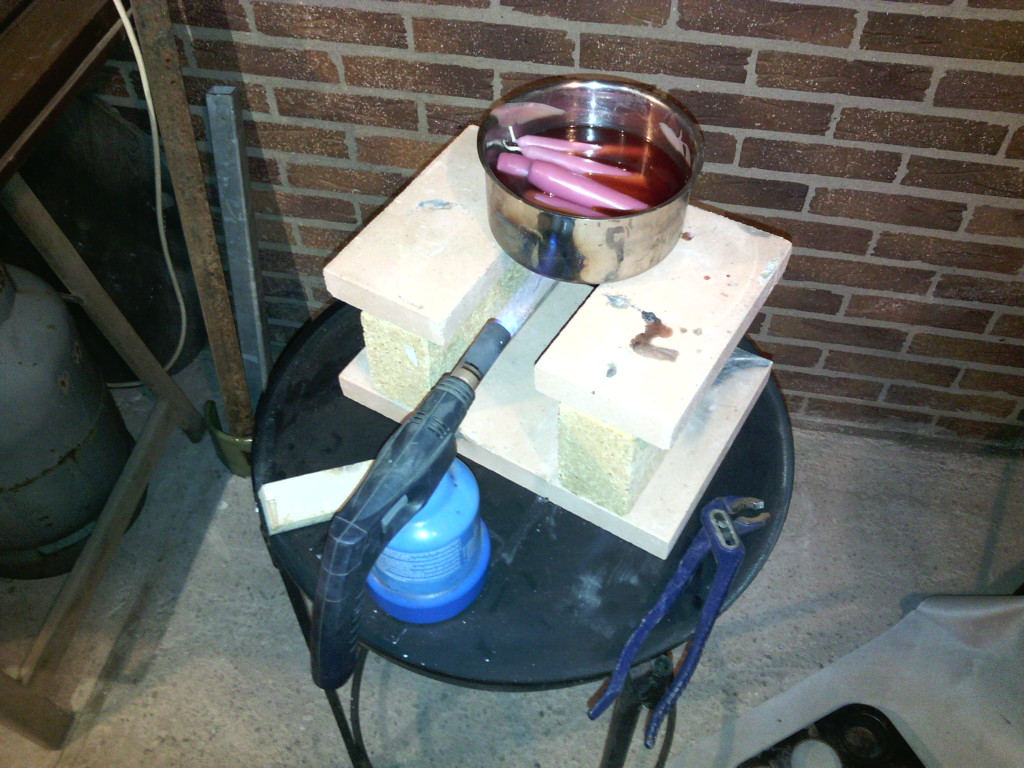
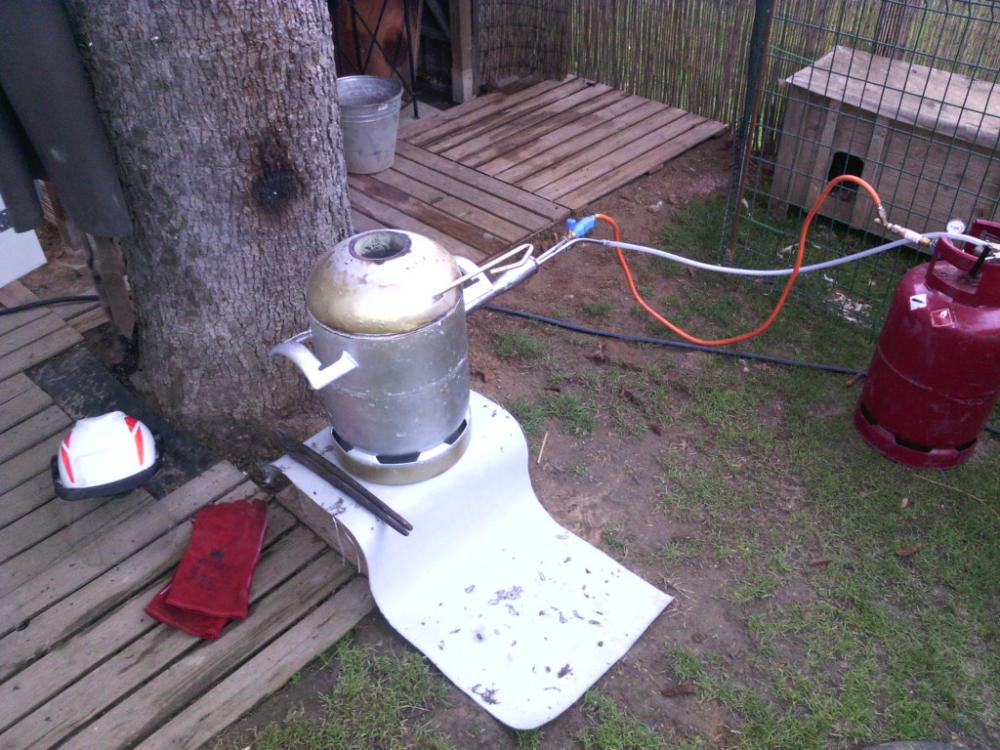
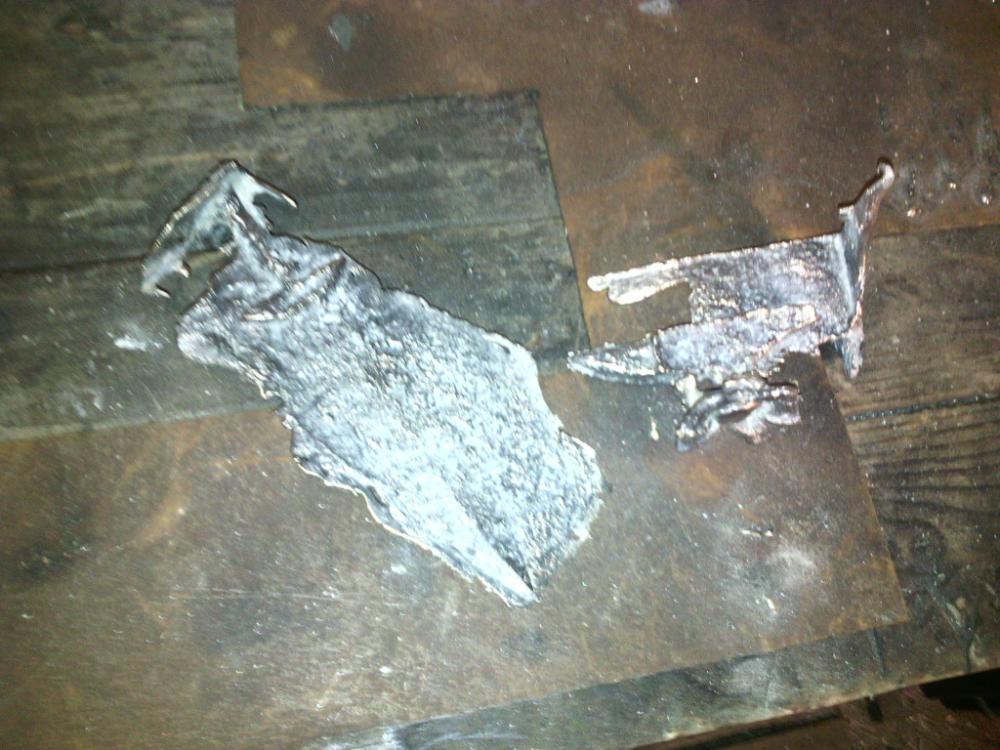
Fully agree with Frosty, see my first and last! brass ingots below. Don’t need to repeat Frosty’s arguments and have some additions / remarks. · Used scrap brass from an old ship bull eye which also annealed with arsenic and phosphor · Got also a lot of zinc oxidizing all over the place (outside ventilated backyard) Glad to use the coal forge after all and not the gas forge to heat the crucible (stuffed with oxide other ways). While melting the scrap in the forge the bottom of the improvised cast iron crucible melted at the same time as the last bit of brass scrap. However looking for decent bronze now and a serious carbon crucible and build an extra gas fired melting pot.
-
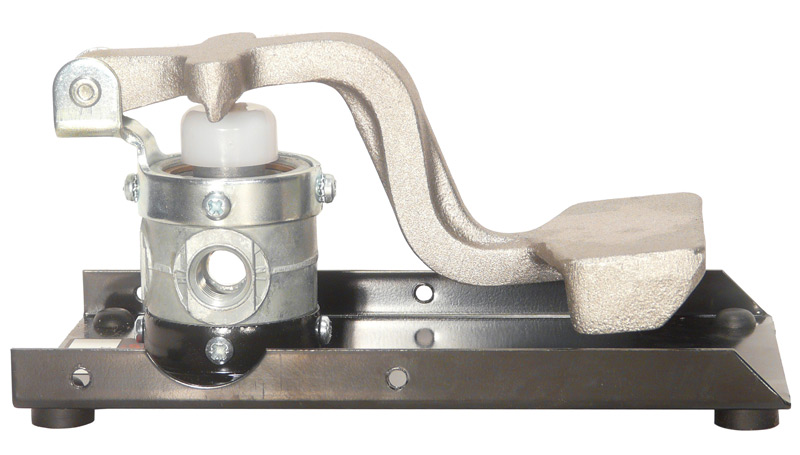
Dear all, looking for an affordable proportional foot switch like the one below (but less expensive). Using now a momentary 2/5 foot valve which only allow a ON/OFF situation and this is very annoying. At the moment I put an extra valve to reduce the air escape, to control at least the cylinder stroke. Did you know any web shop or Ebay supplier hoe also delivers in Western Europe on decent prices. Thank you very much in advance.

-
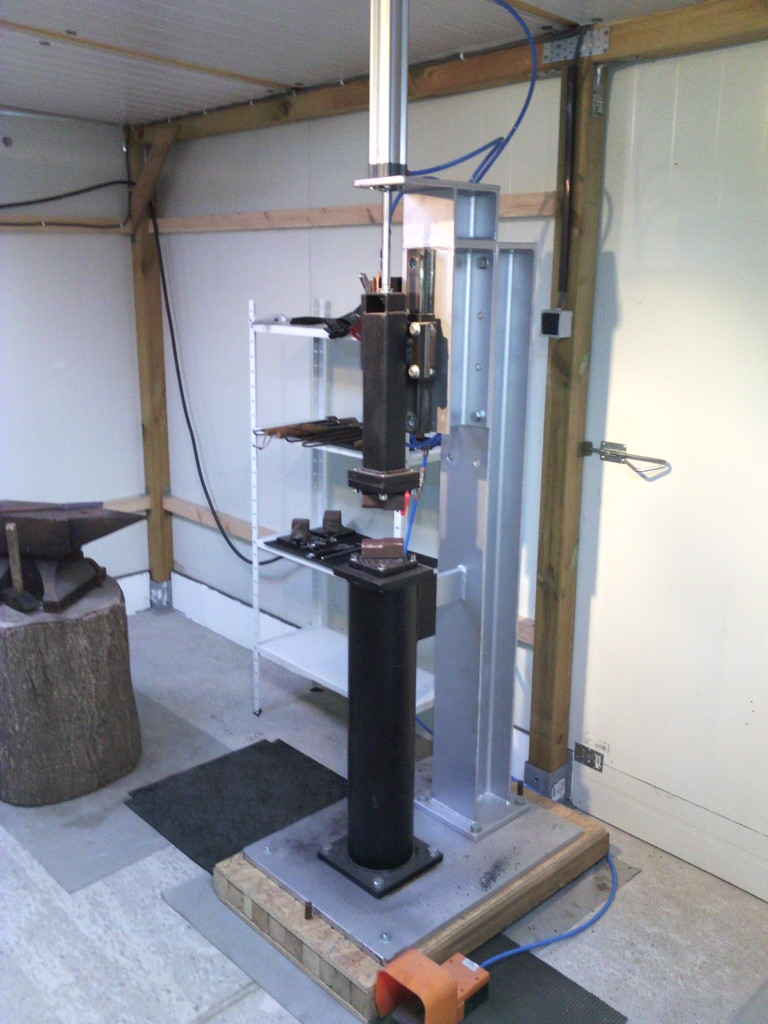
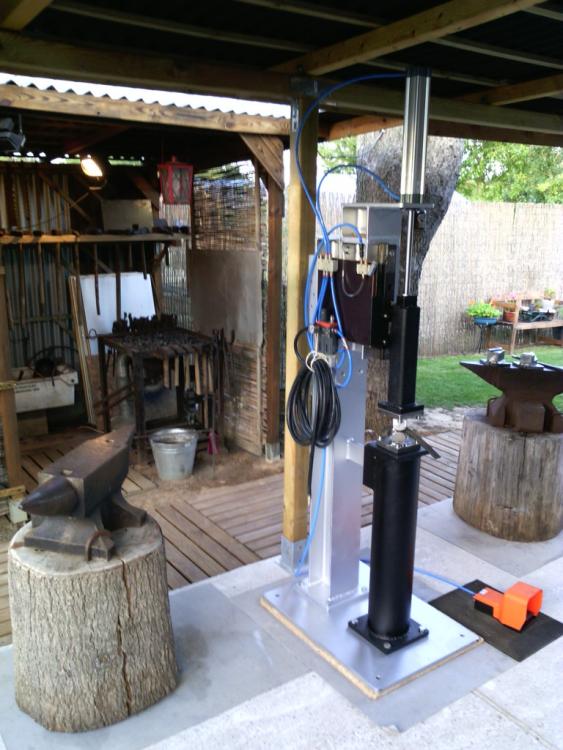
Trial and Error Air Power Hammer
Hans Richter replied to Hans Richter's topic in Power Hammers, Treadle Hammers, Olivers
Gents, your right a solid piece is much better and I’m looking for this. Till than I have to make the best of it and create as much as possible rebound (reach bit more the ½ of the ball drop height yet) -
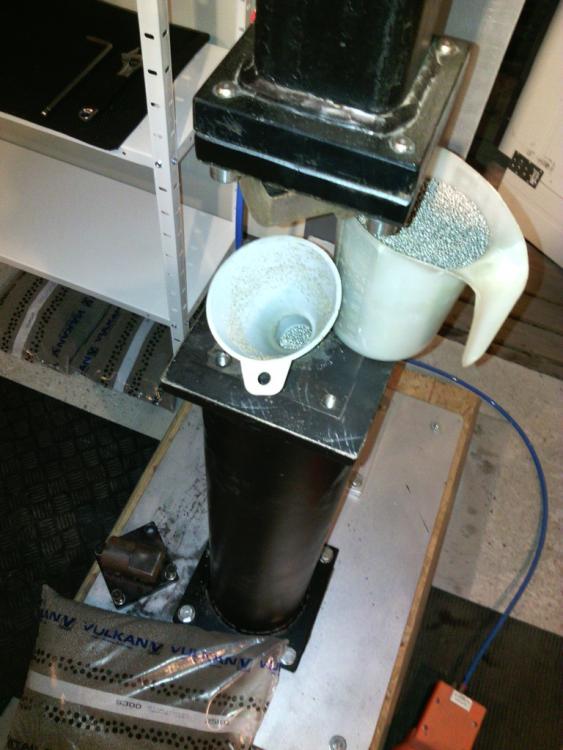
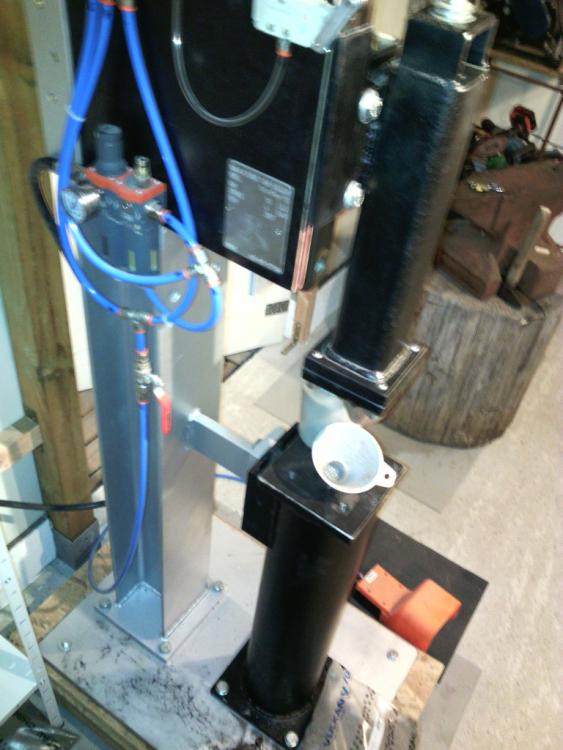
Pimped my power hammer anvil stand today from 60 lbs to 200 lbs. Wondering why the 55 lbs ram cause so little impact on the work piece during forging on the power hammer while the coffee cups are jangle and vibrating in the own kitchen closet ( and neighbours to), despite of filling the anvil with oil sand. Till now ( fortunately not to long) all the energy transfer right in to the smithy foundation instead of the work piece. Finally understood the urgency of a descend contra mass and ratio between ram and anvil. Filled the stand with stainless steel blast grit with a high density and the difference is significant. My air power hammer is an interpretation of the raw blueprint of the Larry Zoeller hammer you can find on the net and I’m very grateful for that. However, if you, like me, try to build your own AIR power hammer please keep in mind that: -you only take advantage of half of the stroke of the chosen air cylinder (in my case 6in instead of 12) -you have enough air, because, air seams the most valuable running resource (two single stroke compressors 65 gallons storage on 150 psi) -you have the possibility to get a decent ball valve foot switch to control the escaping air and ram ( still looking for this at European suppliers) Ones you overcome this obstacles you will be very proud of the result, and nobody can take away the result of blood sweat and tears (incl. money) it costs. Last but not least, I design my hammer as an portable tool to move/change place instead of a log static tool of compact steel of 700 lbs, by bolting parts together ………………… just in case of Know what I’m doing this weekend, try to finish an roman axe and dagger and ready for the first Damascus packaging. Cheers, Hans