

jlpservicesinc
-
Posts
5,770 -
Joined
-
Last visited
Content Type
Profiles
Forums
Articles
Gallery
Downloads
Events
Everything posted by jlpservicesinc
-
All states do have weird tax codes.. I'm a member of the updates the MASS irs sends out so I get all the new updated laws on the books. it's crazy what actually goes throw and what the reading of them is like.. With inclusions and exclusions and what is or is not included with this update vs older code of the same number.. DBA's can get away with a lot of things others can not.. While the laws on the books are heavily regulated there is a lot of sloppiness as lots of it is self governed. But, having a working knowledge of what or why and how is important when you start messing with a "Sales and Use" tax number.
-
When charging tax.. I always do what the item costs and the tax is on top.. NO hidden taxes included. I charge what I charge for any given forged item and as such the price is the price.. Taxes are separate. It also makes it easy to figure out what the collected tax burden is and can put that into a separate account for wire transfer.
-
This is not a correction to any comment just more info. Not all wrought iron likes high heat to forge on. The largest mistake I see people make is because they don't work square and are used to working modern steels, so will work on the diagonals. (not worked square till finish shaping). Wrought iron on the diagonal or on rounding is in shear plane where the fibers instead of being compressed are pushed past each other or smeared thru the center or just off side of the center. This shearing action just pulls the fibers apart. The only real difference in working it is punching and slitting is different and this shear aspect of which I just mentioned. Working Wrought iron in a square correctly will negate many aspects of the falling apart scenario even at lower temperatures.. If you do see it starting to ravel just take another heat and push the fibers back in usually on the corners.. At some point I really need to do a video on it.. I filmed a video about 2 years ago on working wrought iron and the difference between hot short and cold short wrought but the hot short wrought ended up forging just fine at every temperature and the cold short failed to come apart when worked cold so the footage was useless.
-

Common Basic Mistakes That Beginners Should Avoid
jlpservicesinc replied to JHCC's topic in Blacksmithing, General Discussion
To Assume the information that was fed to me by a known smith is correct and true to my limited understanding. If something is said.. I should do my own homework to also understand the material or information presented. -
What did you do in the shop today?
jlpservicesinc replied to Mark Ling's topic in Blacksmithing, General Discussion
Nice Job Mark. Love to see the clean forgings.. I love the fact that you are forging that cleanly.. As it should be, if you ask me.. But no body asks.. -
Nice, I love seeing your updates to your work. It's like watching a person grow up. Really cool.
-
Slag interesting.. for some reason I have always called it the AT symbol.. @ = At.. Right or wrong.. huh.. Thats funny.
-
What did you do in the shop today?
jlpservicesinc replied to Mark Ling's topic in Blacksmithing, General Discussion
Das, you must be a wizard with the mig welder.. What model do you use? Tangled diver.. Wow is all I have to say.. Way to go.. Love to see more.. Did you start a build thread on the shop page I missed? -
What did you do in the shop today?
jlpservicesinc replied to Mark Ling's topic in Blacksmithing, General Discussion
My pleasure.. Always best to confirm. certainly easy enough to do. Where did you order your handles from? Last batch I bought from crazy crow but each one is different size and not very well made needing to be whittled down to get a better fit. -
What did you do in the shop today?
jlpservicesinc replied to Mark Ling's topic in Blacksmithing, General Discussion
David, see if this makes sense.. Not the best drawing. the metal wants to bend away from the mandrel when the material is bent around the mandrel.. By doing a pre concave bend to the eye section when you bend the material around the mandrel it will come out flat or nearly so.. I used to do this on the step between the face and the cutting table on a London pattern anvil. Now I use a swage in the hardie hole or will open the vise jaws enough to get the right arc/concavity.. The area with lines in it is the concave section. The little end view or cross section is the concave section. The 2 ends move towards each other.. To forge out a mandrel out of 1.25"sq is pretty fast compared to the mandrel video upsetting that 7/8" to 1.25"sq was time consuming. I've been meaning to do a video on this starting with the 1.25"sq.. No time though.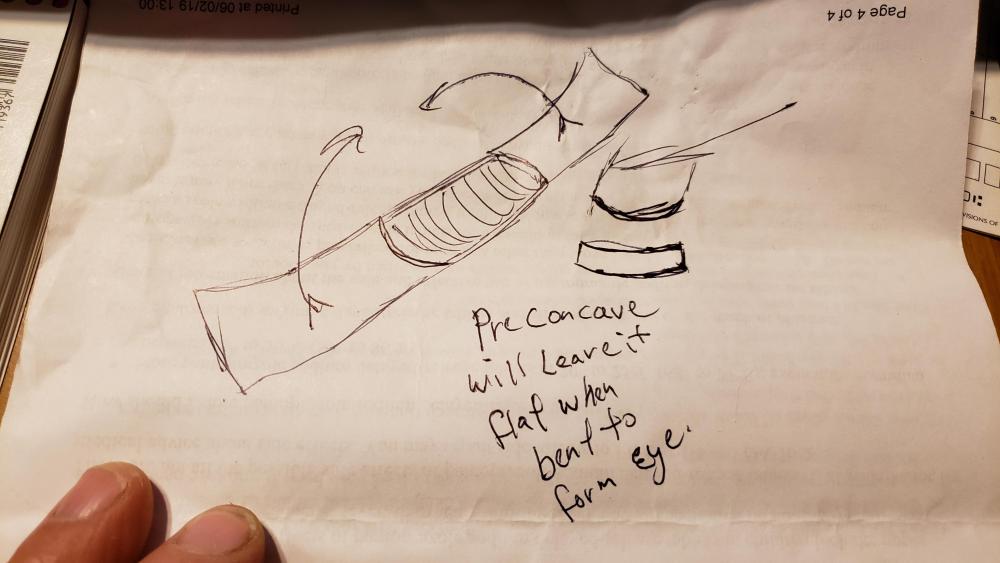
-
mixed results heat treating 1045
jlpservicesinc replied to hunterNDN's topic in Heat Treating, general discussion
So, was it simply an uneven heat that created the colder spots (gas forge)? If that works for you. That is the only important part.. It's another tool in the belt. I feel there is more there than just salt or tempil markers or which have you.. even Magnets.. It's all starting point.. Not an end.. Technique, technique, technique. (You could switch these with knowledge, knowledge, knowledge or skill set, skill set, skill set).. Having the tools in the belt that allow for further development if desired is the important aspect. And now you have a great tool in your belt of tools.. Nice.. -
mixed results heat treating 1045
jlpservicesinc replied to hunterNDN's topic in Heat Treating, general discussion
Ah, Good point on the salt.. i don't carry salt when I'm on the road but have a bunch of magnets I have pulled and stacked on the side of the forge. LOL.. Salt would end up a huge chunk in a short order in the trailer. I find the magnet it's usually close enough.. the basic concept is what was being shared.. The variance in just how archaic forging and heat treatment really are is such a wide spread or wide temperature spread to still arrive at good results. People often get hung up on technical spec's yet for some reason things still work when not at the technical specs. Working with metals is probably one of the most widely spread variations type thing that can be worked with.. It's crazy how things can work out. 1350 to 1800F are the overall transformation temperatures.. So there is a lot of wiggle room depending. -
What did you do in the shop today?
jlpservicesinc replied to Mark Ling's topic in Blacksmithing, General Discussion
thanks for the photo. I didn't use the vise method in the video which is what I prefer. I wanted to interest people who do not have a vise yet. Most the videos use a minimum of tools geared towards beginners or someone whom wants to increase the skills set. LOL.. I say that. But really it seems as I have gotten older I try to use less and less tools on projects. LOL.. The step down has the potential to help with a clean eye as it's easier to get in there and have it end cleanly. I use a step down on long pole or extended pole tomahawks.. I need to get back out int he trailer to finish video #2 in the Tomahawk series.. LOL.. Looks great.. the eye came out really good. did you do a concave bend before you bent it around? You did a great job.. I just like to hear about what others are doing and love the results.. Thanks for taking the time to share your experiences and process.. really appreciate it. -
The Citadel Repair Shop Anvil
jlpservicesinc replied to Mulebrain's topic in Anvils, Swage Blocks, and Mandrels
Yes, that seems to be the case.. During the 3rd generation Hay Budden had some labor disputes and some other funkiness within the company and when they came back on the scene the table to face height was different. I often wonder what happned that Hay Budden changed directions from Gen 1 to Gen2 with the rhino horn and thinner waist.. I know they used continuous forge welding on the 2 piece bases on Gen 2 and 3.. you can see where the rods were placed and cut.. neat really. -
What did you do in the shop today?
jlpservicesinc replied to Mark Ling's topic in Blacksmithing, General Discussion
My 2nd conference.. Be sure to say hi and introduce yourself.. I'm always amazed when people come up and don't say anything and expect me to know who they are via the forums only to have never seen their face or real name. I'll be easy to recognize as I have shirts with JLP Services Inc with big letters on them. -
mixed results heat treating 1045
jlpservicesinc replied to hunterNDN's topic in Heat Treating, general discussion
One thing that can be used in sun light or a way to see when transformation temperature (hardening temp) is starting to take place is a magnet. I have not met a steel or alloy of steel that remains magnetic when in transformation temperature. As the steel goes thru this range it will be nearly the same time an time again temperature wise.. So, even in direct day light the magnet can help with seeing (the magnet will not stick vs stick) the temperature. Once the steel becomes non magnetic try to keep that temperature for a little longer before hardening to get a heat soak. don't go any higher in temperature and don't go to long in the soak as both will increase grain growth/size. -
The Citadel Repair Shop Anvil
jlpservicesinc replied to Mulebrain's topic in Anvils, Swage Blocks, and Mandrels
that is a 3rd generation Hay Budden. Serial Number starting with A were 3rd gen.. HB,. had 4 generation types. 1st gen, tradtional wrougnt iron with face plate, 2nd, was 2 piece anvil welded at the waist, with Rhino horn with higher top face, 3rd was Rhino horn with lower face height welded at the waist and 4th gen was solid steel (rare). its funny but without a reference it looks like a 100lbs.. hay Budden anvils are my favorite. -
What did you do in the shop today?
jlpservicesinc replied to Mark Ling's topic in Blacksmithing, General Discussion
Rodro pedro wonderful work. Good for you on using nature and refining the design. well done. Goods, Looks great.. Did you use the weld eye around mandrel in vise method? How thick is the blade? Side view perhaps would be nice. -
What did you do in the shop today?
jlpservicesinc replied to Mark Ling's topic in Blacksmithing, General Discussion
Very nice. You going to the ABANA conference.. Going to be right down the street from you in 2020. -
What did you do in the shop today?
jlpservicesinc replied to Mark Ling's topic in Blacksmithing, General Discussion
That is a nice stand. Will it be bolted down to the floor? Or a plate to stand on? -
Nice of you to say. Been in a stand still with the weather. I need like a week of good weather with no rain and decent temps to get part of it done. I might just do a bay at a time. What do you guys run into for swedish style double horn anvils. I know Belgium is a different country but there is something about the narrower Swedish pattern that intrigues me. Those anvils are still really nice. I'd love to give one a spin.
-
What did you do in the shop today?
jlpservicesinc replied to Mark Ling's topic in Blacksmithing, General Discussion
Super cool and talented. -
Your area is pretty rich with both history and old blacksmithing gear.. There are deals to be had and you are in New England Blacksmiths range.. They have meets spring and fall and have all sorts of blacksmithing stuff both to use and to buy at the meets at the Tailgate section. . I bought a blower there last year for 35.00 Buffalo silent 200 14". There must have been 20 hand crank blowers at the fall meet which was in Brentwood NH.. Welcome to the ifi group but also check out the NEB group facebook and here on IFI. If you want I am a state rep for MA so hit me up on PM.
-
what year did soderfors go out of anvil production?
-
Anvil saved from the trash with a crack ?
jlpservicesinc replied to BartW's topic in Repairing and Modification to Anvils
Wow, that is a beautiful anvil. Congrats for sure. Those are the kinds of people to keep in beer for sure.
