jlpservicesinc
-
Posts
5,770 -
Joined
-
Last visited
Content Type
Profiles
Forums
Articles
Gallery
Downloads
Events
Everything posted by jlpservicesinc
-

Show me your anvil stands
jlpservicesinc replied to pkrankow's topic in Stands for Anvils, Swage Blocks, etc
Great design. great stand. Looks like you will have a nice and heavy stand. Do you have a bender for the heavier flat sections? Does it rock at all on the floor? On my old 4 leg stand I used to keep a few pieces of sheet metal around to slip under a foot or I would move it so it would catch in all for legs just on the cement. Its funny but my Wooden stump rocked and I had figured out he sweet spot so each time I moved it for a distance thing. i'd just move it back to the sweet spot. I had someone over today to help with building construction and he has taken an interest in smithing after watching me at a demo this past fall. He and his brothers make coil springs for a living so he has some understanding of metals. Anyhow, we worked on getting the builds squared up some and then I showed him the last carving hatchet which he watched me forge at the fall meet. As we were on the way over there he asked about the 3 blue anvils and so I uncovered the peddinghaus 275lbs and the next thing I knew he pulled a ball bearing from his pocket.. Was so cool. Great guy asked if it was ok to doing a ball bearing test. He tested the Peddinghaus, the Fisher, 1 of the 3 school anvils, the Refflinghaus, and my vintage Hay budden before the bearing headed south into the foliage. just looked at the photos again. That really is a great setup. Nicely done. I wanted to mention on the old anvils that were inset they would take sand, or clinker crushed up and sprinkle the fines around the end of the feet. This way as the smith worked the vibration would pack in and basically lock the anvil to the stand. Cutlers anvils also used this method and sometimes would use wooden wedges to good merit when freshly setup till the scale filled in the area. -
JLP Blacksmith Teaching Center.
jlpservicesinc replied to jlpservicesinc's topic in Building, Designing a Shop
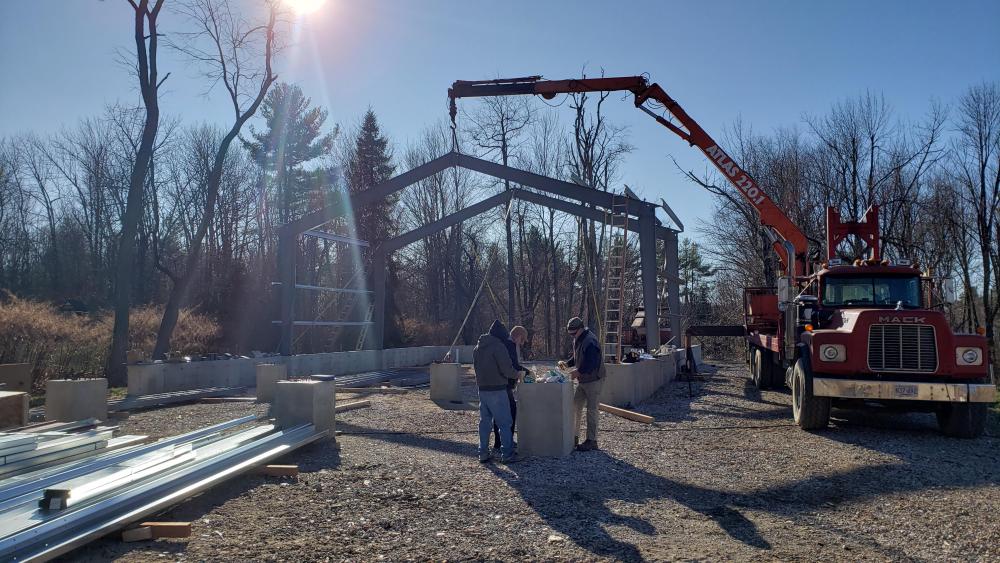
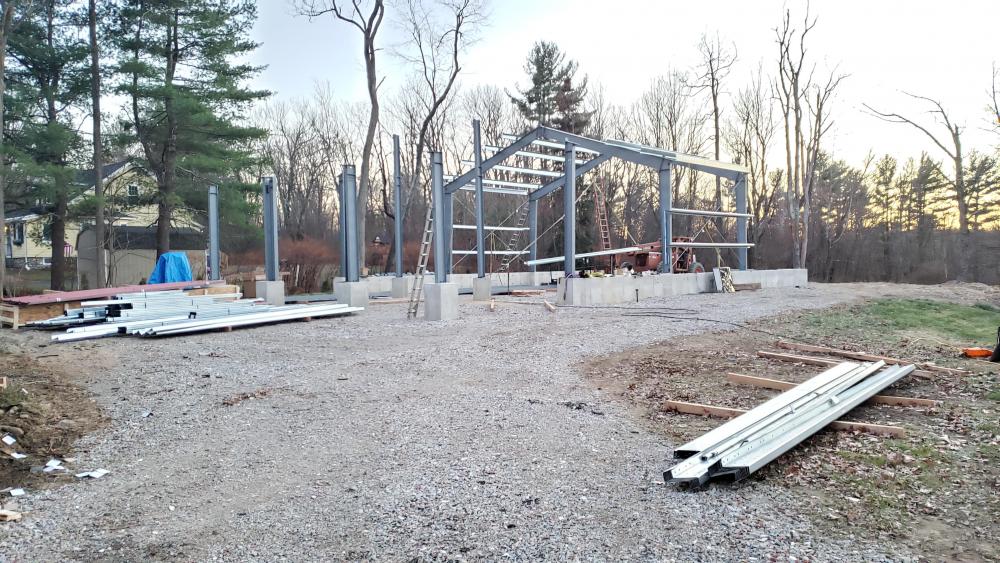
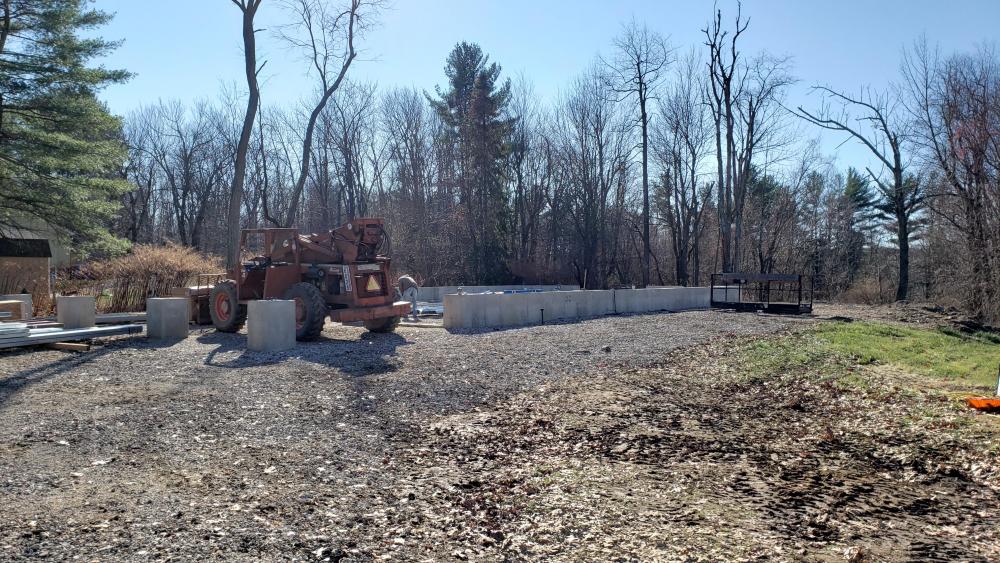
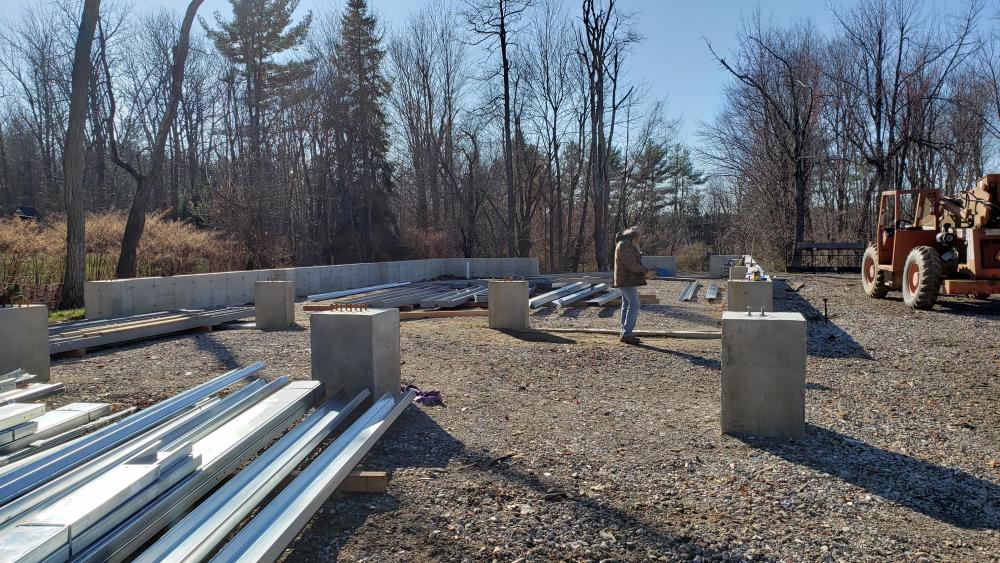
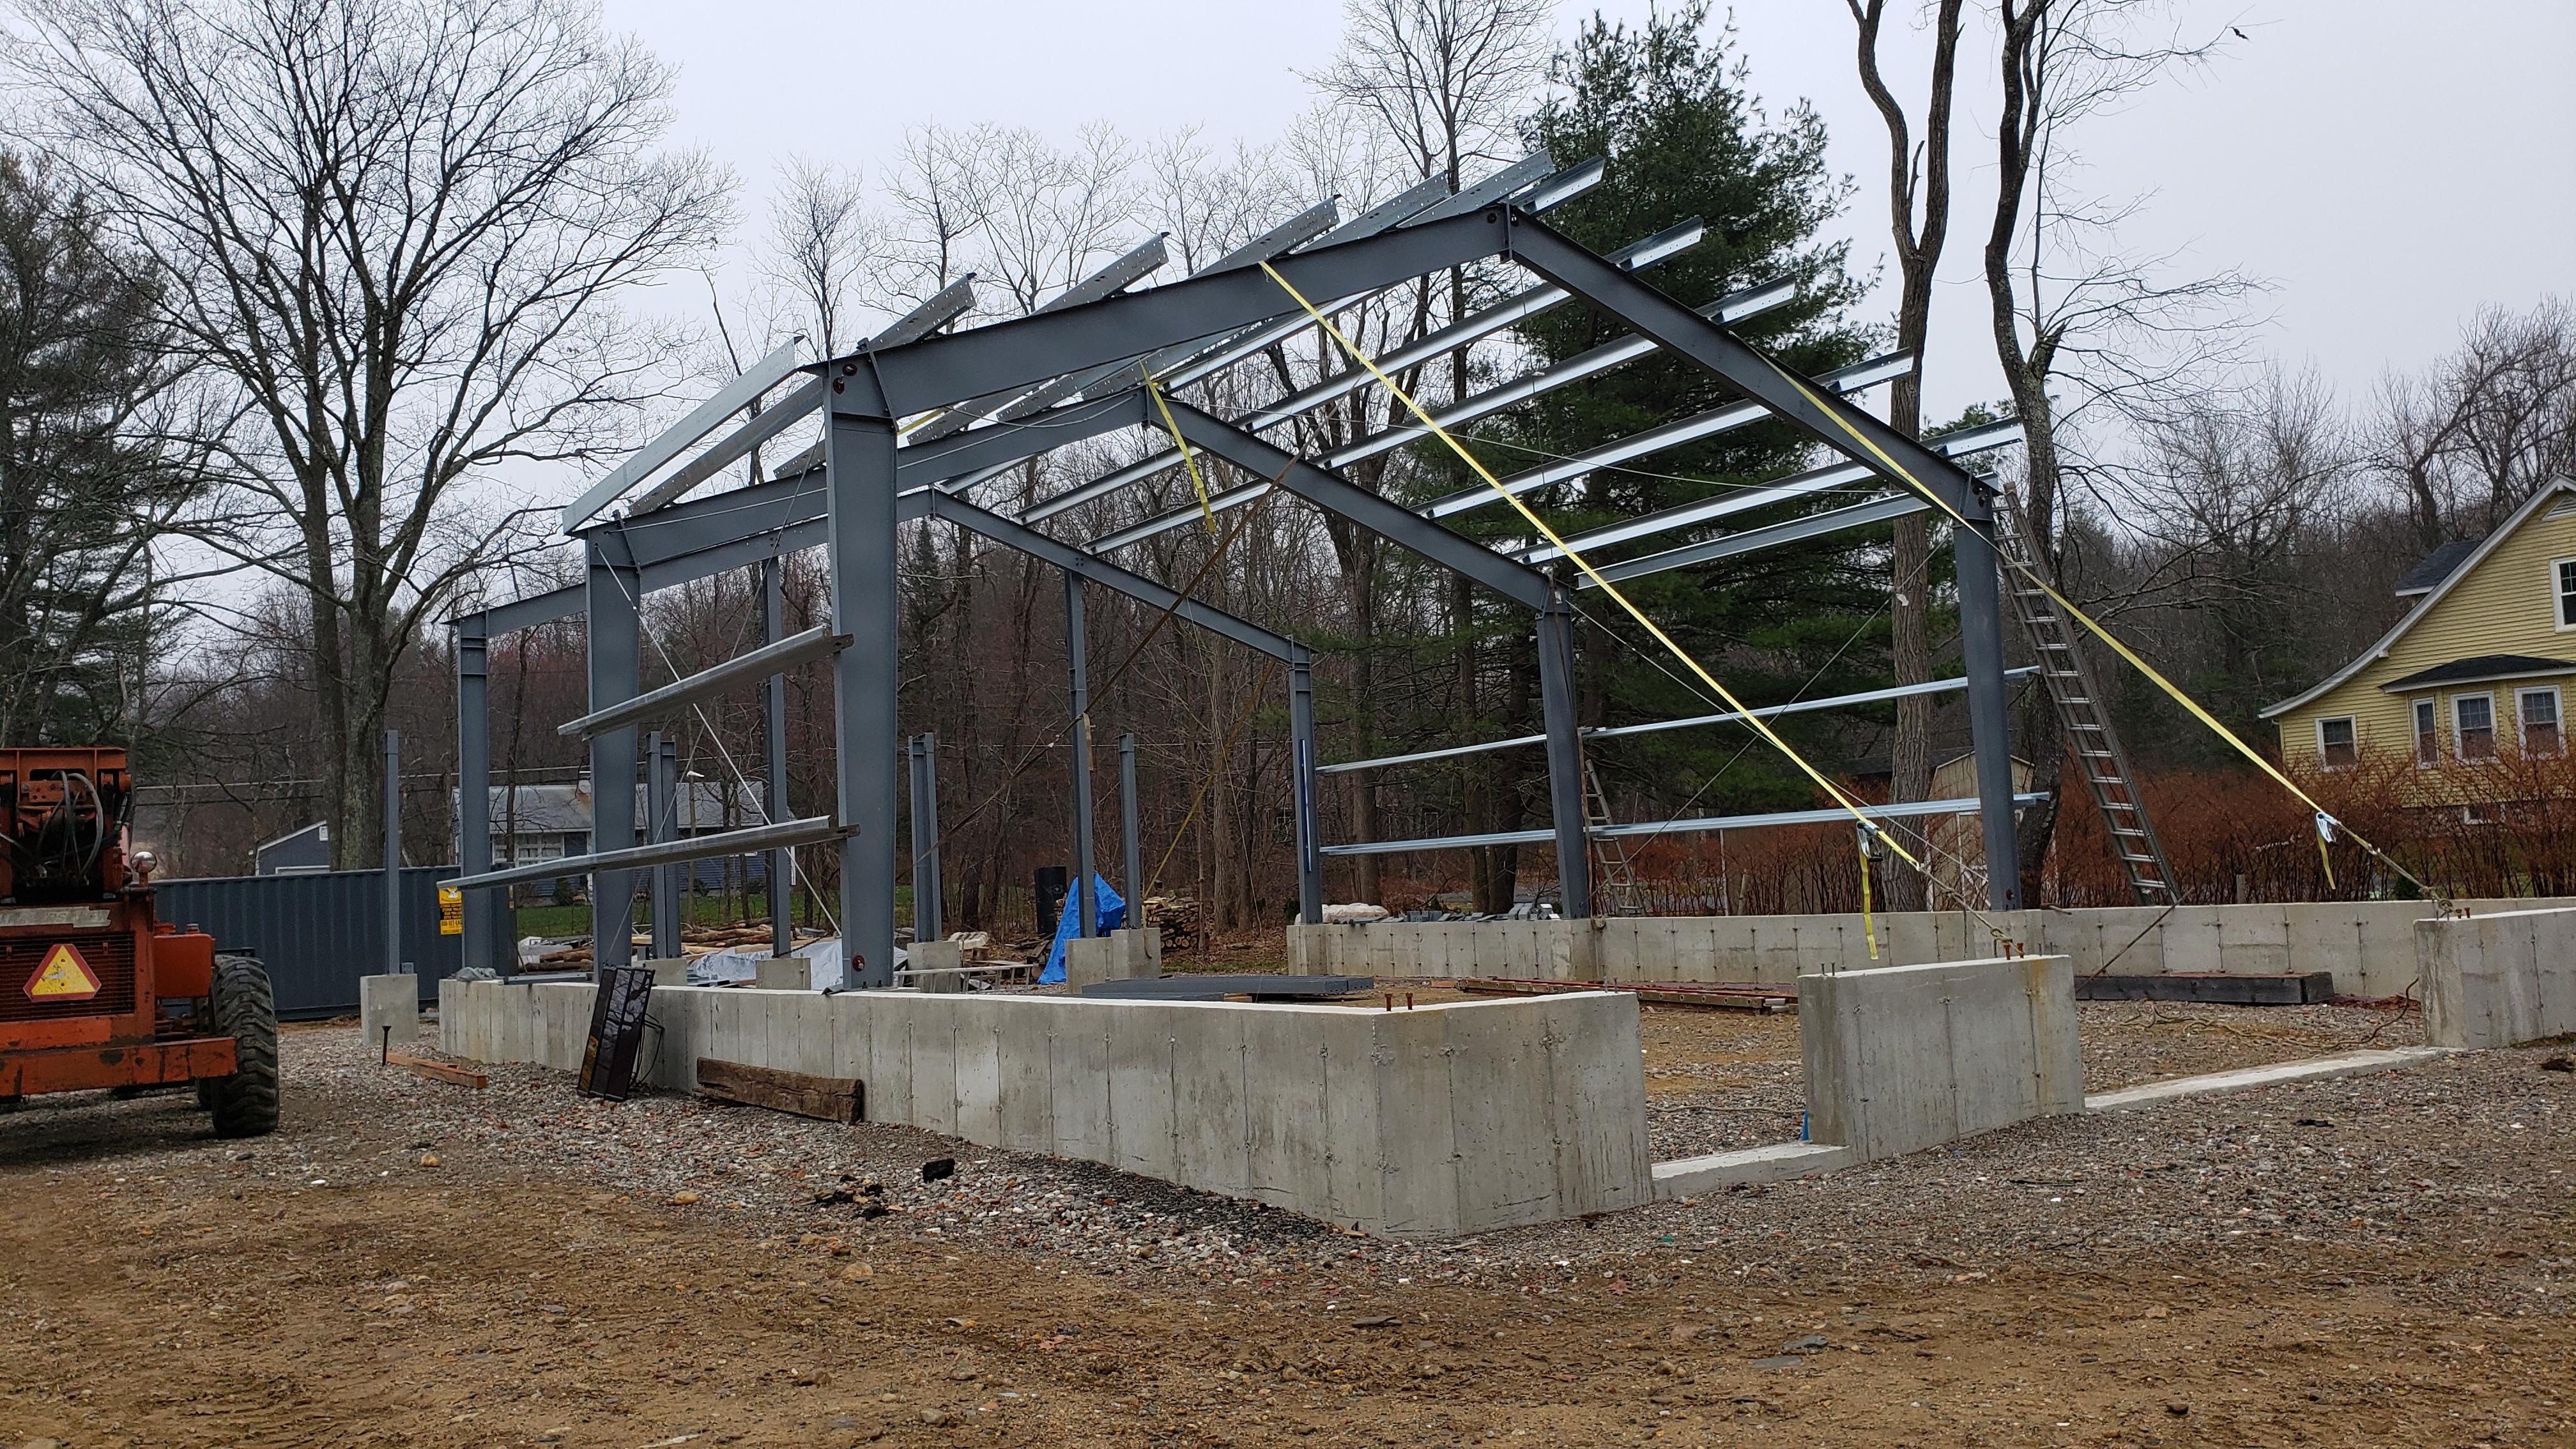
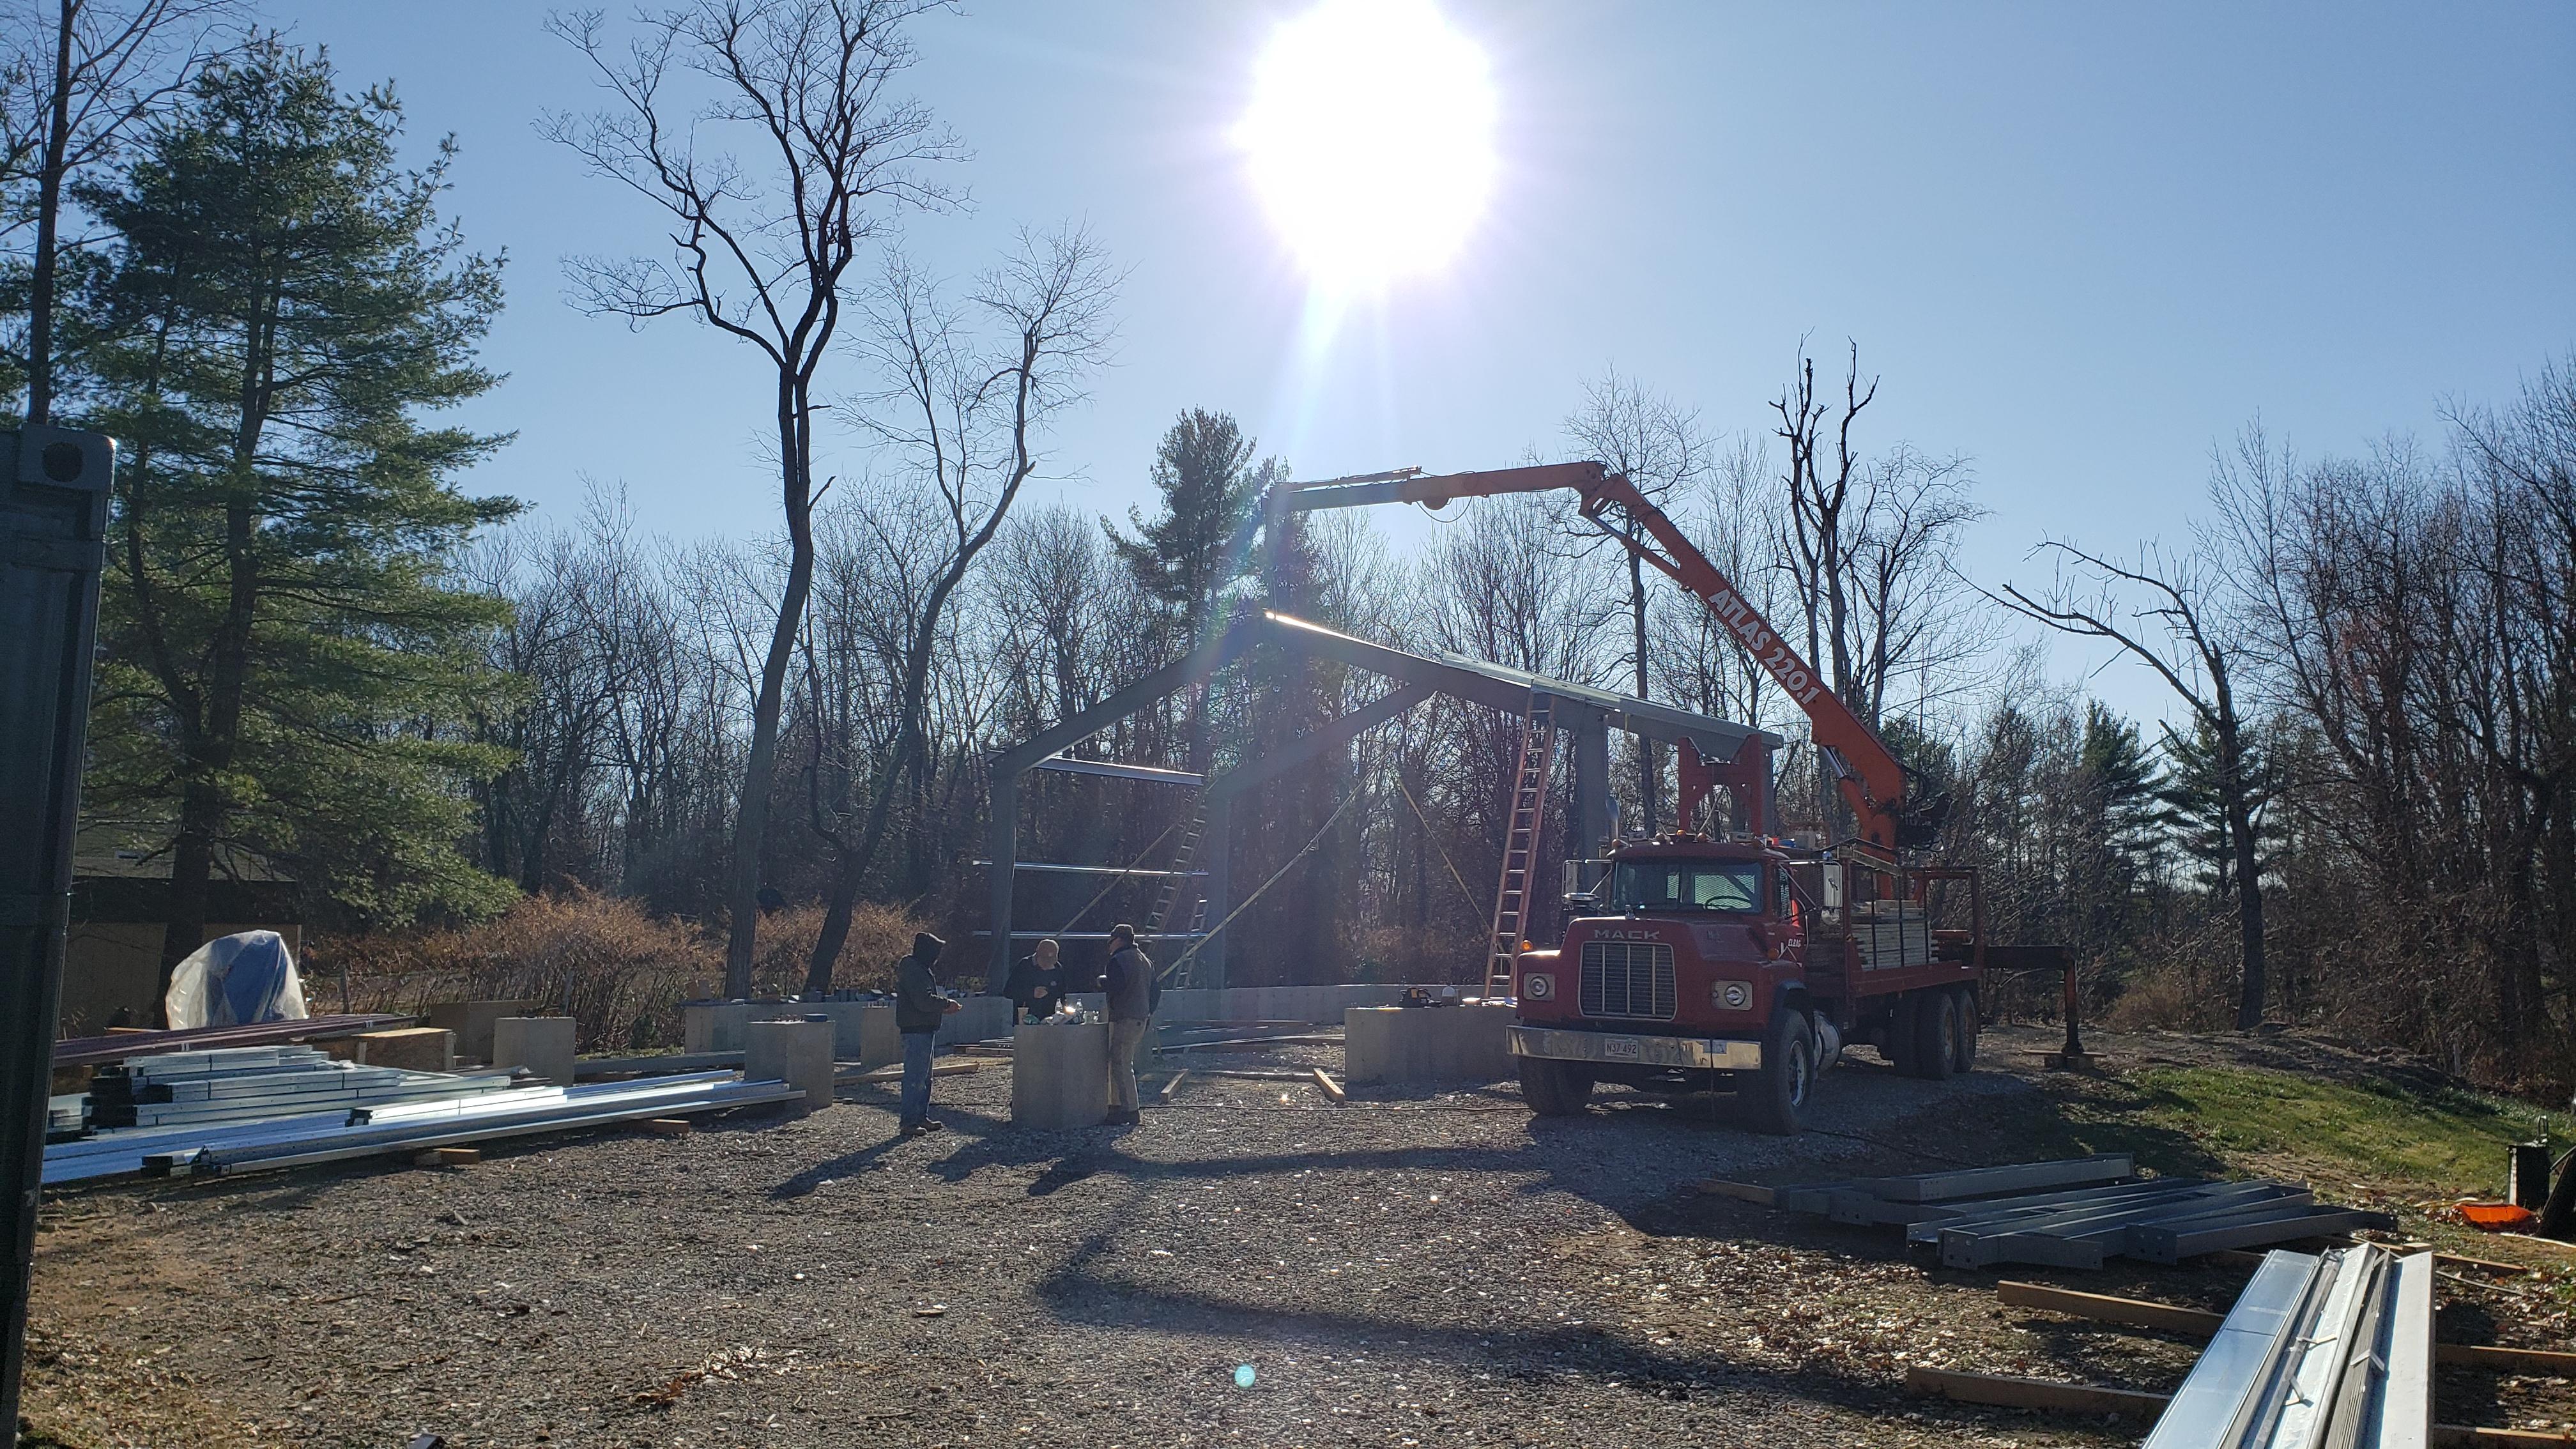
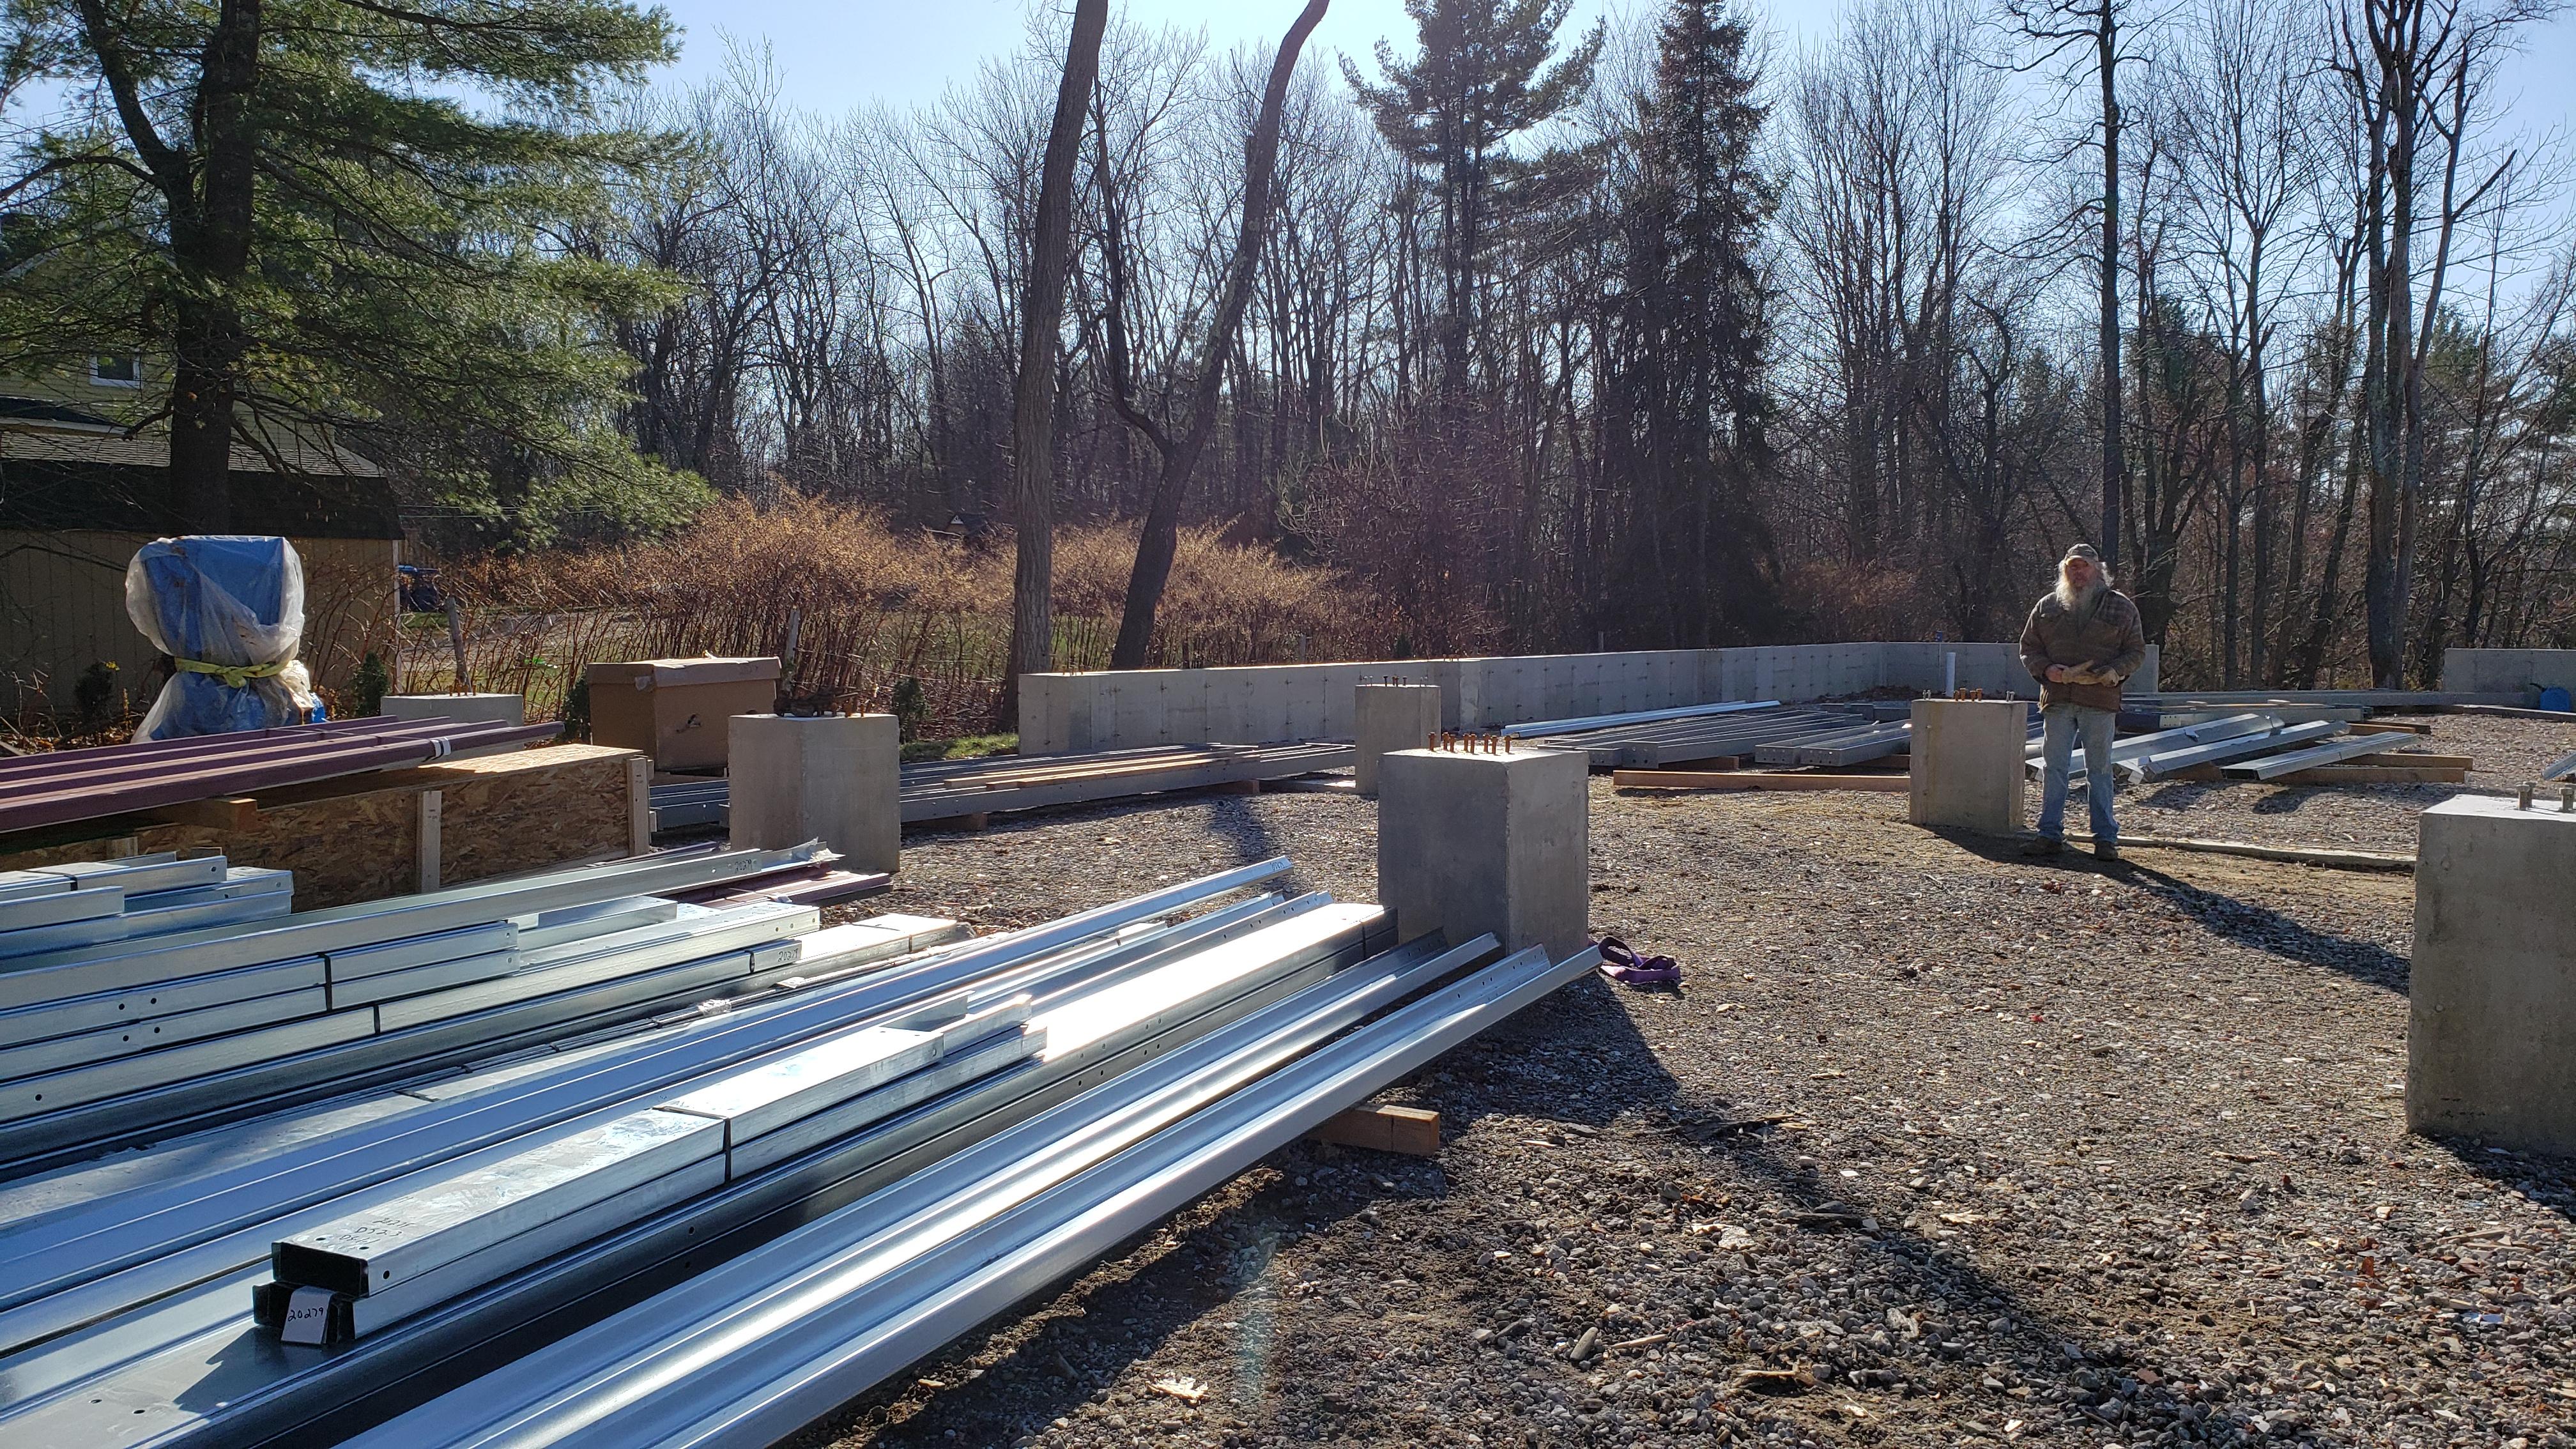
So today was a time consuming day indeed. Today I/We set the frame and measurements for all spacing at the foundation level. We also squared the middle uprights. Next will need to tension the upper RF-2 -2 and set cable tension and the final squaring. This took nearly 5hrs. -
JLP Blacksmith Teaching Center.
jlpservicesinc replied to jlpservicesinc's topic in Building, Designing a Shop
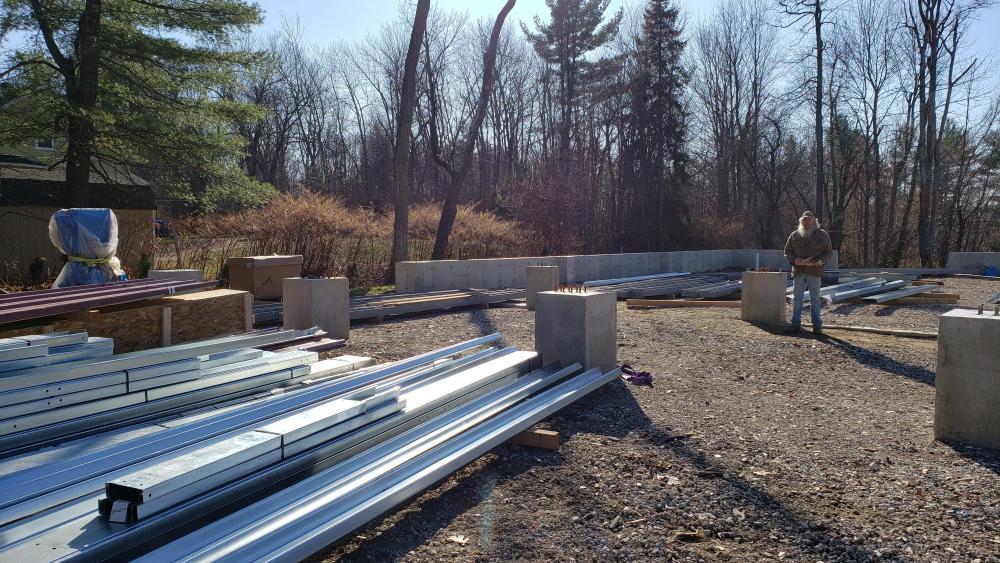
its kind of crazy how it works. the instructions and even people who have experience say to leave the bolts loose and setup the main frame. Everything is loose then you square and tension the main frame.. anyhow, it's not what I'm used to. today was a day off of sorts. I took the build list and went out and checked every bracket to locate and then know what it looks like so getting hands on it will be faster instead of searching thru them all. I also called the MFG to find out about the 2 items that seem off. I measured the foundation bolt patterns and distances and they were all correct yet the front of the building (shed dormer) has this funky separated twin arrangment yet there is a small gap, and I believe there should not be based on base plate location and upper spacer. The original hangup with the top trusses were leaned over out of plumb today I walked out after getting back from work and they were plumb all on there own. As with anything like this, learning a new language is part of the fun. FB, EC, RF 1, FR2, E1, etc, etc, the bottom photo, this is supposed to bolt in between between the flange and the web.. LOL.. Maybe in a different world.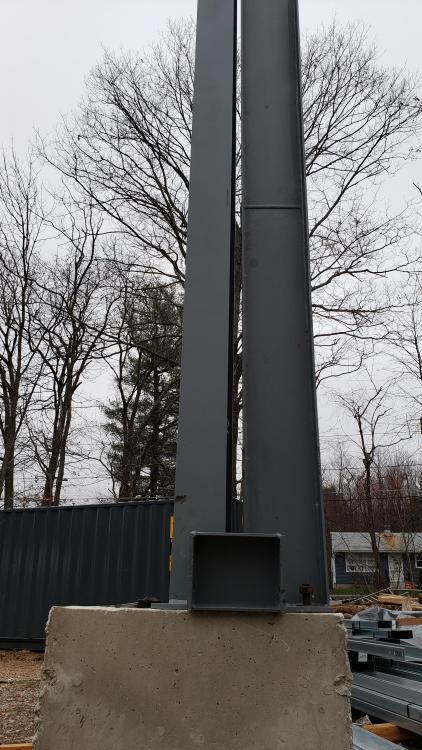

-
ratfink310, great find. You couldn't have found a finer vise beginner or expert. the jaws look like new. Congrats on the find.
-
What did you do in the shop today?
jlpservicesinc replied to Mark Ling's topic in Blacksmithing, General Discussion
Bubbdadreier I bought 4 of those anvils for the teaching center. A great anvil overall for the money and the dual horn design comes in really handy. NEB bought a few for testing and because of the weight they are more portable for the group. Everyone who has tried them has liked them and a few of the members bought 1 as well. I had 1 that was defective with a void under the face you could stick your finger into the hardie hole and right under the anvil face. Was about 2" hollow. the seller sent a shipping label and took it back. No replacement but will buy another 1 for a total of 4. Cheechwizard, looks great. Nice job. -
JLP Blacksmith Teaching Center.
jlpservicesinc replied to jlpservicesinc's topic in Building, Designing a Shop
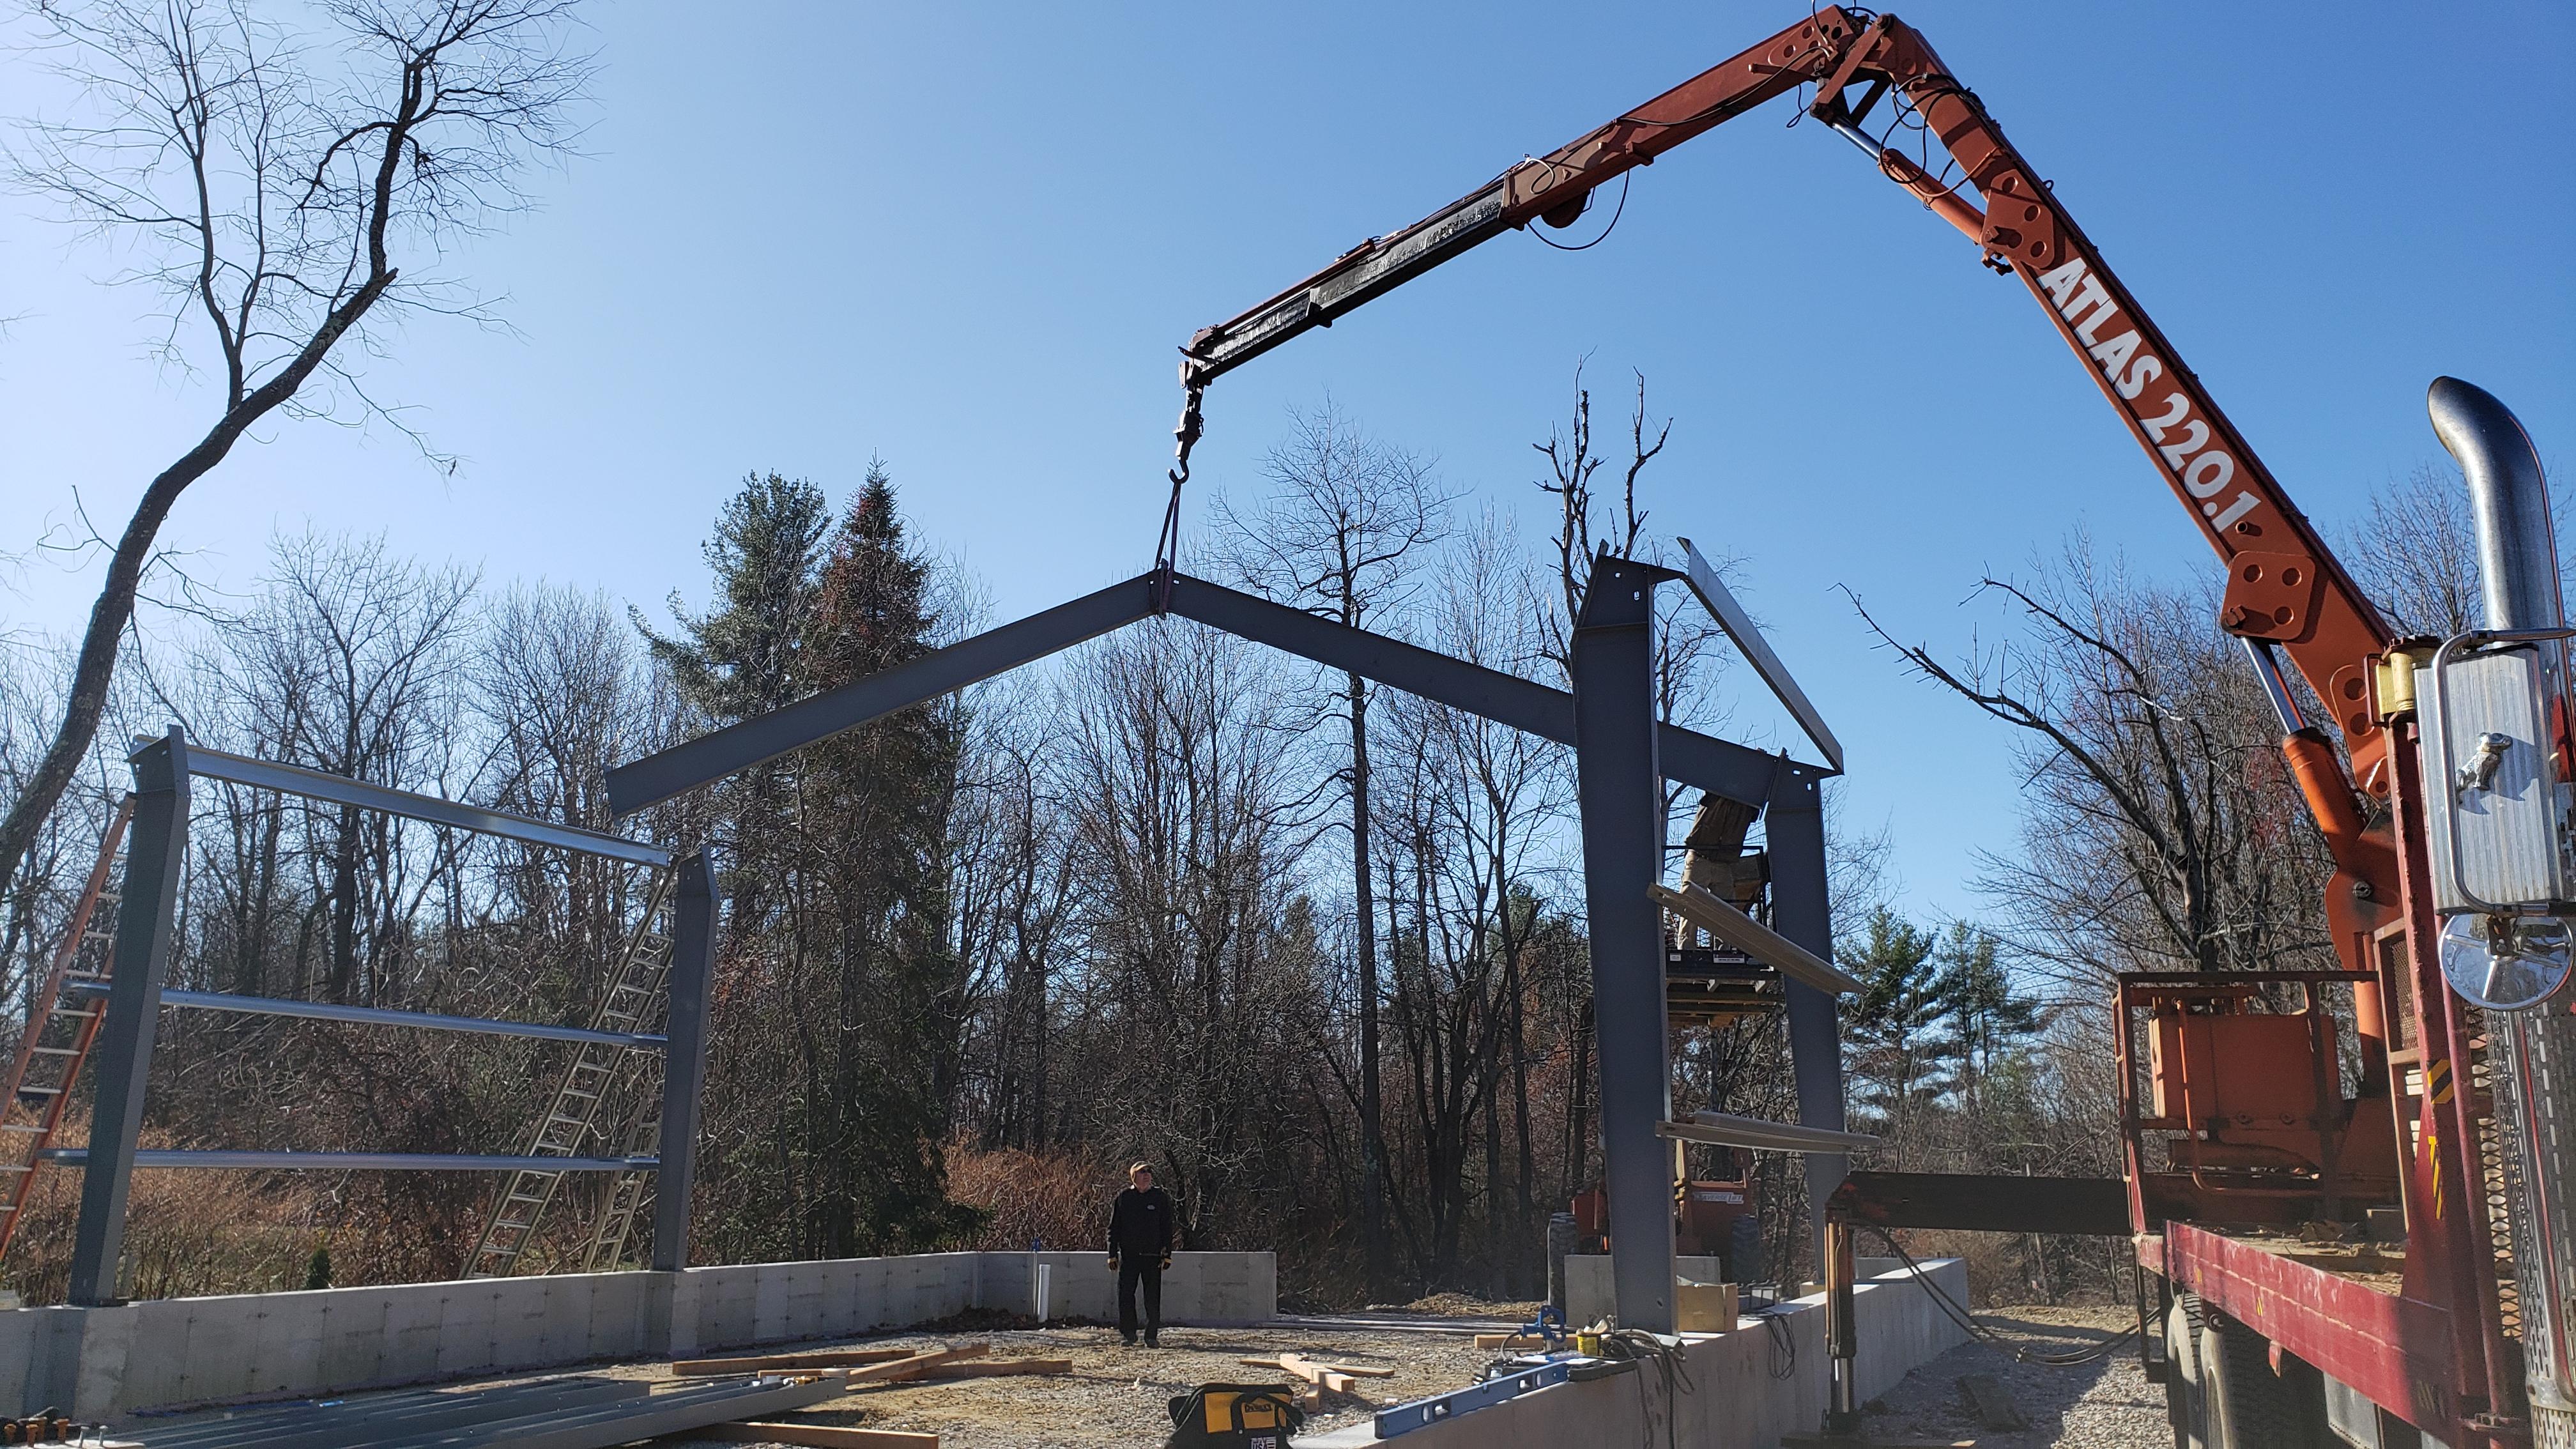
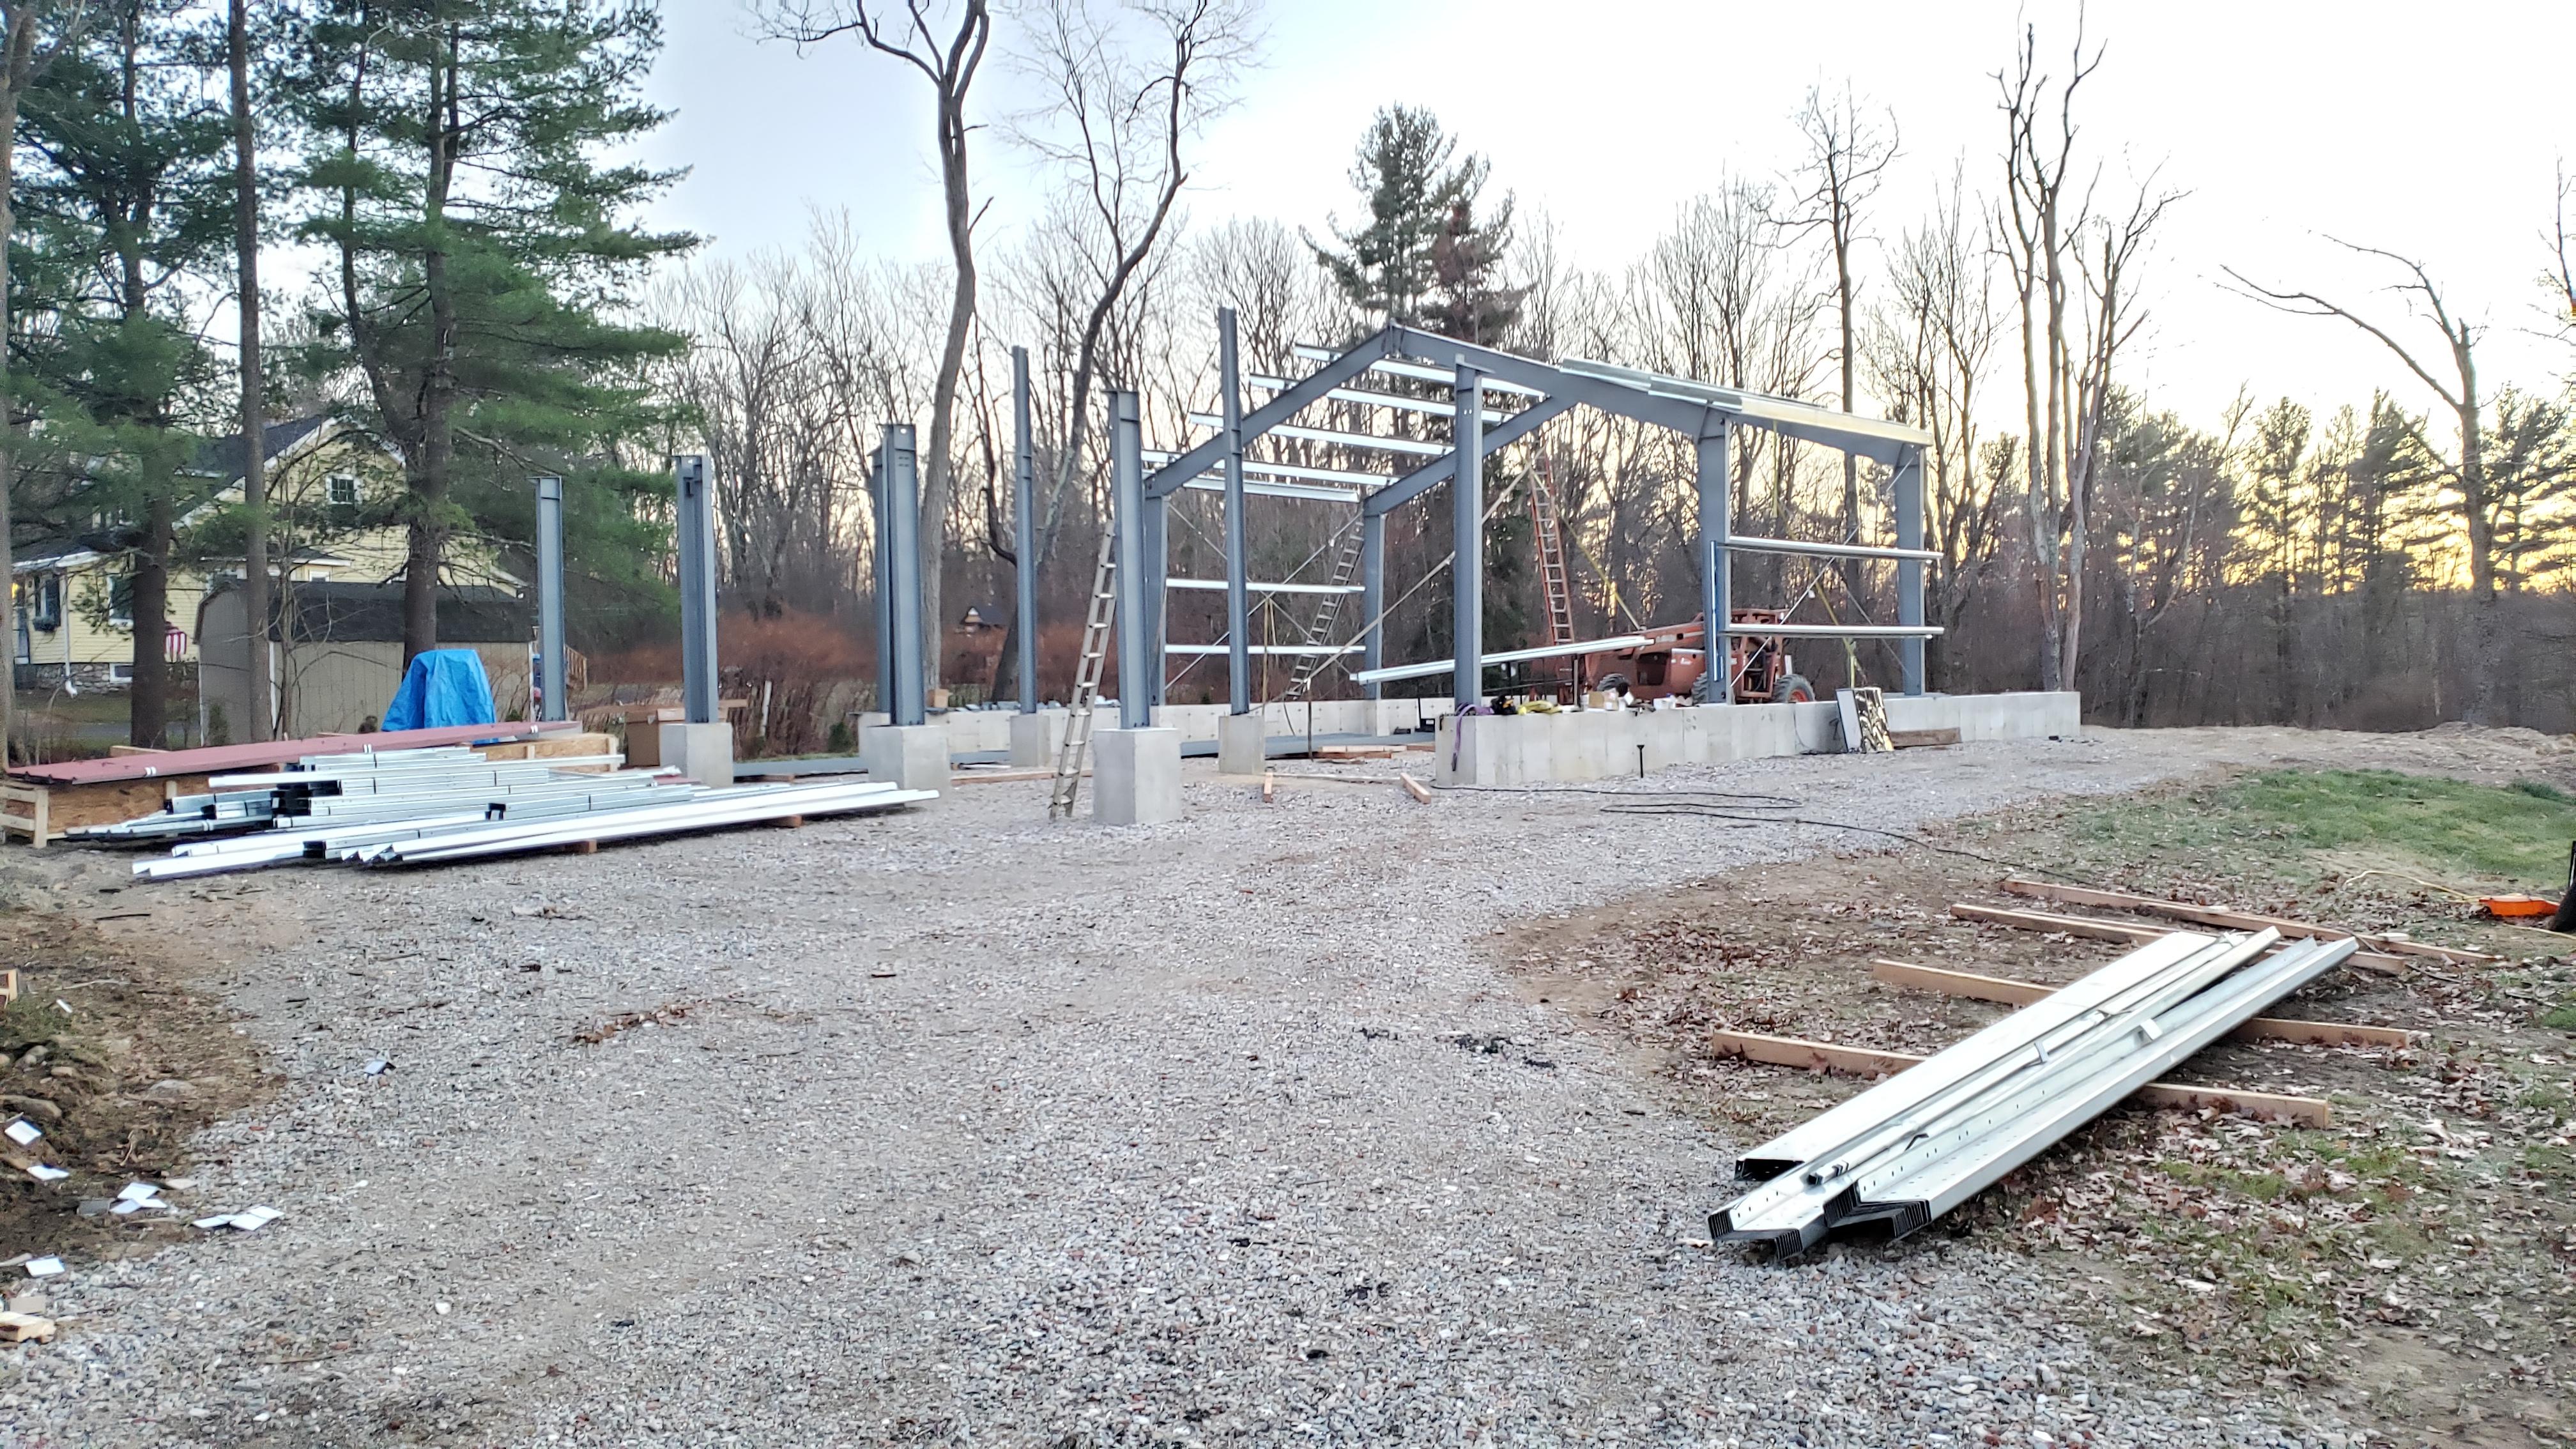
Marcusb, Thanks Les L. I hope so. It's more complicated than most would think. and more info to come.. Thomas, that was my plan only to have it dashed. I have to install the walls first before the roof can go on. LOL.. I'm down to a skeleton crew so have to start looking at other avenues to complete the project. Most my friends have aged out and it's been in the 20's here so they are like. I'm to old for this crap. LOL. finding people who want to work and be SAFE and have time behind a steering wheel in a LULL is a tall order. Its nice having a woodstove to sit by. I have my chair right next to the wood pellet stove.. Me and the doggy and kitty usually shack up right in front.. And yes, safety and water and ice or snow does not make a Metal building be. Few photos of a little more progress.
-
Show me your anvil stands
jlpservicesinc replied to pkrankow's topic in Stands for Anvils, Swage Blocks, etc
Yup, thats better.. For shelves, I used 1"sq X 1/8" wall and used 3/4" round for the pins. I made the stands so they are centered at either side of the stand if need be for catching drift driven through the hardie hole or pritchel hole. the shelfs I want to sorta be a friction fit. That way they won't move on their own. You planning on putting in center gussets for legs to bottom plate of anvil. Some Church window gussets could be kinda cool looking. -
What did you do in the shop today?
jlpservicesinc replied to Mark Ling's topic in Blacksmithing, General Discussion
CGL, many mighty fine smiths would be estatic at the finishes and shape you are aquiring. My self included. really very nice work and design elements. Very attractive and very well finished. Randy nice work. -
Thanks.
-
Show me your anvil stands
jlpservicesinc replied to pkrankow's topic in Stands for Anvils, Swage Blocks, etc
IFC, thats why the shelves that move on the stand. Handy, can move them out of the way and easy to make larger or smaller replacements as well as tong holders, flux, coolant, etc, etc. Old Crew, Looks great. I might go just a little wider in the feet. keep in mind you will want to put your foot there (in the middle) when working at the anvil sometimes. The thing I like about the tripod stand is how open under the anvil is. The part I dislike is the instability of the 3 legs. it was funny looking at your stand with the anvil next to it. The anvil is taller. If you are going to put a full sheet under it. and then leave the center section open I wouldn't worry about where your foot can go. The reason I mention the foot thing is I found years ago that my shoes would be worn on the toes and at the end of a long forging day my toes would be sore. I then started paying attention as to the reason why and noticed that I slide my foot up the stump and smeared the toe of my shoe and foot down the same area day in and day out. Kind of a weird thing but noticed when I made a stand I could move my foot into that space I no longer did that.. I now find it uncomfortable when I go somewhere and the base is to wide and I can not put my foot where it naturally wants to be. -
What did you do in the shop today?
jlpservicesinc replied to Mark Ling's topic in Blacksmithing, General Discussion
CGL. I too love the looks of the brooch. -
Old Crew. Nice anvil for sure.. Have you done the test up the horn too? Most of the German anvils have the face plate to the tip of both horns. I use a clear Acrylic tube the right size for the bearing. this way I don't have to chase the bearing.. some loss to friction probably. But when you hit a dead spot and there is nearly 0 bounce its really apparent. by the way that is a left handed anvil. That is so cool. Nice. Marc1.. Ha, ha, ha.. that is funny.
-
that is awesome. did you find it locally or have it imported?
-
that is a sweetheart for sure. I'll be looking forwards to what you come up with. Love to see build photos too. Have you decided layout of uprights and such yet?
-
JLP Blacksmith Teaching Center.
jlpservicesinc replied to jlpservicesinc's topic in Building, Designing a Shop
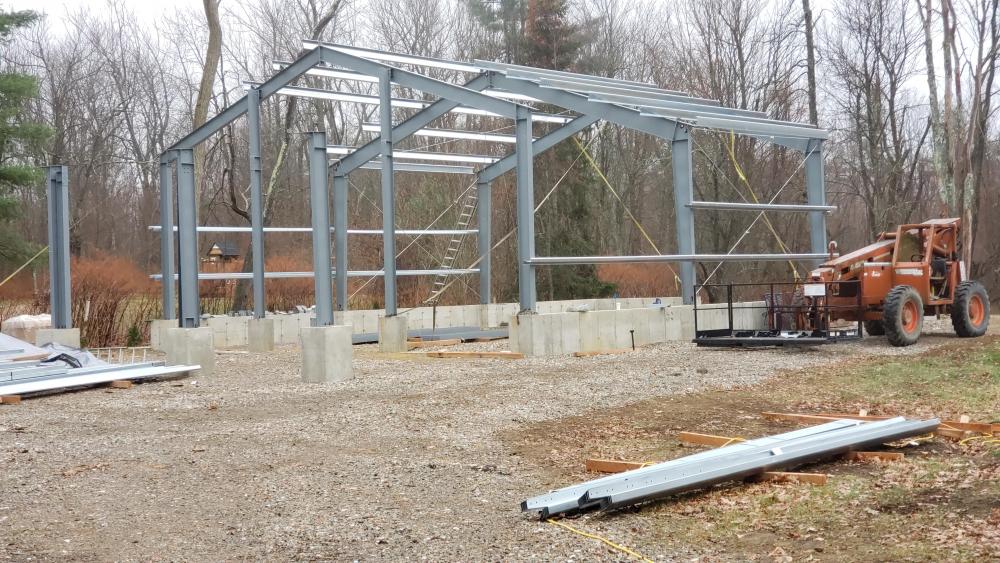
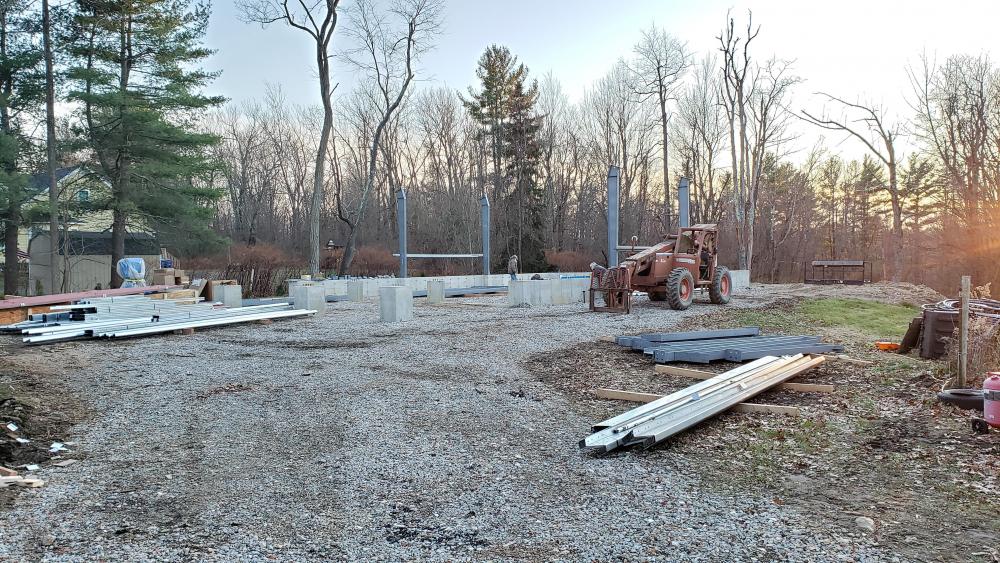
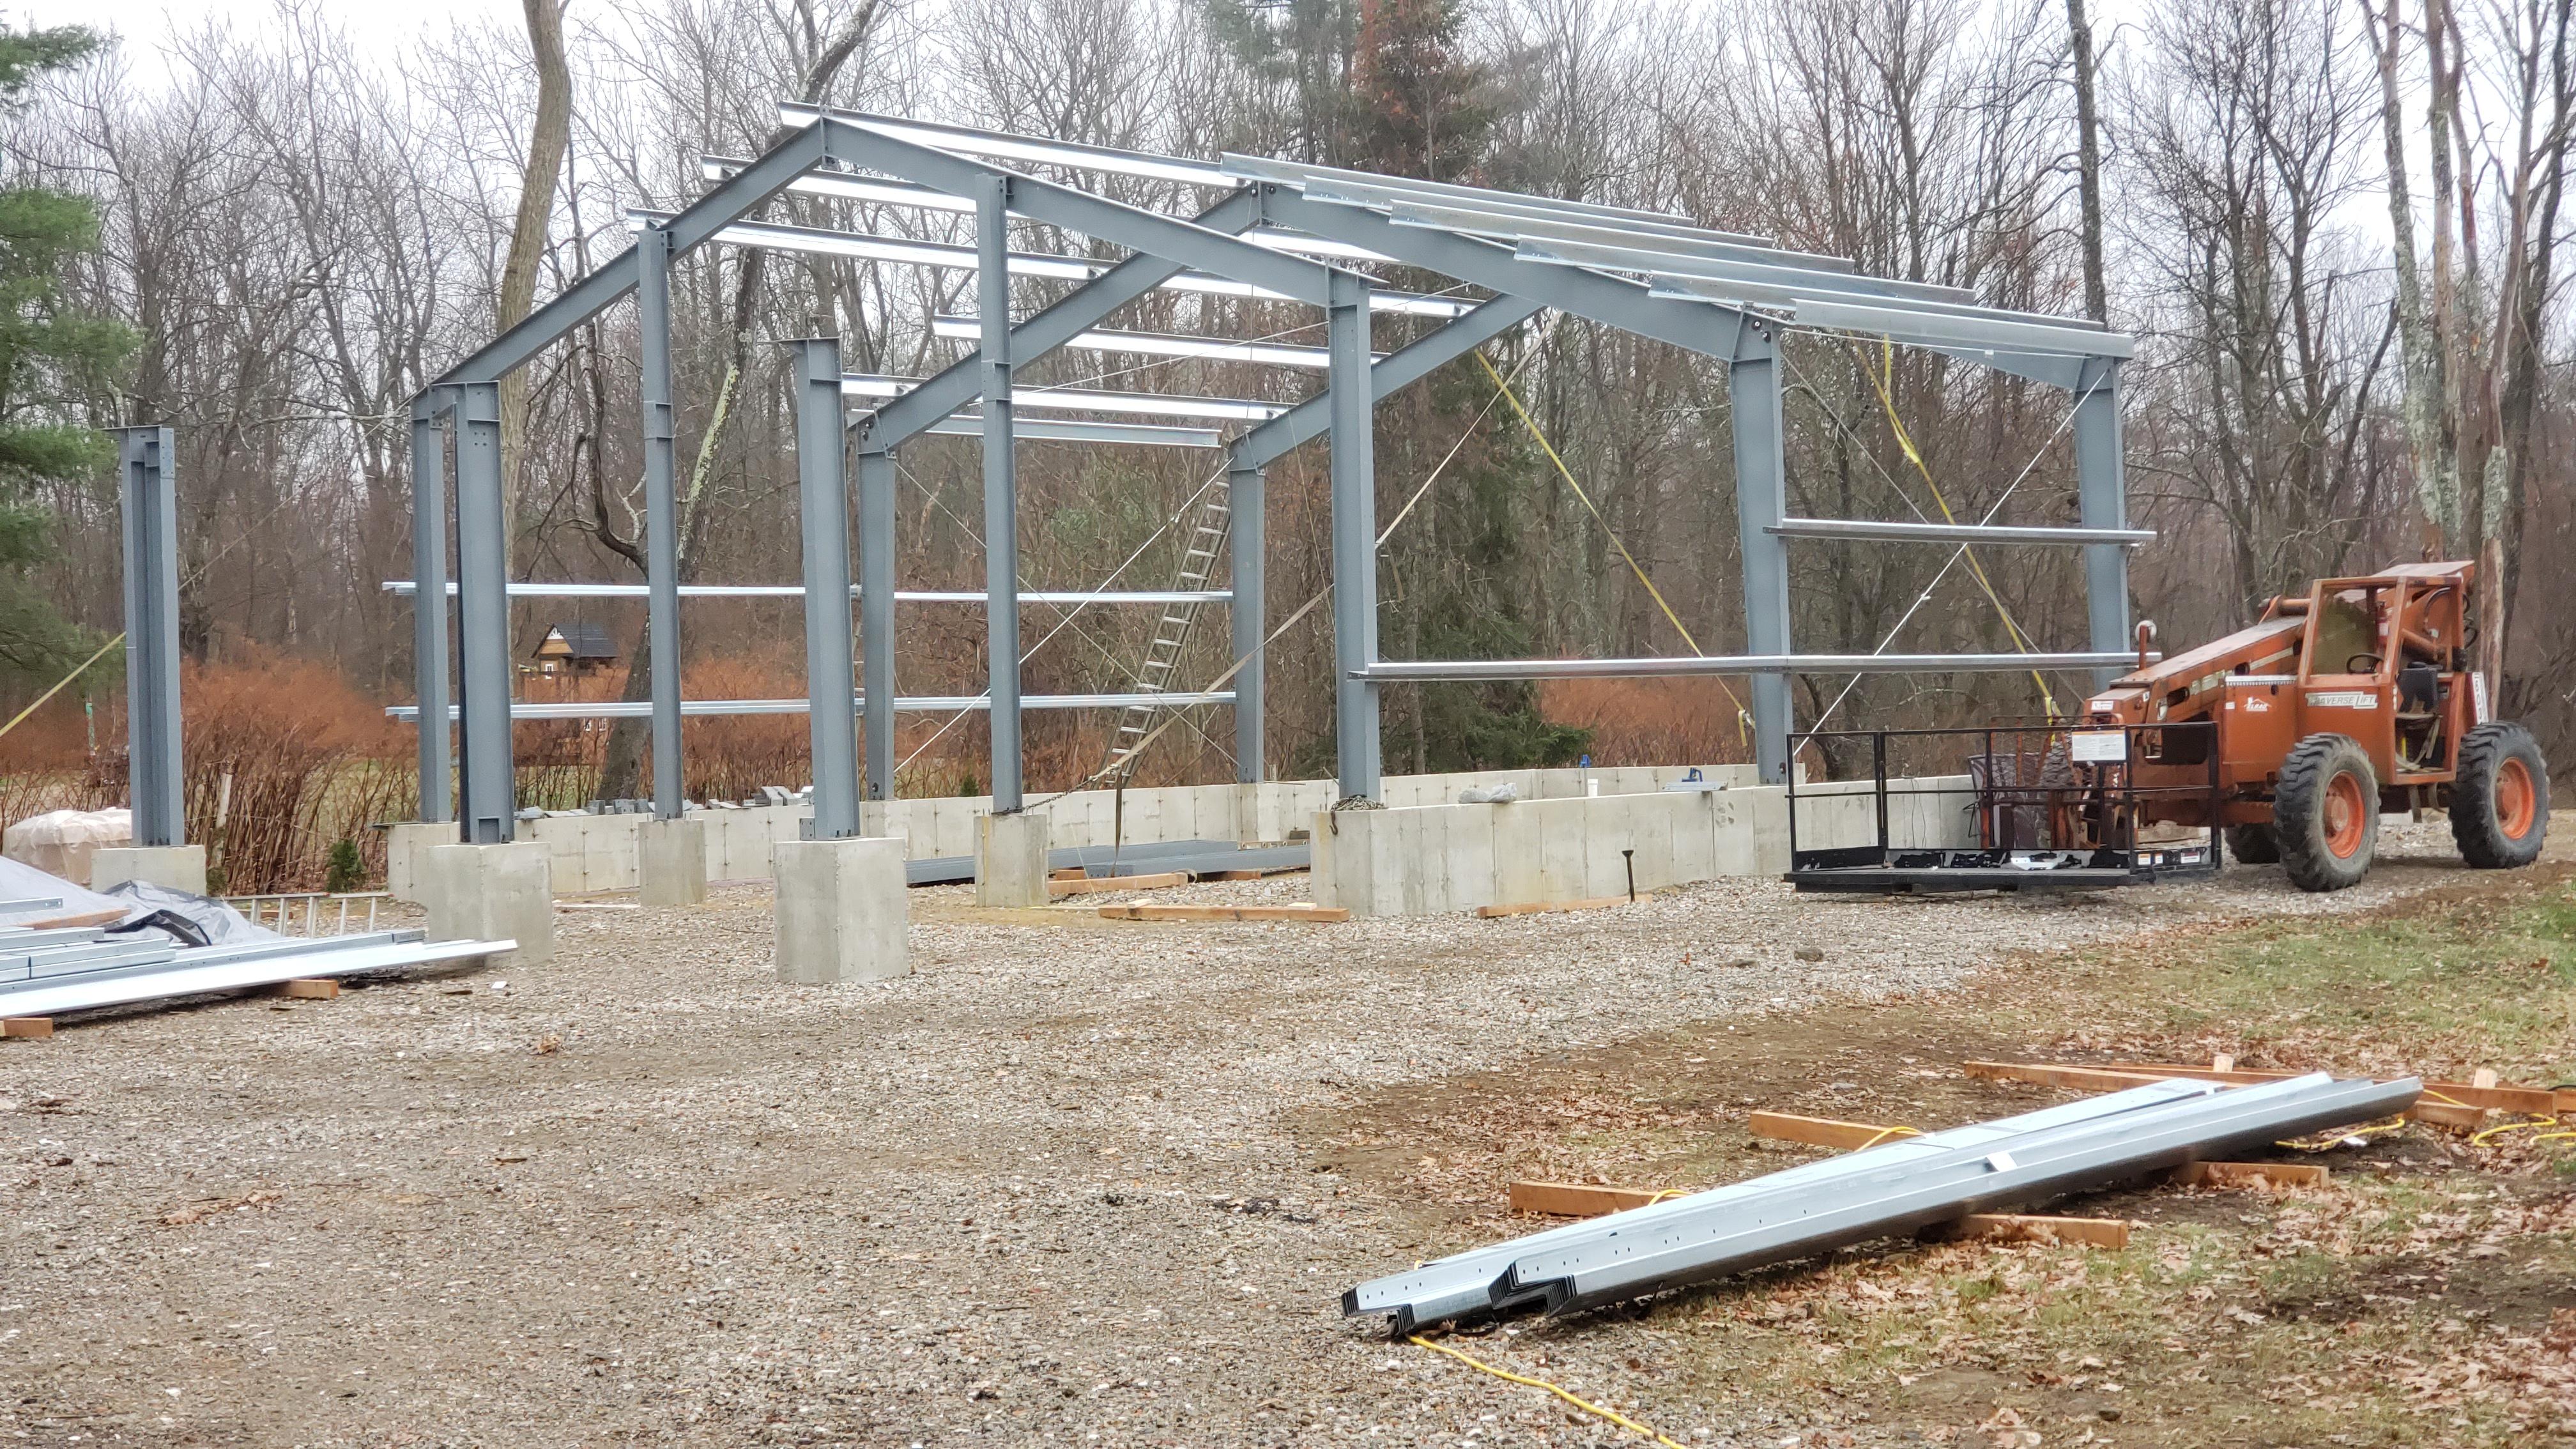
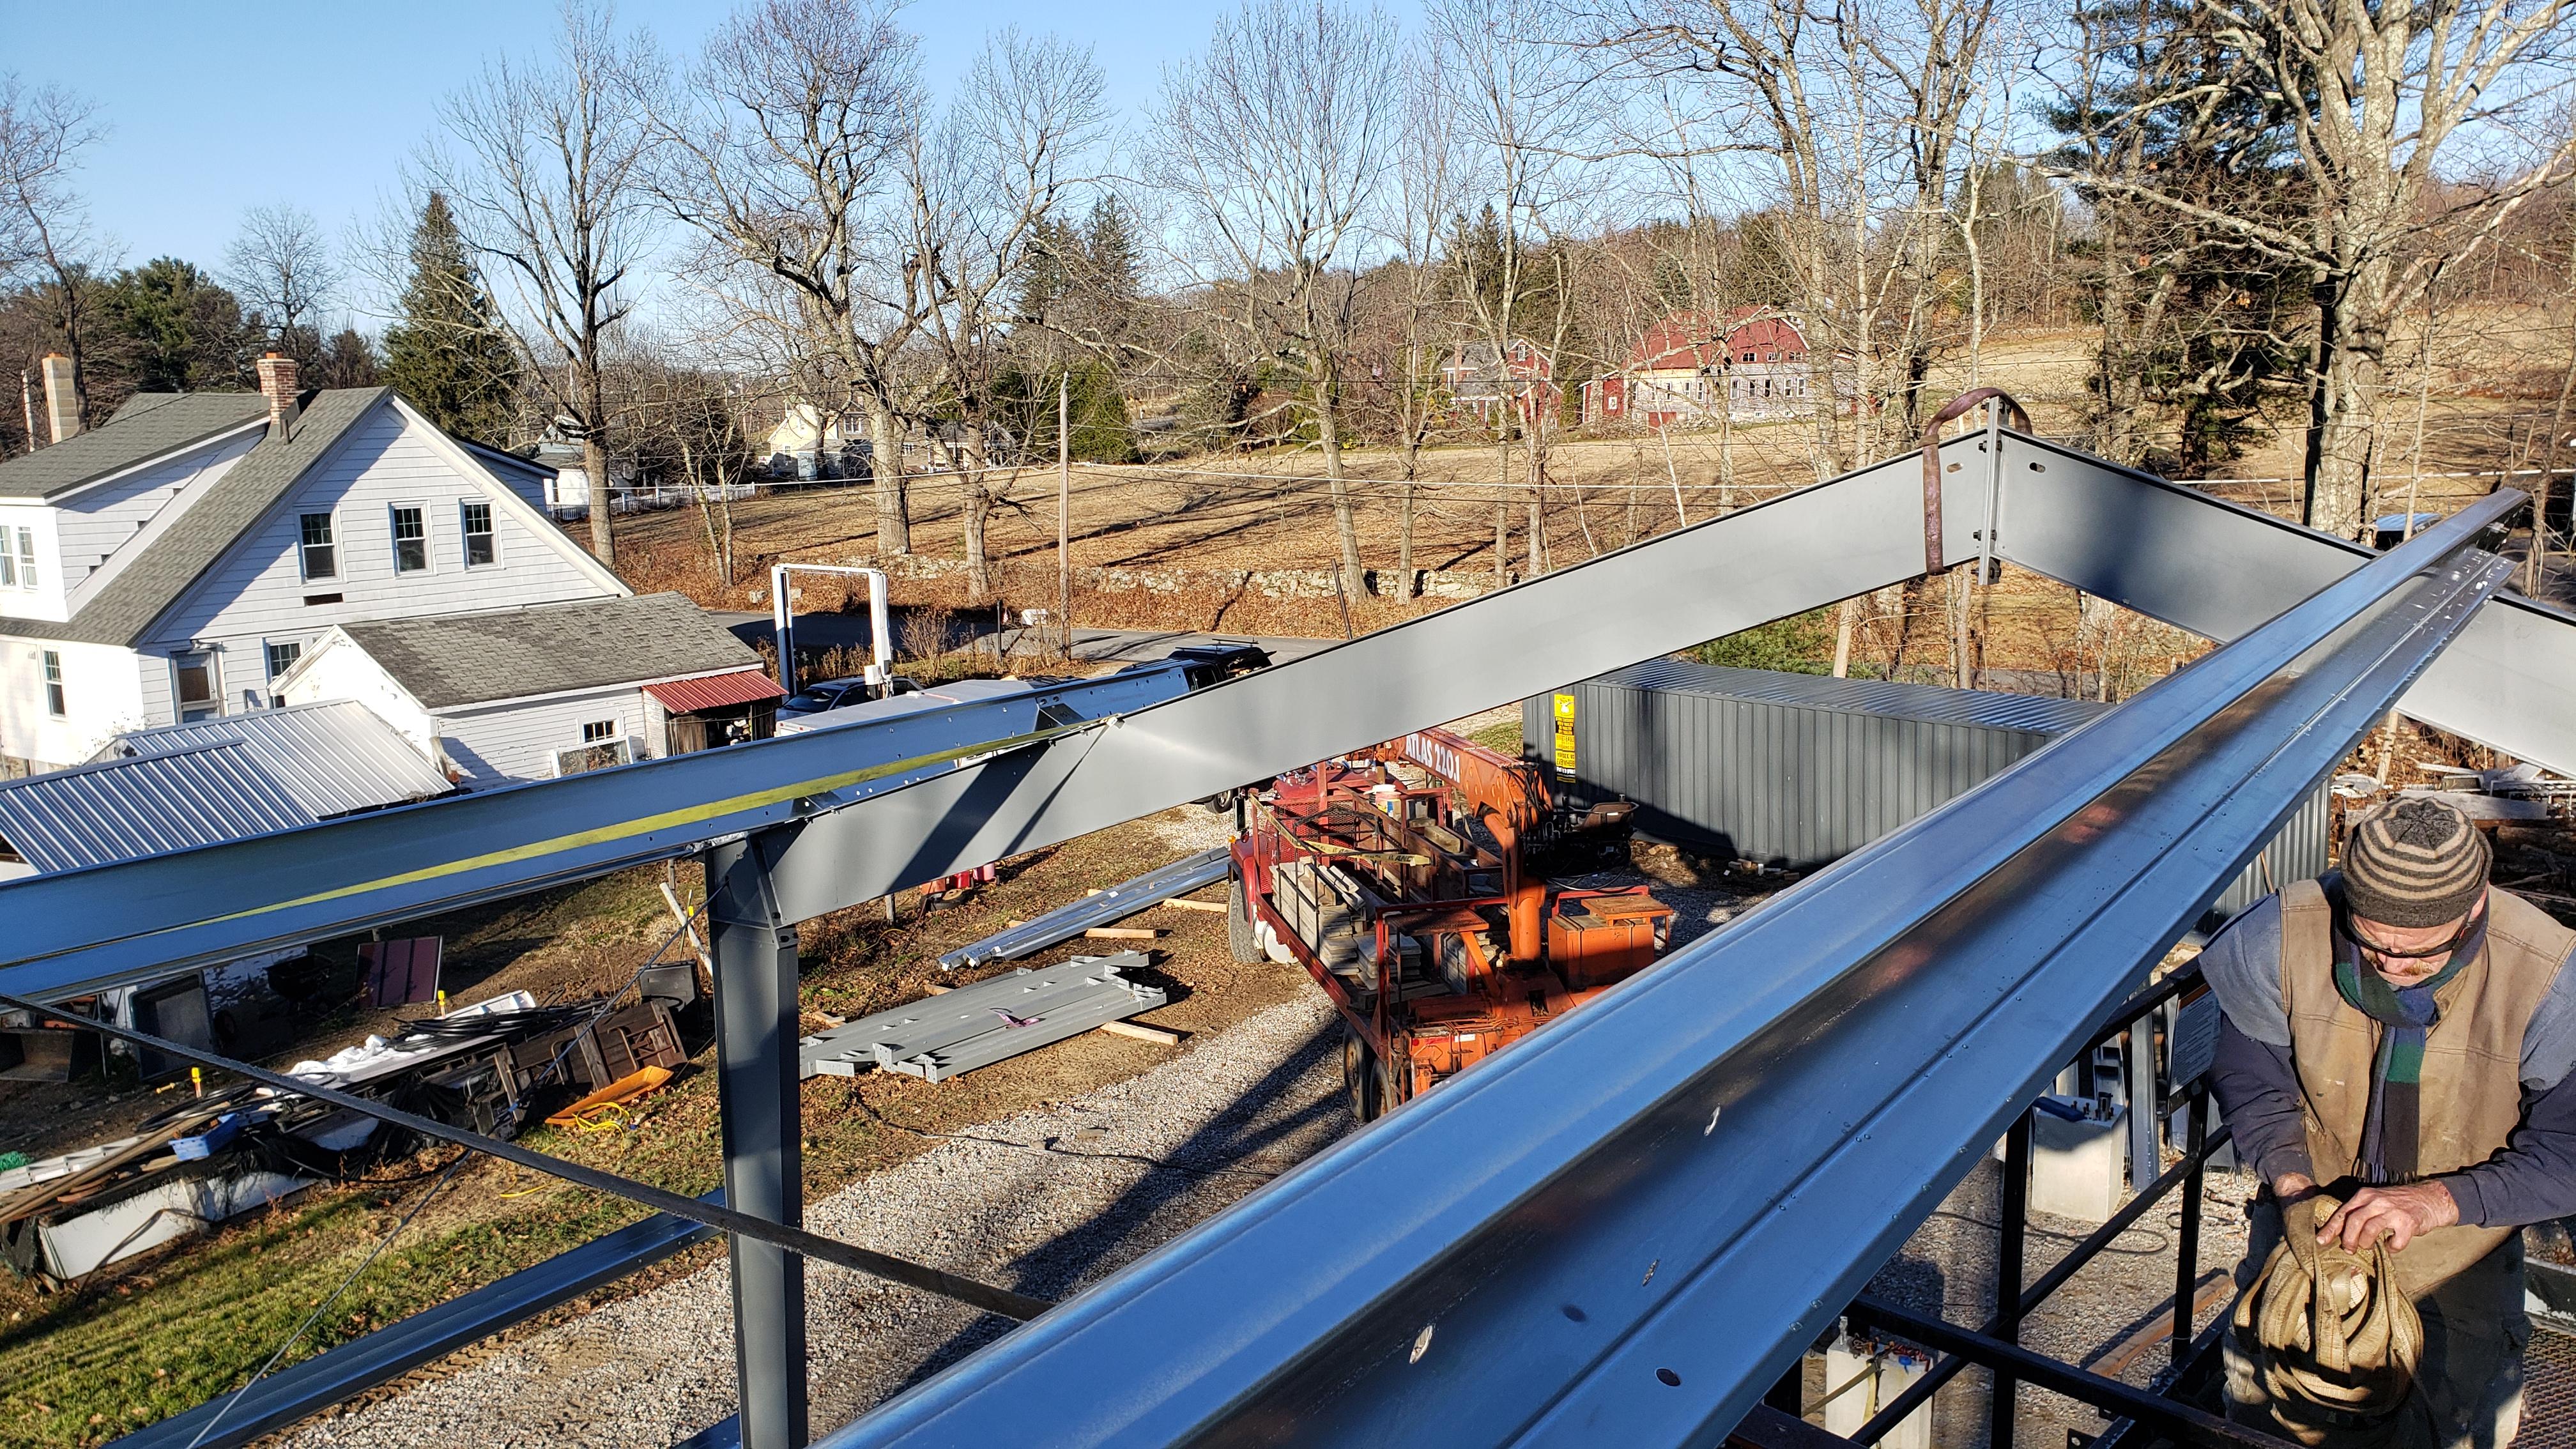
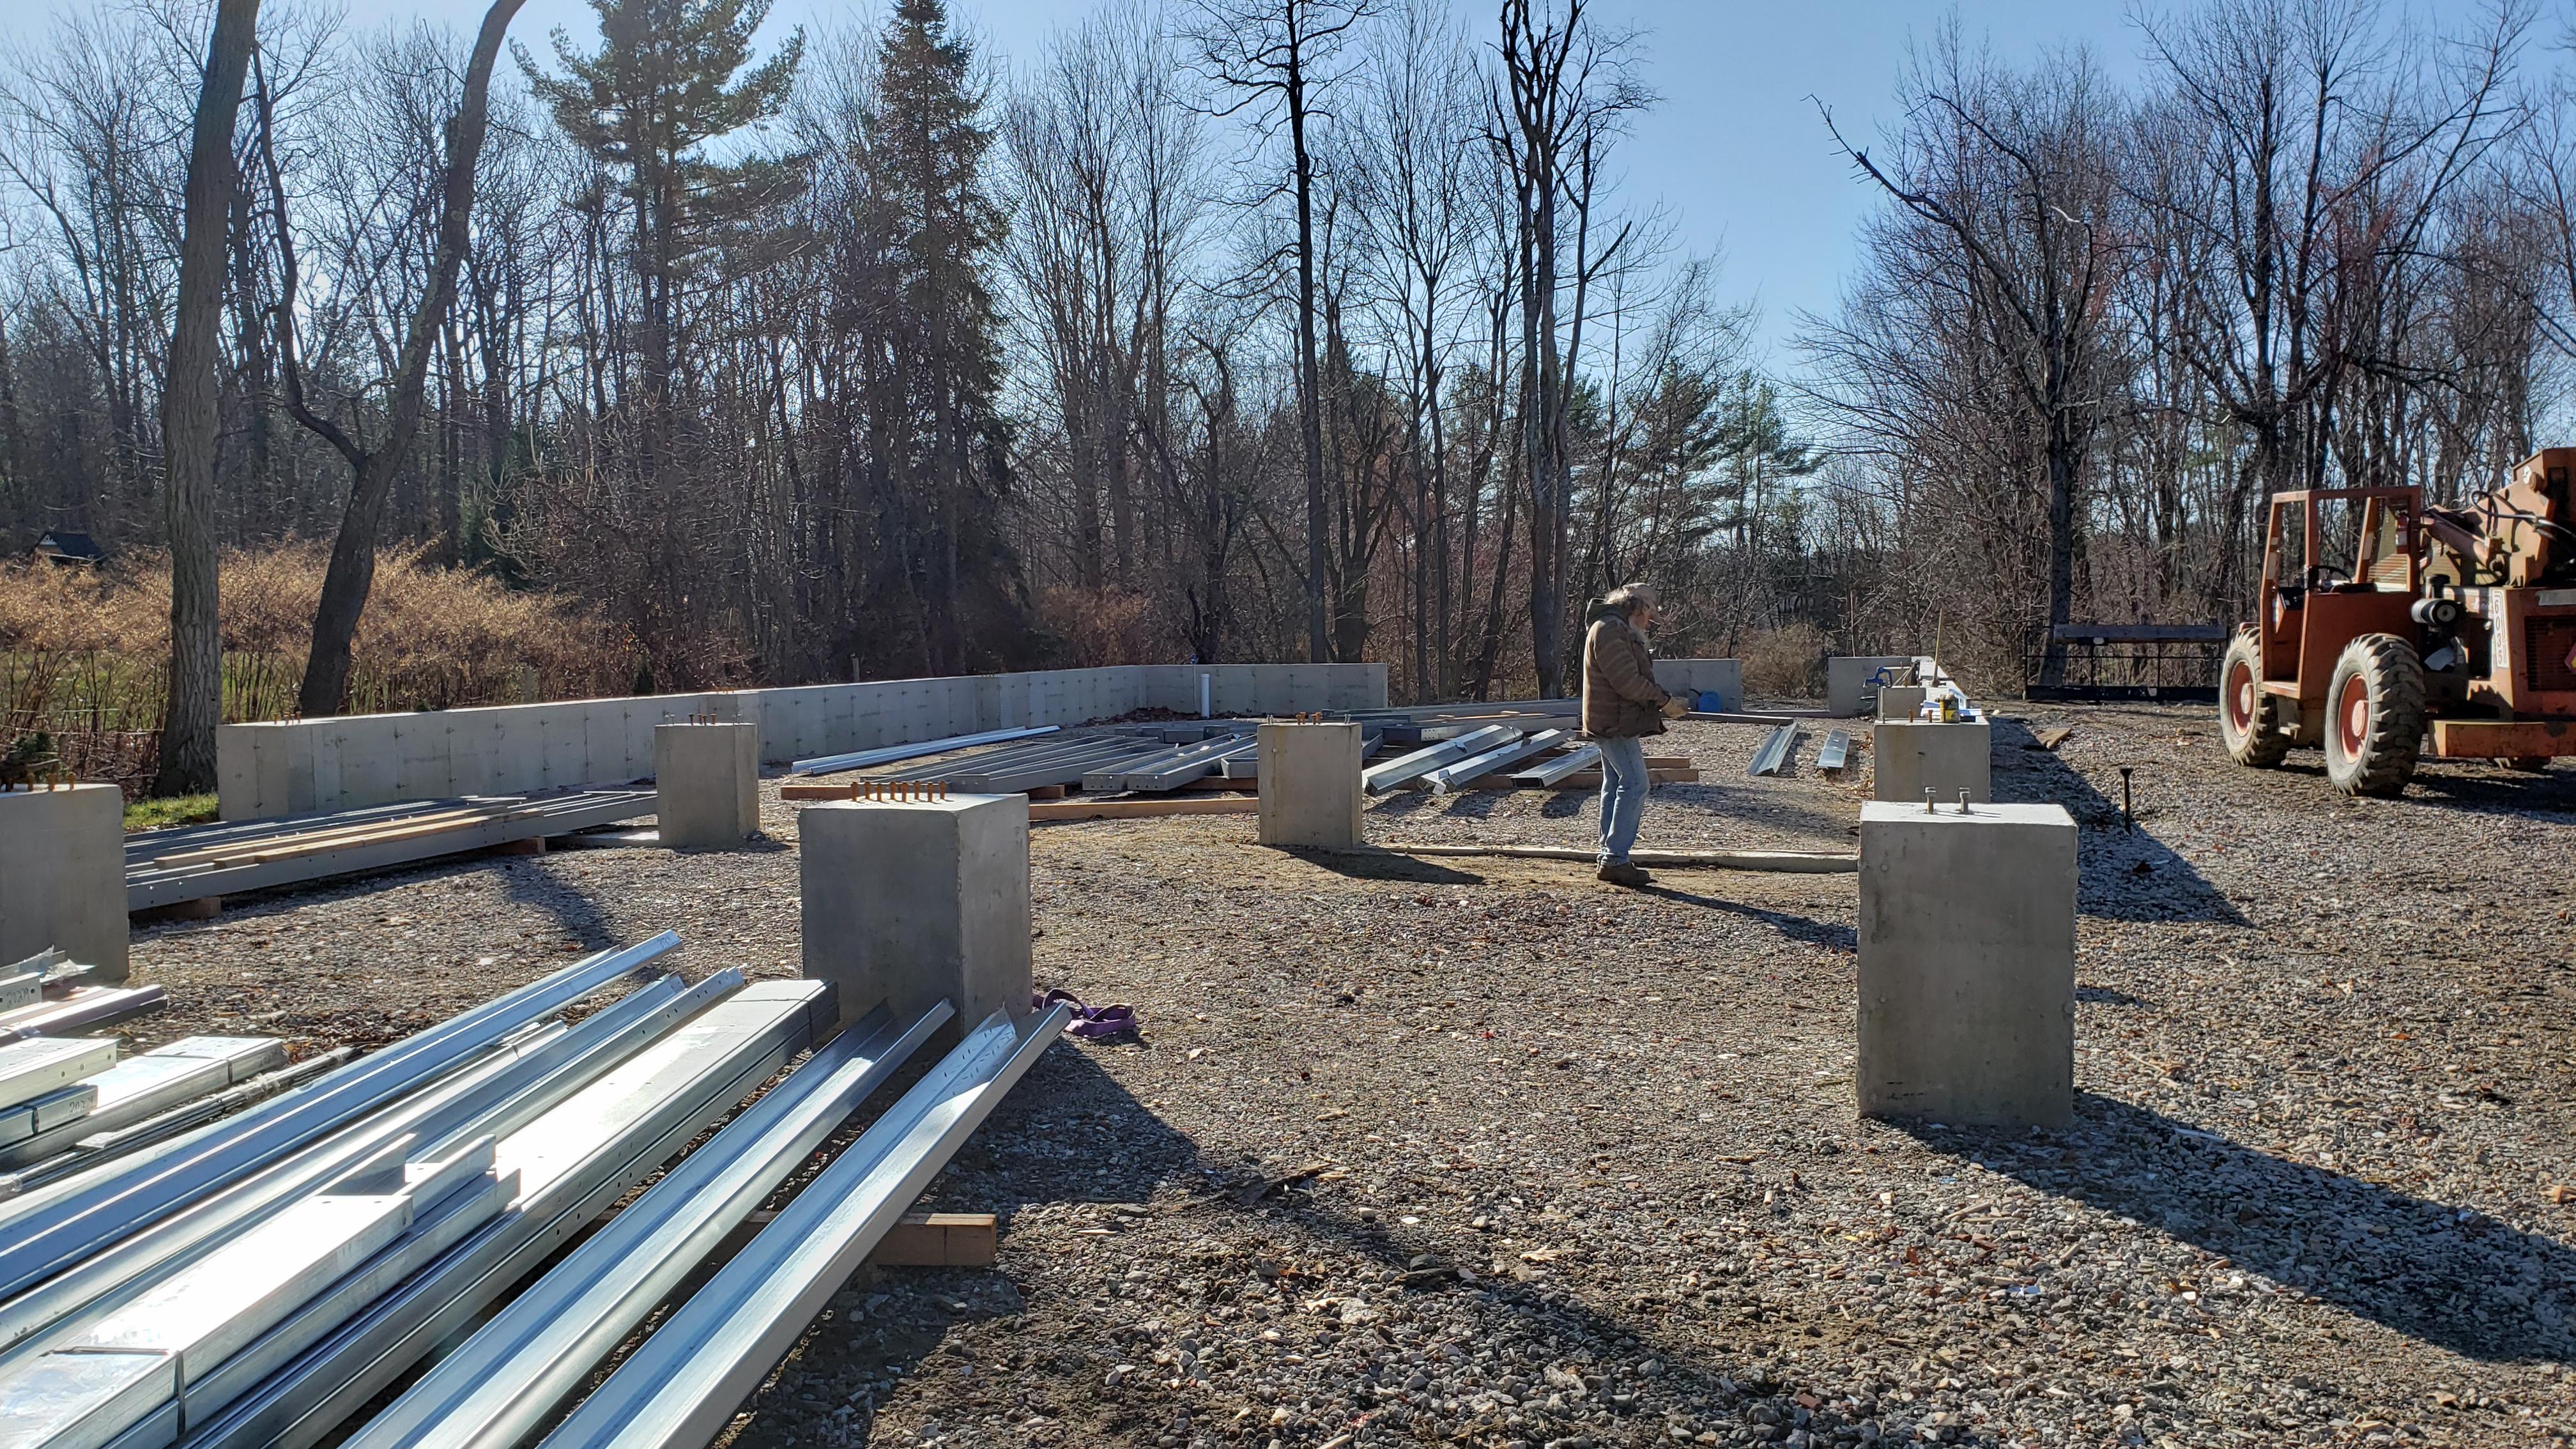
We ran 3000lbs ratchet straps to and from to stabilize the top section as it was put on and bolted down. The way these things go up is so sketchy. It's what the instructions showed. It said to just snug up all the bolts and some of the places it recommend just finger tight.. Cray, cray.. Biggest problem is figuring out what everything is and then where it goes. Speaking a new language without any training is tough. and they use a code that is very foreign. There does seem to be some areas that are very confusing.. Anyhow, it's coming along. A view from up on the ladder as we were putting purlins up. Hey who made that chain?


-
JLP Blacksmith Teaching Center.
jlpservicesinc replied to jlpservicesinc's topic in Building, Designing a Shop
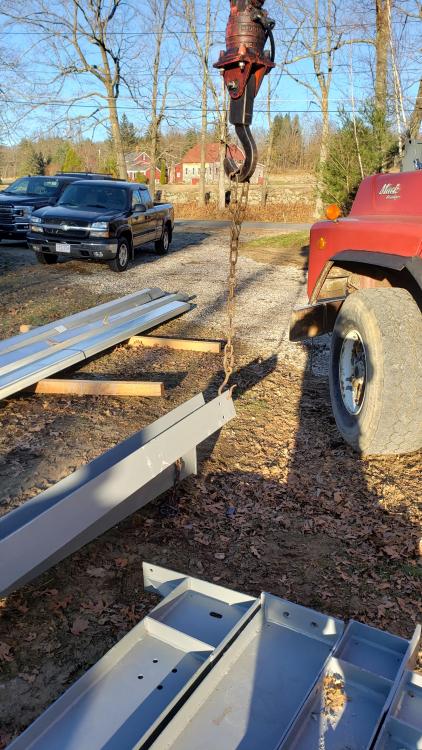
Not sure that is a good or a bad thing.. I certainly could use a few more put to work. The first few uprights with no ladder and I scaled up them as they are and undid the chains. There is so much of this stuff that I barely remember. I ended up getting a length of rope and making a quick release so could be on the ground and give it a good pull and the sling would release. I don't know anyone else who could have scaled up the beams with just feet and hands. That is the part I'm talking about. The next series of events will for sure be longing for capable help. Have 2 days before the rain comes in which means here.. I have 2 days before the snow comes in. Well if you are interested. I'd pay you for your time. Problem I have is skilled boots on the ground. i'm running the LULL, stringing up the parts, organizing things ( My buddy Andrew did a great job getting familiar with the items and which is which) and tomorrow is the first day of working at the tops with scrabbling on the trusses. Fun for sure. I can't spell it either. I use spell checker.. -
JLP Blacksmith Teaching Center.
jlpservicesinc replied to jlpservicesinc's topic in Building, Designing a Shop
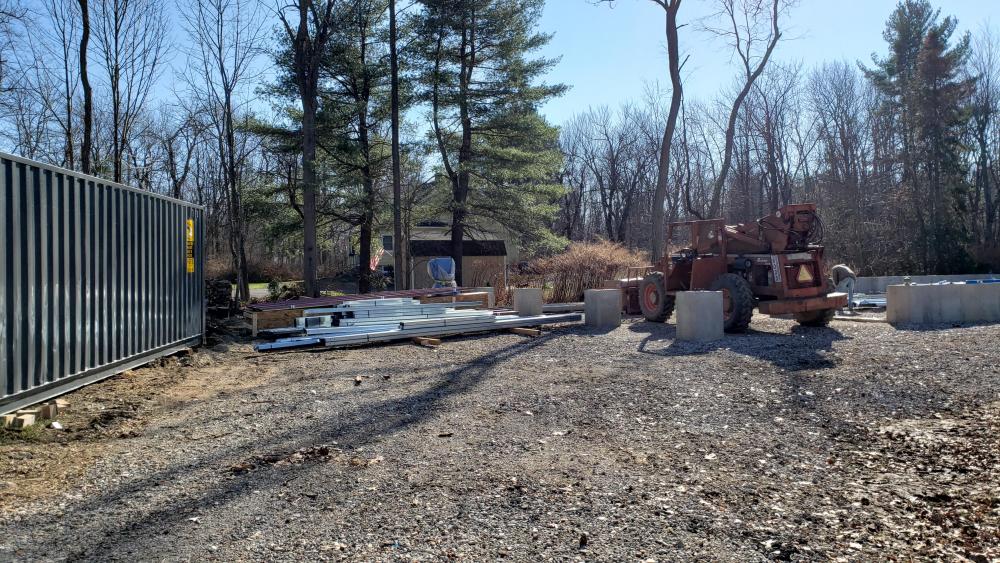
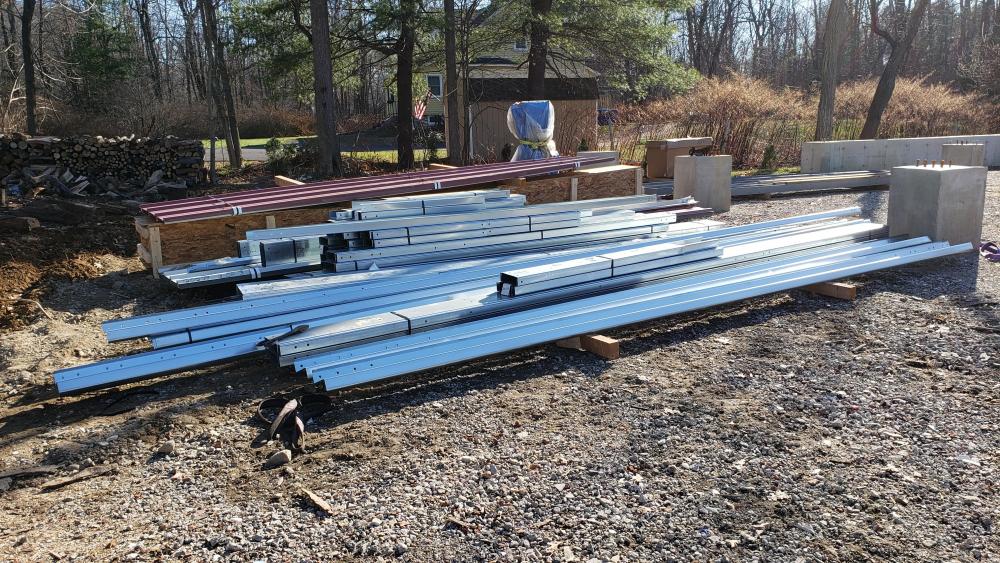
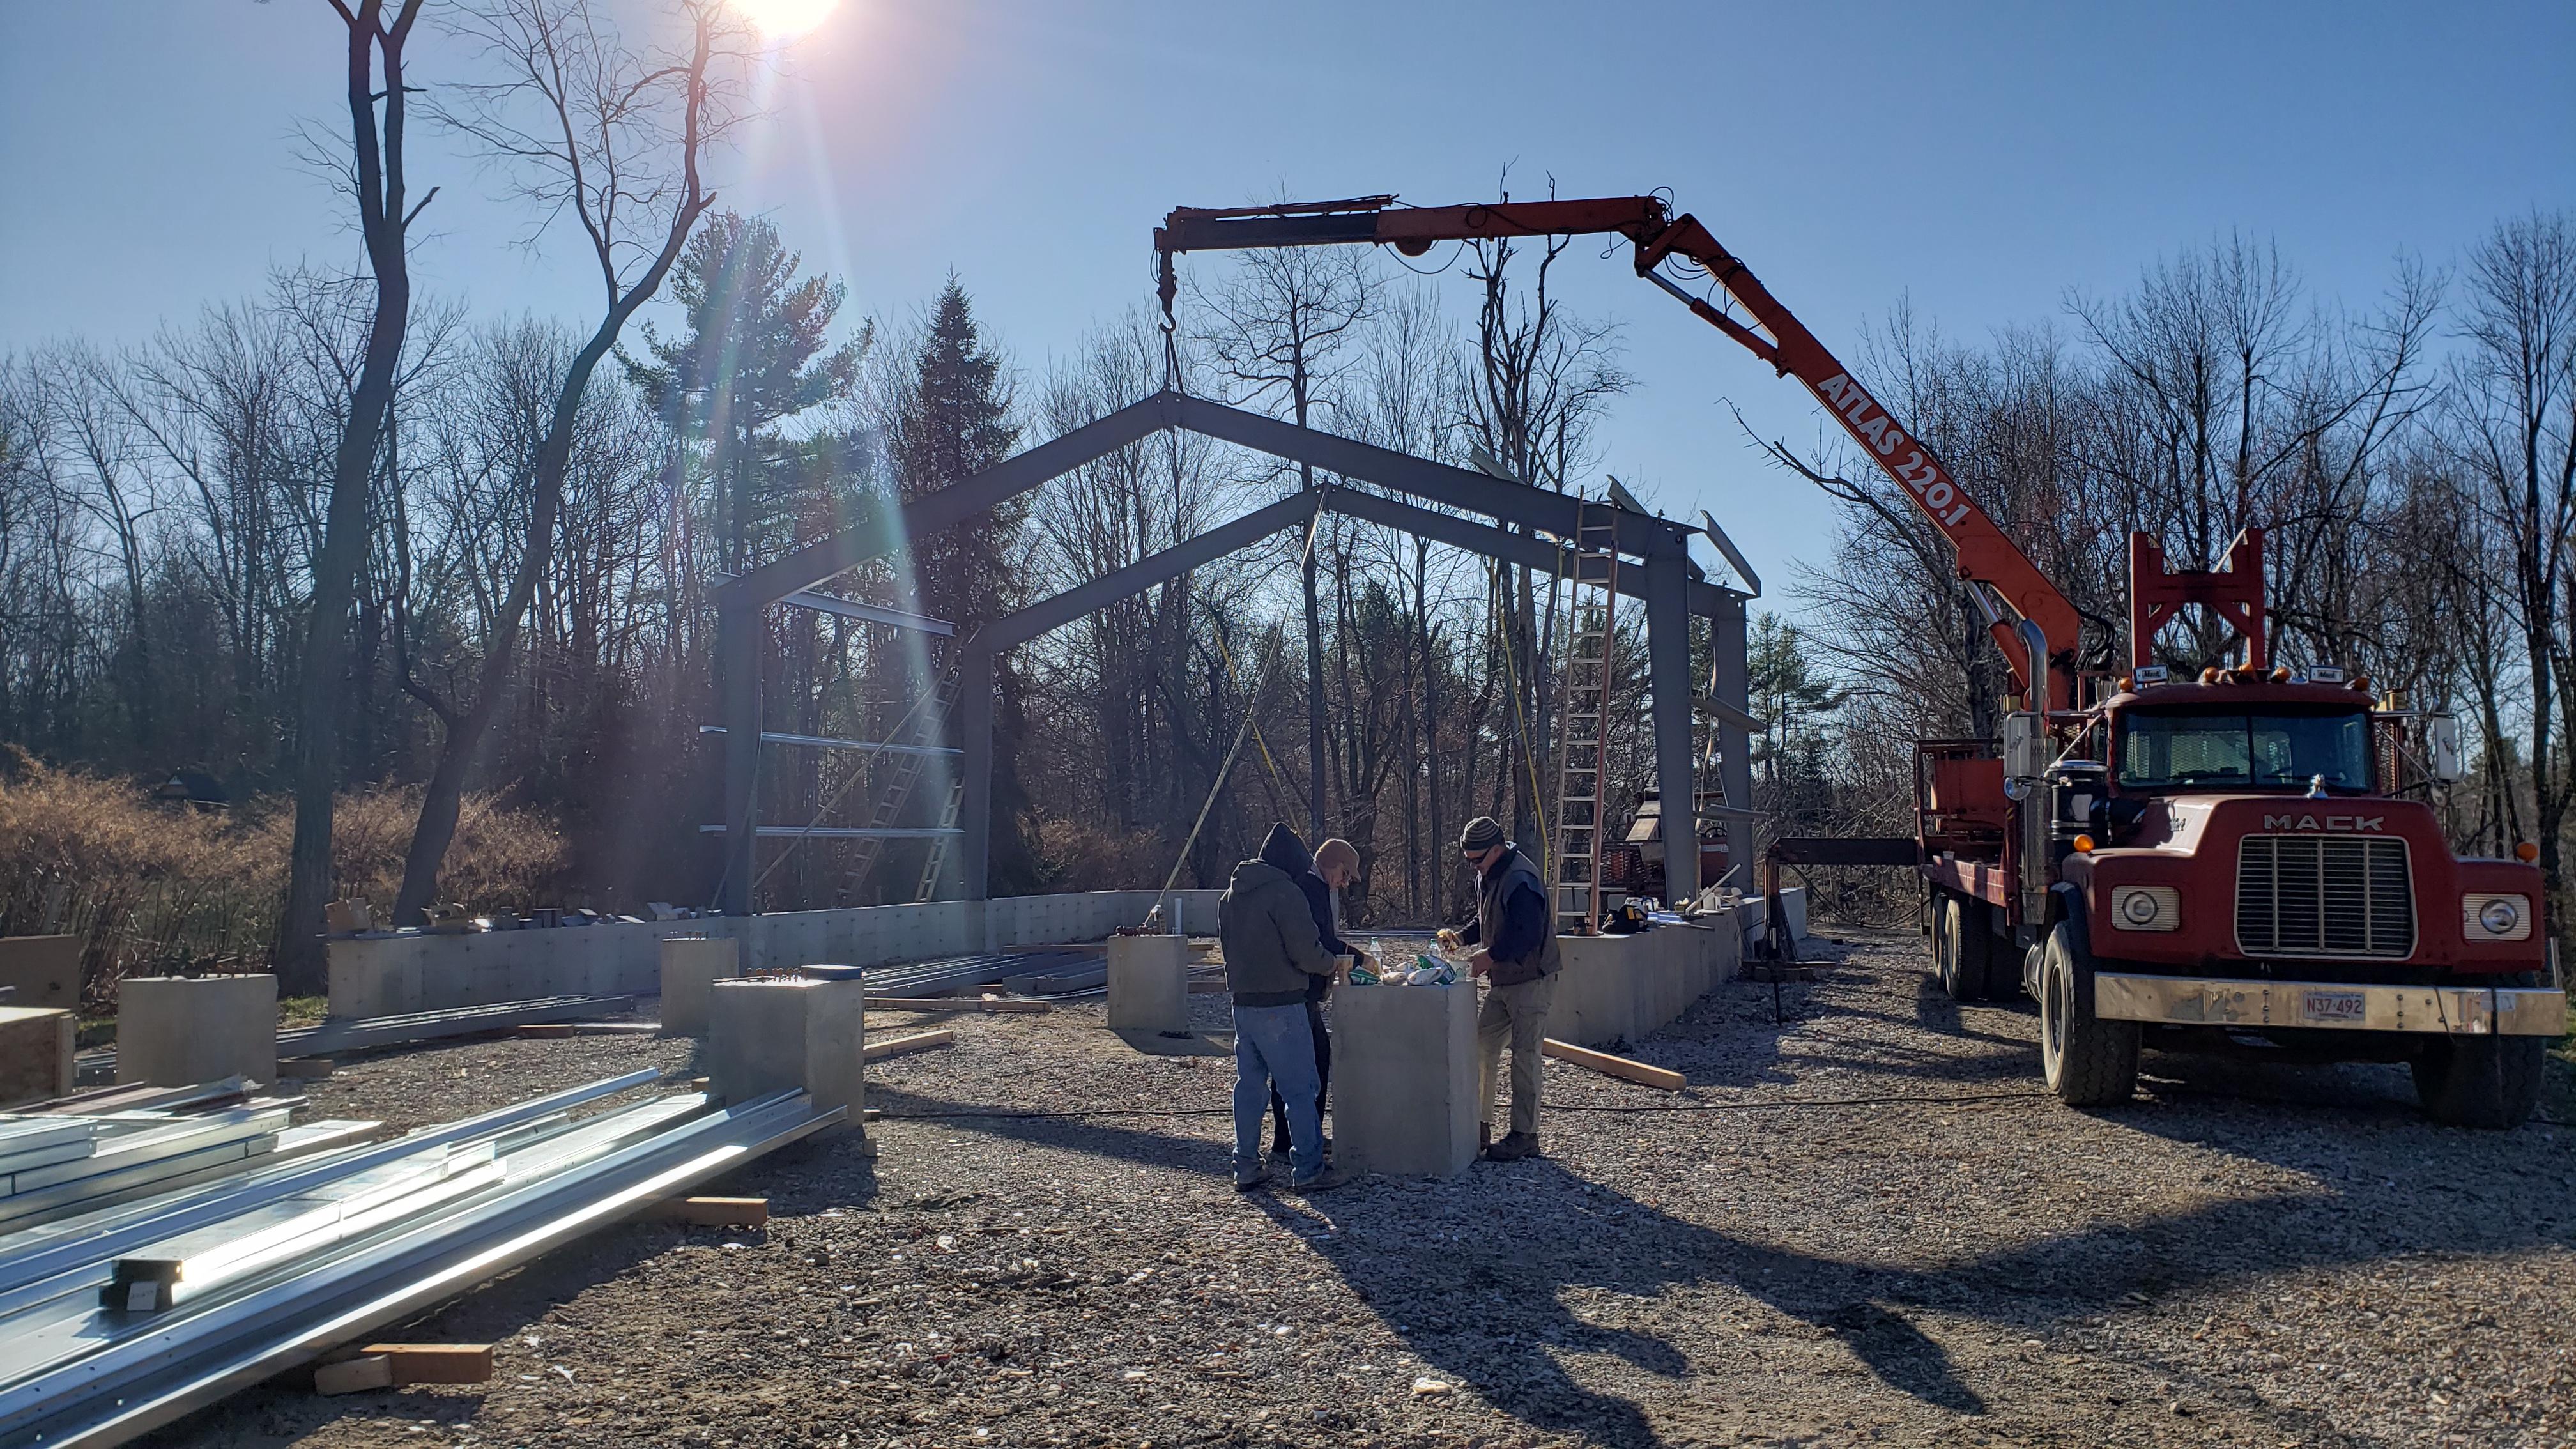
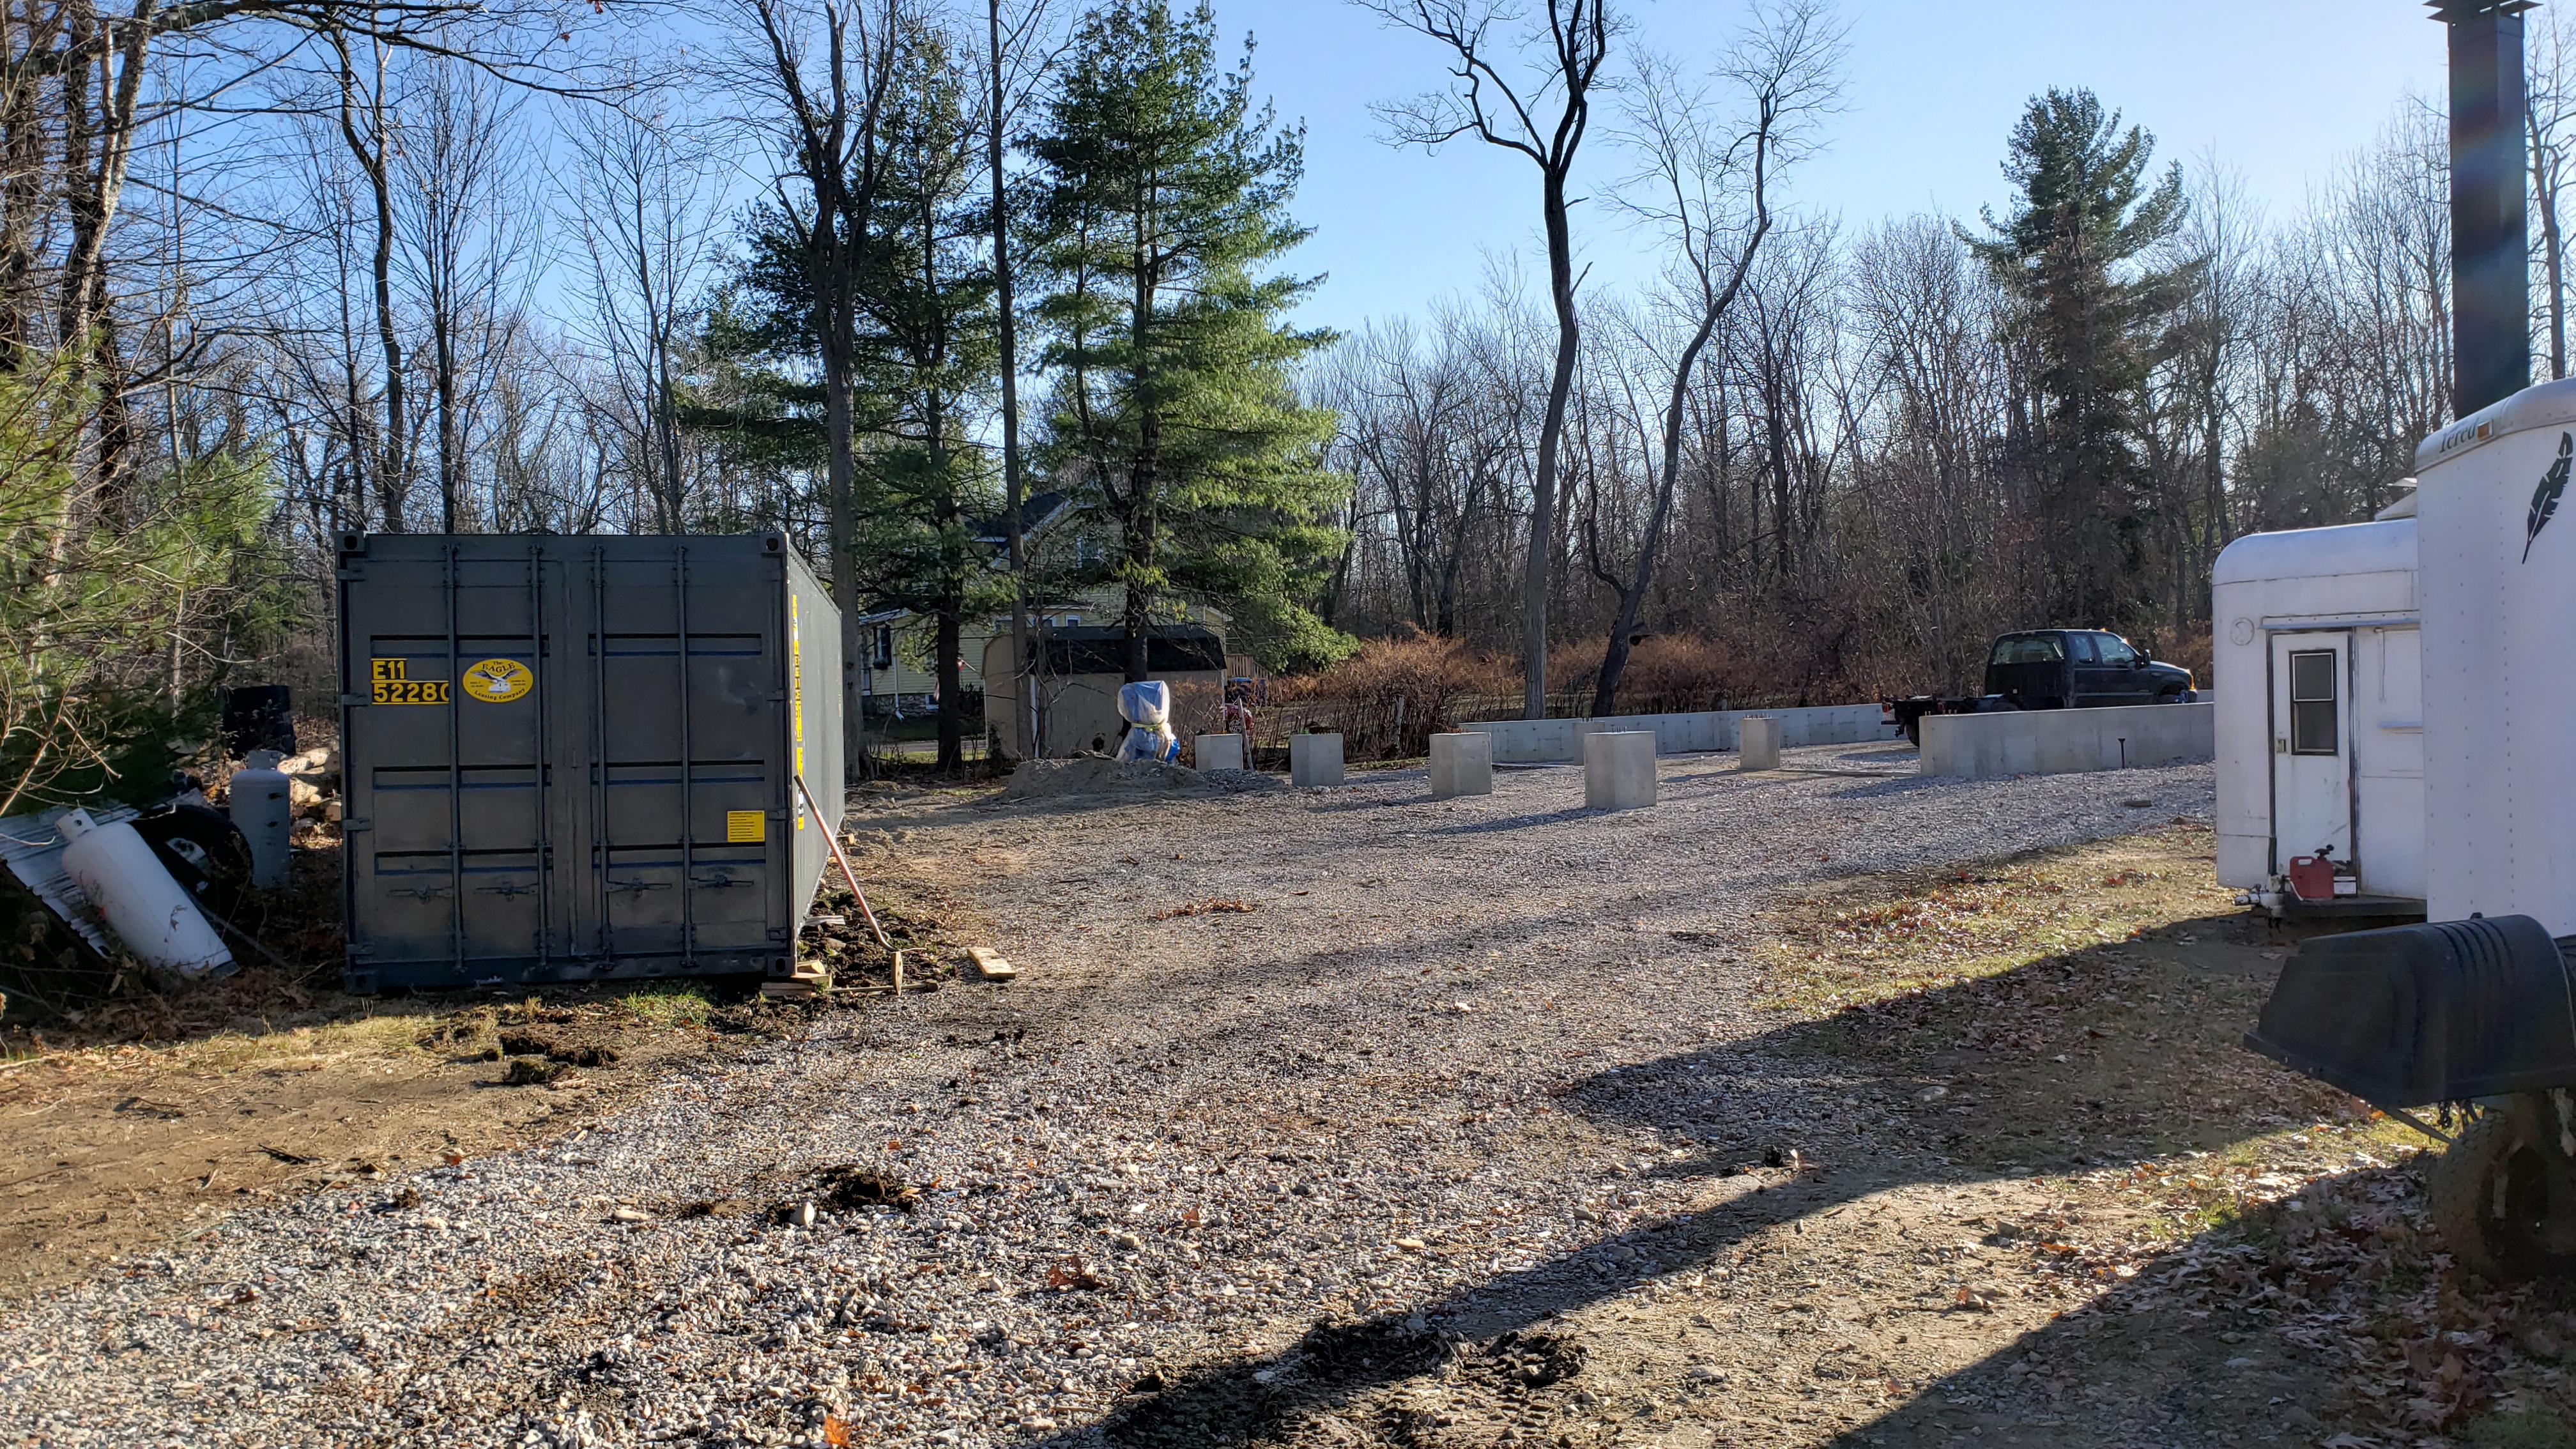
Ok, well in the last 3 days the storage container arrived for the insulation. I was told by the insulation person that a 25ft container would be enough for the insulation. I figured I'd rather have a little extra room so ordered a 40'. good thing to, as it was full by the time we unloaded the delivery semi. So, Wednesday was the container, Thursday was the insulation and today was the building. Took nearly 3hrs to unload the stuff from the truck. I have decided that todays businesses that send out products try to keep it all to themselves.I'm referring to insider knowledge with script and descriptors. I worked at a shipping company when I was much, much younger and we would label everything and put package 1 of 10 if there were 10 packages, etc, etc. The insulation was not marked with anything that resembled the bill of lading so had to call them to learn there language/ script. Then with the building arriving some of the items were hidden in between other stacks. Metal shapes inside metal shapes. The bill of lading was nearly useless as was the loadout sheet as it would have been a 2 day job before sign off with the driver I think the companies do that now. Yes, I'm complaining. It makes it both difficult and frustrating. Spent hours moving stuff around and making sure I/we would know which part is which. Also the order stuff was loaded on the truck was all random. the items needed to be installed first were in the middle of the pile loaded on the truck. Yup complaining again. Anyhow, today was the first day of real building construction. It was a long day.. Wish there were 4 of me.. Would make things so much simpler.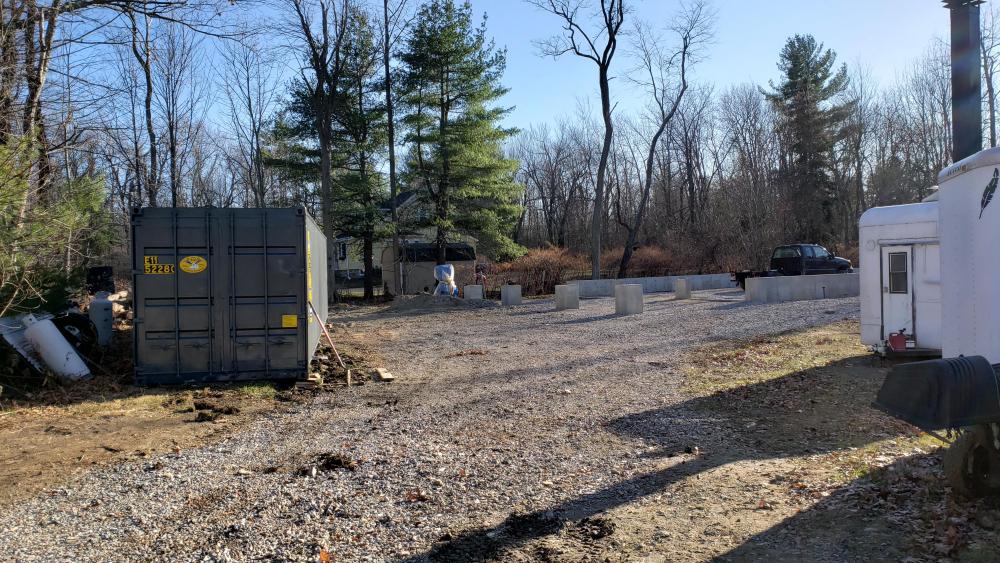

-
Show me your anvil stands
jlpservicesinc replied to pkrankow's topic in Stands for Anvils, Swage Blocks, etc
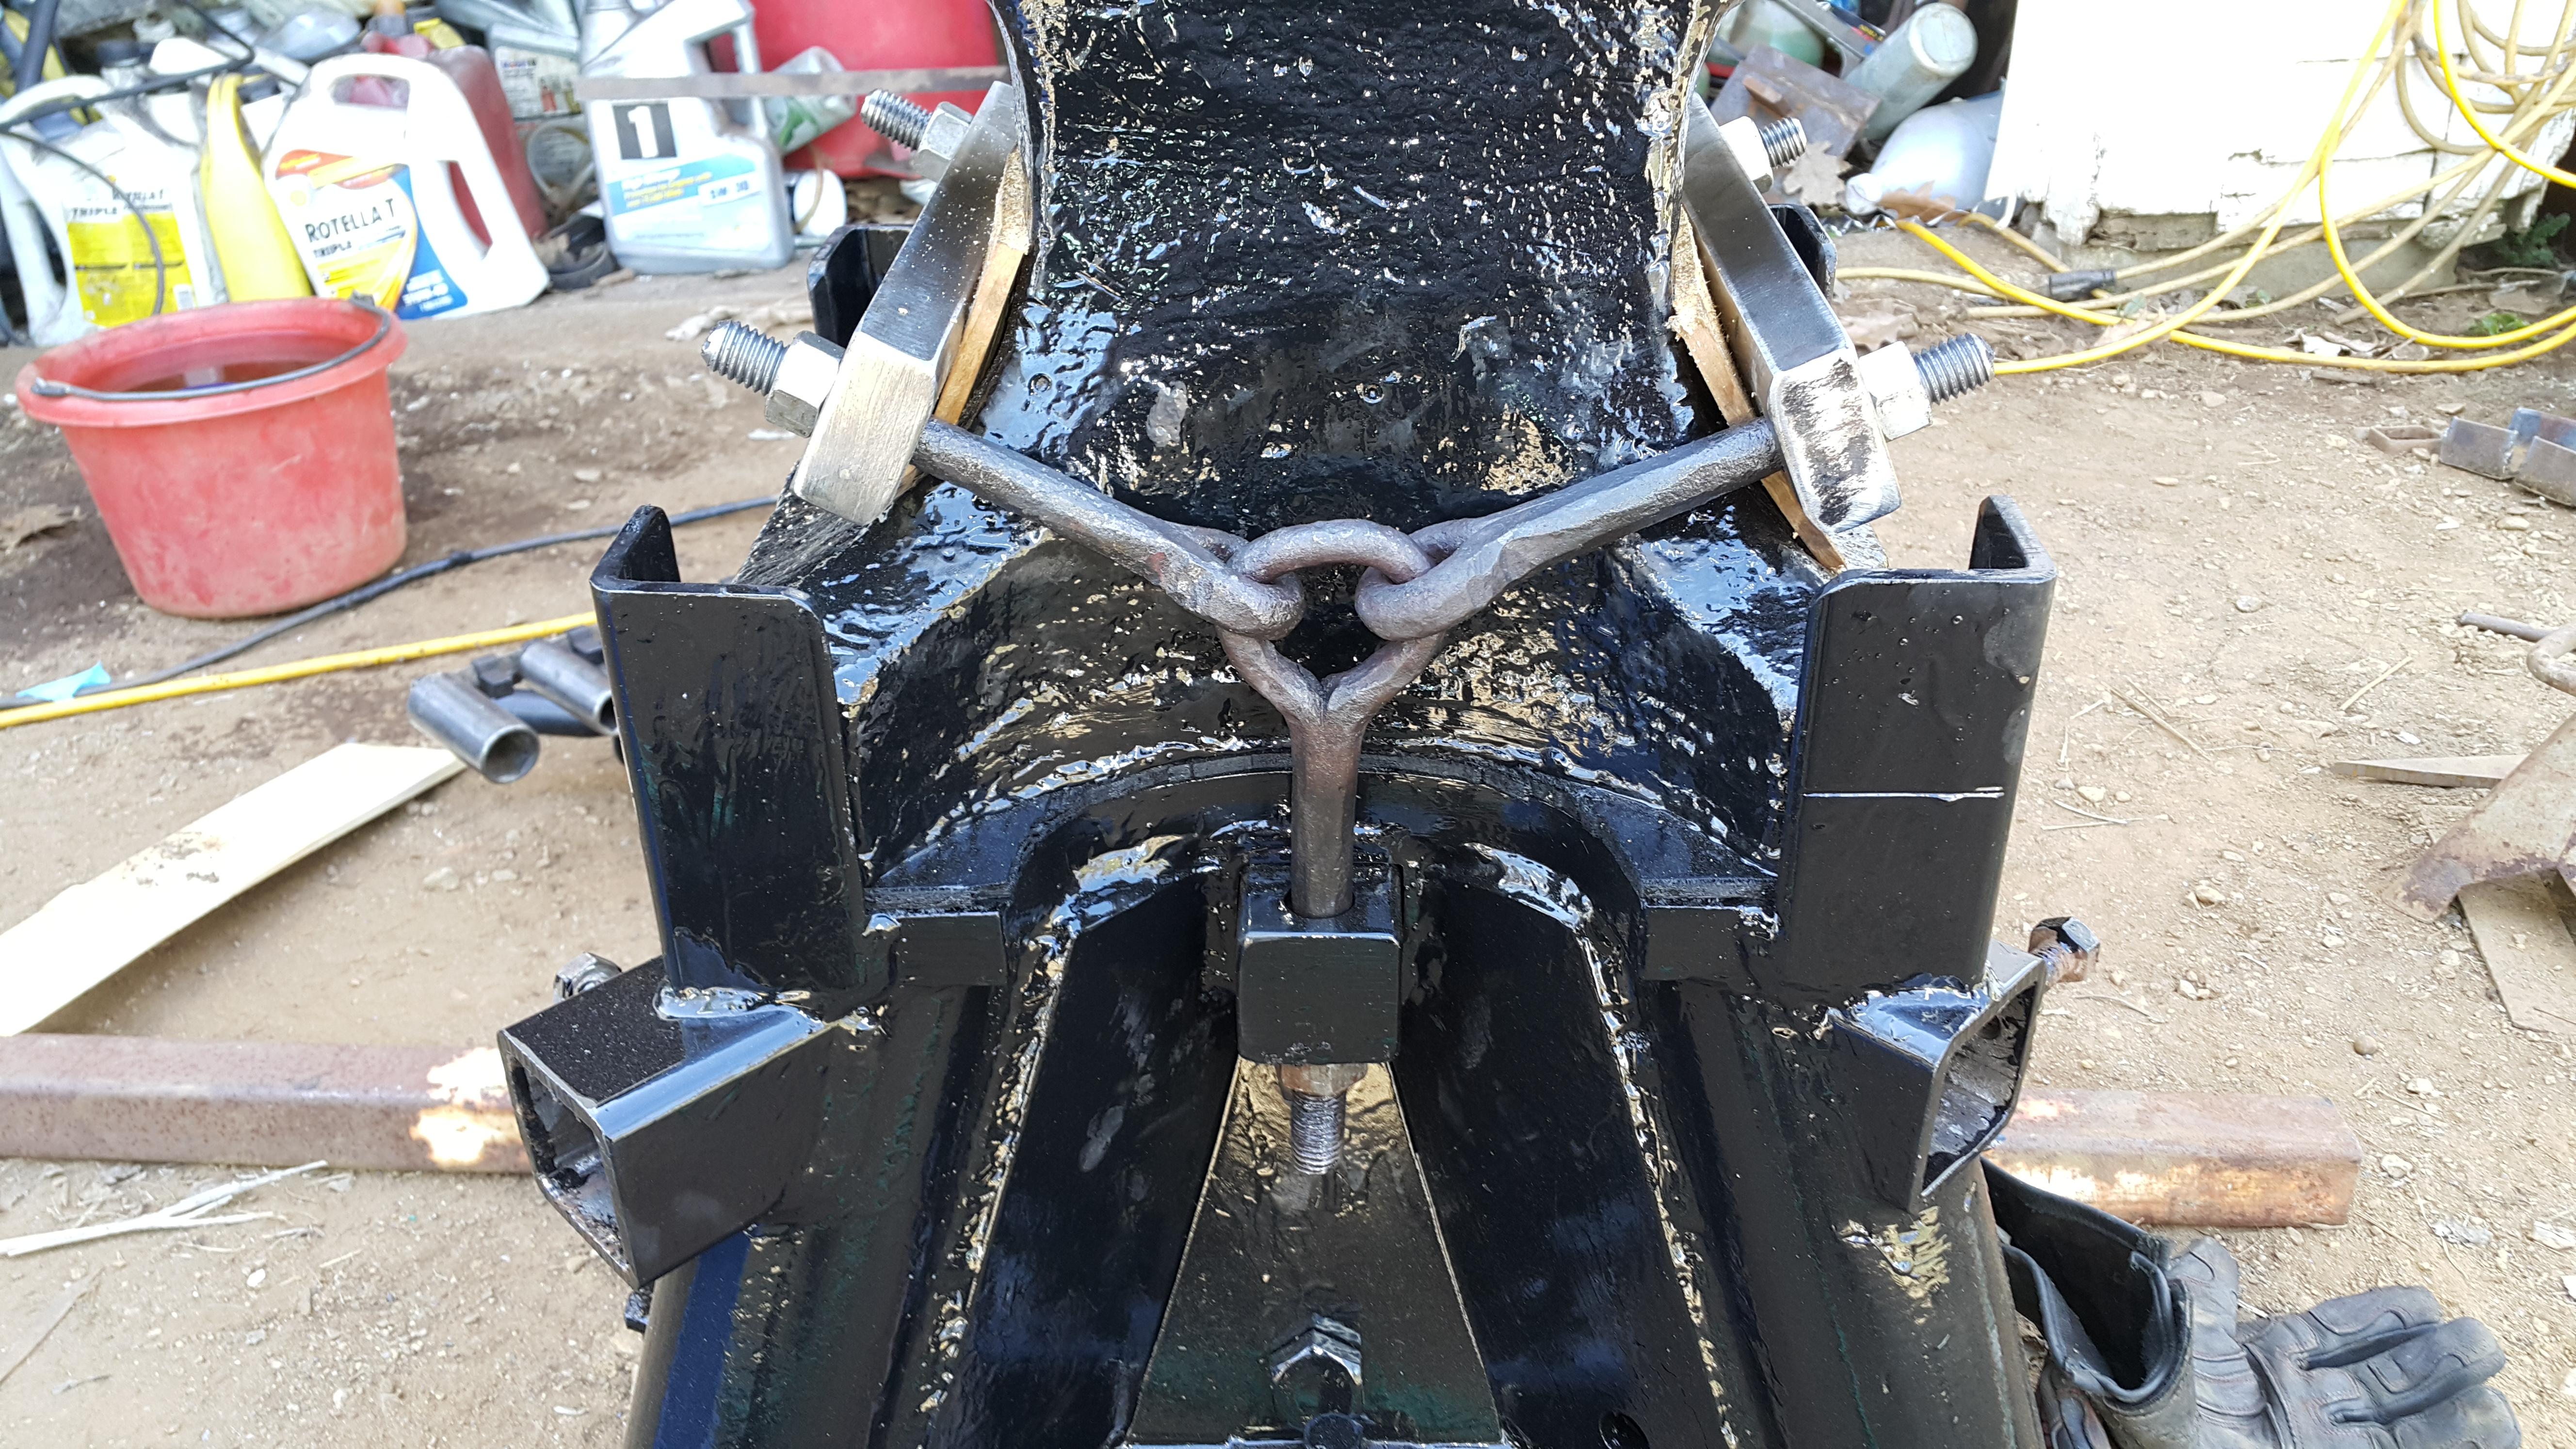
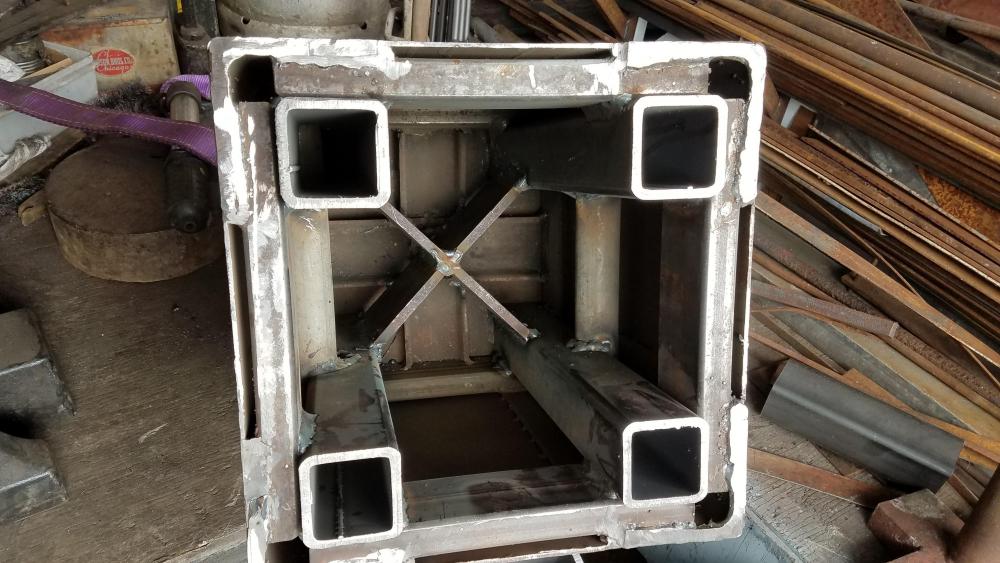
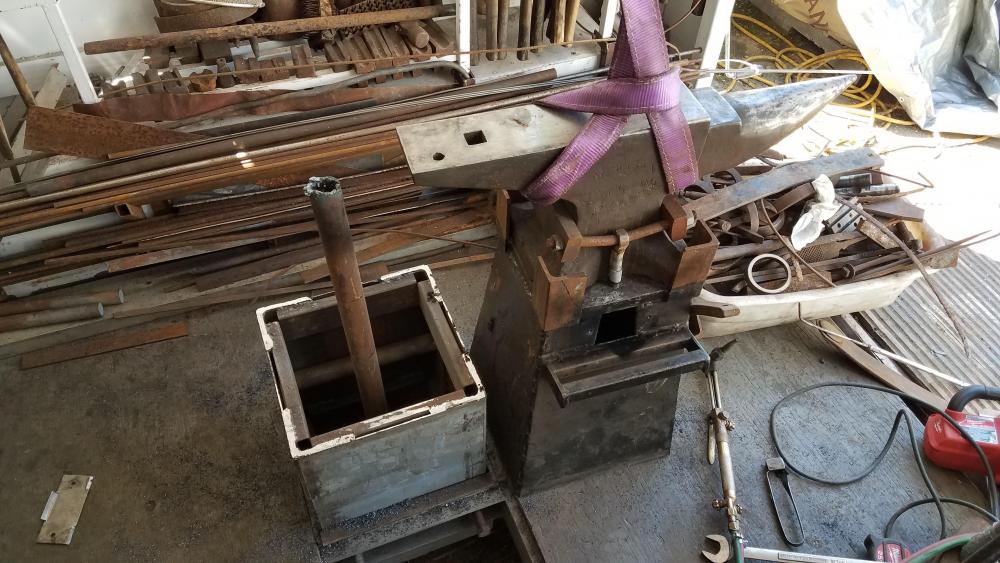
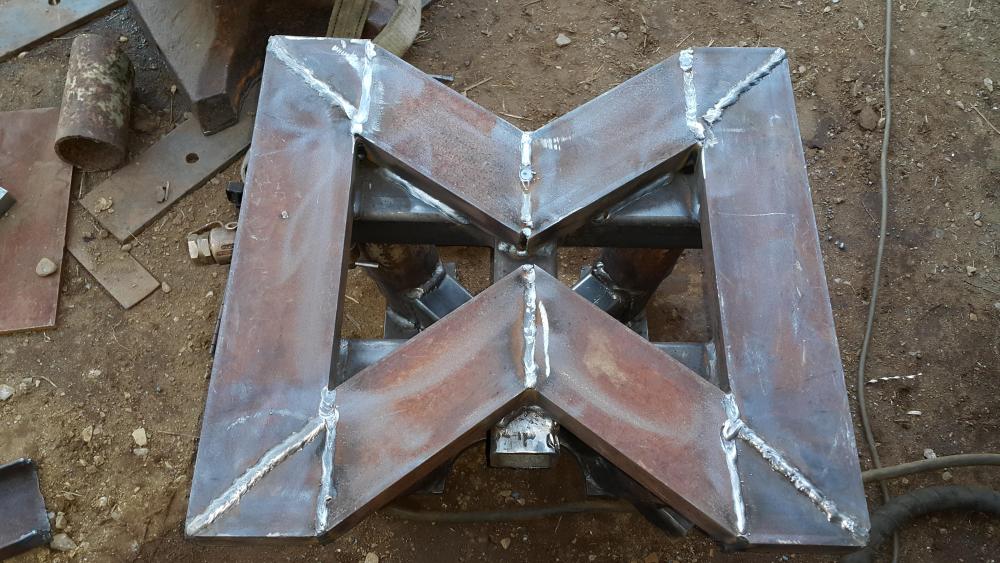
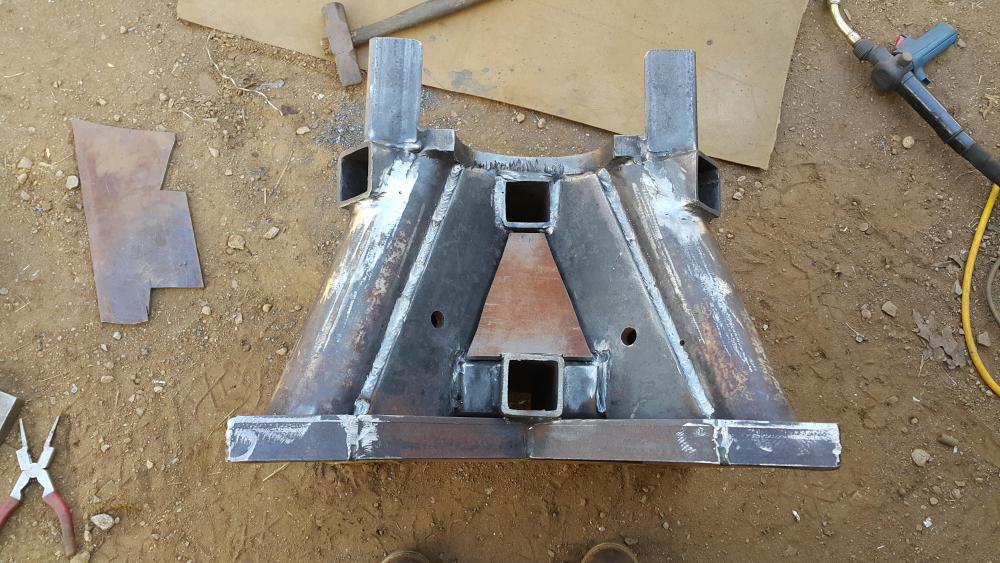
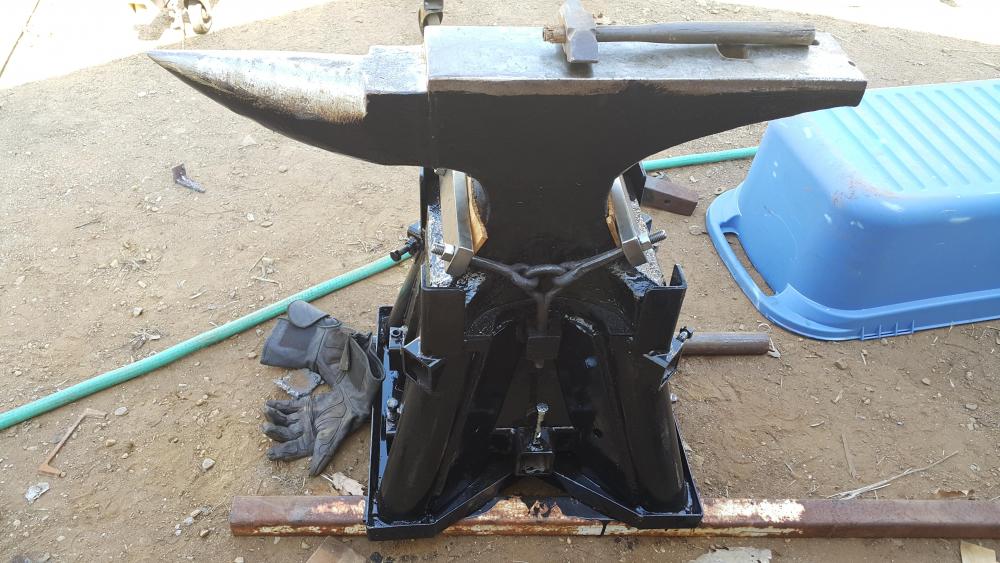
Thanks. The thimble in the trailer was designed for the original 175lbs Hay Budden. My forging skills sucked enough that I dinged it 6 times in 6 months and while not bad dings I knew better so bought the Peddinghaus.. New.. Not so bad as it's not a piece of history and as a way to show some respect to both the MFG but mostly to the guys whom remain nameless who forged that anvil. So the original stand has a really nice taper to it and I loved the looks of it.Clean and kinda oldish, kinda stump like.. I built the original stand pretty light with 5/16X4 angle and ran a 2" pipe up the center to a 1" thick plate matched to the outline of the feet. I was still working it all out. With the this stand if I worked hard on the horn the whole stand would flex and the horn would spring. I was trying to work keep the stand fairly light at this point. R and D.. when I made the stand for the Peddi it was more about functionality and rigidity with what "Base block" I all ready had so did the first redesign and completely beefed up the inside of it adding the 3/8X6" cross in the bottom adding more substantial bracing and such. but then set up to make it rigid with the 1/4" diamond plate and make it kind of snazzy. I to don't really like the straight sides. I like a cone shape. But it isn't needed in the trailer because the base block is pinched in the thimble so it does not move anywhere. Anyhow, heres a bunch of photos. It has been a Research and developement kind of thing. the Blackwidow stand does not have a flat bottom.. It has heavy channel that was welded together into the blackwidow shape then put on a hollow and I beat it with a hammer so only the very outside edge all the way around touches the cement.. I designed it not to turn while having a bending fork in the hardie hole with a 1"sq X 6' long bar torquing on it and not move. I designed it to have a hollow cavity that I can put more weight into if I want to. With the 2" Sq going through the mount and bolts and such it was close to 300lbs when finished. This particular setup is pretty neat as when it's time to move it around it is very hard to slide. But it can be rocked up onto the horn or tail section and balanced on the stand and walked around.. Well at least I could when I built it. that was a few years ago now. The Stand for the Refflinghaus in the trailer is the building blocks for another Blackwidow stand. I planned it out as i built the stand so I can just modify it when the shop is done and with only a little welding and metal work will be a refined 2nd generation blackwidow. By the way. With stands like any of ones I made. there is no reason to pack the legs with anything in less you want the extra weight. The original reason for doing it was because the fabricated stand were noisy. These stands make no extra noise and because the anvils are mounted so tightly to stand the anvils barely ring if at all. Not as quite as a Fisher but pretty quite overall. You can see the arch in the bottom of the stand in the last photo.. So, when do we get to see this Sexy lady?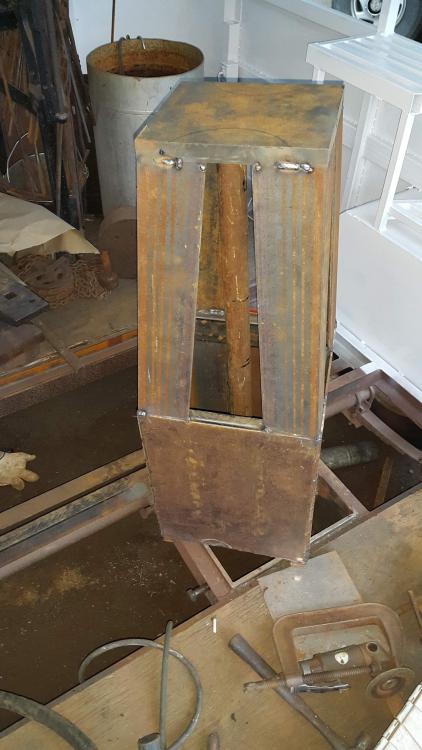


.thumb.jpg.6e2c4c3c5d8d1fccc9d4ea6e4c929530.jpg)
-
It's great seeing so many details on the shops now. Thanks for posting the great photo's all. I feel so archaic now.
-
Show me your anvil stands
jlpservicesinc replied to pkrankow's topic in Stands for Anvils, Swage Blocks, etc
Marcus. That is a great anvil and stand. What does the block weigh? -
Show me your anvil stands
jlpservicesinc replied to pkrankow's topic in Stands for Anvils, Swage Blocks, etc
Here is one of the reasons I like steel stands. It is fully adaptable is such a fast and easy way.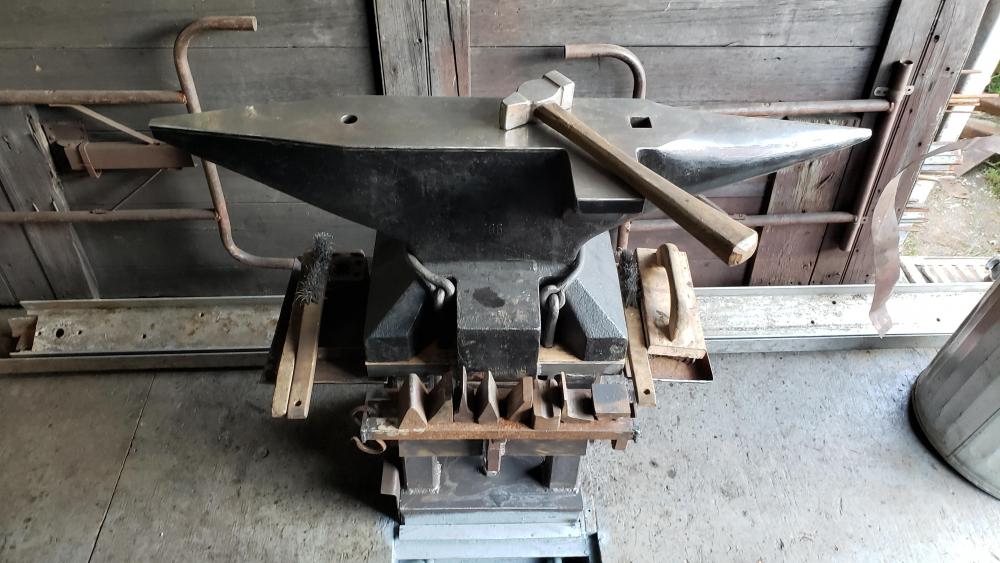
-
Show me your anvil stands
jlpservicesinc replied to pkrankow's topic in Stands for Anvils, Swage Blocks, etc
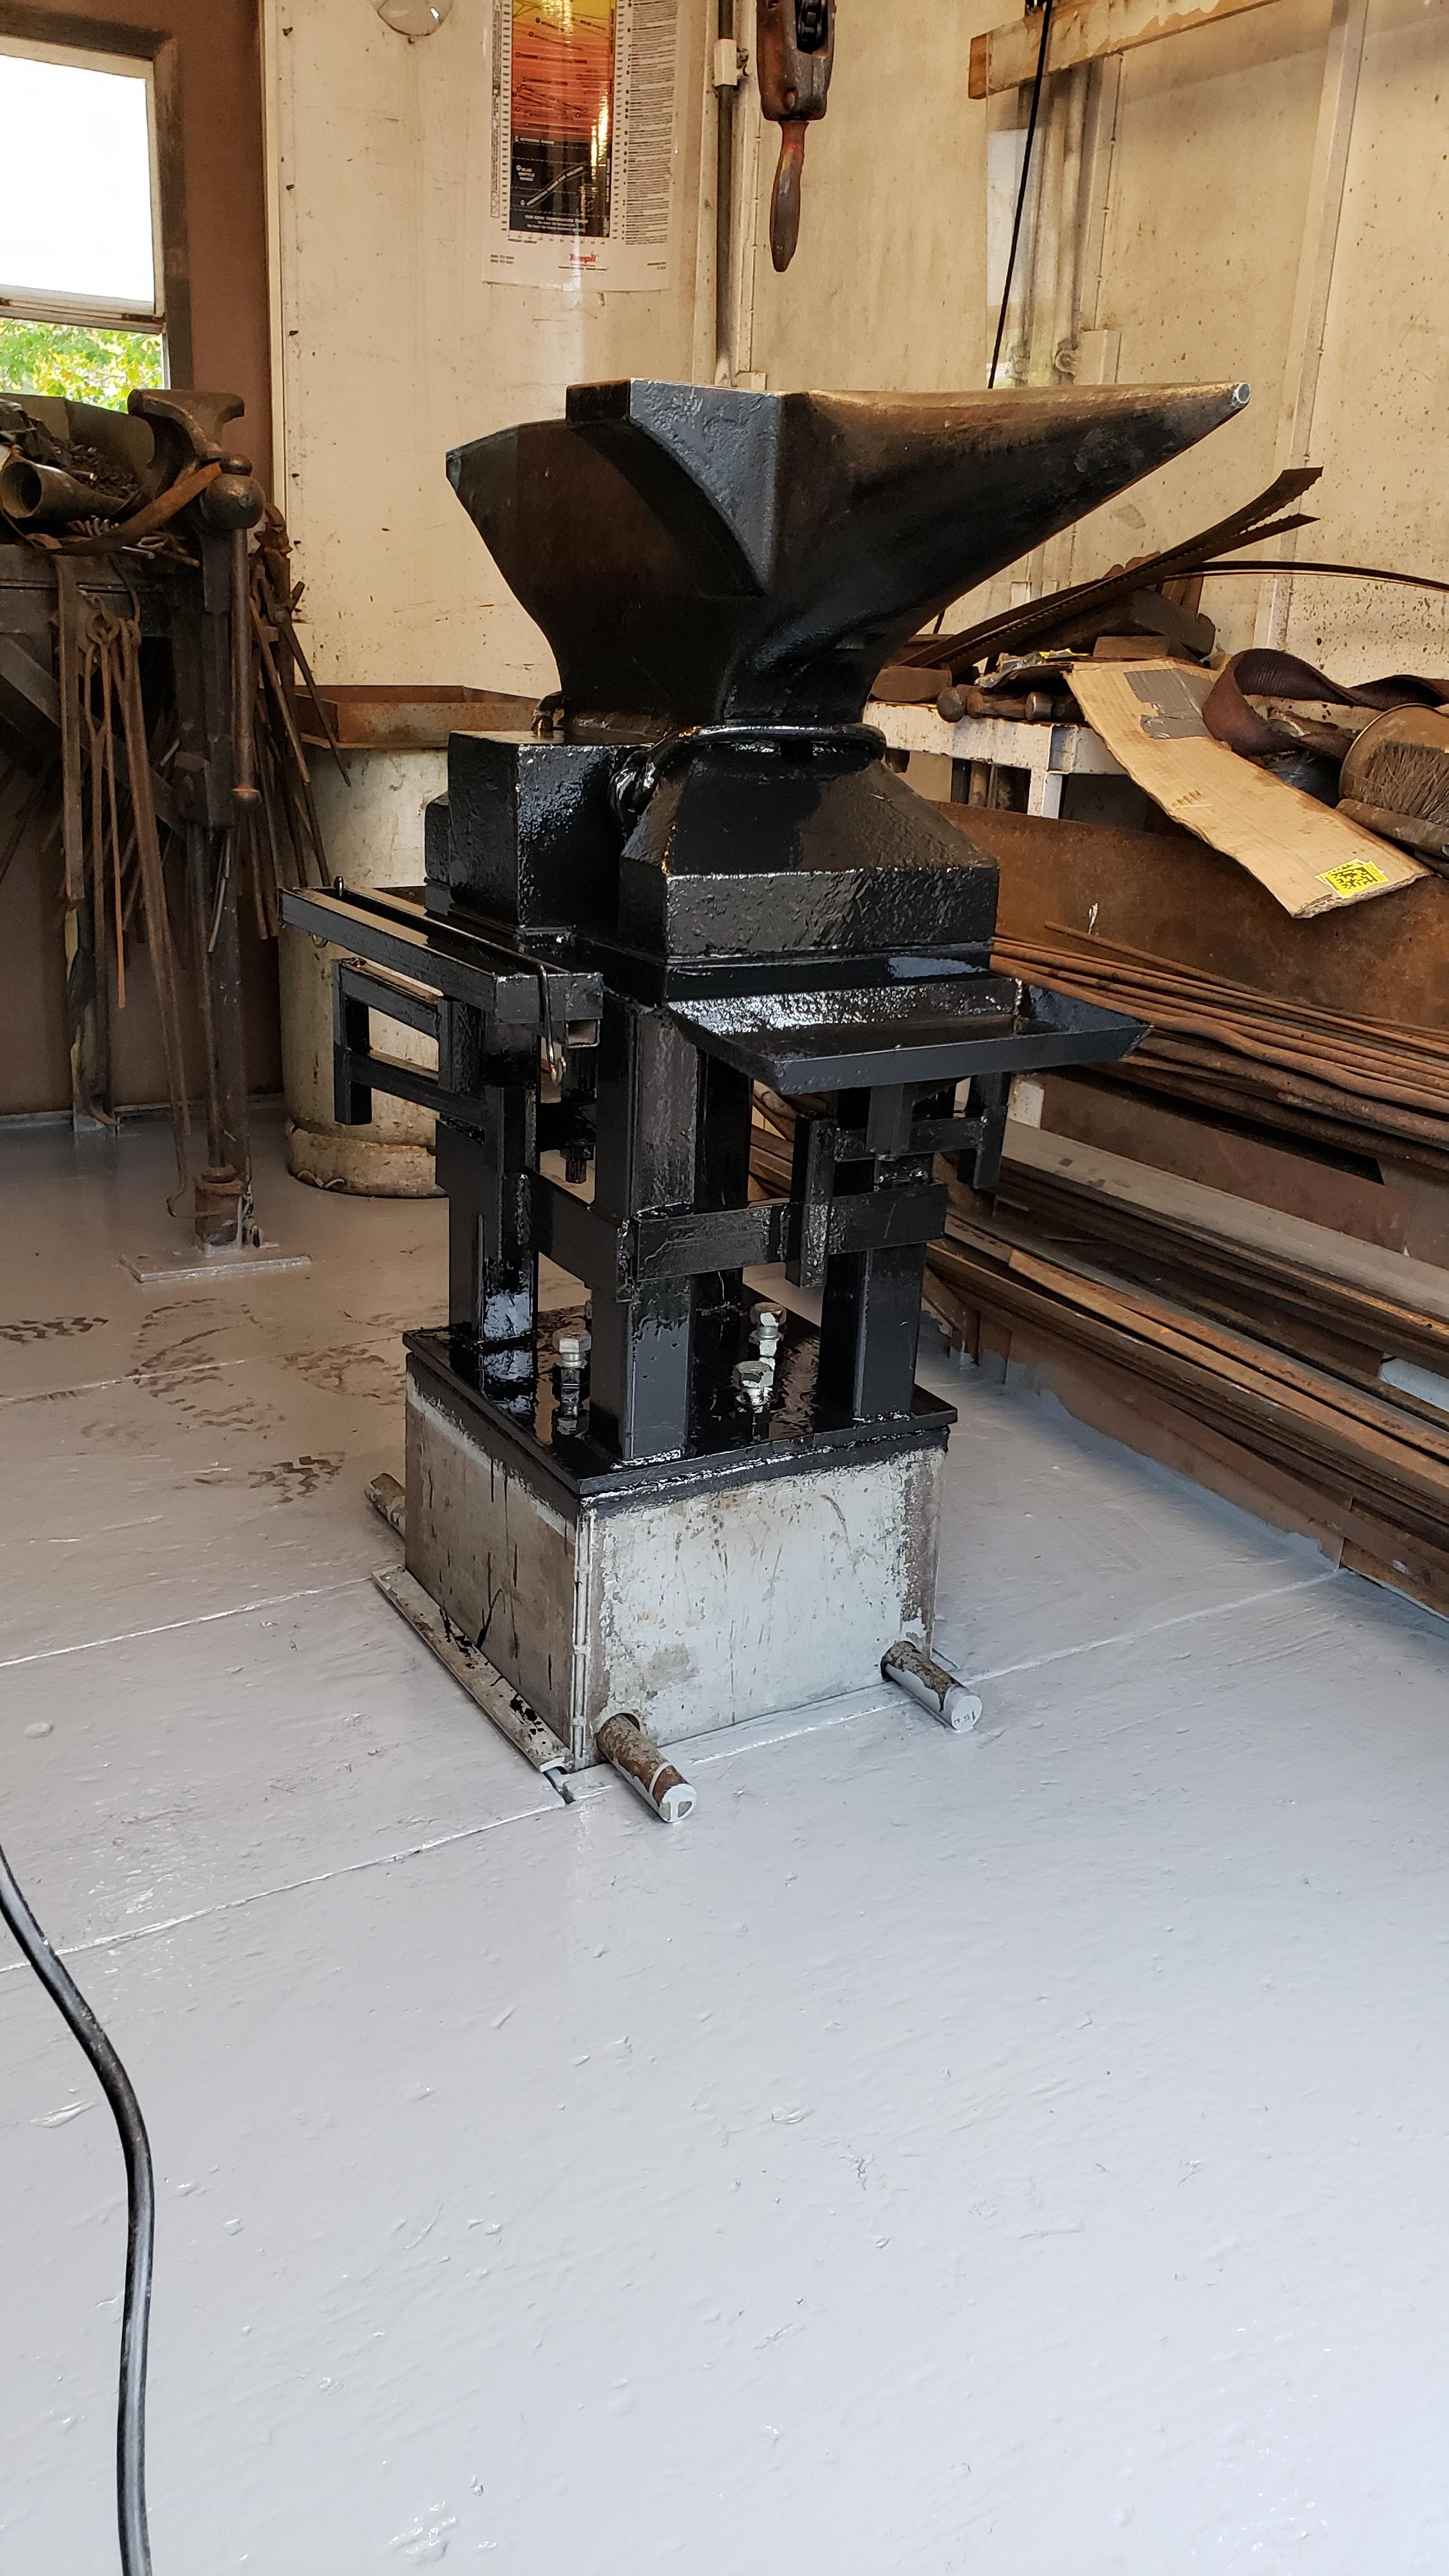
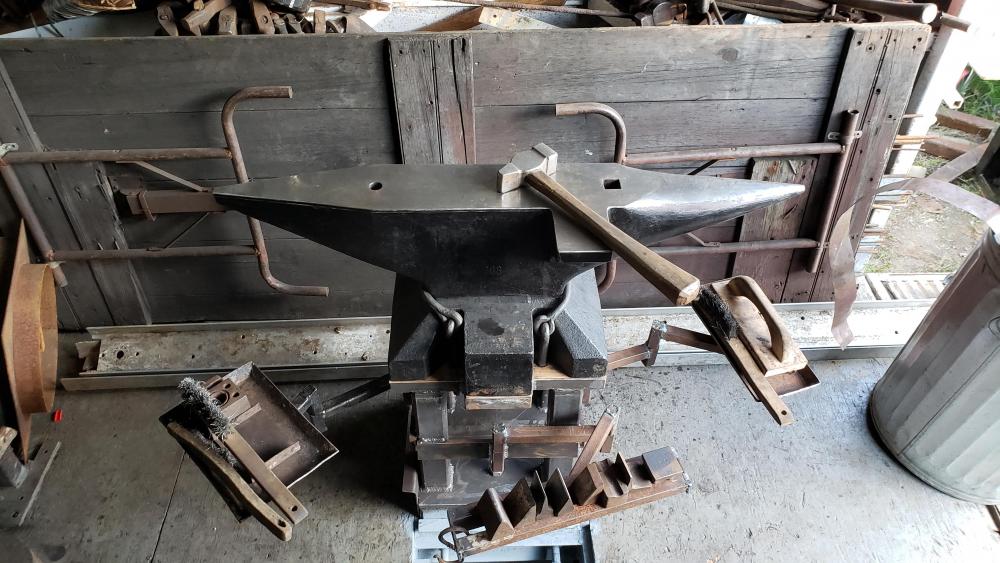
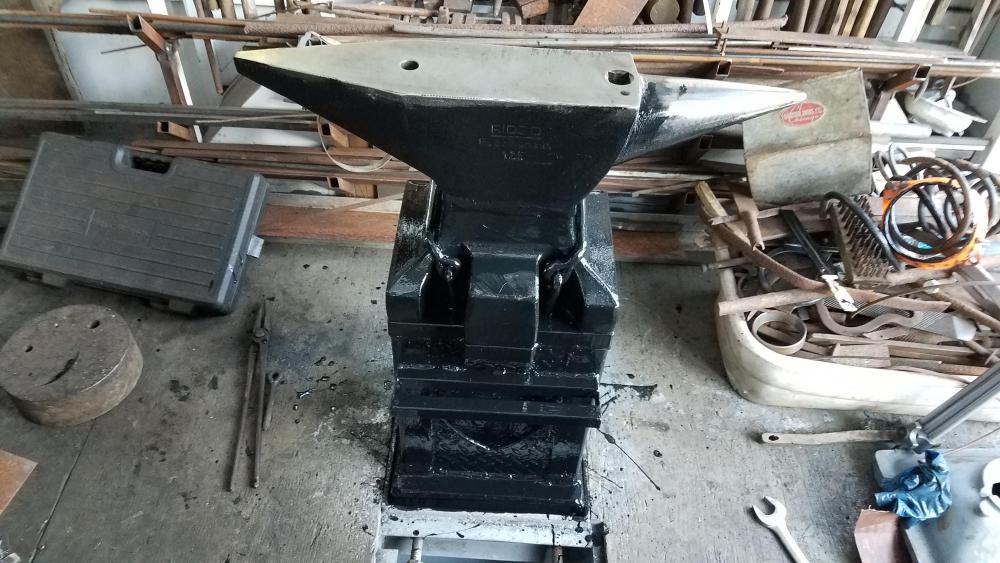
Old Crew: What you use depends a lot with what you have access to and then how much weight you want to have in the stand. I'm a fan of making the stand as heavy as I can and also having it be stable enough when using a bending fork on 1.5" square stock so the anvil and base will not move even without being bolted to the floor. First photo is 460lbs Refflinghaus on 1.25plate, 2.25X1/4"sq tube, with 1/2"X4" plate for the mounting plate. Second is a Peddinghaus 275 on 1" plate with 2.25X1/4Sq tube with 1/4" diamond plate for gussets and 1/2X4" for bottom mounting plate. Third is the Blackwidow stand holding a 368lbs Hay budden on 1" plate with 3" round pipe, 3" heavy channel, 2" sq tube for assecory shoes, and 1/2" filler plates for more weight input into the center for more mass if need be. The Peddinghaus is the anvil that is supposed to live in the demo trailer so the stand is pretty much done. The Refflinghaus anvil will be the main shop anvil and is about 1/2 done. I will add more to it and create the same Blackwidow shape with some extensions of the 4 legs that it all ready has. personally I have worked on tripod stands and farrier anvil stands and wooden stands or stumps and even with heavy anvils end up moving them all over the floor as well as nearly knocking the tripod stands over everytime I work on them, I like the metal stand like the blackwidow stand the best. It's crazy stable. here is one from Anglefire. I'd love to get one of the anvils. But not so on the stand.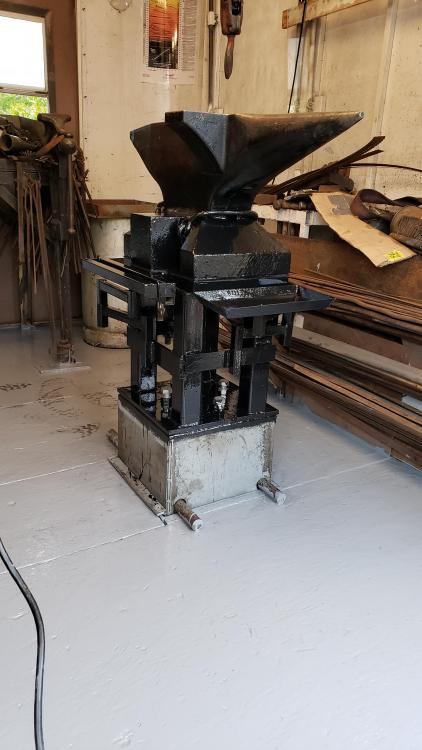


-
Great space. You filled it up nicely. Rent or buy?
-
What did you do in the shop today?
jlpservicesinc replied to Mark Ling's topic in Blacksmithing, General Discussion
Nice work Snuff's.. -
the person never came back did they?


.jpg.841593333b9dd2d3eecd5737adef2127.jpg)