jlpservicesinc
-
Posts
5,978 -
Joined
-
Last visited
Content Type
Profiles
Forums
Articles
Gallery
Downloads
Events
Everything posted by jlpservicesinc
-

What did you do in the shop today?
jlpservicesinc replied to Mark Ling's topic in Blacksmithing, General Discussion
Chad, excellent.. They will love them. -
What did you do in the shop today?
jlpservicesinc replied to Mark Ling's topic in Blacksmithing, General Discussion
Have a demo teaching event with a 15min or under demo. Students have 90mins to work on the skills shown. These are the sample pieces. Have a demo teaching event with a 15min or under demo. Students have 90mins to work on the skills shown. These are the sample pieces. Have a demo teaching event with a 15min or under demo. Students have 90mins to work on the skills shown. These are the sample pieces. Have a demo teaching event with a 15min or under demo. Students have 90mins to work on the skills shown. These are the sample pieces. The heart hook technique was copied from an unknown smith on Instagram. Was a quick blurb i thought was interesting. Forged like the side rake video then the point bent over and inserted into the centervof the opening. Brilliant. I would have never thought of it. Have a demo teaching event with a 15min or under demo. Students have 90mins to work on the skills shown. These are the sample pieces. The heart hook technique was copied from an unknown smith on Instagram. Was a quick blurb i thought was interesting. Forged like the side rake video then the point bent over and inserted into the centervof the opening. Brilliant. I would have never thought of it.
-
JLP Blacksmith Teaching Center.
jlpservicesinc replied to jlpservicesinc's topic in Building, Designing a Shop
I feel you are so right.. funny how things work.. Here is the torch in all her glory.. She is a big one and puts out a lot of Btu's. These types of torches can be used with gasoline and kerosene. Kero offers a little more btus. 20260122_183139.mp4 -
JLP Blacksmith Teaching Center.
jlpservicesinc replied to jlpservicesinc's topic in Building, Designing a Shop
Sorry Frosty won't be here to see this one!!!! Picked up a new gasoline torch.. Have never seen this brand.. Took it all apart and cleaned it. Made a new piston leather and she is ready for her first run. She is a biggin.. any information on the maker would be appreciated.

-
Jerry lives on in each and every person here whos got to know and exchange thoughts, he was very busy on the ABANA email list as well.. Super knowledgeable and one of the few that I would probe for information because of his background and interests.. Kind and stubborn, which is a unique combination, kept him coming back to the school build thread and other posts of mine.. We have had a bunch of personal messages over the years, which have been very much food for thought.. Thomas, Glenn, Frosty, as well as a few others here that I would consider friends and I have/will miss.. Blessings, hugs and love..
-
JLP Blacksmith Teaching Center.
jlpservicesinc replied to jlpservicesinc's topic in Building, Designing a Shop
Thanks Brian, Everything is falling into place.. I just have to get out to the shop and finish up some wiring. -
JLP Blacksmith Teaching Center.
jlpservicesinc replied to jlpservicesinc's topic in Building, Designing a Shop
I certainly don't disagree. As you pointed out, you apply information you already know and link this new information/results together. I don't have any real information on the use of this type of furnace. Two humans can stand in it. It's that big.. Do the same parameters exist? Sure they do.. Is it different than the gas furnaces I have used.. It sure is.. With those, you put on the gas, hit the ignitor, and turn the air up.. It's easy to see, hear, and watch the flame coming out of the lid. This is too tall with too much of a flame to stand over to look in. Once the cover is made it should allow for the flame to shoot out and see what's what. -
JLP Blacksmith Teaching Center.
jlpservicesinc replied to jlpservicesinc's topic in Building, Designing a Shop
Frosty, I'm not quite sure why you wrote what you did.. I only explained what settings I used to get it to ignite and burn very consistently. There were only a few gallons left in the pressurized fuel supply cell and I needed to move used oil to the furnace to heat the shop. So.. Tim, have you gotten your shop setup yet? Forging is a lot of fun.. It's not as hard as everyone can make it sound.. In some ways it's one of those things that seems impossible until you get your first lesson with someone who is good and can teach. These opertunities will move you forwards extremely quickly.. I have a youtube channel but many don't really like it as it's educational vs entertaining.. Your area looks beautiful.. We don't get nearly the rain you do, but we do have a lot of clay in the soil here and it's slickery.. We had a 0F morning with a high of 10F.. We just got another 7" of snow.. Thats a good size heard.. Years ago this was a farming area.. Lots of 100 to 150head.. But those days are long gone. Nearly all the dairy farms switched over to hay and no more cows.. I worked on a dairy farm as a kid.. Of course I wasn't really able to do anything.. I think I got a 25 cent piece per hour. It's funny how all things work.. Love to hear more about your equipment and shop.. If you started a thread please drop a link here.. Your welcome. -
JLP Blacksmith Teaching Center.
jlpservicesinc replied to jlpservicesinc's topic in Building, Designing a Shop
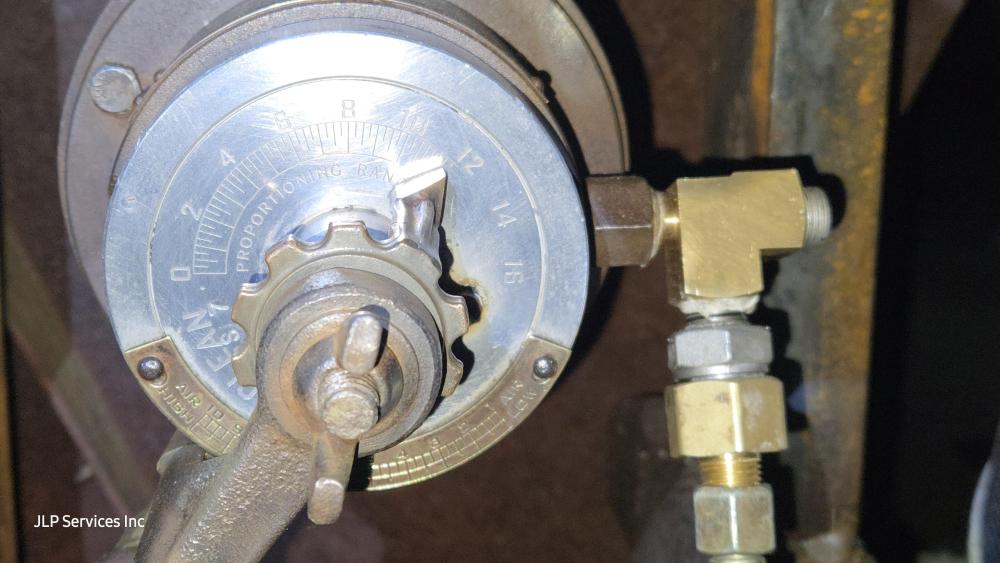
I agree, It's just nice having a starting point. When one is dealing with a very high potential for exploding ones self (gallons of raw fuel with extra air) vs a slow flow with a know start factor (less air as propane will ignite with very little flow) vs it spewing out diesel. The pinch factor of the buttocks can be a little bit tight. Having the gasoline torch to light off the fuel mixture was a good thing.. Having a high voltage ignitor seems like even a better idea unless it's raining out. From what i can tell, about 5 air set on the burner at 16ozi and about a setting of 14 on the fuel discharge rate to start. 25psi oil feed pressure to filter and 2psi to burner via metering valve. I was not concerned with explosion since its such a large opening at the top. But I did not want to create a volcano either. I have been talking with a guy who has experience with casting iron and has been at it awhile. Many people today use a syphon burner like used in a reguarl waste oil burner and add secondary air with a blower of some sort. From what I can see this roots blower will put out 385cfm at 1750 rpms at 4psi.. This means the burner only uses 2psi air max at full burn 9.7gph.. . I know thses figures because I have gauges installed to take notes and see the differences. Used oil and heating fuels like a lazy flame with lyon manes.. It's kind of hard to explain I have read about it in the NORA book.. National Oil research association. They have a great book.. with this its still a research type of deal. I switched the pressure tank over to waste oil and currently have no way to preheat the used oil to feed the burner. During the summer it's not a big deal, but it was 2F this morning and it's been 10F all day.. That really thickens up the oil. they recommend a value of 90SSu index, Stil figuring out.. Sound and site are great ways to go. The a cad cell to do the final dial in.. Adds some safety as when with a flame out. -
JLP Blacksmith Teaching Center.
jlpservicesinc replied to jlpservicesinc's topic in Building, Designing a Shop
Howdy Tim,. Merry Christmas to you and yours.. I'm a summer bug.. Winters brrrrr.. The school is so nice and warm though.. What a treat. We range here in winter from -14F to about 25F. We are in the snow belt here.. Last few years it's been all over the place. Thanks for following along... What a crazy ride it's been. Furnace is pretty much done for this winter... I'd like to give it one more firing to really cook it up.. I'll use waste oil and #2 fuel oil for the next burn. Everything works pretty well now.. I'll change the oil in the blower on this next burn and make it ready for storage. I don't consider myself naturally curious nor skilled.. I was lucky enough to find blacksmithing early enough (8yrs old) and this and this alone helped me to desire to read technical manuals, how to repair manuals, etc, etc. After stringing together all the manuals I have read it's just a matter of adding on the new variables and applying what is already there. Every new piece of what ever involves finding a factory workshop manual (preferably a hard copy) and reading it. Usually cover to cover just to help understand it better. I feel betrayed when I can't find information. Tim your dinner get together sounds fantastic. I'm planning on building a fast cross country gyroplane.. So maybe sometime in the future you might have me in the neighborhood.. Merry Christmas to you all.. Hugs to boot. Frosty, I have stoic charts, just not a good way to measure air to fuel.. I have wide band 02 meteres. I also have CAD cells.. I've gained a lot of experience with running the waste oil burner furnace in the school.. Judging flame color, size, shape, etc. It's really amazing that when I first setup the furnace it had only 1 air gauge and 1 pressure gauge. I have since added a pressure gauge at the metering pump and what a difference this makes to see how inconsistent the oil is.. Every new batch of oil has to be fiddled with.. The other thing is, it goes thru a sock filter then a centrifuge.. The centrifuge adds some air to the oil so this also has to be accounted for.. Anyhow, every batch of oil has to be dialed in. Between the cad cell, and pressure out of the metering pump and then pressure at the burner nozzle it's pretty easy to dial in. I could not find any adjustment instructions for the Hauck 781 burner. Just basic input/output info. Thanks. -
JLP Blacksmith Teaching Center.
jlpservicesinc replied to jlpservicesinc's topic in Building, Designing a Shop
Frosty the inside is round, though the body of it is square. Should I find a 220gallon propane tank and line that one? Or should I fill the corners with soft bricks then fill it with refractory? I know I'll have to line it with spikes to hold the refractory. I'm ok getting rid of the metal lip on top.. With the heat it just distorts anyhow, Have you seen Windy Hill Foundries videos? I fired it up again today to burn off more moisture before putting it away for the winter.. I fired it for 30min. The pressure tank with about 25lbs air in it keeps the 2psi #2 fuel oil feeding really nicely.. Very steady. I still have a lot to learn.. I did try to adjust the air/fuel and this lead to the burn going out.. I have not figured out the ratio.. It does seem that the oil feed likes to be about 12-16 on the burner and about 50% on air feed. this is with about 16Oz air and 2lbs fuel pressure. I have been using my old gasoline torch to light the furnace off but really thinking about setting up a transformer with long electrodes.. The burner does not like to be pushed all the way into the burner port.. It needs some clearance to venturi some air in.. -
JLP Blacksmith Teaching Center.
jlpservicesinc replied to jlpservicesinc's topic in Building, Designing a Shop
The original lid was missing.. In reality I'm not sure it ever had a proper lid.. I think it might have had a piece of plate to cover the opening. I'm pretty sure this was used to separate steel from alum.. In other words they would stuff a transmission in it melt off the alum and dump the steel parts on the back side. Sounds good, thanks. -
JLP Blacksmith Teaching Center.
jlpservicesinc replied to jlpservicesinc's topic in Building, Designing a Shop
Frosty, I have some scrap alum to melt.. I know it needs a lid.. I'm open to suggestions you have in regards to getting this more functional. This video is from when I cut back some on the burner.. An earlier video has flames spiraling out of the top. 20251223_165741.mp4
-
JLP Blacksmith Teaching Center.
jlpservicesinc replied to jlpservicesinc's topic in Building, Designing a Shop
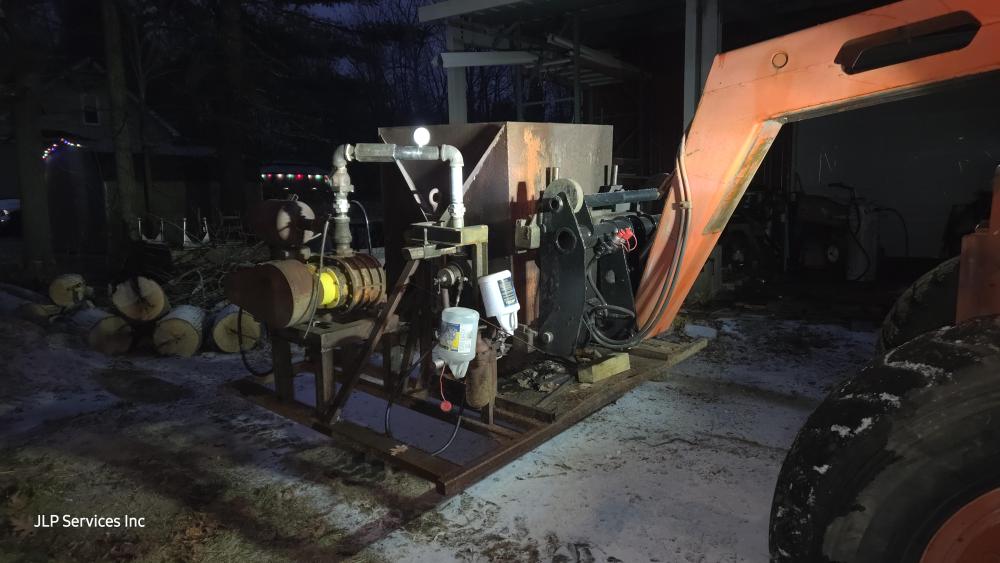
So, today I was able to fire the furnace.. I started it under the front apron/shed roof and the next thing it was raining. All the snow started melting. I was running it on #2 fuel oil.. I was surprised how easily it started once I was able to find the correct air flow. This was running on 2psi of fuel flow at the nozzle. I was feeding 25psi to the oil filter and using a metering valve to bring it down to 2. 20251223_165539.mp4 I was able to grind out inside to smooth out the rough spots like planned. after the burn I decided to clean up the air gauge and oil feed rate.. was tough to read while it was firing. I need to install and air control rod.. This is the last piece of the puzzle this year.
-
JLP Blacksmith Teaching Center.
jlpservicesinc replied to jlpservicesinc's topic in Building, Designing a Shop
Bull, the book looks like a good read. All thats left is to clear the throat of the burner where the bricks lean in, put the tilt motor on and do a test firing. I lined the bottom with sand.. The top will need to have a cover made with a vent hole to keep the heat in and give it a longer duration in the furnace itself. I need to move onto other projects so nearly all the work was to move it in a direction of preservation. I'll make a cover for it next spring/summer.. For the time being I'll move it out to the back 40, flip the furnace upside down to keep water out/ from freezing. I'll reach out to Windy Hill foundry and see what he's using for refractory and go from there.. I do know at some point I'll have to drill holes thru the body to install rods to secure the refractory in.. Currently it looks like they put a lip of 1/4" steel on top to keep all the bricks and such from falling out when tilted. -
JLP Blacksmith Teaching Center.
jlpservicesinc replied to jlpservicesinc's topic in Building, Designing a Shop
Motor gear box cleaned and reassembled. Painted. Some protection for the loose wires that were sticking out and now should be good for a few more years of service. Taking care of things ,takes care of you. These old equipment are worth it.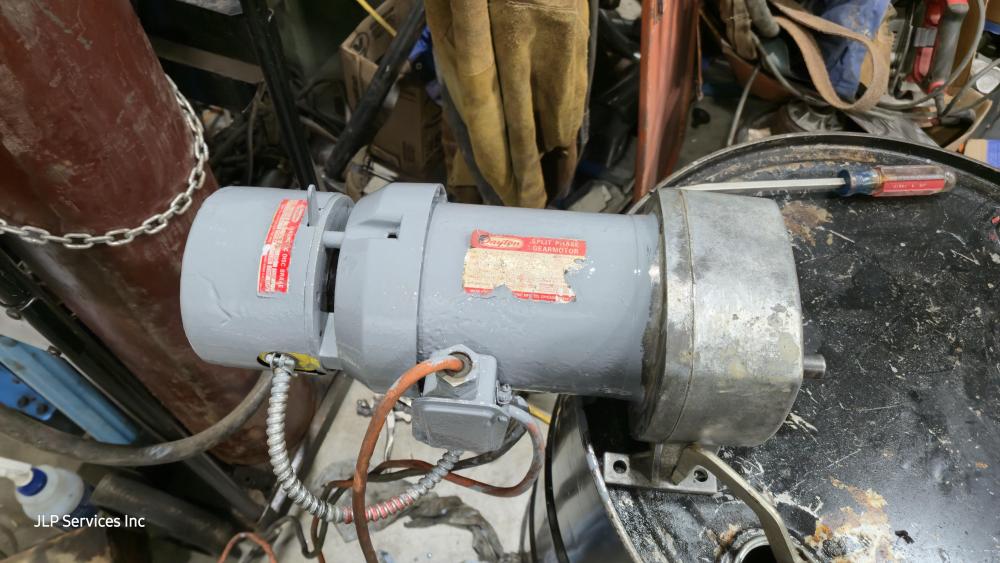
-
JLP Blacksmith Teaching Center.
jlpservicesinc replied to jlpservicesinc's topic in Building, Designing a Shop
Since i have dug in deep I figured I might as well dig into the gear tilt motor.. The inside is like brand new. I can only guess that the assembly is in such shabby looking condition due to being outside on the ground for a lot of years. The casing had a tiny hole in the top from corrosion so clean it and filled it with epoxy. The output shaft ball bearing is pretty noisy but it spins freely and it's such a low rpm deal I'll leave it for now. The oil seal was in good shape. I cleaned all the bearings and packed them with grease for assembly and I'll fill the case with Redline heavy weight shock proof. I have cleaned the brake on the end and painted the assembly the same safety yellow as the blower cover. The motor outside casing had a rust hole in the top so clean the rust and filled this with epoxy as well. I priced out new gear motor and brake assembly and it's near 2000.00. For fyi the blower is a 7" case with 5" gears and a 3" output/intake..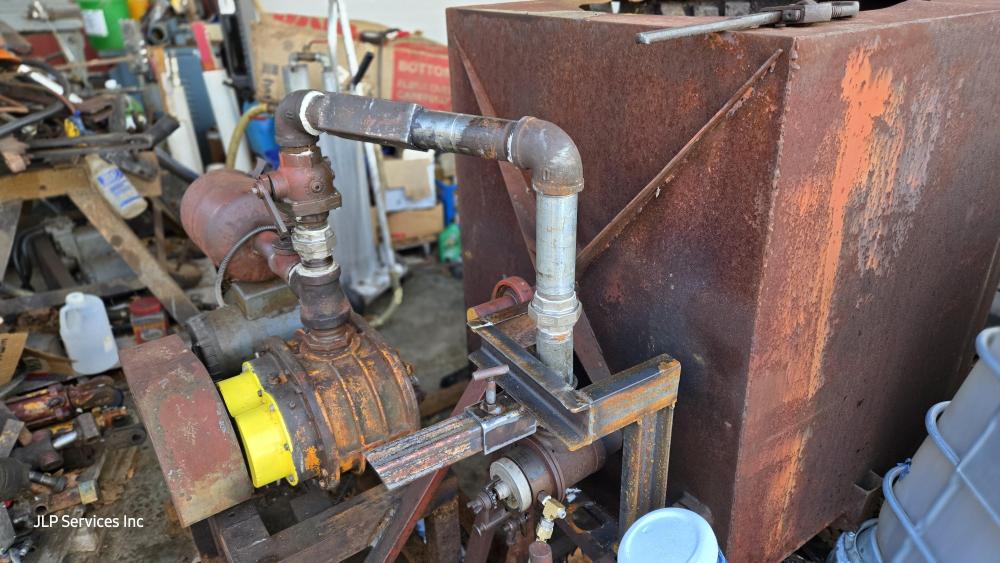

-
JLP Blacksmith Teaching Center.
jlpservicesinc replied to jlpservicesinc's topic in Building, Designing a Shop
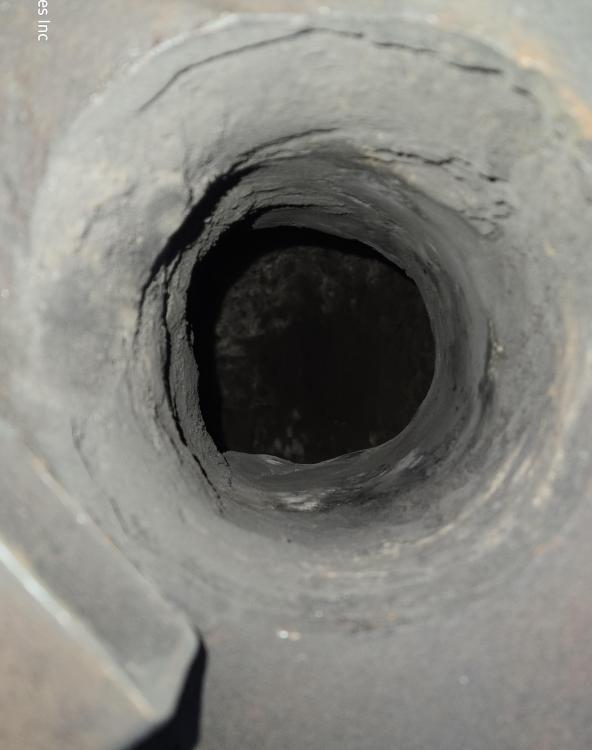
For those that were questioning the square to round interface.
-
JLP Blacksmith Teaching Center.
jlpservicesinc replied to jlpservicesinc's topic in Building, Designing a Shop
Bull, staging is what I was referencing as camping on the side of your climb. Spending the night.. Sometimes it can be a cache of stuff put there to move on more.. Frosty. Ah the good ol days.. There was certainly something about it being more raw and interesting. On that.. Over the last few days I figured out the last part of the puzzle on the furnace. That is a telesccoping air pipe section so I can move the burner without detaching all the plumbing. As for weather.. I all I have to do is play in it.. Snow adds challenges that don't happen any other time of the year.. Iceburg running, swimming under the ice, as Bull pointed out ice climbing.. Lotta good times on the ice. Different kind of skill building.. 20251217_185512.mp4 -
JLP Blacksmith Teaching Center.
jlpservicesinc replied to jlpservicesinc's topic in Building, Designing a Shop
Bull, love the Deuce.. All those movies were fun.. I was thinking about your ice climbing and climbing exploits while out doing the horses. Your climbing sounds amazing. I never got involved with ice climbing.. Though I was always fascinated by it. Did you ever do any staged climbing? OCD yikes.. I get it, It's like the furnace.. or this whole project. I stay very focused until I run into an obstacle to finishing it. Then I shift focus to something else.. If I'm lucky and parts are needed I'm able to find something else on the same project to focus on while waiting for parts. and the parts arrive before switching projects. If I switch projects and the parts arrive, I just put them on the shelf, till I get back to it. My largest problem now is getting started. Once started I'll go till I run into something. I am not a journey person, persay.. I am very much goal and finish-line-oriented. When people say slow down and smell the flowers, I'm like I don't have time for that.. Just getter done. There is plenty of time for smelling flowers later. I'm more of a putterer now vs outright machine. Well at least when working on things.. I still love to forge metal and see exactly how the metal moves with each hit. I have hundreds of projects currently and have to confess it's a little to much.. Frosty, how long ago was that? sounds like you had it figured out.. Did you learn this from others or pick up on things as you went? Farrier work is about expectations and the failure of those expectations. People have very little concern or thoughts to what will make the job easier/safer for the farrier. They also expect you to train their horse for behaviors they themselves create. I have multiple stories every week of such things.. Every new customer has the same problems. Every new customer. So what this means is, one needs to arrive at the job with no pre-thoughts as to what might or might not take place. Simply be in the moment at every instant and try to keep the person from creating more problems till the job is over. Oftentimes, I will hold the horses myself while working on them, again because people can be the problem. Why I mention this is simply because there is no real way to prepare for what will be. Physical output goes from 0% to 110% or more in a matter of seconds.. Not minutes.. seconds. I used to wear a heart rate monitor, and my normal beats are in the 50-60 range while doing normal stuff.. With horses, it spikes up to 140-150 bpm within a few seconds of work. Perfect opportunity for a heart attack or stroke.. Thursday, I had 3 stops.. about 30minutes from each other.. 2 horses at each stop. First horses the owners are great and the horses were in and dry but it was kind of a colder raw day so one of the horses (a mustang) was antzy.. Means more time and phyiscal output. The donky stood perfectly. 2nd stop the horses were outside in the snow (which now means I have to clean each hoof of snow/ice before I can work. And if they figit and pull their hoof back, it will mean having to clean it again to get rid of the snow and ice. (wear and tear).. This and the fact that with each hoof the rasp becomes less effective.. This type of thing is outside one's control.. onto the last job I dressed to start cold knowing I will get hot but its a short visit.. Maybe 20minutes total.. Wind was blowing about 25-35 on a high spot.. First horse was perfect.. 8minutes done.. 2nd horse took about 15min to catch.. 10min to trim. that time standing there waiting for the person to catch the horse was brutal. Not only did I start to sweat from the first horse.. Now I'm being buffeted by cold breeze that was not planned for. Again, it's complexity that is beyond control.. As is all of it. People are complicated, and this trickle-down effect rests sorely on the farrier. -
I have only found 1 off the shelf handle that was good. My double face heller welding hammer. When i go out to conferences or teaching, I get asked about my hammers and handles. Its pretty easy to show why I ended up with the design as people can actually hold them and feel the difference. People use a lot of pressure to squeeze the handle of an oval shape. They also squeeze it to keep the length correct. They also squeeze it to keep the face or peen centered with each strike. Very few people actually hit with the center of the hammer face unless its rounded to much for clean work (less rounding hammers) With a square face hammer that's very flat you can feel when your not hitting in the center. When im cutting on the hardie I use the heel of the hammer as it doesn't jump as much and its impact is usually greater vs the center. Again based on my hammer designs. I really find people are slow to change ideas and such. In a period of 2 years I tried every handle shape as well as hammer face designs I could find. I was 17.
-
JLP Blacksmith Teaching Center.
jlpservicesinc replied to jlpservicesinc's topic in Building, Designing a Shop
Bull you are so right. Mindset. The right mindset is so important. You mentioning mindset really brings everything full circle. My mantra " you can do it". As ive gotten older and I feel this is one of those getting older things is this " do I want to do this"... This question seems to present itself more and more. I know I can still do x,y,z.. but do I really want to? Funniest thing is once I make the decision to do it I have a great time and feel better for it. -
JLP Blacksmith Teaching Center.
jlpservicesinc replied to jlpservicesinc's topic in Building, Designing a Shop
Just to be the odd person out.. During winter if you sweat you are dead.. So the way I have learned to deal with it is this. Start cold and stay cold.. In between jobs take off all outerwear and roll down all the windows to evaporate any sweat, then if there is time roll the windows up and turn the heat on to at least take the chill off. This is what is done between every stop. Rinse and repeat up to 4 or 5 times a day. 4-5days a week.. Then add in everything is wet, icy and slippery.. Rasps clogg with frozed shaved hoof starting on the first hoof. If you have 4 horse at 1 stop, by the time you get to the last horse even with cleaning rasps with a wire brush your working 4X harder or more for each rasp stroke that is less effective. There is a difference between having choices,, cut wood for 10min and then relax by the fire. Sadly this is not the case.. It's production work and when you expect a 15lb foot and it turns into a 1000lb foot because the wind blew.. -
JLP Blacksmith Teaching Center.
jlpservicesinc replied to jlpservicesinc's topic in Building, Designing a Shop
The schools is basically east to west facing door wise. The front shed dormer is the cool side so often in the summer heat you just open the door and there is a cooler breeze that comes thru.. With that solid fuel forges I hope will be the mainstay so there is not the crazy heat soak of gas forges. I also have a huge fan.. The building is R38 roof and R29 walls so it resists heat or cold from outside. I was thinking about maybe some sort of geothermal cooling unit when I'm finally sorted an have time. I planned on it so have a couple of spots open in the frost wall for such things. Like everything, it's time, money or both.. What I have learned from this project is it's all 3 on a regular basis.. they just swap positions at will. I've been sidelined with the furnace project but feeling the need to get back onto the electrical. Hauling around a 6awg extension cord 50ft long is getting old.. especially when you need the compressor, welder and metal lathe at the same time. -
JLP Blacksmith Teaching Center.
jlpservicesinc replied to jlpservicesinc's topic in Building, Designing a Shop
Bull, Rojo, Bull, I still love to go and play in it.. hiking, snow shoeing, climbing, Ice burging, etc, etc.. The farrier work is the worse part.. Normal farrier work is abusive, but you add in the cold temps, moisture, friction, below freezing tools and with each hoof it all just becomes less and less effienceint in an all ready heavy physically demanding job. People talk about blacksmithing as being hard, hot, heavy work.. They have no clue to what that really is.. Sure you can have predictable heavy, but what if at any given moment that load went from 15lbs to 1000lbs in an instant.. Swinging a hammer is easy work.. someone just needs to take their time and work up to it. Simply the snow compounds everything.. I don't care if it's -14f with no snow.. add moisture.. argh.. Rojo, when I was skinny, the heat did not bother me.. I put on 20lbs over the last 18yrs and now I sweat a lot more. I love all the seasons. Forced into working in any condition outside the human norms has a tendency to take it's toll.. My scuba diving season was from just after turkey day till april. So all of it was winter scuba diving. I ended up getting severe cold induced injury in my hands from all the exposure.. I literally have no blood flow in my hands when they get cold.. Couple that with all the injuries my left ring finger gets cold, my right ring finger and pointer gets cold. People say to me when I'm working that I love the summers heat and humidity.. LOL.. Not really, I mean yes but it's because I just think about how hard winters are and it makes it all the better.. NOt really.. but it helps keep me in my right mind. It's interesting to me "what happens from childhood, to teen ager, to adult".. Society dictates a certain behavior (school, responsibilities, ownership, etc, etc).. I've seen plenty of kids grow up now and it's intersting to me how it all takes place..