BartW
-
Posts
281 -
Joined
-
Last visited
Content Type
Profiles
Forums
Articles
Gallery
Downloads
Events
Everything posted by BartW
-
Well it isn't mine, and given it's not my property the owners can do with it pretty much what they want. It's just sad. Especially when It might have been usefull for someone searching for an anvil.
-
I've seen the old workshops of Dave Budd (youtube) and Pavel Rihacek (pictures), both of which didn't have electricity (landline; Dave had a generator if I recall correctly) nor running water. Pavel used to use only a drill as electrical tooling. But instead of trying to recycle the heat to power a blower; how about a gasforge with venturi burners ? You could even make a ceramic chip forge with the burners below, if you want it feel like a solid fuel forge. Doesn't use electricity, but you don't need to recycle the heat either because you use the venturi effect of the gas burners. mvg; Bart
-
In the safety courses at work they explained some european standards about grinding disks. In the 115 mm (4,5 inch) and up grinding disks, they all should have at least a one sided metal washer. And this washer should go against the machine, regardless of on which side the sticker is. This "guideline" is mandatory to get your disks sold in the EU. For the heavier disks, they should have metal on both sides (but sometimes they are only one sided too) and on one side the rotation direction should be indicated. This is a guideline which isn't mandatory. So the baseline is; metal washer against the machine. At least so they tell the welders and mechanics :-) greetz; Bart
-
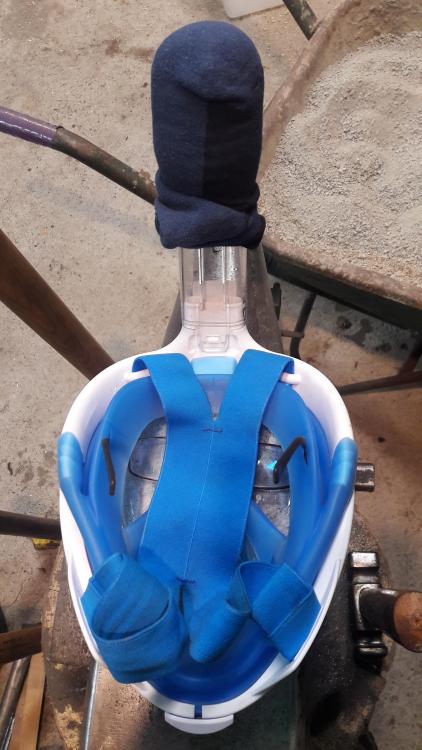
Low budget full face glasses integrated dust mask
BartW replied to BartW's topic in Personal Protection Equipment
I've got three of these, and a bunch of 3M, dräger, deltaplus respirators and various safety glasses for courses. Everybody always starts with just safety glasses, for the forging. when the grinding starts; people add a respirator. by the time they are done - grinding wood for the handles mostly - the three diving masks are in a waiting queue... as in; people having used them; will wait untill one becomes free to finish grinding their knife handle. Adding those peel off things might actually be a good idea; I'll probably try that given that the front of this snorkling mask is almost completely flat. -
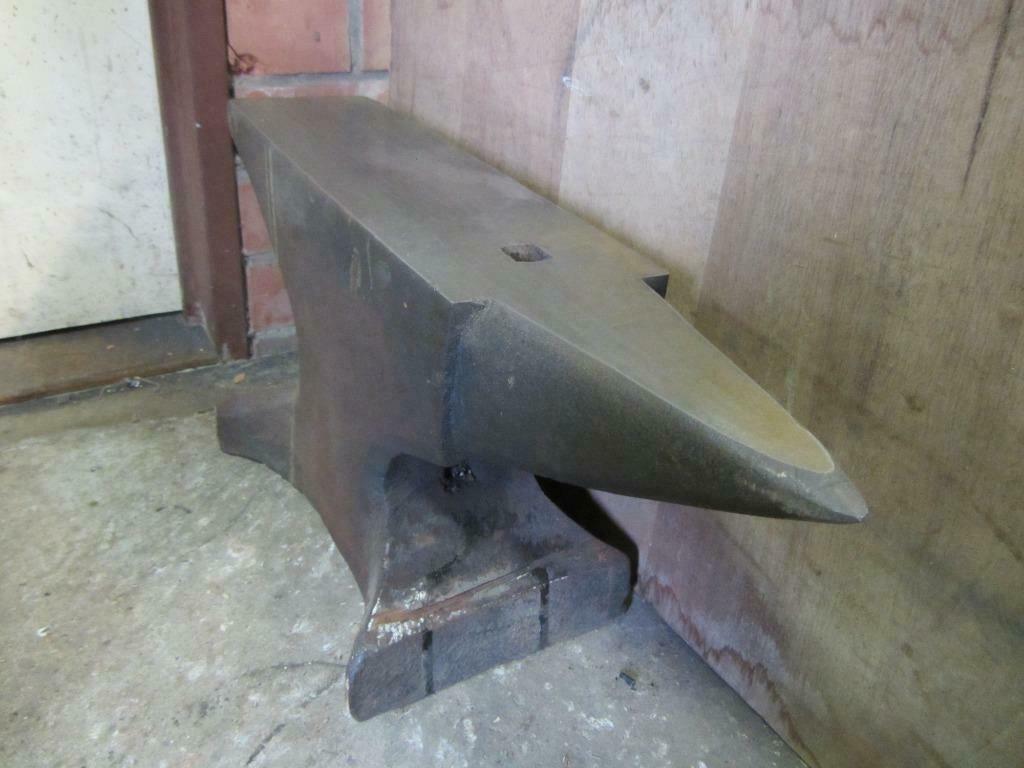
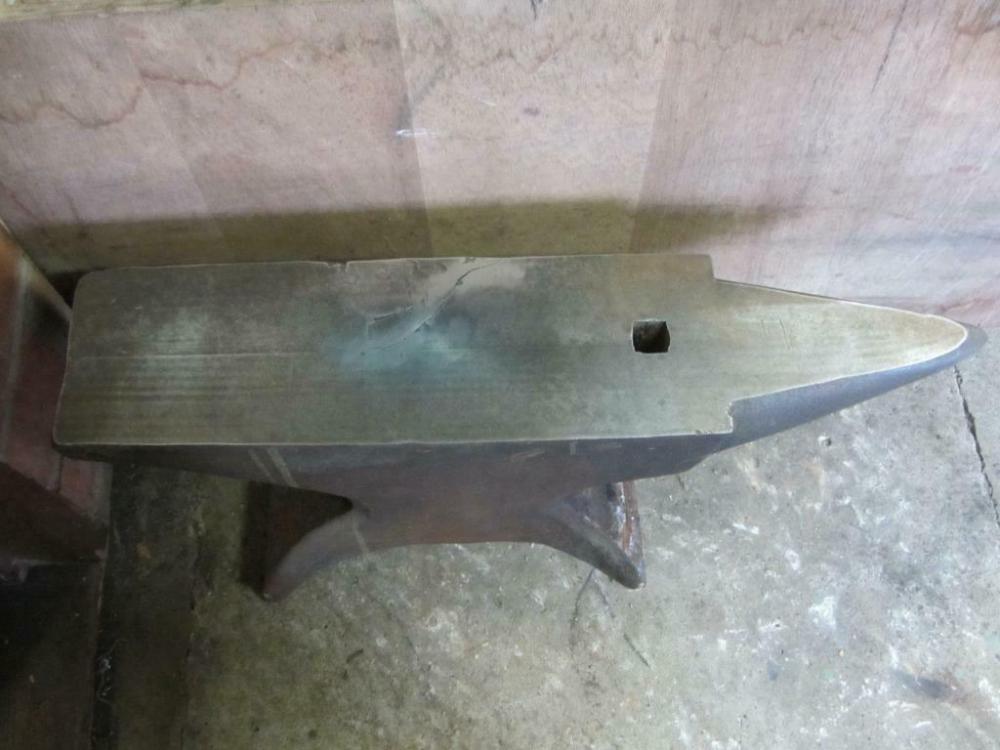
Hello All; Well; after I've shed some tears, I've found a destroyed anvil. I was looking for anvils as usual; but I let this one go ... as it's essentially destroyed. But there's a lesson here: NEVER mill the face of an anvil. Even grinding is nope (except in case where you know what you're doing). The pics below say enough. You can even see where base comes peeking through the top plate. Also very strange horn shape. Probably someone who found this (good) anvil; but wanted to sell it for 'new', and had access to a large mill; so he probably milled off most of the top plate. Sad ...

-
Low budget full face glasses integrated dust mask
BartW replied to BartW's topic in Personal Protection Equipment
If there is a moderator for this thread; I just saw there's a seperate section for personalprotection equipement, maybe this thread is better suited there ? -
Hello; Well; after the 15th person in my shop told me something along these lines : "Well that is a great idea, mind if I do that too in my shop?" I figured maybe it's time to make some pics and share it with the world. You all (probably) know those cheap full face snorkeling masks, I noticed that these almost never fogged up, and have a reasonably thick polycarbonate "window" with verrrrrry large silicone seals. They cost about 20€, you can find them from various sellers; but I've seen them first at Decathlon. They are scratch and blow resistant as the CE safety mark requires this in the European union. With 2 verry small cuts in the silicone; you can add prescription glasses to them, I've yet to find any other full face mask that accommodates glasses for a reasonable price. The snorkel on top of your head can be covered with cloth like socs (washed and without holes ), this one has a nylon stretch thing and 2 layers of cotton soc. This WILL not protect you against toxic vapours like paint; chemicals, burning zinc ... but it will protect you against dust. And since I do a lot of grinding on knives and handles; I've been sick from grinding cocobolo once, not a pleasant experience. I've been looking out for something to protect my lungs and face, but be compatible with my glasses. Best I found so far was the combination of a respirator and safety glasses. But the safety glasses either protected well and fogged up in minutes; or didn't protect enough against sparks. So I tried to install an old pair of shop glasses in this snorkeling mask; and that worked really well; comfortable and all; and doesn't fog up. Then I added a couple of layers of cloth over the air intake; and lo and behold; not even the finest dust irritates any more. Other people have tried too; and almost everybody is really fond of these. Granted, it makes you look like an alien However; it protects VERY well against things trying to hit your face (even a belt breaking). You can even add a industrial filter cartridge on the snorkel with some creative duc-tape. I also thing because you're getting air 10 inch above your head; you're having less dust anyway. And you can add as many layers of various filtering/cloth as you like. It costs only 20 €; so when the face shield is too pitted from sparks; I'll simply buy a new one. I've also found that this thing is better when looking down; because there are no filtering cartridges in the way. I store it in a bag to keep it dust free above my grinder. Pictures : Give it a try I'd say; but keep in mind this is a snorkeling mask; NOT a professional respirator.

-
hmmmm good idea.. need to look into that. Thanks.
-
Here's my most used vise + stand. The counterweight is removable should you want to move the vise around; those iron discs are 60 pounds each I don't know why, but this vise with two legs takes pounding and heavy forging without any issue. In fact, I clamped the head of a traintrack in it, and used it as backup anvil for straightening small things, worked like a charm. mvg; Bart
-
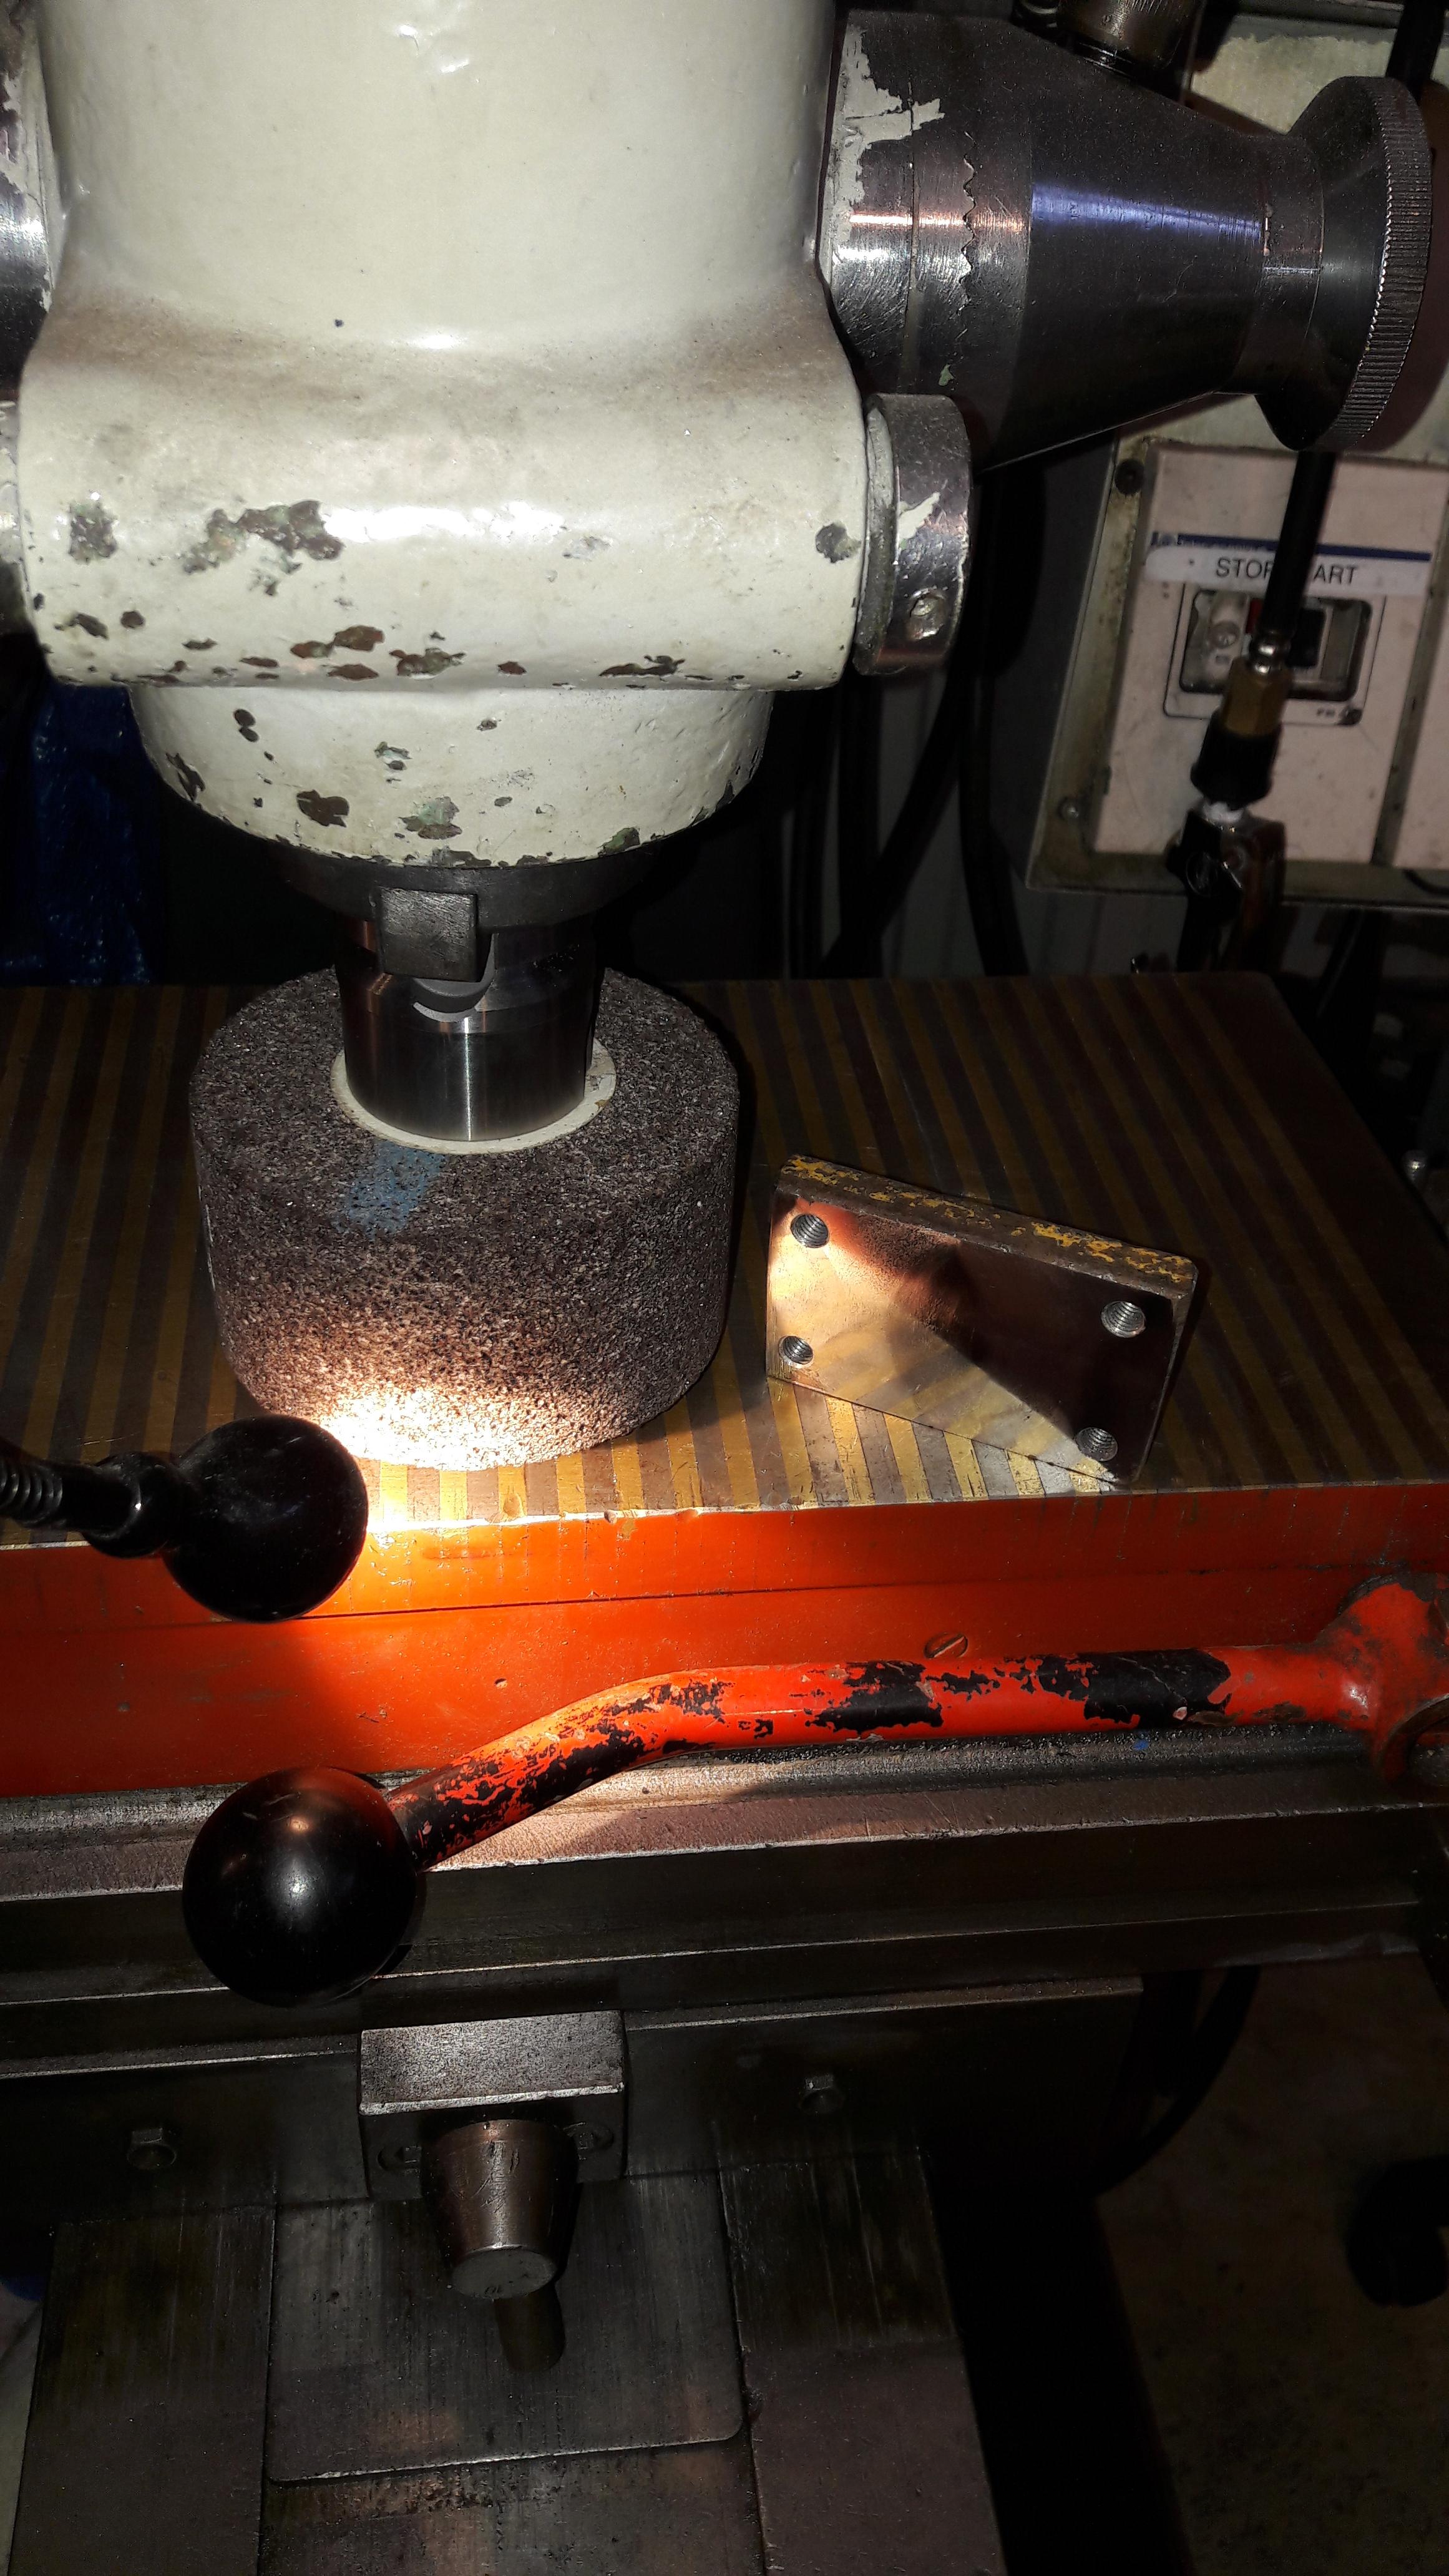
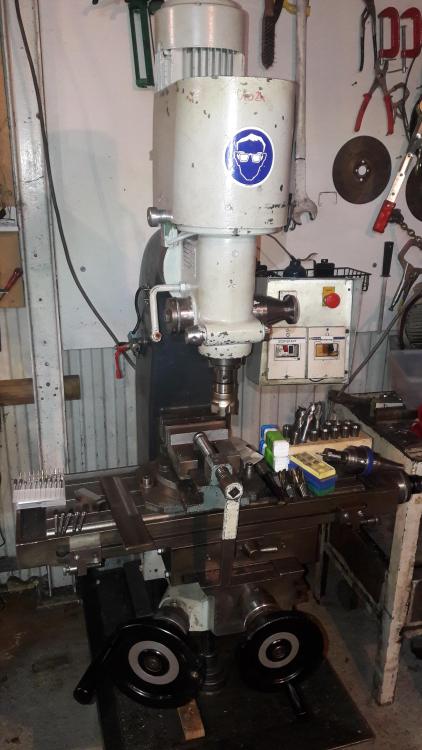
I've found another use of my mill Surface grinding. It's a 240grit stone; at 2k rpm, it delivers an almost mirror finish ; like shown on the block of iron. Check out how it reflects the magnetic chuck. The 240 grit stone isn't "fast", but it delivers precision.

-
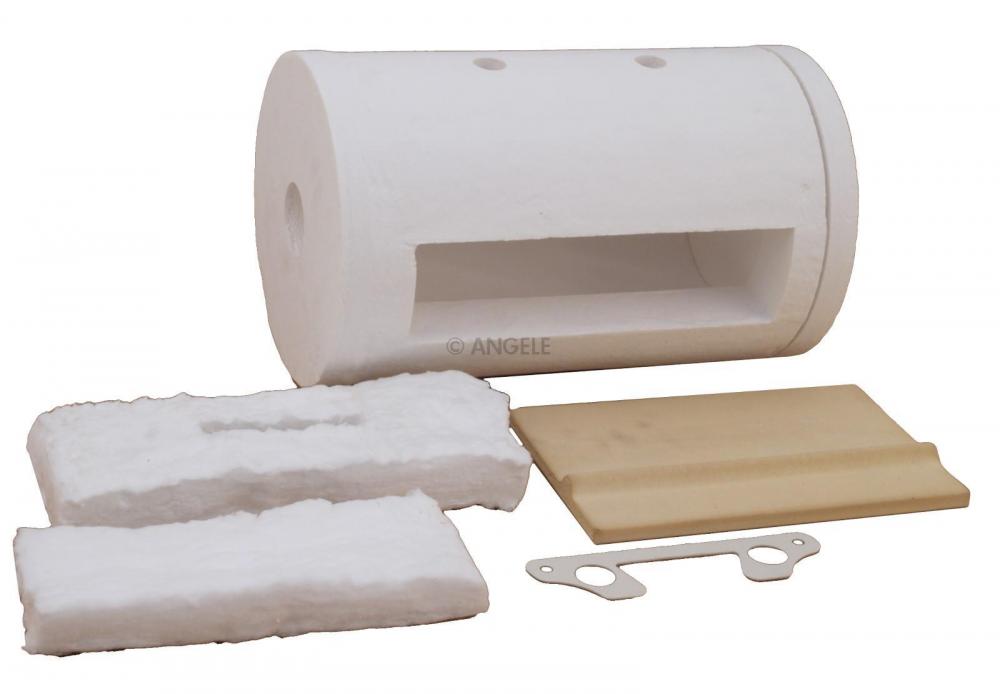
Hello; i've seen a couple of these proforges in operation; and the door shouldn't be RED ! This is a set of interior lining of that thing.
-
Thank you Frosty for that excellent idea. Thze Germans have their own version of Dykem blue; which is called Diamant anreis fluid. It's a scribing fluid like dykem; but non reflective. It's thinner than water; and gets in even the tiny cracks. Works well.
-
Preferred Refractories for Chamber vs Ribbon Burner
BartW replied to Daguy's topic in Insulation and Refractories
I think I know why this issue is US-only. Previously, I went to a metal recycling firm, and asked for a couple of bag of repair cement for melting crucibles; and they gave me about 100 kilos of Intoval Repa SP10 (google that ) . I used it for pretty much everything that involved high heats - firepots, lining of gasforges ... and of course, making other smiths happy as trading stock. Then I ran out of the stuff, and the metal recycling firm doesn't deal with private people anymore. So no more good stuff. After talking to a fellow German smith, he told me he just orders it off amazon, so he didn't understand the problem. Just search for "Rath Carat D 1800". Rath Carath technical specs So that's what I do these days, I buy it in bags of 25 kilo of amazon. It's essentially the same stuff; 98 % Al-oxide fine powder, and some stuff to hold it together. Mix it with water, and you can make smooth porcelain like white surfaces that handle 1700°C (3000° F) easily. Also, if mixed correctly, it will stick to almost any metal. Once dry, it's more like grainy white ceramic; and acts like that too. Doesn't even crack is you pour water on it while it's red hot -
That is nice. I'd like that on my tombstone
-
Hello; Quenched in mineral fast oil; which makes it WAY too hard for a hammer (around HRC 64); cleaned up both faces; then heated up the drift to bright red; and let it sit untill both clean side were going to purples - I was aiming for HRC50 - 55 . Checking for cracks is always good, I found a couple in the tip. I always grind a piece clean with coarse grits; Then I dunk it in cooling liquid (water with oil), then warm it up slowly. Cracks will become visible due to the boiling black goo :-) I've always found this method somewhat "improvised"; does anyone have a better way to check for cracks ?

-
I've made hammers from them; works fairly well.
-
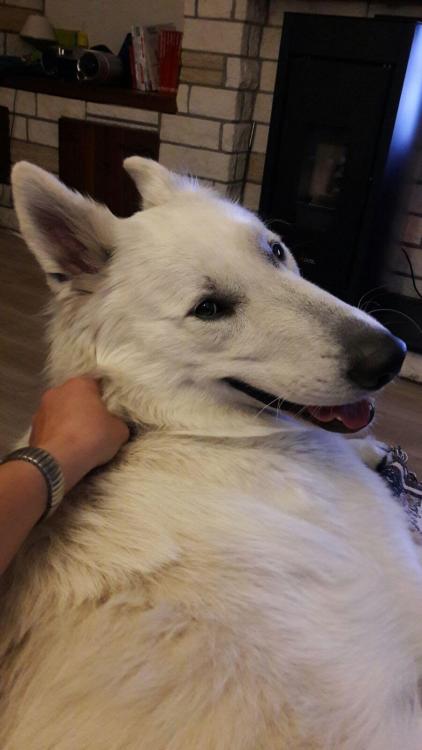
Here are my dogs: The brown one is cross between a chocolate labrador and an irisch setter; she was going to be put down due to her previous owner getting a divorce when she was about one year old; so my wife and me took her home. She 's the friendliest dog I've ever known, she loves everybody, hunts down mouse and rats, and loves to eat :-). She's 10 years old by now. The white one is a swiss shepard dog (Like a german shepard dog, but bigger and white ). He's 2 years old; and listens to the brown boss. Guards very well, and always aiming to work / do something for you. He's not really about to let anyone unchecked approach my workshop :-)

-
Does an anvil work harden?
BartW replied to Rojo Pedro's topic in Anvils, Swage Blocks, and Mandrels
Well I know a fair bit about workhardening in railroad track type steels. These are mangenese-carbon bound, as the typical modern RR track is essentially C80 or 1080 steel with about 1% manganese and between 0.15 to 0.6 % silicon inclusions. There are ASTM specifications for this. However; it's a fairly "dirty" steel for all intends and purposes. Lots of inclusions; casting artefacts and variability in quality. So bad even that Railroad track seems to absorb moisture if you put in in a bucket of water. As such, I wouldn't use it for knives or things with delicate cutting edges; but it's good for axes and splitting mauls ... You could get lucky and have a nice and clean piece of which you could make knives ... The quality is also the reason very few damascus makers will use it in pattern welded steel, although it makes nice dark lines due to the manganese content. It isn't very different from O1, just a lot less consistent and O1 has some vanadium and tungsten to make it a better knife steel. They work harden by plastic deformation, and as such make a good durable rail - the more trains cruise over them; the harder they get. However; they do not become near as uniform or as hard as a proper carbon steel that is heat treated correctly. The hardest rail we've found was around HRC 50. We also found spots were it was almost HRC 60; right before and after a weld. These welds also broke fairly fast; and we found out why; someone was pouring water over the red hot weld (and thus hardening it ! ). makes nice steam columns though My anvils are all in the HRC60 range, and much better quality steel. -
Who can identify my anvil
BartW replied to Ben Kamphuis's topic in Anvils, Swage Blocks, and Mandrels
I'm from Belgium; and honestly, I cannot identify your anvil. I've seen quit a lot, but I've never seen this style, nor the inscriptions. I've seen you have ground a bit on the edges; do you have a clue what kind of steel / iron it is ? Is it hard (you can test with a file) ? It looks to be forged; but I cannot identify a faceplate; which would make it way old. Also; on the second hand websites there's a guy named "jack" from fairly close to me in Belgium; he deals in several hundreds anvils a year (he's a retired metalworker). Maybe ask him ? mvg; Bart -
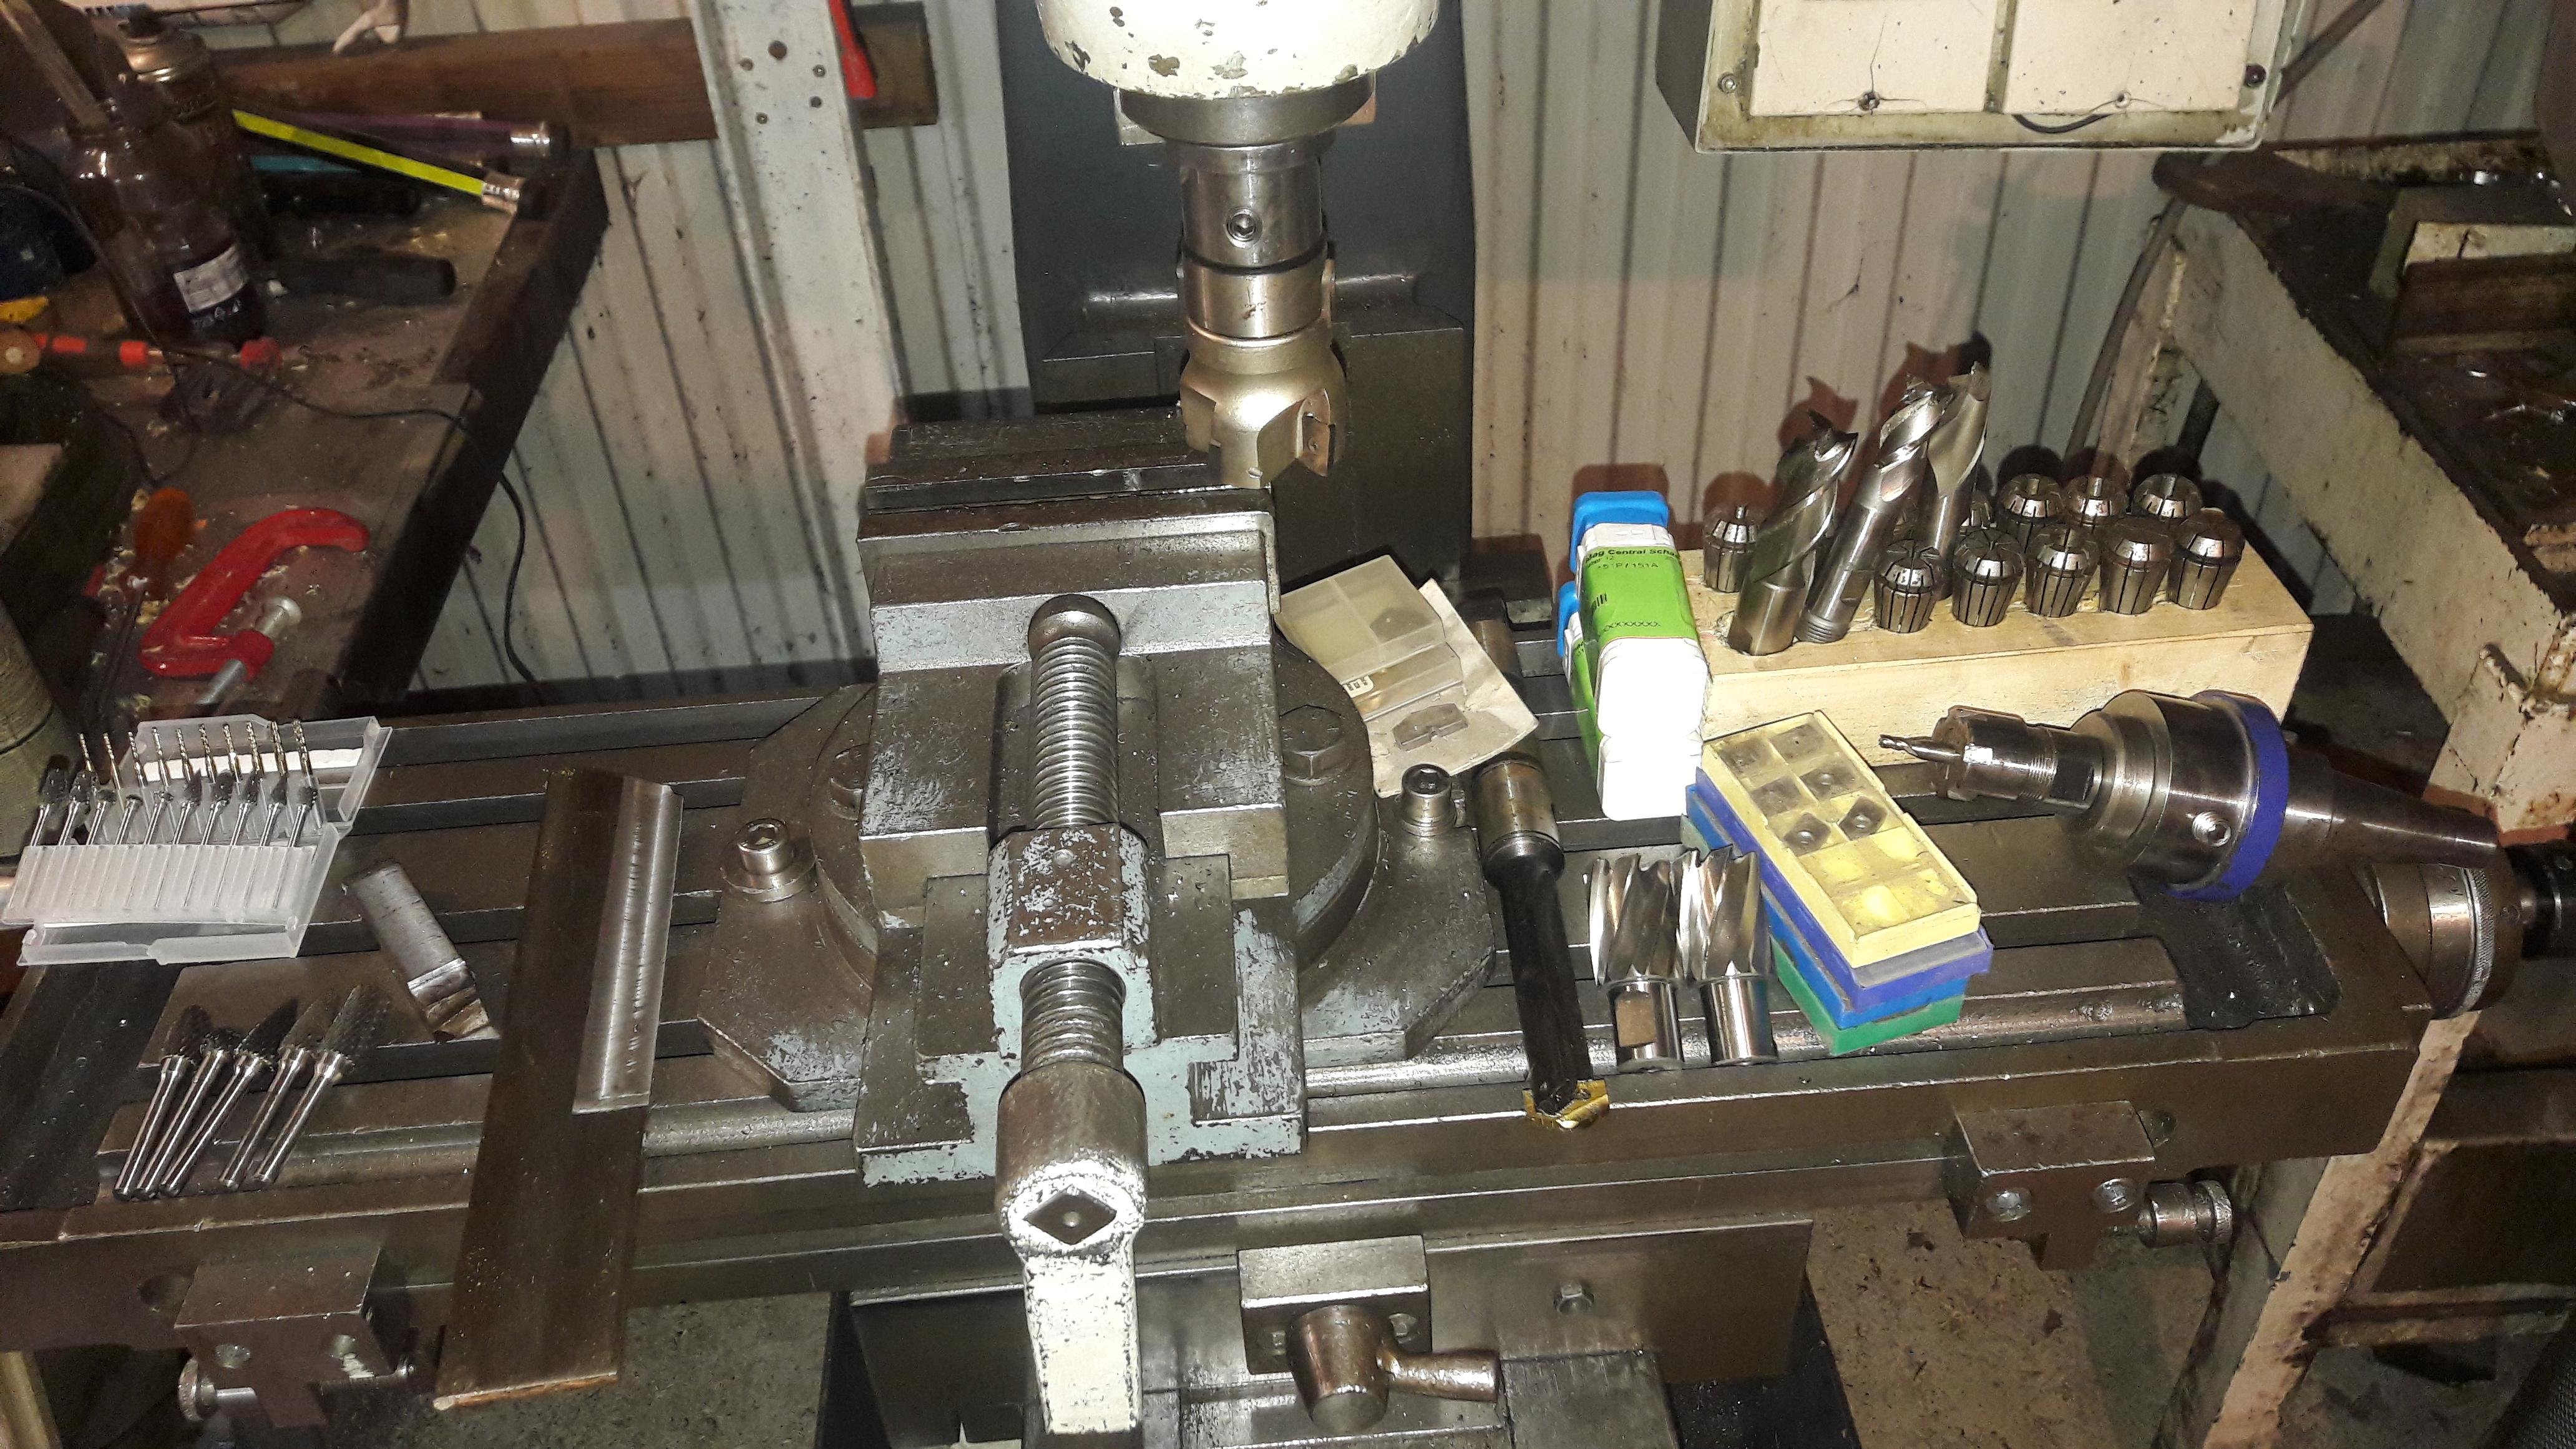
Absolutely love it, and it came with lots of accessories.. I tried to mill a symmetrical grind on a bar d2. 4 degrees, works like a charm. Most of the tooling is carbide that came with it, and i like it best with this head in it at 1000 rpm. It is also very quiet. You stand next to it and talk normally while working. Can you identify all tools?

-
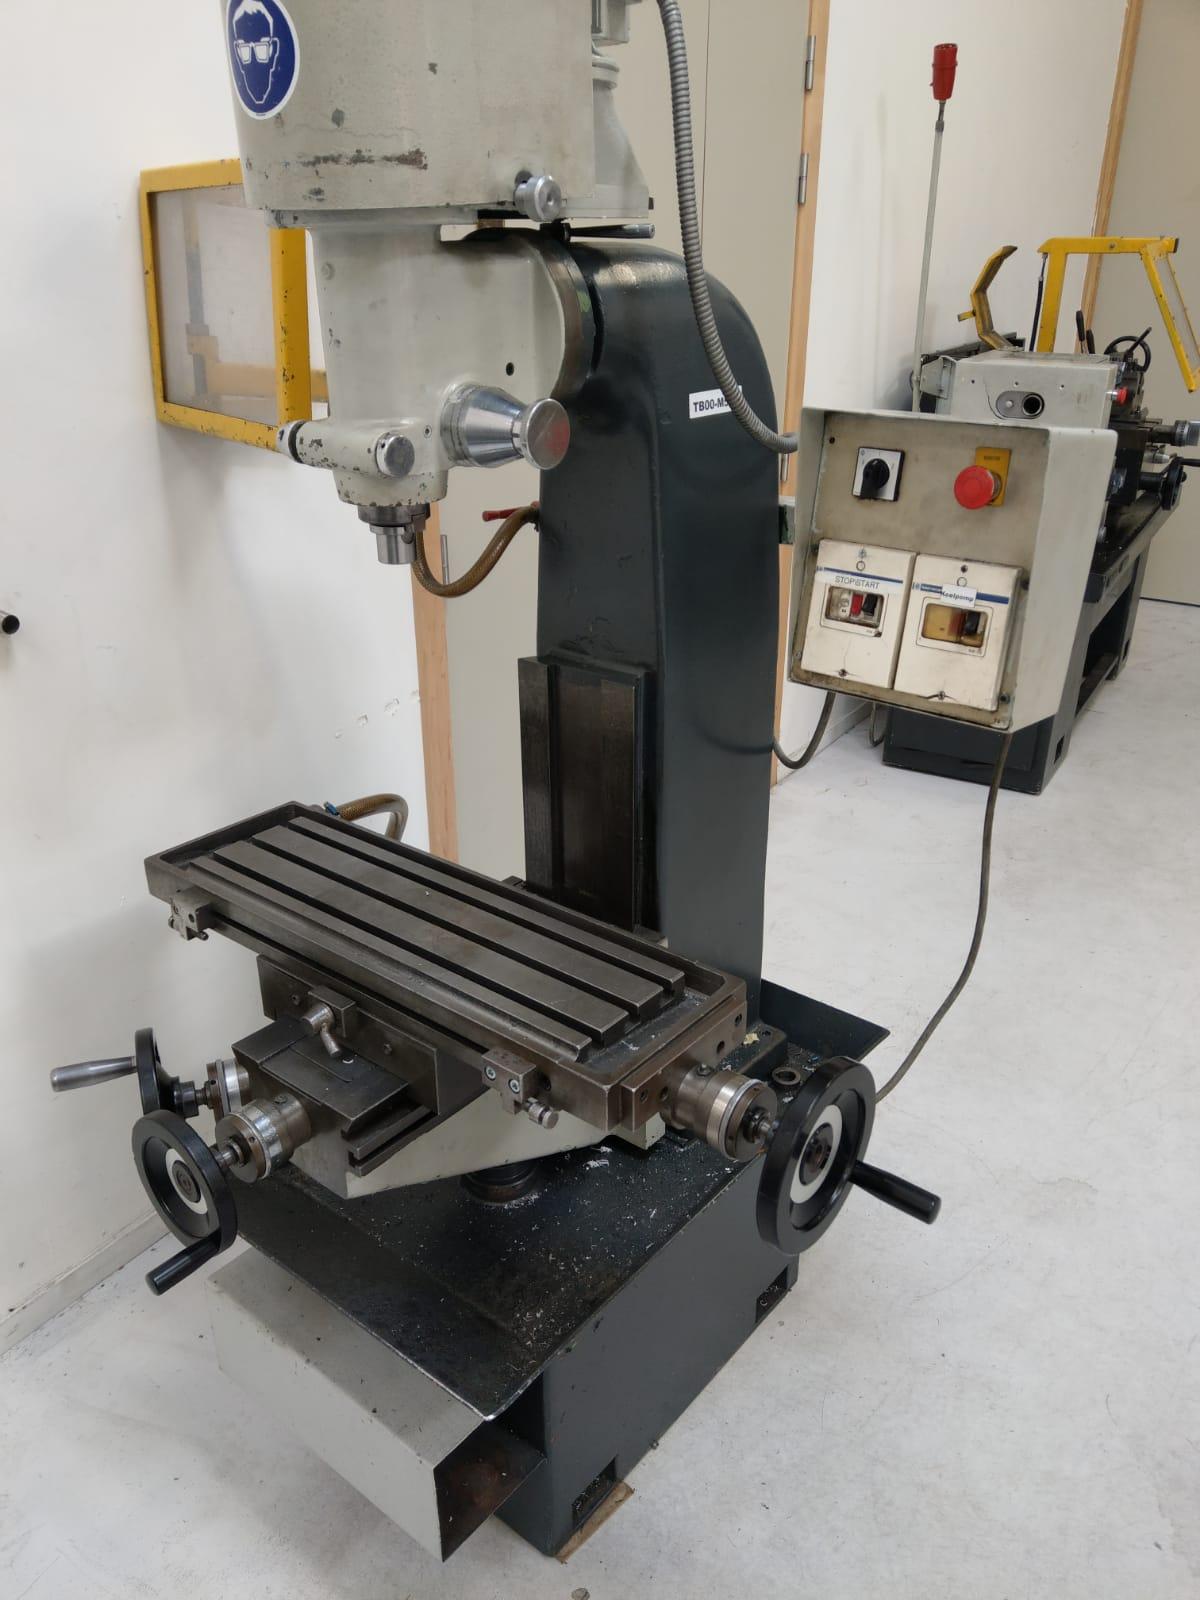
Well I got it home, now I need to get it off the trailer. And outdoors I don't have a crane. I'm thinking of taking the table off (like the saddle of a lathe) but that thing itself is also way too heavy for me to carry. Or the head part with motor... Tramming the head to the table is needed off course. A teacher in machining told me once that it's best to let it sit in its place for a couple days before Tramming. Like leveling a lathe and fixing runout. I also got a large machine clamp, and a couple of mills, two three and four flute hss-co8, 20 mm mills. And a ER20 intake set for small mills. Mvg Bart
-
I am familiar with bladesmithing, forge welding, grinding stuff, but I also have a large metal lathe, and I know how to make tread inside and out side, axles and bushings. Mostly from a repair point of view. Experienced machinist? Nope.
-
Hello All; Tomorrow I'm getting this thing delivered (see picture below). What I know of it so far: 3000W Siemens motor, 380V (I've got a 380V in my workshop sooo) . Goes from 500 rpm to 4000 rpm; belt driven. 600 Kilo's (1200 pound). It's a swiss made thing; as the body on the back is marked "shaublin". It has an ISO 30 / SK 30 head; and it will be delivered with machine clamp; drilling head, and a box of milling cutters. There's integrated cooling (big box of cooling liquid in the foot.). I got it for fixing their network and a server (it helps to be an ICT engineer sometimes). I was up for a new column-drill; and I suppose this thing can drill holes too. But what can this thing do more ?

-
Grind anvil face flat or not
BartW replied to Cian Hughes's topic in Anvils, Swage Blocks, and Mandrels
I'd leave it as it is. Grinding that amount of sway out of the face will force you to remove LOTS of material, which will take years off the usable life of the anvil. Secondly, you risk going through the top plat at worst, or reaching softer material, which invites new dings and will make new sway happen faster, so you'll be grinding more as well. You cleaned it up nicely, now if you use it, it will develop it's own character. And the curves could be usefull is certain jobs. If you consider filling up parts (welding) ; that's even more complicated. You really need to be a skilled welder, preheat the anvil good; and have several types of specialized anvil repair sticks. My advice; NO grinding on the anvil; use it as it is; there's plenty of life left in that one. -
Oh my ... I'll make a couple dozen of those keys, can I get a couple dozen of anvils ???? ;-) You made a great deal. And I agree, the welds look ugly. I'd cut it free, and clean it up. There are only 2 situations I'd recommend taking a grinder on an anvil.. 1 for removing welds, 2 for severly beaten up faces, I'd grind it flat again *once*, preferably with those 36 grit fibre cubitron discs, Fix the edges, and than start sanding, usually to about 240 grit, so it's nice and shiny, and you can maintain it with a simple scotchrbite pad.