

Daguy
-
Posts
87 -
Joined
-
Last visited
-

It’s Finally Burning - a first build story (photo heavy)
Daguy replied to Daguy's topic in Gas Forges
Frosty (and everyone else), Thanks for the reply. When I blocked the ends of the chamber and the NARB was runnining full tilt, It would occasionally spit and sputter, and the flame sometimes sucked back up into the tee. But only at higher propane pressures, and only after the head had heated up. This confuses me. Higher pressures would indicate that the flame was being "blown out", but the fact that the flame wants to travel back up the gas train would indicate that the gas is not being blown hard enough to be beyond the orifi (orifices?) before ignition after the ribbon attains full heat. Math hurts my head, and that's why I'm running my "Hillbilly Logic" by the forum. I have to think that it's because after the ribbon heats up it can ignite the propane in the mixing chamber before it passes through the orifi because there's not enough air pushing it through the ribbon. It seems to me I should retract the gas jet enough to introduce a greater air:gas ratio into the mix. Does that make sense to you Math Ninjas? -
It’s Finally Burning - a first build story (photo heavy)
Daguy replied to Daguy's topic in Gas Forges
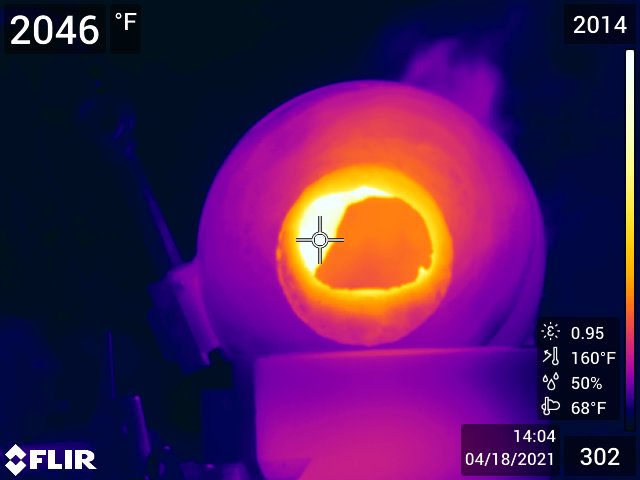
Can't believe it's been over two years since I built this forge, or since I've posted on it. Time flies and drags in the time of Covid! A cool thing happened last week. My employer bought a very expensive FLIR camera and decided I was the guy to train on it. Couldn't resist the opportunity to share some pics. These were taken at 20PSI. Frosty, since this was my first build, I can't believe it turned out optimized. in your experience, how much more than 2113F can one reallistically tune a 20 Lb propane tank homebuilt forge heated by a 20 (Crayon sized) hole NARB to reach?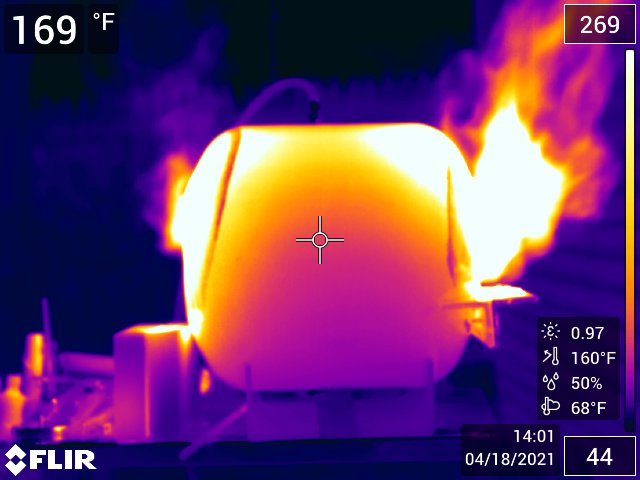

-
Nice job, Judson! Another new idea: cutting a firebrick to shape and drilling it out to use as for the working end of the burner. If you have the tools, it looks like a good option. Hope it lasts, keep us updated. Daguy p.s. (how is the brick attached to the mix chamber?
-
Another tool from the Cave Man Forge
Daguy replied to MotoMike's topic in Slitters, Punches, Drifts, etc
Its in the Blueprints section -
I recently finished building my first forge and I have a lot of folks including friends and youngsters I could view as "mentees" (People to mentor) who want to come enjoy it with me. That is really one of the reasons I built it, so I don't mind. So my reason for posting is to ask y'all for suggestions, including links to pics or maybe vids of someone making the project, that I can help someone with zero experience to finish and take home in one session. It could only increase the number of people interested in the craft and hopefully help some young people to see that us old guys CAN be fun. Simple is the key. Thanks in advance for all of your ideas and for taking the time to reply. Daguy
-
Because it's my build, and I started the thread, I really didn't want to be the one to draw attention to this, but did you follow the link to the thread Buzzkill suggested you read, https://www.iforgeiron.com/topic/60067-it’s-finally-burning-a-first-build-story-photo-heavy/ ? If not, please do. There are links toward the end of an only 2 page to youtube videos that may answer your questions better than paragraphs of responses, including some slo-mo that slow it down enough to see whats really happening inside the forge. Daguy
-
Yep, Spring steel for sure. I got a buddy who owns his own car repair shop, so I have a good source of leaf spring steel. I have it cleaned up. When I get it mounted I'll post pics. DG
-
I just finished my first forge and found the information in the "Forges 101" and "Burners 101" threads in the Gas Forges section of this forum invaluable. I was thinking of buying one and the iforgeiron community helped me to see how building one would give me better quality for money spent, a safer forge (your concern with rigidizer), and efficiency that means less $ spent on fuel. Also, I would recommend Frosty's NARB thread. I ended up building a 3/4" T-Burner, Naturally Aspirated Ribbon Burner driven Forge housed in a shell made from a 20# Propane tank. For all of my projects so far, it's been more than enough, and I can get welding temps out of it and stand next to it and have a conversation at normal tones and volume of voice while it's running full out. It Maintains a good flame from <1 to 20 Lbs of pressure and would probably keep going if my regulator went above 20 lb. That wouldn't be necessary , though as it has plenty of heat as is. Also, not being tied to a blower and hence electricity, it is portable and can be taken wherever I want to heat things up. BTW, I started out knowing NOTHING. I was looking to buy. The experts on this forum are very generous in helping us newbies get a strong start in this craft. Special thanks go to Frosty, Mikey, Thomas, and Buzzkill. Those guys are very generous with their time and advice. Daguy p.s.(check out my build thread:
-
Thomas Powers: Oh, yeah! Michigan definitely sees it's humidity Jim Coke: Is that last pic of a Kimbark? Mine has that same "Top Gear, Drop Pawl configuration for the vertical drive, though it's a two speed manual drive, not a belt drive, so it's probably a little older. I've just started tearing it down and cleaning it up, but it seems to be a more intricately built design than the Buffalo Forge 615. I'm having a lot of fun returning these machines to useable condition. Once I get the Kimbark back in shape, I'll decide which one I want to keep, and maybe gift the other one to my brother. Or Not. Went by the builder box store this morning and got a 5" X 5" X 8' timber to mount it to. Now I just have to figure out how I want to build the base The finish on that rear flywheel drill looks like the finish I'm getting on both drills Daguy
-
Shop Use. I bought a Kimbark at auction and followed that up with the Buffalo Forge before restoring the Kimbark, then cleaned up the Buffalo Forge first as it was a simpler piece of machinery. I'm not calling it the start of a collection, but one never knows. Present plans are just to set it up on a post with a stand as a moveable piece of shop equipment and use it. I bought a used straight shank Jacobs chuck for it, so it's not going to look original between uses, although the chuck is easily removeable. I'll post pics once I get it mounted. Daguy
-
. . . or should I leave the wire-brushed finish? Do me a favor and as you reply (Please give the reasons for your opinion, too) quote this: Paint: 0 No Paint: 0 And change the total to reflect how your opinion changes the totals thus far. That way I won't have to try to keep a total in case this thread goes long as they sometimes do when asking for opinions. Please be honest and just add one number to the appropriate total, as you will probably never see my post drill, but I do value your opinion as much as the next guy's. When I decide what to do and get my new (old) drill mounted, I'll post pics.
-
Looking good.
-
Don't know if you got it out yet, but when I was cleaning mine up, I put a tapered punch through that clip on it and hammered it through the opening. As the cross section of taper under the clip got larger, it started the clip moving out. Once broken free, I just put another piece of flat metal underneath and repeated until the clip came out. If yours is out, great. If not this post might help the next guy with the problem. Daguy
-
It’s Finally Burning - a first build story (photo heavy)
Daguy replied to Daguy's topic in Gas Forges
I'm very pleased by how quiet it burns. Frosty came up with a real winner in this ribbon burner design -
It’s Finally Burning - a first build story (photo heavy)
Daguy replied to Daguy's topic in Gas Forges
Here It Is!! Dragon's Breath Real Time