
Nobody Special
-
Posts
1,618 -
Joined
-
Last visited
Content Type
Profiles
Forums
Articles
Gallery
Downloads
Events
Everything posted by Nobody Special
-
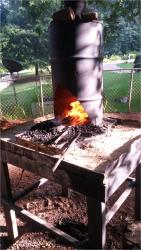
 Started forging again yesterday, first time after moving six months ago. I've been having trouble finding coal (especially cheap coal) up here in the great Northwest, so I figured, no problem, I'll just make charcoal. Did a couple of burns, and made around 30 gallons, lot of alder, some maple, a little fir. Then I fired it up and started making staples to hold the anvil down, and by the time I got three made and a little keychain I burned through maybe seven gallons. Yikes. I know it's not the hardest of hardwoods, but still... Using a 55/brake disc forge, blower is a hair dryer on a rheostat, not using much air. Wetting the charcoal slowed it down a bit, but not much. Any ideas why it's going so fast or how to fix it? I know I'm an amateur, but this made me feel like a rookie.
 -
Water barrel always gets rank
Nobody Special replied to Ramsey26's topic in Blacksmithing, General Discussion
Adding a little copper to the bottom will keep down algae and mosquitos (mosquitoes, mosquit....) vampire devil bugs. Anything works. Old copper pennies (not zinc), copper pipe, etc. Oops. Buzzed in two seconds too slow. -
Don't ask how we know these things
Nobody Special replied to Glenn's topic in Blacksmithing, General Discussion
Sometimes I'm lucky forging. The more I practice, the luckier I get. Practice doesn't make perfect. Good practice makes better. Bad practice makes more of the same. If you hit it, dress it. Clean (and clean up) your tools regularly. Cheap stuff usually ends up costing more. PPE is your friend. Stay close to your friends. (P.S. Gloves are more like associates) Prep ahead. Don't have to make the choice between burning the iron or pulling it out before you;ve found all your tools. Unplanned shipping can take longer than forging the piece. Group shipping together or charge for the time. Your phone is NOT in a safe place. And the dog has your rawhide mallet. -
Anyone in NW Washington?
Nobody Special replied to Nobody Special's topic in Events, Hammer ins, Where to meet
You have a point... -
Hi, I used to post here a lot, moved a few months back to Oak Harbor, Washington on Whidbey Island. There's a couple of groups in state, but Spokane is too far, shoot even the one south of Seattle is a bit iffy until I get my car/finances back in better shape. Love to play given the opportunity. I'm not quite starting over at scratch, but most of my tools are stuck in a storage unit in Georgia, and no money to go back for them for awhile. My best anvils, the post vises, blower, all but five or six tongs, my hot cuts/cold cuts, punches, drifts, swages, swage block, rivet tools, nail header, brushes, mallets, twisting wrenches, scroll forms, stock...you get the idea. So the good news is, the quality of all my hand forged tools will be improving...because now when I make them all again I'm better than when I started. Or maybe I'll be lazy and make hooks and bottle openers and the like to finance tool purchase. Got a good 75 lb Columbian, and most of my hammers, plus some steel (mild and a bit of spring, no I won't sell used spring, but I'll use it for making my own tools somewhat) and a 55 forge that I cobbled together. I've given up on affordable coal (I can get it at 50 something cents a lb and a long drive) and have been making charcoal about 15 gallons at a time.
-
cello bending iron
Nobody Special replied to ravenhome777's topic in Smelting, Melting, Foundry, and Casting
Raven, if you're still around, the dangers above are very real, (I still have my scars from learning, and consider myself lucky) but you can learn casting if you want to. What you are planning is not only very dangerous, but also almost certainly going to be expensive and unsuccessful. We would like to explain why and how to fix it, but you don't have the knowledge base yet. The short version is that you are risking several types of violent explosions, mostly steam, around molten metal, which I can tell you from painful experience, goes everywhere. The safest, not to mention easiest way to do learn casting is to find someone experienced in casting and learn from them. Try around your local blacksmithing group, or sometimes people teaching sculpture at colleges. There may be someone doing iron pours in your area, and they often start with non-ferrous metals like copper or aluminum. Failing that, I would reccomend reading the David Gingery books on casting, and checking out whatever backyardmetalcasting.com has changed its name to. Invest in good PPE, use good ventilation, work from small projects up to the more difficult stuff, and above all, avoid learning casting from YouTube. Those people are downright dangerous, especially the "King of Random." I remember hearing after one of his more spectacularly stupid experiments, "Wow, I really thought that would explode." This while pouring several pounds of 1400 degree aluminum into a watermelon he was kneeling over while wearing flip flops and shorts. Good luck, and above all, stay safe. -
Anvil face is not level.
Nobody Special replied to agblea's topic in Repairing and Modification to Anvils
Or you could always mess with the dirt from the other end; do the "big box of sand" stand. Wouldn't wobble, at the least. -
English pattern wrought iron, 18th century-ish, no telling whose from what's there. Try a gentle brushing with a non-knotted wire brush, and rub the sides with flour or baby powder with it tilted a little to bring out faint markings, if any.
-
Identifying an old anvil
Nobody Special replied to Brittany's topic in Anvils, Swage Blocks, and Mandrels
Can't see it good, but that looks like a Fisher Norris eagle on the side. Would make that 250 lbs. Or then again, maybe I'm taking the blacksmith Rorshach test.... -
My go to is an 11" blade french style chef's knife. A lot depends on what you cut and your style of cutting. French chef's knives have a flatter bottom, and you sort of push them across what you cut. German chef's knives are more curved, and you sort of rock it a bit more, cutting through your vegetables. For vegetables, I like a longer french style, 9 to 11 inches, or for some cuts of meat, but it starts to get too big if you're using it as a multiuse tool for a lot of butchering or cutting joints or such if space is tight, I end up going to something like a butcher's knife or slicer. Some like the japanese nakiri can be much shorter, but they're kind of thin and you just go straight down with them instead of pushing or pulling as you cut., so they're a lot thinner, which means you can't really use them for heavy cuts on meat. Like I said, depends on style and technique. Some people jump around, some use one or two knives for almost everything.
-
Type of Forge and Manufacturer
Nobody Special replied to holder's topic in Blacksmithing, General Discussion
I've done a box of dirt (clay) rotor forge and lined the top of the wooden frame with metal cut from an old 55 drum. (In fact you can see it in my photo. Man I need to update that...) Works fine without burning up as long as you keep the firepot away from any wooden bracing. Charcoal is stupid easy to make. Retorts work, but I've had inconsistent results. This way works well for me. Get a 55 drum w lid. Knock some holes in the bottom. A pickaxe works nicely. Either dig a hole under it, or elevate it on rocks or something to allow air to get in to said holes. Build a fire in drum w seasoned hardwood, preferably smaller chunks. Fill er up, let settle a bit, add more wood til full. Put the lid on and prop it up about an inch or so with a "rock, or something." Wait for the smoke to change colors and become flammable. Usually about an hour or so. Shut the lid, and cut off air by filling in the hole beneath it, or taking it off the supports. Be extremely careful as the metal will be glowing hot. When you put the lid on, it will shoot flaming wood gas out of the holes in the bottom. Wait at least 24 hours before opening. If it flares up on opening, either drop the lid on it again to put out the flames, or hit it with the garden hose. Water won't hurt it. Break into usable chunks and safe uncharred bits for the next time. Only major disadvantage is it makes a lot of smoke initially. I like to do it in multiple drums, preferably at night. -
Dogwood is choice, but I prefer rawhide myself. Find them at flea markets occaisionally. Nice bit is the head comes banded from the factory. Smokes and stinks a bit.
-
A non-knotted wire wheel takes more work, but it's less aggressive. Especially important if you don't want to buff away at marks on old wrought iron anvils. (albeit Fishers are cast) Linseed works well, can be tacky for awhile. Most oils work, and you may want to leave an oiled rag on the face if you're not using it too often. IMPORTANT. If you're not used to linseed, never leave a rag with the oil on it outside of a sealed metal container. They tend to catch fire spontaneously. Some people burn them intentionally after use to get rid of them. Patinas are easy to take off, hard to put back on. Your anvil, your call.
-
Pipe wrench handles
Nobody Special replied to ShortMagPirate's topic in Blacksmithing, General Discussion
Ductile is a kind of cast iron. It has little spheres of graphite instead of flakes, which means it can take more of a beating or a little bending than cast iron, which usually breaks when hammered on. I haven't forged it, but I would think it would tend to fall apart like most cast iron. Of course, then there's the confusing advertisements that you get for them. "Drop forged cast iron" I guess they mean the jaws are forged, but kind of a contradiction in terms. Don't know why they just don't make the whole thing out of steel. -
Never did feed corn as fuel. Messed about with crushed shell from chicken feed as flux in casting for a bit. Worked okay, kind of a pain crushing it to a powder.
-
Supreme Court has ruled that border areas, to include withing 100 miles of the border are subject to different search and seizure laws. They do exactly that on highways near the border, especially near Mexico, and checkpoints in Az were a huge pain when I lived there. And they absolutely can take your car apart.
-
You don't have to ask, it's available online. 99% Sodium Tetraborate....aka borax.
-
Gorgeous trenton. Looks like some previous owner had a bad habit of testing chisels and punches on her though.
-
What's not to love? Dirt floors are easy on the feet, Endgrain wood blocks look cool, are comfortable, and long lasting. Cement is smooth, comfortable and clean. I've mostly done dirt, as it was readily available and cheap. I'd stay away from varnishes, they usually burn easier than the wood they protect. If you have something like a smooth wooden floor, (very much not recommended as a fire hazard) you can get some, imperfect protection by putting sand down near areas you may drop hot steel, or clad them in metal. Without long exposure, most of the time dropped steel just kind of smolders or chars the floors, but don't take chances as burning down your forge softens the anvils, irritates your spouse, and makes for a generally bad day. Wood buildings, wood floors, and and wooden forges always have an element of risk to them. Inflammatory means tending to cause something to burn, and inflammable means the same thing as flammable. I know, it's confusing to me too. A note, if you plan on putting in a power hammer at some point, especially a large one, the flooring underneath will have to be specially prepared so as not to trash your foundation, flooring, etc and send vibrations to your house and all your neighbors. I've known people to mix in crushed rock and/or limestone, been wondering how Caliche would work. It's a clay found in central Texas that they use for foundations and roads and such. Like Frosty talks about, it compacts, but doesn't quite cement to itself. Very firm. Firm enough...well, if it were splitting wood, it would be splitting pecan that hadn't quite seasoned yet on a warm day, without a hydraulic splitter.
-
That poor baby... Lot of life left, but ouch. The edges and that horn...
-
It's far easier and cheaper to make mild steel instead. Processes to make wrought iron, such as iron bloomeries are very inefficient and more suited to small batches by comparison, so it's not profitable for business. Almost no one makes it today, especially in the States, except for hobbiests. Because of it's grain, it also works very differently than steel. One of the last common applications for it was use in marine environments, because it resists corrosion much better than mild steel. A number of smiths and knivemakers like to etch it and use it for decorative elements in knives like bolsters and such rather than make entire knives from it, since it is hard to get and doesn't harden.
-
Bronze knife casting
Nobody Special replied to Andrew Golabek's topic in Smelting, Melting, Foundry, and Casting
Well, it looks nifty, be interesting to see it finished, know how it works. I dunno, the right kind of bronze is supposed to be roughly hard as mild steel if work hardened. Wouldn't apply to cast though, and I wouldn't try some of the other traditional hardeners like arsenic. Where'd ya get the tin? Solder? Old pewter knicknacks? -
They're heaven cent.
-
Looking for information on maille
Nobody Special replied to Richie Dagger's topic in Cold Worked Iron and Steel
I have heard the book techniques of midieval armor reprodruction is supposed to be good. Before you spend the cash though, I haven't picked it up yet, and am looking to pick it up on interlibrary loan, or a birthday present one day, whichever comes first. I played with maille a bit, started losing my mind a few bazillion rings in, so I didn't finish a shirt. Are you flattening both ends? The one in the pic looks like you're passing one rounded end through the flattened one. Definitely specialized or modified pliers for punching and riveting. I tried overlapping the ends a bit and flattening them with a jig that sort of resembled a piston in a chamber. Put rings in the bottom, hit the piston like a set tool, remove rings, repeat. A wedge rivet might be easier, and I would definitely consider larger rings, say around 1/2" or 5/16". At 1/4" you'll have a beautiful, fine weave that will take about a million years to complete. I read somewhere that it typically took 400 man hours to make and assemble a byrnie. I don't know, I didn't get that far, and I never finished the sweater I was knitting either. -
We're making Kaiser jokes now? That'll get them going....on a roll.