
Dan C
-
Posts
810 -
Joined
-
Last visited
Content Type
Profiles
Forums
Articles
Gallery
Downloads
Events
Everything posted by Dan C
-
Good to know we'll be prepared for armageddon or the zombie apocalypse :D In my case it's essential as I have an older vehicle, that's already harder to get parts for, which is very customized. It is a lot of fun and something you can take pride from. I get a kick when the autoparts store asks the make & model to look up in their computer.
-
That's good stuff! I'm getting a 55 1st series Chevy truck back on the road. So far I've used the forge & anvil to modify brackets and then re-forge a new shifter linkage for the transmission after doing a disc brake conversion and the old no longer fit. I'd be dead in the water if it wasn't for smithing and welding (or paying someone else thru the nose) Dan
-
Thanks, that's all very good information. I've yet to work with the Bellottas that I have. I am getting caught up on other work and should be able to do so soon. The last set of spike knives that I sold the guy asked me when I'd have some rasp knives ready which gives me good incentive to do sooner than later. Dan
-
Very nice work, turned out great! What brand name was the rasp, what type of oil did you quench in and what temperature did you temper at?
-
Really need a large ANVIL in Fort Worth TX.
Dan C replied to K.C.'s topic in Anvils, Swage Blocks, and Mandrels
Hi Frosty, I hadn't used my horn for blade work before, but a re-read on the Hrisoulas' The Complete Bladesmith I tried the following on my last knife instead of doing so much grinding for the bevels. In the chapter on hammering the bevels he describes how first you curve the blade over the horn inward with the edge down and spine up. Then when peening & hammering the bevels it straightens the blade. It worked well enough that I'll do it on the next knife I forge. Other than that for bladesmithing I'd agree. The more I use my anvil the more I appreciate all the various angles it has, including the horn and heel. Dan Don't give up on craigslist, keep being vigilant with cash in hand. When something good shows up it goes fast. I was fortunate on my anvil, a friend was moving down from Pittsburgh and I had found a good PW along the route he was coming down w/ his truck. Sometimes things just fall into place. -
Really need a large ANVIL in Fort Worth TX.
Dan C replied to K.C.'s topic in Anvils, Swage Blocks, and Mandrels
Have you searched craigslist for Dallas, Houston & Austin using anvil as a keyword? There are some interesting ones out there that if I was buying I'd be checking out. Then I also saw at a customer car shop yesterday a sweet 200 lb Soder that I doubt they ever use. I'm keeping that one in the back of my mind as to how I could talk them out of it. You never know where one might turn up is my point, talk to everybody! Dan -
Mitch glad you're here as well! Duh, a bench vise would work just fine for the small stuff I'm doing! Sometimes you get so focused on one thing that you miss the obvious solutions.
-
Hi Thomas, Yes, I've straightened 6' rock bars with my forge no problem. My concern wasn't the width of the area to be heated, it's more the thickness and concern that I wouldn't be able to get the pivot area and leg thoroughly heated to make an adjustment without having to be worried about causing it to crack, but I suppose if I really piled on the coal and air it would do it just fine. I'll take another look at the bolt, but I think on mine it's the side brackets that make the hinge that would need adjusting. I think making spacers or using a hack saw blade will do though. It's kinda like my anvil, the edges are worn, there's some belly. At first I thought it'd be nice to restore it, fix up the edges... Then I decided there isn't enough time for the things that I have to get done, much less the things that I'd like, so I just use it as is and have found it works just fine. That is a very nice vise stand Caotropheus. Dan
-
Hi Teebs & Rich, would one or both of you elaborate a little on the temperature that you are forging at with these rasps and when you do the forge weld? I read Bill Epps method on anvilfire, but still have questions in these areas. It'd be great if there was a youtube video, though doubt the actual forging colors would come thru. Very nice snakes Teebs and I need to forge one of those hearts for my daughter! Dan
-
Once you learn how you'll wonder how you've ever done without it. I built my forge and anvil stand both out of scrap. Definitely take a class or learn from someone who will teach you how to do it safely. Keep an eye on craigslist, I picked up my Lincoln tombstone 220 for $50 because the guy said he'd tried to learn to weld with it and wasn't able to. One look at the cables I could see why and was amazed he hadn't electrocuted himself. The ends had be drug across hot steel and most of the insulation had been burned away. I cut them back to good wire and still have at least 15' of cable. I also inspected the insides and restored it before firing it up. Search instructables.com for lincoln 220 and you'll find the steps on how to do so. Dan
-
I'd jump on it. A new PW...haha, that one looks great for something that's at least a century old. If you can get a better side picture you can have a better idea of the date. Here is some info I found somewhere online. "It is difficult to age a PW after 1860 when they went to the now classic London pattern. If it just says PETER WRIGHT PATENT, then likely 1860-late 1880s. If ENGLAND is added, then late 1880 to early 1900s. The logo was stamped on in parts. Perhaps when someone did your's they simply forgot where to put the SOLID WROUGHT circle or the weight. Occasionally stamps were put on upside down. Yes, on Peter Wright anvils. Might be an inspector mark or perhaps it meant it was approved for export. A classic sign of a post-1860 PW are small ledges on the front and back feet. You may have a very early PW since in 1860 on their typical logo was (stacked): PETER WRIGHT PATENT. Then SOLID WROUGHT in a circle usually with the middle weight number stamped in it. About 1910 they added ENGLAND under PATENT. Fairly certain Peter Wright did start putting serial numbers on their late production anvils. They started putting ENGLAND on their anvils about 1910 and are thought to have gone out of business about the 1930s. "
-
Jim, I like your mailbox very much! The others I just want to bang my head against the wall and cry. It's like seeing an anvil in someone's frontyard being used as a decoration. Such a waste!
-
What do Blacksmiths drive?
Dan C replied to TheFullSmokingBar's topic in Blacksmithing, General Discussion
There's something to be said for one that you can still work on. Love that year Chevy truck! My Chevy 55 1st is now only part truck. The 350 engine, 400 hydra tranny and disc brakes came from a '74 Camaro, then Saginaw power steering. -
If you can arc weld and can afford it, what about using some hard facing rod on one of these, like Stoody 1105? I've been meaning to do something like that to make an edge hardy since my anvil's edges are so worn, just never enough time in the day to do all that I would like.
-
Guess I was spoiled by my previous smaller vise whose jaws line up perfectly. I'll give spacers a try. Once I figured out the right key words I did find in the forum where others have had a similar issue, though looking at the pictures in this one mine wouldn't even be noticeable. http://www.iforgeiron.com/topic/21925-non-parallel-jaws/?hl=alignment#entry223538 Thanks everybody! Dan
-
A few weeks ago I picked this 4.5" post vise up for $50, gave it a good cleaning, straightened the leg and forged new wedges for it. Yesterday I put it to use and it worked great for the work I was doing. Today I needed it to hold smaller but longer stock that needed more of the jaw surface area and found it was slipping. I looked at the jaw alignment and saw that the right side closed before the left side did, which explained why. If I close the jaws snug, but not too tight and tap lightly on the front jaw from the left side they'll line up and the gaps are more even. Someone stamped their name and year on the hinge, so I know at some point it was heated enough to become misaligned. What I was thinking about doing was removing the spring & mounting bracket, closing the jaws snug, but loose enough that a hammer tap will move then side to side, and then heating the hinge area. One problem I thought of is my only forge is an 11" brake drum that's built into a 2x3' welding table. It worked well when I straightened the leg, but I could rotate it to get an even heat throughout. Trying to heat this large of an area I'm not sure I'd be able to soak in the heat well enough. When I did bump the jaws into proper alignment the hinge appears strained (though not sure you can see that in the picture) Any suggestions? I'm sure this is not too uncommon. From working with the bent leg I can definitely say this vise is wrought iron. Dan
-
I'll have to remember coffee and donuts for the future. I have found late on a Friday afternoon a hand forged bottle opener and ice cold six pack of beer go over very well.
-
What do Blacksmiths drive?
Dan C replied to TheFullSmokingBar's topic in Blacksmithing, General Discussion
My current project which will hopefully soon be finished and a daily driver is a 55 early Chevy pickup. This is where any extra money I make from blacksmithing goes. I had to forge a custom linkage from the shifter to the transmission after doing a disc brake conversion, as well as modifying some of the brackets. -
That's a beauty! What size stock did you use and how long did it take to make? I'm gonna have to make some of those and maybe have it as a project for scouts getting their metalworking merit badge.
-
I don't know anything about induction hardening other than what I just read on wiki. Seems like you would loose the hardness and be back to whatever mild carbon steel it started out as after heating to a de-magnetized state and quenching.
-
As Josh said above, I'd spend a lot of time looking thru this website to get ideas. There's also purgatory ironworks and anvilfire. The Complete Modern Blacksmith by Alexander Weygers is a good resource to have and will give you a lot of ideas and projects, as well as types of metals to use. You'll probably be able to get lots of railroad spikes if you are polite and ask nicely. Search Etsy for railroad spike bottle openers and you'll get a ton of hits. Openers were my first projects and all but the first ones that I choose to keep sold. Etsy is another good resource for ideas.
-
If you're correct about them being induction hardened, what would the expected result be after forging, hardening & tempering? Similar to the results of using .45% carbon steel?
-
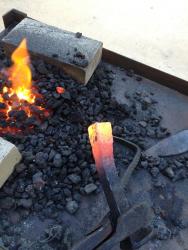
I forge with industrial coke. The easiest method I've found for lighting is using a little homemade charcoal, turning on the air and then hitting it with a small propane torch. That gets going fast, then I pile around the coke. One of those chimney starters used for firing up the grill works well too, but the first method I can use less charcoal.
-
As so many have remarked, but it bears saying again and again...Your work is AMAZING! What type of welder are you using, I'd assume a MIG or OA? While I can't envision ever possibly having your type of skill and talent to create the works of art on your website, I do see this as something my 13 yo son would be interested in and might excel at. He is exceptionally good at drawing, painting & sculpture as he can take what he sees and put it into whatever media he's working with. When I taught him how to arc weld he had paid so close attention that he picked it up almost immediately. How did you get started? Dan
-
Hi Aceman, this was my starter anvil which I got for free by contacting a local railyard and asking them for a 2-3' section of track (they also gave me a bucketful of spikes). It didn't take long of forging and selling what I'd made to buy a 190# Peter Wright. Another option would be to visit a scrapyard (if you can find one that still sells to the public) and find a suitable chunk of steel.