HWooldridge
Members
-
Joined
-
Last visited
Everything posted by HWooldridge
-
The horn works well but you lose some energy as you work farther out away from the body. I have the edges of the anvil near the horn heavily rounded - about 1/2 inch radius over about 3 inches of length and so I use the rounded edge of my hammer face to "double fuller" the material on top and bottom. Remember that everything is a heat sink so it's good to work as quickly as possible and keep the material touching only at minimal places. In other words, if you lay it on the anvil and turn to grab the hammer to forge with the cross peen, much of the useful heat will already be lost. All of Peyton's suggestions are valid - make sure you get it HOT...bright white/yellow and just under burning is where I try to forge most mild steel. I don't know your stamina level but you ought to be able to get the rough drawing done on a tong handle from 1/2" stock in 5 to 7 heats with hand forging.
-
I use short sections of pipe or square tubing in various sizes. Take a piece of 1" square tubing or 1-1/4" pipe and cut about 3/8" off. Debur and mash into a diamond (or an oval). Lots of different sizes possible depending on whether you use pipe and/or square and how much you mash. The "s-hook" style works fine but has some inherent flex in the open design and of course, takes longer to make than whacking off a few pieces of tubing. I also have several sets of tongs that are set for fixed sizes and have a permanent link attached to the end of one handle. Put the stock in place, squeeze and flip the ring around to lock. The best part is that it never comes off or gets lost.
-
I once saw a master ABS bladesmith temper a blade three times after hardening. He used a torch to bring the edge up to non-magnetic while not spending much time worrying about the spine then quenched in oil. I assume this left a fairly hard edge and a softer spine as hardened. This was followed by polishing away the scale, heating the spine very slowly and watching the colors followed by quenching in water when the temper was correct in his eyes. He did this tempering step three times. It produced a blade that allowed a file to just barely bite on the edge but easily cut the spine area. I assume this treatment also helps with grain formation - yes?
-
I have read that the double drifted poll eye used on most modern hammers is a fairly recent development (last 200 years). I am referring to the practice of driving the drift in from both sides so the narrow spot is in the middle of the hammer body, which allows a pretty firm lock on the handle when it is wedged. Prior to that, hammers had straight eye walls so more surface area was better for holding power on the wood. It is also a natural way to make it - i.e., when starting with a bar and working to both ends, the part in the middle stays the largest. In use, it also provides mass behind the working face.
-
A vise is a must have - you really can't do a wide range of work without one. Hammers are somewhat personal. After almost 25 years, I only have 7 or 8, plus 3 sledges. Some smiths have 50 or more and that's OK. At least one ball peen and the rest can be cross peen. At least one cross peen hammer at 1-1/2 lbs and another at 2-1/2 to 3. Bolt tongs with box jaws are most universal. Jigs can be built to hold flat iron securely but flat jaw tongs are almost useless for most work. Some variety of anvil hardy tools and some top tools are needed but will depend on the smith. However, you need a good hot cut - both for the hardy and as a top tool. I also have a round drift I use constantly - small end is about 3/8", large end is 1-1/4" - tapered uniformly for 8 or so inches.
-
If you are having some trouble visualizing how the material moves with different parts of the anvil and hammer, you can get a small amount of modeling clay and work with that to get a view of what the steel will do when struck a certain way. It's also helpful for odd projects that require steps to be done in a certain sequence - you can work it out in the clay before spending time in the shop. I agree that re-bar is a hard way to start as some pieces are high in carbon and prone to burning if overheated. Get a small variety of several stock sizes (it's fairly cheap) and make the item with a minimum of forging. In other words, don't plan to hand forge a piece of 1" stock down to something you can use for a hold-down on the anvil. Persistence, persistence - it will come with practice and an open mind.
-
I can't view it - is it password protected?
-
I agree with Jr. In the normal working range of many vises, the screw remains mostly covered by the box and/or a separate shield. The "wings" that come off the back profile of the jaws is a built-in deflector to keep junk from grinding into the screw/washer/box. FWIW, I bought a leg vise many years ago that was complete and fully functioning except the back of the box was broken off and the end of the screw exposed for a good two inches. I capped a piece of 2 inch black pipe and welded it to what was left, then screwed a grease fitting into the end. After an initial filling of grease, I could close the vise and hit it with a few pumps, which would push grease from the inside out and often any trash that had collected on the outermost threads. Might not be 100% period but it's a good way to keep everything clean and lubed.
-
My honorable son #3 (19 years old) is driving a Bradley Fighting Vehicle as we speak. He has not yet deployed but tells us he will be in the next battalion to be called to duty. All we can do is trust in the Lord to protect him from harm (that and his tank's composite armor ). Hats off to all vets - current and past...
-
Great work on both items - my mother's side of the family is Danish so I am fond of axes, must be in the blood...I have always thought the Scandinavian styles to be pretty cool looking.
-
I would not want to mess with you in a dark alley...;-) It has a decidedly wicked look. Did you do any heat treat on the dagger or leave it as normalized? I made some push daggers for a fellow some years ago using 1080 plow steel and they held a pretty fair edge with no hardening/tempering.
-
-
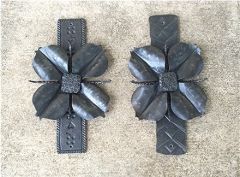 Two of eight decorative wall sconces. Approx size 10" L x 6" W.
 -
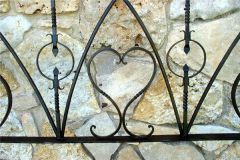
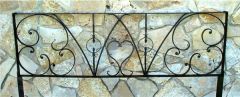 Kingsize bed frame with lots of scrolls. Sandblasted and finished with gun bluing and urethane overcoat.
 -
-
Not speaking for Bjorn but I think he means the way the corners of the square stock are softened by the hammer's blows.
-
Cable makes an interesting pattern - especially if you leave the handle so the original material can be seen - but it is more or less homogenous material. In other words, since it's not evenly mixed strands of wrought iron and 1095, the etch doesn't look the same as a planned billet of materials designed to reveal a specific pattern. This is simply a point that shouldn't be ignored in the final product and not a criticism. The primary purpose of the various pattern welding techniques used around the world before the industrial age was to produce a usable item - with pleasing architecture a secondary (although important) result. In current times, the art is more important than function. This is not to denigrate the performance of damascus in the real world but finished appearance now outweighs edgeholding in most applications.
-
If you ever start making a few scroll forms - so several similar scrolls can be made more quickly - the negative space concept really becomes very apparent because the scroll is rolled over the jig. I once did a little experiment, which was to free hand a small scroll to the best of my ability. I tacked it to a piece of angle iron, which was clamped in the vise, then I made a fresh one and rolled it about the scroll I had just made. It looked quite wrong - but I tacked it to another piece of angle and kept going. What happens is that every other size looks "right" (up to a certain point, then the center gets too big). The form is the negative space inside a properly made scroll. I've studied the pics in detail and think the top one is perfectly executed - for all the reasons Ed already gave. This type of scroll would be very hard to do on a form so accurate freehanding is about the only way.
-
Use the Japanese method and employ clay to make a hardened edge with a softer middle - or - harden the whole thing in oil and temper the entire blade in an oven. Can sharpen with a hand stone but it may take a while. Could also use a right angle grinder and fine sanding discs but be careful not to overheat.
-
I can't speak to the clay covering that helps form the hamon but I have handled a few original Japanese swords and all I have seen were pinned with one or more tapered wood dowels. The tang is tapered and completely encased in the handle plus everything is tightly fitted so no slop is evident. The handle lines up with the hole in the tang and the pin is driven into place. The makers wanted the hilt to be removeable so cleaning could be done periodically. I once handled a very long katana at a sword show that had three pins but you seldom see more than one or two pins. I have also seen pictures of very old swords that were refitted from tachi to katana, which have multiple holes drilled in the tang - probably because the new handle didn't work with an existing hole. The covering on the handle was often shark or ray skin to provide some roughness for a good grip, then the handle was wrapped in silk cord. This makes a good surface since a combat handle had to be held firm by hands potentially covered in blood and sweat.
-
Mon gran' pere used moth balls on everything in their closet including his hats so that's why I suggested it. I have never liked the fragrance - most prob'ly 'cause he and grandma always smelled like...well...moth balls.:-)
-
Interesting subject...my sons are avid gamers but I am not (although I do watch them on occasion). Bad things that can happen: 1. The gamer is making a sword blade and it burns up because it was left in the forge too long at too high a temp. 2. A clinker forms because the smith took too much time to make an item and the fire gets cool so the gamer has to clean the fire. Skills: Hit the same place twice with the pointer (hammer) so the part comes out straight. Improper hammering makes an item crooked. You could also double team with a striker so two players could participate with the same concept. The ore idea is a good subplot - the smith puts the ore in a crucible and melts it to get the base material. I may think of some other things but other folks can chime in.
-
A fellow called me tonight about trying to fix his great-grandpa's beer stein. He thinks it's pewter. It was lying on its side in storage and became somewhat oval, either from heat in the storage building or weight from something else or both. I'm not sure I even want to mess with it but I also don't like leaving people hanging if I can give them a suggestion. My thought was to make a uniform cone shape from wood and tap it into the mouth until the roundness was restored. Has anyone done anything similar or have some sound advice (besides the obvious - "BE AFRAID, BE VERY, VERY AFRAID")...:-)
-
Mills, Keep them in the box if possible. They like to be upside down and supported all the way around the brim. Put some moth balls down in the bottom of the box to protect from weevils or any other eating insect...
-
I settled on the "French" pattern many years ago and use that for my primary battle weapons...:-)