HWooldridge
Members
-
Joined
-
Last visited
Everything posted by HWooldridge
-
I made some racks from square tubing that attach to the side of the shop to hold 20' joints. Between two of the verticals I welded a tray that is five feet long and two wide with an expanded metal bottom. This will hold anything less than 5 feet but I also built a box that sits on the floor for pieces shorter than 18" so stubs, blocks and miscellaneous stuff goes in that. In addition, I mark non-ferrous, stainless, tool or spring steel and keep that separate from the mild.
-
Coolie hat - which is a circle with a small pie wedge cut out and those edges then pulled together and riveted. To increase flow, you can put a smaller coolie hat upside down inside a large one. This will cause the hot gases to exhaust easier. I have a plain 24" coolie hat over a 12" stack with 12" of space from the lip of the stack to the bottom of the cap. Not much rain gets in and this design exhausts just fine in my shop.
-
As a footnote to Ed's comments, small shapers are quite handy and often very cheap at auctions and estate sales because people either don't know what they are or don't want them for industrial use. However, a great deal of work can be done on a relatively small machine with minimal tooling.
-
Doesn't show too well from this angle but the tips of the flames are making a right angle turn into the stack. This is an old material hopper turned upside down and the "bottom" cut out to clear the stack, which is a piece of galvanized 12" round duct (not visible in this pic). Some folks say galvanized is bad to use but I think it is far enough away from the fire (too warm to touch with a bare hand but not nearly hot enough to make oil smoke). Using galvanized right next the fire might generate some fumes but I just don't know... This forge is in a pole barn with a 12 foot shed roof and the chimney is on the high side, with about 2 feet protruding. If I had a barn such as you describe, I would run two pieces of angle iron across two trusses and box in the stack, then go right thru the roof. Seal with plain flashing and plenty of tar, followed by a "coolie hat" on top. Such a chimney will likely pull most of the smoke and ash with no problem.
-
Rick, Centaur Forge (and probably Amazon) has a lot of wrought iron books for various periods. Here are a few in my library that I can see from the computer: Treasury of Ironwork Designs by Grafton Early American Wrought Iron by Sonn Colonial Wrought Iron by Plummer I also have all of the books by Otto Schmirler and the COSIRA publications. PS - I forgot to add that Dona Meilach's books are also outstanding. Mr. Smith from Perth, I actually have a method that works reasonably well on scrolls. I draw the scroll on the table until it's satisfactory to my eye then measure the length with a seamstress tape measure - my wife is a quilter so there are a few lying about the house. A seamstress tape is made from cloth or plastic and easily conforms to the shape of the scroll. If there is a taper or other element involved on one or both ends, I estimate the amount of material needed and go to forging. On most scrolls, the ends are completed and the body bent cold with forks so it's easy to 'tweak' if the finished piece is a little too big or small - but it's pretty close in most cases.
-
Rick, I feel your pain. I've always said that I can make anything that someone else designs but I have a lot of trouble pulling something out of the blue. That must be why good designers are so well paid... It helps me to have a lot of books at my disposal for reviewing both old and contemporary work. If a customer wants a lamp stand, I can look at Renaissance pieces, or 18th colonial, or Francis Whitaker, or Albert Paley, etc, etc, and get a sense of something that will be my design and not a knock-off of another artist. I can tell you that it gets easier with time and practice so some things will start coming faster and with less effort. For small pieces, I work like Ten Hammers if making a 'one-off' and like him, I record stock sizes in case I have to repeat it. I also do some production pieces, so those are designed with speed in mind. Almost everything is sketched, however briefly, on one of my 4x8 layout tables in chalk. Makes it easy to forge the piece and compare to the concept. In many cases, I also make an extra item and keep it as a "last article" so it can be compared to the next run.
-
What mix of ingredients did the Japanese use? It had to be fairly easy to obtain since there were no chemical houses to buy from in the 15th century. The book "Craft of the Japanese Sword" by Kapp and Yoshihara has some pics and a brief summary of the process but did not provide a detailed recipe and work instruction on how to do it. However, Yoshihara's results with temper lines are pretty amazing.
-
I'm not answering for JPH but medium carbon steel holds an edge just fine for an axe and is not as brittle as a higher carbon grade. I've made a few 'hawks by punching a hole in an air hammer bit shank and then forging the edge. This is pretty fast and makes a good, serviceable tool. I also have one from mild steel with a high carbon edge that Bob Patrick made at a demo here in my shop. I gave that one to my son and it has seen heavy, regular use on typical ranchwork for the last several years without failure to any of the welds. As I recall, Bob rough forged a piece of 3/8"x2" flat mild steel on the power hammer in one heat to get the eye section and then wrapped it over the horn to lay the blade sides together. He then fluxed the inner surfaces and forge welded the blade but left a cleft for the edge steel. We broke off an old 10 in Nicholson file and he used that for material. He wedged it into place and crimped the sides then one more heat welded the edge and allowed him to finish the shape. All in all, it was a very good demo on forge welding with a minimum number of heats to finish and resulted in a fine tool that my son may well pass on to his kids.
-
Machine tools (like so many other things) often have regional pricing. Lathes are fairly common in the NE and Midwest but not so much here in South Texas. Yes, there are/were machine shops around here but not to the tune of what is around some of the "motor cities" and other industrial centers. Therefore, it might be easier to get $1200-$1500 here or some place where they are not so common. I paid $1500 almost twenty years ago for a 10" Sheldon with all the chucks and such but no taper attachment. It is not pristine but has served my needs and paid for itself many times over. Mesquite is similar from the commodity perspective. Here, it's a weed growing everywhere. In New York, it's a designer wood for chefs and a high priced material for wood workers and carvers. Personally, I prefer oak and pecan for BBQ... I've never walked from a deal that I still regret. I either bought and still have the item - or I sold it - or it was out of my price range. I've made a few boo-boo's buying and selling cars but always been lucky with tools of all types and cannot recall ever losing money on anything that I 'flipped' for a profit.
-
I have made them for both wooden and metal posts. An easy way is to forge a light upset on the top end of a piece of 3/4" square, punch a hole thru the stock about 2-4 inches from the top, twist the bar in the middle and put the ring stock thru the hole. You can do this any way you like but I thread the rough circle thru the opening, then forge weld the ring so the section is consistent and the ring will rotate freely in the hole. You can also make the ring look like a door knocker so the ends pivot only in the up and down direction. Re the mounting, I like to make a hole in the 'crete, plumb the post and pour lead around it. There are lots of other ways to do this part, including some very good modern epoxies but I like the look and period accuracy of lead. Probably the best finish is a combination of paint and clear coat. I typically spritz on a light coat of the cheapest black paint I can find, then abrade the high spots with sandpaper after the paint is well dried. Add a little metal patina here and there followed by shooting a couple coats of clear satin urethane. After that is completely dry, I finish with a coat of paste wax. This combination is fairly easy to work with, cheap to apply and lasts quite well in my local climate of intense sun and sporadic rain.
-
I have never had much success with wood ashes and have better luck annealing stuff by placing in the gas forge after an evening of forging (so the forge is plenty hot) then turning it off after the subject piece has soaked a bit. I have to pay attention since the forge is usually running way above austenitizing temps so I turn it off before the piece is the same color as the fire. Wrap the piece in foil if scale is an issue to the final product.
-
I have been stung by set tools under power hammers - or by trying to straighten a piece of cold steel (which is a no-no for me henceforth). I had a 25 LG for several years and put a simple bar cage in front of the spring but never added anything else. Fortunately, I have not been seriously hurt in my years of doing this but in order of seriousness, the worst ones for me are: 1. Right angle grinder with wire cup wheel is deadly - has gotten me several times. A 9" with a grinding wheel also took a piece out of my wrist down to the bone once. I was beveling the end of a piece of pipe and was flipping the grinder, which spun the wheel right through space then occupied by my arm. 2. Bench grinder with wire wheel - need I say more? 3. 12" PSA sander. The discs sometimes pucker and the high spot will catch you at a bad time. I lost a good piece of flesh to one while sharpening a shear blade not too long ago. I seldom get burned anymore - must have figured out early that stuff was hot...
-
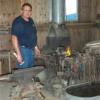
see attached photo Anvil and stand - this is the 250lb Peter Wright that I replated and rehardened about 20 years ago. The concrete stand is about 300 lbs so the whole thing is pretty stable. The stain on top is oil from the pump can for the p-hammer. I also have a 100 lb Hay Budden that is my demo anvil on a metal stand. PS - All this talk about old anvils - I had a Mousehole that appeared to date from the late 1600's, based on Postman's book. It was not in outstanding shape but still plenty serviceable considering the age - I sold it to a fellow smith in this area. Pretty cool to see an old lump of iron still being used.
-
The power hammer debate will really get opinions flying in all directions. Some camps love small hammers - others want the biggest available. Some advocate only drawing dies, other folks want flat dies and still others like "half and half". Depending on who you talk to, air, steam and mechanical are each the best design. Like hand hammers, there ain't no one right answer. I once watched a guy work a piece of 3/8" square on a 4B Nazel...because he could...but Francis Whitaker owned a 25 LG (as does Dr. JPH) so the art does not stem from the size of the equipment. My first hammer was a 25 LG and I now have a 100 lb Beaudry. I have worked on a plethora of mechanical hammers but only a few that were air powered. There are common principles among all - principally that some sort of reciprocating ram hits the hot stock between dies. After that, the descriptive field gets pretty wide open. IMHO, the LG designs in 25 and 50 are decent hammers for the typical home shop or single professional but they take some savvy to repair and keep tuned. Ones in bad shape are at the least, a waste of heats and can be deadly at worst. With that said, the newer self contained or compressor driven air models such as Iron Kiss and Big Blu are probably a better choice for the average user. Like I said earlier, I prefer flat dies but I spent a lot of time making a bunch of tools to fit on those dies so if you want to get a power hammer to hit hot iron and make it move, a set of fullering or drawing dies will meet the need. Past that, you may need to get creative to do very much else. A power hammer does not serve the same purpose as a treadle hammer or a fly press, although a few people can make each one perform some of the processes that may be better suited to another. Everyone has different personal tastes, levels of income, workplaces, skill sets and experience, so all I can recommend as general advice is to sit down and make a few notes before spending time and money obtaining something that may not suit your needs.
-
Hay Budden made good anvils. I put them in the 'very best' category along with Peter Wright, Trenton and other period makers. I had the pleasure of demoing on a 400 lb'er that was a joy to work on - almost threw the hammer back at you.
-
Ellen, A huge topic, to be sure...I am a student of the flat die school so have 4x7 flat dies on a 100 lb mechanical hammer with a lot of "saddle" tooling and loose set tools. Many other smiths like combo dies and I do not believe there is one "right" answer. A lot will depend on what type of work you do and what your comfort level is in running the hammer. Having said all this, I'd probably start with the combo dies for general forging until you are quite comfortable with the hammer, then try something on the flat dies with a set tool.
-
I personally would not leave the mandrel in place while welding. Forge close to final fit and position then weld just enough to make the pieces join soundly. Won't take much hammering to do this - just close it up and get the stock to a consistent size. Afterwards, if the hole is not perfect, a drift can be driven thru or the hole bored out with a drill bit.
-
Might be M2 or a variant thereof. It is sometimes considered high-speed steel.
-
I posted this on another forum and someone said the same thing about radial marks. I should have been more clear in my explanation - I tip the drill motor vertically toward the wheel so the grinding is done lengthwise on the electrode. Of course, the 'trode is spinning in the drill chuck while the wheel is turning but I haven't detected a difference in arc characteristics. Someone much better and more experienced at TIG than me remarked that he could not tell any difference in grinding direction so I just don't know which is correct.
-
I agree with you on the contamination as I have my old bench grinder set aside with a clean wheel to do nothing but tungsten. I use the belt grinder for everything else.
-
I am kind of particular about clean sharp electrodes every time I weld with the TIG. I also will sharpen several pieces and swap them out periodically if I have a long job. I was casting about for a faster way to sharpen the tungsten and chucked one in my 1/4 hand drill then spun the end against the bench grinder wheel. Presto, sharp point in about 3 seconds.
-
Drill out the center and knock out the slivers with a chisel. It's not hard to get the glued pieces out once the middle is gone. I have a 3 lb hammer I "goop'd" about ten years ago. It loosened once a few years later and I redid it - has not loosened again.
-
I'll tell what works quite well for me - plain old household GOOP. Fit the handle as best you can, then coat the wood and head with the glue. Drive the two together, fit the wedge and wipe off the excess. Try it once - I think you'll like the result.
-
Ed, Actually, all the breakage came from the same lot of steel. I bought a bundle of 3/4" and all the work was out of the same batch so there may be some validity to that explanation...H
-
I would roll them by hand with a hammer (hot, of course) and then drive a drift thru the hole to make sure the pin fit. This is pretty fast once you figure out how much stock to leave to make the barrel.