
knots
-
Posts
734 -
Joined
-
Last visited
Content Type
Profiles
Forums
Articles
Gallery
Downloads
Events
Everything posted by knots
-
That says it all. It's gotta be good.
-
Take a peek at this thread, sounds very promising. http://www.potters.org/subject119531.htm
-
OK Jim I am hooked. How about showing us a video demonstration of all that this machine can do.
-
Treadle Hammer Question
knots replied to wd&mlteach's topic in Power Hammers, Treadle Hammers, Olivers
There is no time like the present. Why not build your version now ? Or at least draw it up so that someone else can build it. I, for one, would like to see it. -
Treadle Hammer Question
knots replied to wd&mlteach's topic in Power Hammers, Treadle Hammers, Olivers
Thanks Frosty - Nice hammer for sure. Not many of us have a shop or financial resources to build one like that fine piece of machinery. From my own personal perspective building the hammer that I did was eminently doable with the available technology and with most of the materials already in place on my steel rack. Even if that splendid design had existed back in 1990 when I built mine, I would have likely built the one that I did because there was a clear path to success. It is built and has been in used since then. Still you have got to admire those who build something like that. -
I have been considering using one as a saw stand. I have one pedistal stand which used an old flat belt sheave for the base. However it is to short and light for my current wet saw set up. The disks that I have are the type which slipped onto a hub with lug bolts. it will be very simple to make up an adjustable post and roller assembly for that stand using the brake disk as a base. The original question grew out of the thought that a brake disk might be a foundation for a dinner gong forming fixture. The plan was to weld a 2" rim formed around the brake disk perimeter. If the disk is cast iron as reported, this would not likely work because even if I could get the hoop welded on the disk the question would be if a steel to Cast iron weld would hold in used as a form. The simple thing is to roll a ring or cut a ring out of a large diameter pipe, and then fit and weld a steel plate disk to the ring. In this case the stand works but the gong pan fixture will not.
-
Creative solution to an anvil waist break?
knots replied to SilverDeck's topic in Anvils, Swage Blocks, and Mandrels
More likely this is a retired ships anvil. I have seen a number of anvils that were known to have been ships anvils for which it was standard practice to cut the anvil at the waist and affix them in some manner( unknown to me) to the ships deck. Most of these anvils that I have seen have been re-welded to their base upon return to shore service. Some to an unrelated base. I would like to hear from someone who has seen one of these anvil installed on board a ship. Perhaps some one here can further enlighten us. Interesting anvil prosthesis. -
Treadle Hammer Question
knots replied to wd&mlteach's topic in Power Hammers, Treadle Hammers, Olivers
Frosty - I remember Grant Sarver's spring assembly was a compression spring in a tube . That system was compact and worked directly on the parrallel arms from below to lift the ram. I have also seen other hammers using the cable treaddle linkage where the springs were mounted above the hammer and parrallel arms. That system required more headroom for the machine but freed the treadle of the lift linkage function. A picture of your machine would help us better understand the specifics of your machine. I am always interested seeing alternate design solutions. -
First thing - No Plastic please. Although it is nice to have a welder it is not necessary to have one to build a gas forge. I built my first gas forge back ib the early 80's before internet offered any information on the subject. My solution was to use castable refractory for the forge body and 2" pipe and fittings for the burner. The blower was Graingers acquired 4" surirrel cage type which I still use in two of my current forges. So the answer to your question is Yes you can build a forge with a blown burner without a welder . The upside side is that there is a much simplier way to go. When starting out it is a good idea to keep things as simple as you can. There is a lot of information on gas forge builds in this forum so dig in and read as many of these threads as you can stand and then use the information gained decide how you want to go about building your forge. In addition to this forum there are local blacksmithing groups that you should connect with . Once connected to a group you will be able to see first hand what others have done. So far as fire brick is concerned what you really need is an insulating refractory material which can be had as insulation fire brick, fiber board, or fiber blanket. So dig in search and read . I suggest that you start with atmospheric burners.
-
This Fall send a PM to remind me to pick up a bunch of hedge apples which I can post ot you . There is a stretch of RR siding near me that is hedged with Osage Orange . I would think you could grow a forest of trees from a few apples. So far as trees ready to plant Idoknow. Have a look at this link. http://www.ehow.com/how_5611111_propagate-osage-orange-trees.html
-
So here is my flaw . My camera is not up to high resolution detail shots but I think you can get the idea of what is going on , at least with mine. The hook shape flaw looks like a small forge welding flaw which has , over time, come loose . The thing that is amazing to me is that, with these old anvils, you do not see more of this than we do. When considering the process that was used to produce these steel plates back in the 1850's, the process of joining them with the wrought iron body, and the fact that these anvils have out-lived generations of smiths under hard use, I am awed by their acomplishment. My take on your anvil is that it is a good serviceable anvil that has seen it's share of abuse but will survive to serve a few more blacksmiths. I would continue to use that wonderful hunk of iron and steel as it is. When I bought my main anvil, a 300lb Peter Wright, it was badly pitted and had hammer and chisel marks. However I elected not to grind or polish the face. Over the years the work has healed the surface to the extent that it is not objectionable ( to me at least) . Sometimes less is more.
-
Treadle Hammer Question
knots replied to wd&mlteach's topic in Power Hammers, Treadle Hammers, Olivers
Since each build is unique and local avalability of springs varies, it is really difficult to plan/get the springs right the first try. Multiple spring sets are easier add or sub tract spring power to fine tune your machine. -
I have an old unmarked anvil of this pattern . There is a small flaw in the face that looks like a delamination of the surface layer of the blister steel face . I say that because the bottom of the flaw has a fiberous texture. On mine the flaw is really to small and shallow to make a difference in the function of the anvil but I have been watching it with interest.
-
I protect there fractory fiber insulation of my forge floors with a slab of groged fire clay as follows: My forge floors are made up of fire clay heavily grogged with fire brick with a bit of graphite added for wet workability. This mixture is rolled into a 3/4" deep scrap lumber frame nailed onto a piece of plywood to give it a uniform thickness. When dried to leather hard this sheet is transferred to the forge and placed on top of the fiber insulation. Since leather hard it takes on the shape of the forge bottom. When dry the forge is fired. The bottom fires hard, in place, with that first firing. This method is especially useful for pipe forges since the forge bottoms are curved. It should work equally well for a flat bottom forge and has proven to be very durable over time.
-
Back in those days Austin was a small town . The only place that I can think of that would have had line shaft powered equipment would have been Calcasieu Lumber company . Some where down on West 3 rd street, or there abouts.
-
I tried the wetting solution once and it was not worth the $$$. Been so long I can't remember the contents. But it seems like it was a bit foamy. So when I use mine I sometimes add a little dish washing detergent . In truth water works fine without amendment.
-
This one of my favorite tools. After all blacksmiths are on their feet constantly. Consequently I have a 4E foot in a 2E world. There are special stretching solutions that you can purchase however I just wet the area that needs to be streatched and work around the area a bit at a time. I suspect most blacksmiths need one from time to time. That is pretty close to being a blacksmiths tool.
-
Very Nice. Below are a couple of thumb nails showing how I use ballast to keep one of my benches from moving around in use. This method works well, The angles on the bottom make it easy to move the bench out of the way using pipe rollers when extra space is needed One other thing. Some of the older leg vices have coiled square wire threads brazed into the screw box cylinder rather than machined threads. I would use heat as a last resort to loosen the frozen screw in your other vice. Being aware that the threads could be brazed in, you might imagine the unfortunate result of using heat on the outside chance that your vice is constructed that way
-
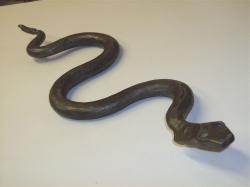
Thanks Jim, From the deterioration that I observed, I basically had given the idea up. However I was surprised that the corrosion damage revealed what appears to be a complex structure of the metal. As usual my curiosity has kicked in . The tthumbnail may not be sharp enoigh to show the change in metal across the thickness of the disk.
-
I was thinking that a brake rotor disk would be a good start rotating jig . The first one i picked up is unusable because of corrosion but the corroded edge got me to thinking. Have alook at the thumbnail of the disk edge below. Looks like this one was lamimated. Anyone have information of how and from what brake rotors are manfactured .
-
Implemented a new method yesterday. I call it direct action extermination. One ran in front of me and I stepped on it . Natural selection in action.
-
Treadle Hammer Question
knots replied to wd&mlteach's topic in Power Hammers, Treadle Hammers, Olivers
Jim, The Bumblebee Is a fine machine. Because of what you have shown us there, I am looking at the hydraulics for the anvil. -
Treadle Hammer Question
knots replied to wd&mlteach's topic in Power Hammers, Treadle Hammers, Olivers
Jim - That is working work of art. Never have seen one quite so clean. Wd&miteach - I packed my anvil column with railroad steel. Welded it together and to the bottom base plate, threaded it up into the anvil column and then welded the top of the bundle to the inside of the anvil column. Why not combine your scrap steel punch outs with Jims concrete idea . Fill the anvil column full of steel punch outs grouted in place ? 180 pounds of molten lead would be give a super result but the thought of dealing with that much molten lead is thought provoking. -
Treadle Hammer Question
knots replied to wd&mlteach's topic in Power Hammers, Treadle Hammers, Olivers
" My response from posting 23 of this thread " "So far as the Planishing Hammer Idea is concerned, the idea is there, maybe a future need will arise." -
Treadle Hammer Question
knots replied to wd&mlteach's topic in Power Hammers, Treadle Hammers, Olivers
There was a modifier used with "contrived". The correct quote woud be " over contrived " . However since we are both just - thinking out loud - I understand your point. I really consider the use of back to back machines with a common frame to have space saving benefits over seperate machines especially In the case of Wd&mtteach's double channel frame. That frame would support a robust planishing hammer . I do not see a functional down side.