
knots
-
Posts
734 -
Joined
-
Last visited
Content Type
Profiles
Forums
Articles
Gallery
Downloads
Events
Everything posted by knots
-
Looks like the holder design is well considered. The only other suggestion is that the tool hole be drilled all the way through the holder body. This is so that if a tool ever did get stuck in the holder you could drive it out from the bottom.
-
So the V in the back of the ram recess matches/alines with the V in the bolted block ? If that is the case it seems like nothing more is required. Just insert the tool shank in the opposing V's and tighten the removable block. Could well be that I am missing something here.
-
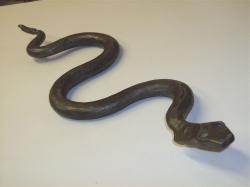
Here is a photo which Shows the 2 of 3 tool holders that I made for my press. The dovetailed tool plate shown is the original hardened plate which was to hard to drill and tap so I elected to make another which could be easily drilled and tapped to receive the tool holders ( that plate is installed in my press and not shown). If you look closely you will see a shouldered demolition chipping hammer tool. Since the punches, slitters, and other tooling used in these presses need to be shouldered I elected to use these demo hammer tools as a basis for my smaller tooling. They are readily available used in dull condition for around $2 each from rental stores. From each tool bit you get one short shouldered tool for the press and a second longer un-shouldered cutoff to be used for hand held punches. The steel is plenty good for most uses. One of the pictured holders is holding a shouldered blank tool. Some press owners elect to have a single tool holder with a large bore. They accommodate smaller diameter tooling by using sleeve reducers. It is important that tooling be shouldered. A recent post described a newly acquired press with a tool mushroomed and locked into the holder.
-
How about showing us your tool holder block.
-
I found the Waterbury Farrell catalogue which contained my press in Google Books. The catalogue indicated, that mine was a die makers tool room press designed to be used testing dies. Perhaps you might find a catalogue listing for yours there as well. In any event yours looks like a good press. Did any tooling come with your press ?
-
Is it a one or two start screw ? My press has a two start screw with 1 1/2 inch lead and works fine for most work.
-
Nice forge. My first forge was made out of an Hibachi. Welded up a air tube and ash dump, lined it with refractory (as with yours) jamed a wad of chicken wire in the air hole, and forged away. You may have bigger better forges in the future but this one will always be remembered with satisfaction.
-
When I got my peter Wright it was a bit rusty like yours. The edges were good. No chips Like yours. After a good wire brushing which allowed a close look at the anvil face. It was pitted as yours will likely be. After considering cleaning the face up with abrasives I decided to use it as it was with the pits and see how my forgings looked. They looked OK so I just kept using it as it was. Although the pits have never completely disappeared they have worked out and down so that there is no visible effect on the forging and the anvil face feels smooth.
-
From what the thumb nail shows I am with Thomas on this one being oil or gas fired because I see no evidence of the provision of an ash dump. Having said that I would like to see how Larry H has configured his forge to work with coal. Hopefully he will be able to either show us his or describe it if pictures are not available.
-
Looks like you done good. The edges appear to be clean and undamaged. Can't really tell if or to what degree that the face is pitted . In any event that looks like a good solid serviceable anvil. The only thing I would do is to wire brush the anvil face and get going. If the face is a bit pitted the pits will tend to be worked out with use. One thing not to do is to take a grinder to it and thin the plate in order to pretty up the plate. Far more harm can be done by grinding than almost any thing else you might do.
-
Most of my hammers have a handle about two hands in length. That is The width of my closed fist,including thumb, times three. Some handles are longer but the extra length does not get used. The neck is usually about one fist in length. I usually grip the hammer one fist width back from the hammer head. This held position is, for lack of a better term, home base with my hand sliding backward along the handle occasionally for a stroke or two. I view the handle configuration as an integral part of my hammer technique. Their shape reflects and supports how I use the hammer.
-
For metal work wood is the only material that I use. I suppose that fiberglass would be an acceptable substitute if it could be shaped to fit the hand easily and the availability cost were equal to wood. If you modify your hammer handles to fit,then wood is the material of choice. For me, wood is the clear choice for comfort because I make or modify all of my handles. Steel handles are a non-starter for my metal working tools. Don't like the feel of them as they strike. Don't like the Rubber handles. I vote not comfortable. I have often wondered how laminated bamboo handles would feel.
-
what causes an anvil to "Go Dead"
knots replied to poundhound's topic in Anvils, Swage Blocks, and Mandrels
If it is a plated anvil and the plate delaminates the rebound can be affected. Plate de-laminations are not common but do occur. Is your anvil plated or cast ? It looks to be cast. In any event If good now it is likely to stay that way. -
what causes an anvil to "Go Dead"
knots replied to poundhound's topic in Anvils, Swage Blocks, and Mandrels
Have a look at this Czech import. The"Blacksmith" anvil looks kinda familiar. They also have Peddinghaus and Habberman patterns. The specifications say manganese iron but the analysis indicates steel . Anybody know anything about Branco and these anvils ? These appear to rise above the standard of ASO's but quality is otherwise unknown to me. http://www.branco.cz/anvils.htm#Packing%20of%20Anvils -
Did I waste my Money, and any info on what it is?
knots replied to 03sp500's topic in Anvils, Swage Blocks, and Mandrels
Well it seems that it is somewhat hardened. When I run across this kind of situation where I want to drill a hole in a piece of iron that doesn't really want to be drilled I will use my Oxy Acetylene torch and heat the spot up to about 500 Deg. Not much heat at all. Drill a smallish hole first. If it is a thick piece drill and heat and drill alternately until you have a hole all the way through the work piece. You can then aim the torch flame through the hole to anneal the area around the small hole and allow drilling a larger hole. There is a learning curve when first using this method but with care you can drill holes in pieces that you would not normally be able to drill while preserving some of the hardness in surrounding metal. It does not always work and if drilling a lot of holes sometimes it is best to anneal and re treat the steel High speed drills seem to do ok at these lower heats so I don't usually cool the metal before drilling but I do cool the drills . -
what causes an anvil to "Go Dead"
knots replied to poundhound's topic in Anvils, Swage Blocks, and Mandrels
Sounds like you got the real thing. Congratulations . If that is a 1940' German anvil you have a fine anvil indeed. So far as the ring is concerned, there are a lot of posts and almost as many opinions as to the best way to tame the anvils ring. After using mine in sand for years I finally settled on fabricated or forged Z clips. My anvils are mounted on wood stumps with a layer of 120 lb roofing sheet laid down between the anvil and stump acting as a gasket (multiple layers of lighter roofing will also work). The Z clips pull the anvil down so that there is complete and firm contact between the anvil and stump. That method made my rather loud PW go thunk. This method has also worked on steel stands. Happy Forging. -
Did I waste my Money, and any info on what it is?
knots replied to 03sp500's topic in Anvils, Swage Blocks, and Mandrels
Nocomment, Phil brings up a good point. If those arms are medium carbon steel they could be used for a lot of tooling. Why not call the lift manufacturer technical support group and see if they can provide any information Re what these lift arms are made of. It could well be that you have a lifetime supply of an extremely useful material. Sure would be nice if it turned out to be 4150. You would be in hammer heaven. Even 1050 would be something to be real happy about. -
what causes an anvil to "Go Dead"
knots replied to poundhound's topic in Anvils, Swage Blocks, and Mandrels
Looks like an cast iron ASO to me. Look at how the anvil edges radius into the top. The stepped feet look like a cheap CI ASO I have seen advertised. That would explain the lack of rebound. Buyer Beware. One thing he was probably right about though is that it probably came off of a ship. Perhaps in a container with a thousand or so others. -
Did I waste my Money, and any info on what it is?
knots replied to 03sp500's topic in Anvils, Swage Blocks, and Mandrels
Looks like you are set. Nice looking heavy work surface. If you don't have access to a shop with a programable plasma cutter and want a real square hardy hole, drill multiple holes out as close as possible, and use a reciprocating saw as a file to clean out the leavings and corners (That is if the plate is not heat treated). It might take a few blades and some time but should be worth the effort. I hope you have a good drill press. What was that plate in it's previous life ? -
Did I waste my Money, and any info on what it is?
knots replied to 03sp500's topic in Anvils, Swage Blocks, and Mandrels
Or in a vice. But it sure is nice to have tooling at the anvil. Some European anvils have a hardy hole on the horn end. -
Did I waste my Money, and any info on what it is?
knots replied to 03sp500's topic in Anvils, Swage Blocks, and Mandrels
Very good buy. Looks like a Mouse Hole clone. Only thing you will really miss is the hardy hole. I bet you could figure out a way to drill a round hole for tooling. The plate is probably to hard to easily drill. If you could get a small hole through the plate one of those abrasive hole saws could be used to enlarge it to a useful size. Once through the plate step drill for a larger hole. A round hardy hole may not be ideal but would sure be better than nothing. Alternately either drill through the step or just weld at fixture a the broken end for tooling. Happy Forging. -
Need some help with this one...
knots replied to IRO-bot's topic in Anvils, Swage Blocks, and Mandrels
I had another look at the pictures this morning. Take a close look first picture which shows the overhanging plate above the chip out of the body. There is a dark line between the bottom of the plate and the anvil body. If the plate were securely joined with the anvil body I would expect to see a sharply defined corner between the two. What we may be seeing is a plate that is not joined to the body. If that is the case I would not buy this anvil at any price. -
Need some help with this one...
knots replied to IRO-bot's topic in Anvils, Swage Blocks, and Mandrels
My recollection is that Vulcan anvils are steel plated on grey cast iron. That being the case I would be skeptical about the chances of simply filling the gap where the cast iron has chipped out from under the plate using common welding repair techniques (preheat and weld). With preheating and special alloy repair electrodes, or bronze electrodes it may be possible but in this case we need the experts to weigh in. Bottom line is that the anvil looks serviceable as is but if cosmetics are important if would be safer to look for another unless you can find a welder who really knows what they are doing. In any event I would bargain because repair is not likely to be cheap. -
Welcome aboard. Now that is a serious table. So far as the vice jaw alinement is concerned, a little heat on the jaw arm down near the pivot and something to space the tight side of the jaw while gingerly tightening the jaws should straighten it without much effort. While doing this you really should block the hinge arm above the heated area as well to keep from bending the jaw arm which could raise the top edge of the front jaw.
-
I had my anvil mounted on sand for about 10 years. It sat in about 18" of sand on plywood. It was not clamped down and it shifted/leaned away for me over time. Could well be the an anchorage system would have solved the leaning problem but there is additional thing that you may consider. If I were to remount my anvil on sand again it would not be deep sand. I would use a clean loam for the majority of depth and maybe 3" of sand of course with the ply wood for the anvil to sit on. One potential problem that I see with the truncated pyramid base form is that the plywood needs to be fitted tight to the sides of the container otherwise the sand will be likely have a tendency to migrate up around the edges of the plywood with use . That base form is going to make a singe layer with tight fitting edges a non starter, however should be easily fixed with pieces screwed around the edges. They could be fitted to the anvil base shape to further stabilize the anvil location . Nice stand.