

Frosty
-
Posts
47,255 -
Joined
-
Last visited
Content Type
Profiles
Forums
Articles
Gallery
Downloads
Events
Everything posted by Frosty
-
It won't come up to temperature because you have a 1" burner feeding into a 90 cu/in forge, call it 8x the burner for the volume. The burner's ratios look pretty far off as well but it's the back pressure that's really killing performance. Make a 1/2" T or side Arm and it'll bring that volume to welding temp. You'll need to close the ends a little and use something other than hard fire brick or it'll take forever to heat up. For the volume you have, a 1/2" burner is about a 50% surplus of burner but not excessive to the point of restricting performance. Frosty the . . .
-
 Thank you Owen. Did you mark the stock with the framing square before cutting it on the square shear for the production? Watching you cut the stock it was pretty obvious you'd set the stop so the marks were irrelevant. If it's a secret pretend I didn't ask. <wink> I just notice that kind of thing, I spent I don't know how many hours working on a square shear in Dad's shop. Frosty
 -
I don't. A slightly reducing forge atmosphere suits everything I do. You do much more varied work than I do. How much do you adjust the atmosphere? All the way to oxidizing? If so for what? I've found a neutral flame tends to allow spots in the chamber where outside air is drawn in and makes scale zones. Keeping it on the rich side eliminates scale. My original 1" T ran so rich it would reduce scale and rust in the forge. WAY too rich, my gums would start buzzing if I stood down wind from it for very long. When I was tweaking the current T burner build I got a couple that ran lean, choking them was a PITA and usually involved aluminum foil or a little Kaowool in the air intakes. Using the slide and set screw method for the jet holder pipe would be an easy fast way to tune on the fly though I'd prefer a vernier so using a swivel fitting for the supply line/hose and threaded pipe and luck nut for the holder would give much finer control.
-
The ratios for a proper air fuel mix in the induction devices we use for naturally aspirated burners is based on the "throat" diameter. The throat is the narrowest cross section after the air intake. This is typically the beginning of the burner tube or where the pipe nipple screws into the T in a T or "Side Arm" or the bell in a linear like an EZ burner. The ratios are as follows. The length of the tube is 8-9 x the throat dia. The jet sets back 1/2 the throat diameter from the throat and the air intake cross sectional area is approx 2x the throat area. The jet setback is the starting point. In home made burners the easiest way to tune them is to move the jet in or out from the throat. The farther back the more air induced, the closer the less. This applies to a home made burner be it a lineal or an ejector type induction device. They have zero to do with a gun burner of course. The output ratio to the forge volume follows reasonably closely unless you really push the output velocity. A choke's only purpose is to adjust the air fuel ratio from oxidizing to neutral or slightly rich. If you build the burner properly it's unnecessary. Using a mig contact tip for the primary jet came about because I'm too lazy to keep removing the gas supply to drill a slightly larger hole. I had no idea they produce such a nice linear gas flow to the gas output. Mike Porter makes good use of the feature in his ejector burner. I just like them because they make rough tuning the ratio a matter of changing tips till the flame is close enough to fine tune. I fine tune by trimming the mig tip. The farther from the throat the more intake air it will induce. If it's too lean use a large tip dia OR open it up with torch tip files. Files work better than drill bits. How I mount my jets came about because I couldn't get 1/8" scd. 80 pipe without special ordering it so I adapted what I could find. If you can buy scd. 80 1/8" pipe USE IT instead of my Micky mouse! It's ID is just right to tap for 1/4"-28 sae fine OR chase and tap for the metric mig tips. Buy the drill bits and taps where you get the mig tips. Chasing and tapping mig guns is NORMAL MAINTENANCE, they have the tools on the shelf. Yes Mark your flame is shaped well so the mig tip is aligned properly with the tube. You've done a good job building your burner it just needs tuning. Try the 0.030" and see how the flame looks and sounds. Right now your burner sounds what I call "breathy" It sounds hissy, might even whistle. The 0.030" tip will make it roar. The 0.035" jet will make it roar uncomfortably loudly like it should. The primary flame zone is the light blue opaque flame in the center of the burner/torch. It will tighten up into a shorter more conical shape and lose the feather with more fuel in the mix. The secondary zone is the darker blue more transparent flame surrounding the primary which will become shorter and tighter to the primary as the ratio becomes closer to neutral. It is the air:fuel that is unburned immediately and is consumed as it mixes in the lower pressure higher temperature of the secondary zone and is NORMAL even with oxy fuel torches. The "tertiary" or third zone is the fuel that is unburned because there isn't enough oxy induced in the burner through the air intakes of the burner itself. Your burner doesn't have a tertiary zone because it's too lean so the excess oxygen is consumed by forming scale on the steel in the forge or returning to the air you're breathing. You want just a LITTLE bit of a tertiary flame. Just a little bit of orange in the dragon's breath exiting the forge doors is perfect. Be aware this means it's making MORE CO Carbon Monoxide and it's BAD for you. good ventilation is a must any time you're burning anything but when you're burning a Rich flame CO production is higher and more dangerous. Good ventilation is a mantra you should live using a forge of any kind. a propane forge especially. Adjusting for a little orange in the dragon's breath might be the place for a choke but like you said, once set you don't mess with the choke. Lets' hope that is more clear than long winded. I've gone on so long here partly because I'd like you to know I actually KNOW what I'm talking about. Frosty the . . .
-
I don't like to discourage newcomers from being helpful but we get a lot of guys offering advice who don't know diddly themselves. Sure they may have cobbled something together that works sort of but they don't understand the original nor what they've done. It's a common human technique to keep adding things till what you had in mind starts happening. A good example is knots. How many things have you seen "tied" up with stack after stack of tangled cordage where one correct knot would've done the job AND been possible to untie without cutting? Heck a Granny knot won't slip if you turn each side twice or more so why learn to tie a square knot? Watching someone try to untie a tangle they made can be entertaining, especially since they usually don't carry a knife. Unfortunately the situation may occur where someone's life depends on their ability to tie a knot, whether it's securing a load on the roof of their SUV or climbing down from a second floor balcony in a fire. I've talked to Boy Scouts with the knot tying merit badge who didn't know a bowline from a half hitch let alone a sheet bend. But they TRIED says the Scout Master, we don't want to damage their self esteem. How about teaching them to take care of themselves? That way they have cause for self esteem, not a meaningless certificate. Schools have become about "through put for funding" rather than educational institutions. Oh crap, I replied to this thread. I've been trying really hard not to, it's too easy to get involved in a rant. Kids will be kids and like the bumper sticker says, "Hire a teenager NOW while they still know everything." I was like that, I think everybody was. It's the people who have been around a few decades who still think they know everything. I used to work with guys who believed a degree in one profession applied to everything. Office mooks who were challenged driving a screw to hang a shelf bracket. You can FIND a stud in a wall!? You can make a set of shelf brackets faster than you can buy them!? Okay, FINE. Just don't expect me to hang from your knots, trust a load you secured or your shelf to support something heavy. Heck, most folk don't even realize why I give a wall a thump with a knuckle under the shelf brackets or eyeball their knots on the load. EVERY-BODY'S knots and if you don't eyeball mine I'm going to double double check yours from now on. And NO I'm not PC enough to scream "HE TRIED!!!" on my way to the ground either. Frosty the old fart who's failed many a time in his life.
-
Welcome aboard Mark, glad to have you. Nice spread of anvils you have there, they all look to have a few generations of good use in them. Nice scores. Don't get caught up in trying to accumulate or learn everything, lighting a fire and starting the process is how you learn the craft. A lot of what you read won't really make sense at the gut level till you have some experience to explain it to your gut. The most complex demanding project is nothing but basic processes applied in the right order. Learning how to sequence projects will come after you learn the basics. Frosty
-
Let me get this straight Tim. You assume I have how many forges? You shouldn't assume other's have to live under your limitations. Your forge is a combination of commercial gas mixer and what else? You manually adjust the choke to control it to hold at +/- 3F temperature? +/- 3F!? Oh give me a break! For alloys that critical pros in AERO SPACE use professional heat treaters. The more I read and reread your last post the more I realize I'm just playing silly buggers replying to you. Frosty
-
Problem with large lap welds
Frosty replied to Iron Poet's topic in Axes, Hatchets, Hawks, Choppers, etc
I just realized I forgot to welcome you to Iforge! With my usual welcome aboard I'd suggest you put your general location in the header, you might be surprised how many of the IFI gang live within visiting distance. Maybe someone who does a lot more welding of that type than I. Okay, sounds like a technique problem to me though I'm sure someone who does a lot of this will be along presently. Let's see, you need uniform heat on both sides and the center. By the sound of it you're using solid fuel cover the project in fuel to insulate it from the ambient air and turn it regularly. When I do large lap welds I match the contact surfaces, shine them up and flux them cold before closing the joint. I've never understood heating a weld to orange before fluxing, even in the low red steel is oxidizing fast. Heck, temper colors are oxide layers. The flux being there when it heats maximizes the protection. Just keep flipping the piece till it's bright, almost sparking yellow hot on both sides. Move QUICKLY to the anvil, do NOT lay the piece on the anvil, hold it a fraction of an inch above the face and drive it into the anvil with the hammer. Use a fairly heavy hammer but NOT a heavy blow, just a medium thump you don't really want any bounce back. Flip it and repeat. Are you using a hammering pattern? The first blow needs to be farthest from an edge so any inclusions are driven to the edges. Lets think of the joint like the letter V with a letter I standing in the center. If you look at it from the side it'd look like a taco with a slice of cheese standing up in it. With me on the visual so far? Okay, the "bottom" of the weld is at the point of the V and looking at from the side the "Center" is the center of the taco. Your first blows needs to be bottom center, one on each side. Your next pair need to be in contact with the first blows but one hammer width to one side, say bottom left, flip it and one blow directly over the last blow or bottom right. flip it and one bottom right, flip it bottom left till you've run a pattern to the ends of the V. Listen closely if it even begins to not thud it's time to go back to the fire. However if you go fast enough you can make a setting pattern over the entire bit in the first heat but you gotta move fast and NOT lay the axe head on the anvil, ALWAYS hold it just off the face so the anvil doesn't draw the heat. I'm guessing 6 or fewer blows per side to complete the pattern. Brush, reflux and reheat, remember keep flipping the piece so it's equally REALLY HOT before you bring it back to the anvil. This is a refining weld so hit it moderately harder but use the pattern. Brush, reflux reheat and hit it harder. when you've finished the pattern let it lay on the anvil till the color starts to leave and eyeball it closely. If the color is uniform throughout without a sharp color change you have a weld. IF the color changes sharply at the join it isn't welded so brush reheat and repeat the pattern. Once you get it to heat the process takes a lot less tie than writing or reading this missive does. Frosty the . . . -
That piece of round shaft sounds pretty ideal to me. It's about 165lbs of steel, all sweet spot. You do know what the Japanese sword smiths use today don't you? That piece of shaft is WAY more anvil than they've been using for a couple thousand years. Give it a rap with a hammer on the saw marks and see if it smooths them up. If it does just put it to work or use a sanding disk on it. You'll want to radius the edges too, sharp corners make for cold shuts. It's going to be a little close to the ground for comfortable hammering but that's what stands are for. You'd have to give it an awfully imaginative try to come up with a fire pot that'd really turn heads around here. An old SS sink, BBQ, washing machine and brake drum, 55gl drum, etc. etc. and some clay make an excellent forges. It only has to hold a fire, nothing to it. Heck, you can use a wooden box, garden dirt and paper bags for the bellows. Just because I use a propane forge primarily doesn't mean I don't appreciate solid fuel or know how to use it. One of the biggest drawbacks to a gas forge is everything in it gets hot where a coal or charcoal forge will heat a small area if you want. If I want to heat a small area, say a couple inches I have to fire up my torch. Dig a hole in mineral soil, a short length of pipe and a blow drier and you have a solid fuel forge. Easy greasy. If or when you want to build a gasser, give me a shout. Frosty the . . .
-
No need, commercially made stamp sets are cold stamps, unless the steel has been hardened they work a treat. The letters in Froggy's example are cold stamps where his touch mark is a hot stamp. There is too much flat area in his touch mark to be done by hand cold and the wear and tear on the stamp would be significant. Frosty the . . .
-
Problem with large lap welds
Frosty replied to Iron Poet's topic in Axes, Hatchets, Hawks, Choppers, etc
Is the side not welding the one laid on the anvil when you first set the weld? When do you flux the join? You might try a low alloy high carbon steel bit rather than 5160, the chrome in spring steel can cause problems with welds. Simple low alloy 1070 +/- welds more easily. Wrought may weld easily but you have to get it a LOT hotter than steel. The more carbon the lower the melting/welding temperature. Frosty the Lucky. -
Dave: I don't have words to express how I feel. "I'm sorry for your loss," falls so SO short but I don't know anything better. I live in daily pain, broken neck, C1 chondyle, related skull fracture and the fracture on the left side of my skull, broken orbit, nerve damage, foot, leg, etc. TBI. Flat lined a couple times, coma. Learning to swallow, turn away from bright light, how to turn my head. Eat, drink, walk, talk, go to the bathroom. The glory of taking a hot shower of my own! Water smelled funky for a couple years, still smells different. Deb went, in some ways is still going through something closer to you losing Nell. It hurts just writing this. You're back with us and we'll pull for you. We may not be Kin but we're Kith in iron. Welcome back Brother it's good to have you. Humbly yours, Frosty.
-
Welcome aboard Bobby, glad to have you. I hope you're clear of the twister herds running rampant in your neck of the woods. You're over complicating the process on us. By "consolidating your beginnings" you're making it really hard to help you trouble shoot things. Just do this one thing at a time so perhaps one correction will deal with problems. Take a look through the solid fuel forge section at all the charcoal forges, pictures, problems and solutions. THEN build a forge. Find something heavy and hard for an anvil, RR rail is good stuff but certainly not the only field expedient anvil around. Do NOT wait till you find THE perfect "REAL" anvil. Waiting for the perfect tools is a recipe for never learning the important parts of smithing. Just find a smooth face hammer don't get a really heavy one, 2lbs. and under are good starters. A heavy hammer does more work for sure but it's harder to control and makes mistakes permanent so much faster. Chisels and hack saws are fine traditional cutting tools. You can make your tongs once you've practiced a couple of the basic processes. One thing at a time is how the great chapels and such were painted or made. Frosty the . . .
-
Yeah, the oil quenched nuts (black) are fine to forge. Once you get it reasonably tight, cool the cut and bring the nut up to near red. Driving them together then will make an interference fit, the shaft will be a few thousandths larger than the hole. When the nut cools it'll be TIGHT. Frosty the Connected.
-
What's the burner tube diameter? A 0.025 jet is ballpark right for a 12" dia tube but be WAY too lean in a 3/4" tube. The use of sodium silicate and colloidal silica in his refractory liners is the one issue Dave and I disagreed on. He designed his based on glass furnace and silicates are darned susceptible to hot caustics such as forge welding fluxes. I really like his method of making his burner, it doesn't rely on special tools and maintains good alignment. Alignment of the jet and burner tube is as critical to proper function as jet size. A properly built naturally aspirated burner needs no choke, the air fuel ratio curve is a nearly straight line. You just need to follow the ratios. From what I can see your build looks good so all you need are the ratios. Frosty the [place witticism here]
-
To lurkers who haven't signed up
Frosty replied to alextynan's topic in Blacksmithing, General Discussion
You got them to set up a forge at work!? Can I come to work there? Making tongs with flat stock like that we'd go with 3/4" x 3/8" or about 19mm wide. It's plenty of beef but not so much workout to draw down for reins. I've started using coil spring around 13mm dia. it makes nice light tongs that are stiff enough to hold firmly. One of the guys in our club uses 4140 for the same reason. The downside being that they're hardenable steels so you can't quench them in water if you let them get into the red heat without risking making them brittle. If you get them red toss them on the ground and let them cool OR keep them cool in the first place. A good drawing technique is to make a spring fuller. Frosty the [place something clever here] -
To lurkers who haven't signed up
Frosty replied to alextynan's topic in Blacksmithing, General Discussion
Glad you delurked Alex, good to make your acquaintance. So tell us what you make. Know any good jokes? Frosty the . . . -
New big anvil.... But how heavy
Frosty replied to basher's topic in Anvils, Swage Blocks, and Mandrels
Hey Owen, how about a picture? Please? Frosty. -
Pretty slick Froggy. Do you have a holder for say 5-6 letter stamps if a person wanted to make a word? It'd need a striking surface as well as holding the stamps in position. Hmmmm? There's more slack stamping a long number but words look pretty funky if the letters aren't aligned and evenly spaced. Frosty.
-
I'm not, I had to get up and go pee! An old friend's boyfriend insists he isn't going to buy a Samari sword till I make it for him. I've been telling him for more than 20 years I don't make blades and he still expects a Katana from me. At least I won't have to worry about the check clearing. Thinking about it if I were willing to make some of the big giant swords I've been asked to make I could have a TV show! Frosty the unwilling to make one.
-
Ayup, top swage. No telling what the thing on the far right was meant to be, maybe a tie tack for a giant but I'd add it to my stock without worrying. Perhaps hold off cutting it up for a while, someone here might know what it is. Good score all round. Frosty.
-
Trouble with Charcol retort
Frosty replied to compboy's topic in Solid Fuels: Coal, Coke, Charcoal, Wood, etc
Don't over think the thing they're simple in principle. You're just cooking the volatiles out of the wood leaving relatively pure carbon and there are lots of ways to do that. The direct method is simply shoveling charcoal out of a fire and extinguishing or using it directly. The semi direct is to start a fire in a container and once it's going close it down to limit intake air. This is the most common method historically and can be as simple as a hole filled with wood covered with sod. The air is controlled by opening or closing vent holes around the bottom of the pile. The indirect method can be a cookie tin full of wood on the BBQ though a steel bucket with clamp lid works better for the effort. Just open the pipe plug in the end and stand it that end down on the charcoal. When it stops smoking it's cooked. The process and equipment scales easily. Enclosing the retort chamber in another helps hold heat so less fuel is burned to convert the wood. You can dig a hole and lay a piece of metal over it for the same effect. Just remove the bung and put that part of the barrel in front of the air intake. No need to weld anything or even put stuff together. Pop rivets are good for sheet metal of all kinds though I wouldn't use aluminum ones on something like this. <wink> If you have two barrels you can stand the inside one on a couple bricks to give it space. Heck, you can do it on the ground with an old water heater shell for the outer retort shell. Going camping? Take a couple 5gl. steel buckets and make charcoal or just shovel it out of the fire and extinguish it in a bucket of water. Yeah, dunk it it dries out quickly. Don't make this complicated, all you need to do is stop the burn before it turns to ash. Frosty The Fleet of Foot. -
So this is my anvil for now.
Frosty replied to Justin Cole Joslin's topic in Anvils, Swage Blocks, and Mandrels
The Bear, the Driller and the TP. Frosty The Fleet of Foot! -
Which is better? (drill presses)
Frosty replied to Rainbows's topic in Drills, Post drills, Mag drills, etc
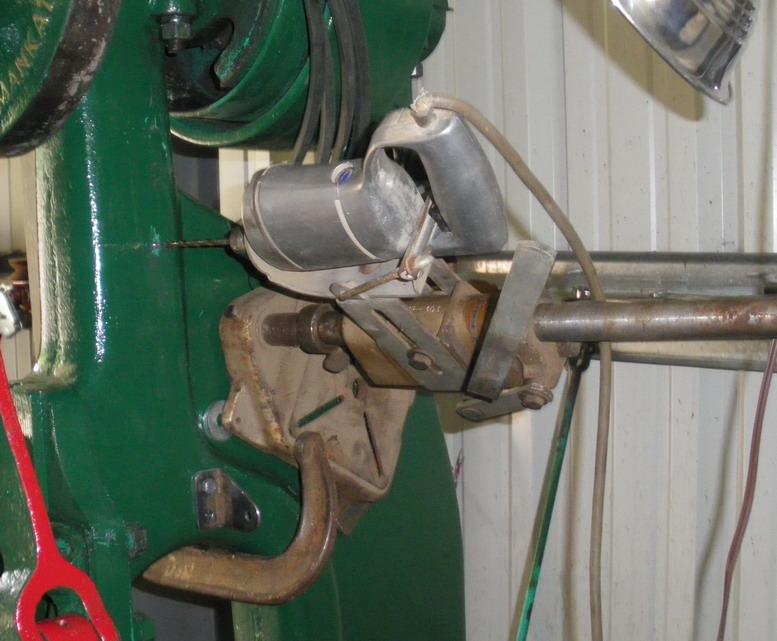
Can you afford the 20? If so get it if for nothing else than one good strong hand drill. I have a hand drill clamped into a set up similar to that one I call my Po boy mag drill. I can't afford and haven't seen a Mag Drill for affordable at a garage/yard/boot sale or I'd have one of those too. Not having a Mag Drill when I was putting a brake on my Little Giant I used what I have. I had this little garage sale $10.00 item and needed to drill and tap a hole for the brake pivot. AND this is how I did it. Once the hole was drilled I chucked up the tap and hand turned it so the threads are aligned as perfectly as I could get them. So, what do YOU think? Is that worth it to YOU? Frosty The Lucky.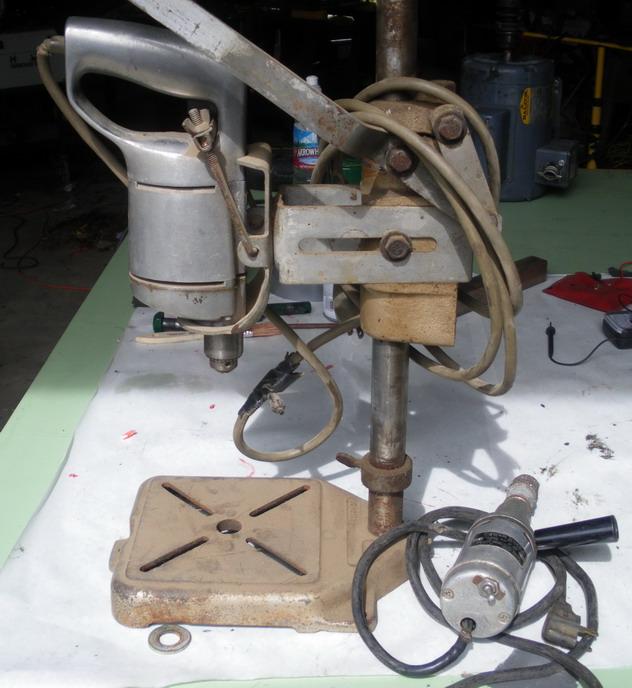
-
I "Think" breeds are my favorite kind of dog. If that isn't a classic, "What do you want NOW" expression I don't know what is. If other folk want the same deal you give family tell them they have to give birth to you and they're on the list. Or paint the house, cook and clean for you for 20 years, etc. Shipping is the only thing keeping me from turning my relative's places into displays for my stuff. Lucky folks. <grin> Frosty The Lucky.

