

Frosty
-
Posts
47,197 -
Joined
-
Last visited
Content Type
Profiles
Forums
Articles
Gallery
Downloads
Events
Everything posted by Frosty
-

Should be ready to go tommorow.
Frosty replied to redd1981's topic in Blacksmithing, General Discussion
I take it you mixed the liner like mud. Expect it to shrink check as it dries or is it some kind of cement mix? If you hang a light bulb close over it it'll really help it dry by warming it above ambient temp. The RR spike makes nice fire tools and allows a nice decorative twist, the spike head at the back of the handle section lets people see what the original stock was. People, the maker included likes to be able to recognize the origins it helps make the transformation really stand out. It makes for pleasurable viewing and handling. The spikes can also make heavy duty wall hooks but garden tools are a good choice. Make something for the wife, they have to love anything we make for them you know. The big nails make nice smaller wall hooks, the existing heads make good hook finials so coats, etc. can't get torn. Frosty The Lucky. -
Viking ship builders war axe
Frosty replied to Chris john's topic in Axes, Hatchets, Hawks, Choppers, etc
Okay, I get it! Dragon ship bow and stern pieces. I was trying to picture how you'd use it with the ornamentation. I was having real trouble balancing the quality of your work with something so seemingly impractical. Sticking to the theme I get. Thanks for helping me part the fog. Frosty The Lucky. -
Rail as used by the RR is NOT through hardened as they need it tough. Only the tire contact surface has been induction hardened a few thousandths deep. Play with it before you commit yourself to all the work of a blade so you'll know what to expect, the stuff can be REALLY brittle. Frosty The Lucky.
-
I'm not sure what you mean by it turning 3/4 or 1/2 way around. If it's stopping it has a problem. The whine is normal you're just hearing the gears meshing. These things don't operate in an oil bath so don't try filling it to what looks like a level plug UNLESS you like oil puddles on the shop floor. A few drops in the oil port on top at the beginning of a session is all she needs. You'll hear the change in tone in the whine so you'll know what to listen for in long sessions if she wants another couple drops. Just plain old 30wt works fine, no need for special lubes though I've been known to use my power hammer oil on almost everything with a drip oiler ad that's chainsaw bar oil with a healthy dollop per gallon of Duralube, engine oil additive. Frosty The Lucky.
-
Joe's squared up spike heads would've had cold shuts too if he hadn't taken a welding heat and welded them up. Frosty The Lucky.
-
I'm thinking two hour long episodes would've been more satisfying. 20 mins is enough for watching river cleanup but I loved the ice carvers. There're two people who truly LOVE what they do and do it so well. A whole hour at the Dragon Forge wouldn't be enough either but would've been WAY better. Unfortunately the show is entertainment and not educational so we with specialized interest are once again stuck with a glimpse. What made me happy was to hear most of the "what's actually going on" narration by a blacksmith rather than a talking head. Happily being blacksmiths ourselves we're able to interpret what we see and pick up tricks the lay viewer would just be bored with if explained. So while I would've loved to see the production crew and Mike tape an entire beginner's course I'll take what I got. Not going to cry about it either. Frosty The Lucky.
-
Beginner steel stock
Frosty replied to Shamus Blargostadt's topic in Blacksmithing, General Discussion
There you go. Being a likable guy is a good thing isn't it? Free is so much a better bargain than bulk discount isn't it? Remember to make the gentleman something to show your appreciation. An excellent beginner project for this very purpose are coat hooks. Everybody needs something to hang their coat, lunch bucket, etc from and a hand forged one is something to brag about. Frosty The Lucky. -
Viking ship builders war axe
Frosty replied to Chris john's topic in Axes, Hatchets, Hawks, Choppers, etc
You guys keep showing me such beautiful blades are drawing me towards the dark side! Arghhhhhhh. I don't know what to say other than gorgeous blade though I don't understand the utility of the hook above the blade or is it for hanging it on the wall? Frosty The Lucky. -
My First Tomahawk
Frosty replied to Hunterbow Smithy's topic in Axes, Hatchets, Hawks, Choppers, etc
Not really but there are things about a drift that make them . . . well, okay more advanced than first session beginner. A drift is used to put a precise shape to a punched or drifted hole. No surprise there, right? So, you want a gentle even taper from a narrow end that fits into the slit/punched/etc. hole. It then expands in a smooth taper to the finished size and shape. This is basic forging and plannishing followed by grinding/hot filing/etc. smooth so it doesn't gall in the hammer eye. Now we get to decisions that . . .Well, you need to make this decision before you start forging. What kind of eye do you want in your hammers? This decision will be effected by what you're using it for. For instance a pic has one type eye and handle while a sledge hammer has a different one. They're entirely different so you have different drifts and processes to get them right. With me so far? Good. If you're making top tools a simple relatively straight through eye is fie, you're not swinging it so it doesn't need to withstand centrifigul forces and high impacts. For this kind of eye you take the drift described above and taper both ends with a couple inches in the center that is the desired shape and size. The struck end taper is so you can drive the drift all the way through the eye and not chance damaging the drift by havint to drive it out from the starting end. If you're making a hammer you need a taper in the eye so wedges can apply forces against a solid backing to keep the handle where it belongs. A single taper from the side of the eye away from the handle (Far Side for purposes of discussion) requires a drift you only drive from the far side so they eye is conical. When you fit the handle and the wedges are driven in the handle is now larger than the only exit available to it. The hammer head stays in place and will warn you if it loosens up so you can keep it secure. Another method is to taper the eye in an hourglass shape, tapered in from both ends. Same process as above but you drive less deeply and from both ends of the eye. Wedged in the handle is larger than the eye in either direction so very secure and will warn you just like the other. I hope that helps, if not there are a number of good video how tos and having seen Brian Brazeal demonstrate in person I'm sort of prejudiced towards his method. It's not the only method and many work as well. Frosty The Lucky. -
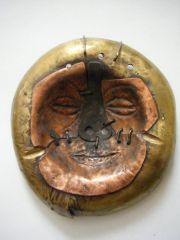 Another very nice piece of iron work Dunstan. A little creepy maybe but that has it's own attractions and is perfect for an ash tray stand. Frosty The Lucky.
 -
Maybe it ain't pretty but having the off switch vividly visible is a good idea. You never know when an emergency shutdown is needed and the person who knows where the off switch is may NOT be the closest person. Frosty The Lucky.
-
If you could have any tool, what would it be?
Frosty replied to joshua.M's topic in Tools, general discussion
I'd like an induction forge. Frosty The Lucky. -
Welcome aboard Rob, glad to have you. If you'll put your general location in the header you might be surprised how many of the IFI gang live within visiting distance. Claying a cast iron rivet forge pan is in reality to shield the cast iron from a large local heat differential. Cast iron is brittle stuff and having a small area a lot hotter than the rest can invite it to crack then break. A layer of clay or similar disperses the heat so the casting doesn't have one hot spot in the center. Sure it's warmer but not really HOT. Dirt, sand, etc. does the same job but nicely rammed clay doesn't get on and in the iron you're heating. No need for any high tech refractory either, just plain old garden, pond, etc. clay works fine. You don't want mud or it will shrink check as it dries like mud in a dried out pond. Just damp enough to squeeze into a hard lump is perfect, spread it and hammer down, a wood mallet is perfect it till the mallet bounces and smooth it off. You're ready to rock. All that said, there are downsides to claying a forge pan. If you use much water to control the fire it can collect under the clay and speed the rusting process. Same if you don't keep it covered in the weather. If it gets wet, clay will turn to mud. It can be more PITA than help but protecting a cast iron pan sort of hits the top of my priority list. I have a nice cast iron Buffalo rivet forge that's cracked almost all the way across, through the air grate. When I got it there were plenty of fire marks around the air grate to show it'd been used unclayed. It also has "Clay Before Using" cast proud in the pan. Frosty The Lucky.
-
You also might want to remember RR rail steel is nominally 1085 high carbon low alloy steel and is dandy for things you might want to hold an edge. Frosty The Lucky.
-
There's nothing wrong with being helpful. Unfortunately simply posting a list of Wiki "fact" is all too often just a load of opinion from folk with little or no actual knowledge. When Wiki information is actually correct it's often because the "contributor" simply cut and pasted information from a reliable source. It isn't because the "contributor" actually knows what they're talking about. Sites like Wiki have actually made reliable research much harder because searches hit on Wiki instead of reliable sites. Wiki isn't as bad as all the web marketing crud that is trying to anticipate things you might buy if they bombard you hard enough but it's still more nuisance than real help. Seeing as the post directly preceding by 6 hrs. (so there is no chance of it being a simultaneous post) was from a person who worked in the industry producing both hot and cold rolled steel in steel mill quantity. Who is not only posting from established industry standard definitions but has on site, hands on experience. Posting the results of a Wiki search was just grandstanding to LOOK helpful. In truth over explaining a topic more often adds confusion than being helpful. I'm not saying the poster in question didn't think he was being helpful, this is a common misconception with new comers to any craft and youngsters especially. Intentions were good and I'm not faulting the intent, unfortunately they were completely redundant and from a questionable source. Worse than posting questionable information just look how much bandwidth the following discussion is taking up. Can we PLEASE get back to blacksmithing? Frosty The Lucky.
-
I'm always glad to see another Ladysmith, they bring a different perspective to the craft and I like different. I'm used to seeing things this way, other views are good. Yeah, time's just slip slip slipping away. I'm afraid the only way to stop time from getting away from you isn't acceptable to me. Doesn't work anyway, King Tut gets older every day he just isn't enjoying it. Frosty The Lucky.
-
That's a gun burner. They're fast and easy to build and only have two down side issues. First you have to have power to run the blower. Secondly if you adjust the heat you have to adjust both gas and air flow. There's a good reason gun burners are so prevalent. Frosty The Lucky.
-
It's pretty unworkable from my experience. Maybe if you tinker with it long enough you might get an acceptable flame from from it. With the recent price increase in plumbing and brass fitting it costs me upwards of $10.00 to build a 3/4 T burner and about 20 minutes if I don't chuck it up in my lathe, if I do knock 5 mins off the time. A drill press and half an hour is really all you need to make and tune a 3/4" propane burner. Of course if tinkering around is what turns you on instead of forging. . . . Frosty The Lucky.
-
This kind of post does NOT make you look learned, just the opposite. Frosty The Lucky.
-
Yes, the texture left when the threads are forged down are cold shuts. They are small sharp deformations to the stock. force is conducted through steel or most anything. Force is conducted in a smooth manner until something interrupts it, all the force concentrates at that spot and it can become the initiation point for a failure. A good example is to have someone stand on an empty aluminum can. They have to apply their weight evenly and smoothly on the end of the can but if they're not too heavy it will support them easily. With them standing on it touch the side of the can with a nice sharp pencil it will collapse. A smooth mark can conduct the force around without it concentrating at a single point and not initiating a failure. for this reason we radius the edges of our anvils and shoulder steel on a radiused edge, tool or die. Frosty The Lucky.
-
Welcome aboard Greatlakesgirl, glad to have you. WE northerners don't generally think of the Great lakes as northern. Of course seeing as we're all blacksmiths here we know there's no possibility of exaggeration what so ever. We happily accept you as a northerner. Honest, we do, I say so. So what do you make? How about some pics, most anything will do. Projects, shop, tools, equipment, pets, landscape homestead, most anything you'd show the grandkids is good. We LOVE pics. Frosty The Lucky.
-
My First Tomahawk
Frosty replied to Hunterbow Smithy's topic in Axes, Hatchets, Hawks, Choppers, etc
That's a very nice hawk on all counts. Well done. Welcome aboard Conner, glad to have you. If you'll put your general location in the header you might be surprised how many of the IFI gang live within visiting distance. Ferric chloride is basically iron oxide dissolved in hydrochloric acid. It's an echant that produces colors often desirable to the project. It's very popular for bringing out pattern welded products where the different steels and alloys etch not only at different rates but react differently. Yes, it's a dangerous chemical and you shouldn't mess with it till you know what you're doing. Frosty The Lucky. -
That's very nice Yves, I especially like the wing nuts. People deserve some juicy eye treats for looking closely, those do quite well. How happy is the customer, are they showing it off and bragging yet? Frosty The Lucky.
-
Ron spent a lot of time refining a linear inducer as a burner and is stubborn enough to not even want to try an ejector type inducer burner. Commercially an ejector is around 29% more efficient and several times stronger on the intake. The drainage vacuum truck draws a darned strong vacuum on a 8,000gl. tank with an ejector running 120psi through the jet. It's been known to suck a human body up through the hose and into the tank from a plugged manhole. I wasn't there for that one and am really grateful. Dave Hammer's burners are a version of an ejector very similar to the one Mike Porter tweaked and wrote his book about. Dave's construction technique is a LOT easier than Mikey's and if properly tuned should perform as well. When Ron and I were noodling the things I settled on the ejector type and fiddled around till I got an easy to build one, the T burner. While I may use my lathe, a drill press is all the special equipment necessary to be easy peasy it to make and tune. I have a couple linear burners guys Jay Hayes for one have sent me and they work fine but my silly T burners are easier to make and work better. They don't get hotter but the draw is more robust so they're not as effected by breezes and back pressure. When it gets down to brass tacks how precisely you can build will main determining factor in performance. Unless you plan on running a couple or more forges in different stations you're not going to need or want to fine adjust individually at the forge, even with multiple burners. If there's much variance in burner performance at the same psi and cant be tuned to perform closely they're not properly built. The four burners in my current shop forge all got made on the lathe to align everything as closely as possible and one is a golden bullet. That one honestly melts the split 3,000f super duty hard fire brick floor under it, even fresh replacement bricks and it does it at around 23-24 psi. You will get some variation, they're home made, expect it. Frosty The Lucky.
-
Thanks for the heads up, it's on at 5:00pm here about 37 minutes from now. Just in time, WHEW! It was probably said by almost every smith teaching someone who got too worked up every time they screwed something up or got told to pack the ashes up the hill to the next town to sweeten the compost pile at the pig farm. Then again, it IS Mike so . . . I'll just watch and find out. Frosty The Lucky.