Frosty
-
Posts
47,277 -
Joined
-
Last visited
Content Type
Profiles
Forums
Articles
Gallery
Downloads
Events
Everything posted by Frosty
-
Okay, nothing strange going on. Have a good time playing with fire. Frosty The Lucky.
-

I was given a Peter Wright Anvil but...
Frosty replied to Worshipdrummer's topic in Anvil Reviews by brand
I could be wrong not knowing the alloy of the face plate but I believe brazing temp is above critical so all it'd require is letting it cool to reasonable hardening temp and quench. The real BAD aspect of this is quenching on a falling temp, leaving that mass of iron and steel brazing hot and letting it cool to critical is likely to cause significant grain growth. Frosty The Lucky. -
You don't need a welder, you have a hand drill and can afford bolts yes? The amount of force that gets applied to a fire pot is really minimal it's not like you're going to be standing a couple hundred lbs. in it are you? You can cut sheet or light plate with a jig saw and hammer corners over for seams, drill and bolt it together. A brake rotor or economy car brake drum is plenty of fire pot for most applications especially climbing the basic skills curve. And no you don't "need" a table but they're sure handy but don't wait till you can make one to build a forge and get hammering. Another easy forge is a duck's nest, just a little depression in a table with an air grate in the bottom. Stack fire brick around the grate to shape the fire and you're in business. These things really are as simple as a fire pit on a camp trip. Simpler actually. Frosty The Lucky.
-
Chasing and repousse are two different techniques. Repousse transliterates to "Pushed from Behind". The stock can be sunk, raised, shrunk or. . . to make an area of extra surface to chase into the desired forms. Chasing is refining detail usually from the front. Usually in that you can certainly chase from the back side say you want a wart on a witch's nose. There are two basic types of chasing, soft backed/pitch and stake. Soft backed chasing can be done on leather, pitch, roofing tar, lead, carpet, wood, etc. The main characteristic of soft backing is it will yield under the stock. I've only done stake chasing once and it was a very nice technique, lots of possibilities but very different from soft backed. Frosty The Lucky.
-
How hard did you ram the clay? How hard to you gouge it with stock when heating? Regardless, clinker and clay are no surprise and no problem unless it starts sticking to your work or blocking the air blast. Frosty The Lucky.
-
Naw, straight pein possibly a stone mason's dressing hammer. Just because idiots hit a hammer with a bigger hammer doesn't change one to a top fuller. She'll clean up well and make a fine hammer at your anvil if not don't get carried away cleaning it up and use it for a wall hanger or paper weight on your desk. Frosty The Lucky.
-
I'm trying, really I am! Frosty The Lucky.
-
And using that strategy how long would it take you two to become millionaires? Frosty The Lucky.
-
I can see using the die to make other shapes to go with. A little development and you could turn out letters and numbers for real monogram hooks and hangers. Good idea, thanks. Frosty The Lucky.
-
Horse shoe nails, things to make from them
Frosty replied to the iron dwarf's topic in Blacksmithing, General Discussion
I've seen very nice dragon flies made from them. Caltrops to keep barefoot streakers off your lawn? Frosty The Lucky. -
The little vise set up is a good solution but you can do as well or better with simpler now you have the idea. My only suggestion at this point is to spread the screw holes a little farther apart for stability. You just never know when someone will hang something really heavy on one, say a fire fighter's turn out coat. Frosty The Lucky.
-
Stumped a plea for project ideas.
Frosty replied to Toothygrin's topic in Blacksmithing, General Discussion
Toasting forks! Frosty The Lucky. -
I was given a Peter Wright Anvil but...
Frosty replied to Worshipdrummer's topic in Anvil Reviews by brand
If available near you take it to a shop that repairs and hard faces rock crushers. the guy in the weld shop won't have to look at it twice to build up and hard face it correctly. Just make sure that s/he uses hard facing rod intended for Steel on ROCK, NOT steel on steel!! Steel on steel hard face is abrasion resistant and not so good for impact loading. Steel on ROCK hard facing is intended to take unholy hammering as routine life. THIS IS WHAT YOU WANT! Whatever you do, don't think you'll get away with repairing that anvil for less than a couple hundred $. I repaired one in much better condition for a fellow two summers ago and he spent $150 just in rod. The guys at the local welding supplier just happened to have an open box of build up rod in the oven and I got the deal of the year on it. Build up rod till it's less than 2 passes from finished, then no more than 2 passes of hard facing to include enough bead above the face surface to grind it flat. I used a cup stone on my 9" Milwaukee grinder while the face was still HOT. Preheated and post heated to 400f. Tempil stick verified. Frosty The Lucky. -
You're ahead of me and mine is just 5"x8" guardrail posts chainsawed and screwed together maybe a couple hours total. The stand lets me use it flat as it sits in the pic or tip it up onto edge on the step using a pinch bar. I'd install a retainer to keep it from tipping when on edge but I just don't use it much and it's safely out of traffic patterns Frosty The Lucky.
-
Help with first anvil
Frosty replied to Heliotropicmoth's topic in Anvils, Swage Blocks, and Mandrels
Patrick: Nobody's talking down to you, we're talking to you like an adult. We all make mistakes, we all have wrong preconceived notions. Believe me nobody is born knowing this stuff and learning is failure analysis. If you can't handle being told you're wrong you aren't going to like how hot steel tells you you're making a mistake. ESPECIALLY if you ignore folk telling you you're wrong and have to learn from your own mistakes. Your call. Frosty The Lucky. -
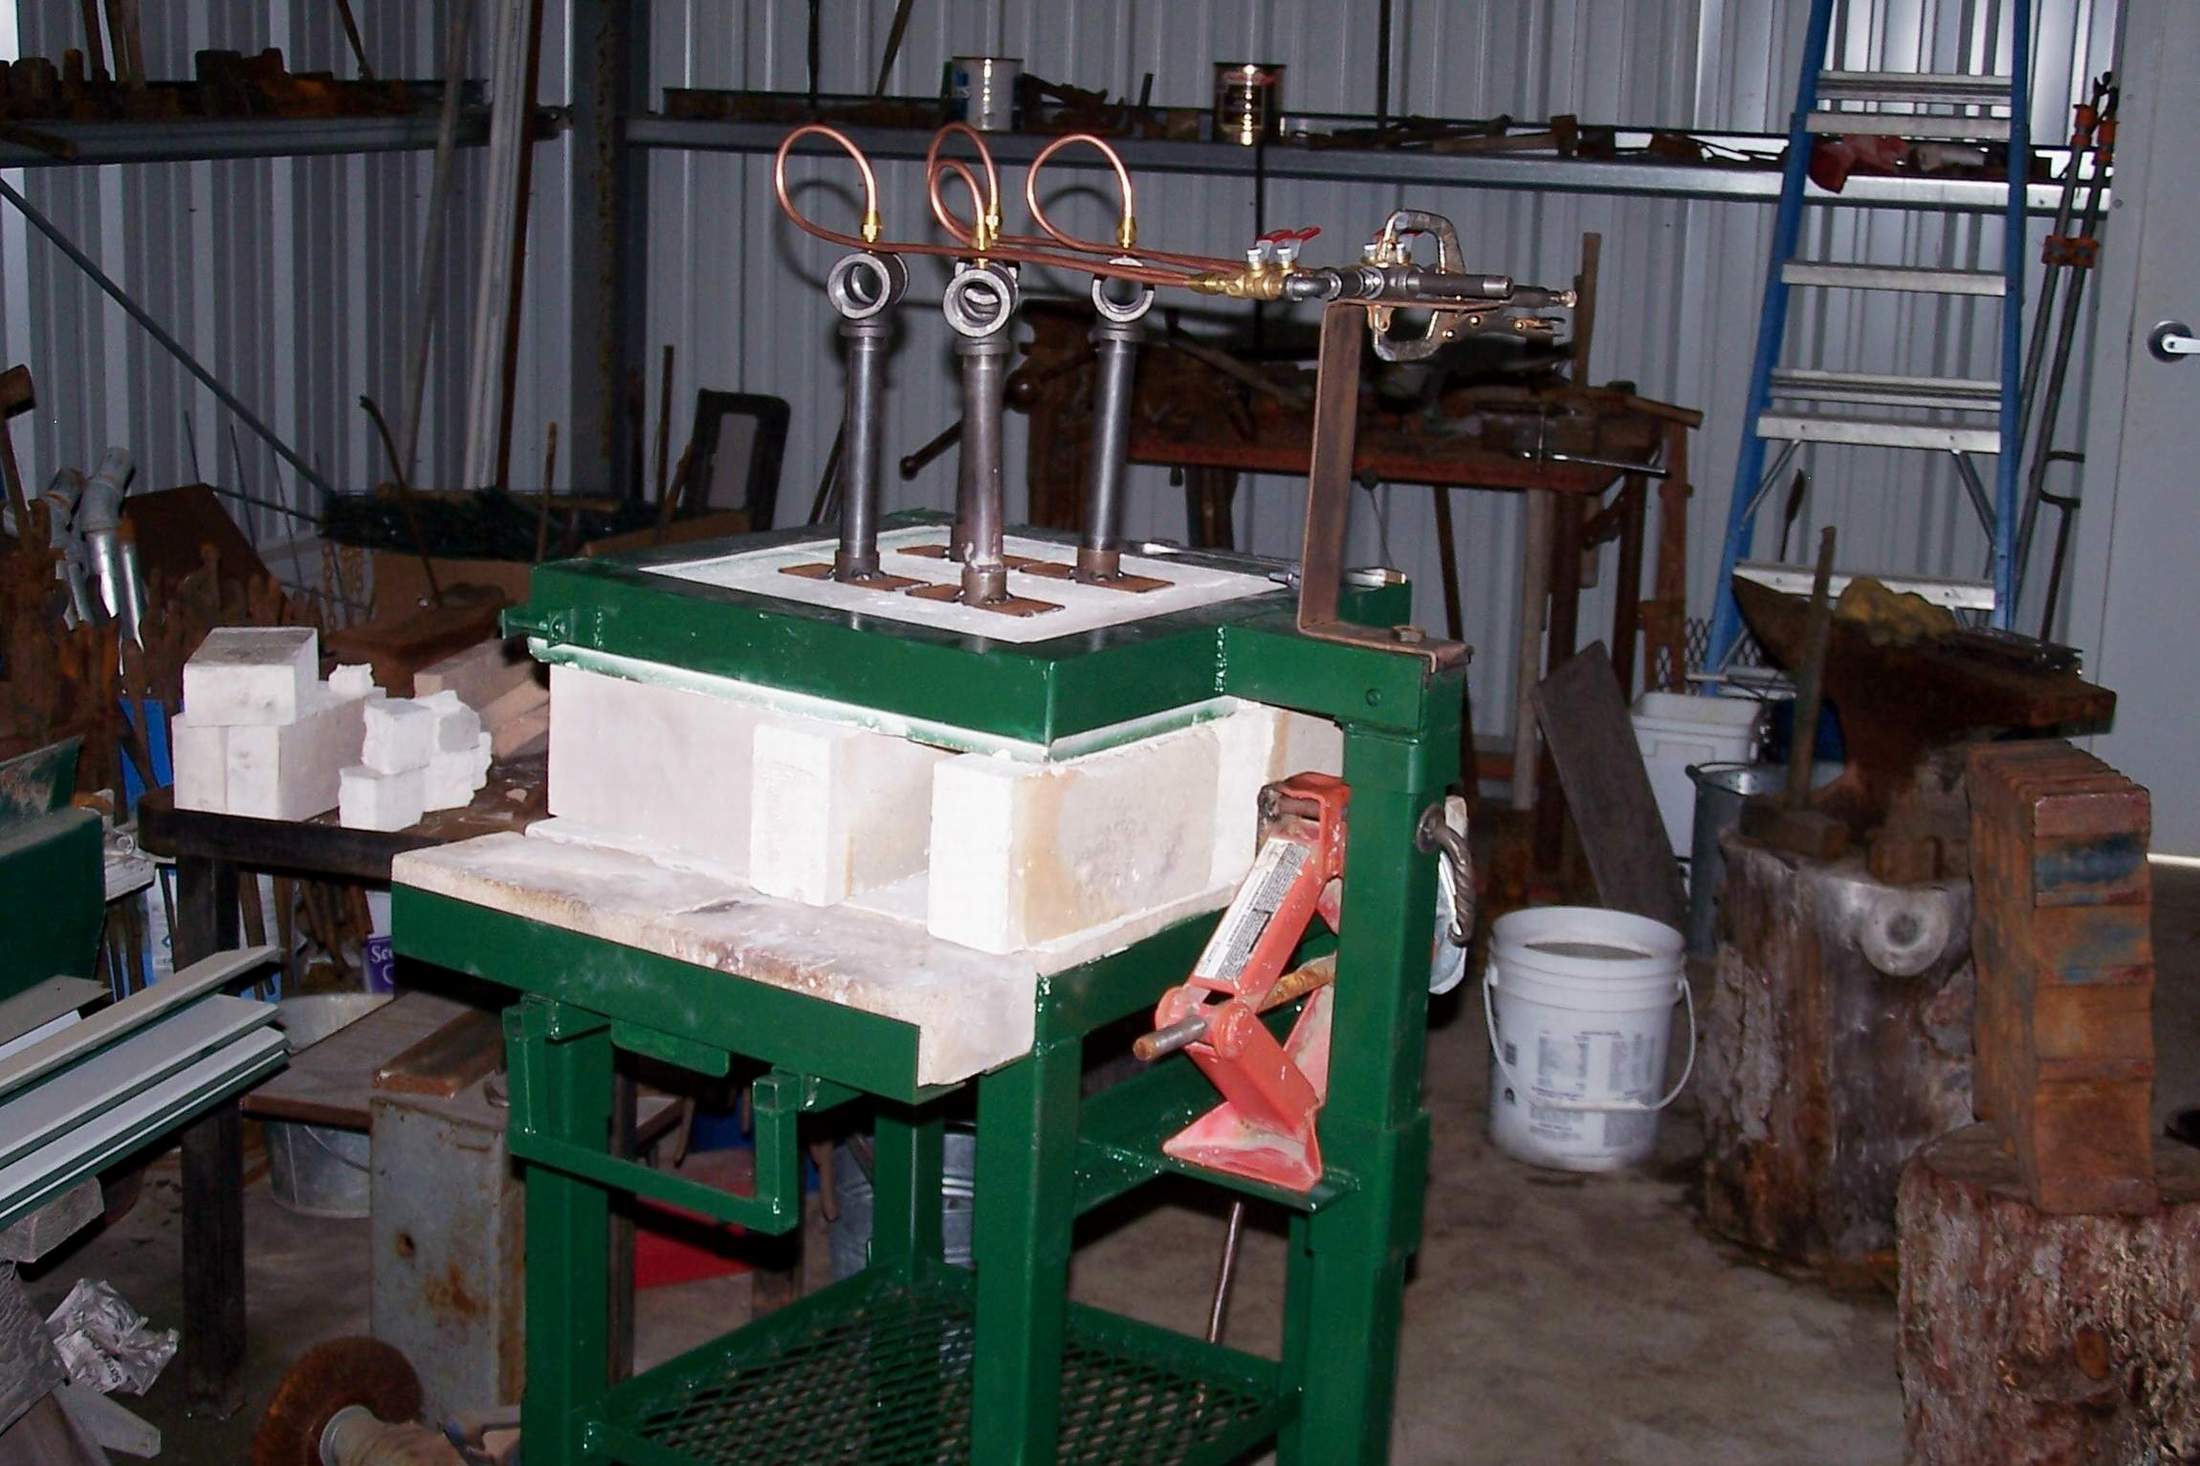
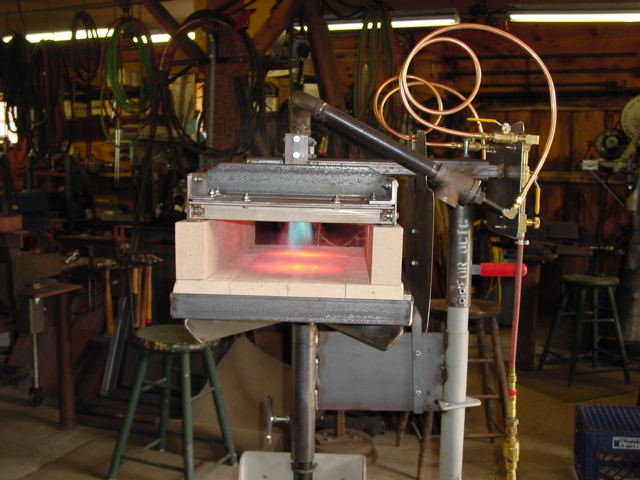
I have to go along with Mike with only a slight difference in terminology. What he's describing as a "cart forge" we more commonly call a "brick pile forge". It's basically a refractory table top you can arrange bricks on to make whatever size or shape forge you need. This is the basis for my main shop forge with a few refinements. In the first couple years after the internet went public I haunted the ABANA email list, "theforge" list and hooked up with lots of smart people. One was Ralph Sproul and we started brainstorming improved brick pile forges. Both are the same in principle and only slightly different in execution. I'll NEVER use a scissor jack for something like this again, I just had a pile available so that's what I used. Ralph used a trailer jack and it's a MUCH better component. The basic device is just a refractory table with a refractory lid on a jack. This lets a guy lift the lid and rearrange the partition walls as needed. I use light firebrick for partition walls and they are the most expensive consumable involved. A good kiln wash really lengthens the life of the floor and I use split 3,000f heavy use fire brick. The first pic is mine, the second is Ralph's. About the burners, mine are "Ts" and Ralph's are "sidearms". I don't know how Mike and I missed each other back then but. . . Frosty The Lucky.

-
I love it when you talk like this Charlotte! I get all goose bumpy! Frosty The Lucky.
-
Oxy/acet torch question
Frosty replied to Elemental Metal Creations's topic in Welding/Fab General Discussion
There's a little more to an oxy propane torch than hoses, regs and a tip. This set up works but has a solid rep for eating oxy like candy. Look into a Harris oxy propane torch, since All States let the patent go Harris can now make the real deal. Harris made the All States oxy propane torches under contract but couldn't sell them. They can now and they run maybe 1/3 or less an All States rig. Be very wary of the tanks, there will be certification plates or stamps on them even if you can prove ownership. There is good solid debate over which is the most dangerous item in a modern shop, the acet cylinder or the oxy cylinder. Even an AIR oxy explosion has a rate of propagation in the range of 24,000fps. orbital velocity is around 25,000fps. However an oxy leak can make everything it touches flammable, very flammable. Dangerous things however you vote. Frosty The Lucky. -
Not bad at all atall. You have forming the cross down pretty well. The texture is a little heavy handed though but that's a matter of taste. I prefer a finer texture running longitudinally to suggest wood grain. However a little refinement of the texture you used would do a nice job of suggesting adze marks and that works nicely. I give you a Frosty "well done" Frosty The Lucky.
-
Show me your Bottle Openers!
Frosty replied to Arbalist's topic in Blacksmithing, General Discussion
The secret is a little knowledge and a lot of practice. Now you know how he did it start trying till you can. Want to bet you do it a little differently when you find the sweet method? I can think of a couple methods that don't include sanding or grinding but might be less efficient. Frosty The Lucky. -
Just for fun, if you were to lay $3,000 in my hand I'd have to drop buy a fellow's auto shop in a nearby town and see if 3k and an ASO would change his mind about using a 450lb. Soderfors as yard art. He's not interested in selling it but who knows, 30, $100 bills has an effect of people. Now if I had a line on shipping I'd try visiting Sweden and area and see if I could find a Soderfors at a price I could get home for 3k. That's just me and my affection for Soderfors anvils. Frosty The Lucky.
-
What kind of rod or wire are you using? I've always just ground welds smooth and painted them with a good quality enamel or in some cases a 2 part acid etch epoxy. Using a phosphoric acid prep works well, anything from Ospho, Naval Jelly or just brush on phosphoric acid and neutralize. The black patina is "phosphate" or "phosphorous oxide" (can't recall the correct term and I'm not looking it up) The black patina is porous and stops rust in it's tracks. There's another thing about welds that isn't common knowledge, no secret just not common. A layer of paint on welds is an early warning system, like stress bands in cable or rope. The highest stress points in a fabbed structure are the joins. Joins are the most likely to initiate failure. Here's how paint on welds works. As the joint begins to fail the material moves on opposite sides of the failure and the paint starts to peal. The other guys I worked with, in the office and on the drill crew thought I was a magician in that I could spot a crack in the drill tower as soon as it started to form. Sometimes I ground and welded them immediately others I could leave it till we turned it in for service at Heavy Duty shop. Paint pealing from welds could simply mean they're flexing and might just need to be a little heavier or perhaps gusseted. Frosty The Lucky.
-
You're using that semi brake drum aren't you? If my memory serves that's your problem, ditch it and find or buy something more appropriate. An old washing machine lid on a table with a hole just large enough to let a pot like thingy slip in and rest on a rim works a treat. Pack DAMP clayey soil around the pot to the edge and you're golden. A 6" cast iron skillet is a touch too wide but will serve if you can't find a disk rotor or just fab something up. It doesn't need to be thick plate or packed with refractory or any of those over thought mods. Just a fire resistant bowl with an air supply. A foot or so of soil rammed hard on a table top with a trench scraped in makes an outstanding side blast forge. Charles has posted instructions with specific dimensions so many times I won't be surprised if he just stops doing so. Frosty The Lucky.
-
2" deep is more a duck's nest than a proper fire pot. It's easy enough to use though I prefer a duck's nest. You just arrange bricks around the air grate to provide the size and shape fire you need. 2" deep nest and 2 1/2" thick fire brick gives you a 4 1/2" deep fire. That's plenty workable just make it wide enough to make a heart the right size over the air grate. Okay, here's a good example of one jargon not matching another. What I mean by "heart" is what is commonly being called a "fireball". I also pretty commonly call the right part of the fire the "sweet spot" and it can be different for different processes. Yeah, I know I've probably just confused a simple thing but I don't know how many times I've used non-common terms and if you read other threads by me I'd like you to have this little Rosetta stone thingy. Frosty The Lucky.
-
What profile swages are you looking for Charles? The through holes are pretty unused on my Lancaster pattern swage block. Being straight they aren't useful even as stake plate and I'm not going to be drawing through them. The round through holes are of some use making bowls and dippers. I've never used a swage block with bowl, dipper, shovel, etc. dies but have never needed one. It's just too easy to forge bowl and shovel shapes on the anvil. I use the term "bowl" in that sentence to include everything with a bowl shape, T spoon to cauldron. The only shape on my block I've found really useful is the V swage for making things like anvil devils and hacks but they're not so hard to forge on the anvil either. The hex swages come in handy to profile the edge of a Brazeal style punch, slitter, etc. one corner of the hex is the correct angle. You don't need a swage flock for a hex though, just weld a couple nuts together or drive one into a steel block for a bottom tool. That big old block is sitting right there so. . . Of course that's just me and my swage block experience. Frosty The Lucky.