
John B
-
Posts
3,598 -
Joined
-
Last visited
Content Type
Profiles
Forums
Articles
Gallery
Downloads
Events
Everything posted by John B
-
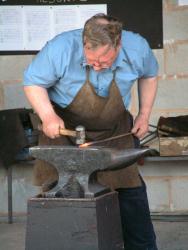
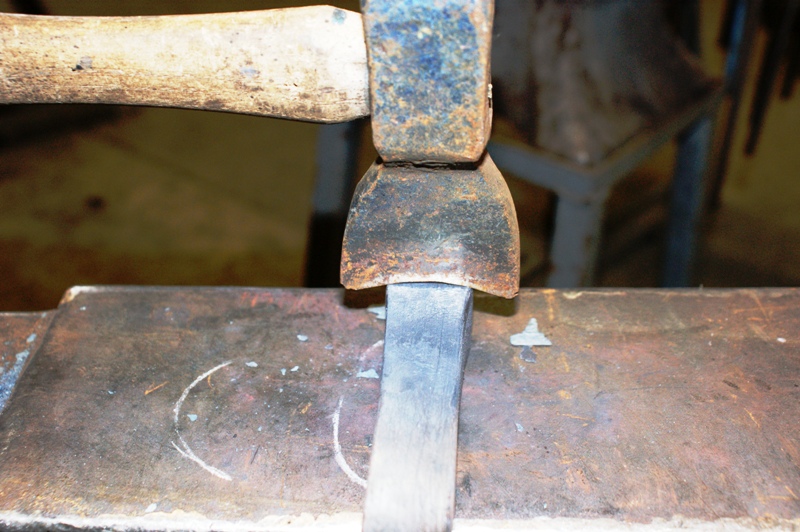
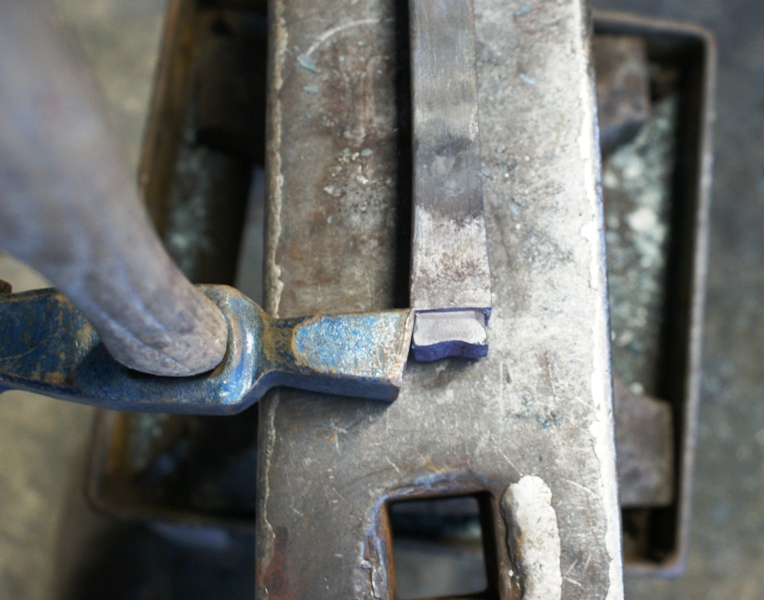
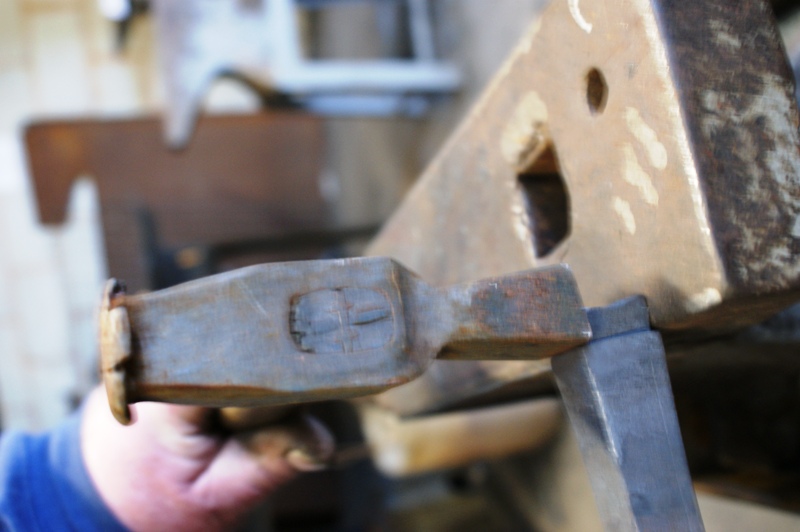
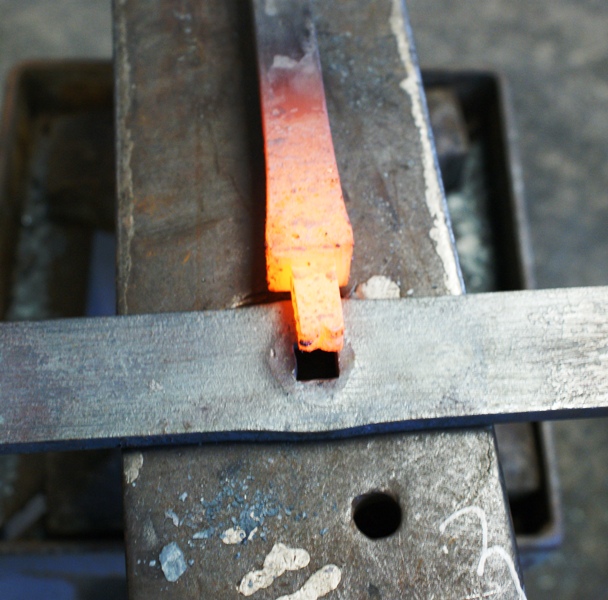
These pics may help to illustrate further the use of the original 3 tools shown, The square faced set hammer being used to finish the tenon/shank and shoulders prior to final fitting into its receiver (in your case the Hardie hole, otherwise a monkey tool) Notch all way round Use side set to start to determine the shoulder Repeat on all sides on a squar'ish corner (not too sharp, if you dont have a good square corner on your anvil, use a piece of square stock or make a block for the hardie hole) Block here has varies degrees of edge profiles with very small to larger radii to be used as required. Set hammer is then used to make parallel the tenon as in this picture, as you are making a much larger tenon, you may not need a set hammer, but I include this to clarify the tools illustrated. Hope this is of some use to some who may not be familiar with the tooling and how it is used.


-
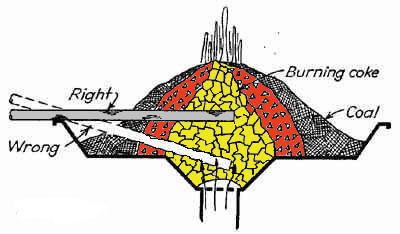
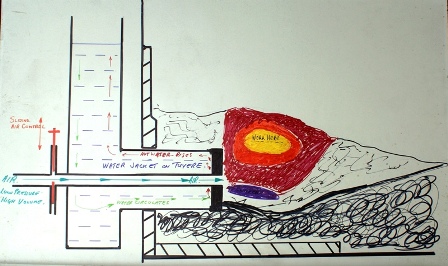
These pictures may be the ones you were looking for that have "disappeared" from the site. If you are using charcoal and a hand cranked blower, you will necessarily not need to have the water cooled tuyere, a heavy section tue will do, (large diameter piece of steel with hole approximately 3/4" diameter through. Side blast is as it says, air enters from the side . Bottom blast air from beneath Both types should work fine with charcoal. Good luck with your choice and have fun.
-

Hammer marks on new anvil face
John B replied to AdamG's topic in Anvils, Swage Blocks, and Mandrels
Not much to add really, but If this is as you say straight from the foundry, then it probably has not received the heat treatment suitable for purpose. Many of the new anvils produced have their table area induction or otherwise surface hardened to some depth. There may also be a possibility that it will work harden as you continue to use it, depending on the steel being used. If its possible, try to get the steel grade analysis and take appropriate action. -
I used strips of steel the width of the T slot and as thick as would fit and move smoothly in and out, by a couple of inches long, drilled and tapped them for screwthreaded rod, and had various lengths of said rod for different tooling, Cheap version of T nuts and studs, you can use more to set up length stops etc or add extra clamps, you will need nuts for the threaded rod
-
You may want to put a hole through the plate before securing flypress to it so any bits/slugs that go through the centre hole (particularly if punching) do not build up and cause problems,
-
The 300 year old forge in question is about to be reopened as a forge in the near future, extensive changes being made to suit the new incumbent and bring it into a commercially viable situation rather than a tourist attraction.
-
Draw it out longer and then make a scroll end, you could double or treble the length of the existing material to give you a longer in proportion handle.
-
Wrought iron style headboard
John B replied to Eisenreich's topic in Blacksmithing, General Discussion
In the spirit of informative,sadly "Wrought Iron" has now become a generic term for metal worked hot or cold to simulate in appearance what was produced traditionally by blacksmiths specialising in decorative forged work. -
Hi Alan, Check the owners planning permission, and the surrounding area's classification. Quote; A B1 use must be capable of being undertaken "in any residential area without detriment to the amenity of that area by reason of noise, vibration, smell, fumes, smoke, soot, ash, dust or grit". If that is the case you are going to have long term problems, A lot of the new industrial estates also do not accept byproducts from blacksmithing. Sometimes you even have problems convincing planners it is a rural traditional craft. It is not an easy path but there are ways whereby you can find somewhere to work from. A private chat may be of use.
-
Personally I have yet to make a long term assesment of it. My usage may differ from yours, but all reports I have heard from others using it seem to be quite favourable and somewhat cheaper than the coke. We have got the Devon County Show coming up this week on Thursday, Friday and Saturday, so should have something to base an opinion on. If anyone is around, come along and introduce yourself, we usually have a kettle on and a cuppa on offer, Also an excellent static display of competition pieces, and live forging demos and competitions, this year the competitors have two hours to forge a kinetic sculpture, 30 minutes to make something sellable, and 45 minutesto forge an axe head from an old farrier's rasp.
-
Yes, angled to suit for hangers to facilitate easy removal and air circulation when clothes hung on them.
-
What springs to mind to hold hangers is similar to the traditional trammel hooks with ratchet like teeth on, instead of the punched hole type, (which would make manouvering your clothes hangers into position somewhat difficult)
-
Hi Andy, probably a bit of both, draft angles make for easier removal of patterns in the sand casting process used in making tuyeres, and the taper reduces the possibility of an air lock when the tuyere is being initially installed and filled with water, Some of the water cooled cast iron tuyeres had no bosh tank directly attached to them, but a reservoir tank was connected by pipes to them. This reservoir tank could also be used to provide hot water for other uses in the area.
-
There is no necessity for the tue to be conical in shape, just tilt it forward at a slight angle so any air does not get trapped at the front when you are using it,
-
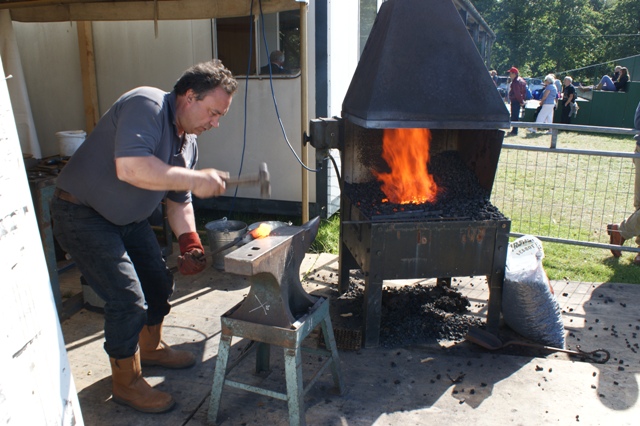
Not argumentative at all, it's called research. It seems there is a lot of "I have heard" and "In theory" around, all I can say is that as you can see, that design works. A few more things that may help, Chimney size works better above 10" diameter, The gentler the slope on the hood the better and make sure your line of sight to the fire when standing by is unblocked by the hood, The side screen is normally used if there is a substantial amount of wind present, if it is a relatively gentle breeze, it is not needed,
-
It is rising heat that causes chimneys to draw, not the smoke. One way to start any chimney to draw smoke away is to light a ball of newspaper or some small kindling and pre warm the chimney as you start to light your fire. Hot air rises and this helps to get the smoke (heavy air) to rise. The smoke will ignite when it is hot enough to, and will clear, whilst you work. Once your fire is going there should be no smoke from it, its new fuel that smokes. The picture does not accurately depict what you perceive as a wind block, there is a side screen as well as the hearth back, in effect forming an L shape and you work it from the open side depending on which way the prevailing wind is, May be site dependent depending where crowd is looking at you from. This side screen can be detachable so you can choose to use it or not, it is not unknown for one to be hinged from the canopy itself,
-
I used to know an old guy who had a couple of large scrolls ( a pattern) and a bit of string, he would use a piece of sheet steel and mark off the width of panel he wanted to make the scrolls fit to, then he would place one of the scrolls over the area and rotate it until a portion of the scroll fitted to what looked ok. then he would mark it out and form his scrolls to suit, measuring the required lengths for blanks with his bit of non stretch string. Scrolls in rose arches look fine when there are no plants up them, but when plants and foliage grow, not much is seen of the scrolls, And scrolls are more expensive to incorporate than straight bars, a point to take into consideration if price is a concern. Good luck with the project
-
Your C design will work outside just fine, this one is at a show where the forge hearth has been brought in from a working forge, there is a very short chimney section which is in effect a register plate for a taller chimney when it goes back to the workshop. You could take your water tank further up to incorporate the hood support to help stiffen the canopy, this would mean you could have a narrower bosh with the same capacity as a smaller and wider one, a drain tap should also be incorporated if you are going to be using it at various events. ,
-
Just a couple of details, you have failed to show where the front of your tuyere is, this forms the basis of your fire centre, so you can move your chimney forward or, move the tuyere and bosh back a relative amount which would then allow you to have a rectangular tank as opposed to the U shaped one. (I am somewhat concerned about convection currents and water circulation if you go with the U shape). Are you using hand cranked or electric motor for fan? If you use coal or charcoal and a hand fan, you will not have to dissipate so much heat as you would using coke which you have to keep a constant air flow through. You also include Super Sucker chimney, How high is this going to be? If you move the chimney forward over the fireball, then the heat will rise straight up , super suckers need height to draw efficiently, this may affect stability and pose mounting problems. Nice theory, and drawing, I hope this is useful and helpful, you have put a lot of time and thought into this project, and I don't want to put a downer on it. The time to alter plans is before putting them into production. Good luck and I look forward to seeing pictures of it finished and in action.
-
Suggest you have a look here, http://www.hlcollege.ac.uk/PDF/CraftPublications/WroughtIron/WROUGHT%20IRONWORK%20PART%203_tcm2-18921.pdf includes most you need to know about making scrolls and a scrolling jig.
-
Most bandsaw blades I have been involved with were flash butt welded usually on the welder supplied with the machine, others I have done have been oxy acetylene, mig or tig welded, the weld should be ground off to the same thickness as the blade, and the area where the weld is should be annealed. No need to reharden and temper, blade must be flexible.
-
K Blasting at Galmpton http://www.kblasting.co.uk/ for details, but be advised that the works location is not at the address or postcode registered on Yellow pages, but in the old quarry off Kiln Road, it is on the same site as Marina Developments, whose address is Dartside Quay, Galmpton Creek, Brixham TQ5 0EH, If you google their details and go to the aerial picture, you can see the K Blast buildings as you enter the Quarry. This company sandblasted and hot zinc sprayed the panels that were made at the 2014 International Blacksmiths Festival that are now installed for all to see at Westpoint
-
And a bit of a Pippin !
-
Its the same stuff as what you have access to, just been graded, I would try what you can easily access first, you can always break it up into smaller pieces, try it before you go off looking for something you prefer the sound of, As a kid I used to pass many a Saturday morning smashing large lumps of coal into smaller more usable sizes for my old Grannie to use throughout the week in her hearth.
-
Show me your Bottle Openers!
John B replied to Arbalist's topic in Blacksmithing, General Discussion
It helps to pop the scale off, similarly when using a flatter to finish we sometimes wet both anvil face (make sure it is clean) and the flatter before use and it seems to improve the surface finish "Is that like hammering on a wet anvil to blow off the scale with the steam" Scale should be removed prior to forging on the anvil face, any scale will be driven into the surface as you forge, using warer, or a quick dip into the slack tub at orange heat helps loosen the scale, and the wire brush (Usually a heavy duty one) then removes it more quickly and easily. The hammering on a wet anvil is a finishing process basically similar to why we use water on faces on anvil and flatter when finishing. Seems to be more of a blademakers tecnique than general forging. Water jets are used in the rolling mills to remove scale as steel is being manufactured to remove scale which would otherwise be rolled into the surface of the finished product,