MaxwellB
-
Posts
152 -
Joined
-
Last visited
Content Type
Profiles
Forums
Articles
Gallery
Downloads
Events
Everything posted by MaxwellB
-
Can you post a picture or two of your current setup? It'll help others here see exactly what you're seeing. If the air intake(s) are sucking in hot air, you're probably combusting the gas further up the pipe than ideal, which is why you're getting the results you're getting. That's of course if your burners are coming in through the top. A side burner wouldn't suck in as much hot air, as heat rises. But since I'm new to the game I can only speculate.
-
That's not too horrible. Can you send me a link to those? Mikey - Once I get everything finalized and I put it through a "session", probably making a few punches/tools, I will definitely part a review on it. Right now it's just more like "oh hey, nothing got pooched during shipment. Cool beans." I appreciate the feedback and encouragement. I agree that there's a ton of focus on homemade forges, and that's a great thing. The only reason I didn't try and build my own is because most of what I've seen require some welding and I don't have access to a welder nor do I have proper electrical for it, being in an older property. I have plenty of land though, so maybe one day down the line I'll put up a dedicated workshop space, instead of the lawnmower/snowblower/weed whacker co-op spot I'm in now.
-
Hehehe... You said bung. I just got my purchased forge fired up for the first time today. Getting exciting! I have some tweaking to do though. Let me know if you find a decent deal on those K26 bricks. The places I looked at last night wanted an arm and a leg for shipping. Bloody highway robbery I tells ya!
-

What did you do in the shop today?
MaxwellB replied to Mark Ling's topic in Blacksmithing, General Discussion
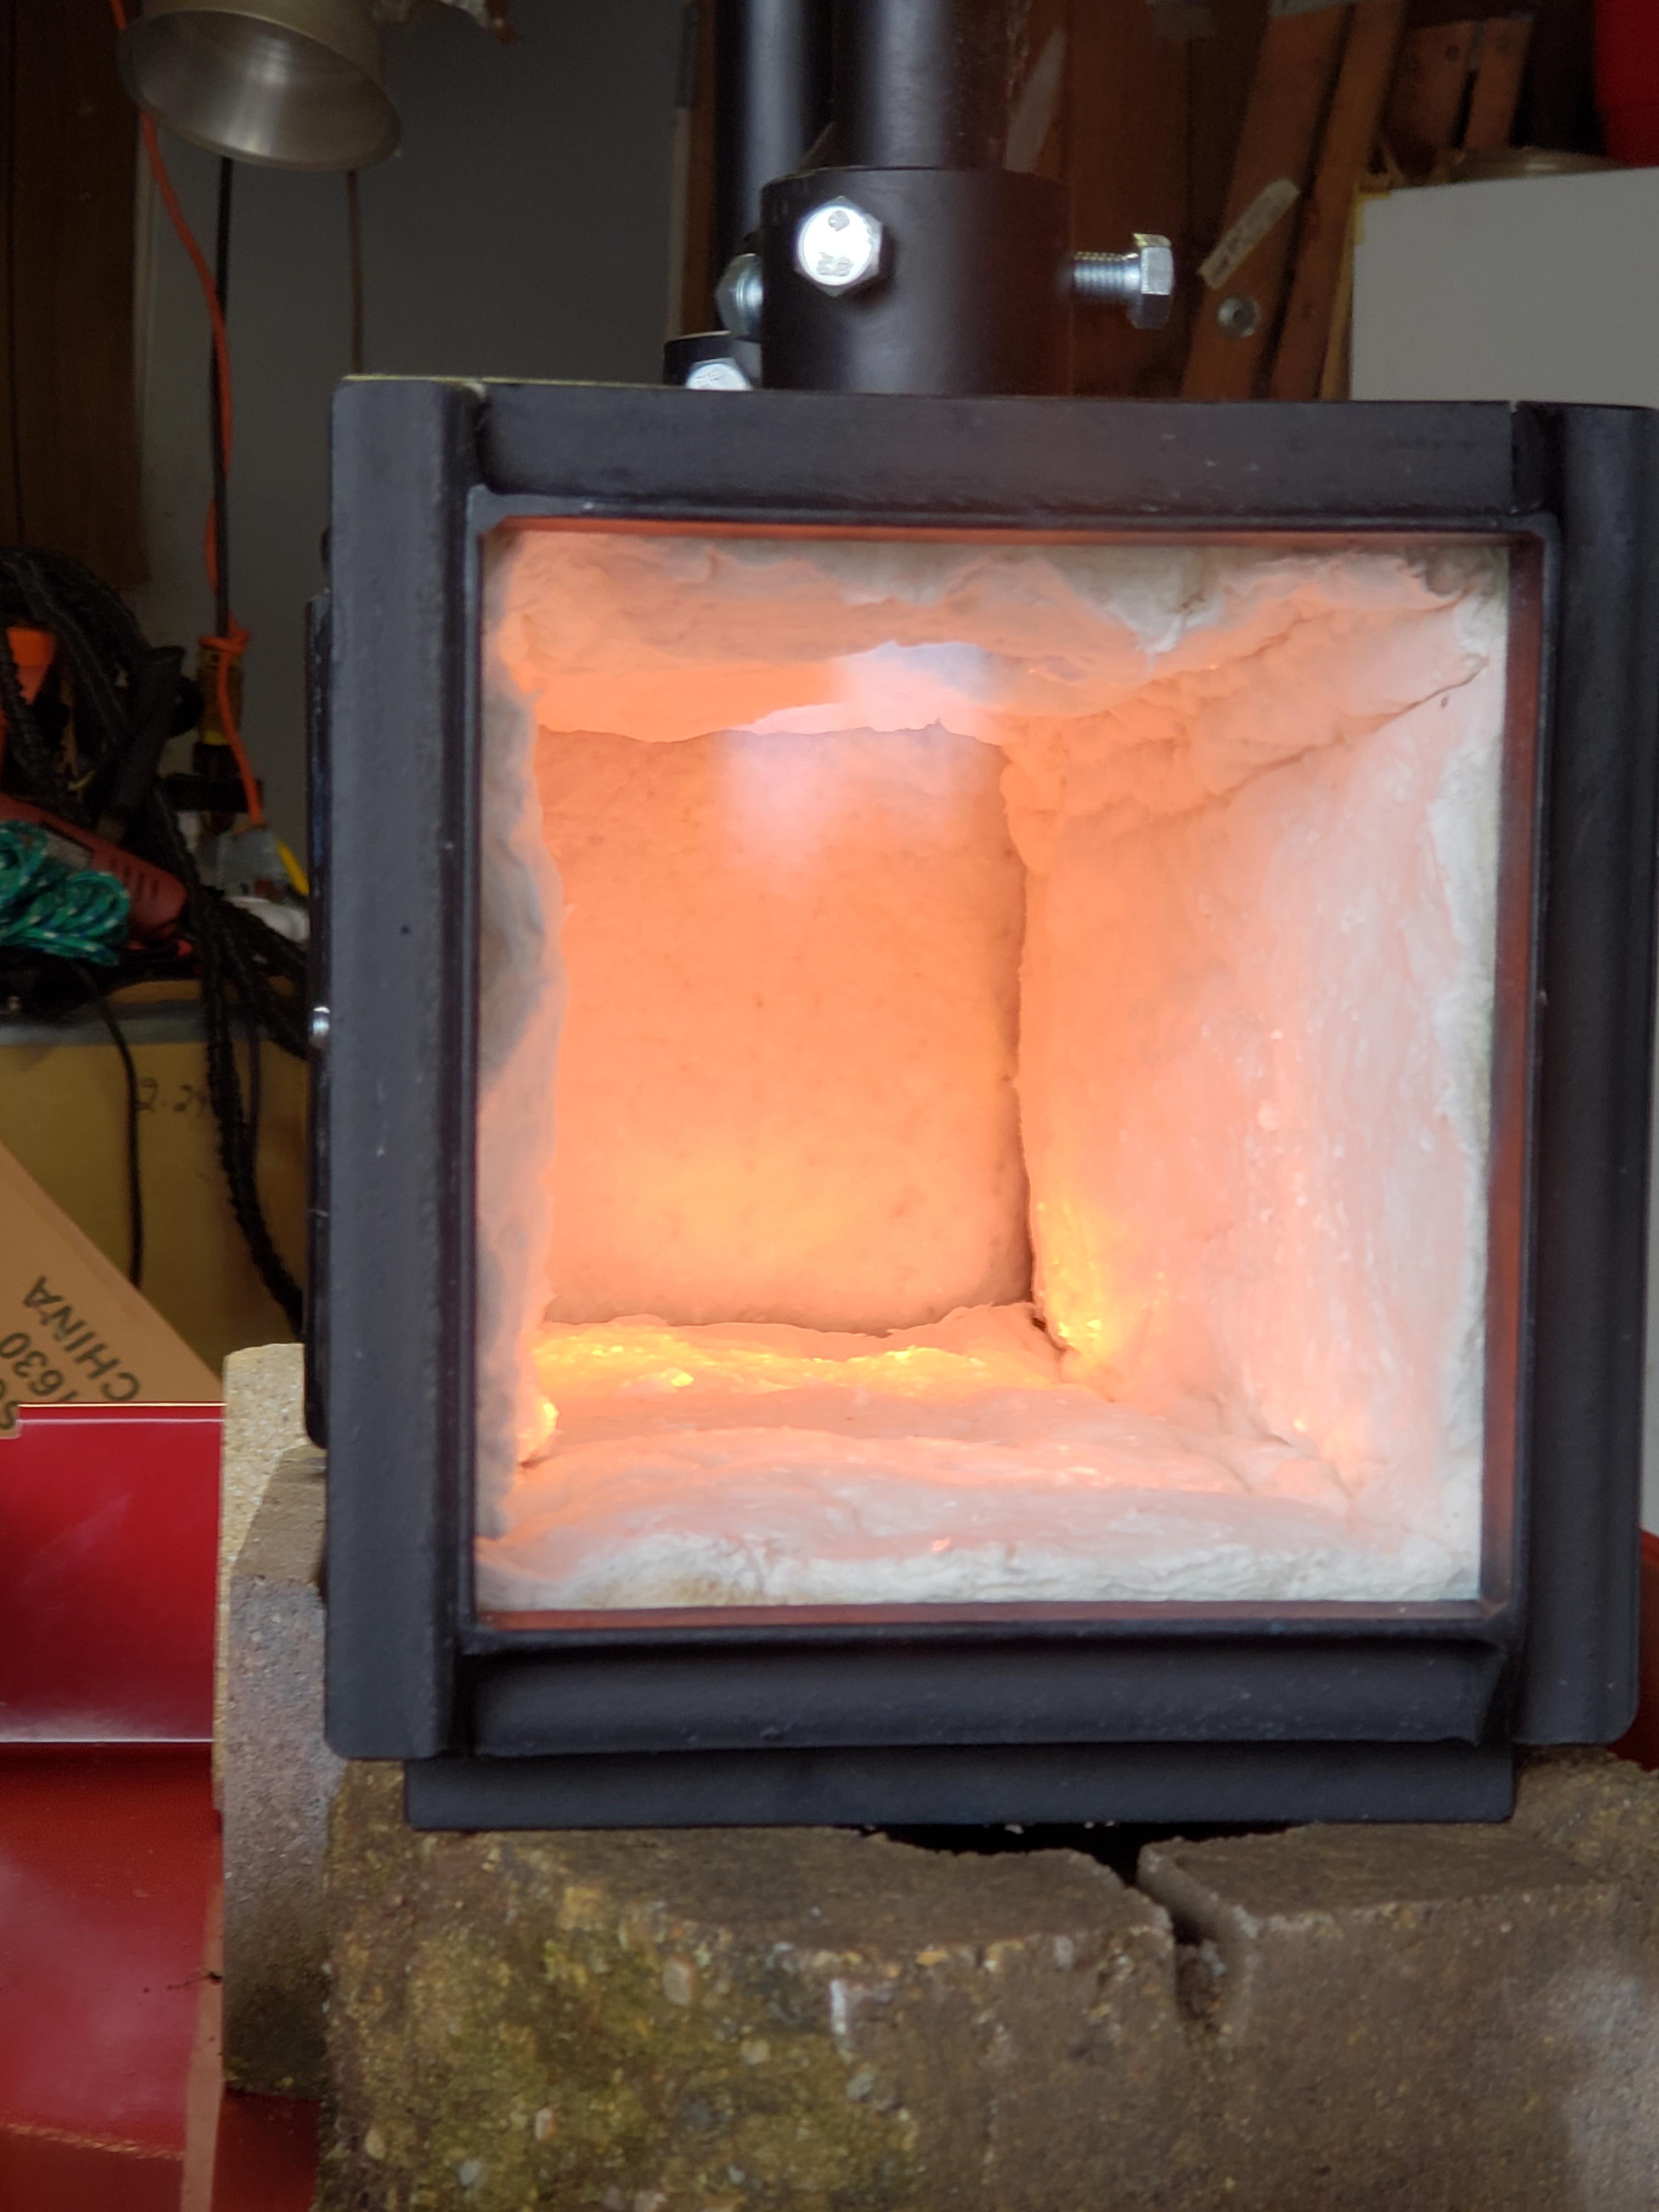
Yay! I can finally add to this thread! It's been nice enough to past few days weather-wise to get my propane tank out from under a tarp and put together the forge. This is the first burn. I've got the burners backwards, the rigidizer has burned off it's dye, and I need to tweak a few things but I'm getting closer! Speaking of rigidizer. Should I apply a second coat? I still have a bunch of the fumed silica left, and I'm really not sure how rigid the kaowool should be. I plan on "painting" the wool on my next day off with the refractory they sent me with the forge, so is it really necessary to hit it again? Or should I save the rest for when the wool needs replacing? And I know the paving wall bricks under the forge aren't the best due to them holding moisture. But the shelf on the cart sits a little low, and it obscures about 1/4 of the opening on the forge, so I had to prop it up with something.
-
What did you do in the shop today?
MaxwellB replied to Mark Ling's topic in Blacksmithing, General Discussion
Very nice JHCC. How heavy is that? I'd be afraid of making something like that too heavy, dragging the fabric or even tearing it. -
Fire from the top of my burners. Help please.
MaxwellB replied to Eventlessbox's topic in Gas Forges
I think blocking the opening will be enough, this way should you ever need to heat up piece longer than your forge, say for a twist in the middle of a fire poker, you could do it. -
I posted in your other thread about this too... After seeing the second video, I'm wondering something... Can you shut off the second burner, run the forge with just one? And then run the same test and see if you get the issue? Also, did you do a soapy water test on your fittings, make sure they're sealed properly? I'm thinking that all that heat coming off that forge is causing expansion. As I stated in the other thread, I'm no expert. Does that small of a forge need two burners? If you can independently control the burners, you could eliminate my theory if it still causes an issue on a single burner.
-
Fire from the top of my burners. Help please.
MaxwellB replied to Eventlessbox's topic in Gas Forges
I am not an expert, but the only thing I can think of causing something like that would be the heat rising off the forge is causing the metal inside the burner T sections to expand, possibly opening up enough gaps to screw with the propane/oxygen mix causing. I'm sure that someone else will chime in with far more knowledge than me, but that's my gut reaction that there's no proper insulation on/near the burners. Perhaps some pictures of the forge? -
What did you do in the shop today?
MaxwellB replied to Mark Ling's topic in Blacksmithing, General Discussion
Get a few gallons of water boiling in a stock pot. Pour the water along the base, one sec should be enough. Then you should be able to rock said log back and forth to break it free. -
No, because as you get better you put out higher quality, so your time is worth more. Your three hours of work @ $20/hr is still the same price as your 4 hours of work @ $15/hr. In fact, your higher quality stuff could easily be billed 3 hours @ $25/hr, raising the price of the item. But market value also needs to be taken into consideration. How many other people are putting out a 4" fixed blade knife with similar handles? The over-saturation of the market will drive prices down simply because at this point you need to recoup some of your investment into it, so you'll forego profit to cover costs. So a little market research into unique or not as common items is also beneficial to the entrepreneur.
-
Well, you need to think of what your material cost was, what your labor cost was, what your overhead and consumable cost is (rent/mortgage, fuel for forge, sandpaper, etc.) and then what your profit should be. In food service, we called it the Rule of Thirds. 30% food cost, 30% overhead, 30% labor. Gave us 90%, with a 10% margin for profit. Obviously you can't run with the same formula as food service, but you can get close. Let's use estimated costs for things. Materials: $50 for scales, steel, pins. Labor: 4 hours at $15/hr (very conservative) = $60. Overhead: $50 rough guess. So that brings your COST of the knife to $160. Obviously these numbers are EXTREMELY skewed, but for the purpose of explanation they work well. So at $160 cost for the knife, what would you accept as respectable margin? 10% = $176 for the knife. 20% = $192 for the knife. You can round these up/down as you see fit. $175, $200, etc. Are you willing to take a loss because the purchaser is a friend? Family? Will you gift it to someone who is going to use and abuse it to test to see if you make good steel and will review accordingly? All these factor into the price. You can't use what you see in retail stores as a gauge because those are mass produced. So you look at individual sites, see what other knifemakers are selling similar blades for. Price is a floating point. Only you can determine what your time is worth, and that's the largest factor in pricing a piece. And as you get more pieces out there, and more people want them, supply & demand kicks in.
-
I went the quick 'n dirty route and bought my kit. Devil Forge 2 burner and an "ebay special" anvil just to get me started with learning hammer control. I've got the kaowool of the forge sprayed down with rigidizer now, waiting for it to set so I can coat with refractory. I'm just soaking up as much knowledge as I can so when I get everything outside and ready to go I'm not wasting working time. Don't have a basement, otherwise that'd be a solid idea. And the garage is detached, so there's no heat in there. So I've got time to plot out a plan of attack when the weather turns and I have some time to put hammer to steel.
-
Not too bad? I'd say those are sexy as xxxx. Very very very nice work! I want to be like you when I grow up.
-
What did you do in the shop today?
MaxwellB replied to Mark Ling's topic in Blacksmithing, General Discussion
Income is income. If I were in Northern Cal I'd offer to help. I wouldn't mind learning how to weld. -
So... With the -25 degree weather, a car that won't turn over (cranks but not starting), and a three days off in a row due to the joys of retail, I figured I'd introduce myself. My name is Maxwell, but everyone calls me Max. Born and raised in south Chicago suburbs, but it's easier to say Chicago or Chicagoland, so people know what you're talking about. I'm 37 years old, I like candlelit dinners and moonlit walks on the beach... wait, wrong profile. Sorry. I am 37 years old. I have worked a variety of retail jobs, been everything from a seasonal peon to an assistant district manager. I've worked in computer stores, gas stations, malls, big box, little box, medium box. I've worked in factories and bakeries as well. I went to school for Culinary Arts when I was laid off a bunch of years ago, just to sharpen my skills. I decided that for 2019 I'd finally get off my backside and get a hobby going. After looking at everything available, I kept coming back to smithing. Between enjoying making things and seeing the potentially limitless variety of things to make, I made my choice and started gathering tools and supplies to get cracking once the weather turns. I plan on my end game being primarily knives... Pocket knives, EDCs, kitchen knives, things like that. I wouldn't mind selling them, but at this point I'm more for the learning than anything else. Good judgement comes from experience, and experience comes from bad judgement. That sort of learning fits me to a T. I've gotten some great feedback from some members already, and I look forward to learning more every day. Now if only the weather would cooperate, I could make some progress in setting up my work area and getting some other things to get closer to being ready to go.
-
I purchased 1 Quart, Fumed Silica, Thicker,Resin Filler 1 Quart Pack Planning on doing the home-brew mentioned above, 1 cup powder to 1 pint water, with a pre-spray of water so the rigidizer penetrates better. Then I'll be coating the rigid blanket with the refractory that came with my forge. After reading the back and forths above, I'm left with a few questions: 1 - Should I look into an IR-reflective coating to go over the refractory, or will it be diminishing returns due to the extra amount of material in the forge needing to get hot to get to proper temp? 2 - Should I get a water glass/kiln wash product for the firebrick that'll be the floor to prevent it from getting damaged due to flux? 2a - Can I use water glass as the IR-reflective and kill two birds with one stone?
-
Oh yeah. I always tell people I'd rather be too cold than too hot. "I can always throw on a hoodie or a hat if I'm cold, but when I'm hot there's only so much I can take off before I get arrested." But I love cool/cold weather. Always have. Love storms too. If I lived in Florida, I'd be that idiot you see on every news broadcast when there's a hurricane coming, standing on the end of the pier watching the storm.
-
Help needed to secure anvil
MaxwellB replied to Kako95's topic in Stands for Anvils, Swage Blocks, etc
You do want the hole smaller so there is a pressure fit as you say. Obviously you don't want to take a 1" bit all the way down. Measure your spike. I'd say you want to start at .5" - 1" from the tip. How wide is it? Do you have a bit a little narrower than that, that will reach that far? If so, you can do it in steps starting from the point up. If not, you might have to start at the surface, and work your way down, as drilling out the stump will make more room for the drill to fit in. Do you have a log to practice on? Or an additional stump in case this gets pooched? Then I wouldn't sweat getting it right the first time. If not, then you want to be more careful. This will reduce the chance you'll split the wood, by drilling that "pilot hole". You'll just need to be careful when you hammer that spike in that you don't get too aggressive with it. And if the wood does split, while not ideal, you could probably forge yourself a few bands to wrap around the stump and hold it in place, just like what Thomas has in his pictures. Of course, I'd more than likely go overboard and do three or four, because my brain is wired like that. "Hey, one's good, but how about eleven?!" Yeah... I know I have issues. -
Help needed to secure anvil
MaxwellB replied to Kako95's topic in Stands for Anvils, Swage Blocks, etc
Depends on what sort of bits you have. I know myself I'd personally end up doing it the hard way, because I know there are far more experienced people here that know the tricks. But I would check my bit lengths and sizes, match up sizes to the taper of the spike, and drill holes accordingly. Use the narrowest, longest bit for the first hole, then "ream" that with the next widest, stopping before you get as deep (mark the bit with tape to know where to stop), rinse & repeat. Then I'd fill the cavity and the face of the stump where the anvil will sit with silicone or construction adhesive, set the anvil in and hammer it down in place. Let cure, and you should be good. But like I said, I'm sure someone else here has an easier way of doing it. -
For sure. I never mastered that ball & paddle toy. This is beyond my skill. Way beyond.
-
Billy, don't do it! At least not this week! -20ish tomorrow. -15ish Thursday. Won't see "normal" winter weather until February.
-
The forge I ordered arrived today, and I already have the fumed silica for rigidizing. I just have one really simple question, and forgive me if it's been answered somewhere else: Should I fire the forge at low heat first to burn off anything undesirable before rigidizing, or rigidize now, cure, then coat with the included refractory? I can't imagine there are any chemicals or anything actually on the kaowool in the forge, but manufacturing standards in eastern Europe are different than US ones. Just curious to know best practices to maximize the life of the wool before it'll need replacing.
-
66 lb. Chinese 'ACCIAIO' Anvil Unboxing and testing
MaxwellB replied to HojPoj's topic in Anvils, Swage Blocks, and Mandrels
I see the 3x3 stands that some post here, with the bands around them and lag bolts sunk to keep the whole of it together. I'll probably go with that base, I was using the picture above as reference to the top, where the anvil is recessed. Portability isn't too much of a concern, as I've got a few dollys available to move it. And that travel distance shouldn't be far, from garage/workshop/storage/CF area to a spot to hammer on things. I've got a few projects to do to get everything squared away. But with it being as cold as it is in Chicago, I can't do much but plan and plan some more. On the brighter side, my forge should arrive in the next day or two, as latest tracking shows it in Memphis. So at least I'll be able to get that rigidized and cured before I'm even thinking of getting some actual hammer time in. I appreciate all the info you're sharing with me. If you ever make it out to Chicago, or I ever make it out to your neck of the woods, first round is on me. And maybe by then I'll have a bottle opener or three to get into the drinks! -
66 lb. Chinese 'ACCIAIO' Anvil Unboxing and testing
MaxwellB replied to HojPoj's topic in Anvils, Swage Blocks, and Mandrels
How was the ring with that setup? I'm thinking of making something similar to this, and fill the inside with sand/pea gravel, something to fill up a bit of that void in the base and reduce the ring. Maybe go deep enough to completely conceal the feet. Thoughts?
-
66 lb. Chinese 'ACCIAIO' Anvil Unboxing and testing
MaxwellB replied to HojPoj's topic in Anvils, Swage Blocks, and Mandrels
I bit the bullet and ordered one of these. Hoj, you mentioned that the shipping times were really skewed. Do you recall how long it took for you to get yours? Mine's not going to be in stock (supposedly) until Feb 15. But I remember you mentioned above you got it before it was even supposed to be in stock. Just trying to plan some stuff out. Guess I need to start researching good bases for it now.