Goods
-
Posts
1,170 -
Joined
-
Last visited
Content Type
Profiles
Forums
Articles
Gallery
Downloads
Events
Everything posted by Goods
-
I have to agree with Nobody Special and Frosty here. I’ve worked with many Japanese and have seen them work for hours from the same position as the boy above. I’m blessed with flexibility and have been able to work with them in their style and the respect gained from them have always help me... it’s also help when it was in their home land using their facilities...
-
U1,V1,W1 are what I’ve seen on three phase wiring. Usually three black wire labeled this way for the 3 phases and one green for the ground. No neutral wire in three phase. (I could be missing something though.) David
-

What did you do in the shop today?
Goods replied to Mark Ling's topic in Blacksmithing, General Discussion
Just a question to everyone out there. What are you’re thoughts on the end of the hold fast? The one shown about has a flat holding surface. The ones I’ve made have a vertical end with a “V” notch to hold rounds better. My thought is that the flat surface would draw more heat out of the pat, but it also tends to mar the work occasionally. They do seem to hold much better that chain hold downs though. To those with more experience, what do you all think? (gburgsmith, please don’t take this the wrong way. I’ve seen this style of hold down done several different ways, some no so good, and you did a good job with yours! I’m just looking for more input..) Thanks, David -
What did you do in the shop today?
Goods replied to Mark Ling's topic in Blacksmithing, General Discussion
Thanks, I understand. Now I just need to make it work. Practice, practice, and more practice. Just need to find more hrs in the day... (yes, coal forge.) -
What did you do in the shop today?
Goods replied to Mark Ling's topic in Blacksmithing, General Discussion
Yes, I did cook the spring steal a bit... I got to get more experience working with different steals. Had a hard time getting the wrought up to a good temperature without over heating the face. The weld didn’t blend real well as a result. I did use the bards for the face. Had a heck of a time with that too. Again, more experience needed. I cut one completely off as I was chiseling it, and had them bend over a couple times setting the face. Steeled the peen like it was an axe, that went more smoothly. Hopefully it will survive the heat treat! I plan on working through this several times to get the process down. I am required to do a demo at the IBA annual conference and, to me at least, this seems like it would be of interest to smiths with more experience. Thanks again! David -
I would mount it tight and start working with it. If you find the edges in the way for projects, then change it. You might find the extra space around the base to be a convenient place to stage tools within easy reach. With a steel stand you can weld material back, a bit harder to add wood back on securely. Of course you may want to have plenty of clearance below the hardy hole. Enjoy it, David
-
What did you do in the shop today?
Goods replied to Mark Ling's topic in Blacksmithing, General Discussion
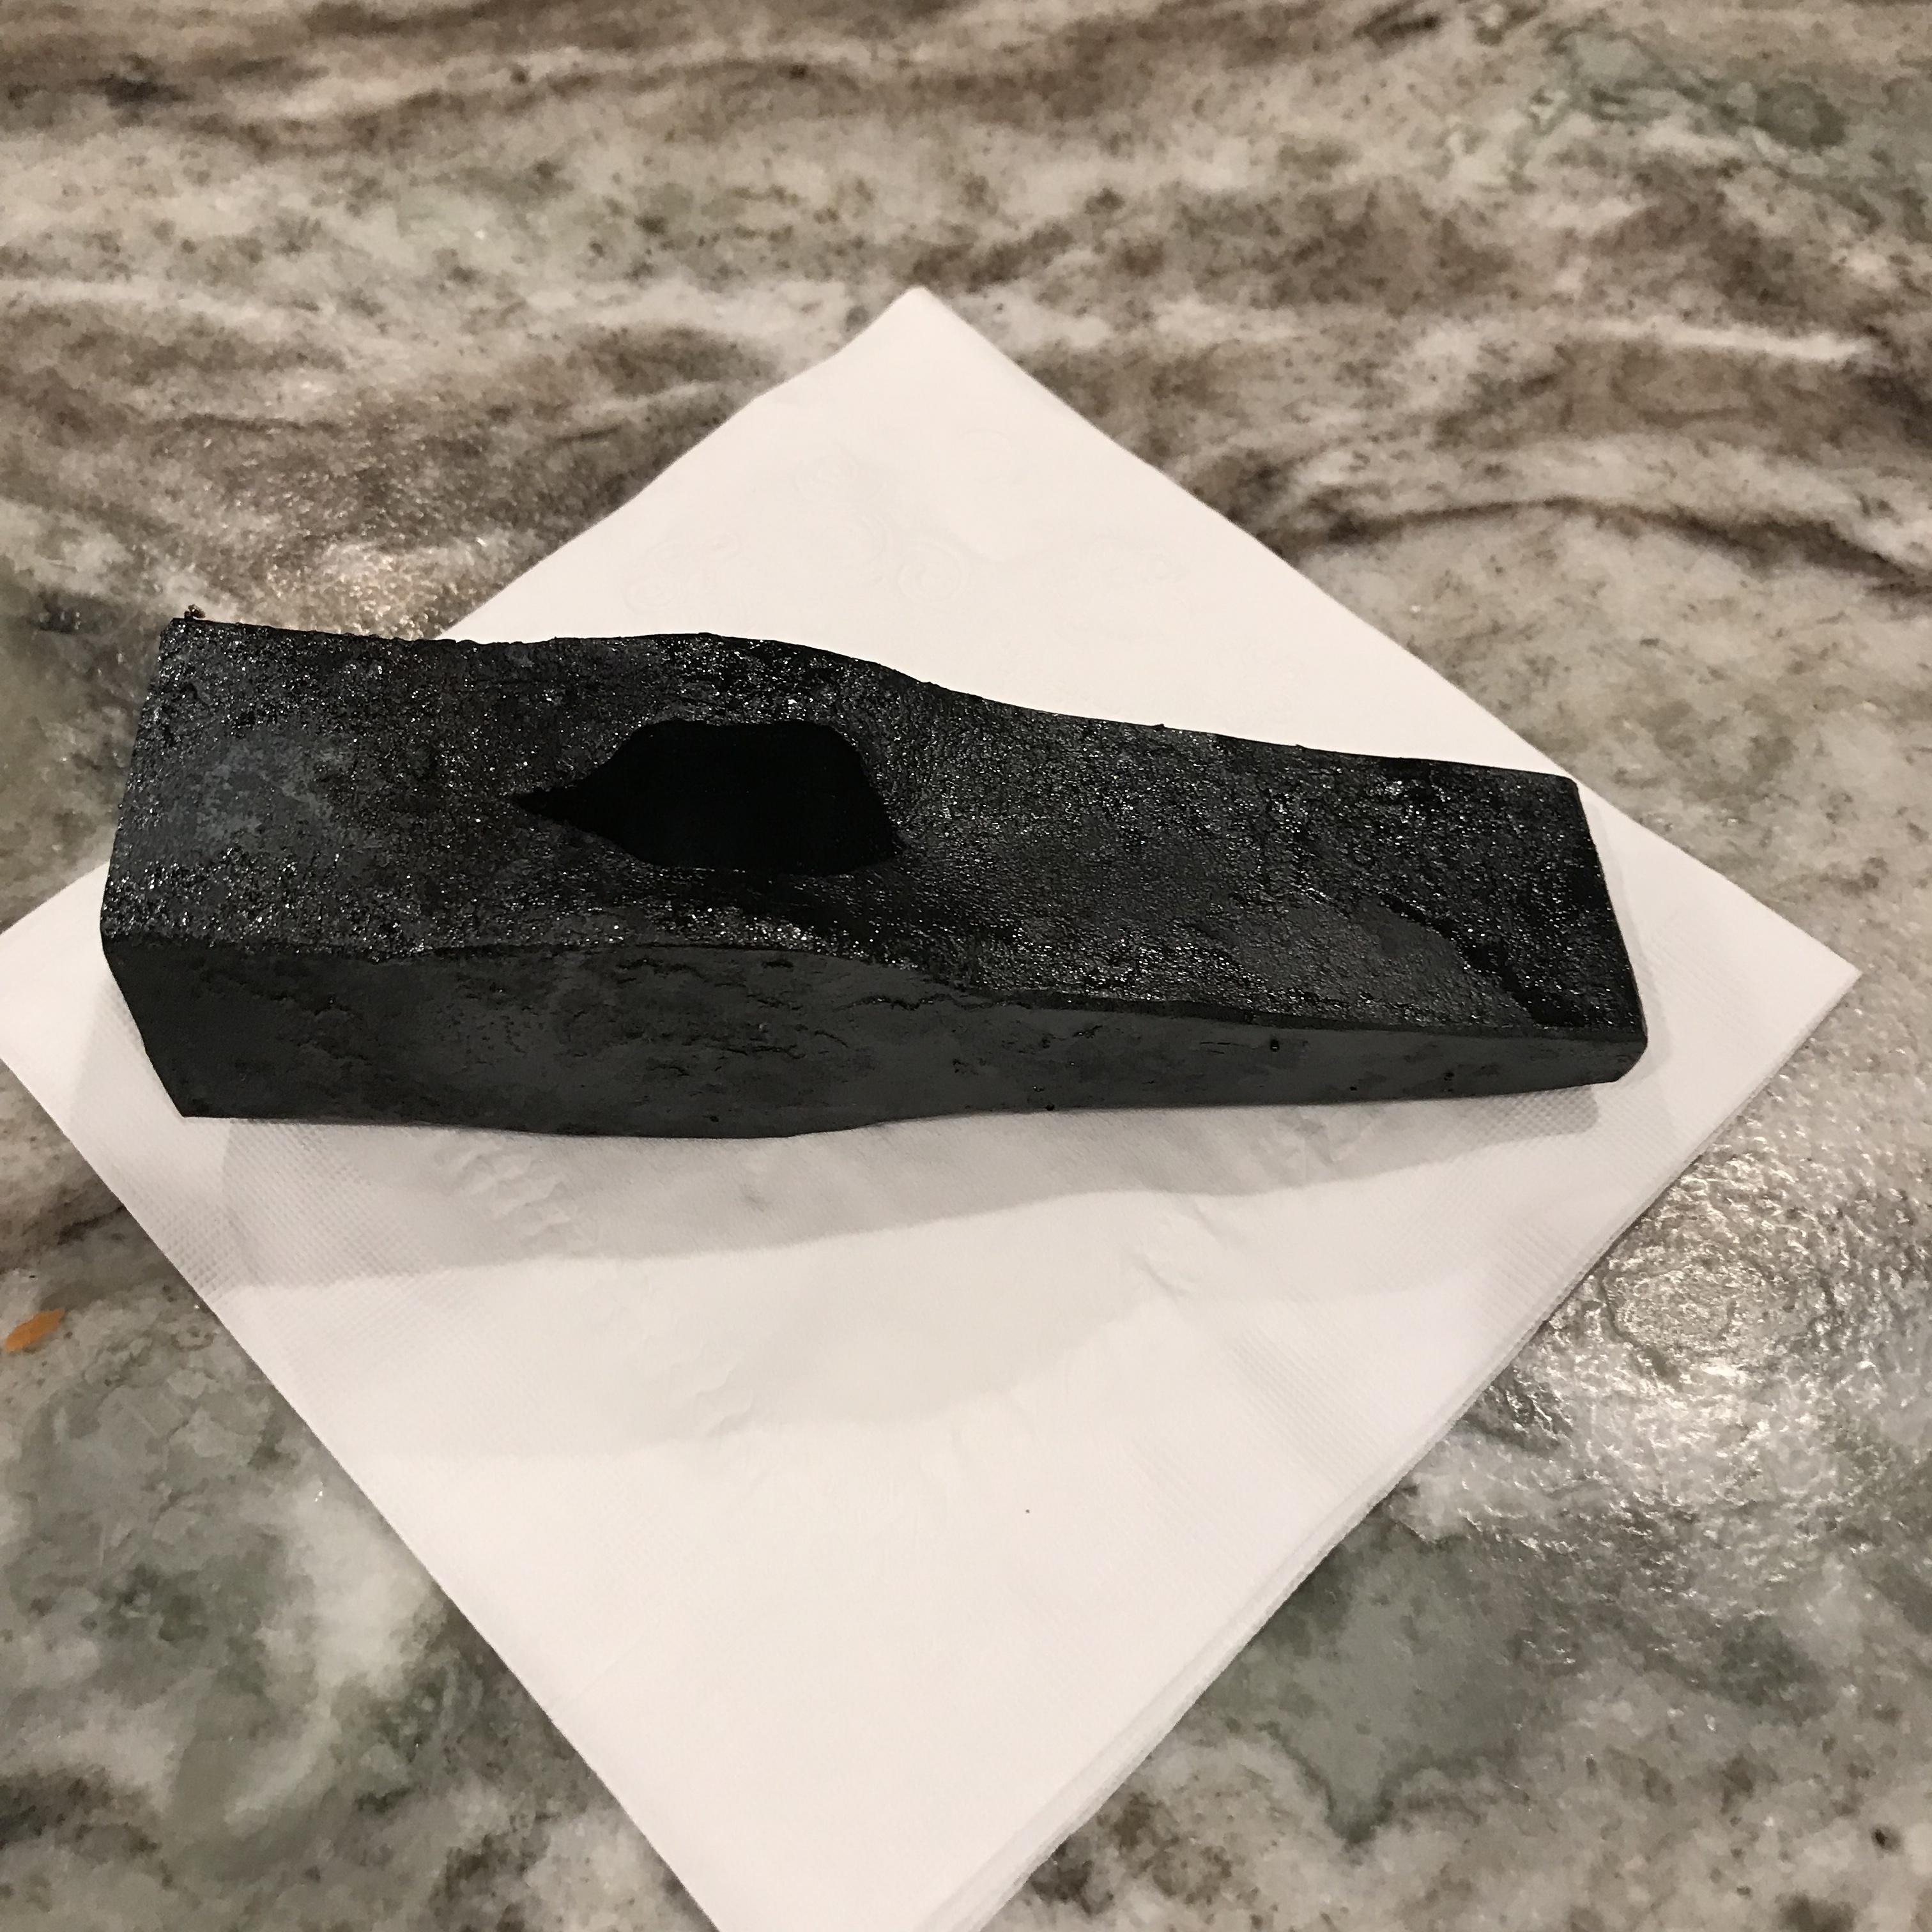
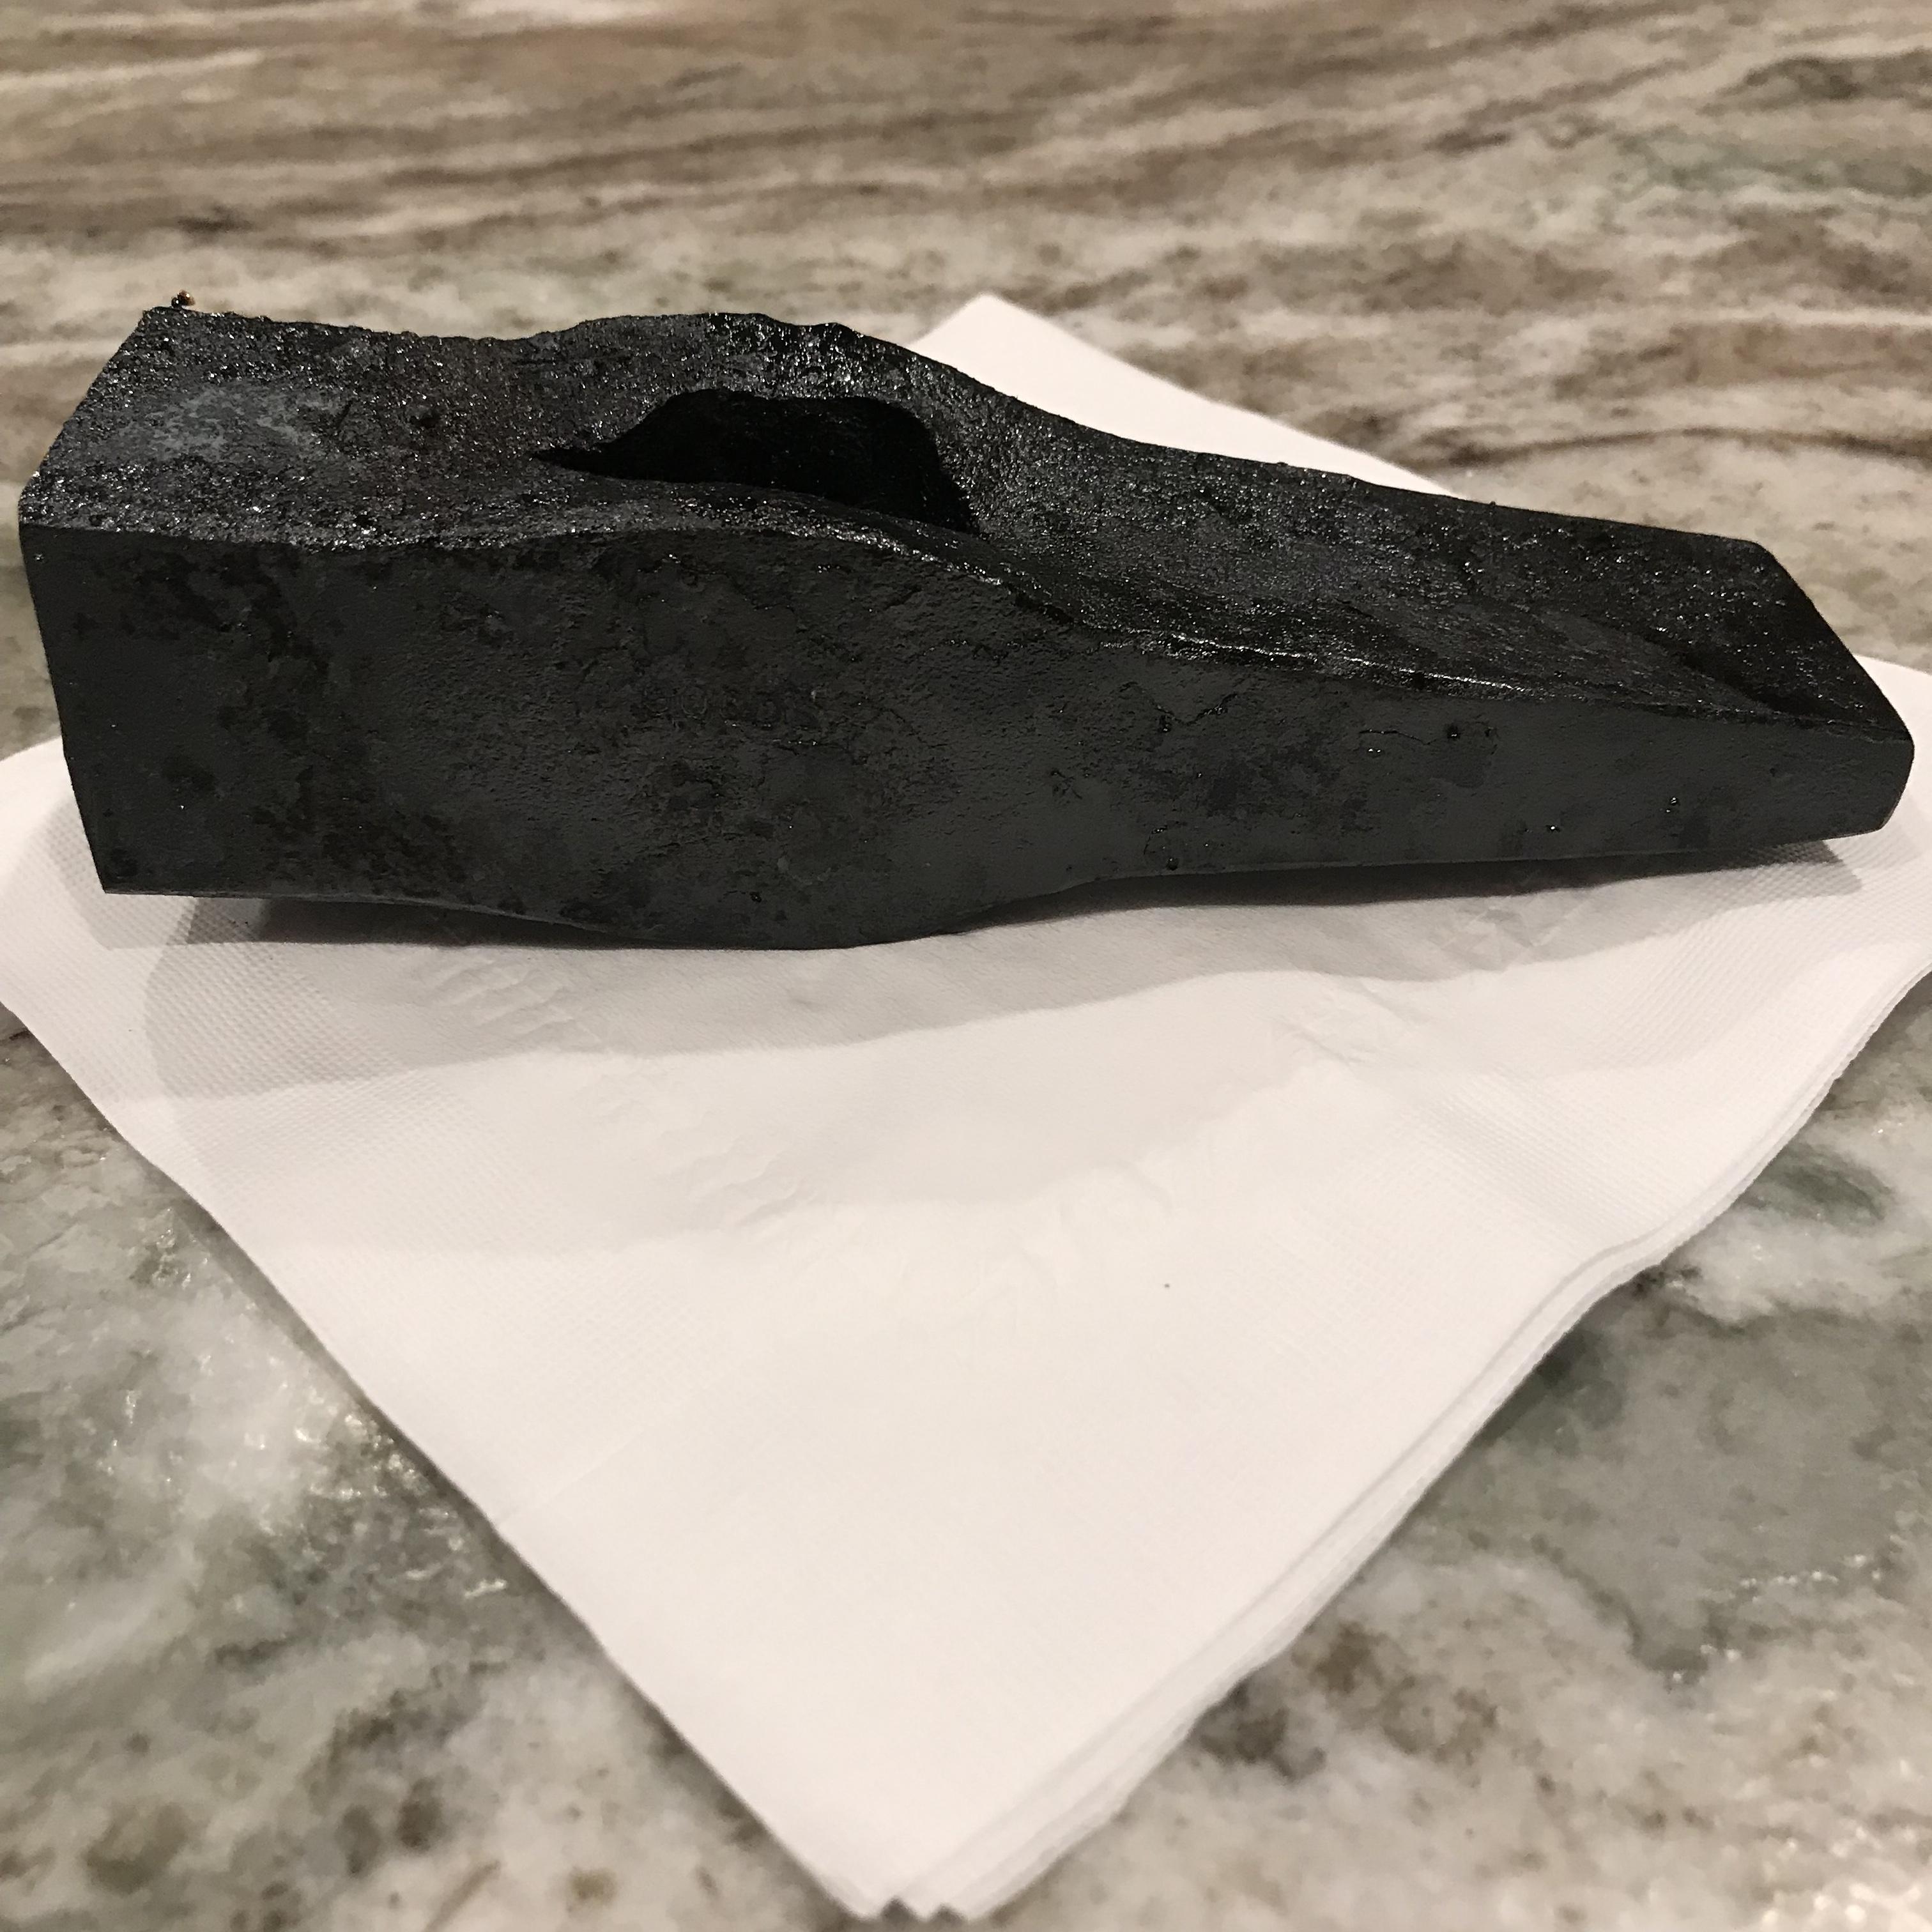
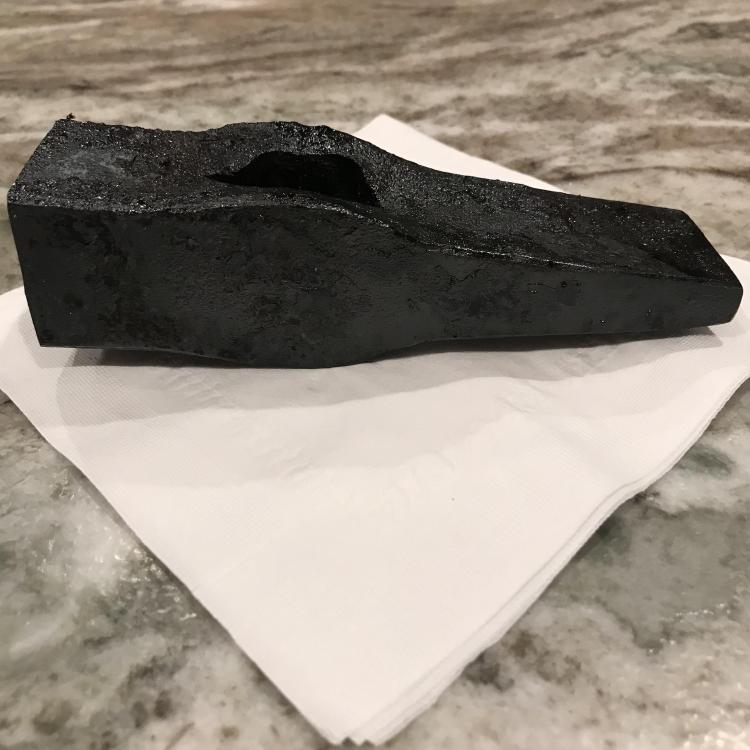
I made several items at the forge this weekend. (I did two long days of demos for a local festival.) This is what I’m most proud of. Inspired by JLP, a faced wrought iron hammer. Still needs cleans up, touch marked, hardened and of course etched. It began life as a 3/4” sq by 15” spike from an old damn (which salvaged years ago when the damn was removed and later gifted to me.) Had to fold and forge weld it 3 times to gain its current thickness, then steeled the face and peen with salvaged spring mat’l. (Picture is a little miss leading, it’s about 2lbs...) Thanks for the inspiration Jennifer!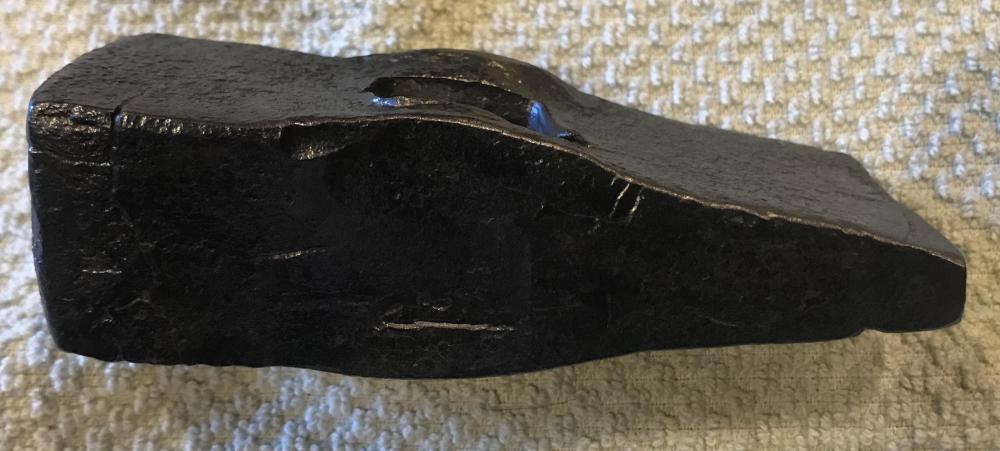
-
I’m no expert in any way, but I’m also a little confused by the weld that failed. Was it a stack billet or a lap weld. From the cross section, it looks to me like it needed a scarf on the ends of the darker piece.
-
3D printed plastic burner experiments (photo heavy)
Goods replied to Another FrankenBurner's topic in Gas Forges
Would casting some spiral ribs into the face of the choke induce the vortex mixing without much lose of induction. One small casting to try? I have been really enjoying watching the progress here... Thanks for sharing it! David -
Don’t worry, I didn’t think of it as idiotic, just over looked it. I deal with it more than I like. If you’re your valve has the capability of doing a what “we” call a power stroke (putting pressure to both sides of the cylinder) you could greatly increase the extend speed (if I’m thinking right 6x current extension speed with your cylinder, but only 1/6th of the force). We usually put a limit switch in and use a separate solenoid to switch modes, but one could always use a pilot valve set to switch at a given “back” pressure. The hydraulic diagram can get fairly complicated... If you try it let us know how it works! I’d love to make a press, but limited electrical service available in my “shop”, not to mention time and money! Take care, David
-
Unless your cylinder is a thru rod type the force retracting is reduced by the area of the rod itself. From the pics you have a normally cylinder, so if you make a ratio of the rod area to the cylinder area you can use that ratio to calculate the reduced tonnage on retraction. Inverse the ratio and you can calculate the increase in max return speed. There could be a difference in the valve also, but I would need to see the valve diagram to help out there. A power stroke option would be awesome for a forging press, especially if it has a large rod to bore ratio! I like the idea of having the action lever reversed. If you hit the lever accidentally the press opening could be a much safer failure mode. Either way, enjoy the press, David
-
What did you do in the shop today?
Goods replied to Mark Ling's topic in Blacksmithing, General Discussion
Make a few hooks in preparation for a Labor Day demo, felt odd not having anything to sell last time I did it. (Still a lot more things to make!) Also, hardened and temper a hammer made yesterday at an IBA chapter hammer-in. I brought both the face and the peen to non magnetic keeping the eye relatively cool, quenched in warm oil, then tempered at 400F for 2 1/2hrs. It started life as new 1.5”x1.5”x4.75” 4140. I had the help from a couple other members striking. Overall, fairly pleased with it, but plenty of room you improvement. (Next time I need to make a smaller slitter!) Someday, maybe, I’ll make it to Jennifer’s level.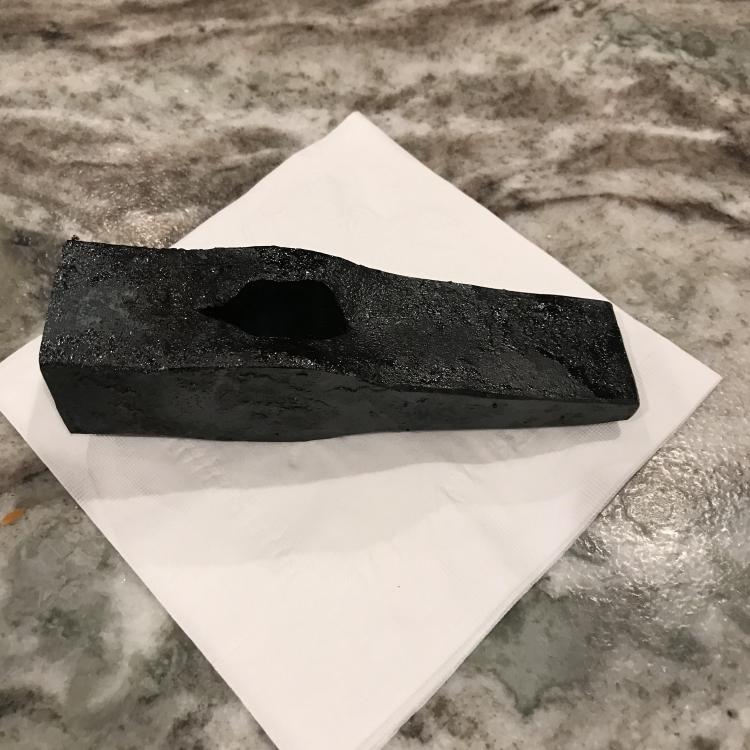
-
I saw the pic’s from that junkyard from picker’s post. They look like a pretty large stock diameter. How big of a hammer are you planning to make? Or is the picture just misleading? David
-
Kentucky Cumberland Coal CO
Goods replied to Wylde32's topic in Solid Fuels: Coal, Coke, Charcoal, Wood, etc
Any chance they have Saturday hours? Thanks! -
What did you do in the shop today?
Goods replied to Mark Ling's topic in Blacksmithing, General Discussion
JLP, I’ll reduce the angle on it a bit. It began life as a 52100 roller bearing from a 2000ton mechanical press, it should hold up with a steeper angle. -
What did you do in the shop today?
Goods replied to Mark Ling's topic in Blacksmithing, General Discussion
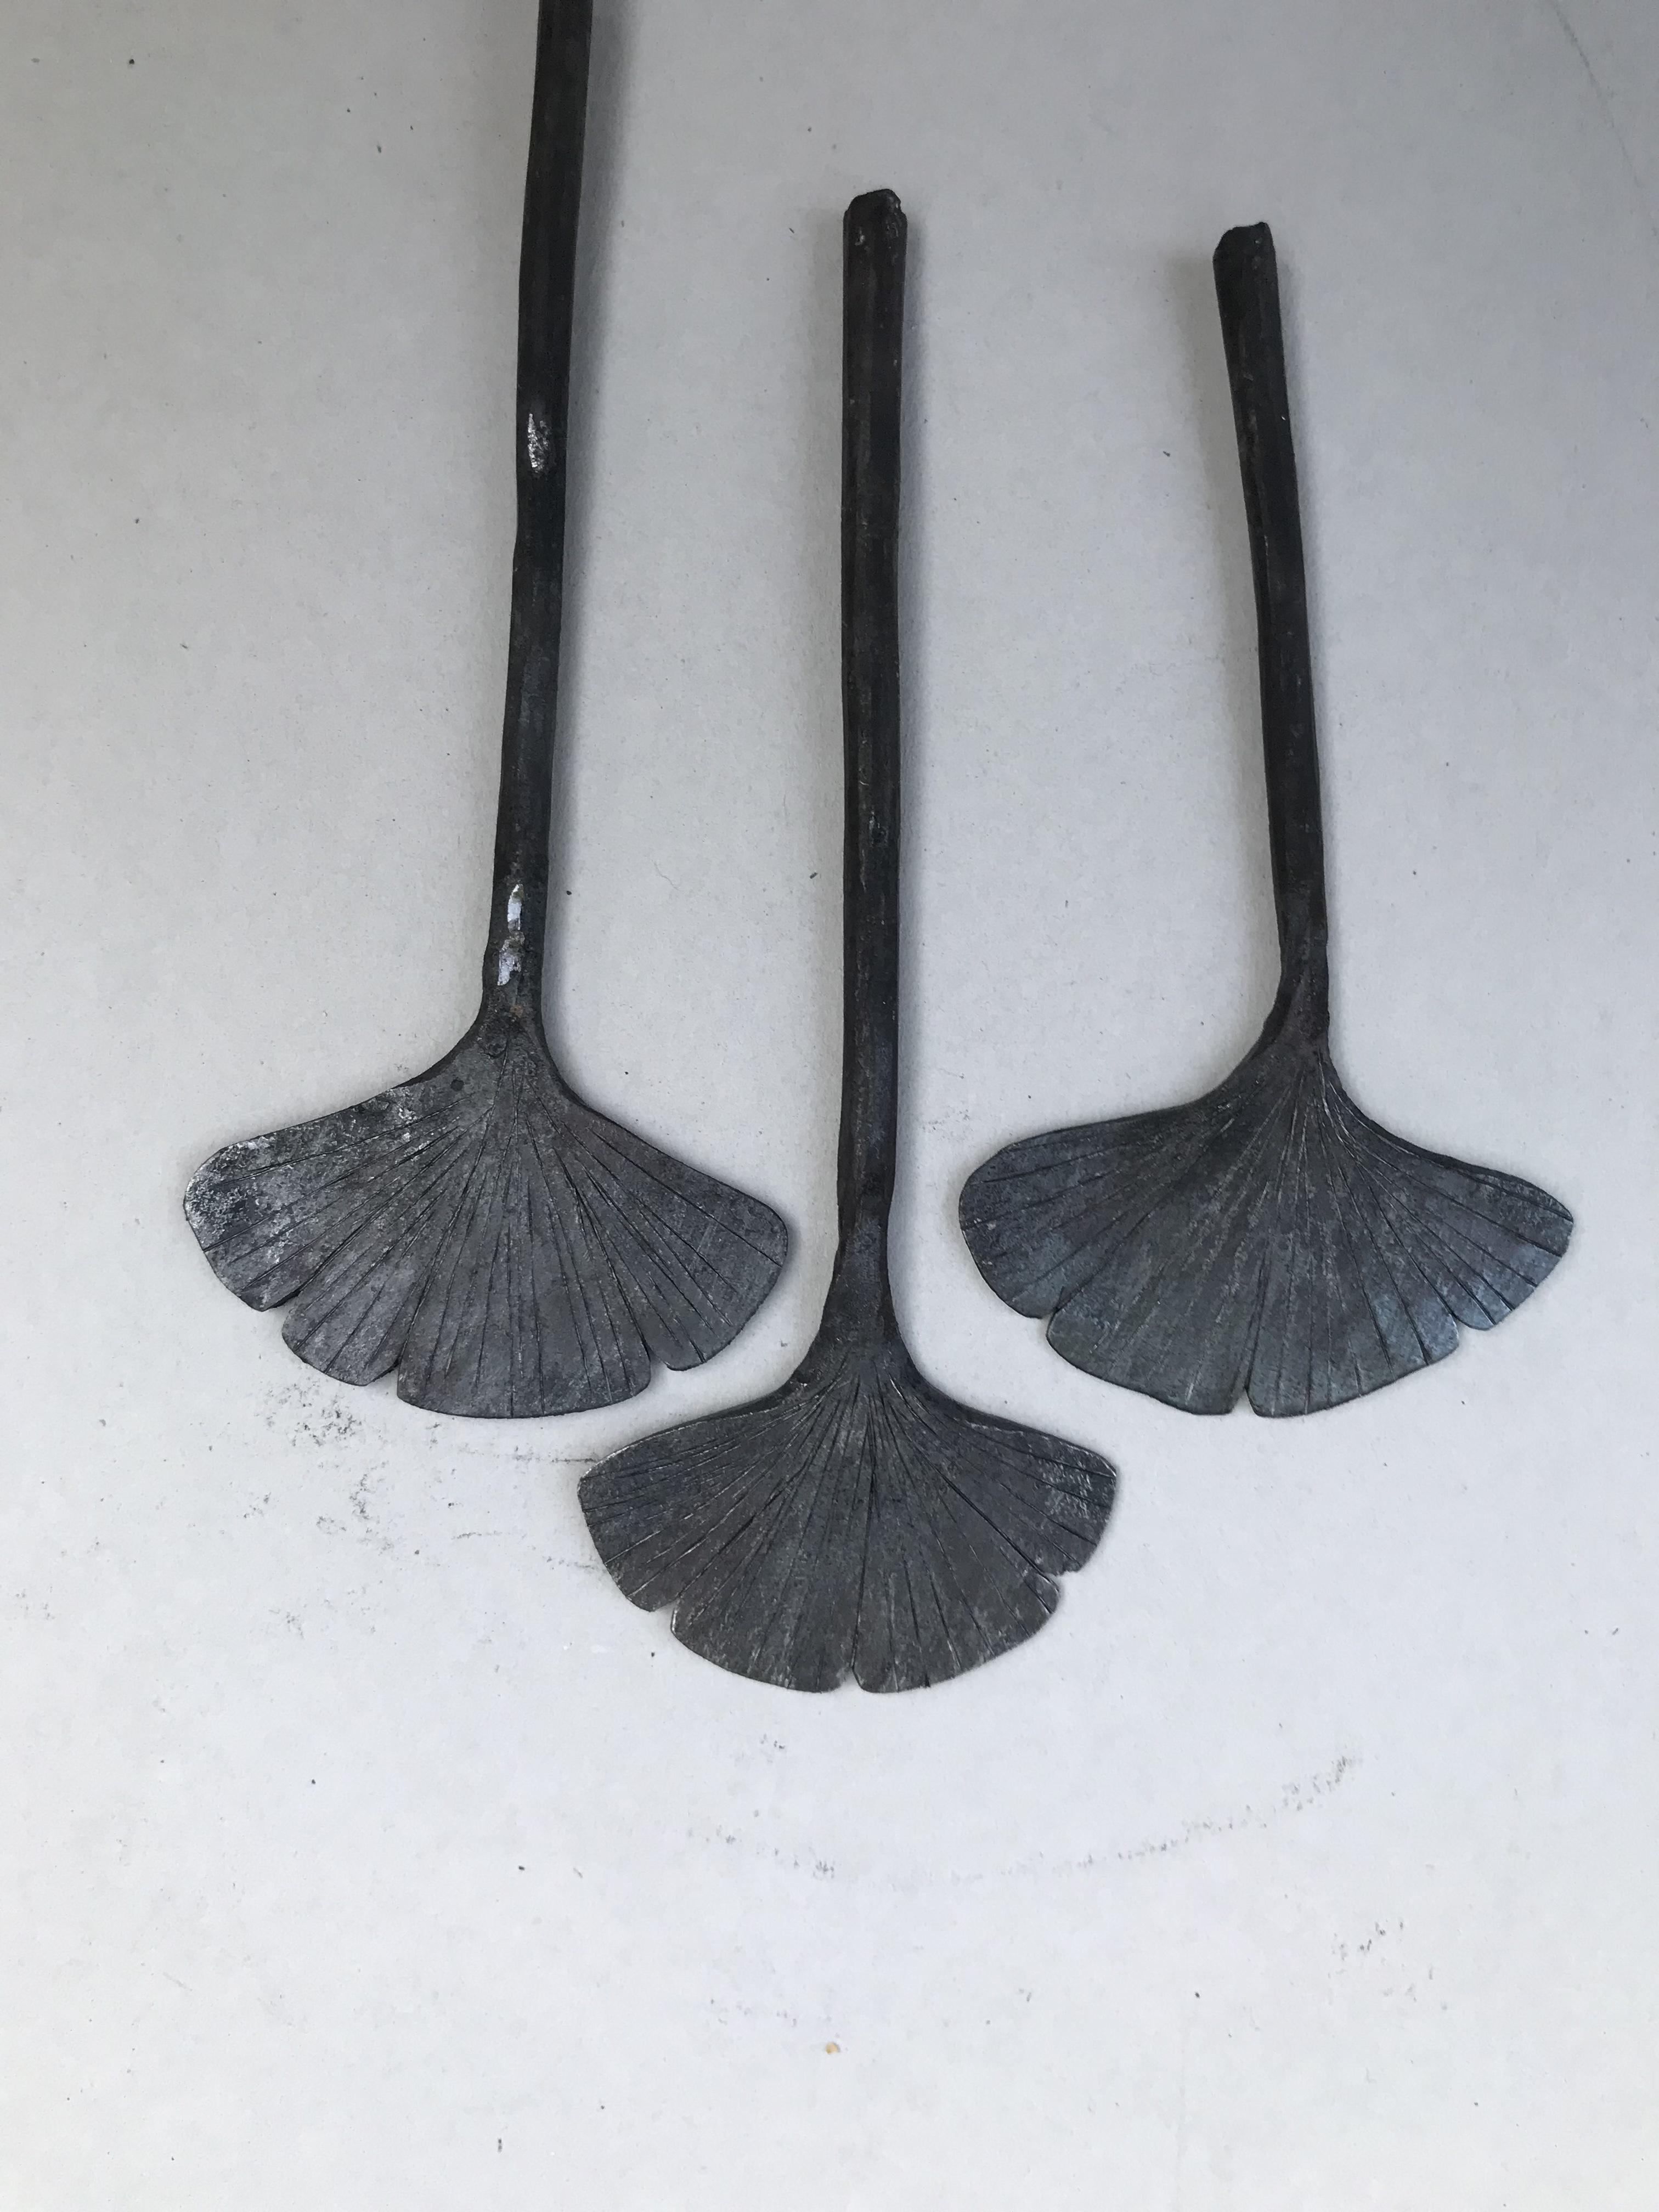
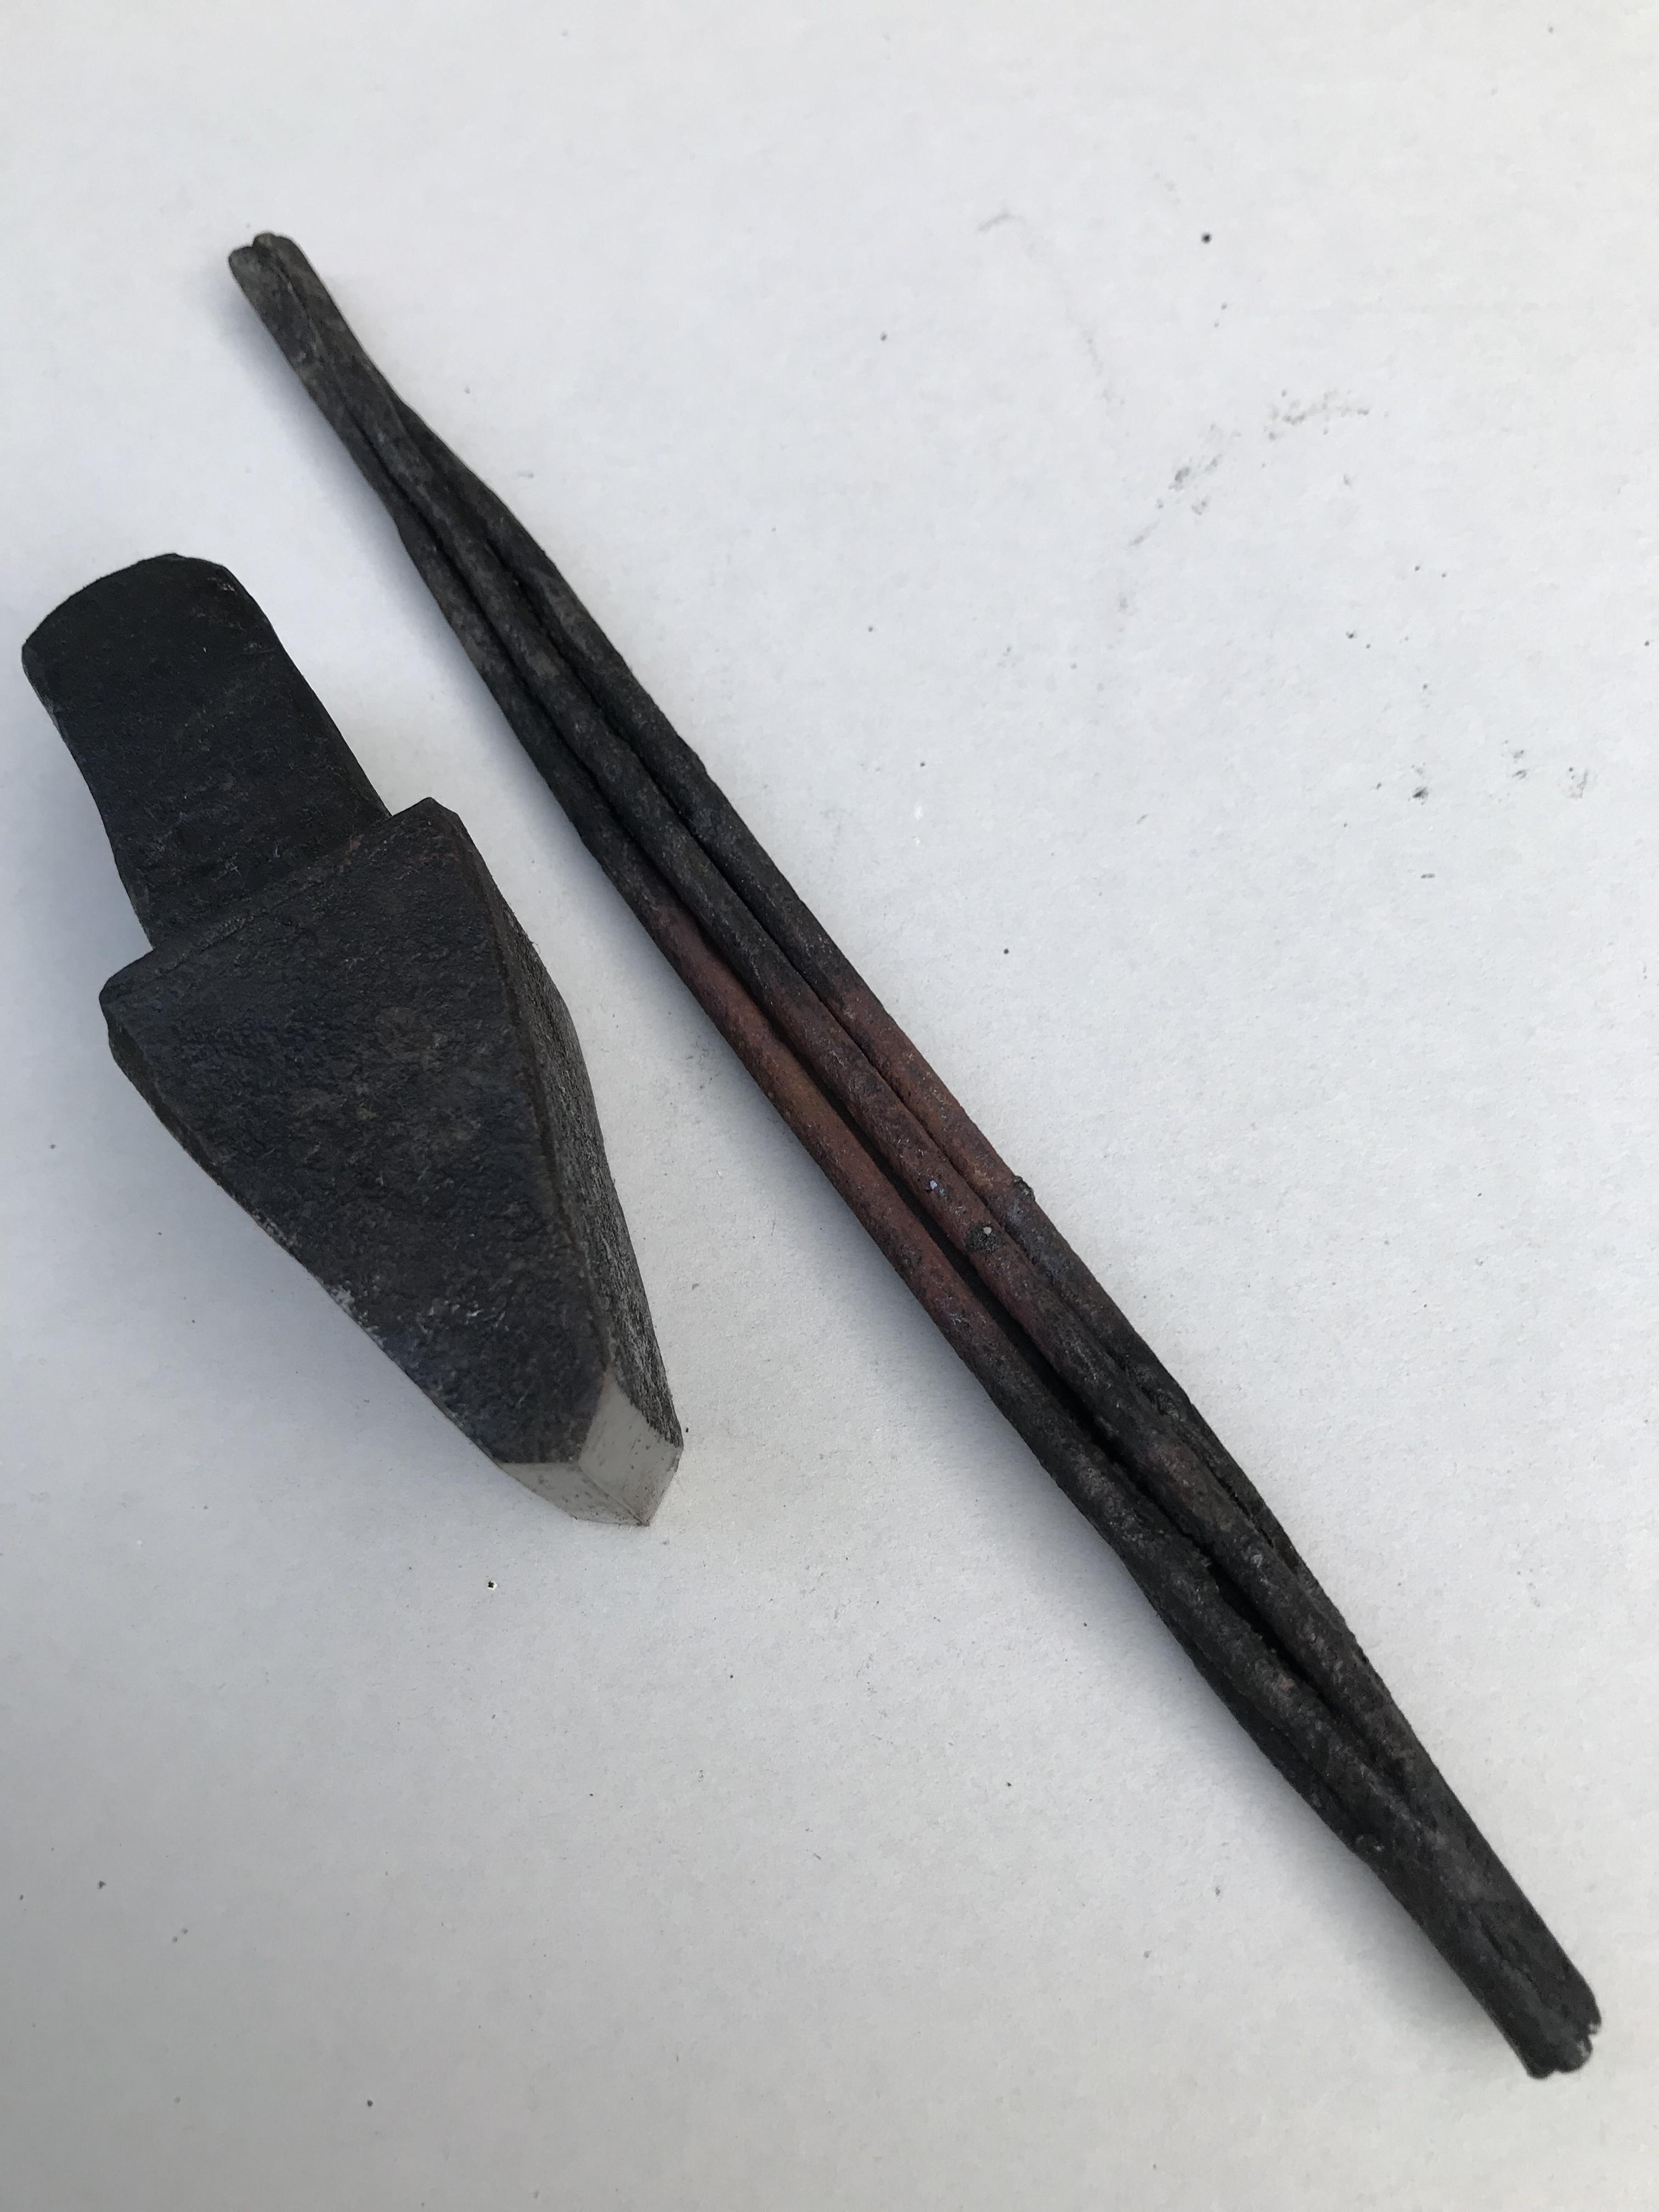
Made a few more ginkgo leaves for a lamp project I’ve been working on... 18 down out of 51 needed. Also, finally finished the heat treatment on a hardy cold cut and started my first attempt at a basket twist. (Sorry about the image sizes, can’t seem to figure out how to reduce the size on this iPhone...)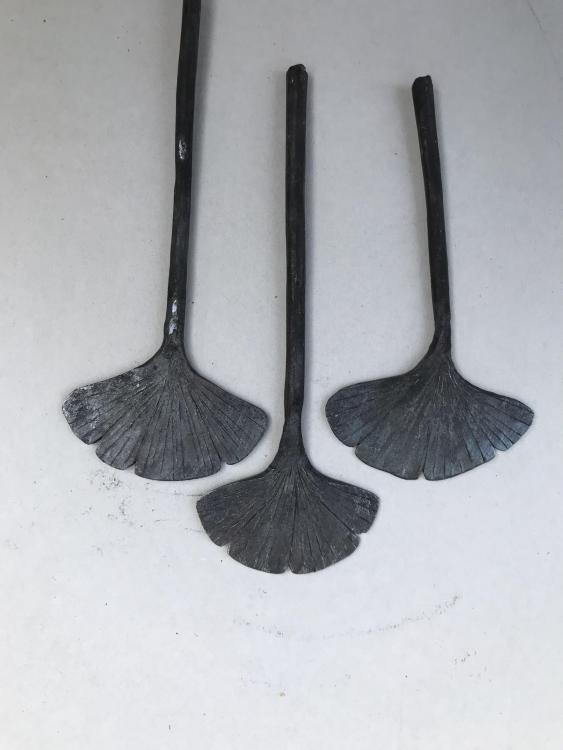

-
Took a wild chance today on a 100# Kohlswa
Goods replied to picker77's topic in Anvils, Swage Blocks, and Mandrels
You could raise the casters 1/16”~1/8” and put steal pads in front of them at the correct height. That way when you raise the hand the stand will tilt back onto the casters to roll around, but still have a solid support for forgiving blows. -
What did you do in the shop today?
Goods replied to Mark Ling's topic in Blacksmithing, General Discussion
Honestly, the handle could be another half inch taller. It’s little tight on my hand, but should be good for him. Thanks for the compliments! My first real project was a claw hammer that I gave to him for his birthday last November. It’s funny how I have given all of my finished item away as gifts or donations. I never have anything to show it people when they ask to see my work. Maybe someday I’ll get more time in the shop! Thanks Again, David -
What did you do in the shop today?
Goods replied to Mark Ling's topic in Blacksmithing, General Discussion
Finally got the hacksaw ready to go with back to see family. I’m pretty sure my father will be happy with it. Functions great, but not quite as clean as I would like.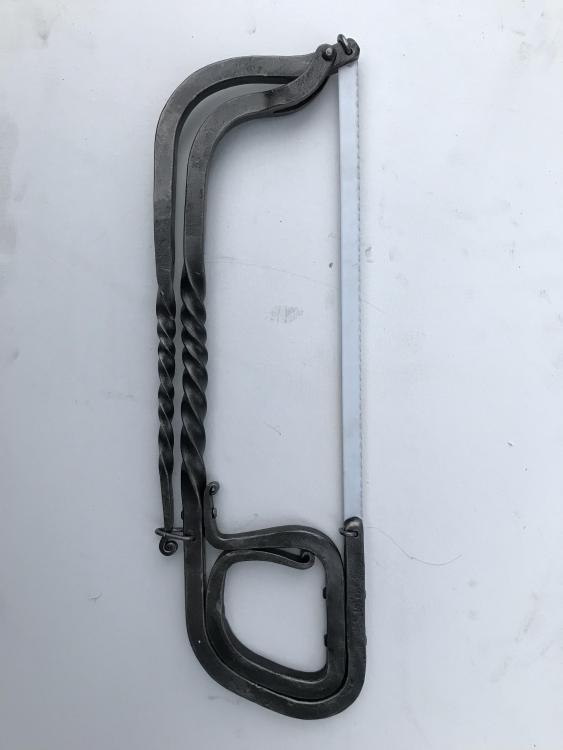
-
Just an observation, you may want remove the brass coupler from the “T” fitting. That should help induce more air.
-
Very interesting thoughts. With a propane forge the by products are carbon dioxide and water. That could be a reasonable source of hydrogen... I have hard several discussions on hydrogen embrittlement at work, but not realty studied it. Very interesting indeed, but I doubt that’s the case here.
-
What did you do in the shop today?
Goods replied to Mark Ling's topic in Blacksmithing, General Discussion
I’ll have a loop to swing over the end or the tension lever. Have refinement to do on the end of the lever, but need to get the pins in before I do too much more. Also, this is inspired by the hacksaw that is show in use in volume 3 of Mark Aspre’s books. Not my own invention... -
What did you do in the shop today?
Goods replied to Mark Ling's topic in Blacksmithing, General Discussion
Not done with it yet. Still have to make an internal scroll/brace for the handle, refine the radius at the tensioner pivot, and drill for the pins and rivets. Overall clean up and coating as well. At least a few hours of work. -
What did you do in the shop today?
Goods replied to Mark Ling's topic in Blacksmithing, General Discussion
Haven’t posted any work up till now, but I thought I’d share the latest project. Visiting family in two weeks and need to have a Father’s Day gift ready. Well I hope this turns out. Still a few hours of work to do, just need to have time available when it’s not raining...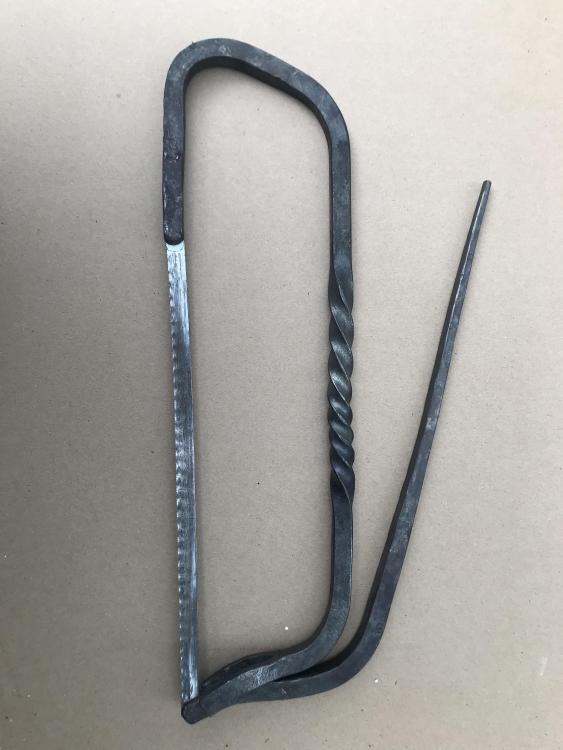
-
Scientist, I got started with blacksmithing as a result of my son building a bucket forge very cheaply on his own. While it worked (kind of), it was very difficult to manage the fire, and it burned through fuel very quickly. (It was enough to get him going and to pull me into the addiction...) I would not recommend using this setup at all. Go with a JABOD concept and modify it to your resources and needs. I’m now using an old machine controls cabinet laying door up on a stand, filled with cat litter. The forge is outside, so when we’re done, let it cool, clean out the clinkers, close the door and the weather is kept out of it. It’s miles ahead of the bucket forge concept. See if you can hookup with a blacksmith organization near you. Time with other smiths will make a big difference with the learning curve on everything. Enjoy!