Goods
-
Posts
1,174 -
Joined
-
Last visited
Content Type
Profiles
Forums
Articles
Gallery
Downloads
Events
Everything posted by Goods
-
Is the solid stock for the swing arm itself a big advantage? I’m a bit stingy with my limited heavy stock... David
-

Wanting to start, came across this on craigslist
Goods replied to Nailsmith's topic in Introduce Yourself
Sorry to hear that. It’s hard to substitute anything for a post vise, but check out the JABOD thread and improvised anvil thread. Could get you up and running quickly! David -
Wanting to start, came across this on craigslist
Goods replied to Nailsmith's topic in Introduce Yourself
John, that’s a good deal if the HB has good ring and bearing tests. Is the blacksmith getting out of it, or just culling the heard? You may want to ask if he has any tooling available. Misc tongs, hardy tools, punches, etc. will come in handy. Do you have any other metal working equipment (files, grinders, hammers, etc.) available? Don’t fret, once you have some basics you can build up skills making what you need. That’s half the fun! David -
Frosty, just so you know I didn’t take you post in any kind of negative way! I just had to comment in the post from Jennifer. I liked the sentiment. Is not about being perfect, it’s all about learning and getting better! Also, can you post or PM me more pics of the dachshund figure head. My wife would love that! Keep it fun, David
-
Very well said Jennifer! Personally, I’m always trying to do better, and can see all the flaws in what I have done. It doesn’t upset me, it just makes me think about what to do differently next time: a bit more with the butcher bush, a bit more planishing(sp?) to save time with the file or grinder. I read up on IFI and listen to what experienced smiths have to offer. I find it very rewarding. I’m in this as a hobby, money from sales is nice, but the compliment from a happy customer is better. Best of all is the focused-almost-meditation of swinging the hammer, making the material move the way I want. I usually leave the smithy a much happier person. Keep making beautiful things everyone! David
-
That stand looks tiny with the anvil! My 150lb Colombian would look better on it than that beast. I could help you out and swap you for it... Honestly, looks like a good heavy work setup. Now, just put it to work! Enjoy, David
-
Chamfering the end of the rod will also give more leg length to the weld making it stronger also. Is the vertical plate a piece of leaf spring? If it is, preheating it would be advisable. David
-
Beautiful!! I need to try pattern welding sometime. Well, I need to get better at forge welding first!
-
Looks like a housing for a ribbon burner to me? I’m not an expert by any means, but I would recommend higher carbon steel for the faces. They are fairly small pieces and with very low carbon in the wrought iron, due to carbon migration, there may not be much carbon left in those after several welding heats. Just my two cents... David
-
What did you do in the shop today?
Goods replied to Mark Ling's topic in Blacksmithing, General Discussion
Shoshinjoe, I like that owl. Pretty cool! -
Better yet, a paper mache anvil and put in that.
-
You could try case hardening it. Put it in a black pipe packed with coke dust and leave it in the forge while working on another project. It could get the carbon content up significantly in that small of a cross section, or it could just ruin it. I’ve personally never tried it. David
-
The fish mouthing may not be a problem. Could just open the fish mouth up a little to put some HC in for the end of the peen. David
-
Very cool! I would love to get up to Kurt’s place some time! David
-
You can develop a lot of force with a ratcheting type arbor press. The general design can be seen on several catalog item type sites. They are expensive to buy and probably a bit complicated to home build. David
-
Very good start! Let us know how it goes. David
-
Hefty, you may be able to fuller the cheeks now. Very little chance of the slit welding shut. You’ll need something as a bolster and need to be careful to forge both sides evenly, but it could be an interesting approach. David
-
My first forge: charcoal JABOD build
Goods replied to ClintMakes's topic in JABOD - Just A Box Of Dirt
Clint, I like the battery setup! Many members talk about using foot switches, but I would wire in a simple on/off switch, that way you can set it where you need it and not worry about having to reset it after you put your stock back in the forge. I haven’t put a switch on mine (yet), but from attending our hammer-ins and visiting others forges, the habit of turning off the blower is well established in me. I tend to work with large stock, so the heating time is long and used to get ready to the next forging steps. A foot switch would get annoying quickly. Just my experience, David -
What did you do in the shop today?
Goods replied to Mark Ling's topic in Blacksmithing, General Discussion
Billybones, not sure about that end for furniture legs. If the leg come down to a radius like that is may be a bit bouncy with a heavy slab top. An upset 90 degree corner might be more stable. No forging to speak of, but I lit the forge yesterday and cooked down quite a bit of 20 mule team borax. I knew the volume would be reduced, but it’s really surprising to me just the same. Also, from those who have done this, did it turn out right? It ended up almost a black/brown glass, then gray when ground down. (Used about 1/3 to 1/2 a box of borax and cooked it off in an old cast iron pan. Then, chipped the glass out with a hammer and chisel, and finally ground it in a cheap 2nd hand “bullet” type drink blender. Took three batches to get the quantity pictured below.) Thanks, David
-
What did you do in the shop today?
Goods replied to Mark Ling's topic in Blacksmithing, General Discussion
Conrad, is that a punch or slitter? If it’s a slitter, how far through the material do you slit before flipping it over to the other side. I’ve been slitting all the way trough to a cutting plate, but I’m curious about how others approach it. Thanks, David -
What did you do in the shop today?
Goods replied to Mark Ling's topic in Blacksmithing, General Discussion
JLP, yes it was slit and drift. The face is 1 1/8” square. I was pleased with the face weld. I was having issues getting the heat I needed while working the wrought, then I gave in and used the last of the coal I had and It came right up to welding heat. I guess my forge is not setup well for lump charcoal. Time to track more coal down. David -
What did you do in the shop today?
Goods replied to Mark Ling's topic in Blacksmithing, General Discussion
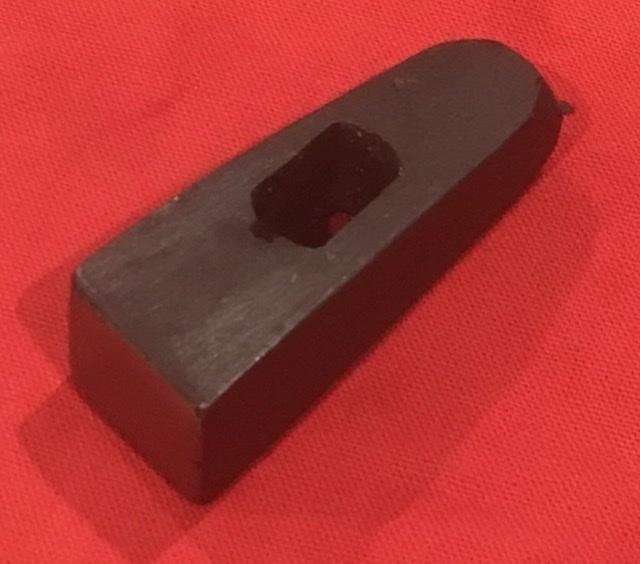
Today, I made a set from the wrought iron billet from a few weeks ago. Was originally planning on a small hammer, but I need a hot set. Not real happy with it, eye is a bit wonky and larger that planned, but it should get the job done. Now, I have to make the handle. (Wrought iron body, leaf spring face.) David
-
Stress Fracture in Railroad Anchor
Goods replied to Marcus_Aurelius's topic in Blacksmithing, General Discussion
That’s one heck of a rail anchor. I wish all mine were that size! Did you harden the whole tool? I just hardened the working end of the slitter shown below, and it held up quite good to a big striker with an eight pound sledge Saturday. David (Really like the lines you had on yours.)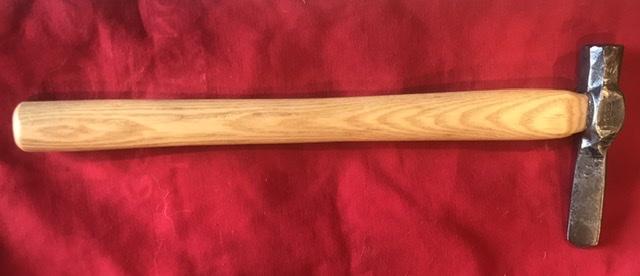
-
Stress Fracture in Railroad Anchor
Goods replied to Marcus_Aurelius's topic in Blacksmithing, General Discussion
I would guess the eye was too hard at the final failure. No deformation at all and happened while driving the handle in. I’m really looking for the reason for the initial crack. Just can’t seem to get my head around that and can’t seem to let it go. The pictures below is the type of anchors I have readily available. David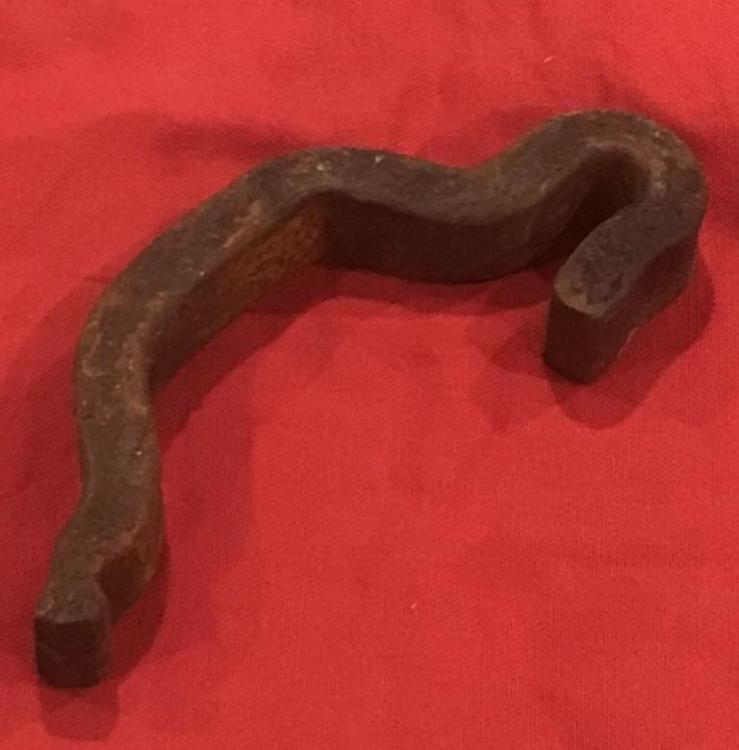
-
Stress Fracture in Railroad Anchor
Goods replied to Marcus_Aurelius's topic in Blacksmithing, General Discussion
Did you punch the eye round, then form to oval, then drift? If so I would guess that the eye wall was too cold when formed back to oval. Otherwise, I cannot envision the failure mode, even then it’s oddly symmetrical. Just can’t see how that crack would have form on the inside wall otherwise. I guess, if the hole was being stretched and the inside walls cooled by the drift, it could fail in that manner. Very interesting and thinking “out loud”... If we can figure out what happened, it may help me avoid failures in the future. (I have a large number of these clip available!) David