Marcus_Aurelius
-
Posts
68 -
Joined
-
Last visited
Recent Profile Visitors
1,399 profile views


-

What do you listen to while working
Marcus_Aurelius replied to SinDoc's topic in Blacksmithing, General Discussion
Typically I listen to anywhere from classic rock to jazz tunes while I am hammering. When I really need to move metal I put on some Creedence Clearwater. I find they got the perfect beat to match my hammer blows to. I have been searching around for some Bluetooth hearing protection. Any recommendations? -
That certainty is a good looking vise. I have tried electrolysis a couple of times with decent results. Like others have already mentioned, washing soda works a treat as it is a cheap and safe way to ionize the water. As long as you have a big enough section of steel to use as your sacrificial bit it'll work great. I recommend doing it in a decently ventilated area, like Frosty mentioned the process does produce hydrogen. Better to be safe then sorry. How does the vise turn? Any goop on the threads? If that was my vise I would skip the electrolysis and give a good rubbin with a brush and coat it with some BLO. But of course its fun to try new methods. -Mark
-
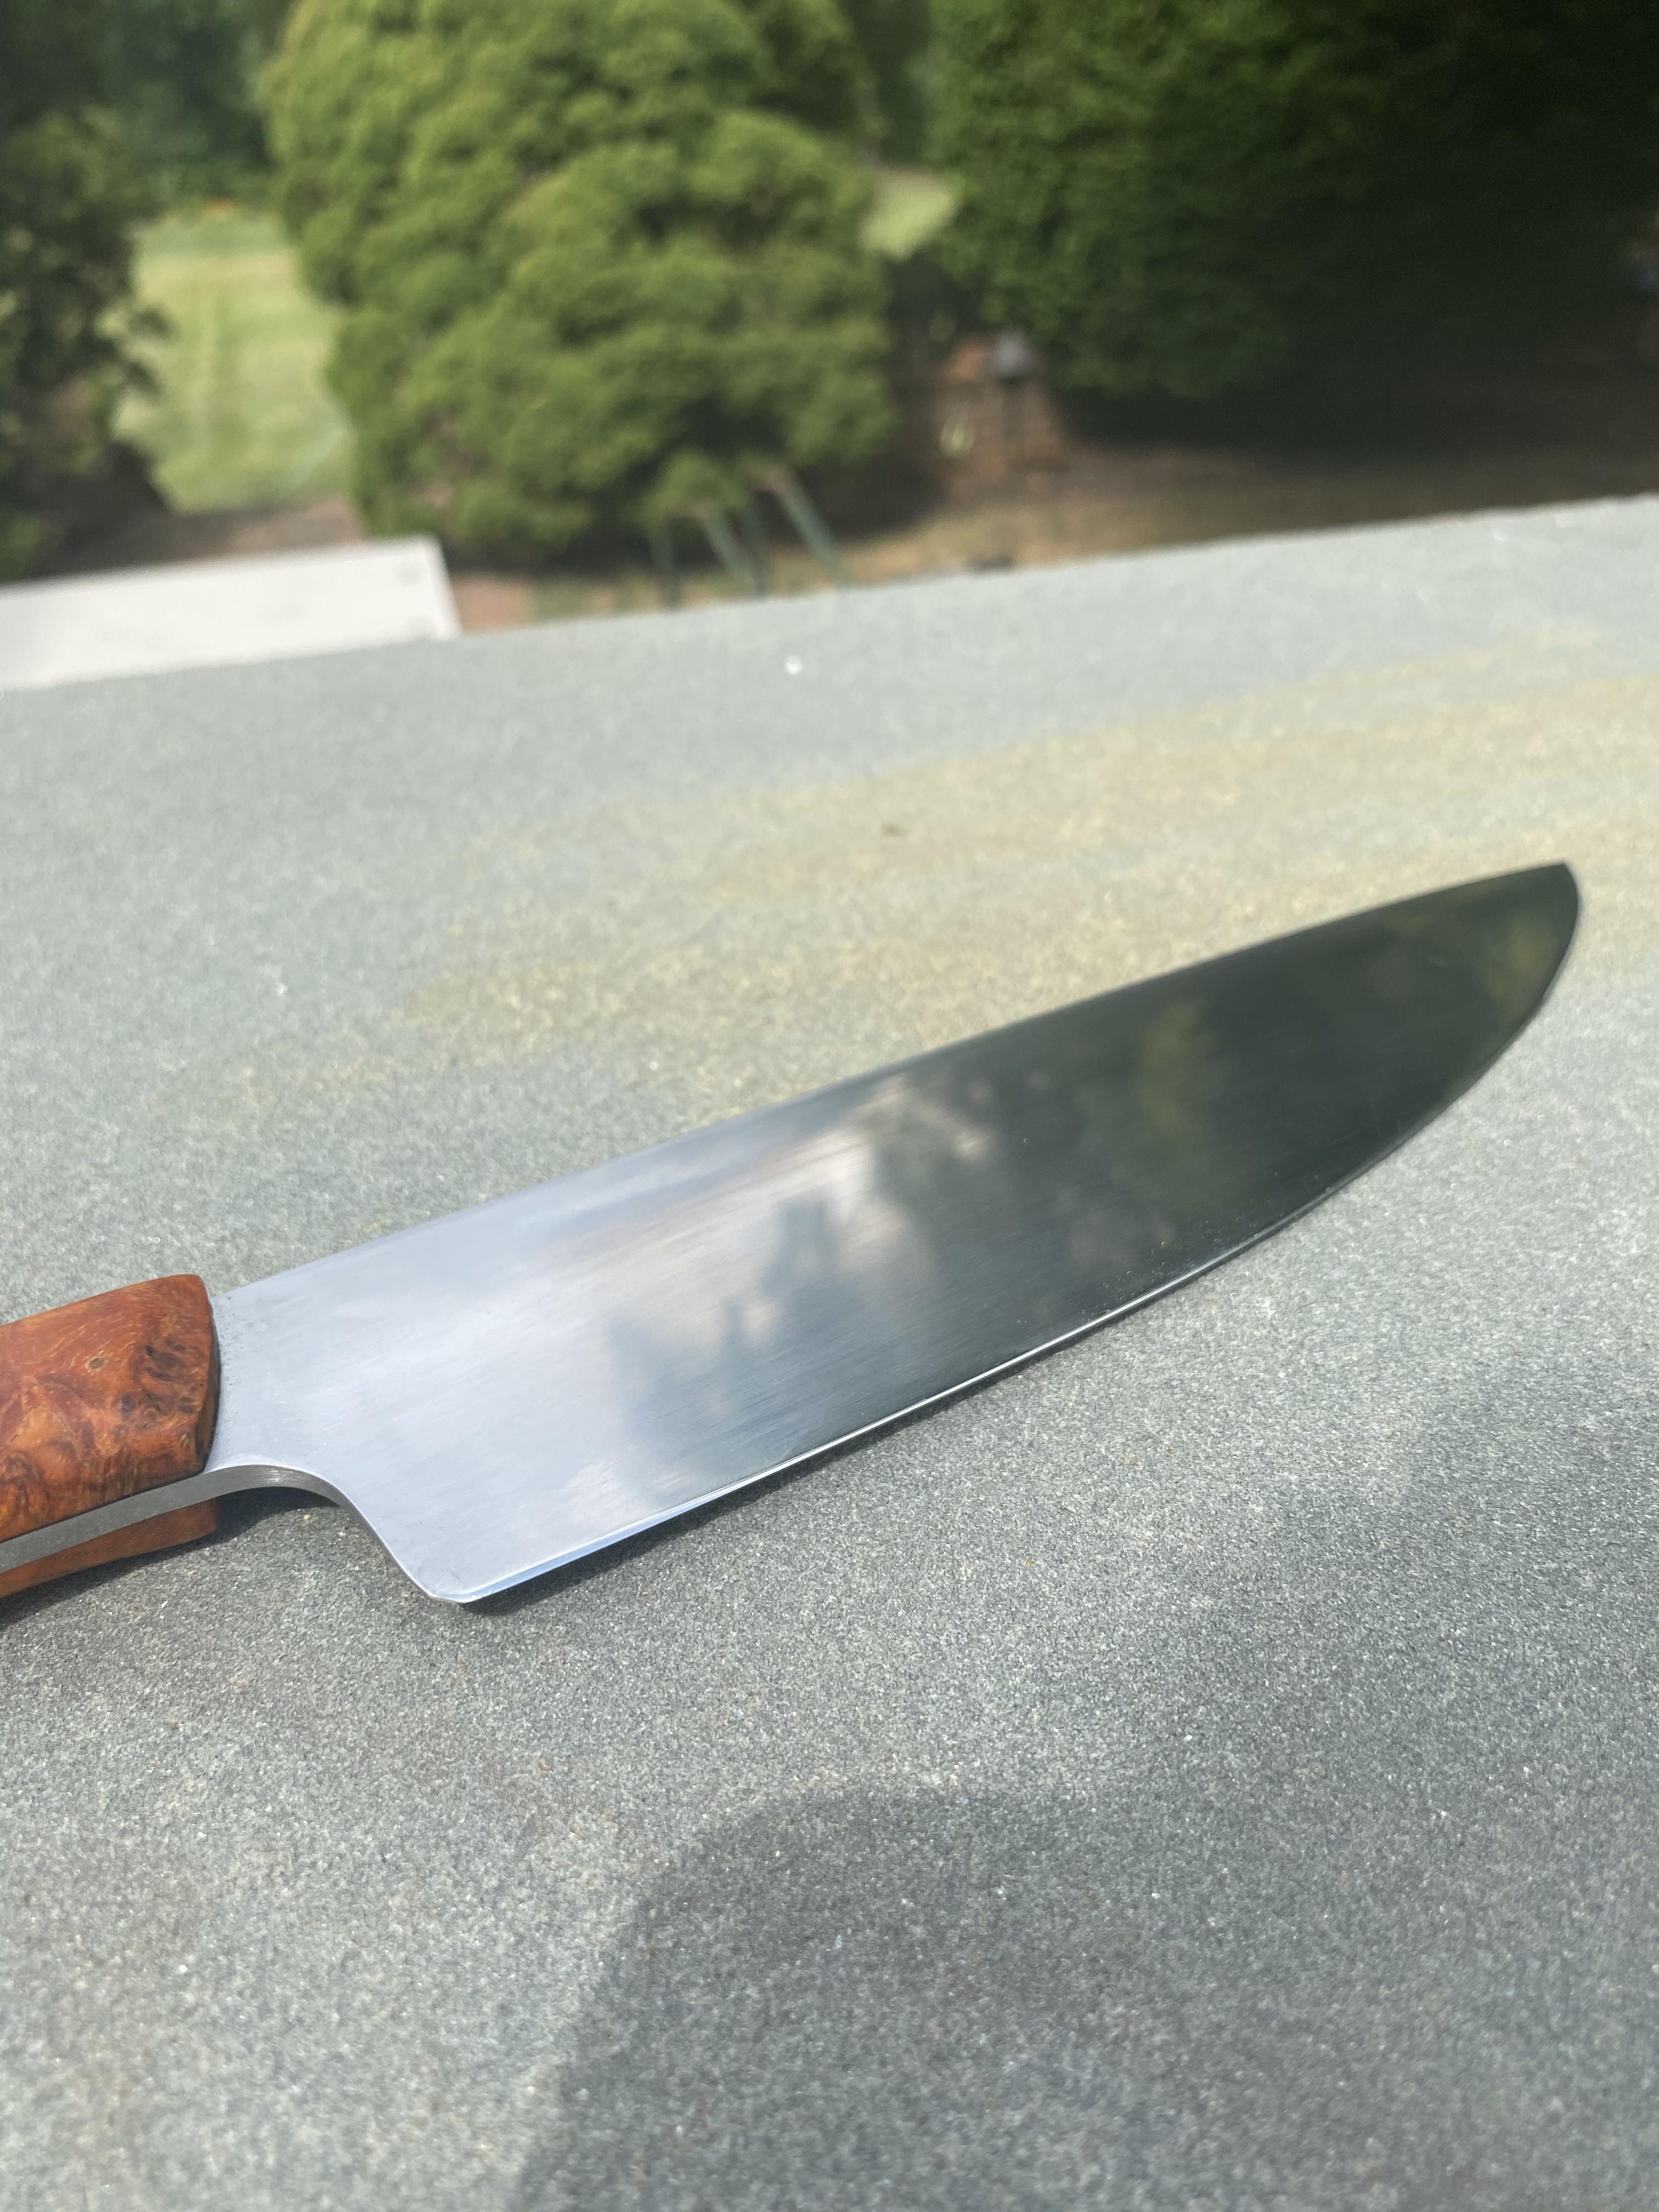
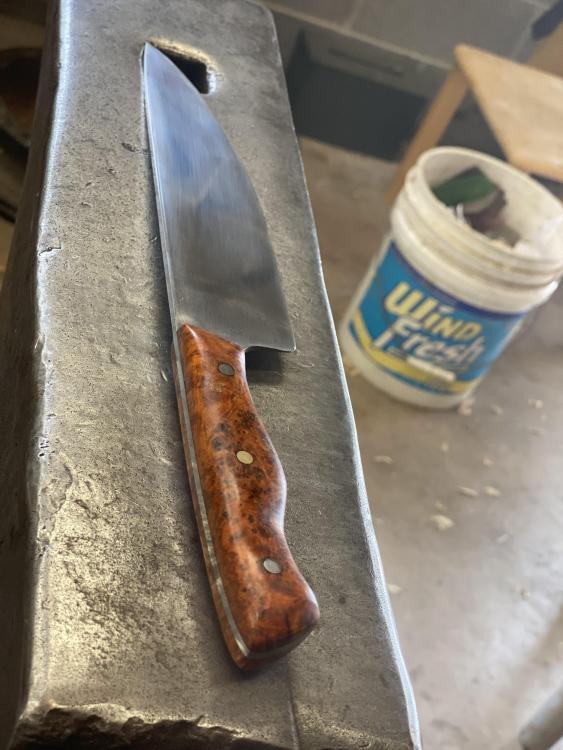
Thanks for the compliments! MCalvert, I purchased the burl from TheBlankSpace, really nice prices and some beautiful options. Thomas, if he does the handle will match the pumpkins nicely (it is more orange then pictures show).
-
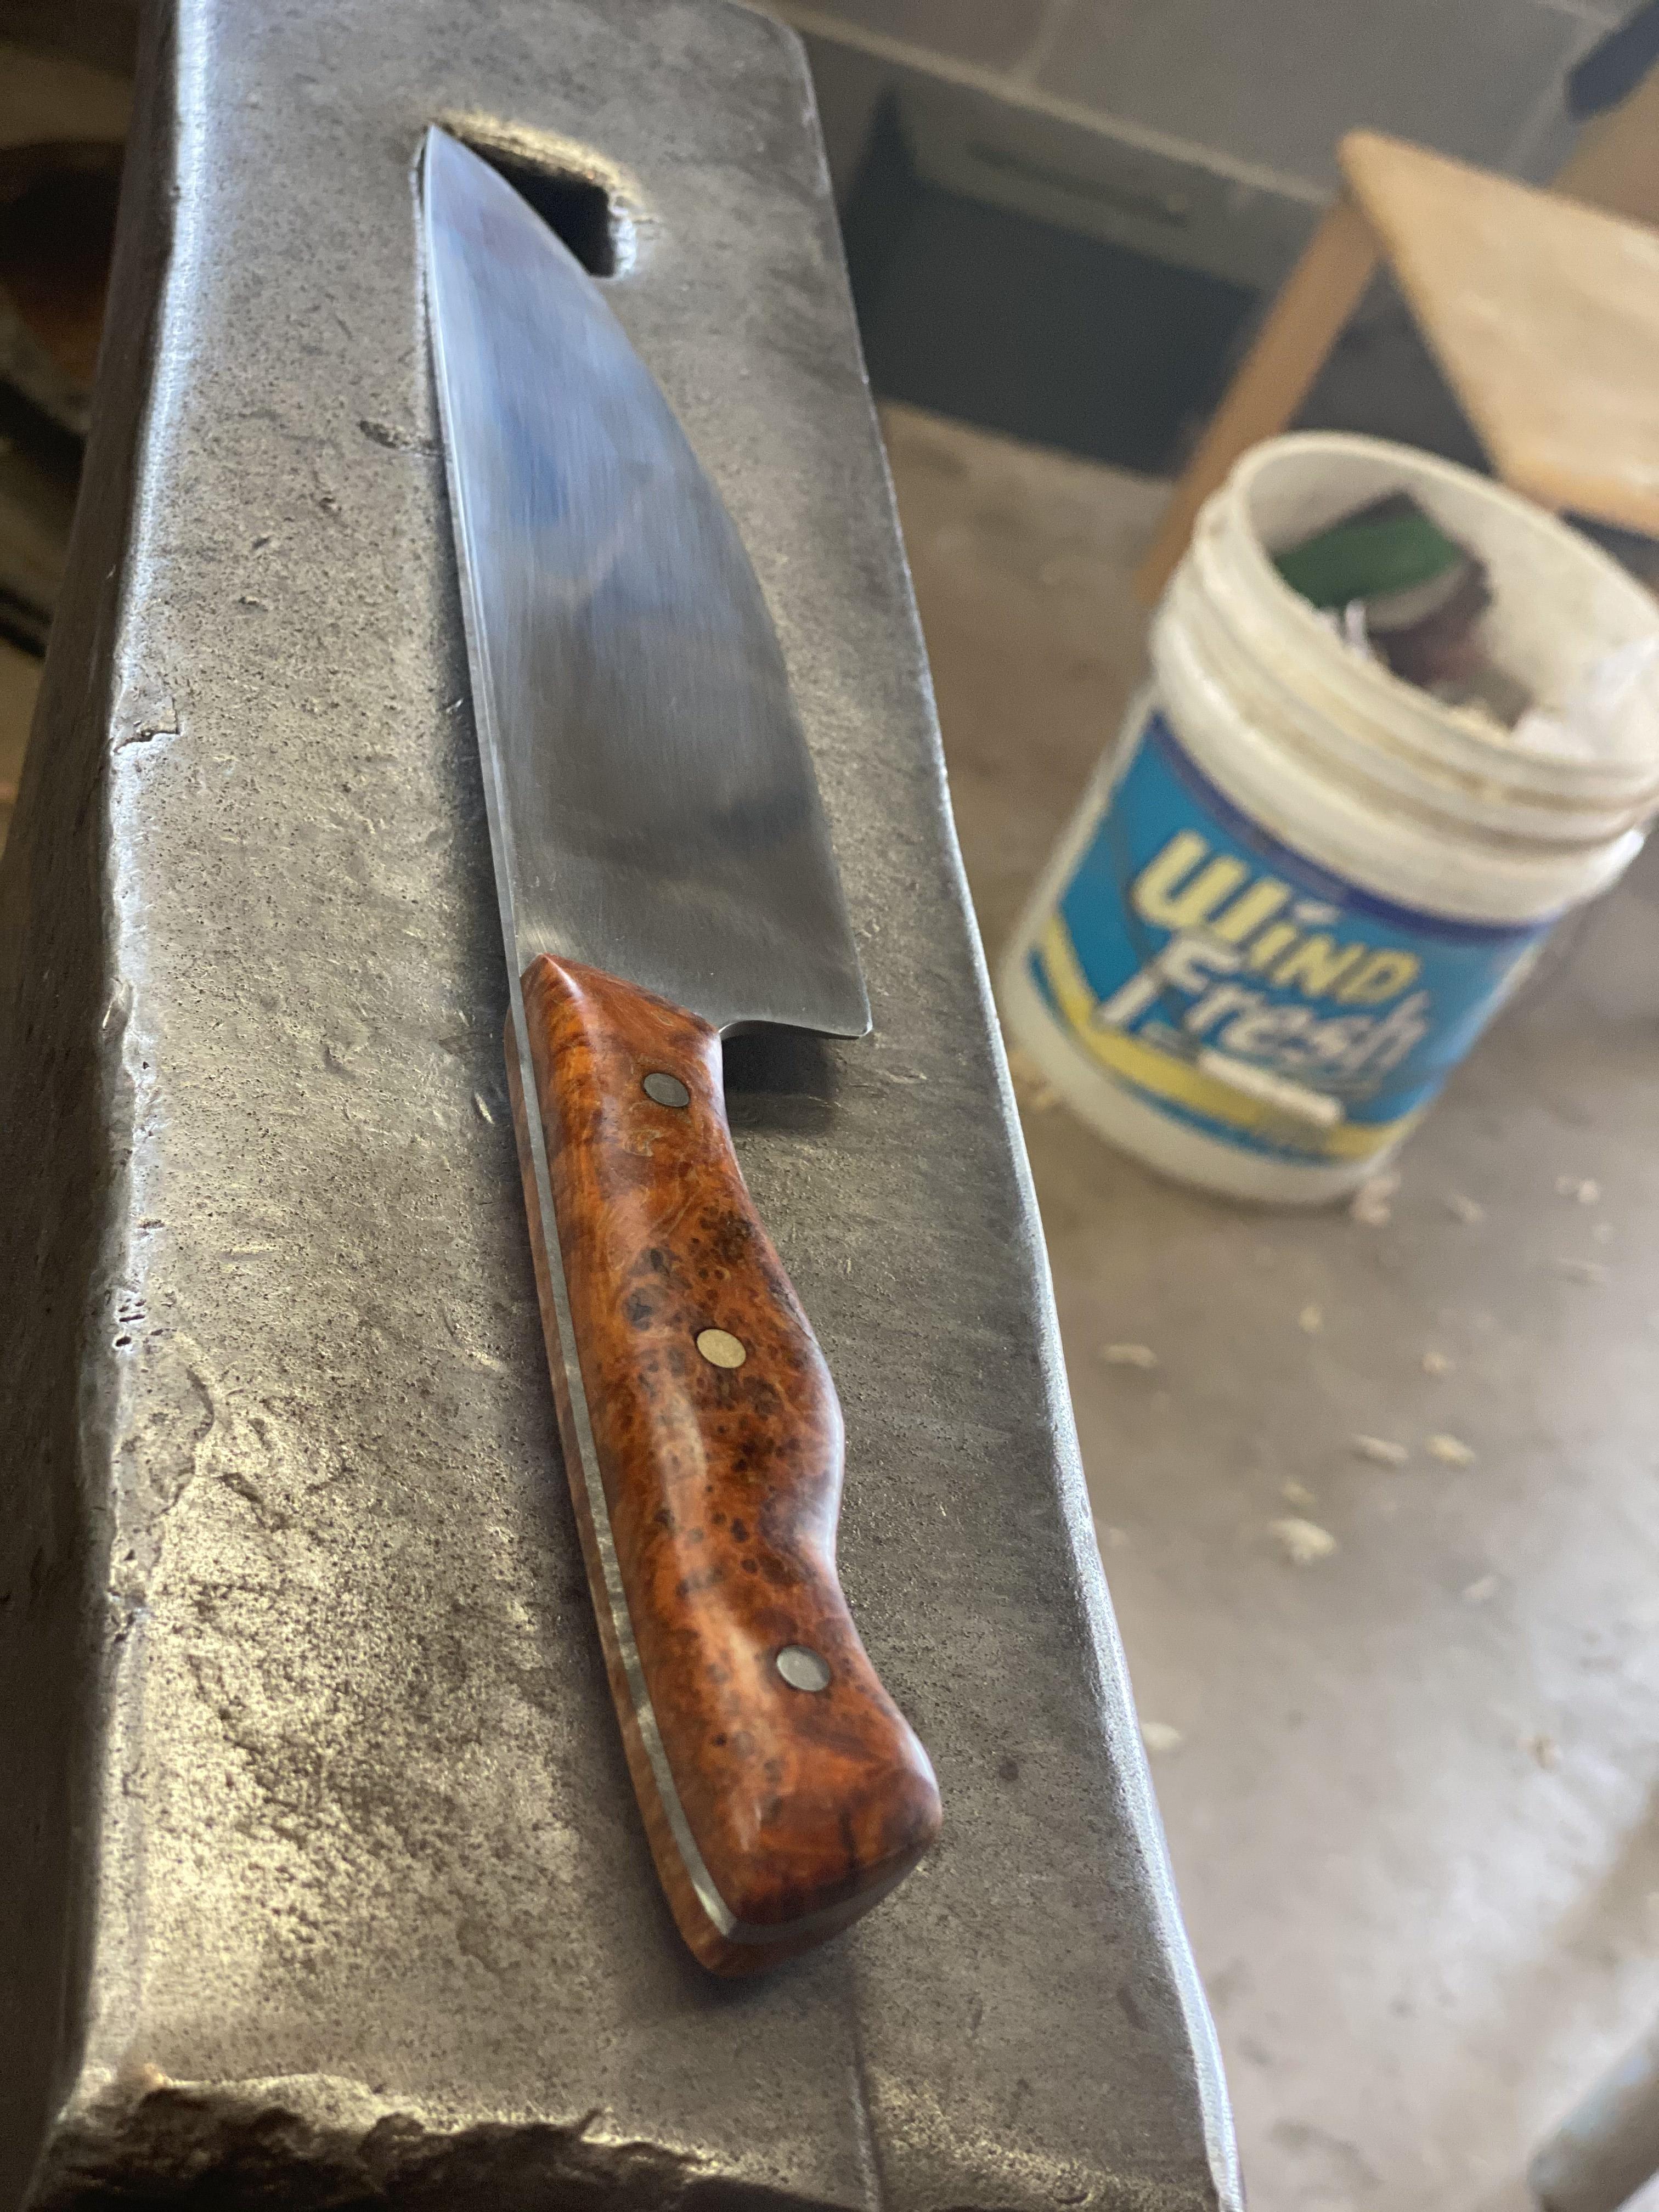
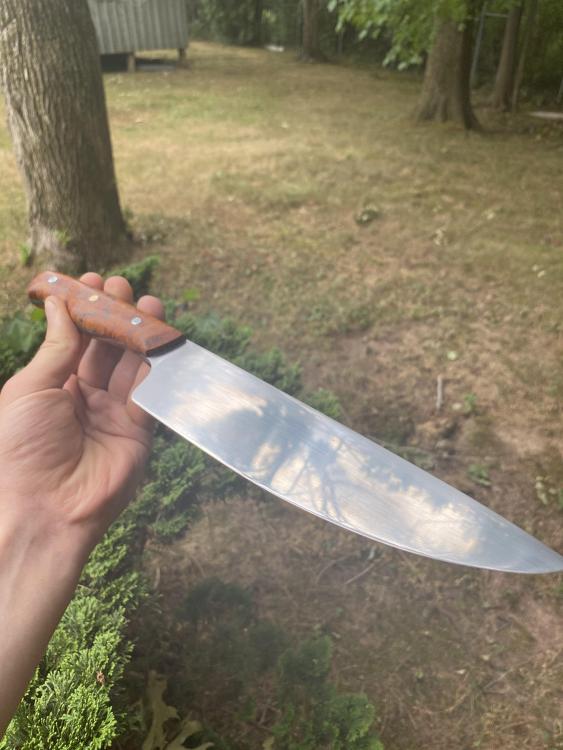
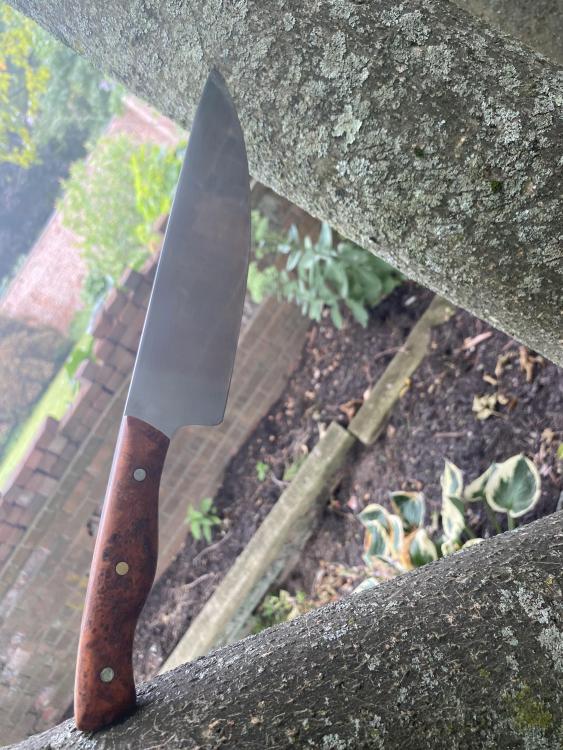
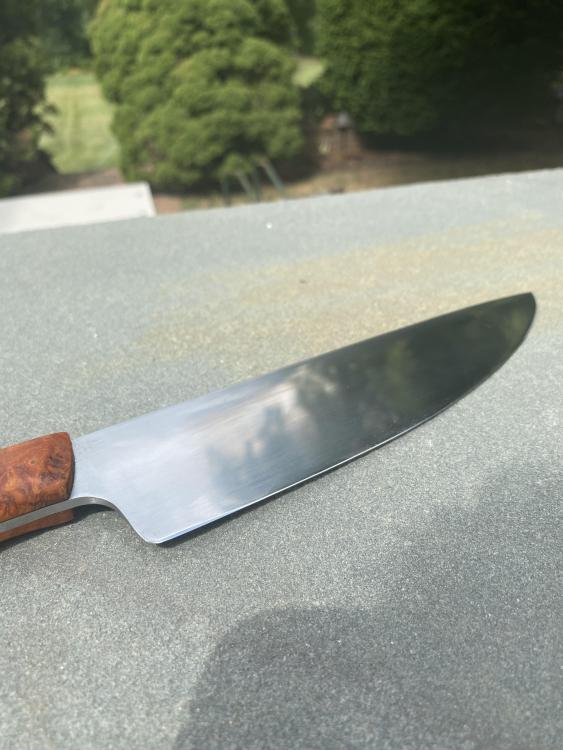
Hi all, Its been a little while since I have posted on the forums, I have been in college which sadly means not much forge work has been getting done. On the up side more machining! I figured I would post some of my old projects, here is my first 'real' kitchen knife I forged back in august. I am really happy with how it came out, its not perfect but some of my best grinding work went into this sucker. The full tang blade is forged from 1084. The handle is dyed stabilized Black Ash Burl, with three pins, the outer two being stainless and the middle being brass (ran out of stainless). There are a couple of firsts on this blade that made it a very fun build. It is my biggest knife by a couple of inches and my first use of stabilized wood and stainless pins in a knife. The blade extremely sharp and holds a mean edge. This blade was sold to a good friend of mine so it came with a nice price cut on it. - Mark

-
Naturally Aspirated Ribbon Burner. Photo heavy.
Marcus_Aurelius replied to Frosty's topic in Ribbon Burners
I like the new term, thanks for clarifying. The propagation rate has always been a road block for me trying to understand burner physics. Your last two posts have been very enlightening and I believe I am more capable to tackle the burner and I understand the term a lot better now. I am going to hold off on the modification for a tad, there are some things I want to hammer on before I decommission the forge for a while. From a little research through the interwebs I believe the scientific term for 'Flame Front Propagation Rate' is simple 'Flame Speed'. Flame speed is defined as how rapidly the flame travels from an absolute reference point. A little more searching brought up a graph for the flame speed of propane at different percents of propane. A lot of the graphs I found from a quick search require a lot of eye scrubbing to comprehend. This is one of the simpler ones. cool stuff -Mark -
Naturally Aspirated Ribbon Burner. Photo heavy.
Marcus_Aurelius replied to Frosty's topic in Ribbon Burners
Thanks for the response Frosty, your logic and solution make a lot more sense. To clarify, does the 'rate of propagation' refers to the flame front, or the speed at which the gas burns? I forged out a hammer yesterday with the forge, still a champ, but I definitely want to get it hotter, I'll take you advice and get drilling. - Mark -
Naturally Aspirated Ribbon Burner. Photo heavy.
Marcus_Aurelius replied to Frosty's topic in Ribbon Burners
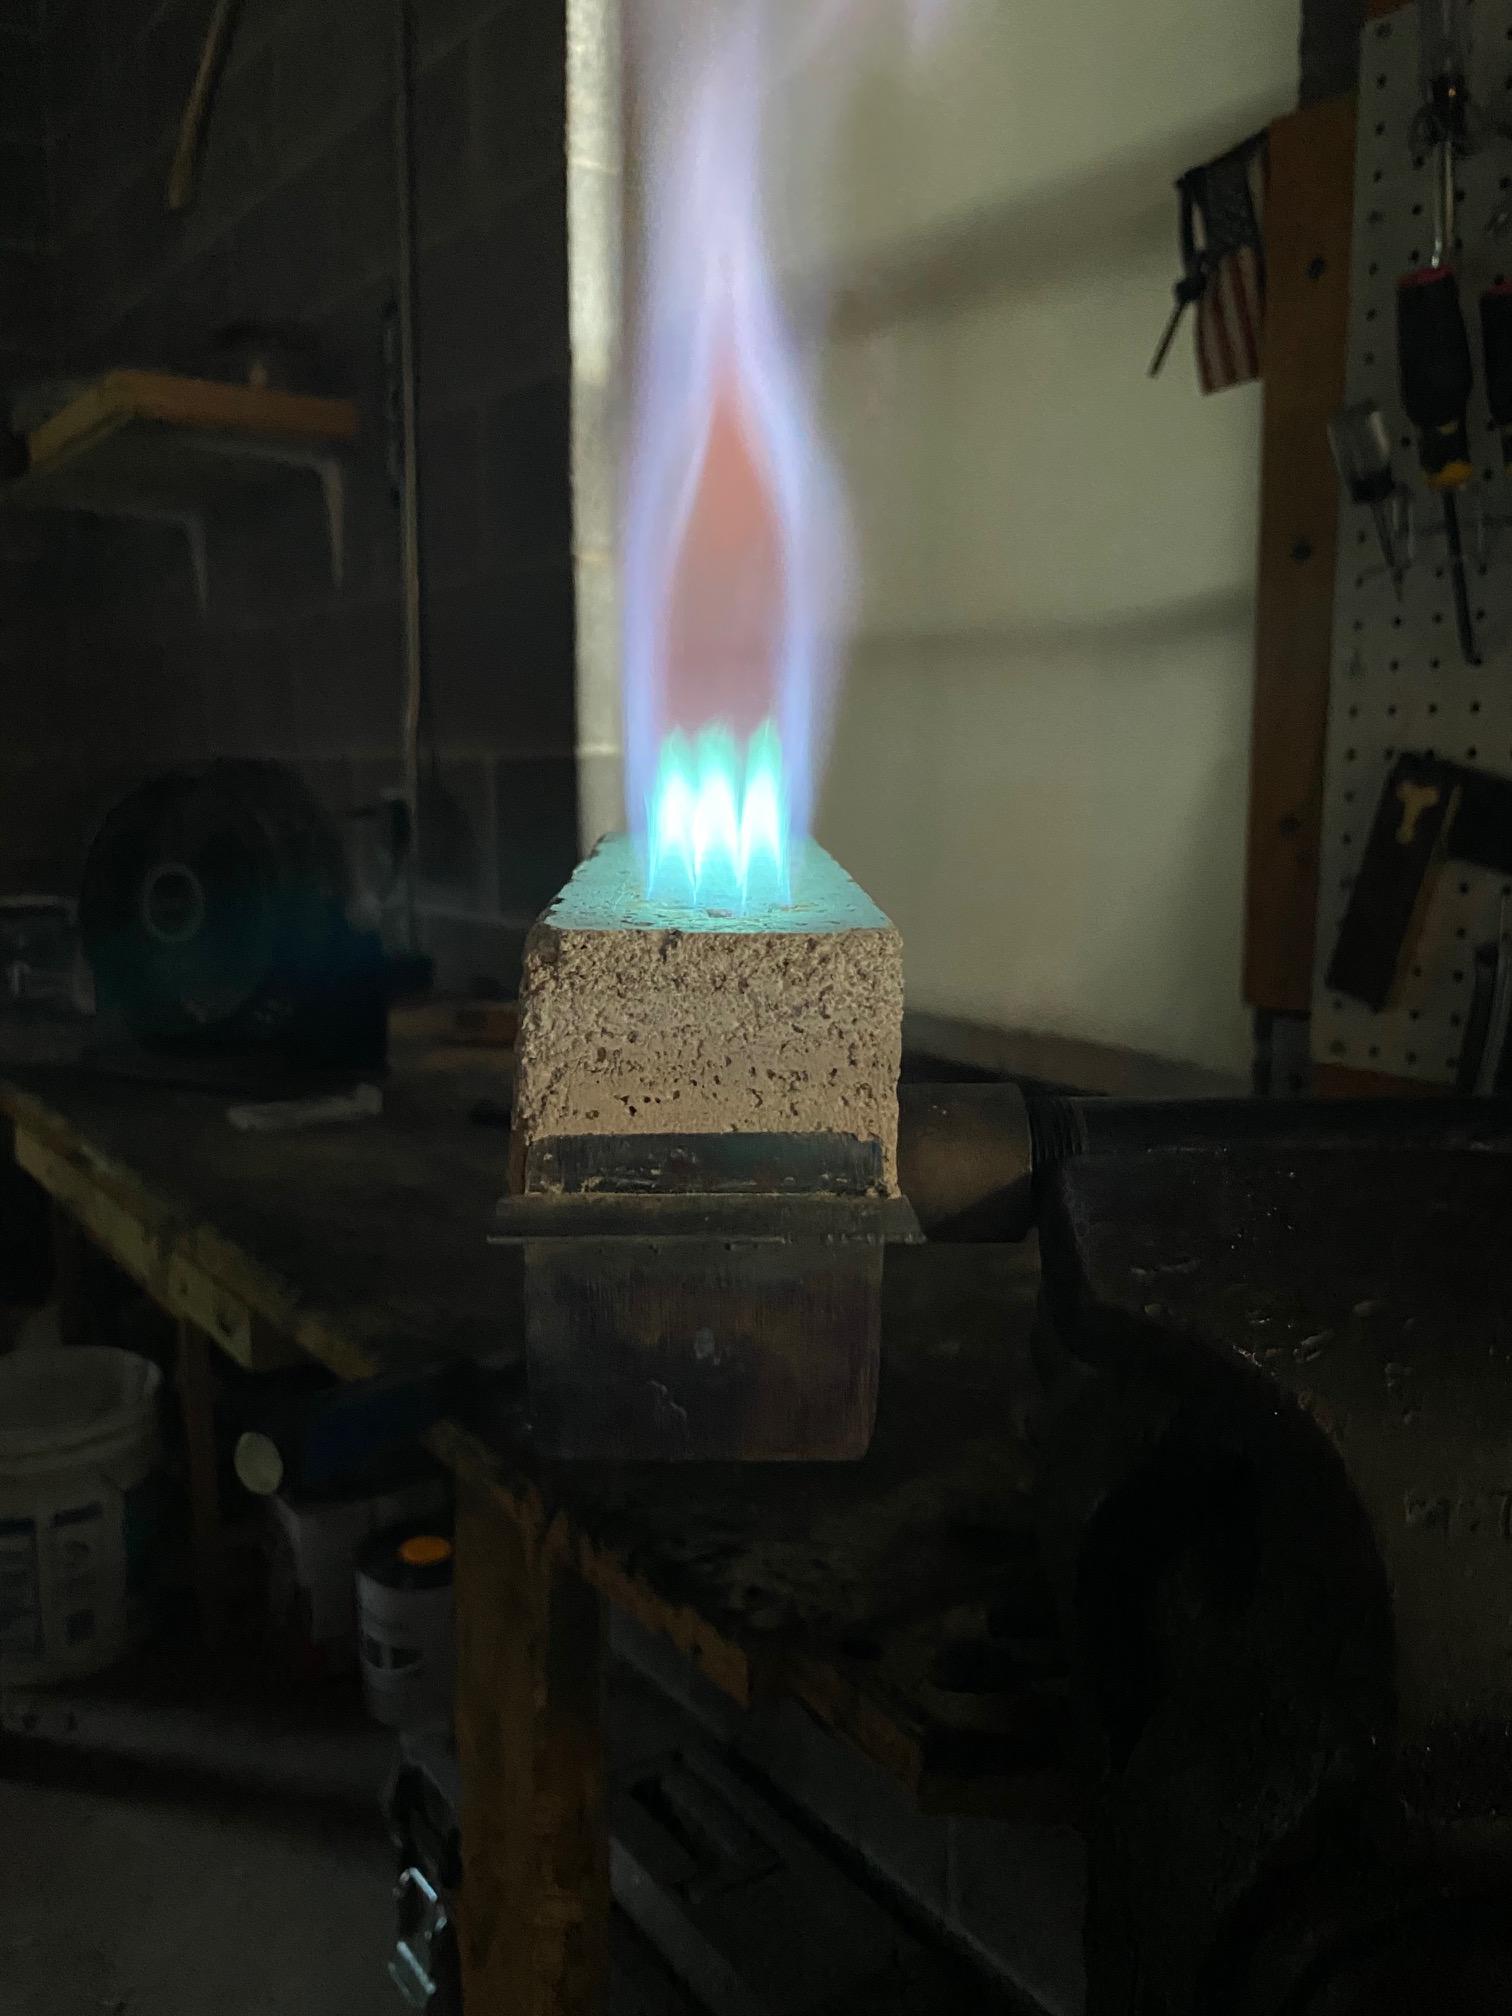
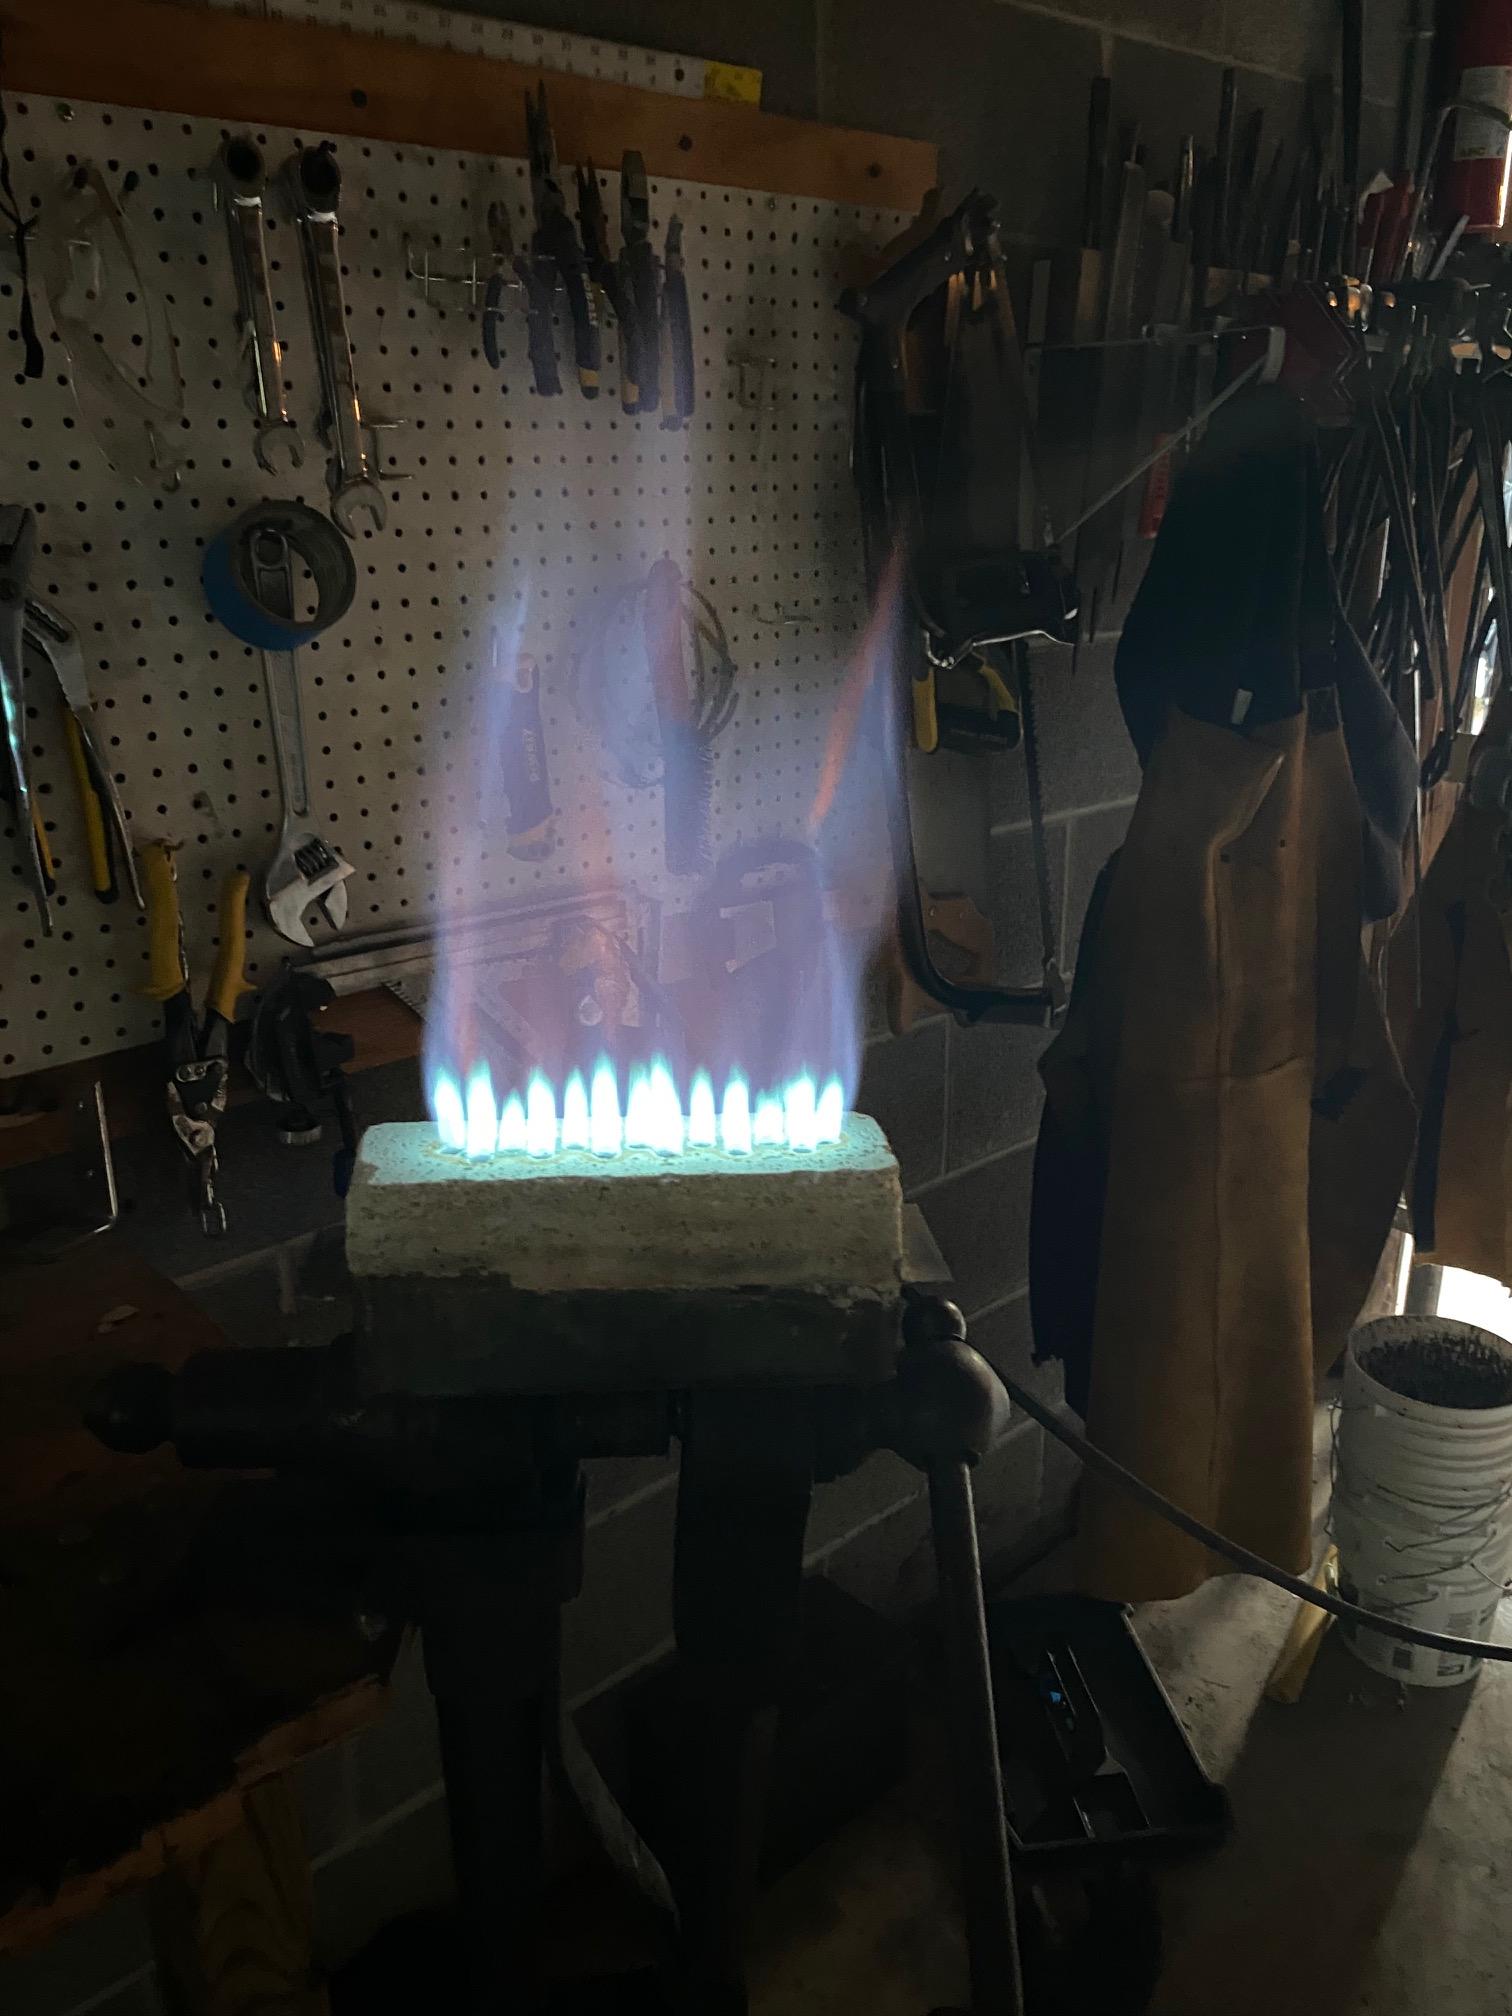
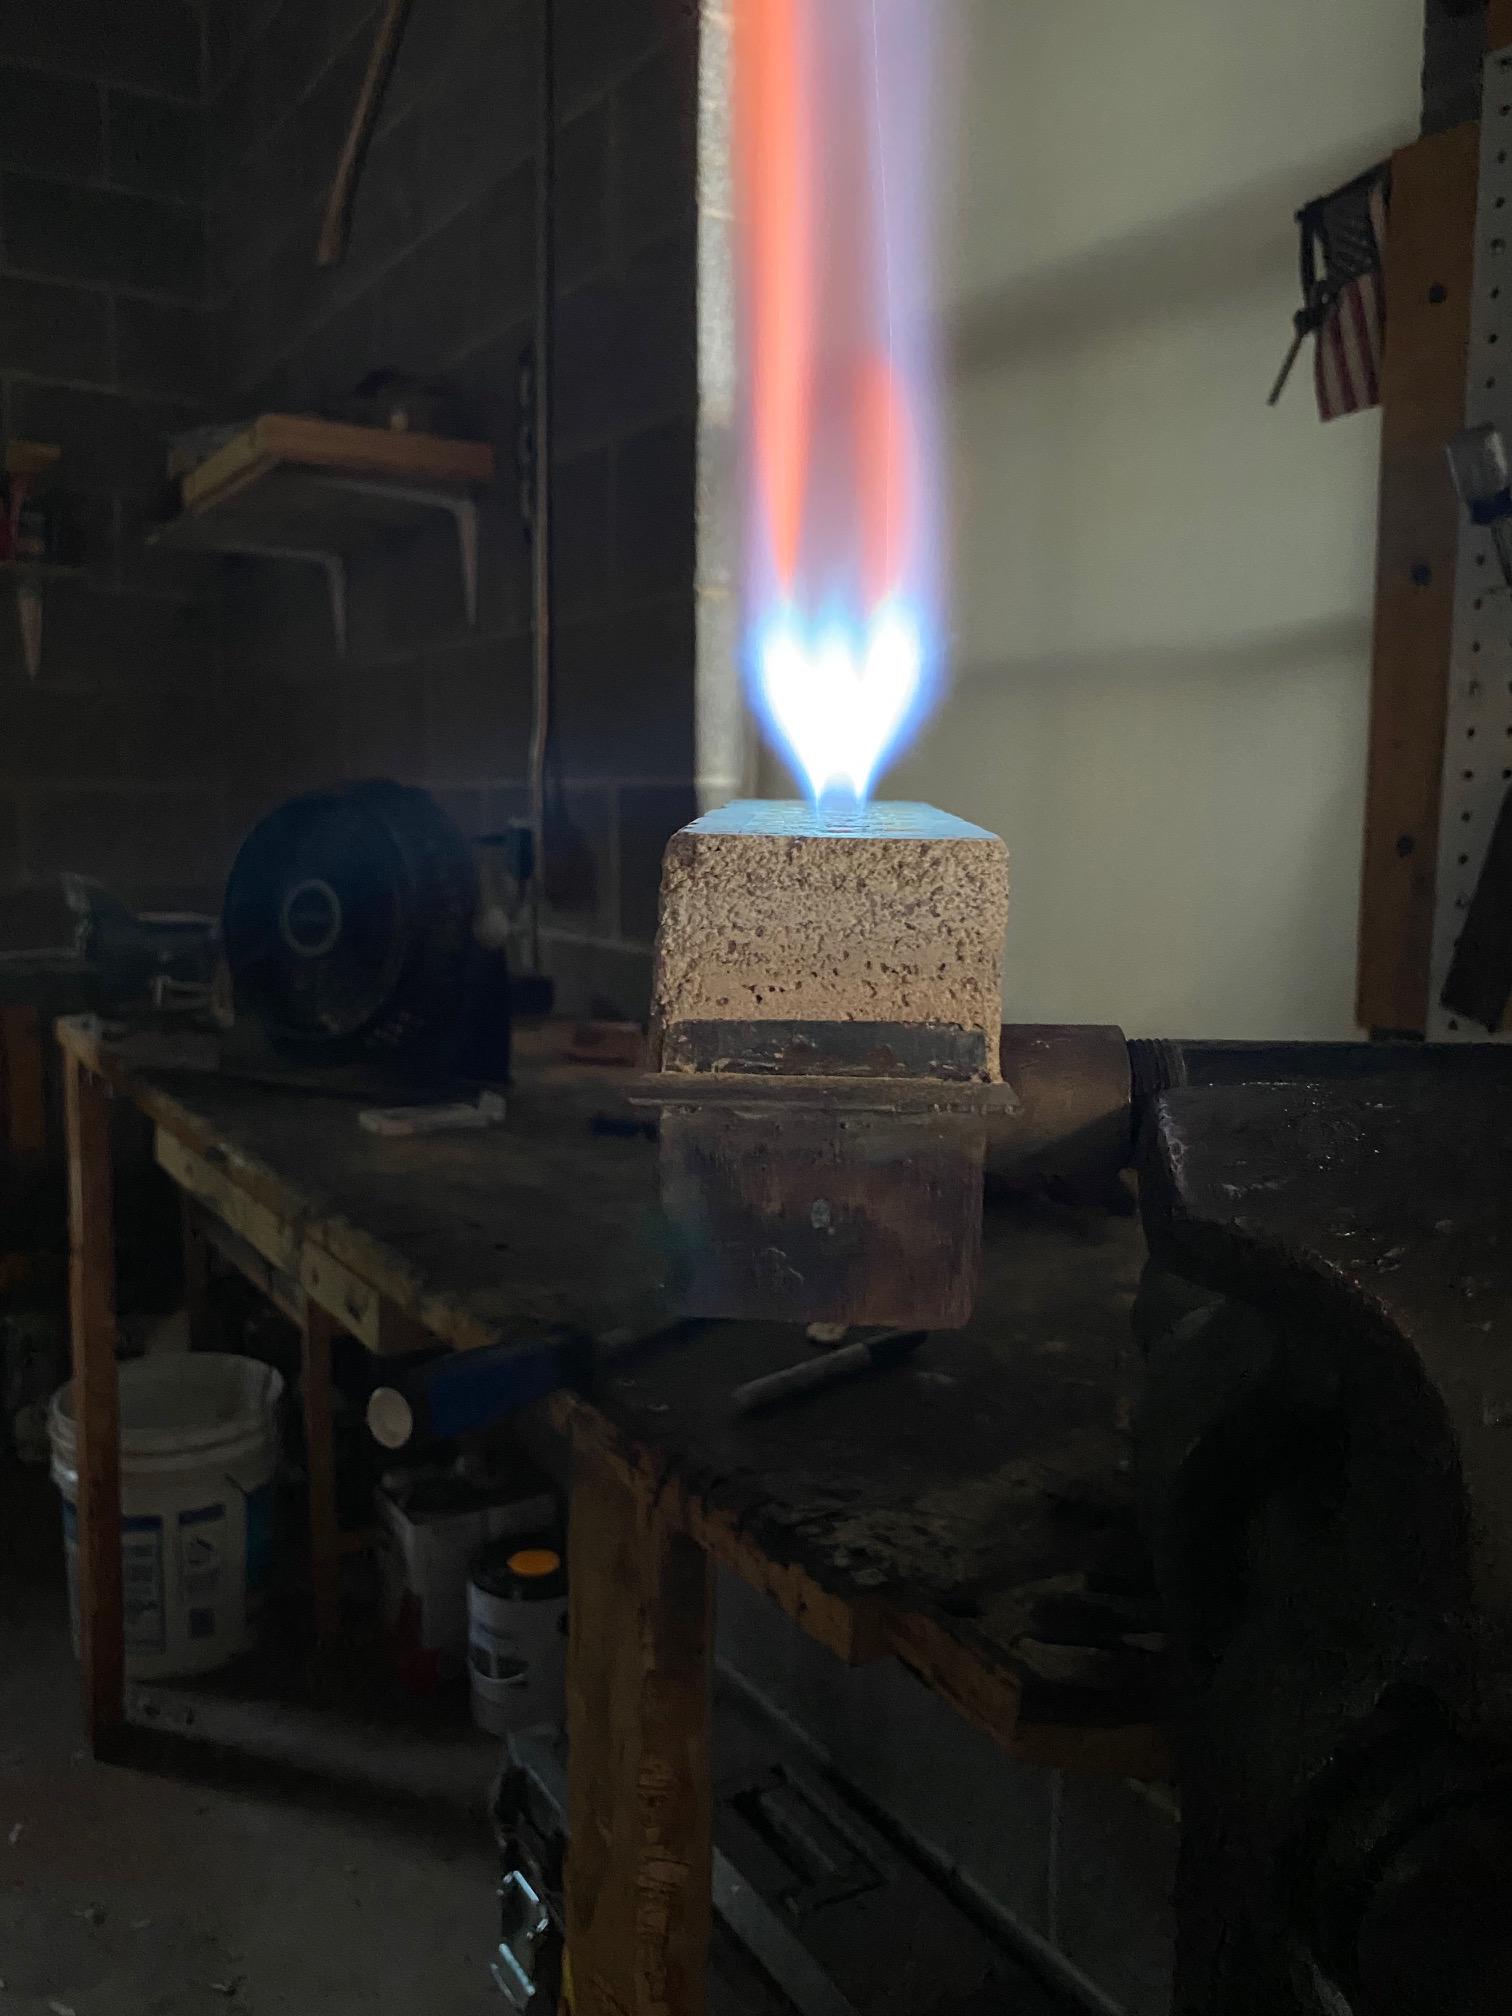
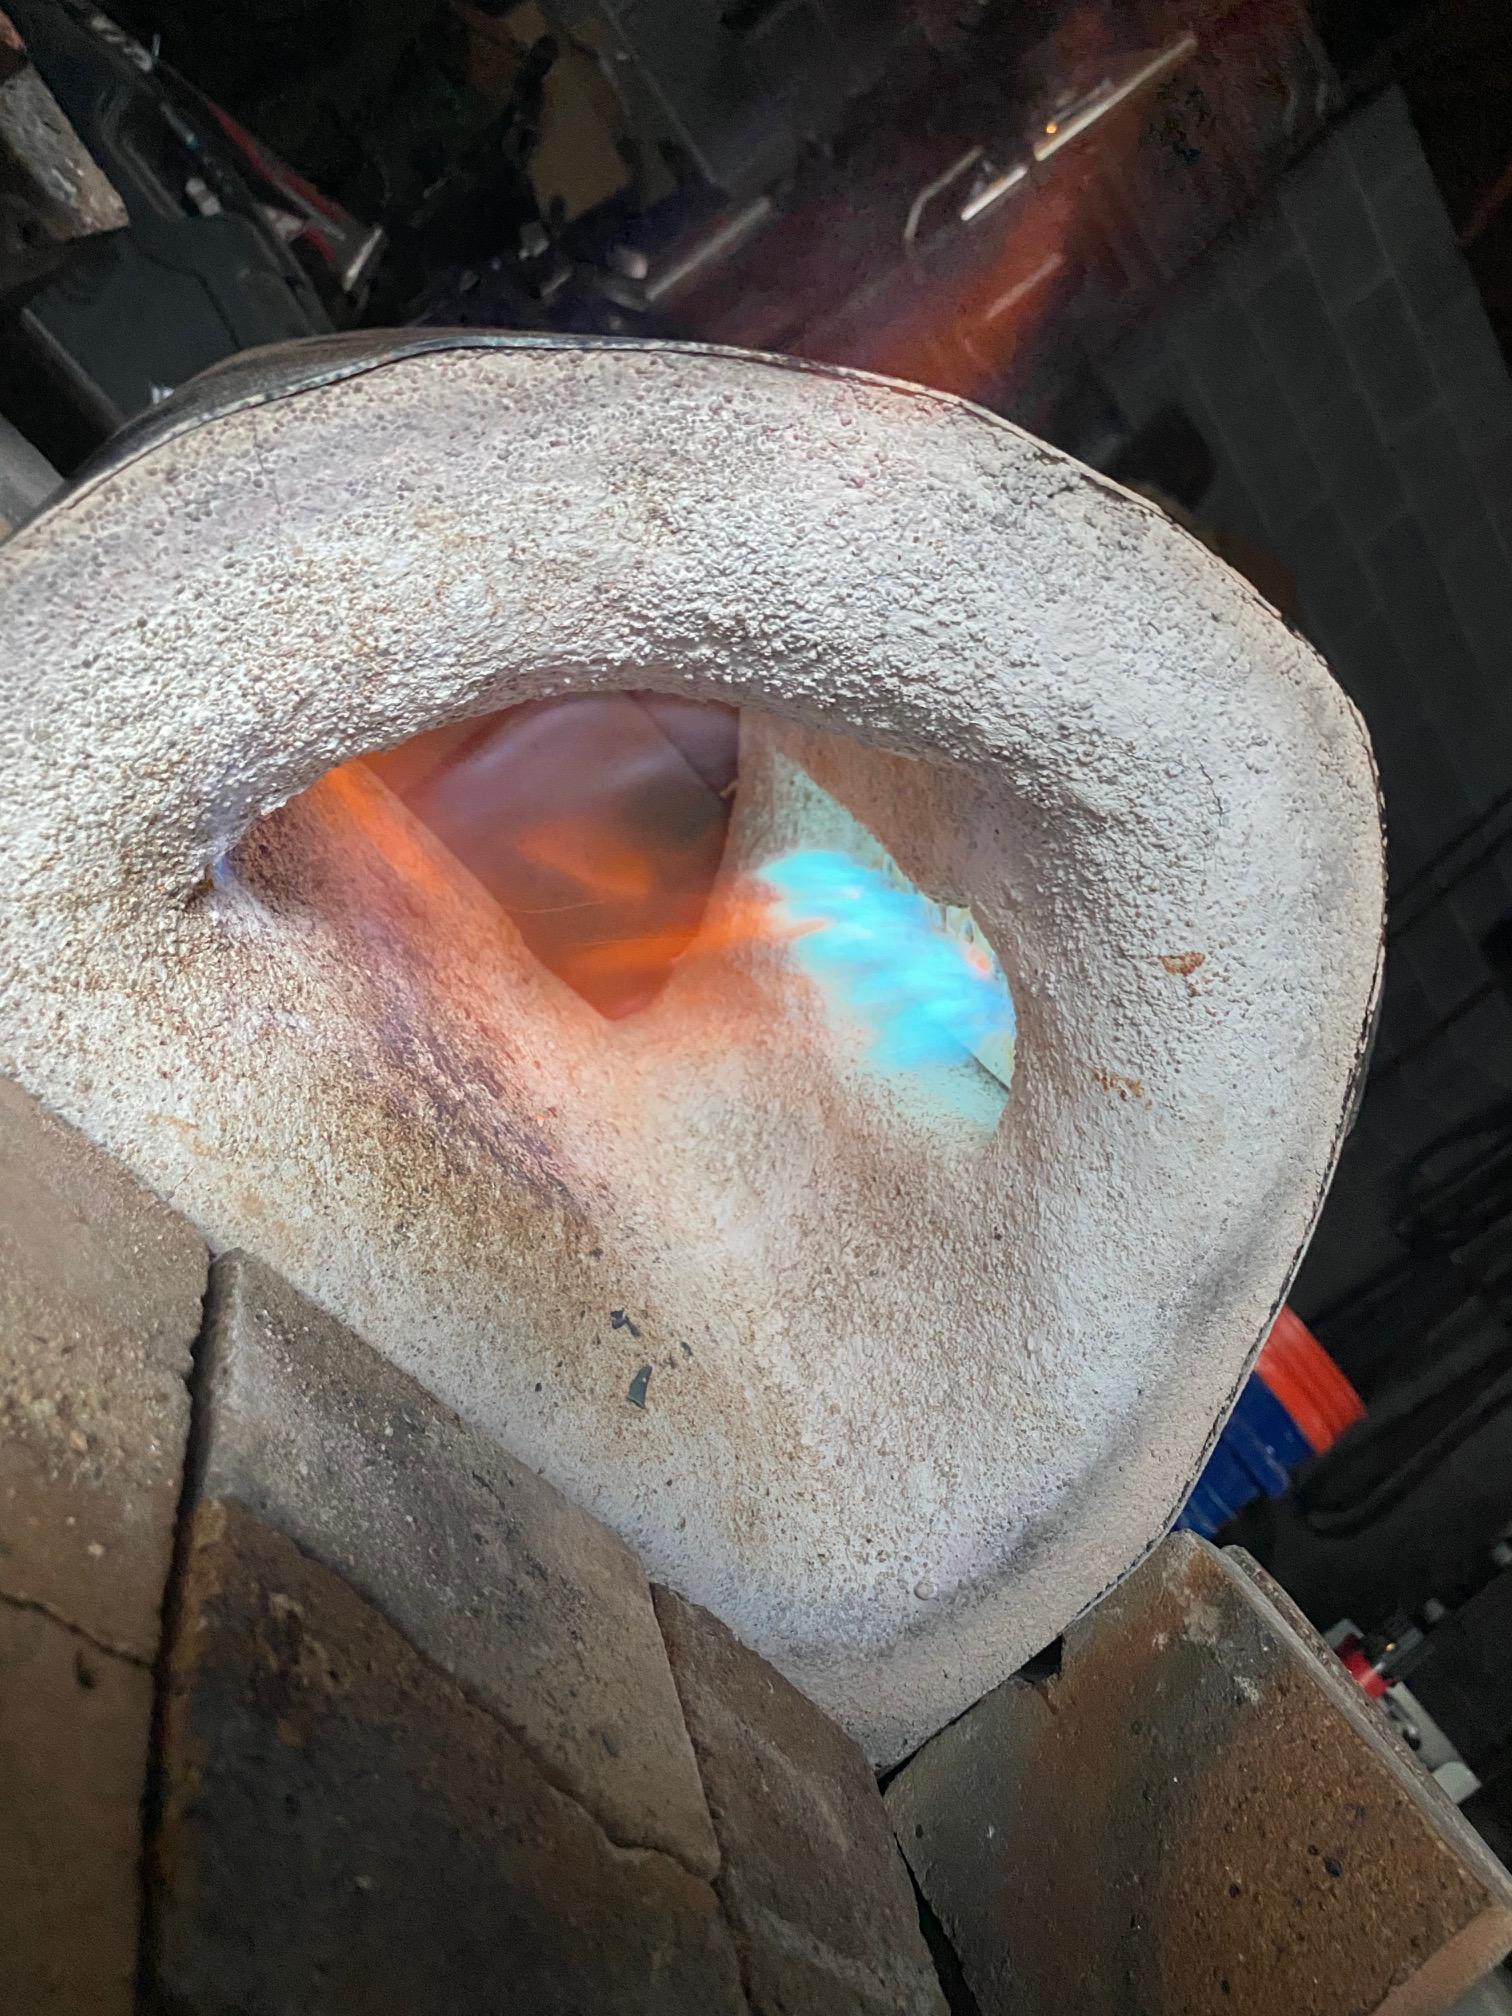
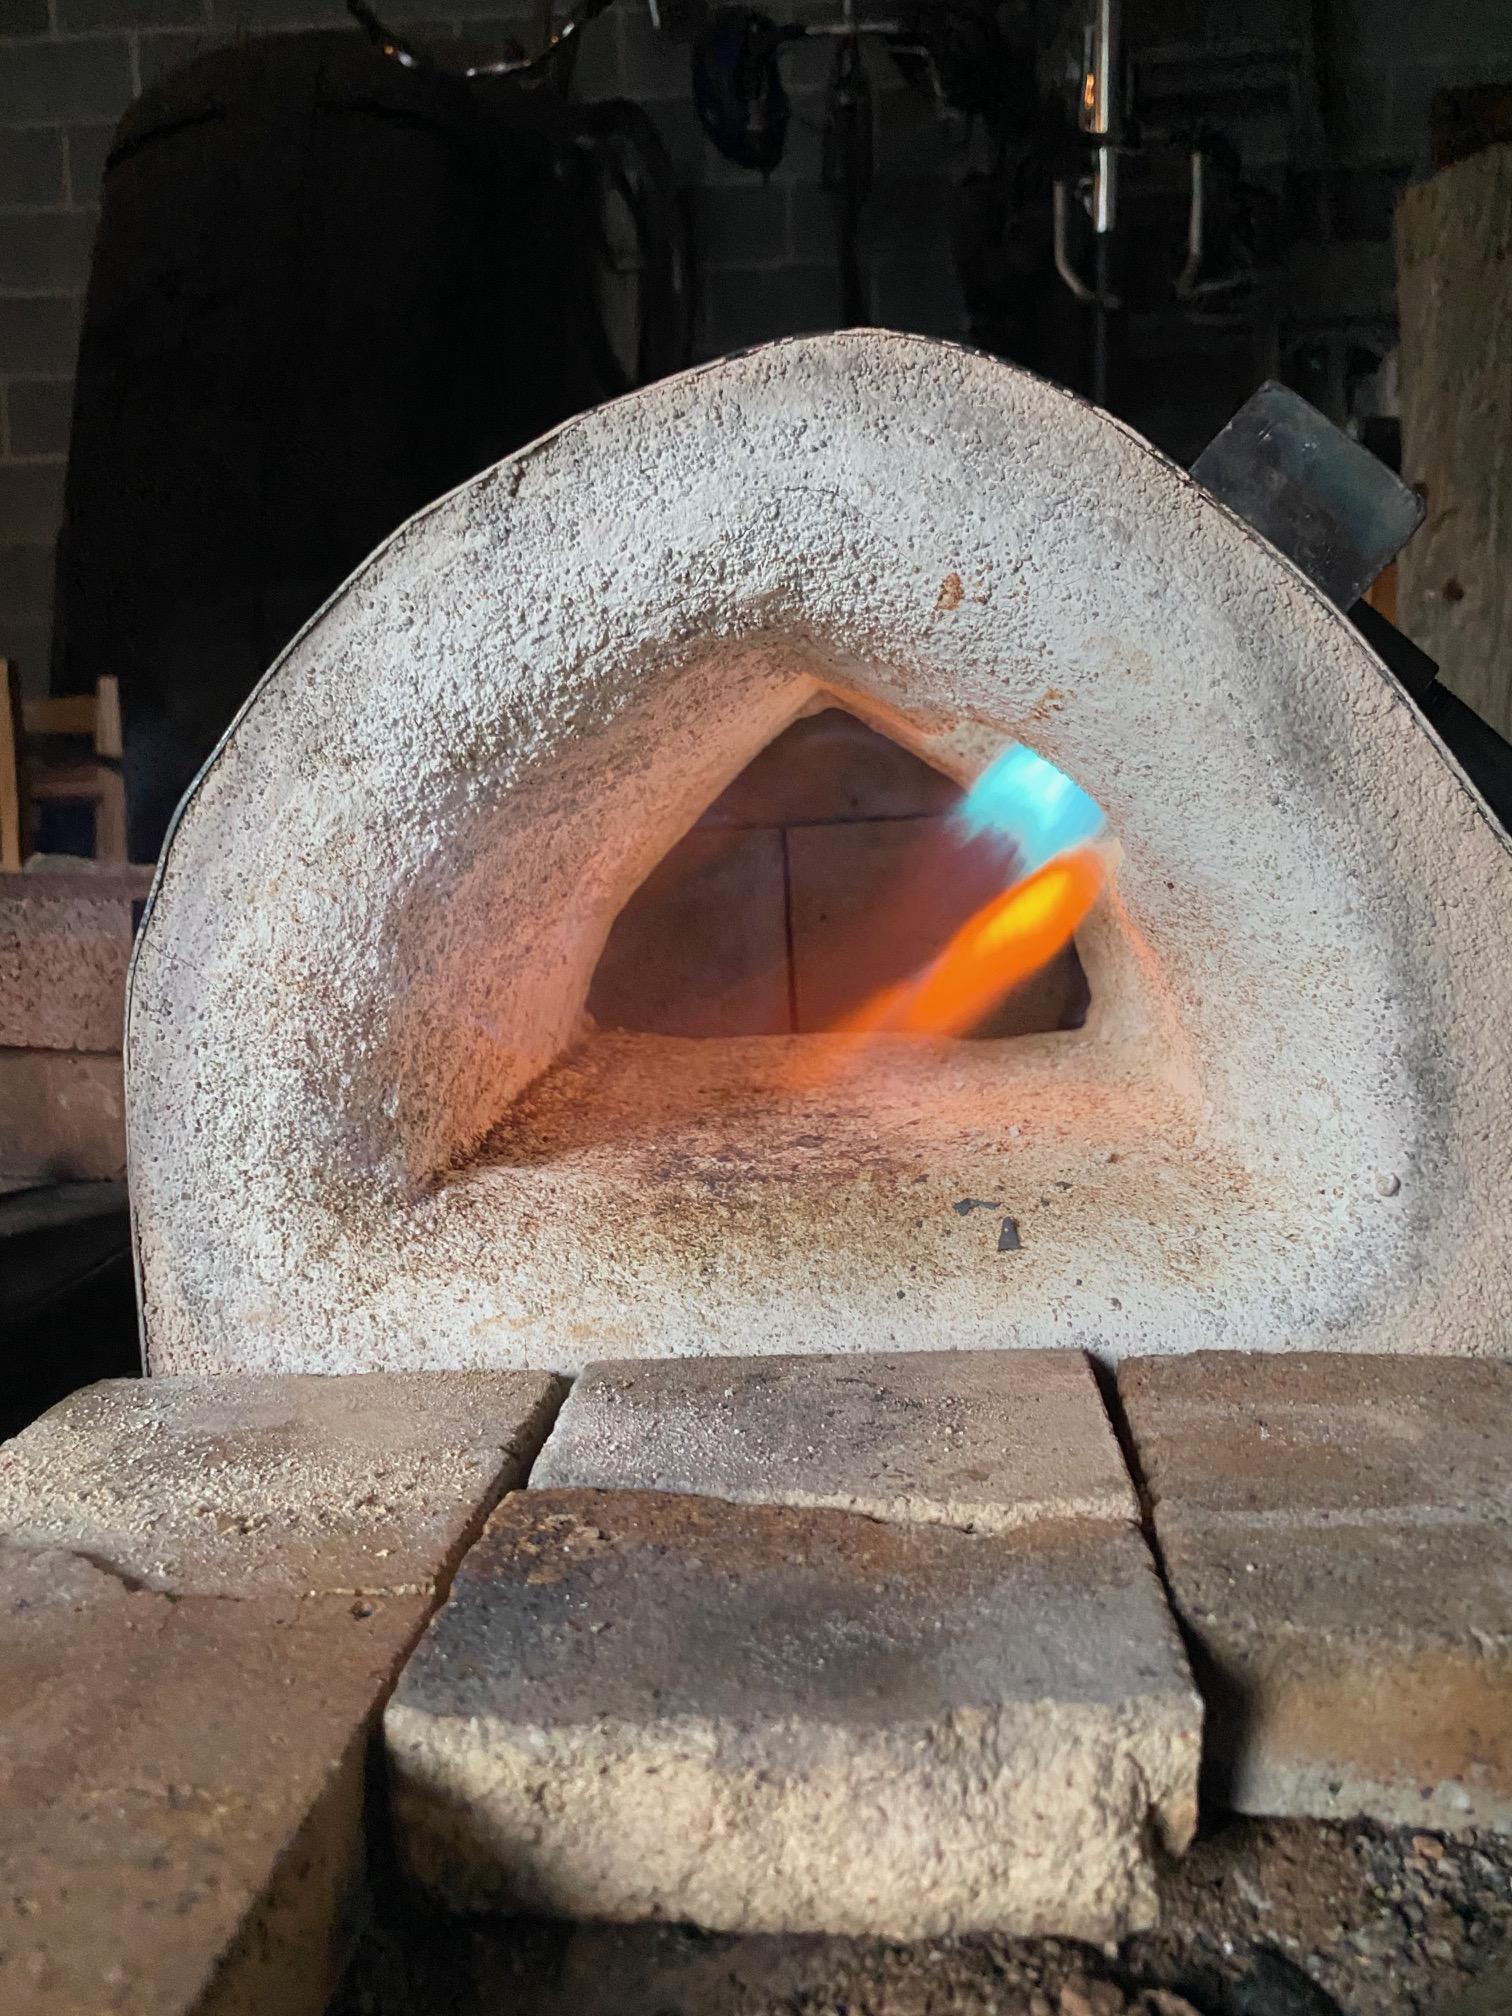
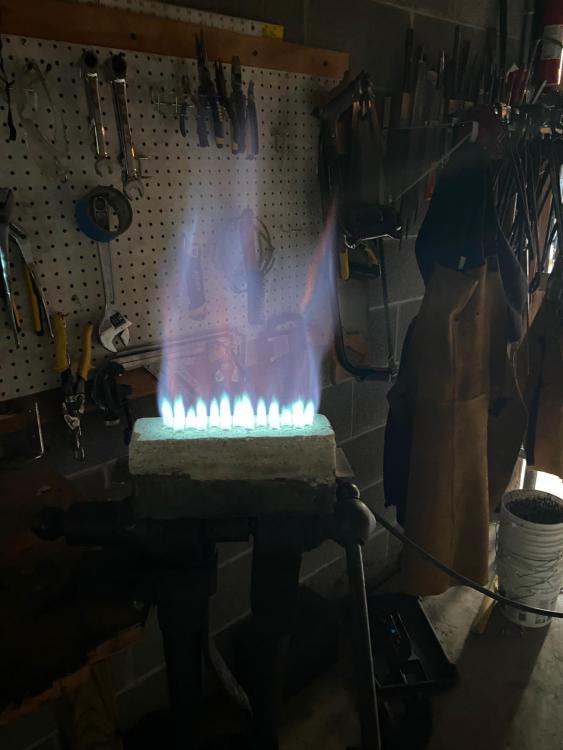
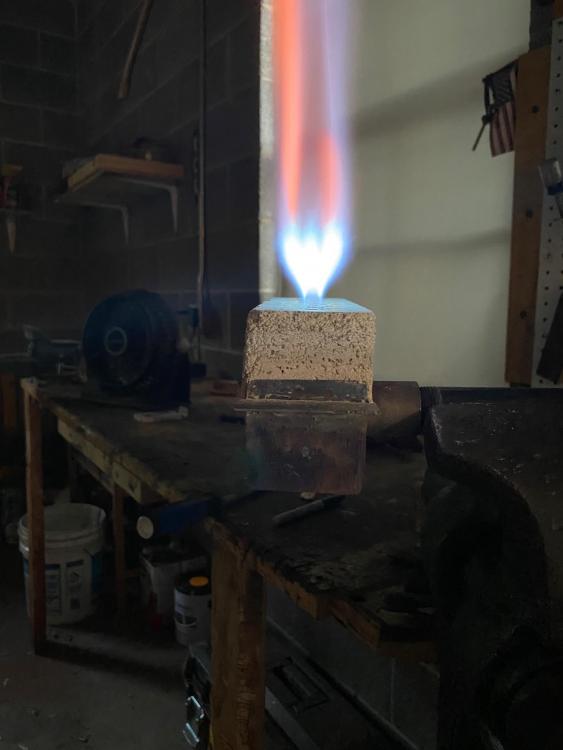
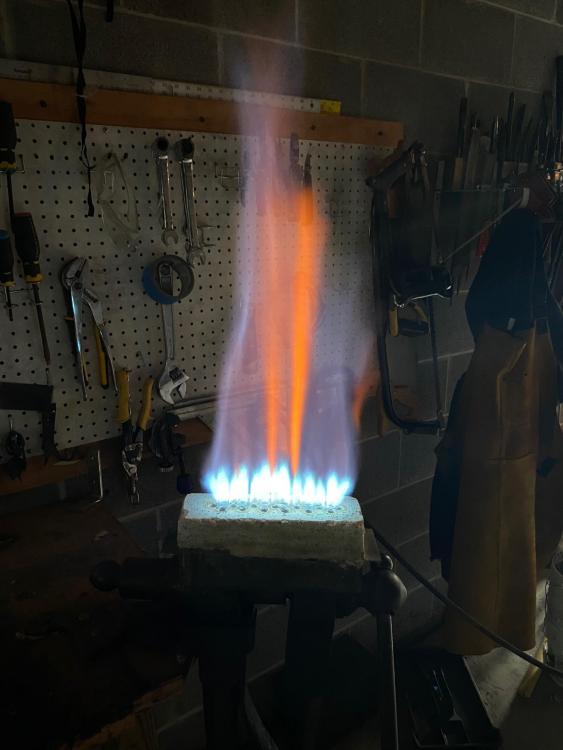
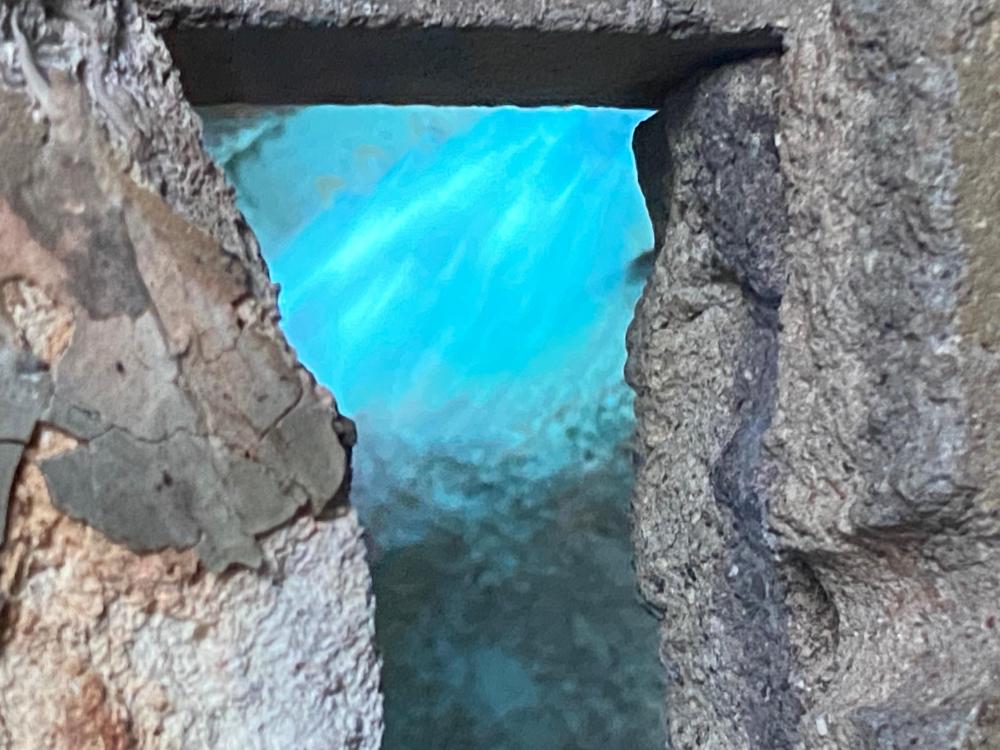
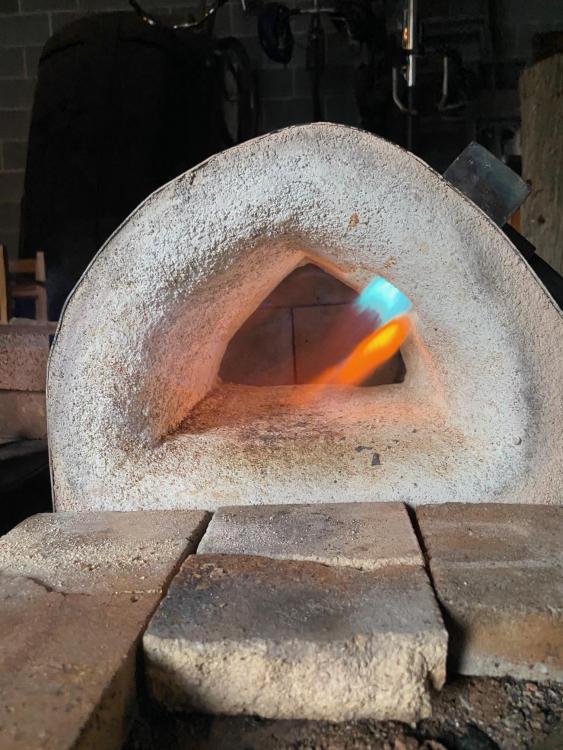
ITS ALIVE! Finally after many hours researching and seeing Lou's NARB in person, I have built up the nerve to give the NARB a go. This is the third Gasser I have made and my first attempt at a NA burner. So far it has gone swimmingly, except for one fact, its not quite at the temperatures I have hoped for. It reaches around 2000 degrees (just a guess) but I was hoping for forge welding temps. The forge is ~340 cubic inches with 2 inches of kaowool and about 1/2 of kastolite-30. It is about 10" long, 8" wide, and 5" tall. While I was casting the refractory, some of the wool was compressed and created a section that is closer to an inch of kastolite (originally I was worried that the extra hard refractory was to much for my burner to get to temps). Anyways, the burner was constructed in the methods explained originally by frosty. I made the burner head with 19 holes but instead of using crayons as per Frosty, I decided on some straws, they are a tad smaller then the crayons, but I had enough of them. I figured that if the holes where to small it would be simple enough to drill them bigger. When I first lit the burner, it looked great (I believe it is fairly well tuned) but upon closer inspection I noticed lift-off on the outer holes. The combustion was not at the beginning of the hole but rather about an inch and a half above. I believe this is the trouble I am having with not getting the forge hot enough (forge-welding temps). Here is the burner running at 8 PSI From the side, it is obvious of the incomplete combustion on the side. and finally at about 2.5 psi (anything higher and there is burner lift-off) Here are a couple of pictures with the burner in the forge right after it was lit (at 8 PSI). Note that with the 'doors' completely closed it seems that the flames are combusting properly on the holes, I believe this is from the internal pressure pushing back from the forge, it is hard to see but I tried to get a picture (at least it looks cool). When the forge is at a higher temps, say a nice orange. The problem comes back, as the burner block heats up and increases the FA mixture speed. Thankfully there are no issues with the burner blowing out. So there you go, the burner is not getting up to temps, and any help on the situation is appreciated. I know you guys do not need my help to figure out the issue, but I figure I'll give it a go based upon my own experiences and research: From what I have observed I believe there is to much velocity from the FA mixture, this in-turn causes the burner lift off. When in the forge, the back-pressure corrects this issue (so maybe its not the reason I am getting to temps.) Considering I used a smaller diameter on the burner holes I believe that there is not enough friction to slow down the fuel air mix, in turn there is to much forward velocity. The simple solution would be to open up the holes, which I want to be sure before I do. This would allow for more friction to slow down the mixture, and bang a better torch. Overall, I am really happy with the forge and consider it a big upgrade from my last one, which was obnoxiously loud. I put it through its paces over the last week by forging a couple of top tools. It gets the 1" 1045 stock quickly up to temps, which is why I don't think the extra hard refractory is the issue. If you got this far thanks for looking, and hats off to Frosty for this gnarly invention. - Mark

-
Fixed speed single phase AC setup
Marcus_Aurelius replied to Jarlberg's topic in Grinders, Sanders, etc
I am one of the lucky guys and I have a VFD on my Bader grinder. While it is not necessary to use a grinder effectively, it sure can be a real help. When I am using ceramic belts on hardened steel or really need to throw some sparks I'll crank up the speed. From my own experience higher RPM make tasks such as shaping wood handles for knifes/hammers, finer polishing on blades, and precision work harder. So I tend to tune down the RPM on those tasks. Regardless, with enough skill and patience all of these tasks can be done efficiently on a fixed speed grinder. -Mark -
Nothing quite like a chunk of schedule 8000 pipe, there are a couple of those THINGS at my local steel supplier, but not nearly as monstrous.
-
I agree with what has been said, using modern equiment and techniques does not detract from the concept of a blacksmith. Depending on what you consider to be modern, these new editions allow us to do more, whether it is excellent heat treatment with a temp controlled oven or forging massive stock with the use of power hammers. These invetions do not take away from the craft but add possibilities. When do we consider 'modern' tools to be detremental to the craft? Certainly the development of the modern london pattern anvil by Peter Wright or the use of precision grade steels do not do this. In my opinion, blacksmithing is an evolving craft with a rich amount of history that ranges with the smith producing weapons of war to works of decorative art (more or less). As long as we do not let the new 'toys' detract from our own skill (of course skills vary between a hand hammer and a power hammer) and do not become complacent with for the past, I do not see any issues with accepting more toys for the toy chest. And of course the use of historical tools and ideas is something special in its own sense and requires lots of skill and patience, but it depends on the person. Personally I like my sanity (at least my percieved sanity) and got myself a nice looking grinder, that looks very fine on its table btw, so I do not have to file my knifes for an eternity. Regardless the topic is open to great interpretation and this is my own opinion (with only two years under the belt I don't know if it is worth much more then 2 cents). -Mark
-
Looks good, I made up a pair that looked similar at the beginning of summer. Its nice when you can get one pair to fit a variety of stock sizes? Especially when you are forging your own tongs, so much less drawing out. (Although I still have the dream of walking into the 'shop' with a battalion of tongs.)
-
Welcome to the forums! That is some interesting information, the process of using clay on the spine of a blade to create a hamon is a technique I have always wanted to try, it also gives me an excuse to make a chopper. As I understand the process the clay keeps the spine from fully hardening as it prevents direct contanct with the quencing medium. Then a blade is produced with a hard edge and flexible spine, cool stuff indeed. Did you apprentice with a smith in Japan? I have heard of lining the quench tub up from north to south, but I have always heard that it was nonsense, have you tried this method with results? An intersting idea regardless. - Mark
-
I did the same thing, I used to use a 2-3 pound hammer for almost everything I did, including the small stuff. But when I started using my miniscule ball-pien for small scrolls and such it became much smoother and relaxing to work. Small hammers defintely have a place in the shop. Fraser - I am pretty sure when folks hand engrave they typcially use a hammer of similar size.
-
Looks good to me, I have never worked with wrought, but I always like the look of it, especially for hammers. I have a small hammer, probably around the same size. Its got a handle to match, so it looks proportionant, but once and a while the handle snaps, kinda like a toothpick.
-
I can't believe I forgot to name the book, you caught me red handed this time . The book is.... Knife Engineering: Steel, Heat Treating, and geometry, written by Dr. Larrin Thomas. concerning the review, I'm hoping others have read the book and may give their opinion. (I believe it came out in July, so I guess that is a shot in the dark)