
Mike Ameling
-
Posts
473 -
Joined
-
Last visited
Content Type
Profiles
Forums
Articles
Gallery
Downloads
Events
Everything posted by Mike Ameling
-

One reached out and grabbed me
Mike Ameling replied to Drifter's topic in Anvils, Swage Blocks, and Mandrels
Yes, it does sound kind of amazing. But it also reminds me of a young blacksmith I saw working at a fur trade rendezvous many many years ago. He came in a car, and unloaded his anvil, stump, forge, coal, tools, and a few pieces of stock - plus his camp gear. His forge was a little table-top rivet forge. He was asked if he could make a classic cross-bar campfire iron set - two uprights and a cross bar for hanging pots over a fire. I never heard how much he told the guy, but then started to work on it. His stock of iron was very ... limited. So he took a COIL SPRING, straightened it out, forged it square, and them made the parts for that campfire iron set!!!!! Including some decorative twists! Yes, he was at that gathering ... on a wing and a prayer. And he could only afford "scrap" iron from a junk pile for making things. But he MADE DO. And he sold something he made to pay for his trip there - and a few other things. Plus he gained a whole lot of experience in that simple project. And that campfire iron set will be very very tough to bend - being made from coil spring steel! I don't remember his name. Doubt I could even pick his face out of a crowd. But I always wonder how he did with his blacksmithing. I saw him at the Apple River Rendezvous east of Galena Illinois, probably early/mid 1980's. If anybody has an idea who it might have been, let him know I was and am still impressed with his dedication at that time. And I fully understand that "wing and a prayer" stuff. Mikey - that grumpy ol' German blacksmith out in the Hitnerlands -
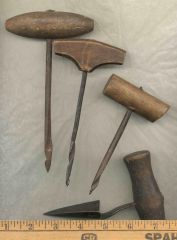
Here's a pic of several original gimlets I have - plus one Pod Auger. The one with the flat wood handle looks like it was forged as a tapered flat on the end. Then twisted, rounded up a bit, then ground/sanded on the outside to smooth it up and sharpen the edges of those twisted flats. The end does not have a classic wood screw point on it. The sharpened flat end just starts digging into the wood, and the twist then works to "pull" it in. The one with the round handle is kind of similar on the end, just much shorter in the twist and cutting edges. The one with the torpedo shaped handle has that tapered "lump" on the end that was filed into a classic wood screw. The flattened twisted section then does the cutting after that screw pulls it into the wood. The bottom is a Pod Auger. It is for making a tapered hole in a wooden barrel - where the tapered tap is put in. It is a classic Arrow shape, formed into that half-cone shape, and then filed flat/true on the one side - which also sharpens it. A slight bend in the shank then aligns the handle directly over the point of it to center the force in use. Just some other options for gimlets. Mikey - that grumpy ol' German blacksmith out in the Hinterlands
-
From the album: Anvils and tools
-
Well, one of the other ways to forge a gimlet would be to forge your taper on the end, then "hollow" one side. Kind of like making a Spoon Drill Bit, but with more taper on the end. Spread the sides out to the size hole you want to end up with. Then ... twist ... that tapered point in a slow twist. Those sharp edges on the hollowed section do the cutting. One version on an original I have left the end as a round tapered lump, with that hollow above it. They then carefully filed that tapered lump into a normal woodscrew. That wood screw end helps "pull" the gimlet into the wood, and then the share edges on that hollow forged section starts cutting the wood out. Yes, for use with a wood handle, you need the other end flattened - kind of like the end of a screwdriver. Mikey - that grumpy ol' German blacksmith out in the Hinterlands p.s. Spoon Drill Bits do work very well for drilling hols in wood - as long as you keep them sharp. To get some idea of them, take a standard round-nosed wood chisel/gouge. Press it down onto your piece of wood, and start rotating it. The real trick is to make sure you have the edges sharp up the sides as well as around the nose of it.
-
A table for the shop
Mike Ameling replied to Bill in Oregon's topic in Blacksmithing, General Discussion
I specifically ran the 2x4 uprights higher than the rest of the bench top to make that platform to bolt the leg vice on. There are 4 sticking up to rest that chunk of oak plank on. And I used extra long bolts to run bolt the vice on - running down through to an extra plate underneath the bench top - with a spacer in between for extra bracing. Two of the 2x4 legs are flush with the side of that corner of the bench, and the other two are side-by-side about 6 inches from the corner at the other end of that chunk of oak plank. Plus the leg of the vice is strapped to the bottom of the bench. The vice does not move at all in use. Plus I can undo two bolts on that bottom strap, and pop the wedge pins out of the bracket and pull the vice off if need be. On the anvil end, I also put in 2 2x4 uprights flush with the corner/end, and two more out where the other end of the anvil sets. These were set lower, with those 2x4's from the bench top covering them. This give me extra strength/mass directly below the anvil. The "off" corners just have one 2x4 upright to balance it out. It can be a bit tricky getting the bench leveled off. You end up with 10 2x4's touching the ground from the bottom of the bench - if everything is perfectly level. So when I travel with it, I throw in a couple wood wedges to help level and stabilize it. The only occasional worry is that the whole workbench is only 20 inches wide. It can get a bit tippy or top heavy when moving it with anvil and vice mounted in place. Plus bending some things in the vice can give you enough ... leverage ... to more the whole bench about. It has worked very well for the smaller work I normally do. And I really like having that whole bench top to lay out projects and tools on! But I finally did put a little wood lip along that back side to keep tools from rolling/sliding off. It works for me. Mikey - that grumpy ol' German blacksmith out in the Hinterlands -
Things I Have Learned as a Beginning Smith....
Mike Ameling replied to Drako11's topic in Blacksmithing, General Discussion
The OLD rule about a blacksmith shop is EVERYTHING needs to be considered HOT - until you verify otherwise! That also goes for your anvil face and vice jaws! Leaning with a bare hand on something that just had HOT iron on/in it does get hot and will burn you! Tongs tend to hold heat longer than the piece they were holding (that extra mass). All leading back to that old blacksmith rule - consider everything HOT until you know otherwise! Mikey - that grumpy ol' German blacksmith out in the Hinterlands -
A table for the shop
Mike Ameling replied to Bill in Oregon's topic in Blacksmithing, General Discussion
Here's a pic of my 2x4 "workbench". The bench is 26" high - 20x40. My anvil sets up kind of high - with the face being 35" high. This really helps me when doing small work - instead of bending over a little all the time. I've got a different larger anvil on a stump at the classic height off to the side for larger work. And all those extra tools in those couple trays on the bottom shelf do help add some more weight/mass to the whole bench. But I still do have to be a little careful when bending large things - as the whole bench wants to move around a bit. But having a ground floor instead of cement does help cut down on the bench sliding about. It tends to ... settle in. Just another possibility. Mikey -
A table for the shop
Mike Ameling replied to Bill in Oregon's topic in Blacksmithing, General Discussion
Lots of possibilities. I put my gas forge on top of a metal shop table I picked up for a couple bucks at an auction. Just angle iron corners with a 14 gauge metal "shelf" top with lip and similar shelf 6 inches up from the bottom. I put a large foot plate from an old tractor on top of that shelf rim, and set the forge on it. The extra plate sticking out front I used to stack my firebrick on. That full brick length shelf out front really is nice. If you are looking for a "cheap" table for your forge, see about picking up a junker kitchen stove. They are already all metal, and insulated for heat. And you have the oven area for shelves - with or without the door attached. They even have "leveling" feet underneath. You can use the top as-is, or lay a sheet of iron across it. Weyger's book on Making Tools talks about stripping down household washers/dryers for the metal frames. The enameled sides are designed to be taken off - ditto removing the inside parts. A wood frame will work. Just make sure to insulate it from the forge heat. Fire bricks do work well, but it does help to work in an air gap between the wood surface and the brick or iron sheet. Working a set of wheels on one end really helps when you need to move things about. I made up a wood workbench out of 2x4's for my anvil and leg vice. I originally made it as a "traveling" outfit for demonstrations. But it ended up being my major work-station in my shop. The anvil is on one corner, and the leg vice is attached on the other corner. I have several pics in my photo Gallery. Have fun with your ... project. Mikey - that grumpy ol' German blacksmith out in the Hinterlands -
I assume some type of cement base set down in the ground. How did you attach the ring to the base? Through bolts? Flanges attached on the sides? I learned a long time ago to NEVER underestimate the power of a dozen "motivated" kids - even with a 1 ton boulder setting on/in the ground! I kind of shudder to think what they might have been able to do with a few ... tools! And it wasn't even malicious vandalism - just a spur-of-the-moment thought. Mikey - that grumpy ol' German blacksmith out in the Hinterlands
-
Where can I get an anvil?
Mike Ameling replied to Smith93's topic in Anvils, Swage Blocks, and Mandrels
And don't forget ads in those free Shopper and Pennysaver newspapers. You will be surprised at the responses you can get from ads in them. Ditto the local radio programs with a buy/sell segment. Also, when you check out the local antique/junque stores, ask about them at the checkout counter. A lot of times they have them, just not out on display. One local antique store that always advertised that they carried old tools had a pair of anvils - but stored in the basement! You only found that out IF you asked. Even posting a Wanted paper at the local grocery store or feed/farm store (where they allow such things) will bring you leads. The other thing is have CASH on hand when you go to check out an anvil - plus a little extra ta boot. It really helps the negotiations, and often leads to other "tools" that might be available from the same person - leg vices, tongs, hammers, etc. Mikey -
Repairing the face of an anvil
Mike Ameling replied to Jaret's topic in Repairing and Modification to Anvils
Nothing "foolish" about what you spent for those anvils. Those chipped edges only bother if you are doing stuff where you need a corner of the anvil. And usually you can just shift over to a section that has a better corner for the specific project. But you can also clean up and radius some of those chipped corners. This can give you more bending/fullering options. An angle grinder does wonders to smooth and round up chipped edges. As to the anvil face. It all depends upon how bad it is and over how much of the surface. Going over the surface lightly with an angle grinder and flap wheel tends to clean things up very well - usually only leaving a couple deep dents. Plus don't overlook your woodworking belt sander. They can do wonders for smoothing up and blending out scratches on an anvil surface. It will knock down the "high points" a lot easier than work with an angle grinder until you get more experience with the angle grinder. Again, nothing foolish about your investment. Just get them into your shop area and start working! Mikey - that grumpy ol' German blacksmith out in the Hinterlands p.s. My books are kind of buried right now, but as I recall AJAX anvils were a hardware store brand that was made by Trenton. Nothing wrong with them. My first real anvil was an AJAX. Picked it up at a household auction in town They had almost nothing for tools listed, just household and furniture. It was one of the first things sold, and I got it for $60! Approximately 130#. The face and horn were almost pristine! The only "problem" was a minor chip on the corner of the heel where it had tipped over years before. One of the BEST deals I ever came across. It's still in my shop, just kind of buried off to the side. I should treat it better than that. -
You can always make a 4-tined version of the twisted wire forks. A classic twisted wire fork is 2-tined. Bend a length of utility/bailing wire in half, clamp about an inch of the ends in your vice, slip a 1/4 or 3/8 inch rod through the end, and start twisting it in one direction until fairly tight. Pull a little as you are twisting it. When it is tight up to the vice jaws, twist the end a bit until the loop lines up parallel to the vice jaws. Now take it out and remove that rod for twisting. Trim and point the ends of the tines with a file, and bend those tines out to a pleasing shape. You can curve the tines and/or handle to suit your tastes. There is your basic simple twisted wire fork. Historical examples go all the way back to the mid 1700's and earlier. They were often a soldier's improvised fork. For 4 tines, just use two strips of wire bent in half and twisted up. One stylistic hint on these. Slip your twisting rod through only one loop, and pull the other loop right up next to it. And you might need to use a pair of tongs/pliers to grip the wire around that rod so that it starts twisting right over the whole length of what will be the handle. This ends up giving you only that one wire loop on the end of the handle instead of a two wire loop. But some people twist those two wires together in the center until they have enough to go around their twisting rod, then twist the whole bundle together like normal. This gives you a two-wire twist loop on the end of your fork. The tines you just bend out to suit your tastes, trim to length, and point with a file. Bailing or Utility tie wire works well for these. And so does barbwire. But barbwire has a little more "tensile" strength to not flex as much in use. But it also might have a galvanized coating. Soaking it a day or two in common household vinegar will safely remove that zinc coating. A number of people make forks by tack welding a small round rod onto the end of their handle material - like forming a T. They then cover up that welding by hammering the joint, and then forming the tines out of that round rod and finish the handle as they please. This does give you a nicer transition from tines to handle than splitting the end, unless you do a lot of hammering to "clean up" that area. Plus you can have heavier/thicker tines this way instead of just being 1/2 or 1/3 or 1/4 of the original parent stock. For 4 tines, you would just need to tack weld on two small/thin bars to start with. It would then start to resemble some of those old frog/fish gigs - but without the barbs. The stock for your tines can be either round or square. Each will need tapering anyway. So it's a matter of what "look" you want in your tines. Just a few options to consider. Mikey - that grumpy ol' German blacksmith out in the Hinterlands p.s. #9 brace wire makes a very good twisted wire two-tine meat cooking fork - with that galvanized coating soaked off of course.
-
I forgot to mention. These "kettles" are simple straight-sided round ... pails. The sides come straight up, not flared or tapered. And the top edge can be left just as-is when cut off (if your metal is thick enough), or with the top rolled/bent back onto itself, or rolled over a wire to help stiffen the rim. Some were even then "tinned" on the inside to help with rust and cleaning - like the brass kettles were. If you go down to one of the hardware stores, you can often find a "milk pail" that is very similar - made by Behrens. But it has that machine rolled/crimped bottom seam like bean/coffee cans. It also has bail lugs riveted on the sides and down a ways from the rim - to allow clearance for a stamped iron lid. A one gallon version of the old 5 gallon "shotgun" can for milk. Sheet iron "kettles" show up in various trade goods lists and journals from the early 1700's on well up into the 1800's. They were a standard British Military issue cooking pot - one per 8 man mess group. Those 6 to 8 men in that "mess group" took their issued raw food, combined it in their kettle/pot, and cooked it for themselves. The only ... chow line ... was the cooks/kitchens for the officers. The soldiers had to cook their own food. The preferred British Military method being -- boiling. But very few originals survived. They tended to rust away. The couple originals that have been found are usually smooshed. One was found in the bottom of a post hole at Fort Ligonier. It had been flattened and the tossed down into the bottom of the hole for the post to rest on. Mikey - that grumpy ol' German blacksmith out in the Hinterlands
-
A couple books that could help: The Ashley Book of Knots The Arts of th eSailor by Hervey Smith Moving Heavy Things by Jan Adkins Plus a good timber framing or log home building book should have some pretty good info in them. Mikey
-
Yes, that had to have been a very old ironmonger. I would have loved to have gotten that box of hammer heads. Yes, they most likely were for smiths, machinists, even carpenters - to shape to their own final needs. The "hard" part of punching the eye and getting the basic shape was already done. So only that final shaping and heat-treat would have been needed. When an "old" shop closes down, you can often find some pretty interesting items that were buried in the back-rooms and shelves. Mikey
-
stone mason hammers, heat treating
Mike Ameling replied to fat pete's topic in Heat Treating, general discussion
If he kept talking about the "... hammer must cut the stone ...", then he most likely was talking about that chisel-shaped peen. That chipping hammer - kind of like on a "brick hammer". That "chisel" end is what would then "cut" the stone. Most "stone hammers" are for just pounding on the stone. You ... hit ... the stone to break a chunk off. If you tap along a line with the long/narrow peen, it sets up a fracture line in the stone until it just snaps off along that line. Or you tilt the hammer to the side a bit and use the "edge" to create that fracture line in the stone. Otherwise you are hitting a chisel, and that chisel then ... cuts ... the stone. In the end it still comes down to what you will be hitting directly with that hammer. If you are hitting the end of a steel chisel, then the hammer face needs to be softer to give a bit and "grab" the end of the chisel. If you are hammering directly on the stone, then it needs to be a lot harder to stand up to the use/abuse. I'm still kind of puzzled by his response. But then I do get ... easily confused. Mikey - that grumpy ol' German blacksmith out in the Hinterlands -
The booklet The Packet by Mark Tully has a 2-page article on Camp Kettles - with documentation. His time period focus is Rev War, but the information covers a lot more years before and after that. Common sizes were: 9 1/4 inches tall by 9 1/2 wide; 7 1/2 tall by 7 1/2 to 8 inches wide (the original was smooshed). These two were from Fort Ligonier in Pennsylvania. Two from Ft. Meigs Ohio were 11 1/2 wide by 11 1/2 tall, and 9 3/4 wide by 9 7/8 tall. Height to diameter seems to be pretty much the same. Bail attachments were either "dog-ear" lugs riveted on (a strip bent in half passing over the rim and then held with two rivets - with a hole for the bail), or just two holes punched through the sides just beneath the rim. The other key detail is that bottom seam. It should not look like the seam on a modern bean or coffee can. It should be a flat circle with the outside edge bent up and the straight sides slipped down into it and soldered. Those "crimped" seams came in after those hand-cranked tinsmith machines started to be used in the 1840's and later. Several tinsmiths make good reproductions - but from tinned sheet iron. One that I can think of right now is Backwoods Tin - Bob Bartelme (sp). Another is Carl Giordano. And the Civil War vendor C&D Jarnigan. They all have the correct bottom seams on their kettles, but do make other items with more modern tinsmithing methods. I've been trying to get Jim Kimpell from Fort Dodge Iowa to start making some straight sheet iron kettles instead of using tinned sheets. But so far he just works with the electroplated tin or the hand-dipped tin. I have threatened to make some up - from around 20 gauge sheet iron. But then I'd have to learn to solder effectively. I hope this helps give you some ideas to go with. Mikey - that grumpy ol' German blacksmith out in the Hinterlands
-
Punching the eye on a hammer head is always the ... rough ... part of making them for most people. That is why so many people prefer to re-work existing hammers. Those classic double-faced "bashing" hammers can be re-shaped. Forging the one end into a straight or cross peen takes a lot of muscle. Plus it also messes with the geometry of the hammer - by stretching out that side for the peen. A minor detail, but it could be a problem. The other option is to grind away the excess metal till you have the peen shape you want. That's a lot of hard grinding. But if you do it kind of slowly, and cool the hammer head often, you can end up not losing the original heat-treat in that hammer and not have to redo that. I had one like that years ago. It went from a 3 pound "machinists" double faced hammer down to a straight peen weighing slightly more than 2 pounds. But the guy who did the grinding had it too narrow on the peen - almost to a concave cutting edge. Some other guy absolutely loved it and talked me out of it years ago. More random thoughts to share. Mikey - that grumpy ol' German blacksmith out in the Hinterlands
-
stone mason hammers, heat treating
Mike Ameling replied to fat pete's topic in Heat Treating, general discussion
You have two main types of hammers when dealing with stone masons - those used to hammer the stone directly, and those used to strike the steel chisels. The hammers used to strike the steel chisels tend to be heat-treated softer or not at all. The hammer tends to be the "consumable" part as opposed to the steel chisels. So they tend to mushroom out in use, and the surface dents/nicks more. This helps preserve the more expensive steel chisels - which can them be heat-treated harder to last longer. But one or the other needs to be the "consumable" part and wear away in use. Plus that softer hammer face helps ... grip ... the end of the chisel better, instead of wanting to just skate off of it. Hammers used to strike stone directly need to be ... tougher ... than harder. Too hard and the face/edges will crack and bits of shrapnel might fly off. So the hammer head itself needs to be viewed as a "consumable" item. Weyger's books have some good info on stone mason's hammers and chisels, and how to make and heat-treat them. The only real way to know what steel is in those hammer heads is for you to make one up from known steel. Otherwise you would have to contact the company that originally made it. A friend reworks hammers and chisels for a stone mason near here. He is always debating with the guy about how to heat-treat both. The guy always wants both to be heat-treated HARD - to extend their life. But Andrew is always worried about cracks in the edges, and the possibility of shrapnel flying off in use! So he ends up doing as that specific client requests. But that guy has also experienced that "shrapnel" problem. He caught a 1/4 inch chunk from the end of the chisel one time. It entered near his wrist, and traveled up through muscle almost to his elbow! No, he did not sue since Andrew is his friend and did what he specifically requested. But others might not be so ... understanding. Especially when their work/livelyhood and family get affected by an injury. "Family" can be a lot less understanding about deals worked out with friends. Just a few humble thoughts to ponder. Mikey - that grumpy ol' German blacksmith out in the Hinterlands -
It all depends upon what you mean by "lump" hammers. If you are talking about hammers used to strike chisels, they do tend to have a softer heat-treat. They are something of a compromise. Either the hammer face needs to be softer and dent or mushroom out, or the top of the chisel needs to be softer and mushroom out. If both are heat-treated HARD, you end up with cracks and "shrapnel" flying off one or the other. A stone mason I know specifically had chisels and a hammer heat-treated hard - to extend their use before having to recondition them. He ended up getting a 1/4 inch piece of shrapnel from one chisel in his forearm - entered near the wrist and stopped up near the elbow! Stonemasons hammers designed to hammer stone directly tend to be harder - but not as hard as a blacksmithing hammer. More trade-offs on wear and chipping. But those also tend to be taller and thinner than a normal smithing hammer. I have reworked several for some specialty punches and fullers. If you are talking about those generic hardware store cross peen hammers, those ARE what so many people use for blacksmithing. The mushroomed and chipped edges can be ground/sanded and cleaned up for use. If necessary, the hammer head itself can be re-heat-treated. Most blacksmithing books have instructions on doing this. Even a classic carpenter's claw hammer will work. The only real problems with them is the crosshatch checkering on the hammer face, and the lighter weight. The claws can be reshaped, or even clipped. Ballpeen, or machinist hammers, come in many sizes. And lots of people use them for smithing. The ball peen can be reshaped to a classic straight or cross peen. Hope this helps. Mikey - that grumpy ol' German blacksmith out in the Hinterlands
-
Stainless requires a full melt of the iron and the various metal alloys - to be fully blended together and then "cast". Lots of fuel will be required, plus a lot of loss to oxidation/scale. The closest other method to make "steel" would be Case-Hardening. Take you pieces of iron, pack them into a crucible along with lots of bone/leather scraps, seal it up, and then "bake" it in your forge for many hours. The "carbon" from the organic matter will migrate into the steel. It's a small version of that Blister Steel. But the carbon only migrates in a few thousandths of an inch. So then you need to forge/lap weld the pieces together repeatedly - to help distribute that carbon throughout more of the iron. With the associated use of much more fuel and loss to oxidation/scale. The Bloomery kind of does this all in one step, but the final carbon content will vary greatly. Making your own steel is an interesting little project - just for the learning process. But a poor "economical" choice. Mikey - that grumpy ol' German blacksmith out in the Hinterlands
-
After a little more looking, it seems that it is very similar to an old Tiling Spade. Long narrow blade designed to slice out long narrow strips of ... peat. The main difference is that cutting wing. With a tiling spade, you are digging a long narrow trench. With peat you are slicing/digging down along a bank, and want to have fairly uniform "blocks" of peat - in length and width. The other feature is that high step plate to the side - for using your foot to push with. So you will also have to determine which foot will be used, and in which direction the cutting/digging will progress. The drawings show right foot step, and right side cutter. Plus the wood handle seems to be a lot wider/thinner as it tapers into that metal head - more of a long wedge shape instead of for a round socket. Keeping the overall shovel thin enough to slice well, and still work well to lift out that peat block will be a bit tricky. Plus having enough strength to overcome the wet bog suction holding things in place! Have fun with your project. Mikey
-
In John Seymour's book The Forgotten Crafts isbn 0-394-53956-7 he has some info and a drawing. But he calls it a Slane. He does show one old b/w picture of two guys digging peat, but you can't see much. Mikey
-
1/2" sq. Shepard hook
Mike Ameling replied to hammerkid's topic in Blacksmithing, General Discussion
Nice work. Yes, bending on the -- diamond -- is rarely seen, and hard to do and keep true. (Well, unless you have V groove dies/rollers in a bender.) But it is one of those little ... details ... that tends to catch the eye a little more. And I always have liked the look of two tight reversed twists. You get a lot a style and transitions (changes in visual planes) with two quick twists. One note about cemeteries: Be sure to check with the manager/groundskeeper about any rules or guidelines for placing things around a grave. Some have rules, some do not. It becomes more important when they have to mow the lawns around the headstones. Most allow a hanger or pedestal mount for flower pots as long as it is placed right next to the headstone - touching it. Again, nice work. Mikey - that grumpy ol' German blacksmith out in the Hinterlands - trying to remember the last time I bent square stock on the diamond - too long ago -
While digging about to get pics of some old anvils, I decided to get a few pics of this old Hot-Cut shear. Whomever made it put some style and grace into making it - besides the functionality and leverage. He even beveled a bolt through the base plate to fit just under the inside lip on your post vice and help lock it in place during use. He never made it to bolt to some workbench - just to be clamped into a leg vice for use. Such a simple tool, but the guy put that extra effort into it. Extra bracing, guided lever, just little things that add up. Somewhere around here I have one of those classic simple 2-bar with lever on a simple 2-piece 4-leg floor mount shears. You see the style in the old books, like Art of Blacksmithing. Simple/functional - for cutting hot material - or very thin sheet. Just an example to share - of putting that extra thought and effort into a simple tool. I have several more pics in my gallery in my Anvils and tools album. My junker digital camera doesn't do good closeups - sorry. Mikey - that grumpy ol' German blacksmith out in the Hinterlands