
Mike Ameling
-
Posts
473 -
Joined
-
Last visited
Content Type
Profiles
Forums
Articles
Gallery
Downloads
Events
Everything posted by Mike Ameling
-

Viking era fish spear and fish hook - 10th Century
Mike Ameling posted a gallery image in Member Galleries
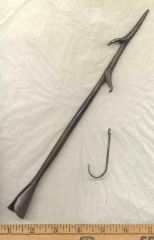 This style of fish spear and hook were found in Denmark at the base of a waterfall. Dated to around 900 A.D. To use the spear, you bind your heavy line around the shaft above the socket. Then jamb the head onto your wood shaft. When you spear a salmon, the wood shaft pulls away, and you "play" the fish with your heavy line attached to that spear head.
 -
From the album: Historic Iron Work
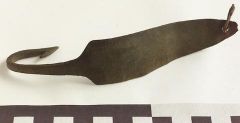
Viking fish lure/hook - 10th Century -
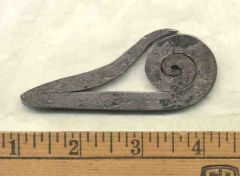
The British museum gave that striker that generic 18th century time period designation. Don't you just love those hundred year ranges? But ... the Dutch were trading one style of striker somewhat similar to that one, to the Seneca Indians in the mid 1600's up in NY State - out of their colony of New Amsterdam (which became New York when the Brits captured it). That style of striker had that spiral curl on both ends. So the similarities are there. And that note about the Scotts dealings with France and Flanders shows the link. The Museum had several Scottish flint strikers, but only had that one pictured in their Catalog of the Exhibits from 1926. Same thing with the Irish flint strikers. Descriptions of several, but only a picture of one. And that one is very similar to a Burgundian (French) striker from the 1400's through 1700's. There are literally dozens of different flint striker styles out there. The ... adventure ... is finding them in the books and museums. And then you have to figure out HOW to make them. There's just something about the shape/style of that Scottish one. It draws the eye. But one lady wanted two as close to exactly the same As I could make them. She turned them upside down, and pointed out how they then resemble a Ram's Head - especially with that pointed end having an extra tiny curl on it to form the "eye". Yeah, she and her family were Ram's football fans - instead of Scottish. Mikey
-
From the album: Historic Iron Work
-
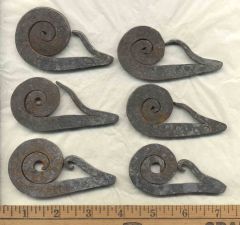
Hey, just sharing some humble thoughts learned along the way. Since your demo is going to be at a Scottish event, you might want to do a couple of these Scottish style flint strikers. Between the forging, curling, and heat-treating, you have around the same amount of time/work involved as some of the leaf key rings. And you end up with a pretty decorative "Scottish" item. And a slightly more stretched out wedge shaped version. And if you then take a break from hammering and show how to use it to start a fire, it really does impress people. I made these from sections of a modern hayrake tooth. I buy the replacement rake teeth down at the local farm store. They are around 1080 or 1095 high carbon tool steel, and around 1/4 inch in diameter. After you straighten that rake tooth out, you end up with around 30 to 36 inches of 1/4 inch high carbon tool steel rod - and all for around $1.30! You can't buy new tool steel for that price. These just have that yellow or green paint on them. I made these out of around 5 to 6 inches of that 1/4 rod - depending upon how much "curl" you want in that snail shape. I flatten/square it up first. Then I taper the one end, bend it back, and hammer that "snout" tight. I then bend the pointed end out a bit to get it out of the way of the spiral. I then taper the other end and start spiral-ing it up. I bend the end, then clamp that end in the corner of my vice and just pull/bend the rod around itself. Heat another section, clamp it, and pull/bend around another section of the spiral. Goes pretty quick --- and EVEN! When I get enough curled up, I tap that other pointed end back over against the spiral - either curling the very tip, or running it up along the outside of the spiral a bit. A couple taps on each side of the edge while stood up on the anvil straightens that teardrop shape. Then do your heat-treat as you would any flint striker. They are kind of ... kewl looking. And have that 18th century Scottish link as well. Mikey - that grumpy ol' German blacksmith out in the Hinterlands p.s. And I luv the shape/style. It has a Mediterranean feeling to it - like I've seen the shape in some early cultures around there. Possibly Minoan.
-
From the album: Historic Iron Work
These flint strikers are based upon an original in the Byant and May Museum of Fire-Making Appliances. The unique part is that the British museum actually classified it as a Scottish style instead of just giving it that generic "British" or "English" classification. They also said that it was ... more decorative than our local ones, and probably influence by their dealings with France and Flanders where it is common. The Museum also identified another style/shape as an Irish flint striker. -
Cowboy Bar-B-Que Fork
Mike Ameling replied to Johnnie C.'s topic in Blacksmithing, General Discussion
A quick way to make the end look like a "cowboy hat" is to use an iron washer. Get a large/wide one, and thin - or hammer it out thin. Then slip it down over the end of your rod which should be hot, and tap the end to swell it out a bit to lock that washer in place. A little heat and you can ... curl the brim ... to your liking. If you are welding, have one washer curled as needed, and then tack on 1/2 of another washer perpendicular to the other washer to form the crown of the hat on the brim formed by the other washer. Instant cowboy hat. And people will easily see the image you are creating. And when making up a cowboy figurine, use some horse shoes. One becomes the legs - very bow-legged. 1/2 of a shoe tack upright from the top becomes the body - with that washer hat on top. And 1/3 of two different shoes form the arms when tacked on the sides. A bit of stiff wire tacked up from one "arm/hand" becomes a twirling lasso. And if you put some brass rivets through the nail holes on the "legs", you have conchos on his chaps. For a base, just tack the legs onto another horse shoe, but angle things slightly for that sculptural appeal. And a strip of colored clothe/ribbon tied around below the hat really sets it off and "finishes" the look. Just a way to make a quick sculpture from a few old horse shoes. Mikey -
When doing a demo, don't expect to get "production work" done. Leave the big projects at home. You are there to ... play to the crowd. So small quick little projects always go over better. Otherwise you "lose your crowd". A friend did a demo one time where he just forged up a layered damascus billet to make a knife out of. It was ...sort of ... interesting to a few people, but mostly not. They saw some "work" being done with little understanding of what was being made and never really saw any finished product. It was also hard for him to really explain what he was doing and why. I usually make the leaf keyrings. Great simple demo project. People can see the end of that 3/8 round rod turn into a leaf before their eyes in a few minutes. And a few minutes more they can then see the finished leaf key ring. And then I often see some little kid who has been intently watching/listening as I formed up each step and explained it all to the crowd, and I gift it to that kid. The smiles from that kid and everybody else are worth it. And YES, you will then also get to sell a bunch of them - either already made or the next one you are working on! Sometimes you will even have a line of people waiting to buy the next one - something they SAW being made! Axes, knives, swords may be fun to work on, but big projects like that will quickly lose your crowd. It is better to make a little project they can see finished in a few minutes. And something they can see a use for in their own life. Projects? Nails - always a good quick project that leads to an interesting history lesson for the talk. And, at a buck a piece you will be surprised at how many you sell! Leaf key rings - great for demonstrating lots of techniques. And a consistent sales item. S-hooks and plant hooks. Quick, simple, easy to add extra design details. And people can see a specific use for them back home. Ditto wall hooks - for coats, keys, hats, etc. Mini horse shoes - just a simple U shape bent out of flat stock, with heel cauks turned down and a groove fullered in where the nail holes would be punched. Kids love them. A variation on the leaf key ring project. Make up a little bottom swage block with a design or a face chiseled/punched down into it. In use you flatten and spread out the end of a rod (kind of like for a leaf but more rounded). Then heat it up and hammer it down into that bottom block. Now cut it off and draw out a "tail" to curl in interesting shapes (like on a leaf key ring). That "face" almost instantly formed on the iron as you hammer it into that bottom block/swage really amazes people. And it makes an interesting ... key ring or necklace pendant or zipper pull or window shape pull or .... If you are "selling" stuff, you really should have an extra person there to take care of that while you are working/demonstrating the smithing part. It is hard to divide your time between the showmanship and the salesman. And have fun. Your attitude and enthusiasm will get reflected in the crowd. Hope these humble rambling thoughts help. Mikey - that grumpy ol' German blacksmith out in the Hinterlands
-
There is always that fine line between cracking the whip for maximum production/profit and taking the time to do a project well. Forcing "speed" can tip that balance -- from enjoying the project and doing it well over to hating the work and having to produce produce produce etc. SOME repeticious projects can be done in a "speed" mode, and can often benefit from it. Like making nails as an example. Once you get ... in the groove ... it is much easier to keep busy with several "irons in the fire". But sometimes you can't "think out" the whole process, and have to stop and ponder several times during the forging. It all depends upon the work. Some people like that "hard core bottom line corporation" approach. But too many get "burned out" by it. So I prefer the simple one-man shop/business approach. I do my "production" modes when necessary, and enjoy the "creative" times when I can. And then there is that difference in working style/method -- between that "frantic/frenzy to get it done now and quick" mode, and a working pace you can maintain all day long and end up getting more work done in the end. Just some thoughts to ponder. Mikey - strolling along instead of running to ... chase that buck!
-
Viking era riveted sheet iron pot/kettle
Mike Ameling replied to Mike Ameling's topic in Blacksmithing, General Discussion
That "prune people" book sounds like the Crescent book called The Vikings - mostly white dust jacket. I had several more sections all formed up for this one, but didn't calculate the "curves" as well as I should have. Only 4 sections would fit after I got them all dished. That also shrank the bottom circle needed by about half. So the next one will be about 2 to 2 1/2 times as wide. And the bottom will be of the same thickness of material! Projects .... all the little projects we want to do for ourselves ... but only occasionally get to tinker on! Mikey -
Viking era riveted sheet iron pot/kettle
Mike Ameling replied to Mike Ameling's topic in Blacksmithing, General Discussion
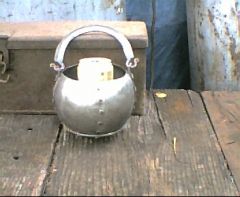
Most of the original Viking pots/kettles were larger. It sure helps when forming those rivets inside! I used 18 gauge for the main pot, but grabbed a 12 gauge slug/knock-out for the bottom instead of just cutting a new circle from the 18 gauge. It would have been better to cut it from the same material. Although, that extra weight on the bottom does kind of help keep the pot from wobbling over when set down. I've made several before (but never took pictures). I always intended to make one for my own use, but just got ... talked out of them. We'll see just how long I can resist the ... arm twisting ... with this one! Mikey -
Some Viking era flint strikers
Mike Ameling replied to Mike Ameling's topic in Metal Sculpture & Carvings
I made the pot using 18 gauge sheet. Although, when it came to that bottom piece, I grabbed a 12 gauge slug/knock-out instead of cutting a new circle from the 18 gauge. I should have just cut a new piece. But that extra weight does help keep it from wobbling over when you set it down. But doing those rivets inside such a small pot is a real pain! Now I know why most originals were around twice that size or larger! Mikey -
Some Viking era flint strikers
Mike Ameling replied to Mike Ameling's topic in Metal Sculpture & Carvings
There was a Thor's Hammer version of a flint striker that the Vikings liked. I've made a few over the years. I'll see if I can scrounge up a picture of one to post. The striking surface was across the top of the "hammer". Highly decorated ones were often worn like a necklace. I've tried several versions of drawing that central peak out and up from round or square stock, but just couldn't get much of a peak. So I start with wide stock, and then taper both ends down. The real trick is to make sure both halves are tapered and drawn out the same length and matching before you start bending up the "coiled snakes" ends. And then bend carefully. When doing a symmetrical item, slight variations in the bends show up really quickly! And if you taper that flat stock too fast, you can end up with almost a ... cold shut ... showing up on the sides of the taper. Not really lapped over on itself, but still a visible "line" following the taper. One guy several years ago asked me how I got that line to show up on the flat sides of the tapered steel. I mumbled something about a ... trade secret, or something like that. Mikey -
Viking era riveted sheet iron pot/kettle
Mike Ameling replied to Mike Ameling's topic in Blacksmithing, General Discussion
The seams gunk up and seal in use. A little cornmeal or oatmeal swirled in water inside tends to seal them up fairly quickly. Plus when you COOK in it, the food also kind of bakes into those joints. It will drip a while, but it is surprising just how fast it does seal up in use. Mikey -
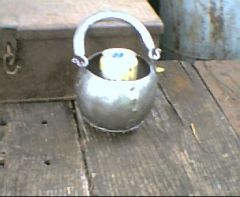
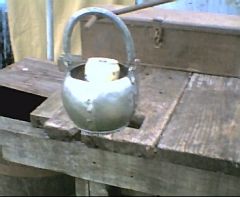
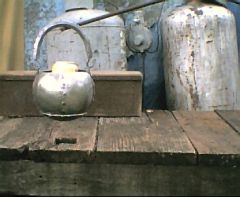
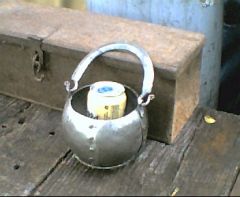
I finished this up yesterday. It is a Viking era riveted sheet iron pot or kettle. The beverage can shows you the relative size of it. Most recovered artifacts are around twice that size. (and I now know WHY - easier to hammer those rivet heads inside of it!!!!) Did I mention? Nordic Fest starts in Decorah IA this evening - thus the Viking era forge work. 30 to 40 thousand extra people in town (only 10 thousand normally). Lots of people of Scandinavian ancestry showing up to ... party. I also made up these Viking era flint strikers yesterday. Aaaah, the little ... toys ... we tinker with. Now to go help the guys with the Viking longboat find a monestary or castle to raid! (or at least plunder a bass boat or two on the river!) Mikey - that grumpy ol' German blacksmith out in the Hinterlands
-
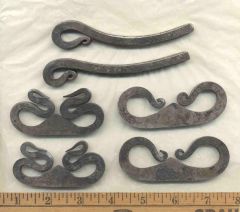
Here's another batch of flint strikers - yesterday's project. They are based upon originals from around 900 to 1000 A.D. The top two "pin" style flint strikers are based on an original found up in Newfoundland at an Innuit/Eskimo village site. The other two styles have been found in numerous burial sites like Birka. The Vikings really liked that high center "peak" in their C-shaped flint strikers. For the coiled snakes pair, I started with a piece of 1095 3/16 inch thick 3 inches long by 1 inch wide. The other C's I started with a piece of 1095 1/8 inch thick by 3 inches long and 1 inch wide. I tapered and drew out each half to 4 inches from the center for the simpler C's, and 5 inches for the coiled snakes C's. It really helps to have both halves the same length and taper before you start bending them to final shape. And here's a couple pics of a Viking style riveted sheet iron pot/kettle I finished up yesterday also. The beverage can shows you the relative size - around 4 1/2 inches deep by 5 1/2 inches wide. The fun little ... projects ... we play with. Mikey - that grumpy ol' German blacksmith out in the Hinterlands p.s. The small town near me is having their Nordic Fest starting this evening. 30 to 40 thousand extra people in town for the Fest (town of around 10,000). So I had to do some ... Viking era ... blacksmithing.
-
From the album: Historic Iron Work
Three styles of Viking era flint strikers - from around 900 to 1000 A.D. The top two "pin" style are based on an original found in an Innuit/Eskimo village up in Newfoundland. The Vikings like strikers with that pronounced peak in the center. -
From the album: Historic Iron Work
-
From the album: Historic Iron Work
-
From the album: Historic Iron Work
-

From the album: Historic Iron Work
-
From the album: Historic Iron Work
-
Viking era/style riveted sheet iron pot/kettle
Mike Ameling posted a gallery image in Members Gallery
From the album: Historic Iron Work
A small Viking era riveted sheet iron pot or kettle. -
Many years ago I picked up a 200# Trenton that had been through a barn fire. The fire had been left to just burn out. The anvil face was soft, and had little dings in it from a little use after it survived the fire. I was not set up to heat treat it again, so I let a guy talk me out of it. It still had the ... mass ... beneath the surface for working, but that soft top steel plate was just too prone to little dings from the hammer or when the iron I was working on got too cool. Mikey
-
On any large project, materials costs and changes can make or break a project for you. A year and a half ago when steel prices were going nuts, one project that Jay submitted a proposal/bid on got caught by those rising prices of steel. Between Jay submitting the proposal/bid to the client and them accepting it 3 months later, the cost of the steel for the project went up $800! That quickly eats up a lot of any ... profit. Luckily it did not cost Jay anything other than a bunch of his time. It could easily have ended up costing him out-of-pocket money and his time to make that project for them - since he did not have an ending date on his proposal/bid. A friend who teaches at the one high school tried to get some bids on steel for the school shop around the same time. All the suppliers would only give him a bid that was good for one or two days! So, if possible, build in a clause on any proposal/bid to allow adjustments for rising materials costs. The larger the project, the more it can affect your return on your labor. Once you see that in action, you then can understand why so many building and government projects are bid as Costs + Profit. Mikey - working on following my uncle's business practices --- a not for profit business, although it did not start out that way!