Mike Ameling
Members
-
Joined
-
Last visited
Everything posted by Mike Ameling
-
Sonn's book is pretty expensive. Check for it through Inter-Library-Loan. Also check out Plummer's book Colonial Wrought Iron. Or Neumann's Early American Antique Country Furnishings or Collector's Illustrated Encyclopedia of the American Revolution. The big problem with these books is the later time period. A lot of stuff did carry forward, but a lot also didn't. The simplest advice would be to look at a good book of 16th century iron work, and then think ... simpler or plainer. The fancy stuff survived and ended up in collections, museums, and books. The common stuff was just too ... common. 1500's is pretty early for "eating" forks, and those would be 2-tined. Basic table utinsels would be a knife and a spoon. Dutch Oven or Bake Kettle. Tricky terms. First, forget those cast iron "dutch ovens". Those only started to come into use about the time of the Civil War - mid 1800's. But mostly late 1800's on into the 1900's. The early version of this was the French Tourtiere. The "bake kettle" was basically a large pot with a lid. But the ... term ... changed a lot in its definition, just like the "dutch oven" term. Hanging skillet - picture a round sheet iron pan with a fixed bale Peel (hearth shovel) - two different things - a peel is a cooking spatula while a heath shovel is just that - a shovel Trivets - generally would be tall for cooking over coals Hanging S hooks - a wide variety of possibilities Spider (skillet on legs) - sheet iron pan with long legs - for cooking over a fire - can be either flat bottomed or rounded Bake kettle or Dutch oven - see above and search for a Tourtiere This should give you a start. Mikey
-
A few people use those floating water tank heaters for their quench tanks. They are designed to keep a water tank open for animals to drink. My folks use one to keep a bird-bath open over the winter. If my shop was in a slightly different place, I would have the spring piped in and through the quench tub to keep it all open. I will keep my oak barrel quench tub full with an old 2x4 stuck in it until the ice gets to be more than a thin 1 inch layer. The 2x4 helps keep the ice from punching out the sides/bottom - at least for a while. Over the years, I've had ice punch out the bottom of two tubs. Plywood to wall in my shop? My tools wouldn't know how to react! They are just happy not to have snow PILED on top of them! Mikey
-
When it is -20 degrees outside (Farenheit, not that euro-trash celsius), I wear insulated coveralls and pack boots. I pour out my quench pot and refill each time. And I place a heated bar on top of the anvil face before I start. My "shop" is a couple tin roofing sheets and plastic tarps hanging down the sides to within 3 feet of the ground. And just a ground floor. Yeah, it is also ... breezy. Simple shop. Simple steps. And life goes on. Mikey - that grumpy ol' German blacksmith out in the Hinterlands
-
Tiss something I have contemplated. Along the likes of a ... Sketchbook ... in style, with styles/shapes by time periods and cultures. Even some "tips" on making each style. But it also is a pretty small ... marketplace. There are not that may people interested in such a book. I had to work hard to find the couple books already written. And they are basically "collector's" type books. It's hard to justify the work writing/publishing to be able to sell only a couple dozen books. Self-publishing helps, but the demand just isn't there. I would love to buy such a book. But writing/publishing one just isn't justified right now. Plus my drawing skills are lacking ... Mikey
-
-
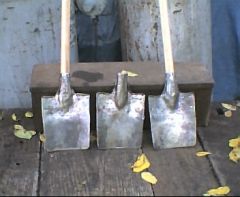 3 small 18th century shovels
-
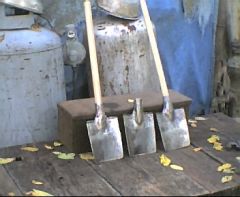 3 small 18th century shovels
-
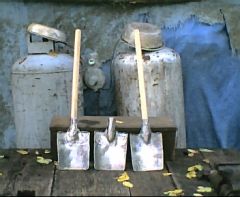 3 small 18th century shovels
-
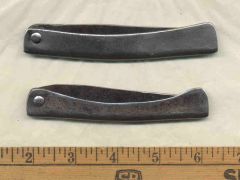 2 la Belle style iron handled clasp knives
-
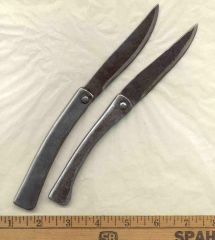 2 la Belle style iron handled clasp knives
-
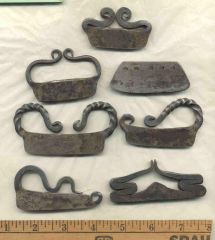 Roman/French/British/Dutch/Tibetan strikers
-
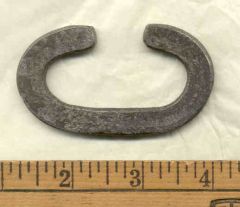 Welsh/British 1590 flint striker
-
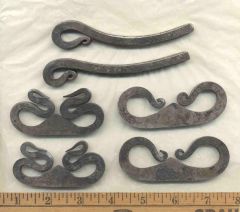
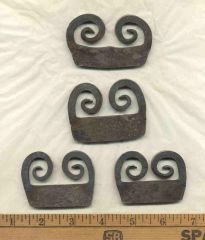 Irish and Burgundian flint strikers
-
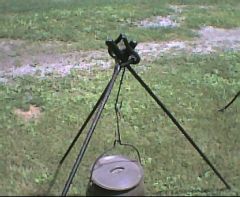
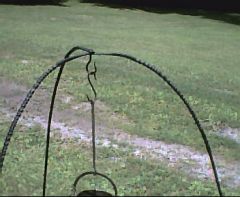 The top of the Viking era campfire tripod
-
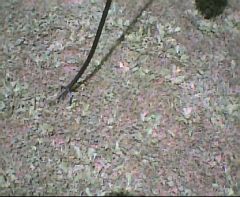 The claw feet on the Viking era campfire tripod
-
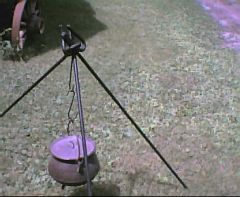
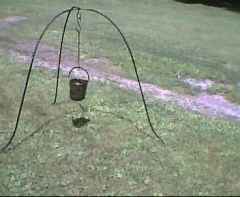 Viking era campfire tripod
-
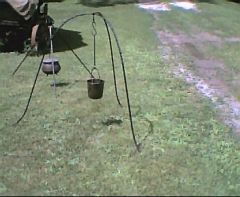 Campfire tripod variations - Viking and Chuckwagon
-
 Chuckwagon Campfire Irons set up as a tripod
-
 Chuckwagon Camprife Irons set up as a tripod
-
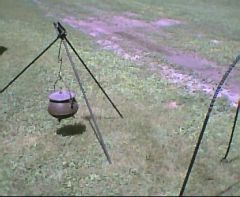 Chuckwagon Campfire irons set up as a tripod
-
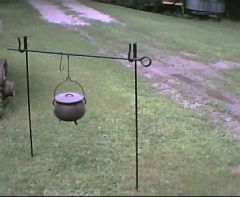 Chuckwagon Campfire Irons
-
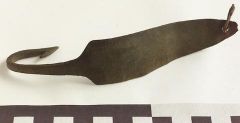 Viking fish lure/hook - 10th Century
-
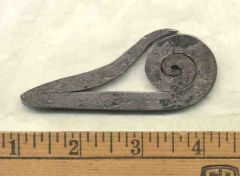 Scottish flint striker - 18th Century
-
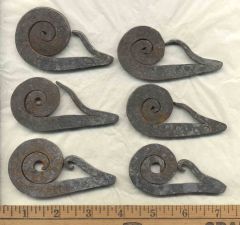 Scottish style flint strikers
-
 Viking era flint strikers
-
-
The old time farm blacksmith near me would always make ... hitch pins ... when he had spare time. 3/4 round stock, slight tapered point, and an eye loop. He had a bin he tossed them into. When things were slow, he filled that bin. And then they were always ready to buy when a farmer came in for a repair or blade sharpening. It kept him busy during those "slow times", and gave him a constant small income. By the end of summer/fall, the bin was pretty empty. Mikey
-
Plus a pedal grindstone is a SLOW grinding stone. Stones from modern companies are generally made for much higher speeds. The classic pedal grindstone is a soft "sandstone". Around here in NE Iowa, they show up pretty regularly at flea markets and in antique stores. 20 inch wheels or larger are pretty common. And you can often get them with metal or wood frameworks to hold them and sit on while sharpening a scythe or axe. So check out the local antique stores and flea markets. There is not a lot of demand for them - other than with the full stand. The simple stones should be pretty affordable. Mikey
-
Check out the Guild of Metalsmiths. A web search should lead you to their web site. They are a fairly large blacksmithing group kind of centered around the Twin Cities. They hold regular meetings and hammer-ins. Many have shops in or near the Twin Cities. So get in touch with them. They will be a great place to start. Mikey
-
Here is a picture (scan) of some Irish flint strikers I made this week. The bottom 3 are the Irish ones, the top one is a Burgundian flitn striker. Note the similarities. That Burgundian one has that little "peak" in the center, while the Irish ones are flat inside. The Burgundian ones date from the 1400's on up into the 1600's. They also show up in lots of family Crests. The Irish ones are based on originals in a British museum book. They date them to the 18th century - 1700's. The influence came from their dealings with France. And here are some more flint strikers to offer more inspiration. The bottom two are Roman era strikers - 1st to 3rd century. These were never North American shapes/styles of strikers. The next two above are based on a French painting dated 1566. They are the Nose and Ear of a fire creature in the painting. The top right flat one is made to be sewn into a leather pouch along its bottom. The main influence for them is China and Tibet, but there were a few Medieval ones in Europe - probably from trade with the far East. They were never really found in North America until modern times. The top left and very top strikers are 1700's trade styles of British/Dutch/French/Italian origin (they all "borrowed" ideas from each other). Just a few more flint striker styles/shapes to help inspire your own work. But don't get discouraged. Just keep in mind this one British/Welsh striker dated 1590. Just a simple basic striker. (and surprisingly hard to get to turn out looking right) Have fun tinkering, and ... feeding ... this blacksmithing addiction! Mikey - that grumpy ol' German blacksmith out in the Hinterlands
-
That "flint" on those magnesium bar fire starters is a rod made up of Ferro-Cerrium. That is the same material used under the wheel of a BIC lighter. All you have to do with that rod is ... scrape ... it with a hard/sharp edge, and you will get tons of hot sparks! So a traditional flint striker doesn't have much to do with them. One of the best "scrapers" to use with those ferro-cerrium rods is to just snap off a chunk from a small hacksaw blade. That sharp edge will give you tons of sparks with those fire starting rods. A traditional flint striker is different. You need a sharp edge on a flint like rock to chip/dig out little bits of that hardened tool steel. Chipping/digging out those little bits of hardened tool steel heats them up enough that the carbon in them burns. That's the sparks you see. There are a number of original flint strikers in the one British museum book that have the ends tapered and curled like yours. They are dated from the late 1700's to early 1800's. And when you start to look at a bunch of originals, you do start to notice how they may look symmetrical, but are just a little ... off. The tapers can vary a bit. The length drawn out can also vary. And curves sometimes just don't match that well from one side to the other. Just some of those normal blacksmithing processes. Riveted sheet iron pots. There is no "sealer" added to the joints. They seal up naturally from food being cooked. It gets into that seam and plugs it. I start it out by filling it with water and swirling in some corn meal, oatmeal, or flour. As the water seeps through the joints, it draws that meal in with it. And that starts sealing the joints. It also starts some "rust" in those joints. As you cook in it, that adds more to the sealing of the joints. I'll see if I can post some pics of some Irish flint strikers I just finished. Mikey - that grumpy ol' German blacksmith out in the Hinterlands
-
I've thought about forging up a swage block from thick enough iron so it could lay flush on my anvil, but just haven't taken the time. Especially when a shallow hollow in the end grain of a block of Oak works so well. Yes, it does slowly char deeper in use, but a replacement is quick/easy to make. So the time to make an iron one just hasn't been a priority. Mikey
-
The people restoring old farm machinery and tractors love Fastenal for their square-headed bolts. The hex-head ones just don't ... look right ... on old farm machinery. Mikey
-
I would be a little less concerned about making some version of a horn on your "anvils". With a little practice, you can do the same bends using a small BICK, bending forks, or just over the edge of your anvil. Personally I seldom use the horn on my anvil. It is nice to have, but I just tend to use other things instead. A hardy hole. Most any hardy can also be used in your vice. Just clamp it in tight. Of make a modified base for a hardy - in the form of a U shaped plate that sets down over your "anvil". Make sure that it is of thick enough stock, and that the side parts stick down far enough to support any twisting. You could also weld on a couple thick chunks of iron onto that plate to form a deep enough "hole" to slip your hardy into. Just some options to get around drilling/grinding/filing/swaging out a square hardy hole in thick steel. If you look around at a scrap yard or farm implement store for a tractor drawbar, you will be surprised at how well it can work as a small/light anvil. And they already have several round holes through them. And a bulldozer drawbar is even bigger/thicker! Just some thoughts to ponder. Mikey - that grumpy ol' German blacksmith out in the Hinterlands
-
I would be a little less concerned about making some version of a horn on your "anvils". With a little practice, you can do the same bends using a small BICK, bending forks, or just over the edge of your anvil. Personally I seldom use the horn on my anvil. It is nice to have, but I just tend to use other things instead. A hardy hole. Most any hardy can also be used in your vice. Just clamp it in tight. Of make a modified base for a hardy - in the form of a U shaped plate that sets down over your "anvil". Make sure that it is of thick enough stock, and that the side parts stick down far enough to support any twisting. You could also weld on a couple thick chunks of iron onto that plate to form a "hole" to slip your hardy into. Just some options to get around drilling/grinding/filing/swaging out a square hardy hole in thick steel. If you look around at a scrap yard or farm implement store for a tractor drawbar, you will be surprised at how well it can work as a small/light anvil. And they already have several round holes through them. Just some thoughts to ponder. Mikey - that grumpy ol' German blacksmith out in the Hinterlands
-
That long term storage should not hurt it. Only if other stuff got in/on it to contaminate it. Heating anthracite coal does vary a lot. One other thing with some varieties is the oil that bubbles out of it. That does help bond it together, but does leave some oily residue on your work. And more clinkers. You can use it for forging. The heat will be different and a little less. But that can be adjusted for. It also can be mixed in to help extend your good coal supply. It all depends upon the work you are doing. And you could always re-sell it to some of the fancy landscapers. Some have started using stoker coal instead of gravel for landscaping around plants. They love that black shiny look! Mikey
-
Yes, bees and wasps are a constant problem. I always cover any drink when in the shop - those little "sweat bees" love to fly in for the sweet juice. I also thought about that cooking/veg oil down the holes in the ground. But that would just encourage the possums and raccoons to dig up the lawn! Yes, they do like to swarm out when the lawn mower "disturbs" them. The little burns from popping/flying hot scale are bad enough, but I hate bee/wasp stings. I ain't allergic like many people, but it does affect your working for a bit. I usually don't have much problem, but ... Those mudd dauber wasps are mostly an pain. They want to plug up any hole they can find building their nests. Every time I want to change a drill bit, I have to clean out the hole for the key for the chuck! Minor little things .... Mikey
-
And here I was worried I wasn't being clear enough in describing those wrapped legs. But that "girder" or "cage" look can also be created by tacking straight/curved/curled/twisted rods between each of the three legs. It doesn't have to wrap around the three bars. One other ... expansion ... on that would be to make that wrapping round rod look like a vine climbing up the legs. A few forged leaves carefully placed and tacked on will greatly add to the look for very little extra effort. And then you can go ... wild ... with those vines/leaves/flowers - and even put some "creatures" in the cage work. Flat cut-outs of birds/fishes would work well in the curved triangle along each side. 3-D examples would work well inside the "cage". And you can then get as ... expressive ... as you wish. Mikey
-
I've always had various wasps hanging around what can only be charitably called "my shop". Usually no problem. They stay out of my way and I leave them alone. And the "mud daubers" are usually just a nuisance. They build their nest in the holes used by the drill chuck key, in holes drilled in bars, A nuisance, but livable. But today I had to pull my drill press apart. They had gotten inside, and filled up the gears and slot to raise/lower the drill chuck! Two or three weeks of not using it was enough time for them to mess up the inside of my drill press! Plus add in a little "moisture" from their work creating some rust .... aaaaaaaarrrrgggghhhhh! So everything is cleaned out, put back together, and ... well oiled! Wasps. If they don't sting you, they find other ways to get you. Now to go try to ... discourage ... the couple ground nesting wasps/bees that have taken up residence in the lawn. They get a bit ... disturbed ... when you run the lawn mower over them! And they only moved in 2 weeks ago. Mikey - that grumpy ol' German blacksmith out in the Hinterlands
-
Yes, modifying existing "tongs" once you have them is just a matter of ... thinking past what you see. And sometimes it's just as simple as tack welding on a couple pieces to form what shapes are needed. I have a friend that cast pewter medalions. He forms his two-piece molds from brass - hollowing out both halves to create the total form, and then drills/files in a sprue hole to fill them through. His big problem was making of getting "tongs" to hold the two halves together when he cast his pewter. He solved his problem by picking up a bunch of cheap/junker pliers. He then brazed the brass mold halves to the jaws. And there is enough strength in the joint to get the mold parts to match up well each time. The ... toys ... we play with. Mikey
-
Getting the legs to look proportional to the door will be the tricky part. Supporting the total weight will be less so. One possibility would be "cage" type legs. Forge up three bars of 1/2 square to match the corners - one straight up, and the other two curved/flared out at the top. Weld or rivet them to a foot plate and a mounting plate on top (possibly an L shape from flat stock.) That will cover supporting the weight. And scrolling the two ends on top that support the sides would add an extra "forged" touch. Then, for extra "mass" in the look, take some 1/4 round and spiral wrap it up around those three bars of the leg. Tack weld it to those three legs in several places to hold it all together. This gives you the support, and some "forged" parts, and makes a good combination of elements between straight, curved, scrolled, and spiraled. And if you deliberately make each slightly different, then you won't have to worry about matching them close enough on all the bends. Plus that "cage" work created with the spiraled round rod will give the impression of more ... mass ... to help the proportions to the overall size of the door/table. Just a thought to share ... Mikey - that grumpy ol' German blacksmith out in the Hinterlands
-
The big ... advantage ... to them is that the pivot joint is already formed and trued up. And they usually have enough metal past the rivet to make a number of common tong configurations. A friend likes them because he can get the ends formed tight enough to be able to pick a dime up off of his anvil. My big problem with them is their total weight. For most of my work I need and like thin/light tongs. Tongs just seem to be one of those things that some blacksmiths HATE to make. (I'm one of them!) And some have no problems making them, and have many specialty variations. But modifying something else to work as the tongs I really need just seems less ... foreboding. Actually, the last pair of "tongs" I made were for a Colonial era Rush Lamp - with a candle socket on the end of one of the reins. The one rein stuck straight down into a wood block base, and the other end with the candle socket was bent up 180 degrees. In use, you would clamp a rush soaked in grease in the jaws to burn for light. Or use a candle in that other handle end. But this one we used on the one table in the display room to hold business cards - one clamped in the jaws and several curled into that candle socket. It finally got bought to be used once again as a table light. The couple had a candle in the socket, and also burned those long pencil-thin waxed wicks in the jaws. (those wicks dipped extra times in wax and used for lighting other candles) Mikey
-
The basic fact is that it now is YOUR tool, so modify it as you need for the task you want to use it for. Most people make a drift from solid bar stock for forming/working the eye hole on hawks. But nothing would stop you from modifying this to work the same. Plus it already has a handle hole to help hang onto it. The big question is if it has enough metal/mass where you need it. Some people have a hard time ... modifying ... an existing tool for a new purpose. They tend to see that tool in its original shape instead of what it could become. It's something of a modern "hardware store" mentality - where you don't change/adapt a tool, but just go to the store to get a new one for that new purpose. When it is YOUR tool, you can do anything you want with it. The hard part is seeing past the initial shape/purpose, and on to what it can become. Just my humble rambling thoughts to share. Take them as such. Mikey - that grumpy ol' German blacksmith out in the Hinterlands
-
A little ... sway ... is generally put into an anvil by the original maker. It is there for a purpose. The main group of people who WANT a perfectly flat anvil tend to be knife makers. Much more important is how beat up is the surface? Lots of dings/dents? How chipped up are the edges? Some of the edges/corners you will want to round (radius) over anyway. Sharp corners are nice, but rounded corners work better for most work. So if some edges are chipped a little, consider grinding/sanding them rounded - possible to different radius's. Dings/dents on the surface get reflected in the underside of anything you work on that section. Light dings/dents can be smoothed out with an angle grinder/sander or belt sander. Big/deep dents/dings tend to need to be welded up then ground/sanded flush and smooth. So be more concerned about the overall surface than a little sway. And milling the whole surface always seems like the ... quick fix. But you would be far ahead to have the surfaced properly welded up with the correct hard welding rod, and then ground flat/smooth - with a slight sway in it (unless you are a knife maker and want that perfectly flat face). Mikey
-
A bunch of years ago a friend got some true wrought iron from a slightly unusual source. He did some salvage at an old pickle factory - specifically the big wooden mixing/aging vats. They had large wrought iron bands holding them together - 1 1/2 inch thick round bars! I got a couple feet from him in a trade. Great stuff, but one drawback. Any time you heat a chunk up in the forge, the whole shop then smells like DILL PICKLES! Last time I heard, he was talking about doing some salvage on a huge wharehouse up on the Great Lakes. All the rods holding the walls and beams together were wrought iron - starting at 2 inch diameter rods! He mentioned there would be several tons! And NO, it was not just going to the scrap yard! One guy I knew used to pick up scrap out west at various old mining sights. They were old enough that a lot of the iron was real wrought iron. But forget about most of those old fences. So many of them were made from cast iron. Mikey
-
Well, there are a number of places that sell damascus bars and knife blanks. That might be a place to start. Making the original damascus billet tends to be the hard part. The rest is more skill in forming a knife blade and making a handle. Crazy Crow Trading Company offers some damascus knife blanks. And if you go to some of the knife maker supply sites, they offer lots more options to help get you started. So don't discount that damascus knife idea just yet. Mikey