Mike Ameling
-
Posts
473 -
Joined
-
Last visited
Content Type
Profiles
Forums
Articles
Gallery
Downloads
Events
Everything posted by Mike Ameling
-

From the album: Anvils and tools
Large stump anvil 125# - 24 inches high by 36 inches wide -
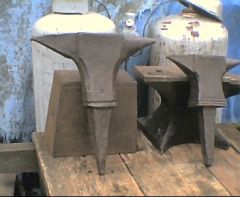
From the album: Anvils and tools
Two old stump anvils - 65# and 45# -
I know what it's like to start a ... theme ... in a bathroom. For one couple, Jay and I went and did a series of Grapevine items. It started with a frame for the mirror and medicine cabinet. Then towel bars and robe hooks/hangers. And then they wanted a free-standing TP holder to fit into the same style/theme. Well, we got a bit carried away with that holder. We used 1/2 round, textured it, did a spiral base, and then curved it all up and over on top. Then we added smaller "tendrils" down to hold the TP wood dowel (wedge fit or modern spring loaded plastic), with a large grape leave draped over the top of the roll, and several more leaves and tendrils up and off of the sides. Yeah, we got carried away and exceeded the original quote. But when the couple saw it, Jay explained our "error", and how we could make another to the original quote but this particular one would run a little higher. She loved it and would not leave without it. And that greatly relieved Jay - who's wife had seen it and really really wanted it for their bathroom! But she did start to roll her eyes when Jay and her husband started to talk about bending this leaf up and out a bit to hold a beverage container, and that leaf up/out a bit to hold a cell phone, and slightly tweaking that top leaf to hold a magazine. SHE stopped any further discussion of HER tp holder! So starting a ... theme ... can be good. But it also has its hazards. Sorry, I don't have any pics, but Jay does -- somewhere. Just another of those many projects he never got pictures of posted on his web site. At least the last time I heard or looked. Big River Companies So it goes. Mikey - that grumpy ol' German blacksmith out in the Hinterlands
-
If you are going to attach it to the wall, then look at some of the old Shutter Dogs in the books. You slide the door past, and then swing the "dog" down to hold it in place. The only real problem is having to physically spin that "dog" back out of the way to close the door. Making one end slightly heavier would keep it hanging straight up/down. But then the door's weight would hold it in place when turned horizontal - if not TOO heavy. The hardware stores do have those spring C catches for screen doors. When placed right, a simple push will click/hold it open. Yet a simple pull will also then release it. Sorry. I don't have any pics scanned in on these ... infernal machines. Just a few humble thoughts to share. Take them as such. Mikey - that grumpy ol' German blacksmith out in the Hinterlands
-
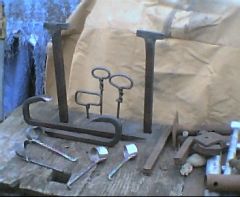
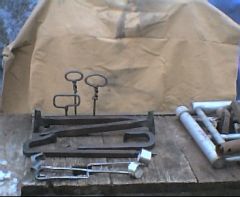
Here's a couple pics of the Cooper's Tools I made a couple weeks ago. Cooper's Tools - used to make wood barrels. I made them for a friend to use up at Grand Portage National Monument in Northern Minnesota. The T shaped stakes are Rivet Set stump anvils - for setting the rivets in the iron bands (if using iron on the barrels). The large "hooks" get driven into a stump and you "hook" the barrel stave you are carving on under the flared end, then press down on the other end with your body and carve the future barrel stave with a drawknife. The D looped pieces are the Heading Vice. The ends are forged/filed into a wood screw. You screw that end into the head of your barrel to pull it up into place. Where you screw it in eventually is where you drill the tap hole for the spigot. The other pieces are scorps or in-shaves. You use them to scrape and smooth the inside of your future barrel. I initially made a pair of scorps using some stainless pipe I had. But I couldn't get it to heat-treat and hold an edge like I wanted it to. They worked OK for simple scraping, just not for shaving the wood. So I forged up some 1080 for another pair. I did not put wood handles on them. Karl will do that to fit his preferences. Ah, the little projects we ... play .... with. Mikey - that grumpy ol' German blacksmith out in the Hinterlands p.s. But it did kind of remind me of those Viking era wood working tools I forged up years ago for one of those Living History people. He just needed the blades, shaves, and spoon drill bits. He was going to do all the wood handles himself. Never did see and pics of the finished tools.
-
-
-
John Seymour's book The Forgotten Crafts isbn 394-53956-7 shows an early picture of a clog sole maker using a stock knife on a simple 4-legged workbench. It also shows drawings of a Stock Knife and a Gripping Knife. I would also start with a large truck leaf spring. The "handle" will take a lot of drawing out, but that is what those "dumb assistant's" are for. The advantage of drawing out that long handle from the spring steel is to have the strength and flex of it, without too much extra bulk. Something of a trade-off there. I've made a number of cooper's tools over the years, but no stock knife yet. The last batch of tools included two cooper's block hooks, a couple heading vices, and some inside scorps. I could have used Jay's big air hammer on those cooper's block hooks. Tapering one end and flaring out the other end of 3/4 square tool steel takes a lot of ... muscle. My little 25# Little Giant barely dented it. I ended up using the short-handled 6 pound sledge to do the major metal movement. (Used an axle from a farm disc, so probably was 1080.) Good luck with your project. Can't wait for the pics! Mikey
-
Need tricks/tips for making bowls/spoons
Mike Ameling replied to Cool Hand's topic in Blacksmithing, General Discussion
When you choose your wood block, try to get a chunk of oak. It tends to last longer than things like pine. Plus end grain also works better and lasts longer. Although, you can get some interesting textures from pine or oak when hammering hot iron into its side. The different layers of wood growth tend to "char" at different rates - leading to different levels in the final iron piece you hammer into it. It is a subtle difference, but still there. Mikey - that grumpy ol' German blacksmith out in the Hinterlands -
Nice look and detail on the cross. Roger Cook up in northern Minnesota always forges crosses like this from Wrought Iron if he can. He then works it a little "cold" when he is finishing them up. That "colder" work then has the wrought iron splitting/separating a little. This helps give some of that "wood grain" texture. Mikey - that grumpy ol' German blacksmith out in the Hinterlands
-
The spark test is a better way to go. First grind a piece of regular modern mild steel - for a comparison. You should see medium length streamers, with some "twinkling" sparks - and fairly white-ish. Then grind the possible wrought iron. The streamers should be a lot redder and fly out longer. And there should be almost no or none of those twinkling sparks that fly out only a little ways before the twinkle out. The twinkling sparks are the carbon in the metal burning. Wrought iron would have very little of it. If the metal bar has been aged/rusted a bunch, you can then start to see some of that fibrous structure - like wood grain. Mikey
-
My first thought would have been decorative leather work. With a lot of use, the other end would get that "hammered" look from all the stamping done. The next thought was decorative TIN work. Stamping designs into sheets of tin. Most people think about the decorative punch-through or chisel-through work on tin, but lots was also done by just tapping in a design using stamps. Mikey
-
Show me your use of waste
Mike Ameling replied to Archie Zietman's topic in Blacksmithing, General Discussion
The sheet iron I start with for my sheet iron pipes is the rectangular cut-outs/drops from making steel household doors. The piece is cut out to form the hole for the Mail Slot. So I salvaged a bunch of the drops. After sanding/grinding the paint off of them, it's good sheet iron for cold forging. I also use a lot of push lawn mower blades. They are generally made from either 1084 or 5160. They make up into good flint strikers, knife blades, and draw knives or scorps for wood working. I also use a lot of "agricultural" steel. So much of it is made from 1080 carbon steel. Like plow shares, cultivator points, disc blades, mower knives, hayrake teeth, etc. How to use the stuff is limited only by your imagination. Mikey - that grumpy ol' German blacksmith out in the Hinterlands -
Latest batch of sheet iron pipes
Mike Ameling replied to Mike Ameling's topic in Cold Worked Iron and Steel
Well, they were made for trade to the Indians here in North America. So they would have originally been made over in Europe somewhere. The ones that were found down in the Tunica Indian village sites on the Gulf Coast were associated with a French colony and traders. Those found up at the Seneca Indian sites were trading with both France and the Dutch out of their colony of New Amsterdam on Manhattan Island - before the British conquered it and renamed it New York. Around the Great Lakes was mostly French trade goods - even after the British won the 7-Years war and took over Canada from France. They still use French trade goods, or made their own based upon French goods. So the Dutch/French/Flanders areas are the most likely original source of them as "trade goods". Now, I keep hearing stories about them also being "sailor's" pipes. Don't have any specific documentation, but I hear it often. Early 1600's on up into the early 1800's is a long time for them to be traded here in North America. Yet they never were as popular or wide-spread as the various clay pipes. Another little ... detail ... lost to history. Mikey -
The foot print of my "shop" (a very charitable description) is 15 x 18 feet. Of that I only really use an area about 9x10 for forging. The rest is mostly "storage". But my "shop" is just 6 sheets of old roofing tin nailed to some scrap 2x4's held up by a couple posts setting on the ground, and with plastic tarps coming down the sides mostly to the ground. It keeps the rain off, and the snow out - mostly. But I've also got less than a hundred bucks in it. I don't know what I'd do in a REAL shop? 24x18 for 1400 or 24x24 for 1800? The best advice I could give is to scratch up that extra 200 each and go with the bigger building. In the end you will be far happier with the extra room. The "hard part" of a shop building is keeping the ... storage ... usage under control. Stuff just accumulates. And the creeping loss of usable floor space is hard to notice/realize. Steel materials storage above in the rafters is nice, but requires more planning. As in the extra STRENGTH of the roof system to handle the added weight. And the problems with access to it - first to haul it in and get it up there, and then to get pieces back down to use. Plan for a "short stock" storage area right away - for those cut-offs, odd lengths, and scraps. It is very hard to throw them away for most normal blacksmiths. But you also don't need them under your feet while working. So I would echo what others have said. Build as big as you can for the money you have on hand - and bigger if possible to arrange. Available "space" gets et up faster than common bar stock. Just a few humble thoughts to share. Take them as such. Mikey - that grumpy ol' German blacksmith out in the Hinterlands p.s. If you can, think about where/how an addition to your shop might be built right now before you start the main shop. A good spot for the main shop might be better shifted a few feet to one side when it comes time to put an addition on - such as a lean-to along one side. p.p.s. Also look into what it might cost to extend the roof/rafters out a couple feet to the sides. Extending them out 4 to 6 feet gives you a lot of "outside" storage. Like, for example, a wall-mounted steel storage rack under roof, and with a plastic drop tarp to protect it from the weather.
-
Latest batch of sheet iron pipes
Mike Ameling replied to Mike Ameling's topic in Cold Worked Iron and Steel
I've never looked at golf clubs - either new or old. So I would not know how they were originally made. I see "golf" as a 4-letter word. Know why they called it "golf"? Because all the GOOD 4-letter words were already taken! Mikey -
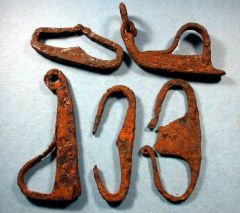
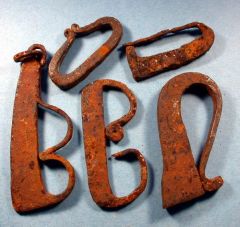
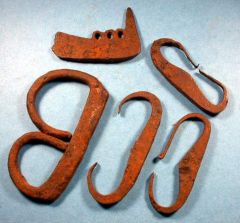
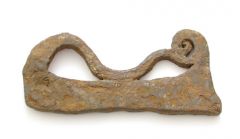
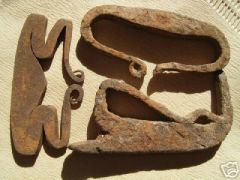
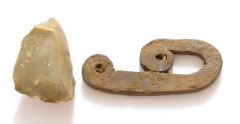
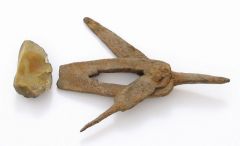
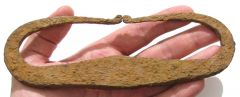
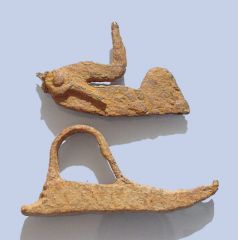
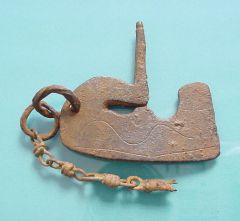
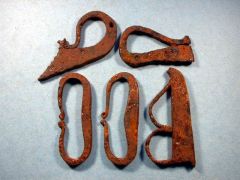
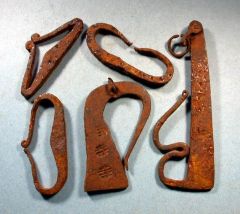
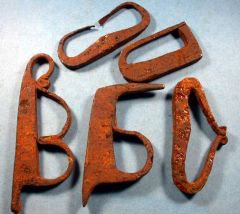
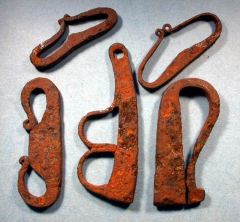
I posted a bunch of pics in my Gallery in the Album called Roman Flint Strikers. All but one pic are of originals. I only had a few reproductions on hand at this time. I need to make more. These are the "sled" style - because they resemble the profile of a dog sled. But these also are now being sold as original Colonial American era "musket" or "flintlock" combination tools/strikers. They claim that the tail is a screw driver, and the prow point was a vent pick. These C shaped strikers show some of the variety. Form barely over and inch long to 4 inches in length. From 1/16 inch thick to over 1/4 inch thick. And the treatment of the ends varies also - from both ends left fairly straight to both ends having extra little curls on them. But most tend to have some sort of "peak" in the middle, and are made fairly symmetrical. The Ovals vary quite a bit as well. The center opening on some is barely more than a slit, while other are open enough to stick your fingers through to hold them. And the thicknesses vary just like the C's. Decorations can be very simple/plain, or they may have chiseled in decorations. The one P style I thought had been made from a file when I saw the cross hatching marks on it. But once cleaned up a bit more, those markings are only on one half of each side. Clearly just decoration. The one squared up oval striker has half-moon decorations chiseled/stamped into it. And you can also see some of the ... wear pattern ... on the striking surface of some of those originals. They were used a LOT to wear in that "step" in the striking surface. You can see how some of the C shaped strikers could easily be passed off as original Colonial American flint strikers. The shapes have not changed very much over all the centuries. But some of the "details" tend to point towards those early Roman times: the "peak" in the middle, and the symmetrical treatment of the ends - either each end left straight/pointed or each end with an extra little curl. I really like the "coiled snakes" style - each end is drawn/tapered out and then folded back/forth on itself until the ends finally meet at the top. It's actually fairly hard to get them to come out even! You have to measure out from the center, and then make each bend the same on both sides - starting with both ends tapered out the same way and distance. I've tested a bunch of mine out as flint strikers. They still work, and work well! I usually carry one of the P style or the dog sled style with single loop and prow point. I like the feel of carrying and using such an old tool to start my humble campfires. So check out the pics in my Album in my Gallery. Lots of ... inspiration ... in there. Mikey - that grumpy ol' German blacksmith out in the Hinterlands p.s. That chain on the one P style was made out of full WELDED rings bent in half and then hooked through each other to for the chain - with the last one connected to the striker with a simple jump ring. Yeah, those tiny rings were WELDED!
-
-
-
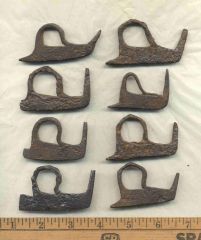
From the album: Roman era Flint Strikers
-
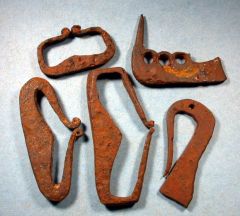
From the album: Roman era Flint Strikers
-
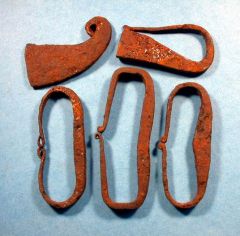
From the album: Roman era Flint Strikers
-
From the album: Roman era Flint Strikers
-
From the album: Roman era Flint Strikers
-
From the album: Roman era Flint Strikers
-
From the album: Roman era Flint Strikers