
Mike Ameling
-
Posts
473 -
Joined
-
Last visited
Content Type
Profiles
Forums
Articles
Gallery
Downloads
Events
Everything posted by Mike Ameling
-
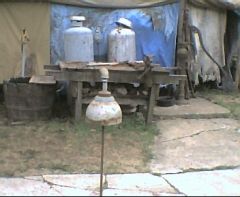 A garden bell/gong made from the top of a CO2 cylinder, and supported on a 5/6 hex rod sticking up through the 1" pipe threaded into the top. Good clear tone!
 -

A different kind o' dinner bell
Mike Ameling replied to chyancarrek's topic in Blacksmithing, General Discussion
Simple enough to do, Frosty. You already have that threaded top where the valves were. Just put your threaded pipe or rod up into it. Now, you would probably get better volume if it was a little more ... free standing. So a rubber "bushing" slipped onto the support rod, and then the tank slipped down onto that "bushing" to support it. I'll have to test out that one section I have tomorrow - to see how the pipe threads in from the inside, and then how it sounds. I might have to chase some threads a little farther into the thank. We shall see. Hmmm ... interesting concept. Garden "mushroom" gongs! Mikey - that grumpy ol' German blacksmith out in the Hinterlands -
Shop Talk. I have a delema. Kinda long
Mike Ameling replied to Fe-Wood's topic in Blacksmithing, General Discussion
Too many people overlook an old vehicle as a potential power unit. It already has all the framework, motor mounts, clutch/tranny, wiring, and fuel tank. You can run directly off of the universal joint where the drive shaft attaches. Or you can work your equipment off of each hub of the drive train. And if the rpm's are too high, just add in an additional gear box after the existing one. That can really reduce the final rpm's. Plus the engine already has a 12 volt alternator on it. Use it as-is to charge the battery and run some lights/radio, or carefully "tweak" the output up as needed. You can even add an additional alternator if needed. With one of those auto parts store Inverters, you can get normal 110 power right from it. With one hub running your generator, and the other running your compressor, (with appropriate switches and clutches) you would have your shop "power". And a 110 inverter running off of the battery would give you normal lights/radio/drill/bench grinder power. Some of the smaller car engines actually run pretty economically. And they could be tweaked to run on home-produced fuel. Possibilities ... Mikey - that grumpy ol' German blacksmith out in the Hinterlands -
A different kind o' dinner bell
Mike Ameling replied to chyancarrek's topic in Blacksmithing, General Discussion
For the big garden gongs, Jay would leave them as long as he could. They had a deep resonating tone. But Jay also made some smaller ones from large hand-held fire extinguisher bottles. If you cut the bottoms off, you can work a hanger from the threaded top. If you cut the top off, you need to weld on a chain loop on the bottom to hang them. They give a surprisingly good tone when tapped with a wood handle. I still have one top cut off of a 100# lp cylinder - cut off just where the rounded top meets the straight sides. With a short length of pipe in it, you still get a clear tone - but higher pitched. And it also works pretty good as a floor stand as well - all that weight of just the tank top. With a plate welded onto the bottom and filled with sand, it would be a pretty solid stand - probably at least 50#'s worth. But that full length LP tank had the "tone" of those old temple bells/gongs from Japanese shrines. Add in a little "artistic" design for a holder, and it made a great centerpiece for a garden. I don't remember if Jay had any pictures of it on his web site. He might ... Big River Companies Mikey - that grumpy ol' german blacksmith out in the Hinterlands -
Now what do I do with it?
Mike Ameling replied to Charlotte's topic in Blacksmithing, General Discussion
Sounds like a good deal - if you can afford it right now and have the storage. Uses for it's ... odd size ... will start cropping up all over. It would be a good size for handles for pots/pans/frypans/grills/comals. And for splitting the ends for forks. Colonial style meat skewers. Colonial style grills. Scotch broilers. Even simple things like tent stakes. Plus those window frames/grates. Riveted lattice work. How about some ... woven baskets? Lots of possibilities. Just a few thoughts to ponder. Mikey - that grumpy ol' German blacksmith out in the Hinterlands -
Shop Talk. I have a delema. Kinda long
Mike Ameling replied to Fe-Wood's topic in Blacksmithing, General Discussion
3rd party monitoring? It comes into effect when you want to sell excess power you are generating on site back to the formal power company through their power lines. All of your equipment, and the type of electricity you generate must be compatible to their equipment and line current. So private installations need to be checked out initially before they can be connected, and then monitored occasionally to see that everything is up to correct standards. Those little "box" or cube generators are OK for some uses. But you can quickly exceed their capacity. I would suggest that you go talk to one of the local farm implement dealers near you. Specifically ask him about the back-up generators that you hook up to the PTO of a tractor. Those things kick out more "juice" by far than those little "box" generators. All the big farms around here have them for when the power goes out - do to storms. And the run their whole operation and home from them - large animal feeding systems, well pump, grain handling equipment, and whole household. When the first responders and fire department around here need electric power at a site, they try to get a neighboring farmer to come over with his tractor and generator. Then there are no problems running electrical pumps, saws, drills, and those porta-power units. And those farm generators do not need to be run with a tractor. You could pick up a junker mini-car with good engine and adapt the drive shaft from it to run the generator. But talk with the people at the local farm dealership. They will have all the specs and requirements to run them - including power output. Or search for some large construction company selling out older equipment. Sometimes you can get a good deal on one of their large trailer generator units. It may be enough to run all your power-hungry equipment. As to simple lights/radio/fridge power, a quick simple all-weather "drop cord" run down from the house can handle that. Put a plug-in on each end of some electrical wire designed to be buried, and string it down. Just watch the temptation to draw too much juice through it. Just a few possibilities to ponder. Mikey - that grumpy ol' German blacksmith out in the Hinterlands -
A different kind o' dinner bell
Mike Ameling replied to chyancarrek's topic in Blacksmithing, General Discussion
The tone and loudness of a dinner gong has so much to do with the thickness of the metal used. If you jump up from 1/2 inch stock to 1 inch stock it will be surprising. A friend got a hold of some 1 1/2 inch round rod that was from some jet fighter landing gear struts - so some high-tech alloy. He made a few classic dinner triangle gongs from it. It had the most perfect beautiful tone you ever heard - except from a formal bell. And LOUD ta boot! Alas, he only got those couple pieces of scrap. And Jay over at Big River Forge has made several large garden "gongs" from old 100# LP gas tanks. He "carefully" cut the bottoms off, and threaded in some pipe to form a hanger from the top. Then a simple pair of slanted 4x4's to hold it between a 1/2" plate bottom and and smaller version top plate turned it into a great garden/patio gong/bell. A rubber mallet hung from a hook on one of the uprights finished out the project. The tone was a lot like the large bells you hear in the Japanese temples. Bells/gongs are always popular. Just keep in mind where you hang one for display around your shop. Kids LUV to play them! Mikey -
Our cowboy/old west club got that commercial restaurant range, and we used it in the old west town we were building. The right "cook" could run a lot of food through it in a short amount of time! But it drew more LP gas than one 100# cylinder could feed it when you had that grill, one oven, and several burners running. So we linked two 100# cylinders in series to feed it. But now it is in storage, along with most of the rest of our club furnishings. After 20 some years, we had to move out of the farm place we were converting into that old west type town. One of the land owners decided that he had to personally make money off of what we had built and all of OUR stuff - by renting it out to other people/groups/clubs! So our club pulled out and took all our "toys" with us. We left a handful of stripped buildings behind. And that land owner's "dreams" of a money machine to crank died when we left. Now he will probably end up losing the whole property. He hasn't asked out club to come back - yet. And then there is that 16" x 16" tabletop commercial restaurant grill that I picked up at a household auction years ago - with two burners on the side. A 20# bar-b-que pig tank will feed it without problems or freezing. It's great for those pancake/sausage suppers for the church or legion. Mikey
-
A few years ago at a blacksmithing convention, we started to freeze up a 20# bar-b-que "pig" tank running a single burner Daryl Nelson style forge. It was only 95 degrees (F) with about 90% humidity! We just slid one of the quench tubs over and set it in. Yes, it kept the beer cool! And we also just about killed off the main demo guy. He came up from Arizona where he was used to 110 (F) temps. But our normal high humidity really go to him. I run a simple Daryl Nelson style single burner forge, and feed it from a 100# cylinder. I only have freezing problems when the tank is running low - and then only after several hours of running. If it gets too bad, I can just switch over to the other tank on the normal "household" lp gas regulator. But I have used that extra brass coupling/tubing to hook two tanks in series before (to feed a large commercial gas range with 2 ovens, 6 burners, and a grill). Mikey - that grumpy ol' German blacksmith out in the Hinterlands
-
A lot of people use a section of Forklift Tine for an anvil. Especially the big commercial pallet mover ones. You get a lot of ... mass ... with them. Two shorter lengths welded side-by-side (and welded on the bottom/back side) give you a lot of working surface. Plus those rounded edges give you lots of angles to play with - including between the two pieces. I have several "drop outs" from a scrap yard that I use for small/specialty work. They are 3 and 4 inches thick! One round and one rectangular. They are not heat-treated, so I do have to be careful about what I am pounding on them. Nicks/dents/dings can be kind of easy to get. But if my work iron is red hot, I don't worry about it. I also have a granite anvil for some Viking/Roman era presentations. A large wedge shape - weighs around 100 pounds. I did a little cleanup on the top flat, but it is still mostly its natural shape. As long as I always have color in the metal, I have not had any problems using it as an anvil. And some of the "rougher" surfaces do give an interesting texture to the iron. I've made small specialty anvils from farm machinery parts. Some of those square and round tool bars from plows and cultivators have a lot of ... mass ... in them. And most are pretty good tool steel as-is. Already heat-treated for toughness more than hardness. A little searching can lead you to some 3x3 or 3x4 inch diameter bars. Plus don't forget about those draw bars from tractors and bulldozers. More great flat heavy steel. Sometimes evil-bay can be a good source. But way too many "collectors" to compete against. Check out some of the antique/junque shops near you. And ASK them about anvils. Some times they have them, but stashed in the basement or back room - because they are so big/heavy. Over the years I've gotten 2 good 100+ pound anvils from antique stores. And they were happy to get that "hunk of junk" out of there. Ditto fleamarkets. Mikey - that grumpy ol' German blacksmith out in the Hinterlands
-
For small pieces I just use that common household vinegar (white). No electric current, just soak the part in it. It will flake the rust off and even flake it out of deep pits! And it also will dissolve the galvanized (zinc) coating off of wire and rivets. It leaves a slight white-ish layer on the surface that rubs right off. Mikey
-
A lot of people use Piano Wire - either sections from broke/replaced wires or new wire from the music store. They are generally very good spring steel tempered fairly hard - but still with some flex left in them. Some wire guitar strings will also work. Historically, the touch hole on most old muzzleloaders was fairly large. But modern muzzleloaders tend to have a very small touch hole - often with a screw in liner that can be replaced. Plus, historically, they were not called Vent Picks, but Priming Wires - in the written documents. The powder measure was called a Charger. Such changes in terminology tends to mess up research. Mikey - that grumpy ol' German blacksmith out in the Hinterlands p.s. Don't forget about the twist-on Gun Worm for cleaning - a coiled wire that tapered in diameter a bit that you twisted onto the end of your wood "wiping stick" to clean your gun. Some were made with threads to screw into brass end caps on your ramrod or wiping stick. But a lot of Fur Trade era guns just had that twist-on coil of wire for a cleaning jag.
-
Plus you can heat-treat the copper wire. It works the opposite from iron/steel. You heat it up and then let it air-cool. This "hardens" the copper. If you heat it up and quench it in water, this anneals it - making it soft. Sometimes when working copper you need to anneal it a time of three - as you feel it starting to stiffen up and work-harden. Otherwise it might crack/split on you. Brass works the same way. Years ago I got a bunch of thick electrical wire from an old farm place - the overhead power lines for the farm. Thick heavy stuff! The main wire is 3/16 inch in diameter. The lighter version is 1/8 inch in diameter. It originally had a coating/cover on it, but that is/was mostly rotted away. I also use that wire for my "layout tool". If I need to forge up a scrolled sign holder bracket, I will bend that wire to the approximate size and shape needed. That gives me the "look" when compared to the sign, and also gives me something to measure against. When forging, I lay my pieces against that wire to check the curves/angles - instead of getting hot iron next to a finished sign. When done, I just roll up my copper wire and stash it on the shelf for the next "design" project. Mikey - that grumpy ol' German blacksmith out in the Hinterlands
-
The main reason to use the claw hammer head is that ready-made eye. No punching/drifting. And it is also already sized for many standard wood handles. If you go with a small enough diameter wood handle, you can slip it through the eye for a wedge fit - like on a classic tomahawk or a classic full-sized adze handle. But that would be a pretty thin handle. So I usually just pick up a new wooden claw hammer handle, and then reshape it to fit my hands. With a ballpeen hammer, you could always drift the eye if you wanted to. But I tend to use my ballpeen hammers for making other tooling punches, chisels, cutters, flatters, etc. Mikey - that grumpy ol' German blacksmith out in the Hinterlands
-
what to do with the waste...
Mike Ameling replied to bourne101's topic in Blacksmithing, General Discussion
Coal ash/clinkers being the question. I tend to save them for winter time. I spread them on the ice/snow on the driveway. The grit makes for great traction. Some people like them for controlling weeds/grasses around trees and shrubs. Bugs and crawlers also don't much like the sharp edges on the ash/clinkers. And they make for pretty good drainage "rubble" along foundations and walls. But many places want you to treat them like toxic waste - hard/heavy metals and concentrated chemicals. Just look at what the coal-fired electric plants go through with their "fly ash". But most of that is because of the quantities they have to deal with. The sound advice would be to check with your local ordinances and waste removal company. Some have rules/guidelines, some do not. But the moment you ask about it, you will probably then be monitored for it - and for HOW you are generating it. Could complicate things. But out here in the countryside, we just use coal ash/clinkers on the ice/snow during winter. Ditto the wood stove ashes - which we prefer and actually work better on ice. Just a few humble thoughts to share. Take them as such. Mikey - that grumpy ol' German blacksmith out in the Hinterlands -
Make up a jig for your vice to help you keep a consistent spacing between all the scrolls. A 2 or 3 inch length of metal bent into a slight curve is all you need. And make it thick enough to match the distance you want between the metal parts of the scroll. Then, after you have started your scroll up to a working size, then heat the next section up, slip the scroll up tight along the inside of that jig, and tap/bend the off part up against the curve of your new jig. Then heat the next section and repeat. A bit of flat bar or plate sticking out on the inside of the curved jig will help support the finished scroll and keep things "square to the world". And you could always rig up a rotating handle on the off side to pull/bend the unscrolled part against your jig. The longer the curved "jig" part is, the easier it will be to bend the scroll against. But it will also become harder to adjust the curving as the scroll grows larger. And if you have enough of them, then a full scroll jig starts to become worth making. Mikey - that grumpy ol' German blacksmith out in the Hinterlands
-
How do you set a price on your work
Mike Ameling replied to billp's topic in Blacksmithing, General Discussion
Ah, the modern "hand made" look. For some flat plate door hardware we made for a new restaurant, we had to "texture" the plates to make them look - hand forged -- dent/break all the edges, and put ball peen hammer marks over the rest of the surface. And then make the mounting bolts look like peened over rivets. Yes, it looked great in the dim light of the restaurant (actually in any light), but it also was several hours of tap-tap-dinging to put those little "facet" dents in all of it. And then the menu holders for the waitresses were an Omega shaped adaptation of a scotch broiler with a bit of cage/grill work connecting it to a back plate. They loved it all - and that was the important part. And it all looked "hand made" or "hand hammered/forged". Mikey - that grumpy ol' German blacksmith out in the Hinterlands -
As I recall, the COSIRA group has plans for a simple forge and it includes such a round bellows. The organization and their plans are for "developing countries", and setting up simple businesses that people can work. The CINVA Ram is another type of simple tooling - for making consistent mud/clay building blocks. It forms and compresses them by a hand lever system. A lot of those simple technology plans have a lot of value and ideas for you to gleam from. Of course, a lot of their plans are for gardening and raising animals. But they also have stuff to help you turn it into a small business. Mikey - that grumpy ol' German blacksmith out in the Hinterlands
-
I made up a version of this for hanging/displaying key rings at Jay's Big River Forge. I took a bunch of variable length 1/8 inch round rod, and tapered one end. Then I gave it a quick wrap with some utility wire, heated the "bundle" up, and twisted it. This gave the "trunk" of the tree a pleasing twisted branch look. Then I heated up individual points, and bent/curved them out with a little upturn on the end to hang the keyrings from. We then welded it to a round domed and textured plate for a base - heavy on the thickness for that base. A bee's wax coating finished it off. If your base plate is dished enough, you can make a hole through it and hide all your arc welding underneath. Or you can taper the other ends as well, with random lengths, and bend/twist them out like tree roots and then do a couple discrete welds to hold it onto your slightly domed base plate. It would look better with just a few of the outside "roots" twisted down on the base plate, with the center core pieces being flush with it or passed through a hole in that base plate and welded underneath. It sat on the counter in the retail room at the shop - right next to the register. We kept an assortment of the leaf and little fishes key rings on it. But I had to make a second one. Somebody talked Jay out of the first one - for hanging ear rings and jewelry! I don't remember what Jay charged them for it. I hope he got shop rate. But I think it was more of an "advertising incentive" on a big railing or spiral staircase project. So it goes. Mikey - that grumpy ol' German blacksmith out in the Hinterlands
-
How do you set a price on your work
Mike Ameling replied to billp's topic in Blacksmithing, General Discussion
The big problem I have with my historical reproductions is that I usually charge my "working person" price instead of a "commissioned art work" price. It's one of those judgement calls you make at the time. And it has led to a bunch of repeat business. With my reproduction flint strikers, I charge what many consider to be a high price for them. I started charging $10 to $15 for them years ago. After seeing my pricing, a bunch of the local people making flint strikers moved their prices up to my pricing level - but their work quality varied quite a bit. Then I shifted up to $12 to $15 for them. Very few other have moved their pricing up. This year, after a dozen years, I've shifted my pricing up to an average of $15 each. A few people have decided to match that, but most say they will never sell costing so much. But mine always sell. The quality of the work plus the historical research behind it tell in the end. People searching for the absolute cheapest price buy from those other guys. Those comparing quality of workmanship tend to buy from me. Too many of those other guys only put in the absolute bare minimum effort/time into forging their flint strikers, and it shows in the end product. In the end, the quality of the work you do shines through. And applying the same level of quality workmanship to the simple/basic things also shows in the end. Otherwise you are just competing for that bottom rung of the marketplace. But some people start right out charging "commissioned art work" pricing. They are looking for that top end of the marketplace. But too often their clientel become educated about what truly is quality work and shift to other sources. With time/experience, you develop a "feel" for the pricing in your area. Just keep all those behind-the-scenes business considerations in mind. Mikey - that grumpy ol' German blacksmith out in the Hinterlands -
Over the years, I've made a bunch of the Celtic cloak pins (also called blanket pins) from brass brazing rod. I cut the main part to length, chuck it in my drill, and the "taper" it on the bench grinder. It's quick and simple to do a long taper that way. Then I will heat up an end and use scroll pliers to put a little curl on it. And then I heat up the whole piece and bend into a circle. I often use the kitchen gas stove to heat up the brass rod. And for the "pin" I use some very small diameter brazing rod, file a quick point on one end, heat the other end and make that "eye loop" with scrolling pliers. Tweak it open a bit, slip it onto the large "c" part, and tighten the eye. A little emery cloth shines them up nicely. And sometimes I heat them up and "forge" them square, and then twist them before bending into that circle. Plus you can flatten/flair the ends as well. A ... light ... rubbing with emery cloth shines up the high points while leaving the low parts darker. The only point to remember in making them is to leave enough gap between the main ends so that the rotating pin can pass between them - and having that pin long enough to go all the way across and extend a bit past the other side. They are a good project to do some "mass production" on. Make up the pieces for a half dozen or a dozen at a time. Just do each step on all the pieces, then move to the next step - cut to length, taper the ends, scroll the ends, heat and bend into the C or Oval shape. Then do the same for the rotating pin part. They are a fun ... tinkering ... project. Mikey - that grumpy ol' German blacksmith out in the Hinterlands
-
How do you set a price on your work
Mike Ameling replied to billp's topic in Blacksmithing, General Discussion
Ah, to be able to get "shop rate" on projects. Tiss a noble quest! First, there is that distinction/difference between doing this as a Business, and doing it as a Hobby to make a little extra beverage money. The "hobby" pricing tends more towards covering physical costs of materials, plus a little extra for the labor - just to make a little extra pizza/beer money. But that usually does not cover the ... infrastructure ... costs - building/land, tooling, insurance, taxes, depreciation, bookkeeping, etc. "Business" pricing has to figure in all those ... extra costs. In his Cookbook, Francis Whitaker said that for every "billable" hour spent forging/working on a project, there is at least another hour of "shop" time that cannot be directly billed to a project. That extra time is for the normal business overhead. So what you charge for a project needs to cover that additional hour of time you cannot directly bill for. And then there is your marketplace. Some locations will pay more for good iron work. But many will view it like fleamarket or garage sale junk/pricing. Plus they also tend to think that you BOUGHT it somewhere else just to re-sell, so you can ... dicker down ... on the price to not make as much "profit" off of them! And sometimes you still want to slap some snit who looks at the price and then goes storming off muttering that you must think it's made of gold! They don't see the 15 hours of work at below min-wage you spent making that. All they see is that they like and want it, but expect to pay pennies-on-the-dollar for it --- just like at most fleamarkets and garage sales. And then there is all the competition with the cheap/import junk sold by so many stores and vendors. You just can't compete against that. Selling "campfire" iron work at living history events is a rough market. Too many people want the better or fancy work, but they only want to pay the lowest possible price they ever saw for a similar item - no matter how many years ago that was. Plus you will be competing with all those "hobby" smiths who only want to make a few extra bucks to pay some of their costs and cover some extra pizza/beer. That level is only slightly above the junker/closeout fleamarket garage sale marketplace. So pricing is a pretty mixed bag. On some things you will easily make back your costs plus some profit. On other things you will mostly end up losing money - but gaining experience. Plus what people want to buy varies from year-to-year or even week-to-week. A "hot" selling item today may never sell again. But too often the one item everybody wants is what you do not have along, or only had a couple of. Big projects require a good commitment to full shop pricing. You have to figure your time, your materials, your "overhead", and then try to figure out how to make some profit off of it -- without scaring them completely away from "sticker shock". In the end you usually just hope you don't lose money making it for them. Water and beans instead of pizza and beer. Just a few humble thoughts to share on a very complicated question. Mikey - that grumpy ol' German blacksmith out in the Hinterlands -
Show us your keyrings!
Mike Ameling replied to easilyconfused's topic in Blacksmithing, General Discussion
Several lady friends showed me the ... use ... they found out for the leaf keyrings I gave them. They use them to help open their pop-top beverage cans! Instead of sliding/using their long fingernails to pull up the tabs. Just slip the leaf under the tab and pull/lever up. Works for them. Mikey - that grumpy ol' German blacksmith out in the Hinterlands p.s. I generally use 3/8 round rod for my leaf keyrings. About 1 1/2 inches of it makes a good leaf if you hammer it right. -
But there also are some videos showing fire starting with a traditional flint/steel. I know several people have found some, but I don't know what they searched for. Probably used that "traditional" word in their search. I have a dial-up connection, so I don't watch videos. Yeah, they now call those modern ferro-cerrium rod fires starters FLINT! Even that tv show SURVIVOR calls it FLINT. More traditional words given new meanings/definitions. Mikey - that grumpy ol' German blacksmith out in the Hinterlands
-
Show us your keyrings!
Mike Ameling replied to easilyconfused's topic in Blacksmithing, General Discussion
Many years ago, I made up a simple story-board of forging a leaf keyring. I made it up to bring along when doing a demo. It helped explain the steps/stages I was working on - without having to repeat myself too often. And, at the time I made this up, I was still using a spring fuller to neck in behind the lump that will become the leaf. Now I just lay it over the corner of the anvil and fuller it in that way - quicker/simpler. Leaf keyrings are a good project for a public demo at something like a threshing/steam engine show. You can generally get one made up within 5 to 20 minutes - depending upon how much you talk and show the people. And you can complete it before the attention span of kids gets tooo stretched! But I usually end up giving them away at the shows. There is usually some little kid there intently watching it get formed/forged out. Or some cute girl watching. One time I had a young girl (around 5 or 6) watching while her parents were a few yards over talking about some old gas engines with another guy at his display. You could see the ... excitement/amazement ... in her eyes as that bar of metal took shape - with lots of running commentary. When I finished it, I put that ring on it and then handed it to her to look at. And then I told her she could have it. She beamed that smile, said a thank you, and went bubbling over to her mom to show her. A minute later she came back and handed it back to me. She said she ... did not have any keys to put on it! I smiled and suggested to her that maybe her mother had some keys and might like it. Another beaming smile and thank you, then off she went skipping over to her parents. Aaah, the simple thoughts and world of children. Mikey - that grumpy ol German blacksmith out in the Hinterlands p.s. My friends and I have sold the leaf keyrings at the threshing show demonstrations. Pricing has been a little ... funny ... with them. At $3 each they will sell all day, and almost as fast as you make them. At $4, people think about it a while before they buy. At $5 or $6, they tend to pass them by. At $8 or $10, other people start to get interested in them (but want to dicker a bit). When Jay had the Big River Forge retail store open, we sold them for $10. At that low price they are viewed more as a fun souvenir of the show. At the higher price they are viewed as an art/sculpture piece, but you will sell fewer. But too often people see them as just a ... trinket. So I tend to give away more of them - to people who really do appreciate them.