
Mike Ameling
-
Posts
473 -
Joined
-
Last visited
Content Type
Profiles
Forums
Articles
Gallery
Downloads
Events
Everything posted by Mike Ameling
-

Now comes the fun part....
Mike Ameling replied to Bryce Masuk's topic in Blacksmithing, General Discussion
Scroll jigs are nice, but .... When you have a very large scroll jig to make, tack weld it to a couple thick bars instead of plate. Plate is nice, but sometimes the jig needs to be pretty large. A large/heavy piece of angle iron works well for the main backing piece for the jig, then weld other "braces" off of it. When I do some large sign brackets, I do the long gentle curves cold on the large curve of the swage block. It goes faster and easier in many cases. Just don't use a hammer with fairly sharp edges. A well-rounded old sledge works well. I use heavy copper wire for laying out my scrolls and the whole shape. It bends fairly easily, holds its shape, and I can lay hot iron right next to it without too much worry. The last sign bracket I made had me tapering and scrolling both ends of 3/4 square stock 10 and 14 feet long. That's a lot of iron to swing around and taper/scroll/bend. I sometimes clamp a Visegrip on the stock to help give me a hand-hold for better ... leverage ... when holding and swinging it around to get the right angles for a specific section. Just use a visegrip with smooth/warn jaws so you don't mark the steel too much when you "clamp" it on. A movable support stand is nice. Just a section of pipe coming up from an old car rim/wheel, with several rods tacked on the side at different heights. You can cast some cement into the wheel dish for extra weight if needed. And sometimes a rope or chain hung down from above really does the trick for helping you hold large pieces that you are scrolling. The longer the rope/chain, the more area you can move it about without having to adjust the height. With a 20 foot high ceiling to hang from, you can set the height and run the piece from the forge to the anvil to the vice without having to adjust things. It takes a lot of strain off of your arms/hands. And a final tip: get the pieces close, but not ... too close ... to a perfect match. If they are perfect, people will think "machine made" and "bought" instead of hand forged. Plus, even a few inches separation is often enough to not see any little ... differences. Just some thoughts to ponder. And remember to have fun along the way! Mikey -
This all reminds me of the business card my one uncle made up for his "retirement" business. Tired Iron A not for profit business - altho it did not start out as such That last line was half joke and half prophecy. But it was his retirement business - something to keep him busy, and occasionally make a little extra beverage money. Francis Whitaker had a little note in his Cookbook about shop hours. He said that for every billable hour you spend forging/working on a project, you have at least another ... non-billable ... hour associated with it. So you have to adjust things on any bid/quote to accommodate that extra "overhead" time spent tending the shop, repairing/sharpening tools, replacing inventory, and doing all that book work. And somewhere along the line, it also helps to add in a little ... profit ... for your own pizza/beer. Mikey - that grumpy ol' German blacksmith out in the Hinterlands p.s. My big failing point is that I tend to charge what I would like to pay for the same thing instead of what I really should be charging. And friends always get upset no matter how much or little you charge - they always want it cheaper - for a "friends" deal!
-
Another Bowl With Copper Rivets
Mike Ameling replied to John NC's topic in Blacksmithing, General Discussion
Too many rivets? Any past the bare minimum necessary to hold it together pushes you into the "decorative" use of rivets. So then you have to worry about number, spacing, size, materials, and whether they form a Smiley Face that you never noticed or thought about before you put them in! Mikey - who once put over a hundred iron rivets in a Viking style sheet iron pot (it only needed about half that!) -
Travel anvil modifications
Mike Ameling replied to Sam Falzone's topic in Blacksmithing, General Discussion
For my Viking era portable set-up, I went with a large workbench. (Sorry, no pics.) I made the workbench out of home-sawn oak 4x4 for the 4 corners and cross braces that support the 3 inch thick oak planks for the top. I then cut holes through that top to fit the several stump anvils I use. The BIG anvil just rests on top of that bench - a 100# granite rock that is wedge shaped with a good flat on top. The various tools go right on that bench top or on the shelf below it. I also chiseled a hole through the top to slip a "wagon tongue" variation of a leg vice through it and around the side brace. The bench itself (with vice) is in the background of my one pic in my albums - of my regular anvil stand/workbench. Works for me. Mikey -
Smelting iron in a microwave
Mike Ameling replied to Iron Falcon 72's topic in Smelting, Melting, Foundry, and Casting
It would be something along the lines of an Induction Forge - but without the specific frequencies and safeguards. And the temps involved would end up destroying your microwave oven. Plus iron ore has other ... impurities ... in it that could lead to explosions. Any small rock with moisture in it could explode! You would be better off using a proper casting crucible and the old Carbon Arc leads from an old style welder. Still dangerous, just a whole lot less. Mikey -
The whole idea was to help cool the metal around your tuyer. This helped slow down how fast it "burnt out". But those comments were also for people who had those forges running all day every day during the week. 12 to 16 hours per day for 6 days straight. So they tried to figure out other ways to help slow down the "burning out" of the metal at the bottom of their forge. In the same sections of that book you can also see examples where they took a CANNONBALL, drilled a couple holes through it, and used that in the bottom of their forge. The ... MASS ... of it helped extend the time they could run the forge before having to tear it apart and fix/replace that whole tuyer area. Mikey
-
Here's a pic of how I solved my vice mounting problem. And it also solved my anvil stand and workbench problem as well. I made this up as a portable traveling workbench/stand. But it is now my primary work station in my "shop". I just drag it out when I travel, and drag it back into place for regular use. I do have a regular large anvil on a stump and another leg vice mounted over on a workbench in the shop, but these tend to get used the most. Since I do a lot of small work, I made it so that the anvil face is higher than normal and recommended. This keeps me from bending over that little bit all the time when working. Bending over that little bit was a real pain in the back after a few hours. When I need a regular height anvil for heavy pounding, I just shift over to the one stump mounted anvil over to the side. I really like that "workbench" as part of the anvil mounting. I spread my tongs/punches/tools out on it - all within easy reach. Plus the vice is 2 or 3 steps away. I even clamp an iron bar in the vice to use as a rest for long pieces of iron I am working on the anvil. It works for me. Mikey
-
I've had leg vises mounted outside exposed to whatever the weather is for over 20 years without any real damage or worry. And that is in NE Iowa. I've even shoveled snow away and chipped off ice in the middle of winter to use the one. NO, I have never ... painted ... a leg vice. Just cleaned off the major rust/grime. For me, they have "aged" much like the old farm machinery around here. The only parts that REALLY rust away are those in contact with the ground. The big worry area is the screwbox. That is where your don't want to get too much moisture or dirt. Moisture could freeze inside there in winter, and dirt can/will wear on the screw threads like sandpaper. But a good fit, drained well, and oiled/lubed well have kept my outside vices working well for decades. Just my thoughts to share. Take them as such. Mikey
-
One of the hardest parts of making any wood-handled tool is punching/drifting the eye hole in it. So if you start with a hammer head, you already have that eye hole. I have made a number of small bowl adzes from claw hammer heads. I look for those with the square handle hole in the head (actually rectangular). That eye hole is usually also slightly tapered inside, so you can get something of a "wedge" fit with a wood handle. I clip off the claws, and then forge the hammer end to the new shape. As I forge it, I also shift the whole mass of steel in front of the eye hole up so that it is in line with the top of the hammer head. This then allows me to create a gentle curve across the top of the new adze - to match the curve of the adze in use, without having to grind off a bunch of the eye hole area on top. There are also people who use a claw hammer head in their modern sculptures. That claw hammer head can be made into a pretty good Bird's Head for a sculpture. Mikey
-
was it worth taking home
Mike Ameling replied to coalfired's topic in Blacksmithing, General Discussion
Those coil springs can be good tool steel. But there can be ... problems ... inbedded in the steel. The one problem already stated is stress cracks from work, or from a possible flaw during the manufacturing process. One other problem is that those coil springs are made to a specific minimum standard for metal and alloy content. But that actual alloy content can vary. So when it comes to heat-treating, there can be some problems with consistency in the heat-treat. There usually are no problems after any obvious ones show up in the initial forging. Mikey -
I've been using variations of the old "monkey wrench" for years. They work great. Some I modified the existing jaws by rounding the edges. Some I extended the existing jaws by welding on spring steel extensions. You just have to be careful to not extend things too far. The other major modification is to weld on an extra handle from the top of the wrench. This gives you two hands when twisting/bending. And more "even" force -- like when twisting square stock. Leaving flat areas in the original jaws also helps with that twisting of square stock. I also often clamp my "monkeywrench" in my vice to use the jaws as a stationary bending fork with adjustable spacing. They are great to have several floating about the shop. I even occasionally use one to hammer with (like when under a vehicle tinkering up some repair and a real hammer is not handy). And I keep one in my pickup all the time, with the other assortment of tools - one with an all metal handle. Yes, I often abuse it as well. They come in a whole range of sizes. Great project. You will be surprised at how much use you will get out of it. Mikey p.s. I've also ... bent ... several in use. Even one of the BIG ones! OK, there was a pipe involved for extra ... leverage. They will take a lot of abuse, but sometimes we push their limits.
-

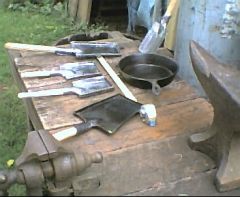
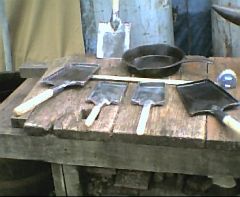
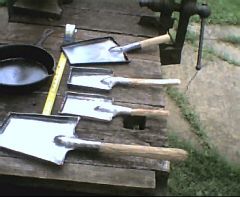
From the album: Historic Iron Work
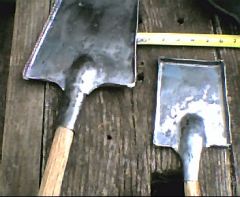
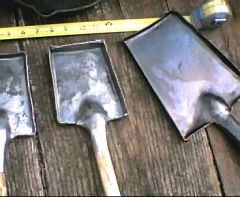
Some replicas I made of frypans converted from shovels. -
From the album: Historic Iron Work
-
From the album: Historic Iron Work
-
From the album: Historic Iron Work
-
From the album: Historic Iron Work
-
From the album: Historic Iron Work
-
From the album: Historic Iron Work
A frypan made from a shovel. Attributed to the Rev War time period - late 1700's. -
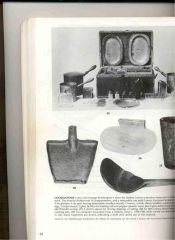
There is no stop to keep the blade edge from contacting the inside of the handle. In use, it has not been a problem. But some people have glued a strip of leather in the bottom bend of the handle for the blade to contact instead of touching metal. They were worried about it enough to take that step. I just haven't found it necessary. Mikey
-
I'll have to dig a bit. I can't recall just where I read it, but it might be in the book Iron For The Eagles: The Iron Industry of Roman Britain by Sim and Ridge isbn 0-7524-1900-5. Or in one of the Viking era books I have. There was some info in The Chronicle - the quarterly newsletter from the Early American Industries group, but I can't remember the specifics and it's been a couple years since I went through those back issues. I gotta dig them back out from beneath the stacks of books. So I will see if I can find those early references. Right now it's time to get back to making some 1700's style iron shovels, and then converting them to be used as a frypan. There is one original dated to the Rev War time period. A bunch of the mid/late 1700's living history reenactors have finally accepted that there really is no documentation for their "folding handled" skillets/frypans with socketed handle for use with a wood stick. And they are now desperately searching for something/anything with a socket for a removable wood handle, instead of the documented looooong handled skillets/frypans of that time period. They just don't like packing a pan with a long handle when hiking the hills. So I'm replicating that one soldier's improvised frypan from a shovel. Mikey
-
There are a few examples where a few rivets were used to hold the kettles together - but mostly just to hold them until they were soldered. But after making a couple Viking era riveted sheet iron kettles, they could have been riveted instead of soldered. Yes, the seam will "leak" a little. But with use the seam will seal up with a combination of food and rust/crud. Swirling some flour and cornmeal in water in the kettle will go a long ways towards sealing up the seams. Just clean the inside surface well before cooking in it. But the riveted kettles have an earlier European/Medieval look and feel to them. They can be pushed up into the 1800's, but take a little more ... justifying. Sheet iron rolling mills were developed pretty early. Even the Romans had their versions. It sure beats hand-hammering sheet from thick billets/blocks. So there are no problems with thin sheet well back into the 1700's, 1600's, and earlier - even as thin as 20 gauge. The sheets used for making "tin" are a prime example of that. The original size of the sheets was a limitation of the width of the rolling mills. And the lengths were limited by the size of the tanks to melt the tin and dip the sheets in. Forge welding thin sheet is always problematic. That is why you see a lot of riveting or soldering of thin sheet objects. Far less chance of damaging the sheet in the process. Cast iron kettles/pans get problematic before the mid 1800's when the molding/casting process was greatly improved. Before that, the mold for each item had to be hand-made, and was a one-time-use mold. And casting the bulged pots (gypsy or witches kettles) was even harder because of that bulged inside mold. So cast iron kettles/pots did exist, but you have to pay attention to lots of the little "details" of their shape/style. Like the bale ears - they should look like the number 7 sticking out from the kettle. The bottom casting sprue should be a round spot in the center instead of a long thin line sprue. And that infamous ... Dutch Oven ... (like the Lodge versions currently being sold) only came into common use just before the Civil War, but mostly after that. Other things were used to "bake" over/around a camp fire. A Tourtiere would be one such object - a sheet iron/brass pan/lid combo used much like a modern "dutch oven", but of French origin going back well into the 1600's. Just a few rambling thoughts/observations. I hope they answer some of your questions. Mikey - that grumpy ol' German blacksmith out in the Hinterlands p.s. A couple books to check out for early cooking gear. Collector's Illustrated Encyclopedia of the American Revolution - Neumann/kravic Early American Antique Country Furnishings - Neumann Decorative Antique Ironwork - D'Aliemagne Iron and Brass Implements of the English and American House - J Seymour Lindsay
-
Rivets: upsetting small rod
Mike Ameling replied to john_zxz's topic in Blacksmithing, General Discussion
For putting a consistent rivet head on the end of a rod, I drill a hole through a large square or flat bar that is the size of the rod. I then countersink one side of the hole a little bit. To use, I slip the rod through the bar leaving just the amount of rod sticking out past it that I want for the rivet head. I then clamp it in my vice with the forming bar lying flush on top of the jaws. The vice now supports the rod, and my "block" holds the rod while I tap and form the rivet head. It works well for me. For precise length rivets, I just chose the thickness of my forming block carefully. I then cut my rod material to length, slip it in the countersunk hole with the block lying flush on top of my anvil. Then tap/form my rivet head. The depth of the hole and thickness of the bar keeps my precise length. The drilled hole supports the rod so only the head mushrooms out. And sometimes I don't countersink the drilled hole - so the rivet head is flat to the surface when I am done. The rest is just practice. After you make a hundred or so you get much better. Like when I made that second Viking era/style riveted sheet iron kettle. There were only around a hundred rivets between all the various panels. (Yeah, I used around 1/3 more rivets than I really needed to - which I learned after completion.) Mikey -
Help interpret "3 10" mark of Peter Wright
Mike Ameling replied to ichudov's topic in Anvils, Swage Blocks, and Mandrels
Don't be in too much of a hurry to part with your old anvil - unless you really have to financially. You will be surprised to find out how much you like having a second anvil about the shop. Of course, having an extra anvil in the shop is almost an open invitation to friends to ... play along. Mikey p.s. Most anvils by the major manufacturers are pretty standardized in their markings. But exceptions do exist. Like the Henry Armitage Mouse Hole anvil in my shop. Exceptions and re-markings of anvils happen. -
Hey, glad to help. I'm more of a "visual" designer. A few quick bends/kinks with copper wire gives me size, proportion, lengths. But Jay at Big River Forge grew up in that design/drafting school. He prefers to sketch things out on the computer using one of the CAD programs. And then he lets the computer tell him lengths of material to use (plus the guess-ti-mating for drawing tapers). Now, when I make up some of those Spider frypans (a skillet with three riveted on long legs) I just eye-ball it. A slight variance matters little with them. And this also shows up when you look at some of the originals from the 1700's. Mikey p.s. Now to get back to making a couple 1700's style shovels/spades, and then "convert" them into a small frypan - like the one original they found that some Rev War soldier made up. The fun ... projects ... we play with.
-
Texas also has one or more large blacksmithing groups. If you check with them, they can point you towards people near you who are blacksmiths, and to gatherings/hammer-ins also near you. They are great places to meet other blacksmiths, and to pick up or trade tools. The ABANA web site should have a list of chapters near you, and be able to point you to their web sites. There is a whole plan/blueprint on finding and anvil somewhere on this site. Probably in the blueprints section. But others who know more about this will pipe in shortly. Mikey