
Jymm Hoffman
-
Posts
312 -
Joined
-
Last visited
Content Type
Profiles
Forums
Articles
Gallery
Downloads
Events
Everything posted by Jymm Hoffman
-
one detail most of these instructions leave out: To make a bellows work much better, do not divide the leather evenly top to bottom. Instead, place more leather on the top chamber, as much as a 1/3 to 2/3 ratio. I can and have made a lager bellows smaller in overall size and work much better with this ratio. I cut about 12 inches of length off the back (and wider section) of a bellows, when putting on the new leather I applied this theory. It not only made it more compact, but worked much better. I also found garment leather in a remnant bin at a Tandy's store that happened to be just the right size. Garment leather works great, thin and supple, it cost me about $80.00 at the time, 15 years ago. These bellows still work great. I also did an old set in canvas about 20 years ago that is still in use. The garment leather is actually lighter in weight than the canvas.
-

Grinder attachment opinions....
Jymm Hoffman replied to KYBOY's topic in Blacksmithing, General Discussion
I have been buying my belts from Klingspor Abrasives. A friend gave me a gig to cut 4 by 36 belts in 1/2, which is what I think Klingspor has been doing. I use the blue zirconium belts and prefer them -
Grinder attachment opinions....
Jymm Hoffman replied to KYBOY's topic in Blacksmithing, General Discussion
I have one of these on my Milwaukee 8 Inch 3/4 hp bench grinder. Great investment! I use the belt side far more than the grinding wheel. Anything from deburring to serious hogging and sharpening. I actually don't remember when I bought it, several years ago. I do not have the side miter table on mine, it was extra as I bought it from McMaster Carr for around $250.00. I don't remember what they wanted for the miter table. Plus I had to buy an adapter for the Milwaukee. It is extremely well made and I highly recommend this, as long as you have a good grinder to put it on. If not, buy one of their combos with a grinder. Get the biggest you can afford, 8 inch is far better than the 6 inch grinder. I could not find the 8 inch unit that they used to offer on their website. Multitool USA MULTITOOL 362 BENCH GRINDER ATTACHMENT w/ MITER TABLE & GUARD !!! OSHA & UL COMPLIANT !!!! by Multitool USA -
Blacksmithing as a profession
Jymm Hoffman replied to Mulciber's topic in Blacksmithing, General Discussion
Aside from the more personal side affects of being a self employed blacksmith for over 25 years, I apologize about not more information on how I have done it. I started out selling my wares at Revolutionary War events, mostly to the reenactors as that is what lead me into this. I still do Rev. War and F&I War events, some times going out on the field as a soldier, sometimes setting up my demonstration stuff (historic traveling forge,) or just a selling set up. That end of the business is very difficult to make a living. I also did a few craft shows a year, for a number of years. This was mostly before the internet was even around. I would try to find shows that had the level of quality in other crafts that I would not mind being associated with as that would also bring in the type of clientele that would be more likely to understand and want to buy the stuff I make. After my business really started to pick up with more and more orders, I had to face reality and not do as many shows, both craft shows and reenactments. At about the same time, my major client to date started to place bigger and bigger orders so I stopped doing craft shows. Now as those orders wind down, I decided to "hit the pavement" again to remind previous customers and potentially new ones that I am still in business. This fall I did a couple of paid demonstrations with the historic set up and a couple of reenactments as well as started my web site. I recommend trying different venues and not rely on one. I think people still want to touch and feel what I make, not just see it in pictures. I also keep a portfolio ready to show potential customers. I can't have everything on a table, but if they see some stuff then look at photos, it helps. In fact, last night I went to visit a potential new client that got my phone number from the yellow pages. Because I had my portfolio, they understood better and tripled the order from what was originally discussed as a possible order. I also believe that the nature of this type of business takes longer to get established than what someone at SCORE might say. They think a year or two and you should be there. Maybe, but I say more like 5 or more years. First you must have the skills in the craft and running a business. You have to first produce a quality product, be able to work with people (your customers and suppliers,) and be flexible to go where the market takes you. Until you get the business coming to you, you have to go to the customers. Also until you start getting orders, make some things that you really want to make so you have something for people to see and touch. Be ready to not have work and be patient with that, especially if you don't want to get trapped making a lot of things you don't want to make. -
Blacksmithing as a profession
Jymm Hoffman replied to Mulciber's topic in Blacksmithing, General Discussion
As Bill as said, I have enjoyed the comments. Ever hear of the term starving artist? I have been there. I have also seen 2 guys get ambitious enough to try the self employment thing as blacksmiths over the last few years. They did not last more than 3 years each. One reason, they had families to support while they were trying to learn the craft and the business. I have been a full time smith for over 25 years. The first 4 years I was single. Most years I could have made more money than I have. However, as much as I love the craft, I also love my family and other parts of life. So one must define a "living". I have had to pay my own health insurance, but also take advantage of my wife's coverage when possible. There is some personal struggles and triumphs I won't bore you with, but they still affected me and my business. 2 years ago at age 46 I bought my first brand new pick up truck, well me and the bank. It does not have leather seats, but nice cloth seats. It is basically a jazzed up work truck, perfect fit for me. I was at it for about 10 years before I got my first power hammer a 100 lb. Bradley Compact. I ran it on a gasoline engine due to power and motor situation. I finally switched it to electric in 2001, a year before selling it to help pay for my new SayHa (now Say Mak,) 50 kg. self contained hammer I bought (again with help from the bank,) from Tom Clark, God rest his soul. Last year things got good enough for me to hire an apprentice for the summer and buy my second self contained hammer from Tom. In 1993, about a year or so after getting my first power hammer, I switched to gas and have not burned coal in my shop since. I only on a rare occasion due any fabrication work, mostly for me. I really forge, heat up mild steel and beat it to shape and do a lot of forge welding with propane. I have adapted to certain modern tools and developed some of my own. I still have debt and worries, but I have work, and still like to go to work. I tell most people that after 25 years plus, I am starting to get comfortable with the craft (I still have my days.) Now I am working on the business end of things. I pay my bills on time, and when possible early. When I stay focused on the good things and producing a quality product, I can make what I call a good living, not what many might call a good living, but I am happy. -
The Colonial weighs about 100 pounds. Thanks Mike.
-
Double Horn Anvil - Blacksmith Photo Gallery Colonial Pattern Anvil - Blacksmith Photo Gallery
-
You're welcome. Now that I know you are wanting it for heat treat, I highly recommend not messing with it. I was trying to get not only more efficiency, but higher heat since I do a lot of forge welding. When some one brought out some sort of heat measuring device from an old steel mill, one of my forges that he tested was going above 2300 degrees F. That is one of the newer non preheat forges. Without pyrometers, I still work by color. Is sparking white hot hot enough? To best control my systems for running cooler, I use a water gate valve on the air pipe before the gas is introduced.
-
While preheating air can increase efficiency, it is not always practical in application. I did run preheat tubes on my first gas forge for several years. The costs due to wear and tear on the piping, plus my time to maintain, replace etc. plus the loss of pressure due to extra bends in the pipe etc. did not pay. My system actually worked better by getting rid of the preheat piping that wrapped around the forge, etc. I used regular pipe, that did not last long, heavy wall that did last longer, as well as stainless, including heavy wall stainless. It is necessary to get the pipe really hot (red to orange,) to effectively heat the air for the short distances my system had. I found it better to use really good insulation, and good refractory materials and stop messing around with preheat tubes.
-
How many fuels do you use?
Jymm Hoffman replied to Ramsberg's topic in Blacksmithing, General Discussion
I voted 1. I only use propane in my shop. I only use charcoal with my historic demonstration traveling forge. -
For the historic traveling forge, it takes a 14 foot tandem axle trailer. For the modern demonstration, I only need my pick up truck. This is actually one of my every day forge systems on a cart. It has a unit of desk drawers set (not permanently,) into the cart. All of the tongs, hammers and punches I need can fit into the drawers for transport. The forge has to come off to fit into the truck as I have a cap. The forge lifts right off, plug the hose into a propane tank, plug a cord to a 110 outlet and I have power at the cart, 2 out lets. One on a switch for the blower.
-
This or that (New anvil purchase)
Jymm Hoffman replied to rustyshackleford's topic in Anvils, Swage Blocks, and Mandrels
Going to Colonial Rondezvous? I will have a double for you to see, as well as a colonial. -
Another inexpensive (cheap) source for swedge blocks, cylinder/oxygen bottle bottoms. Trick is cutting them off, find someone that has a good band saw and willing to do this to decommissioned tanks.
-
I don't remember, I have frequently done that as a demo. For Eating spoons, I use 3/16 X 1/2 or 3/16 X 3/4, depending on how big. Forge down the handle and leave enough to spread out the bowl. Ladles, either 16 gauge riveted, but I prefer to forge them with a wider bar forge welded then spread .
-
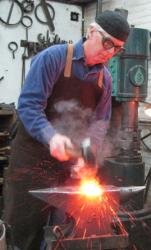
Hand hammers are the "colonial" or 18th. century and earlier pattern cross peens that I have forged, especially the ones from H13. The ones I am having machined from S7 (and heat treated professionally,) feel great, balanced, etc, especially with the handles in the shapes I make. The one with my arm is forge, the others are machined. These weigh 2 pounds. Favorite power hammer is the Say Mak 60 from Tom Clark.
-
Ft. Ligonier 250th. Anniversary of Battle
Jymm Hoffman replied to Jymm Hoffman's topic in Blacksmithing, General Discussion
Found a photo of the blacksmith shop and smith's hut. -
Ft. Ligonier 250th. Anniversary of Battle
Jymm Hoffman replied to Jymm Hoffman's topic in Blacksmithing, General Discussion
Unfortunately, it is not on their website. They are dreadfully behind in updating the website. The shop is outside the fort near a collection of buildings representing hospital buildings, smoke house etc. stuff they know was outside the fort, as well as the siege train that I have been working on. The virtual tour is only the "inner fort". There is an outer wall with a couple more batteries. I have done most of the hardware for the expansion project, including the fascine batter gates, and the buildings outside of the inner fort that is shown on the virtual tour. Jymm Hoffman's Forge - -
Any one interested, I will be demonstrating at Ft. Ligonier this weekend as part of their 250th. Anniversary of the battle. They built a reconstructed frontier blacksmith shop that I will be doing simple things such as nails, on one of my hornless anvils.... I will also be available to talk about other iron stuff, such as the stuff I have making for them for the last few years. Jymm Hoffman www.hoffmansforge.com
-
Quad-State 2008....Shout out if your going!!
Jymm Hoffman replied to keykeeper's topic in Events, Hammer ins, Where to meet
I can't hide from you guys anymore! -
This or that (New anvil purchase)
Jymm Hoffman replied to rustyshackleford's topic in Anvils, Swage Blocks, and Mandrels
Still availabe by order, but don't know what the price will be next monty let alone next year. The foundry is about 8 weeks out from date of order. I will do what I can to keep the price as low as possible. I did let a couple of other anvil dealers know who my foundry is, they liked the material and quality they saw at Quad State. We might be seeing more American made anvils of H13 in the future. -
A key feature in building bellows I have not seen here, maybe I over looked it. I have been able to make a smaller bellows out of a larger one work better and have build another smaller set, both working better than many larger ones. The tip I picked up years ago from another smith, still working at Hale Farm in Bath, Ohio. Put more leather (or canvas) on the top half, as much as a 2/3 to 1/3 proportion. The bellows on my traveling forge is only about 24" wide and about 36" long. You don't have to build 6 foot long bellows. Maybe someone that knows the measurements used a Colonial Williamsburg can chime in here. I don't believe they are very long. The ones on my traveling forge I used garment leather from a Tandy store that had it in their scrap bin. I have built with canvas, but prefer leather. If you can take your time you might be able to find a deal on some garment leather. It is very soft and pliable, works great. I have also used a bellows at a local historic site that spent way too much money on getting them rebuilt and used to heavy of leather. They are hard to work. I would not try to valve one bellows to run two forges. Plus you will need a rigid frame to mount, or hang them regardless of where they are, overhead down low, etc.
-
Hello Carl, welcome aboard.
-
This or that (New anvil purchase)
Jymm Hoffman replied to rustyshackleford's topic in Anvils, Swage Blocks, and Mandrels
While this is not 250 lbs. take a look and compare sizes and technical info. I use one of these in my shop everyday, very versital. Double Horn Anvil - Blacksmith Photo Gallery -
Power hammer test
Jymm Hoffman replied to mike-hr's topic in Power Hammers, Treadle Hammers, Olivers
Made it to Quad State for the first time in a few years. Made some nails on Tom's 60 kg hammer. Clifton Ralph enjoyed it, as well as the others there to see it. As I was standing on the other side of the drive from Tom's set up, some one asked me why no other power hammer dealers were there. I pointed to Tom's set up and said because of Tom. Not one other power hammer dealer showed up to take up Tom's challenge. -
check with Kayn & Son (Blacksmith Depot.) They have a good one for coal, next size up from the one I use for gas, may 2 larger ones. Centaur also has a good one. They are not cheap, but you should never have to replace one you buy from either source. Jymm