
Jymm Hoffman
-
Posts
312 -
Joined
-
Last visited
Content Type
Profiles
Forums
Articles
Gallery
Downloads
Events
Everything posted by Jymm Hoffman
-
Send me a message and I will be glad to forward my updated information in building a blown system. Might take a couple of days since I am really busy right now. In the mean time you can see one of my small forges in use on this You Tube video: YouTube - Jymm Hoffman, American Blacksmith this one is about 8 inches wide by 12 inches long on the inside and uses about 1/2 gallon of propane per hour. The larger 3 burner uses about 3/4 gallon per hour is 10 to 12 inches wide and about 18 inches long, has a side cut out for odd and larger shapes. I forge weld a lot in all of my propane forges. That is why I built them the way I did.
-
Swage Block: How to Mill?
Jymm Hoffman replied to bajajoaquin's topic in Blacksmithing, General Discussion
That's a great price, worth every penny! -
Swage Block: How to Mill?
Jymm Hoffman replied to bajajoaquin's topic in Blacksmithing, General Discussion
No milling required, if you have access to discarded/out of service oxygen cylinders, the bottoms make great swages, ask armorers. I have a friend that has a band saw large enough to fit the cylinders and cut off a few inches from the bottom. I weld a bar that fits my hardy hole to an inside wall of the cylinder so it sits on my anvil. A mini grinder works fine to clean up the depression. Prior to cutting them short, I had some cut to the same height of my anvil, also worked as a back up stand. Then I ran out of room in my shop to have several cylinders sitting around. Several of them fit into an old desk drawer that is under a bench, out of the way and off the floor. -
Sorry for not responding sooner, been really busy this fall, lots of weekend stuff, etc. Freddie, thanks for the good report. Dan I sent you a private message. If it does not come through, contact me through my web page: www.hoffmansforge.com The entire exposed surface is the same ram refractory I have been using on the bottom. For a few years I tried coating the upper blanket with 3,000 degree mortar. I experienced the same problems of when it eventually flakes and breaks off, it pulls blanket with it. The new version using ram all the way around (backed by blanket) has solved this problem. They are much more resistant to damage from banging into the top and no worries about flux touching anything. I believe I previously posted the contact I use for my refractories, Dixie. If still needed I will try to remember to post it again. I still simply use blanket for the doors. One, I found it difficult to get a really good seal if I used the ram on the door, might try a couple more on student forges I will be relining the tops before I start my classes in December. I am also trying to keep the cost down on these, so adding one more thing normally adds a lot more time than expected. I am still working on the costs. I don't really want to go into the business of building forges, as I prefer to pound hot iron. However, I will occasionally make one or two available, especially for students and other smiths I meet through IForge, etc. Plus, I am not a fabricator, my electric welds are not pretty, but they do hold... I prefer forging and forge welding, did I already mention that? :)
-
Recent YouTube inteview
Jymm Hoffman replied to Jymm Hoffman's topic in Blacksmithing, General Discussion
Thanks Kenny for finding the link. I should warn anyone mail ordering these that has a wide foot. I have had to get them a whole size bigger to accommodate my wide foot. -
Recent YouTube inteview
Jymm Hoffman replied to Jymm Hoffman's topic in Blacksmithing, General Discussion
Thanks for the compliments. I have been wearing wooden shoes in my for over 20 years (not the same pair though.) I had thrown out something about them previously,not sure where they are in the archives. I prefer them over any work shoe, work boot or walking shoe I have ever tried. These are made in Holland. I used to be able to get some from a factory in Holland, Michigan until they closed a few years back. My legs and back are in much better shape at the end of the day than with any other shoe, they have a great arch support. I put iron "shoes" on them to slow down wear. I can normally get several years out of a pair if I replace the "shoes" when the wear down to the wood, about once a year. The pair in the video have broken on the tops from drying out and me twisting in them. This is the first pair that ever did that. Glued them back together and put a steel top on one, might do that to the other. I have a new pair, I oiled these a couple of times with linseed and may paint them as I have done with others. Not good for walking, great if you stand in one place all day. I am also wearing welders' spats with these. I have had troubles with scale falling onto the top of my foot, especially while running the power hammer. I wear these all year round with a pair of cotton socks and a pair of heavy rag wool socks, no other padding as I used to try to pad the tops. They are cooler in the summer and warmer in the winter as my feet can really breath. When it has been really cold and my office heat was off or way down, it would appear as though steam would rise off my feet when I slipped them out of the wooden shoes. I have pour circulation in my hands and feet, they are either hot and sweaty or cold and clammy. The wooden shoes help with this as well. The last pair cost me $38.00 at a reenactment. I am not sure if I saved the dealer's card. -
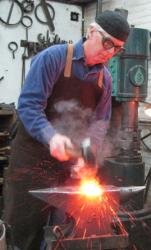
For those that have not seen it and are interested in an interview of me in my shop:
-
I prefer the 18th. century style hammers I make, with my longer rounded handles. I normally use 2 to 2 1/2 pound hammers. I hate flat handles, never feel right. Ran out of handle stock, supposed to have more 2 days ago. This batch is forged out of 4140 and heat treated, 2 hammers tested showed them to be 50 Rockwell C scale. Anvils are H13 54 Rockwell C scale.
-
Sak-Mak air hammer and/or Phoenix
Jymm Hoffman replied to Smith Studio's topic in Power Hammers, Treadle Hammers, Olivers
Do a search on power hammers. You will find my comments, I own 2 of the Say Maks, or technically one Say Ha and one Say Mak. I had the good fortune to buy them from Tom. In any case you can not beat them for the money. In fact, while time was alive, he posted a challenge here, to be done at SOFA's Quad State Round Up. That was to see which (who's) hammer could draw the longest taper in one heat. All the competition did not show up with their hammers at the event that normally did. Search the archives here on IForge and you will see. Jymm -
Traditional smith's cap
Jymm Hoffman replied to Bill in Oregon's topic in Blacksmithing, General Discussion
18th. century pattern workman's cap is one I like to wear or a modern welder's cap with the bill cut off. -
current anvil suppliers
Jymm Hoffman replied to ironsmith's topic in Anvils, Swage Blocks, and Mandrels
My Colonial Pattern Anvils run 100 pounds and the Continental runs 110 pounds. I had troubles finding the info I had posted on IForge a long time ago about my anvils, so here's a short cut: http://hoffmansforge.com/anvils I am getting prices now for a larger Continental pattern with with a 4" by 4" shelf. 5" wide face, 34" long from tip to tip of each horn. Heat treat facility said no problems getting the 52 Rockwell with H13 that I am using with the other anvils. Estimated weight will be around 300 pounds. -
Wait till I do C3PO If you are thinking of a blown system, I highly recommend the blower Grant mentioned at Blacksmiths Depot. I attach them to the forge cart and have a light switch with a plug. I prefer the light switch to turn them on and off, hopefully you can see in the photos. I can also simply lift the forge off the cart and swap with another. The earlier photo of the vertical is on the cart that usually has my first 2 burner. The larger 3 burner can also be lifted off the cart, but it is a handful. I also set up the gas valve so that down is off, thus the light switch and gas valve are up for on, down for off and a simple safety feature. Blower should get turned on first, so start there and go up, then reverse for off, start at the gas go down to the blower... Those blowers are great and a great price. As I was preparing to build several forges of my "standard" size (12" X 12" round shells,) I was searching for a good source of blowers. One they had to work and two be reasonably priced. I had tried another blower from a furnace that a friend had loaned me. It was readily available through Grainger, but cost about $165.00 ten years ago. Nor did it perform the way I needed it to, in other words, it was not strong enough. As I was developing the manifold based on previous experience, I admit that I was reluctant to buy a blower that I had not used and was about to give up. So I went ahead and spent the money and bought one of these blowers from Kayne & Son (aka Blacksmiths Depot.) Much to my delight, not only did they work, but I found that I did not have to change any of my pipe sizes, the 1 1/2" black pipe slips into the blower. The only size change I have seen is initially I had to remove the coating from the black pipe for a slip fit. Now I don't have to do that. Not sure which changed, the pipe or the housing of the blowers? Does not matter, I normally don't even have to worry about taping around the pipe, the fit is good enough. I love it when a plan comes together and it is a simple as what I do. My "horizontal" forges are 2 and 3 burners that I can do lots of forge welding, the verticals I don't use for welding, so it is not as important to be as hot. But they still work very well. Thank you Grant for the arrangements to get those blowers into our hands. As I occasionally sell my forges to students, I have probably gone through at least 2 dozen of these. As previously mentioned, you can normally find 6 in my shop, 4 permanently mounted, 3 getting serious use. I am still using the first one. I receive no benefit from promoting these blowers, only hoping enough people continue to buy them so Kaynes keep stocking them for when I need to buy them.
-
Thanks Phil for adding the link about my burners. I have been using this style burner since 1993. I started using the blower Grant plugged since around 2000 or 2001. I still have the first one, even after it froze up. I took the covers off and found that there are no bearings, just bushings. I lubed it up and have been using it since, that was probably 4 years ago. I just sold one from my stock to a neighbor that is a fabricator. He is building one based on my system. I have over 6 ready to run in the shop right now. I just modified my first vertical forge today. It only had one burner and did not get as hot as I like. I had since built a vertical 2 burner, based on my other system, just turning the entire manifold vertically. That left a cold spot on the burner/manifold side. Today I put another burner into the single vertical forge, opposite the first one, both angled to get a nice swirl. I had help from my fabricator friend that had a pipe bender. I also agree with Grant, they don’t run well when they are wet, even the blown ones. Here are a couple of photos. There is a 15” diameter disc in it; it is now a frying pan.
-
The search engine here works pretty well. If you take a look at these previous posts, you might find your answer:
-
A customer asked me to copy his original brazier. The "box" is @ 6 1/2" square. The grills are mortise and tennon joints with the cross bars being froged down from 3/16" X 1/2" to about 5/32" X 3/8", as are the feet. The box corner supports and hadle support are forged from 1/4 X 3/4". Box and ash pan are 18 guage with punch air holes.
-
This is my latest, larger 2 burner for a customer. The outer shell is 12 inch long by 15 inches wide and a hard shell interior using ram refractory over blanket, including the top. Third photo is a couple of minutes into a test firing.
-
Mine is the Hartford/Abana stuff. Somewhere around $600/year. Partially based on gross sales. Similar coverage as HW's, supposed to cover me at shows, replace the rented shop and loss of goods, while traveling etc. I actually deal with a local agent instead of the guys in New York. Jymm
-
I would agree with late 18th or early 19th century. From what I remember from Postman's book, the table was not added until after the 1780's. I think it is around 1830/1840 for pritchel holes to become common. There is a tendency for the earlier anvils to not be marked with a maker's name. Also if I remember what he said about weight markings, the earlier method typically center punch dots with chisel lines connect the dots. It was into the 19th. century (maybe late 18th. century?) that number stamps become common in marking anvil weights. So these points would back up early 19th century, unless it came from an anvil maker that was still making them "the old way." Mousehole is quite possible, but nothing definitive without markings. Obviously, these can be hard to date. Now I will have to pull out "Anvils in America," and "Mouse Hole."
-
This is what I'm considering: http://www.clogs.co.uk/cat_safety_clog.htm
-
Yes, you do have to walk differently in wooden shoes. I don't buy these for walking shoes, but work shoes, cause I stand in them all day. I can normally get 2 -3 years out of a pair, normally depends on doing something that breaks them. You will notice the iron on the bottoms from the previous post, absolutely necessary in my shop or the wear out in 8 months. I buy mine from Smoke & Fire: http://www.smoke-fire.com/shoes-boots-1.asp I also prefer to buy them at an event where I can try them on. I learned to buy them a little over size, so I try them on at the end of the day, after standing all day when my feet are at their largest. I do not pad them, got used to them, but do wear 1 pair of thin socks (normally cotton, sometimes merino wool,) and 1 pair of heavy rag wool socks, all year round. I don't want any other work shoe, even my Redwings with orthautic inserts, my back an legs are more tired at the end of the day than in my inexpensive wood clogs. All of the "real" shoe experts and orthautic people put some kind of hard insert into shoes for insteps, well made clogs already have them. It is a real bummer, they are up to $38.00, were $20.00 when I started buying them. I have some Swedish made clogs for kitchen work at home, helps reduce the back pain from standing over the sink. I have not tried the Welsh clogs yet, they are around $150. http://www.clogs.co.uk/index.html
-
I can't find the posts I have previously made about me wearing wooden shoes in my shop. I have for years and highly recommend them. Last spring I was told about welder's spats, they look and work better than old boot tops. I have been wearing wooden shoes in my shop since the early 1980's. They have built in arch support and are comfortable enough for me that when I know I will be standing all day, I want to be in my wooden shoes instead of my expensive work shoes or work boot. I find them warmer in the winter and cooler in the summer.
-
Thanks Jerry. I am serious about all my safety gear, not doing anything in my shop without ear plugs, safety glasses, wooden shoes, apron and a hat. I feel uncomfortable without one of these. I know the ringing in my ears is very slight and I think somewhat manageable,at least staying away from loud noises without protection. So to all others, be safe. Body parts are hard to replace.
-
That is basically what I have that cost $70.00. Check with your local audiologists. But maybe cheaper here cause the company that made mine is right down the road from my shop, Microsonic.
-
I went to my local audiologist and had the molded ear plugs made. They are supposed to be able to make them to certain decibel settings. I have a hard time hearing people speaking, but can hear voices better than when I use foam. First pair I had got hard after a few years and I developed tinnitus (ringing in the ear.) Audiologist said the first set were no longer any good, a little too loose (but I thought they still helped.) They ran a bunch of tests on me and said nothing could be done about my tinnitus at the time. Other than that I had good hearing for my age. I ordered another set of ear plugs and told the audiologist I wanted to be able to hear voices, she liked that. I have had the new set a couple years. After about a week with the new set the ringing went away, until about a week ago. Not as bad this time. The new set of plugs cost me $70.00. I had both sets made in "flesh" color so I could wear them at reenactments, especially when shooting, with out them being very noticeable. I have tried to wear them at public/reenactment type demonstrations and find it difficult to hear questions, especially since I put up a rope line and don't let people get too close to work area. I prefer these plugs over the any other at this time. I am not fond of ear muffs, but do have them and some times use them. A friend that ran the repair shop for an equipment rental company was standing too close to an engine backfire. Hurt his ears enough for him to go to doctors. The doctors told him to eliminate caffeine to help reduce the ringing. Last year I decaffeinated when I had a cold. Unfortunately, I like coffee too much and needed the caffeine in a busy schedule. So now I need to try to cut back to see if it helps. I have not tried the new over the counter stuff to combat the tinnitus.
-
Looking for some Wrought Iron
Jymm Hoffman replied to KYBOY's topic in Blacksmithing, General Discussion
This was an ad in ABANA's "The Hammer's Blow." http://www.wisconsinwoodchuck.net/treasures.htm