
Jymm Hoffman
-
Posts
312 -
Joined
-
Last visited
Content Type
Profiles
Forums
Articles
Gallery
Downloads
Events
Everything posted by Jymm Hoffman
-
Making a bellow need help
Jymm Hoffman replied to mnray's topic in Blacksmithing, General Discussion
Aldren A. Watson wrote and illustrated a book, "A Village Blacksmith" , I think the title has been changed, that has an excellent set of drawings for building a bellows. The only part I would change is how to place the leather. I can make a smaller bellows work better than some larger ones by using more leather on the top chamber than the bottom chamber, as much as a 1/3 to 2/3 ratio. They are not very complicated to build, but time consuming. The other point that some miss and can cause problems, the valves need some sort of device to stop them from being able to flip over or stick open. I small piece of leather strap is all it takes. -
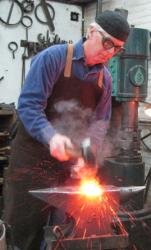
The charcoal I use for public demos is the real hardwood charcoal, sometimes Cowboy brand if I can't get another local made company. Don't bother with brickettes. Kingsford is now being made in Argentina, (while there are still plenty of producers in the U.S.!) Is this better? I have changed the manifold of the burners, photos included. First photo is Ugly Betty (2 burner,) second is Bertha, the larger 3 burner with a sid door. The questions I ask people when wanting a larger forge: How much can you pound on at one time? Do you have a power hammer? Are you making a lot of large bends? That has a lot to do with required size. Otherwise you are waisting fuel, same as building too big of a coal or charcoal fire. More on these later, I am off to load and get ready for the class in Buffalo.
-
PS, I do use hardwood charcoal when I demonstrate with my historical traveling forge. It is more expensive to use than good coal, but less harsh on my vocal cords, as well as no complaints from the small amounts of smoke.
-
I used coal for over 13 years as a full time smith. I got tired of chasing after the good stuff, plus all of the other headaches that are not listed in the cost of using coal. One, going to get it (or paying for the shipping,) the time involved in cleaning out the fire pot, hauling the ashes to some place out of the shop, time to start the fire, time to haul the coal into the shop (I never kept the entire supply in the shop.) Not all coal is good for forge work, especially if you want to forge weld and I do a fair amount of forge welding. I had "free" coal that turned out to not be worth the time to get it. I also had stuff that was so good it hardly smoked and had very, very, very little clinker. Now if I could afford to buy 2 semi loads of really good stuff, plus a place to store it, I doubt that I would take it. If you have never worked with it, find a place to try it for a while. In 1993 I switched to propane. My first forge was based on one from a fellow in Western New York (south of where I was living a the time.) It was built up of large fire brick, opened up to about 18" wide, 9" deep, about 4" high, and the top could easily be lifted up to accommodate larger work. It worked well and burnt about 1 1/2 gallons per hour, best estimate I could come up with. After moving to the Pittsburgh area, I started experimenting with smaller forges, the shells being built from old 20 pound propane tanks. I have also built a couple of larger ones, 1 from a 30 pound tank, and one from a cut down 100 pound tank to get more width. I do not have a flow meter, but estimate my propane usage (others using my systems have similar results,) the 2 burner in the 20 pound tank size burns about 1/2 gallon per hour. The 3 burners run 3/4 to 1 gallon per hour. I have built both naturally aspirated and blown systems. I prefer the blown system, it gets to temperature faster and uses less fuel. Even with the price of propane going up, I don't have to get it, I have two 125 gallon tanks outside of the building. Since I have 2 semi permanent forging stations and occasionally teach in my shop running 6 to 8 forges I have a manifold system of black pipe bringing the fuel into the building with several locations to hook up the forges. I also do production work and frequently have more the one iron in the fire, much harder to do that with coal. What I have to do to get my propane is to check the tanks occasionally and call my supplier, if they have not tended to the tanks before I thought of it. To light the fire is really hard, throw a match into it and go! In no more, less time than lighting a coal fire, I am forging. In my shop, the bottom line to me is pounding hot metal, the heat source needs to be clean and get to the temperatures needed for welding and can be cut down. Cost is a factor, but the hidden costs have to be taken into account as well. The more time I get to pound hot metal, the more money I make (and most of the time I still have fun doing it.) There is no clean up or ash to remove, and no smoke to bother the neighbors. Plus the only black buggers I get is now from grinding. I feel that I am healthier and have fewer respiratory problems since switching to propane. And no, not all propane forges are built a like. Attached is a photo of my heavily used 2 burner 20 pound tank forge. I lovingly call it Ugly Betty. It has been through many changes, but it works great and I was using it today. You would be amazed at the size projects that can be done out of this. I will also be teaching a workshop in Buffalo this weekend in which this is the only style forge we will be using, 8 of them to be exact.
-
I would not wear contact lenses in a blacksmith shop. This is why: A friend that was taking blacksmith classes with me, only wore contact lenses due to her glasses being so thick. Her eyes were constantly red. She went to the eye doctors and he just about yelled at her to get her contacts out now. Dust had gotten under them and scratched both eyes. They thought she might not be able to wear contacts again. Fortunately, she only wore her bottle bottom glasses in the shop with goggles after that and her eyes did heal a few weeks later to allow her to wear contacts again. I make my daughter take her contacts out, put on her glasses and goggles when she is working in my shop.
-
Heat it & beat it! (Jymm) "It it ain't broke, you're not trying hard enough." Red Green I also like to use "the handyman's special." (duct tape, another one from Red Green.)
-
Double horn vs. single horn anvils
Jymm Hoffman replied to Dave M's topic in Anvils, Swage Blocks, and Mandrels
You have to take care of family first. I do have a double horn available at this time. You get first crack at it, after you say no, another iforgeiron subscriber can have a shot at it. -
Double horn vs. single horn anvils
Jymm Hoffman replied to Dave M's topic in Anvils, Swage Blocks, and Mandrels
Would you like to help support this site with the purchase of a new anvil? You won't need a 250 pound anvil if you try this one:Double Horn Anvil - Blacksmith Photo Gallery If you wait about another year, I might have the 250 to 300 pound version available. I only have them done on order, the foundry is about 8 weeks out from order time. -
two of my favorites, my continental and early colonial (early London) pattern anvils.
-
If you don't want to forge weld the poker and you still want to spit it, and you have a good vise, try splitting in the vise vertically, with a narrow chisel. I frequently use this method not only on forks, but larger splits as well. Check out in this article: Feeding the Army If you are worried about splitting down a line, do a cold chisel line as your guide for the hot chisel. It makes a much cleaner split, no flashing to clean up or fight you when drawing out the tines. It does take a little pratice and you have to remember to take smaller bites at it or the work will bend in the vise.
-
Making Frying Pans
Jymm Hoffman replied to civilwarblacksmith's topic in Blacksmithing, General Discussion
Excellent questions. As this time period is not in my area of expertise, others should have more definitive answers. I do not know the history of when spinning was used for making frying pans. Most of the antique pans from the late 19th. century and earlier that I have seen, have been very impressive in being very difficult to see any tooling marks, including a few spun pans I have seen. Were the spinning marks worn off from use and cleaning? Maybe. On earlier pans that were made by a local smith and marked, it is very difficult to see any hammer marks. Again could this be from cleaning or were the hammer marks removed by the maker? How late were local smiths still making products such as frying pans? That depends on location and customers' demands. The originals I have personally examined showed excellent craftsmanship, much better than many "reproductions" I have seen. A coppersmith sent me a reprint article in a periodical from the early 18th. century, unfortunately I can't lay my hands on it. In this article, the author states that there were only 2 pan makers left in England and they made pans stacked 3 or 4 at a time. I can't remember any other technique being exposed. I do not know when pans were commonly stamped in presses. My question is were they being stamped in either a drop hammer, or forged while stacked. I have not tried stacking several disks to forge them out. This may also be appropriate by the time of the American Civil War. Now as to issued equipment, again, this era is not my area of expertise. I would venture to say that frying pans were not issued to every soldier as part of a mess kit. During the 18th. century, British and American soldiers were strongly discouraged (even ordered, ) not to fry their rations, they were to be boiled. On campaign, they were normally issued camp kettles, sheet iron, sometimes tinned, straight sided kettles. There were several standardized sizes. 6 - 8 men were to form a mess, partially depending on the size of the kettles they received, able to hold about 2 - 3 gallons. Cast iron pots were normally only used by the military in permanent locations: i.e.. forts or ships. Some officers were able to get camp kettles with lids that were sometimes used to fry food, but that is not typical/common soldier stuff. -
Making Frying Pans
Jymm Hoffman replied to civilwarblacksmith's topic in Blacksmithing, General Discussion
You could have one too! -
Making Frying Pans
Jymm Hoffman replied to civilwarblacksmith's topic in Blacksmithing, General Discussion
Terminology: these are not jigs, nor fixtures. Technically they are oxygen cylinder bottoms being used as swedges. I heat the disks up and pound down into them, trying not to hit the bottom of the swedge very hard. This is something I can probably type 3,000 words to explain. You just have to give it a try and learn from mistakes or come to my shop for a lessons. Also shown are the primary hammers I use for making frying pans, ladle bowls, and wax catcher cups for lighting devices.The large body shop looking hammer is only used for really deep bowls and frying pans. It is very unwieldy to use. An 8" diameter pan takes me about 30 to 45 minutes to finish, especially if I don't have to cut it. Larger pans take an hour or so. I now buy most of my disks already cut by a local fab shop that has a computer controlled plasma cutter. -
Making Frying Pans
Jymm Hoffman replied to civilwarblacksmith's topic in Blacksmithing, General Discussion
I'll try to remember to take the camera to the shop tomorrow. 12 gauge will be tough on you. Find someone that can get the 16 gauge for you. It will be worth the money. -
Making Frying Pans
Jymm Hoffman replied to civilwarblacksmith's topic in Blacksmithing, General Discussion
I demonstrated making a smaller frying pan at the Great Lakes International Iron Fest a couple of weeks ago. I make my pans for spiders, either round bottom, semi round bottom or flat bottom as well as flat bottom pans. I had a large cylinder of tool steel cut by a machine shop to act as a big swedge and used it for years. Then someone told me about oxygen cylinder bottoms. They work great and come in different depths and are normally very cheap. At first I had them cut to the same height as my anvil. I now get them cut about 4 inches from the bottom and weld a stud to the inside of one wall, this stud fits in my hardie hole and the big swedge does not take up floor space, fits into a drawer or underneath a bench. I also made a couple of special hammers. One was from a blank that would have been made into a hot or cold set. The intended striking end was easiest grind smooth and rounded, the intended cutting end was square and took a little more work to grind, but not too much. Most commercially made hammers for embossing and planishing I found to radical in shape and not long enough to reach inside. I made another hammer for the really deep pans that looks like a very large (auto) body hammer. Something that is a 2-3 pounds in weight is good for this work so that you are dropping the hammer and not trying to force it into the work, etc, reduces your fatigue. I like to work with 16 gauge for smaller pans, 6" up to 14" in diameter. If you go bigger, I suggest going to 12 gauge. I also suggest that you start with 8" diameter of 16 gauge. Depending on the size and my mood, start either in the center and work out, or from the outside and work into the center. You have to go back and forth a couple of times. Do not try to take it all the way to the bottom immediately, it can actually cause a tear. Most of the time I start on the outer edge, going all the way around and spiral into the center, then back out. Stop and take out the wrinkles when they appear. For all pans, I make into a bowl shape, then flatten the bottom by pushing it back into the pan with a light hammer and more rapid blows. You need to flip it over frequently to take out the wrinkles that start to appear in the bottom. . To flatten the sides, (take out the curve or cupping shape,) I do this cold and I frequently use a post vise. Close the jaws and hold the side of the pan to be worked over the closed jaws and flatten out the cup shape. -
Where to get good coal
Jymm Hoffman replied to Sesshoumaru's topic in Blacksmithing, General Discussion
The last time I bought coal in the early 90's was from Euclid Builders Supply in Euclid, Ohio. They carried Pocahontas coal, which was one of the better sources at the time. The best I ever bought was from Emmert Studebaker, God rest his soul, in Tip City, Ohio. You might check out Thompson Brothers Mining Co., 3379 E. Garfield Rd., New Springfield, Ohio. Some guys in Western Pa use them. Bottom line, if you want to find good coal, you will have to search. Some of the better sources have been given to you. Now you will have to either drive to get it, maybe up to 4 hours away, or have it shipped to you, then fire it off and test it. You may eventually find out why I got tired of chasing after good coal and switched to propane. The worst coal is normally free. -
Safely securing anvils
Jymm Hoffman replied to Thermalfun's topic in Anvils, Swage Blocks, and Mandrels
I suggested a chain method to a friend, based on what I saw at Colonial Williamsburg. This is what he did with the idea: Anvil Stump -
Stories behind smithy/forge names...
Jymm Hoffman replied to elkdoc's topic in Blacksmithing, General Discussion
Hoffman's Forge. Wanted to use my name, something traditional and professional sounding, back in 1981 when I decided to go full time. When I lived in New York in the late 80's and early 90's I had to register the name. Some clients don't want to and some can't write a check to an individual. They have to write checks to a business name. My current bank does not care, but the one in New York did care. So I had to do a business checking account and have the business name registered. My current bank allowed me to put the business name on a cheap checking account, which is now a small business account due to mergers. I never cared for the cute names. I have seen a couple of different people use Dragon Breath Forge as well as a couple of different people use Lazzy Ass Forge. If you use a more conservative/professional sounding name, who know's maybe something big will happen. -
how it is constructed?
Jymm Hoffman replied to trattoclip's topic in Blacksmithing, General Discussion
Andy would probably not mind the question, he is a member her too, I think. He lists this site as a link from his site if I remember correctly. Although he does not check in very often. Mende is on the right track. The way I would do it is twist one direction at a time. Once that section of twist is done, it gets cooled off before trying to twist in the other direction, working my way down the bar. -
I'll work on it when I have a little more time. I need to update some photos.
-
how it is constructed?
Jymm Hoffman replied to trattoclip's topic in Blacksmithing, General Discussion
why don't you ask Andy? He is the guy who made it and has it posted on his website: http://www.arcironcreations.com/gallery.html -
In 1993 I stopped using coal. I use only propane in my shop. I do a lot of variety in my shop, I now have 2 basic forges, one for smaller, one for larger stuff. The first gas forge I used for about 7 years, I stopped using as it was the largest least efficient. The smaller 2 burner version I have been using for about 8 years now, almost every day. It uses about 1/2 a gallon of propane per hour and I do a lot of forge welding as well as just basic forging with it. I do use blowers with these and prefer the blown forge over naturally aspirated. I use barbecue regulators (1/2 pound of pressure.) You can see more of the variety of work I produce and the forges I use in the photos posted at forgemagic: Blacksmiths Gallery'
-
The best chimneys I ever used were hoodless side draft, as described above. The worst were hoods hanging over the fire with the chimney pipe in the center of the hood.
-
Power hammers
Jymm Hoffman replied to yesteryearforge's topic in Power Hammers, Treadle Hammers, Olivers
I can not say enough good about my Say Ha 50 kg, now Say Mak, I bought from Tom Clark. I had a helper for 8 weeks last summer and needed a second machine. I liked the first one well enough (after using it hard for 5 years,) that I bought a second one, the 60 kg. I love both of the machines and find them a real pleasure to use. Very low maintenance, easy to change dies. I had a 100 lb. Bradley Upright Compact for 10 years prior to buying the first air hammer. I do not regret the move. The service from Tom is also great. The machines are ready to run as soon as they are off the truck and on the floor. I have had some opportunities run other machines (not all, but some on your list) and have been very unimpressed with them after using the Say Ha/Say Mak. I think Tom's machines are the best machine with the best service for the money. I know a couple of people that regret buying other machines, which will remain nameless. I do not get any monetary or personal benefit promoting Tom's hammers. I am a full time smith, my only income is from my business and I rely very much on these machines to run for hours on end, some days sitting idle while I do a lot of hand work. They are ready for constant heavy use, or occasional light use. -
I don't understand the structural issues. A side draft chimney can be (as were my last several chimneys) simply old sheet metal rectangular heating duct run down to the fire with a hole cut in the side, placed next to the fire. These were approximately 8 inches by 12 inches. The best chimneys I ever worked with were side drafts built with brick around 12 inch square flu liners. The brick forge I built with a double forge. Only problem I ever had with it was remembering to block off one side while starting only one fire. It was fine to fire both at the same time. I do like larger fires than some, but not huge fires. I used both side blast and 8 inch by 12 inch fire pot for these fires. 6.7 will only work for very small fires and very good, no smoke fuel. But I don't have to worry about chimneys any more since switching to gas.