
Jymm Hoffman
-
Posts
312 -
Joined
-
Last visited
Content Type
Profiles
Forums
Articles
Gallery
Downloads
Events
Everything posted by Jymm Hoffman
-
70-90 lb anvils: advisable?
Jymm Hoffman replied to kerisman's topic in Anvils, Swage Blocks, and Mandrels
While this is a little bigger at 110 pounds, it is very versatile. I used one similar to this full time for almost a year prior to getting a larger anvil. I still use one of these a lot. http://www.iforgeiron.com/index.php?app=gallery&module=images§ion=viewimage&img=23685 -
I am in favor of and recommend the top be larger than the bottom. I have cut down larger bellows, (about 1 foot off the back in order to fit my traveling forge (cart.)) This made for a smaller "foot print", but with more leather on the top they actually work much better than the larger version with the leather being equally split. It was recommended to me in the early 1980's and that is how I have built bellows since. I have not used one the other way, but it makes no sense to me. It would seem as though you would not use the working chamber to its potential or would be forcing air through the reservoir in such a fashion that would give you an uneven blast (which I can still do with the smaller working chamber.)
-
Show me your anvil stands
Jymm Hoffman replied to pkrankow's topic in Stands for Anvils, Swage Blocks, etc
For historic demonstrations I still use a stump. In my shop and for modern demonstrations, I prefer the metal tripod. The small one shown comes apart for easier transport, however, I do prefer the permanently welded version for everyday use, of which I do have one for one of my 110 pound Continental Pattern anvils. For my 330 Euro, it has a welded version. I do have holes in the floor to drop pins through the feet to keep them from walking, but still easy to move closer to or farther away from work, depending on project needs. -
If you want a very versatile anvil that does not take up a lot of space and support IForge, then take a look at this: http://www.iforgeiron.com/index.php?app=gallery&module=images§ion=viewimage&img=23685
-
I have had some experience with all the floors mentioned. There is no perfect floor to meet every demand as there is no perfect tool to do everything, perfectly. I keep coming back to concrete and is my choice. Much easier to keep clean and keep dust down, and if poured and finished correctly, never changes unless something stupid is done to it of course. Most of the problems were mentioned with the exception of pavers set on dirt or sand eventually move and can cause tripping. If you have back and leg problems on one surface, I would venture to say you will have those problems to some extent with any floor, jus maybe a little less. My solution that we discussed last year is clogs. The arch support is superior to any insert I have used in my expensive work shoes and boots. If I am going to be standing all day, which is what I normally do as a full time smith, I want to wear either my wooden shoes or wooden sole clogs. Makes a huge difference on my legs and back. That's all I got to say about that.
-
Check with Ft. York and Ft. George. Saw something at Ft. York in the late 1980's that was slightly different than Muller's drawings of 1757. Mine is a Muller/British traveling forge. I am not sure what and when the Brits started to change. American's were supposed to have gone to French pattern artillery around 1800-1810. The French pattern forge is supposed to be a four wheel set up, basically a wagon frame. I have only seen photos of a model years ago and no one has come up with it or drawings when I ask.
-
When coal is $23 for 50 lbs....
Jymm Hoffman replied to Brasilikilt's topic in Blacksmithing, General Discussion
I switched to propane in 1993. First system used about 1 1/2 gallons per hour. New systems use 1/2 gallon to 3/4 gallon per hour. I have not used coal in my shop since. I do miss the localized heats, but that is it. I can either use a torch or dip parts in water to get the localized heat. Shop is much cleaner, so are my lungs. I don't spend any time chasing, hauling or cleaning up after coal. I think I am healthier because of it. If I could afford the start up cost, I would try one of Grant's induction furnaces. See my other posts about gas forges -
Current 3 burner (that I can heat up 4" or so in it,) has about a 9 inch wide opening with a cut out for odd sizes. I was using a 2 burner welding up axes all day today. How big do you want to go? This system can be adapted to any size forge, just get a bigger blower and bigger orifice. It is run on propane at household pressure (barbecue regulator.) If you want it to heat up faster, you need good refractory material. Blanket covered with ram, thicker in the bottom to help radiate heat and the stuff I use is impervious to flux. 2 burner system uses about 1/2 gallon of propane per hour, could handle 3 inch square. Current 3 burner in use uses about 3/4 gallon of propane an hour and can probably handle 5 inch square. I have no problems with 3/4" by 5" in the 3 burner. So how big do you want to go? A friend in Buffalo has a large 2 burner version with a more powerful blower and much larger than mine. With the right blower and right refractory, this is simple to build and kicks butt. I recommend one burner tip per 6 inches of forge length. Although this is so simple some don't believe it works until they see it. I got the idea from my brother that is an engineer at Underwriters Laboratories, works in the burn department. When I had problems burning up commercially made burner tips asked him what they use. He said the guys in the shop just flatten a piece of pipe. It was so simple I had to try it. After about a year of burning out commercially made burner tips I switched to these and have not used any others since 1994, regardless of the size of the forge. As long as you keep some blanket packed around these burner tips, right to the edge, they last a very long time, years. If you send me a pm I will send you more information.
-
I don't know if the burn out rate is any better or worse in regards to burner placement. The definite advantage is flexibility in changing the system or repairs. With it in the bottom half, you can take the top half off to repair or even enlarge. With my first (much less efficient) system the top was one solid piece of castable over blanket. If I needed a larger forge, I just lifted the top off an piled up brick. This was the system that used about 1 1/2 gallons of propane per hour and took about 45 minutes to get up to welding temperature. With the smaller clam shell systems, welding temps are achieved in about 15 minutes. I have also switched sources and no longer us the Rampack 85. I am now buying form Dixie Refractory Sales and Service. The salesmen puts in an order for me with another large batch and saves me huge amounts. With UPS shipping costs, it is still less than 1/2 what I have to pay for Rampack 85 locally. I am now coating the entire system with Thermogen 60, making a hard shell interior. Much less damage do to me banging up against the walls and working very nicely. If you send me a pm I will give you the email contact information. I will also try to remember to take some photos prior to closing up the recent forge.
-
To get a more even heated chamber, I recommend one of my burner tips every 6 inches. It depends on which side of the chamber the burner tips enter and the size of the blower, etc will also affect the evenness. My first blown system was much larger with 2 burner tips coming in on the narrow side. It worked fine but was also much larger than needed for most of my work, and much more costly to operate in comparison to my smaller systems. It used at least 1 1/2 gallons of propane an hour. My smaller systems use about 1/2 gallon per hour for the 2 burners with a 12 inch long shell and about 3/4 gallon with an 18 inch shell. While it is not necessary, I prefer a curved top to help with a circular flow of the flame. I believe it helps get a more thorough burn of the fuel and a more even heat. These are the only forges I use in my shop, the ones I build. Off to build another one for my Saturday class.
-
I just took a closer look of the original in my possession to reproduce. The main body of sheet metal is one piece. Another example of not seeing two alike.
-
I think there might be some confusion here, at least when I read some explanations I am confused. I have made a couple, from photos, a couple from originals. The pan on the bottom is indeed an ash pan, but there is grill work in the bottom to hold the coals, normally this grill is at the height of the bottom of the main body. I have seen completely removable top grill as well as those in which are permanently attached. The cross bar of the grill opposite of the handle pierces the sides to act as a hinge, as done in the above photo. The body of these are 2 pieces of sheet iron. One side is one piece of sheet and the other 3 sides are one piece, with a wrap around to the final side which normally is the side the handle is attached. Most of the originals I have seen are about 6 inches square.
-
If you are using coal or charcoal (real hardwood charcoal,) you should be fine with 20 Mule Team. If you are using gas, then 4 parts anhydrous borax and 1 part boric acid works better for me in my gas forges. I can use this mix in coal or charcoal as well.
-
I played with my panoramic options on my camera today. At Grant's request, I did not clean the shop prior to taking these photos. It is as I left the shop in a rush before leaving last weekend. I hope these are big enough for you to see. I do rearrange things for classes and hammer-ins. I have posted some of those previously.
-
Added another Colonial Pattern Anvil
Jymm Hoffman replied to Jymm Hoffman's topic in Anvils, Swage Blocks, and Mandrels
Found an additional answer. The customer that requested this addition to the pattern pointed me to Mr. Postman's book, "Anvils in America." While he agrees of not knowing exactly why, he thinks maybe it was influenced by the earlier style of "church windows." -
Added another Colonial Pattern Anvil
Jymm Hoffman replied to Jymm Hoffman's topic in Anvils, Swage Blocks, and Mandrels
This one weighs 103 pounds. Cast entirely of H13, fully heat treated, 52-54 on Rockwell C scale. The face is 4-9/16 inches wide, 9-1/2 inches long, horn 4-1/2 inches long, and about 9-1/2 inches high. I did this for demonstrations requiring historic tools prior to 1820. I primarily use it with my traveling forge I use for 18th. century shows. If anyone is interested in purchasing one, the cost is $875.00 with or without a horn, plus shipping. I will donate a portion of the sales to IForgeIron if you tell me you found it here. -
Added another Colonial Pattern Anvil
Jymm Hoffman replied to Jymm Hoffman's topic in Anvils, Swage Blocks, and Mandrels
I have not heard a good reason. Short answer, I don't know. Lots of ideas, but maybe some folks back then thought it looked cool. I have heard others speculate, but nothing I would bet on. -
I picked up my first 2 Colonail Pattern Anvils with a 5th. Foot today. One is already sold and the reason I had this added as it was requested by a customer in Georgia. The other is going to Quad State with friends, since I can not be there.
-
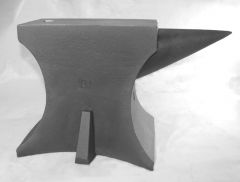 Colonial Pattern (early London pattern) Anvil with 5th. Foot. Latest additon to my line of anvils. Horn is 5" long. Available with or without a horn. The one hornless anvil I have photographed had the 5th. foot on the oposite side in relation to the hardie hole. So this pattern is set up to do that.
 -
I will argue which tent maker produces the better tent, that being Tentsmiths. They might be more expensive than Panther, and not make as many, but they are well worth the cost. For example, every seam is flat felled. They are making them in a small shop of their own in New Hampshire, and very well documented for the different type of tents for different time periods. Also the treatment on the canvas is done, so you don't have to, and the fire retardant is required by some state laws. The painter tarps and other canvas you can purchase at the hardware stores and farm stores normally do not have fire retardant. I would not set up without the fire retardant. Yes the canvas will still burn, but not as fast. Again some states require the fire retardant. I only use my large fly/awning a few of times a year. With a little care, mainly storing when completely dry, they will last many years and worth every penny, just like any good tool. Well worth the investment.
-
I don't use this so much for demonstrating while it rains, but to give me shade and protect my equipment and other stuff when it does rain. It is a 15 feet wide by 24 long awning made by Tentsmiths, with Sunforger and fire retardant. I have 2 sets of poles for 2 different heights, depending on where I set up. The center uprights are either 10' or 8' with the side poles 2 feet shorter.
-
Whats your weekend Project,
Jymm Hoffman replied to Tom Lumpkins's topic in Blacksmithing, General Discussion
Saturday morning I relined one of my hard used gas forges. Started using a plastic (ram) refractory as the inside layer for the top. Now using 1 inch of blanket and about 1 inch of ram for the top of the shell. Stands up to my abuse much better than just blanket. I am using the same plastic to cover the 2 inches of blanket in the bottom. Working very nicely. Saturday afternoon I started working on an order for 18th. century patterned shovels and spades. Hope to get this done this week. Today was a family day. After church went out to the horse farm where my daughter rides and then to the movies and dinner. -
New anvil, freight shipping cost
Jymm Hoffman replied to MarkC's topic in Anvils, Swage Blocks, and Mandrels
For items over 150 pounds (including anvils,) I have had the best prices from R&L Carriers, R+L Carriers , no charge for a lift gate, but it must be strapped to a pallet. As with all of the shippers I use, I think there is a surcharge for residential delivery. I have narrowed my shippers to UPS, R&L Carriers and the United States Postal Service. UPS wants to do my freight, but I will not use them until they drop the surcharge for the lift gate. -
Anyone making gun parts?
Jymm Hoffman replied to Bill in Oregon's topic in Gunsmithing, Muskets, Flintlocks etc
I make lots of gun parts, of the larger variety. My insurance agent knows it, he even came to my hammer-in to see what I do, with lots of people in my shop getting close to hot metal, etc. He loved it, and is a broker for Hartford and the ABANA insurance. They know what we do, including public demonstrations, and costs around $500.00 a year. -
Asking For The Experts
Jymm Hoffman replied to Rattlecat's topic in Blacksmithing, General Discussion
Fayetteville? Western PA? Starting with basic forging is the right attitude. Ray Rybar has used me for this purpose when beginners approach him about making knives and swords. Pittsburgh Area Artist Blacksmith Association Pittsburgh Area Artist-Blacksmiths Association event this weekend with traditional forging demonstrations at Steel Ornamental. I would be there if it were not for me doing generic public demos at Fort Ligonier this weekend for their 250th. Anniversary of the French attack on a redoubt. I would also encourage you to take some courses at one of the craft schools, Touchstone Center for Crafts would be your closest. I plan to run one day courses again this winter in my shop.