
Jymm Hoffman
-
Posts
312 -
Joined
-
Last visited
Content Type
Profiles
Forums
Articles
Gallery
Downloads
Events
Everything posted by Jymm Hoffman
-
If you were running a blacksmith school...
Jymm Hoffman replied to KevinD's topic in Blacksmithing, General Discussion
I would highly recommend that you take a serious look at taking that class with Aspery. While I have not met him, nor taken any classes from him, I have reviewed his book and was impressed. I can not speak about the instructors for the dates you list at John C. Campbell, but will say it could be another good place to start. Try to get some reviews from others to compare if you have to choose. If you can afford it, try one at John C. and Aspery. Also try to commit your self to practice what they teach you. Just like learning a musical instrument or athletic skill, practice what the teacher shows you. -
Some advise another blacksmith gave me that I have used: when applying the leather (or canvas,) do not divide it evenly between the top and bottom chamber. Use more on the top section, as much as a 1/3 to 2/3 ration. I have made smaller bellows work better than large bellows with this method.
-
Ideal shop setup plans
Jymm Hoffman replied to RainsFire's topic in Blacksmithing, General Discussion
The size of the anvil is not as important as stability. I like to be able to move my anvils around when I want to, not when I am pounding on them. Some old timers would sink the stump a couple of feet into the ground. Then the anvil does not move, even when you want it to move. I have a concrete floor, so no hole to sink the stump, plus I prefer the metal 3 legged anvil stand, with the 3rd leg under the flat/ square horn and 2 legs under the round horn. I put the round horn on my left side as I am right handed. To solve the moving anvil (even my 330 lb will move on me on certain jobs,) I welded washers to the foot of the 3rd. leg to drop a bolt into the floor. This stops that part of the anvil from moving. I can still move the round horn end to change the angle in relation to the vice etc. I can also easily pull this bolt to better move the anvil when necessary. -
Way back when I still burned coal, I had to do the dog leg thing out the side since the land lord didn't want a hole in the roof. It worked very well. Even with it at a slight angle, it still collected soot and ash that needed attention every once in a while. You might also try running straight through the wall at the height of the forge (start your side draft there.) This is a trend I have seen to help get the chimney outside as soon as possible, especially for schools that operate in hot weather. You basically run the chimney to the ground outside the building and tee into it. It should be easier to clean out than trying the horizontal run up higher, especially if you put a an access door on the outside below the T.
-
Depends on your location as to what brand name and when it is available. Another term used is lump. In the Northeast USA and southeast Canada, you can find it in grocery stores, hardware stores. Other places at restaurant supply houses.
-
Here's a couple of my gassers. I have been building this round style since around 2000. I like using 20lb. propane tanks for the 2 burner. This three burner is a cut down 100 lb. tank. The 2 burners will heat 12-16 long sections and the 3 burners will do 18 to 24. Welding is no problem, depending on the size as to how fast. With the 2 burner I can weld 1/4" chain within about 5 minutes. Larger material takes a little longer. 1" square, about 30 minutes. The 3 burner has a 3" wide slot cut out of the one side for odd shapes. I have been using this type of burner tips since around 1994. The burner tips are 11/2" black pipe flattened to about 1/8". I use blowers from Kayne & Son and barbecue regulators set at 11" water column, which is about 1/2 pound in pressure. The oriface is 1/8". I use about 1/2 gallon of propane per hour for the 2 burner and about a pound per hour on the 3 burner.
-
Show me your air hammer
Jymm Hoffman replied to Glenn's topic in Power Hammers, Treadle Hammers, Olivers
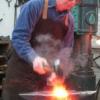
Sorry for the fuzzy photos. I bought a second air hammer this summer when I had an intern for 8 weeks helping me with production stuff. SayHa (now SayMak) 50kg. (110 lbs.) & SayMak 60 (130 lbs.) -
How did you get started in blacksmithing?
Jymm Hoffman replied to Glenn's topic in Blacksmithing, General Discussion
The shortest version is I had one semester in college, a few workshops and spent a lot of time in my shop beating my brains out. I took machine shop in high school and liked the tool & die stuff. I did get a job in a job shop after graduating in 1978, but did not care for it. I was looking at getting into the gunsmith's trade, then into blackpowder gun work. I started volunteering at Ohio Village in Columbus Ohio in 1979. Gunsmith sent me over to the blacksmith, Paul Browning, for a time to start me and get some open spots in the gun shop. I made hooks and nails. Then I started at Salem College, Salem, WV in January of 1980. They did not have a gun shop but did have a blacksmith shop and a wood shop. Working with the blacksmith, Tom Goodson. That is when the bug bit me. Tom left to get a chemistry job and I starte helping teach beginners. I left Salem College in 1981 with an Associates Degree in Heritage Arts and worked at Ohio Village as the Blacksmith through July, then started working at my business full time. I went back to school in 1986 (while running my business,) and got my Bachelor's of Arts in Museum Studies. Salem had changed the program from Heritage Arts to Museum Studies. I started at Old Fort Niagara as the Interepretive Programs Manager, March of 1988 through October of 1990, while running my business on the side. I returned to full time work in 1990 and still at it. I have managed to get into a couple of other workshops with Peter Ross and one with Bob Patrick on the power hammer. That is the Reader's Digest version. -
HW, thanks for the thoughts. Years ago I had considered flame cut as I knew someone that had gone down that path. The problems with flame cut, the shape is still not really correct for an English (London) pattern anvil of the 18th. century. Then there is finding a shop that can do it and not charging you their "standard shop rate." At least that has been my experience. I would even consider a CNC mill if the prices were close. Unfortunately, it seems as though casting is still less expensive. The anvils I had cast at the first foundry, the price was lower because they were remelting H13 they got at a good price as drops from a machine shop. I would have stayed with them, however the quality was dropping and I was consistently being lied to about deliver dates and fixing the last batch that were too soft. They did not add any carbon and other alloys lost in the reheating. They would tell me they would be over the next day to take back the last batch that was 5 months late from the promised time, then did not show up. After my phone calls were ignored for 2 1/2 weeks, I decided I better get my patterns. I thought I had another foundry that would work with me if I provided the material, but then they backed out. I would have considered them, but I would have to drive an hour to pick up the material in a container that I had provided to the machine shop, then drive 2 hours to the foundry to melt and cast, and drive an hour home. Then drive an hour to pick up the anvils, bring them home to do final grinding, then an hour to the heat treat facility to drop off for heat treat and Blanchard grinding the top and bottom. When they were ready, another 2 hours (an hour there and back) to get the finished product to my shop. Had that worked out, I might have tried it. If I knew someone that could do the resistance welding I would give it a try. If it could be done with malleable iron, then the foundry I mentioned above could be a candidate for this method. They got cold feet when someone told them they had to have a new crucible when switching to and from tool steel. I will keep looking and hope something pops out. I am trying to keep these as affordable as possible. I have learned a lot about buying and selling specialty products that I can not make.
-
PS. I do not have a website. I had the pattern made so I could get one. Others have encouraged me to get more made. If I get orders, I will make them. I am not ready to go into the anvil business, yet.
-
Hey gang. Thanks for the plug and compliments. Kingsferry's email caused me to lurk and the above posts caused me to sign in. Good News/Bad News. I can still get them, however the price as gone up. I had too many problems with the last foundry. I am still looking for another. I tentatively have one, but the price has gone up to $1,200.00. If any of you that know of any foundries willing to cast tool steel, especially H13, in small batches, please let me know. I found one or two foundries that are close in price to the tentative foundry, but I have to get 10 anvils done at a time. The cost would also be in the $1,200.00 range with these guys. All of them are say 8 to 10 weeks from day of order to delivery. This anvil weighs approximately 100 pounds. I also have a double horn pattern that weighs about 110 pounds. I have proto type photos posted at forgemagic. I have the modified pattern as well as the colonial in my possesion.
-
HW, if you have done this lots of times before, it could be a wierd batch of steel. I have had that happen to me. Or you looked at it cross eyed, or your flux got a little dirty, and it could have been just a bad day for you.
-
Back in the early 80's, the Anvils' Ring had an article about hearing protection. I took it to heart and have worn ear plugs ever since. I am now uncomfortable to be in a shop without my ear plugs, as well as safety glasses, etc. Ears and eyes can not be replaced, protect them. A few years ago I invested $60.00 into the molded to fit my ear canals type plugs. They are worth every penny! I got them "flesh" colored so they would not be as visually noticeable for use at re-enactments. I can hear voices (spoken ones of course) and lower deicbles while the louder ones are cut. Safety First: Don't be macho or stupid. Wear hearing protection, safety glasses, and other correct clothing, etc. I am now uncomfortable doing anything in my shop without wearing my "standard" safety gear. That includes, ear plugs, a leather apron, long pants and either good leather work shoes or my favorite, wooden shoes.
-
Yes Wayne. You must not pour too much directly in one spot. I "splash" a ladle full at a time. Some might use a can with holes.
-
If you learned with coke, you may not have been taught to use water on your fire. Sprinkle or splash water around the edges of the fire. This helps to control it as well as those "fleas." I will use as much as 5 gallons of water a day when I use charcoal. Sometimes I even through a ladle full of water right into the fire when it is too big and sparking too much, while I am pumping the bellows to make certain air is keeping the fire going.
-
According to Potman's book, the table would indicate this being made after the 1780's.
-
Poll - What is your primary forging hammer?
Jymm Hoffman replied to Glenn's topic in Blacksmithing, General Discussion
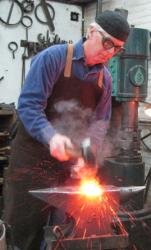
This is the hammer I use most of the time. About 1 3/4 pound, traditional English pattern cross pien. I forged it from H13. I have used a couple of hammers of this shape and size as well as this handle shape for over 15 years. Not long after I made one of these, I also stopped using a death grip, then stopped wearing an elbow wrap and haven't since. With this handle, I can pretty well keep my hand in the proper position while changing the angle of the hammer face or switch in mid swing to the pien. Not only can I choke up for light work I can also get out on the end of the handle to get more power. The handle is hickory and feels really nice in my hand. -
If the gas is bothering you, is it burning completely? Do you have a CO detector? Your shop may also be too tight for a chimney as well. I have been using gas since 1993, maybe that is part of my problem?! :)
-
The best side draft chimney's I have ever used were masonry. The first one was at Ohio Village in Columbus, Ohio. It has at least 12" square flue liners faced with brick with about a 12" square opening at the bottom, and that is it, no smoke shelf. I built a double forge that went into a single 12" liner, faced in brick, also worked great, a lot of work though. The best metal side draft I have used were built by Richard Shepherd and are used at Touchstone Center for Crafts. There are 12 there for student forges. The instructor's forge is masonry and works very well. Metal can work fine, but it depends on your budget, both in money and time. However, if you don't like blowing black dust from your nose, messing with a chimney, what to do with ash etc, you can build a gas forge and not worry about putting up chimney.
-
I used rectangular heating duck for several years in 3 different locations, some was discarded from a furnace change. First stuff was 8 x 12 and last one was 10 X 14 if I remember correctly. Worked fine. Last place had to be inspected. As long as I was a certain distance from wood and built in a flashing, it was approved. Check your local codes. I switched to gas in 1993 and have not had to worry about chimneys through roofs or walls (did both.)
-
Is there an acceptable substitute for ITC 100
Jymm Hoffman replied to Woody's topic in Problem Solving
I use 3,000 degree mortar, thinned to a "slurry." It will be a little more brittle, but for the cost, it is easy to patch when necessary. It cost me about $15.00 for a 2 1/2 gallon pale already mixed. I break it down into smaller containers so that it does not dry out. When needed I literally grab a hand full or two and add some water in a large coffee can, then smear it over the fiber blanket that needs it. Takes very little time and can normally be fired right away. I find that it still does a pretty good job of containing the errant fibers. It may not be as durable as the other products, but again for the cost and ease of use, I prefer it. -
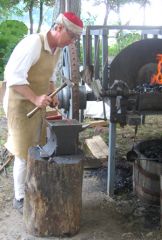 Demonstrating with my 18th. Century Traveling Forge and new Colonial Pattern Anvil, with a horn.
 -
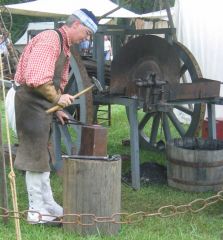 Demonstrating with my 18th. Century Traveling Forge and Block Anvil.
 -
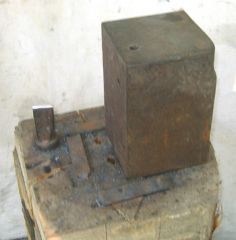 This is the anvil I used for over 25 years when demonstrating with my 18th. Century travelling forge until this fall. I used Simmons & Turley's book as a basis and have since found other original "block anvils." This happens to be material used in large truck axles in the late 70's, not sure what it is. It has a spike welded on the bottom and stuck into a hole. The large straps on the stump are staples to keep the log from splitting out throughout the checks and keep the anvil from turning while working on it. Many were amazed to watch me make hooks and chain on this with out a horn. I learned early on, while making scrolls, I preferred to not use the horn, so I applied that to making hooks. I did round one corner to help dress certain curves and hooks. I also drilled a hole into the face and a hole in the side to be a clean out for punching. However, most of the time a "bolster bar", (a flat bar with holes,) works as well or better. That is a hardy in the stump. The main thing is to have a flat hard surface to pound on. To quote Glenn, "the tools don't make the blacksmith...." I also like to apply the keep it simply philosophy.
 -
ASO: Anvil Shaped Objects
Jymm Hoffman replied to primtechsmith's topic in Anvils, Swage Blocks, and Mandrels
This is the anvil I used for over 25 years when demonstrating with my 18th. Century travelling forge until this fall. I used Simmons & Turley's book as a basis and have since found other original "block anvils." This happens to be material used in large truck axles in the late 70's, not sure what it is. It has a spike welded on the bottom and stuck into a hole. The large straps on the stump are staples to keep the log from splitting out throughout the checks and keep the anvil from turning while working on it. Many were amazed to watch me make hooks and chain on this with out a horn. I learned early on, while making scrolls, I preferred to not use the horn, so I applied that to making hooks. I did round one corner to help dress certain curves and hooks. I also drilled a hole into the face and a hole in the side to be a clean out for punching. However, most of the time a "bolster bar", (a flat bar with holes,) works as well or better. That is a hardy in the stump. The main thing is to have a flat hard surface to pound on. To quote Glenn, "the tools don't make the blacksmith...." I also like to apply the keep it simply philosophy.