
Jymm Hoffman
-
Posts
312 -
Joined
-
Last visited
Content Type
Profiles
Forums
Articles
Gallery
Downloads
Events
Everything posted by Jymm Hoffman
-
Show us your portable forge for re-enacting event / demos
Jymm Hoffman replied to Sam Falzone's topic in Solid Fuel Forges
Historic Demonstrations, 2006 - Blacksmith Photo Gallery 18th. Century Traveling Forge - Blacksmith Photo Gallery -
Anyone in the neighborhood that would be interested, I am heading off to Trenton, NJ. I am doing a weekend demonstration for the public at the Old Barracks Museum with my 18th. century traveling forge. Mostly making nails, maybe a thumb latch and parts. Also sent in my Quad State Round Up registration this week.
-
Power hammer test
Jymm Hoffman replied to mike-hr's topic in Power Hammers, Treadle Hammers, Olivers
Finn, I understand what you are saying, especially if you have a paying demo and you not showing up. One of the problems I have had with SOFA's choice of weekends. The first time I went was in 1981. The second time I went was in 2001. I have only been there 3 times, going for my 4th. I have been a full time smith for over 25 years. When doing the weekend selling thing, this is a prime time of the year. So that really makes it tough on those of us trying to make a living at this. I also understand that many blacksmiths are just out and out cheap. Plus I know what is involved, cost and work, to haul equipment. My historic traveling forge takes a 14 foot tandem axle trailer, etc. etc. etc. However, if you are in the business of selling, especially power hammers, you know you have to put up with tire kickers. You also should know, you some times need to put up with this to get as much exposure as possible. As I have told people that approach me about going into business as a blacksmith, the advice I give I believe applies to power hammer dealers as well, you need to do 3 things besides make a quality product. You need a catalog or brochure, an internet web page, and you still need to get out so people and actually touch what you make or sell. Again in the case of SOFA'S Quad State Round Up (the real name for this event,) where are you going to get this many people? I was trying to be nice. I have seen some advertising of other hammers and Tom put out a challenge for them to put the hammers to a test and I have tried a couple of other hammers. I think Tom scared off the competition. I don't get paid for this, but I am prejudice enough to say it is the best power hammer for the money. Good enough that I bought a second one and don't regret it. Too many blacksmiths are penny wise and pound foolish. I certainly am not rich, and probably never will be, but I do try to balance running a business, love of the craft, spending time with my family and paying my bills. Some days I am successful. As I once told a local hobbyist, recently retired and wanted to make some money doing this stuff as he whined about paying for some tooling: "have you ever regretted buying a cheap tool?" He answered yes. "Have you ever regretted buying a good tool?" Guess the answer: "no." I know that dollars don't always make a good tool, but my research showed, and 6 years experience as proven to me that I made the right choice buying a hammer from Tom Clark. So now I will ask again, why is the competition not showing up to try Tom's challenge? Jymm -
Need help from YOU
Jymm Hoffman replied to kovacija(blacksmith)'s topic in Blacksmithing, General Discussion
kovacija, I would not be happy with one burner in the tank you plan to use. I have no idea if the burner you have will work. Look for a blower. John, the pressure in the gas is constant, no adjustment. However, I do adjust the flow or volume on both the gas and the air. Too much flame coming out cut the gas or increas the air. Not enough gas, visa versa. -
Need help from YOU
Jymm Hoffman replied to kovacija(blacksmith)'s topic in Blacksmithing, General Discussion
You should be able to find a blower/motor that will work. I listed the ones I use as a reference. Since I listed the pressure and volumes, after you convert to metric, start digging around. Try different types of furnace and other gas heating systems. While a blower may cost more in starting a system, it pays for itself as they normally use less gas, get hotter and get hot faster. -
Blacksmithing has come to a DEAD STOP
Jymm Hoffman replied to John Martin's topic in Problem Solving
Switch to propane and the problem is gone. -
Need help from YOU
Jymm Hoffman replied to kovacija(blacksmith)'s topic in Blacksmithing, General Discussion
Starting with the manifold, it is made from 1 1/2 inch black pipe parts. The burner tips are 10 inch nipples cut in 1/2. I heat them up and flatten to a 1/8 inch sheet to act as a gauge. I no longer us elbows and street ells as it requires more adjusting or tuning of the burners tips. By only using T's, there is less need to adjust the burner tips (open one that is not burning as well as the other by using a long chisel while it is running.) The T's do not necessarily have to be welded together, you can use short nipples to connect everything. I used to recommend 1/8 inch hole for the gas, but the newer method of connecting a 1/4 nipple to a ball valve into the 1 1/2" to 1/1/2 inch T works fine. VERY IMPORTANT: This system works on household gas pressure, here in the United States, that is 11 inches of water column, about 1/2 pound of pressure. A common regulator that is already set for this pressure is used on outdoor gas barbecue grills. Do not try this system on high pressure gas with this large of an orifice. I normally run 3/8 to 1/2 inch rubber propane hose from the regulator to the ball valve. NEXT IMPORTANT PART: The blower must be a high speed blower that can produce not only enough CFM, but also enough pressure. I do not know what the minimums are, I use blowers readily available from Kayne & Son/Blacksmiths Depot: Blacksmiths Depot | Forge Blowers. The small blower they sell works great, it develops 112 CFM at 36 ounces of pressure. I run my smaller 2 burner and large 3 burner systems with the same blower (not at the same time of course.) I also use 2 inches of ceramic fiber blanket to line the entire forge. I do occasionally replace the upper exposed layer from time to time. Normally as a result of me damaging the lining. I use a ram refractory called Ram Pack 85 to cover the bottom half of the system to protect the blanket from flux while forge welding. This also acts as a little bit of a heat sink that then in turn reflects the heat up and actually helps to make the system work better. I coat the entire interior with thinned down 3,000 mortar instead of ITC or a rigidizer. It is less expensive and serves the same purpose of containing the fibers from the blanket. The manifolds shown with elbows have been changed to T's. Also, the shell in progress does not have the ram refractory covering the bottom yet. I would also recommend more than one burner in the tank you plan to use. It will give you a much more even heat, and it is better to turn the entire system down than to try to shut off one burner if you want it cooler. -
Need help from YOU
Jymm Hoffman replied to kovacija(blacksmith)'s topic in Blacksmithing, General Discussion
I will try to post some more information later. Until then take a look at my photos on Forge Magic: http://www.forgemagic.com/bsgview.php?by='Jymm%20Hoffman'. I have changed the manifold to the gas forges, but you should be able to build this system and will be impressed with how hot and how fast it will get hot. -
forge welding mild steel
Jymm Hoffman replied to evfreek's topic in Blacksmithing, General Discussion
I mix my own flux, 4 parts anhydrous borax to 1 part boric acid. Works fine in both gas and charcoal (so I it should be fine in coal as well, just haven't been around a coal fire to try it.) -
forge welding mild steel
Jymm Hoffman replied to evfreek's topic in Blacksmithing, General Discussion
Don't forget that scale could be the problem. If you wait too long and all the flux is burnt off, scale will build up, not flowing off and prevent a good weld. Sometimes people wait too long while trying to "soak" the steel in the fire. Is your fire shallower than the one you had great success. If that is the case, you may be too close to the air source which may also cause excess scaling in comparison to the other fire. Also, if there happens to be more carbon in it, the welding temperature may be lower, not higher. Most of my welds are done at a bright orange, not white. I find that having both (or all) sides to be welded are the same color with the flux dripping or flowing. Quick light hits were mentioned earlier, but also turning so that the anvil is not sucking the heat out of one side only, back to trying to get or keep everything at the same temperature. -
Power hammer test
Jymm Hoffman replied to mike-hr's topic in Power Hammers, Treadle Hammers, Olivers
While this is an excellent idea and about the best test to do, from what I have recently learned, it does not sound as though any of the other dealers/manufacturers are willing to show up and participate. Some may claim higher fuel prices or busy etc. What's up with that? -
Charcoal Making Report
Jymm Hoffman replied to John Martin's topic in Solid Fuels: Coal, Coke, Charcoal, Wood, etc
I would not try to leave it. Do it over the weekend. I would not recommend leaving the property at any time. You should be closer to it in case something does go wrong, maybe set the woods on fire. Not a good idea to leave any fire unattended. This is not the same as an air tight wood stove. -
Another example of why I like propane, no need to wash it. Think of all the time you spend dealing with coal, you could be making stuff.
-
If you have not, you should join the Pittsburgh Area Artist Blacksmith Association: Pittsburgh Area Artist-Blacksmiths Association I am in Ambridge and host a hammer in, normally the second Sunday in March, when the Pennsylvania Historic & Museum Commission open their sites for free and we have members demonstrating at Old Economy Village that same day.
-
Blacksmiths Depot | 112 CFM Blower These are the blowers I am using, they work great and 1 1/2" black pipe slip right into the opening as shown in my previous photos.
-
Over engineering for the blowers I use. For me the more I engineer and complicate things, the more things go wrong. Keep it simple works best for me. I use at least one of these systems most every day. The small one I call Ugly Betty and the lareger one Bertha. I could pretty them up, but don't have the time. My goal is to make them work, and get them working so I can make money with them.
-
Drop tong welding is no problem, it is like any other forge welding. By the way, the forges that I put a water gate valve on the air line and needle valve on the gas line give me the most control. I make these forges to get really hot really fast, so the valves help me cool them down for certain jobs. The "official" way to light a blown forge is to use a small amount of paper waded up. Light the paper, put it into the forge, turn on blower, turn on gas. I set up my forges up so the blower is on a light switch and the gas valve is down for the off position. That way up is on for both and down is off for both. It is also very natural to turn the gas off before turning off the blower since the light switch to the blower is below the gas valve.
-
take a look at my response to this thread in blacksmithing: http://www.iforgeiron.com/forum/f7/coal-vs-gas-7197/
-
I have not tried it yet, they tell me it has to do with orifice size. You will probably need a blown system as most of the time natural gas is brought into a building at 11" of water column, that is about 1/2 pound of pressure. One of my customers is supposed to try one of my forges on natural gas and let me know, still waiting.
-
Why would you not want to try to build one that would cost less and possibly get hotter faster without these expensive burners? Or is it that you just want to build with these? If you want to build with these, then just buy them and start building. Many of the commercially built ones that are natrually asperated with more than one burnere can forge weld if you run high enough pressure. However, they use more fuel and take longer to get to welding temprature than those I have pictured.
-
these are white oak. the current contractor has switched to red oak as it takes the pressure treatment better.
-
canon carriage
-
Forge welding in a gasser: protecting the bottom
Jymm Hoffman replied to KYBOY's topic in Gas Forges
I use Plastech 85 in the bottom of my forges from: ANH Refractories I can't remember what I paid, about $75.00 or so for a 55 pound cube. I use about 1/4 to 1/3 of this to line the bottom of my 2 burner forge. The stuff lasts nearly for ever. The flux can build up and puddle like glass and it will not damage this stuff. -
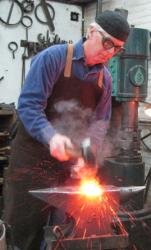
Gas: Pros: much cleaner, especially in and around the shop. Can forge weld in my gas forges, in a matter of minutes. I have not had coal in my shop since 1993, that is how much I like propane. Plus, I do not have to go get it, shovel it, it is fast to start, fast to shut down (turn off and walk away,) I don't blow black buggers out of my nose and I think I am healthier. Cons, can restrict the size of projects, with creativity and knowing how to build them, I don't have any problems. The picture of me working on a trunion plate made from 1/2" X 3 1/2" HR steel, (canon barrel rests on this on top of a field carriage,) was made in my smaller 2 burner forge, a larger project than many will work. The shell is from a 20 pound propane tank. The larger 3 burner forge shell is made from a cut down 100 pound propane tank. It has a side cut out for shapes that won't fit straight through the front. I have since made a smaller cart to keep the 2 burner mounted so I roll one out of the way to use the other. The smaller one gets to welding temperature faster than the larger one, only a few minutes difference. I also posted photos of burner tips and manifold systems. The manifold made of only T's works better, but I can make both types work.
-
Interior floor space of my shop is 17' X 43'. I built an office/storage area at the far end, taking 8' off that end of the shop. It actually helped as I need the storage and office area. These are from 4 years ago, I will try to update with another interior shot. I have rearranged the end where one power hammer is, there are now 2, one in each corner with an anvil and forge, etc.