
Jymm Hoffman
-
Posts
312 -
Joined
-
Last visited
Content Type
Profiles
Forums
Articles
Gallery
Downloads
Events
Everything posted by Jymm Hoffman
-
Yes. Rigidizer does not protect from scale or flux. You can just lay the ram pack stuff over the blanket, but it is better to pack it down somewhat. It is called ram refractory since they use hand held air hammers on this stuff in the mills and really ram it into place. It is not necessary to do more than use a hand hammer to pack it into place. I have also just used my fist.
-
Do not go cheap on the bottom of your forge. I use Plastech 85, or Greenpack 85 over 2 1" layers of blanket, nearly indestructable stuff. Can watch scale and flux puddle on this stuff, scrape it off and keep going. It is worth every penny, maybe $75.00 for 55 pound box. I use about 1/3 a box in a 2 burner system that is about 12 inches long and about 8 inches wide. I fire it off as soon as the system is together. It lasts for years in my shop, with a forge that is used nearly every day, many hours a day. ANH Refractories,There is a company warehouse in Leetsdale, a few minutes from my shop you could come visit and see how I build my systems (for free,) or Chiz Brothers in Elizabeth, http://www.chizbros.com/
-
Learning experience
Jymm Hoffman replied to CRAFTBENDER's topic in Blacksmithing, General Discussion
welcome aboard. Have you looked into joining the Pittsburgh Area Artist Blacksmith Association? Pittsburgh Area Artist-Blacksmiths Association Next Hammer In is at Old Economy Village and my shop. -
blksmth, thank you for the comments. Brian, wished I'd thought about feet long enough for holes before I welded mine to the legs. The washers welded to the feet work okay. My problems is the anvil scooting when I work over the edge and against the side. I do like bolting things down.
-
Looks a lot like a Mousehole to me.
-
I agree very much with making certain an anvil is very stable. I admit that I was reluctant to try a tripod type stand. I used stumps for years. I also got tired of the anvils dancing around the shop, even my 300 plus pound anvils. So I started to bolt angle iron to the stumps so they could be bolted to the floor. I find that I want to move my anvils around, depending on the job, thus the reason for not sinking them into the floor. As I have seen done and did like the stability. I have worked on anvils that are in sand boxes, I don't like them. They are not rigid enough for me. Back to the tripod, three legged stand, whatever you want to call it. I do not want to get into a debate with who came up with the idea first, this is my adaptation. And my story of how I came to use this style of anvil stand: After seeing Tom Clark using and selling these, I started to pay more attention, but was still reluctant. Then a friend provided me with the legs and I built one to fit my needs and my 335 pound Euroanvil. I also find that I really like being able to stand closer to the anvil, and many times my feet are under the anvil, safely, enabling me to stand straight up, not reaching out and I get more power out of my body with less harmful moves. So I recommend to everyone with a tripod stand to put the single leg on the side of their hammer hand, you don't kick that leg very often as you might the other way around. I like the tripod enough to adapt it to my smaller anvils and have a break down version shown as well, makes traveling with this tripod much easier to pack. The large anvil is secured with brackets around the corner of the feet and silicone. It works very well. The anvil has never shown and sign of moving out of the mount. I did find it necessary to weld washers to the 3rd. leg to keep it from moving around the shop. I drop a bolt through the floor to keep it from moving, primarily from when I am working on the side, and over the edge of the anvil. Not only does the silicon hold it, it quites it down considerably. The smaller anvil is bolted down, on top of a piece of conveyer belting to quite it down. I have always securely fastened an anvil to its mount (wood stumps included,) which also helps to quite them. The legs are heavy walled tubing. The Euroanvil stand is completely welded while the small one has detachable legs for traveling. I have a small stand that is welded for one I do not travel with, I prefer it. You should also note that there are holes that enable things to pass through the anvils pritchel and hardie holes, very useful. I like to keep my anvils clear. I do not like a lot of things hanging around my anvils, they eventually get in the way, so I only have one or two places for hardies and to hang a brush. I have changed the hardie holder on the larger stand so that the hardie is stored sharp edge down, similar to the smaller stand.
-
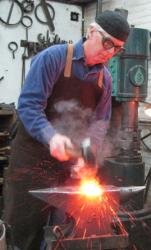
whats a blacksmith now days?
Jymm Hoffman replied to ironcreations's topic in Blacksmithing, General Discussion
I am a full time smith and work at it. As I previously posted in another thread, define a living. I do have a stick welder, but don't use it much outside of making my own tools. I have modernized my shop, propane forges (ones I build,) 2 self contained air hammers, bandsaw, belt sander attached to a good grinder. I do mostly histocial stuff, but take a look at my website to see what I do, a picture is worth a thousand words so the saying goes. Yes it is a tough way to make a living. -
anvillain, You are on the right track, that is how I used to build my larger forges. The firebrick will absorb the heat while the ceramic fiber blanket reflects it. Having ceramic blanket underneath will help keep the heat from transferring out and help reflect the heat in the firebrick back up into the forge where you want it. That is one of the reasons why my systems work so well. However, I have switched to a ram refractory to cover the "wool" on the bottom. It does not break down as the fire brick will. Even if you do not do any forge welding, it will eventually break down, from thermo shock and scale from the metal. If you have a quantity of these thinner fire brick, you may just consider them sacrificial, I did in the beginning of my use of a gasser. However, replacing them will probably cause you to damage the blanket around them. The other concern about containing the fibers is legitimate. However, the brick will be insufficient for that. You need to coat the blanket. Some like the expensive ITC. I use a 3,000 degree F mortar that comes premixed. I thin it down to coat the blanket and the entire system. It is much less expensive and will do the same, contain the fibers. I have had firebrick/blanket suppliers tell me that all ceramic material, fire brick, blanket, etc all become a carcinogen after reaching a certain temperature. Regardless of the fuel, so firebrick in a coal forge can be dangerous to handle as well. Wear a mask to keep the fibers out while working with this stuff. It is an irritant when new, carcinogen after firing.
-
Book on 75# upright Bradley
Jymm Hoffman replied to Warren Nakkela's topic in Power Hammers, Treadle Hammers, Olivers
When I bought my Bradley, the owner handed me what I would call more of a flyer than a book. It had a parts break down, motor sizes and foundation recommendations. I tried to follow the foundation recommendations but started to hit water about 24 inches down as the location was lowland. I called the guy I once worked for to ask about the foundations. He told me to stop digging. He set his hammers ( strap/ half helve machines) on 6 inches of concrete without any problem. I basically stopped the depth and widened it for the area under the anvil. I think I went about 12" the rest of the hammer bases plus the are to mount the motor. I also re-enforced the concrete with scrap iron as well as welded up a frame to hold the bolts that came up through the concrete to bolt down the base of the machine. It never moved or gave me any problems. When I moved the machine to another location, I did not do a foundation and it broke through a 4" floor, just settled down. The next location was also set on the floor without any problems to the floor, but it would need more frequent adjustments due to it "wiggling" some. If I made a copy of that flyer and can find it, I will let you know. I let the original go with the machine when I sold it. They are very well built and hard to kill. 6 to 8 inches of concrete with bolts through, should be plenty. They also recommend 2 inches planking between the wood and concrete. I used oak. -
Now you have many opinions. Figure out how much material you need. Those prices on eBay you posted are about as good as they will get. I rebuilt one set of bellows using untreated canvas, back in 1981. Last I knew, they were still working. The other 2 sets I have done were done in leather, both are still working. Check to see if there are any leather shops in your area that carry garment leather. That's the best material I have used, got it from a remnant table at a Tandy's Leather. It cost me $80.00, and I had leather left over. My opinion is: the best material you should try to get is garment leather. If you really can not afford the extra dollars, only then should you use the canvas. Do not bother with all those fancy treatments or painting it. If you think you need to spend the extra money and a lot of extra time treating or painting the canvas, you probably could have spent the extra money on garment leather. Have patience and save your money to buy the better product. Don't get into a rush and use cheap stuff
-
I lock into a price in the summer with a "pre buy." Unfortunately, our prices have not come down, I am paying 2.899 for the 1,000 gallons I ordered this year. It sound good when gas was over $4.00 gallon. I have always done the large tank outside since I switched over to propane. I have also always used a system with a blower and household pressure, 11 Inches of water column (about 1/2 pound pressure.) They are much more efficient than the naturally aspirated forges, hotter faster too. However, since I started running classes and more forges in my shop, my propane dealer set me up on 10 pounds of pressure coming into the building. I have black pipe running around most of my walls with outlets that I hook into. The outlets are old tank valves the dealer gave me. They fit into 3/4" pipe as that is the thread on the tank end. I hook the barbecue type regulators into those old tank valves to bring my pressure down to what I need and able to run 6 to 8 forges off this type of system. Plus I can move a forge to the work when necessary.
-
Butterfly Hinges - info req'd
Jymm Hoffman replied to Mark Aspery's topic in Blacksmithing, General Discussion
The butterfly hinges I made for Ft. Ligonier about 8 years ago were all forge welded as the originals in their collection. I used 1/8" by 1 1/2" stock. I roughed out a bunch of one side of the hinges at a time. I bent about 2" over the edge of the anvil and formed a sharp 90 degree bend, then wrapped it back onto itself to form the barrel around a 3/16" pin. I did get a little of the bowing, but forced it back when reheating. I welded the overlap, spread out (alternating cross peen and face of hammer,) to the desired width. I cleaned up the barrel and cut off from the bar. The rest was bench work to cut and file the "wings" as well as the barrels to fit, outside of setting the pins as I did peen both ends. I don't ember the time, but I would estimate about an hour for a finished pair. (4 welded up identical sides.) I would not do these for less then $75.00 a pair. -
PowerHammerPlans
Jymm Hoffman replied to rakessler's topic in Power Hammers, Treadle Hammers, Olivers
Link: [ABANA] The ABANA -
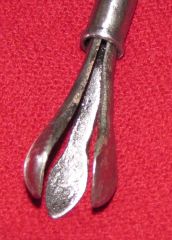
17th. Century Surgeon's Ball Extractor "Fingers"
Jymm Hoffman posted a gallery image in Member Galleries
-
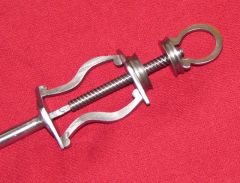
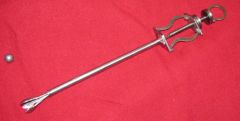
17th. Century Surgeon's Ball Extractor Screw
Jymm Hoffman posted a gallery image in Member Galleries
-
-
I also use the Hartford for liability insurance. If someone is in your shop, you need to check with them. I make students sign a waiver acknowledging the work is dangerous and will not hold me or the site liable for hurting themselves, plus I have the right to kick them out if they do not follow my instructions. If you have employees, different story, workman's comp. etc. How does any of this hold up in court? I don't know and hear lots of horror stories. Bottom line, what risks are you willing to take and how much are you willing to spend?
-
Thanks Don, great info.
-
I thought I would cut from an early post I made and elaborate a little more, the addition is in the secod paragraph: I have worked on several different types of floors. I prefer concrete in my shop. 1, it is much easier to clean. 2. when you do drop something and need to pick it up with the tongs, that is the only thing I pick up, not stone, dirt or what ever. No matter what set up you come up with, you will eventually want to change it. Therefore, I have started putting wheels on most everything. Wheels roll easier on a smooth concrete service. Much more flexible. I do like to bolt certain things down to the floor, concrete works better, faster and again more flexible and versatile. Dirt floor requires digging deeper to "plant" something to make it stable. If you do not have a separate finishing "clean room", again concrete can be better. If you sweep it and keep it clean, less dust will mess up your finish, even if it is oil or wax. The best way I found to fight the fatigue of concrete floors or any other hard surface that I have to stand on for long periods of time is wooden shoes. It is not so much because wood gives more than the concrete, it is because of the arch support wooden shoes and many wooden sole clogs have carved into them. Think about those infomercials selling shoe inserts. I have been wearing wooden shoes in my shop for over 20 years and prefer them over any other shoe or boot. I found it best to buy them a little big, they do not give nor break in, your feet have to give or break in. They are not good walking shoes, I love my SAS walking shoes for just that walking. I have Red Wing work shoes and Red Wing work boots. Both are great products, but I still prefer my wooden shoes or wooden sole clogs for standing. I move as little as possible when working in my shop, at least in relation to walking around. I do shuffle around the shop, and I do not pad the wooden shoes. I got used to them, but do wear a pair of cotton socks underneath a pair of rag wool socks (learned that from hiking in Boy Scouts,) and prefer to wear that combination all year round. My feet are actually more comfortable through the year, especially in the shop with this combination. My feet are never cold standing on the cold concrete, nor overheated in the summer. I have modified my shoes, externally. I put iron (mild steel) "shoes" on the bottoms, not just the heels. If I don't, I wear them out in about 8 months. If I do they last 3 to 4 years, but have to put new irons on the bottoms occasionally. I also cut the leather tops off cheap pair of snow boots to add a top to the wooden shoes to keep the scale from landing on the top of my foot while running the power hammer. They don't look pretty, but neither do I, especially in the shop. I prefer the old black horned rim safety glasses with side goggle type side shields (my option calls them birth control glasses.) I don't care about pretty in the shop, safety first, comfort second and when the 2 can be combined, I am happy. If I am comfortable and safe, I am more productive. If I don't produce, no money...... Added shoe photos. I get them from Smoke & Fire Company: http://www.smoke-fire.com/shoes-boots-1.asp these are made in Holland (Netherlands.) Unfortunately, the Wooden Shoe Factory in Holland, Michigan closed a few years ago. That is where I got my first couple of pairs.
-
I made the sign brace in 1981, and made a wooden sign similar to this metal one. The sign brace is based off a sign brace my first blacksmith instructor made for the entrance to the Masonic Lodge at Ohio Village, Ohio Historical Society, Columbus,Ohio. A neighbor in the industrial park bought and operates a computer controlled plasma cutting table that made this sign with my initials in it (which are also my mark.) The company is Country Fab, email: country_fab@msn.com The gray on the brick behind the sign is not from painting the sign but over spary when the roof was coated, prior to putting up the sign. The sign was located near the front corner of my shop next to the "allowed sign." I have not been told to take this one down, going onto 2 years. Property managers must think it is not too outstanding and good for advertising 2 businesses in the park.
-
need advice on raplacement for 50# lil gi
Jymm Hoffman replied to wolf mtn's topic in Power Hammers, Treadle Hammers, Olivers
The Say Mak sold by Ozark School of Blacksmithing (Tom Clark's) is the way to go, they run on single phase and offer control and service that is great! My last post: http://www.iforgeiron.com/forum/f57/pattison-100lb-8697/ Look under my name and you will find other posts regarding this hammer. There are also some owners in New York that will probably let you try theirs, as I did, before buying. I can do anything on my Say Mak 50 kg. that you can do on a 50 or even 25 pound Little Giant. But you can not do on the 50lb. Lg that I can do on 50 kg. I can forge 1/4" round stock into nail shanks without a problem. I bought the first one to help me forge 1" square into nails for canons. I had custom dies and made the other tooling to do this job, over 2,000 for one order. I demonstrated this for Tom at SOFA'S Quad State Round Up last September, as well as at the 1st. Great Lakes International Iron Fest. Photos are posted on their website. If you can't find someone in your area and willing to drive to the Pittsburgh area, you are welcome to try both of my hammers, 50kg and 60 kg. -
Sugestions for my new shop
Jymm Hoffman replied to Lysdexik's topic in Blacksmithing, General Discussion
I think that a lot of early shops were thrown together as after thoughts and as cheaply as possible. Not as much thought was put into making them as comfortable as possible as today's serious thought and concern for "ergonomics." But with all research, you can find variations and not all were alike. I have worked on several different types of floors. I prefer concrete in my shop. 1, it is much easier to clean. 2. when you do drop something and need to pick it up with the tongs, that is the only thing I pick up, not stone, dirt or what ever. No matter what set up you come up with, you will eventually want to change it. Therefore, I have started putting wheels on most everything. Wheels roll easier on a smooth concrete service. Much more flexible. I do like to bolt certain things down to the floor, concrete works better, faster and again more flexible and versatile. Dirt floor requires digging deeper to "plant" something to make it stable. If you do not have a separate finishing "clean room", again concrete can be better. If you sweep it and keep it clean, less dust will mess up your finish, even if it is oil or wax. Height: my current shop has 10 foot walls, I would prefer 12 foot, but since there is only one truss in the center to interfere with the distance to the ceiling, it is pretty good. Lighting: I think the dark shop is hogwash and an old wives tale. I also think, that blacksmiths being intrinsically cheap, they did not want to put in windows. They were much more expensive to deal with "in the old days" than today. Plus, relying on sunlight in many places is unreliable. I have recently changed my lighting. I had inherited a lot of florescent lights in my current shop. It was set up for painting a race car. I love a shop that is bathed in light so there are no shadows, but not sun light bright. I certainly can see my colors. Five years ago, I also had changed the bulbs to a full 40 watt Phillips. It was great. As they were starting to show age and my neighbors recently put in some wonderful highbay lights I started looking. Instead of using 28 4 foot 40 watt fluorescents, I am using 4 High Density/Low Bay lights that use 1 250 watt bulb each. They should use less electric and still "bathe" my shop in light. I am getting used to the difference. They are supposed to cause less eye strain, but I did not notice that with my last round of fluorescents. I do not recommend the "economy" 37 watt fluorescents. I don't think I was ever bothered by the pulsation of the good florescent light that bother some people. If I am not totally satisfied with the new lights, someone recommend adding a couple of fluorescents to balance it out. I did move one of the new HD lights away from my electric welding bench as it was too much light behind me (shining in the hood.) I have also painted ceilings and walls white in previous shops. I was happy to find my current shop already with white walls. I am preparing to paint the ceiling white this week. Stock racks: personal preference and space limitations. I keep threatening myself (prior to my current helper wanting to do this,) to change from horizontal to vertical. I see advantages to both. If you keep material at 20 feet, stay horizontal. I have almost always cut my stock to 10 feet. First out of necessity for transport, plus due to shop space. Also depends on where you locate and cutting device, I tried a chop saw for a while when a band saw died. I only used it for a couple of years before returning to the bandsaw, one of the cheap ones that can be used in both horizontal and vertical. Another very vestal tool. Plus they are quitter and cause much less dust. With the bimetal blades and a little lubrication, they can cut nearly as fast as a chop saw and the blades last as long or longer than the chop saw wheels. -
Pattison 100lb
Jymm Hoffman replied to rustyshackleford's topic in Power Hammers, Treadle Hammers, Olivers
I would only consider this hammer if I were collecting antique hammers. This may last a very long time and possibly longer than you will live. However, it will take more to time move it, set it up and get into running condition than expected. Especially if you have to travel a day or two to go get it, it could take nearly as long to move it and set it up as if you were to build a new hammer. There are many other options that are much more versatile, especially new. After owning (moving it twice) and running a 100 pound Bradley Compact for 10 years (full time, no offense intended to the part time smiths,) I do not regret selling that old wonderfully built industrial machine for my self contained air hammer from Tom Clark (God rest his soul.) Within minutes, I did not regret the move. After a few years, I was fortunate enough to buy a second self contained air hammer from Tom. While the start up cost may seem high, Tom's hammers are ready to plug in and work! If you have the electric plug ready, the only other thing you will need to do to a concrete floor is put a few holes in the floor around the hammer to keep it from walking. Yes you can get more involved with a fancy foundation, etc. but it really is not necessary. Even if I had the room, I would not consider buying any other hammer than a self contained hammer from the Ozark School of Blacksmithing -
The ones I make, use and am having reproduced are based on an example found in Dunbar's Camp, the guy that was in charge after General Braddock was wounded then died, plus other 18th. century examples BRPA - Dunbar's Camp . So that is why I put the label "Colonial Pattern" on it. Yes there were lots of styles, but as mentioned, most early cross peens seem to have one thing in common, the peen is on line with the bottom of the hammer not the center as is most modern peens. Yes, there were some regional and of course personal variations. As pointed out, there are hammers for other trades that vary greatly. There are a couple of pattern books that have been reproduced that show these. My hammer is for blacksmiths, not silversmiths, coppersmiths, coopers, carpenters, etc, unless they want to do some serious forging. Without digging up a lot of research, you will see the basic pattern from the early 19th. century (that is 1800's) and earlier. One can even see this basic design throughout Europe. The English did import German and French ironworks in the 16th. and 17th. centuries. So there is probably less distinction in patterns than there is today. But many people today want a label and they want sound bite answers. So I made a flyer up, prior to posting it on IForge's Tailgating area as "Jymm's Colonial Pattern Hammer", not THE Colonial Pattern. As I am reluctant to broadcast something this basic as "MY" design, I choose to leave my name off the posting in the Tailgating section. Now, if you want a top notch, excellent 2 pound forging hammer that is made in a style that is appropriate to use for historic demonstrations. Look at the hammer I have posted in the Tailgating section "Colonial Pattern" Hammer - Blacksmithing Classifieds. There are 3 left and I do not know when I will be getting more. Everyone that uses these with my handles fall in love with them. I use one like this every day, I am a full time smith. One of my helpers uses one of these everyday. He stopped using other hammers after he started using this one. Other students have also made the switch and refuse to use any other hammer for basic forging. When I have reproduced tools for historic demo's, and get it right, I normally find out why some things should not be changed.
-
I would say it would be okay, maybe even work for earlier periods better. One of the common parts I see of earlier hammers, cross peen is in line with the bottom of the hammer. Many variations after that.