Shabumi
-
Posts
399 -
Joined
-
Last visited
Content Type
Profiles
Forums
Articles
Gallery
Downloads
Events
Everything posted by Shabumi
-
Hahaha, im picturing a couple hobbits lugging a 400lb anvil that's almost as tall as they are to a volcano to weld on a new faceplate and mill the edges, avoiding NOSguhl and the ASOrcs.(Nasty hobbits's will ruin the precious!!) What about some of the heros of the story? Stryker the ranger, legvise the elf, boraxomir of the iron city, and flatter baggins.
-
 Dont worry about it, even the Masters can make misteaks, You can always Chuck that one and start again
 -
Try not to get too frustrated, or at least know your not the only one who's frustrated. There are few definite answers in the fluid dynamics of the airflow in a forge chimney as it seems to be effected by the wind velocity of an unladen sparrow. My understanding is that to get the suck into the supersucker, the design needs to have it's opening at the bottom be smaller than the opening at the top of the chimney. The amount of hot air coming out of the top needs to be replaced. By having the replacement air enter through the smaller opening it has to increase it's speed to match the amount leaving the top. Thus giving you the sucking action. Supersucker design= 12in chimney(113in²) with a 10in x 10in opening(100in²), bottom is ~90% the size of the top. I also heard that a 10in chimney(79in²) with a 8in (50in²) circular opening below works well too, 63% If you wish to stay at 8in then you would need to make the opening in your supersucker less than 50in², I would suggest between 30-45in² to keep within the 60-90% range. Though I admit that is just a guess on my part You may want to look into a larger diameter chimney as Glenn suggests. A larger diameter means more air moving and a larger opening, both make it more likely to catch the smoke. Isn't that the goal of a supersucker? Taller chimneys increase draft as well. Also to maximize the effect the suction has on removing the smoke, you should set the sucker as close as you can to the fire so you get the heat(which keeps the draft going after the initial paper fire inside) and smoke, not just the surrounding air. Especially if you keep the 8in chimney, a 30-45in² opening would have to be right on the smoke to catch it.
-
Steel and concrete anvil stand
Shabumi replied to Ted Ewert's topic in Stands for Anvils, Swage Blocks, etc
I've been lurking this post for a while and I do enjoy the constructive conversation, but I've been having a stupid question floating through my head whenever I read this thread. They obviously wanted the power hammers mounted solidly to it's foundation, they cast the bolt holes into the bottom, but anvil manufacturers didn't. So my stupid question is if an anvil was meant to be mounted directly to it's stand, wouldn't they have designed them that way? -
No leaves on any that look like it? That does help narrow it down a bit. Unless they are all dead then that means they're deciduous(drops all their leaves every year). That's one step closer to a positive ID. As for people to ask for an id, tree trimmers and wood cutters might know, an arborist would be better, and there are wood workers who can Id it by the way the wood looks, feels, smells... so maybe try furniture makers, wood sculpters, or a place that sells the raw material to those people. Happy hunting
-
From what I see, I'd guess locust as well, but the lack of thorns removes that possibility. Around here the walnuts of that size don't have as shaggy a bark, and the yellow section would be more chocolate milk colored. Based on some of the dead leaves around the stump, it *might* be mulberry, but the majority of the leaves I see Im not familiar with so take my guess with a grain of salt. I'm not overly versed in the flora of that side of the country.
-
I like it aus, it reminds me of when someone gets electrified in the movies and their hair stands on end. It still looks like a steer though. If your aiming for an antelope then I'd have the horns come off the top of the head and flare out before straitening to a point And +1 to jme's suggestion of keeping the chin area off the shank for ease of cleaning
-
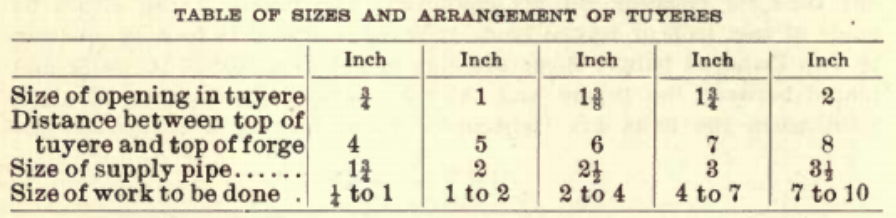
Thank you for all the responses, after the comments here and some PMs I realize that I had already read all the info that would answer my questions, most of it was in the stickies. I had taken the advice given, and read them first in my search for knowledge, but it had been pushed out of my memory to make room for info more recently read. So here's some advice for those who are just starting out. Don't just read the stickies, go back and re-read them periodically. You never know what may have slipped your mind. I got this table from "Machine Blacksmithing"(1913). I know I've seen it posted before, just not sure where. This is the kind of info I'd been asking about. This is for bottom blast, but would it carry over to side blast, with some adjustments to the distance from tuyere to top of fire?
-
This is what I do to start a fire too, I found that the wax boxes that produce is shipped in works the best. Thank you this is exactly the kind of info I was looking for. I do remember seeing this on your 55drum thread, and had already taken down the info, as well as info on 10 other forges in the first few pages of threads. I was just hoping not to have to spend the hours searching through each forge build to get enough to have a decent idea on a concensus of a size range for general all purpose work. Though I will if I need to. As someone who has forged in a variety of sizes I'm sure there is a minimum size to your fire. Or would you use a thimble sized fire to forge a needle? I apologise if my questions seem like they've been asked a hundred times before, they sounded original to me, but as I see I'm getting the same answer as a hundred before me, they must not be too original. I'm just trying to make it more clear than "if the fires not hot enough, then you don't have enough air, Or too much air, or not enough fuel, unless your smothering it with too much fuel, or... "
-
I've been seeing alot of posts where people need help with the size of their fire, or whether they have enough or too much air to their fire. There are not alot of answers out there for inquiring minds on these subjects, it seems to be a knowledge that comes with experience. Now I have a hunch that there are some experienced smiths here and I'd like to see if we as a community can come up with some basic parameters for solid fuel forges that anyone can use to help with their build. I'd be willing to chart the parameters of forges that are known to work, but as I don't have access to too many forges, i was hoping the collective of great minds here could help. What I am asking for is some info on the forge that works for you, like fuel type, firepot type(shape, dimensions), tuyere type(size, position), airflow, and any other info that might be helpful, like the min amount of air you need to keep anthracite coal going. If enough people are willing to share about their forges we may be able to find a 'sweet spot' for people to aim for when building forges for certain fuels. I'll start with mine. It's a jabod, charcoal fire, firepot is 3"L * 7"W * 3"D, ¾" side blast tuyere, ~15ft³/m airflow. It seems to work well enough for me, it gets metal hot enough to work, but it does take a few minutes to get ½" stock to heat and I doubt I would be able to forge weld in it. So please tell me, what works for you?
-
I'm a function over form kinda guy, so I wasn't seeing a purpose besides aesthetics for the blackening of a handle until your answer. I do like the look though, and I learned as a line cook that form IS a function (you eat with your eyes before your mouth). I guess after I get more experience with different handle shapes and sizes I will have to char one or two so I can see if I like the feel of them better than a 'raw' handle
-
I've been seeing alot of these charred handles as I roam the libraries of IFI, and it has me wandering. When charring a handle, is the goal to fire harden the handle like you would a wooden spear tip, or is it just for the looks?
-
I'm basing my opinion on the threads coming off the back, if it uses that threading to open and close the blades then it would take far to long with too much effort, but if it opens or closes in <5 rotations of the handle than it could be quick enough to do the job. As for using it as a castration tool all I have to say is... Ouch! That's the kind of thing you'd see being held by a cat in scrubs in a dogs nightmare
-
As someone who dehorns cattle fairly regularly(once a year), it seems like that tool would be more of a burden than a help. If the cow startles and starts bucking in the chute, then you have a long piece of metal with protrusions swinging wildly around. But maybe im just partial to the piano wire garrote to dehorn for large horns or the "scooper" for calves.
-
Das, That's a great deal. A wood splitter? Yes, it does have 6 holes. Yep, A quick web search came up with the brand. If I had a vehicle that it'd bolt to, I'd be tempted to keep for it's intended purpose. Though with a replaceable high(er) carbon tip and a case hardened body, it sounds like perfect mandrel material. Would grinding the threads smooth effect the case hardening?
-
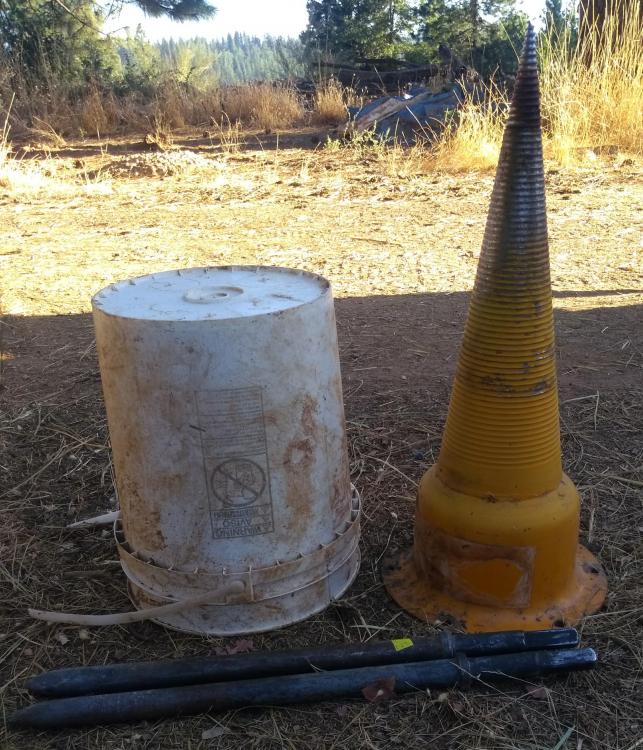
The mail lady would have the easy job of delivering it, I feel sorry for the person who packed the live possum for shipment. Very nice swage block, looks smaller than most I've seen here in the anvil/swage desert of the California gold country, and I'm sure it cost less, even with the shipping Gerg, that is an awesome table, you should get plenty of years of workout of it I went to our local re-store to try and find some chimney for the forge I'm building... No luck on that front but I did find a couple jackhammer bits and something to turn into a mandrel.(5gal bucket for reference)
-
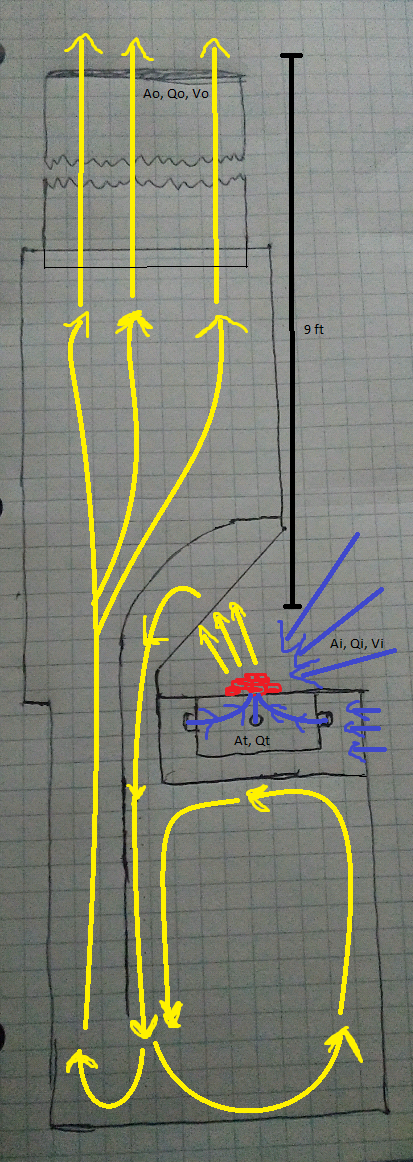
I haven’t been able to light the forge lately, due to the fact that I promised the landlord I wouldn’t light it until fire season ends (mid October usually). And I don’t blame him for asking either, I was on the verge of stopping on my own when I realized that having an open tire rim full of dirt and charcoal with way too much air from a hair dryer going into it wasn’t the smartest way to forge in the middle of the California fire season, especially this year with all the fires we’ve had. So I’ve decided to take this down time and design a better forge. After seeing some threads on the barrel forges about how some people have enough airflow going into the firepot that they didn’t need to start their blower unless they wanted to get to welding temps. That combined with how fast a super sucker can pull air in, I started musing about a blowerless forge. While toying with this concept I came across a book which really started me thinking it could be done. It was the “Eclipse Combustion Engineering Guide”. $4 at a garage sale. It has info on most anything you can think of on combustion engineering, everything from fan laws and blower application, to steam and water boiler requirements, to heat loss/storage of various refractory’s, to weights of metals that fit in varying crucibles for casting, and the various tables and conversion charts in it are nice to have too. After reading this book, and everything else I could get my hands on with info related to this, the idea started forming into a plan. Sure I could make an easier workable forge with what I have, but I have ~2 months before I can use it, so I may as well use that time to design the best forge I can. I will be limited on how I am able to fabricate it due to my lack of welding skills and proper tools, but I know I can make a working prototype with what I do have, self tapping screws and chimney tape. My current build plan involves a washer/dryer stacked combo shell. I will be using charcoal as fuel, so ill start with a firepot similar to the mk3 jabod design, and it is said that charcoal works better with a side draft inlet, so ill go with that. I would like a down draft chimney so i don't have to worry about sparks or fire fleas as much. Im assuming that the equal drop and rise in chimney cancel each other out. The box around firepot will be sealed with openings to the outside, and might be used to recycle some of the combustibles later by closing off outside air and opening up to the inside, but I still haven’t figured those out yet. After measuring everything and computing the pressure differences and frictional losses, and some VERY frustrating moments where my just passing grade in high school algebra 18 years ago wasn’t enough to figure out what I wanted, I realized I was over thinking this thing. So I stepped back and broke it down to the basics. WARNING!!! There is math and technical terminology involved in this post, so if numbers or smart words hurt your head, dont read any further. I know it hurt my head trying to figure it out. You have been warned 1. What makes fire hot? Fire is hot. Its something ingrained in us from the time we could understand what hot was. It has most likely been the goal of all early blacksmiths(historically or total newbies like myself)was to make fire hotter. That’s why the bellows or blow pipe were invented. Whoever invented them probably didn’t know the science behind how they work, but he knew they made his fire a lot hotter than his neighbors. What the bellows/blow pipe do is provide volume control, airspeed control and airflow placement. Many people think its the air speed(velocity) that makes a fire hot. Its not (at least its not the main thing), it’s the amount(volume) of air flowing into it that makes a fire hot, so first I need to find the right volume needed to get fire to welding temps. After a lot of searching online and in my local library came up empty, I ended up finding the info I needed here on ifi and in my garage. I have two different dual action hand pumps that are common for the jabod builds I’ve seen, a red one and a yellow one. Both have been used enough that the company names are worn off, but the red one is one I see in a lot of the pictures. The yellow one is slightly larger than the red one, and the specs printed on the side haven’t worn off. It says it delivers 66 gallons/min at 60 strokes/min (stroke=pull and return to starting position) so ill estimate the red at 60GPM @ 60 strokes/min or 1gal/stroke. I read that to get a mk3 with charcoal as the fuel to welding temp it needs to be pumped more vigorously… Perhaps someone who uses these pumps on the regular could shed a more accurate light on this, but 2 strokes/sec or 120GPM sounds vigorous to me, it may be too much, but I‘d rather have too much airflow that I can reduce than not enough. Target volume(Qt)=120GPM=16ft³/min Ok we now know what we need to make the fire hot. 2. How do I get that air to the fire without a blower/bellows? Natural drafting chimneys (no forced air) get their airflow from the draft effect. Draft effect basically says that the heated air inside is less dense and will naturally try to “float” on the cooler, more dense outside air, moving up out of the chimney and pulling the cooler air in through the openings further down. To find the volume of air moved by the draft effect use this equation*: Q= Stack effect draft volumetric flow rate a. m³/s b. ft³/s C= Discharge coefficient** .6-1 A= Area of chimney exit a. m² b. ft² g= Gravitational acceleration a. 9.81m/s² b. 32.17ft/s² h= height *** a. m b. ft Ti= average inside temp a. °K b. °R To= outside temp a. °K b. °R Use only column a. or column b. DON’T mix them *, this equation is for air inside and outside of chimney, smoke has different density so this equation is only a rough, but close estimate. **, C is based on resistance to flow of orifice transition at entrance to chimney (see below). If fire is inside of chimney, like in a 55gal barrel build then C=1 and can be removed from equation ***, Length is not a factor in h. If chimney is on a diagonal, or there are horizontal sections, then measure from top of chimney straight down to top of air inflow. Lets use my planned forge as an example. Im a lazy American and cant be bothered with trying to learn to convert to m, so ill use column b. C=.72(Chimney transition orifice is reentrant) A=254.5in²=1.77ft² (18in D chimney pipe) g= 32.17ft/s² h= 9ft (will get taller as I can find/afford more chimney) Ti= 800°F= 1259°R (seems to be the consensus of the research I have been able to do as an ‘average‘ fire exhaust temp, ill use it for now as I don’t have any data of my own) To= 70°F= 529°R (will vary day to day, but this gets a good midline ) .72*1.77√2*32.17*9((1259-529)/1259)= 1.27√579.06(.58)= 1.27√335.85= 1.27*18.32=23.27ft³/s=1396.2 ft³/m (as this is a rough estimate ill round up to 1400cfm) Q=1400cfm This means that to get air into the fire pot, I have to have the firepot be part of the ‘closed‘ system of the chimney. If its out of the system then there is no draft to pull the air. Ill need to have a hood that closes around the fire area. 3. How do I get the right amount of air to the fire? I couldn’t find any info on multiple inlets so this is my best educated guess on how to get proper volume to firepot. If the math is off, then it would be from here, but at least it gives me a starting point. I’m guessing that if the target volume is a certain percentage of total volume in, then the target area would be the same percentage of total area in. Volume flow is a constant so Qo=Qi so Qt/Qi SHOULD give us the percentage of flow needed for firepot. Qt= target volume in, Qo=total volume out Qi=total volume in so 16/1400=.0114. If we keep Ai=Ao then we need .0114*254.5in²=2.9in²=At. That means I’d need a hole/pipe with a diameter a little under 2in. Hmmm, that sounds like too large an opening for a side blast, so I can step it down to 2 1½in holes/pipes or 4 1in holes/pipes spread around the firepot as they have roughly the same total area. That would leave me with ~250in² for the work area openings, perhaps a 12.5in radius half circle in front and a 9in radius half circle on each side with doors. That covers volume pretty well, and I know I said volume makes the fire hot, but if that was the only factor then you could build a fire and the air around it would fuel it to forging temperatures and beyond. Remember, the bellows/blow pipe provided volume control, air speed control and airflow placement. We have volume control and placement(into bottom of firepot, within draft effect system) covered. That leaves air speed control. 4. How to find air speed into firepot? With a bellows air speed was adjusted by pumping harder or softer, we don’t have the luxury of being able to go by feel. So first, how to find velocity(V). The simplest way I found is Q=AV… wait that tells us how to get volumetric flow rate from area and velocity, but weren’t we looking for velocity? Oh wait we can convert it over to Q/A=V. There we go, now we can figure this out. Ok if we know that Q=1400ft³/m and A=1.77ft² then V must =791ft/m. That is if we keep the Inflow Area(Ai=Ao) Outflow Area. 5. How do I control the air speed into firepot? This is where the math tells you how a super sucker works. Ai*Vi=Q=Ao*Vo (look familiar). This says that the inflow area multiplied by the inflow velocity is equal to the outflow area multiplied by the outflow velocity and both equal the volume passing through. That means that if you decrease the inflow area that volume must pass through then velocity is gained. We see this in effect with the super sucker. A smaller inflow area pulling the same volume has greater velocity than the outflow area. Now if I need more velocity into fire pot I can reduce total inflow area by reducing work area inlets. If I reduce the Ai to 200in² then I start with the known values 1.77ft²*791ft/m=1400cfm=1.39ft²*Vi, which means Vi=1007ft/m. Now if I reduce Ai then I will be increasing the area ratio between Ai and At, which increases volume through firepot inlet. So I reduce Ai to 200in², then 2.9/200=.0145(new area %) now multiply that by Qi, .0145*1400=20.3cfm. So instead of 16cfm at 791ft/m(9mph) I will have 20.3cfm at 1007ft/m(11.5mph). That will give me more volume at a higher velocity, so I would definitely need a valve to reduce airflow into firebox. So based on what I can figure with my rudimentary math skills and the info I have been able to gather is that a natural draft forge COULD be possible in theory. Now I need to build it and try it out. I will be posting photos of the build, but be warned that it wont be pretty, and will most likely be held together with chimney tape and hope. If it doesn’t work then I can connect the hand pump to it and I will at least have a forge that will be better than the open air tire rim firepot, so it wont be a failure. If it does work, then I can build a better, more substantial one and all that would be needed to make one for different fuels would be to figure out the proper air volume needed to get and keep that fuel at the temp you want. I hope this wasn’t too complex to understand. As this is still in the planning stage, I am open to any questions, comments, clarification, corrections or criticism. Hopefully someone can help with the math in #3 as it is based off my best guess. It might be correct, but I don’t know how to check. Perhaps I’m trying to reinvent the wheel, but isn’t the wheel just a roller reinvented to stay on the object you want moved Ok, ive been typing this for far too long... Time for some sleep.

-
Information Needed, Kuhn Ring Element Challenge
Shabumi replied to Al Stephens's topic in Blacksmithing, General Discussion
Wow, according to that book you guys have solved a Gordian knot, without cutting it in half. Just goes to show that what someone thinks is unsolvable at one time doesn't mean it's unsolvable for all time. -
Feng shui in a blacksmith shop
Shabumi replied to Glenn's topic in Blacksmithing, General Discussion
Just saw this part, had to look up what a koan was. Wouldn't beating metal hot enough to start your fire, so you can heat your metal in the fire to beat it, be a koan? I did find this one already written, but he must not have had the PPE. "Barn's burnt down- now I can see the moon." Masahide (1657-1732) -
Feng shui in a blacksmith shop
Shabumi replied to Glenn's topic in Blacksmithing, General Discussion
Hmmm, "heat with no heat"? Induction forge? Or IIRC there is a video of someone getting a piece of metal hot just by hammering it somewhere on IFI -
What weird animals have been in your shop
Shabumi replied to Glenn's topic in Blacksmithing, General Discussion
I'm not sure about everywhere else, but a sure way to tell the difference between a venomous and nonvenomous snake around here is by the head shape. The nonvenomous ones have an ovoid shape to their head. While the venomous ones have a triangular head, almost heart shaped, to hold the venom glands. It makes it a bit easier to tell from a distance if the coiled up snake that's shaking its tail is a gopher snake or a western diamondback that is either too young to have a rattle or has lost it through injury. -
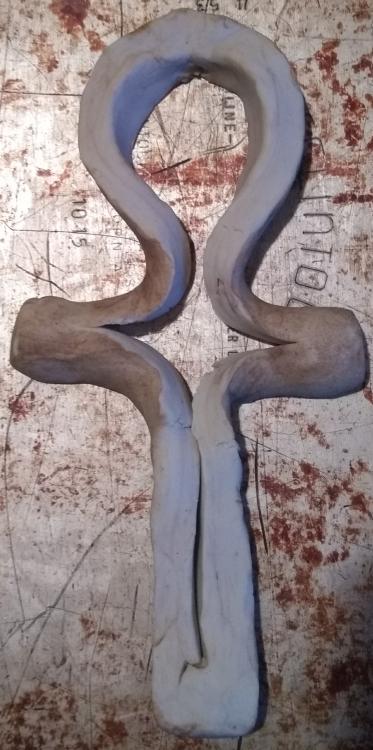
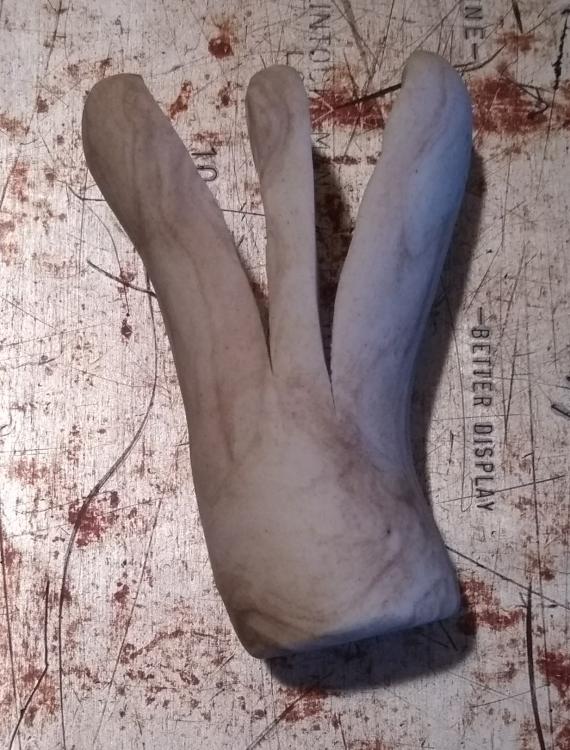
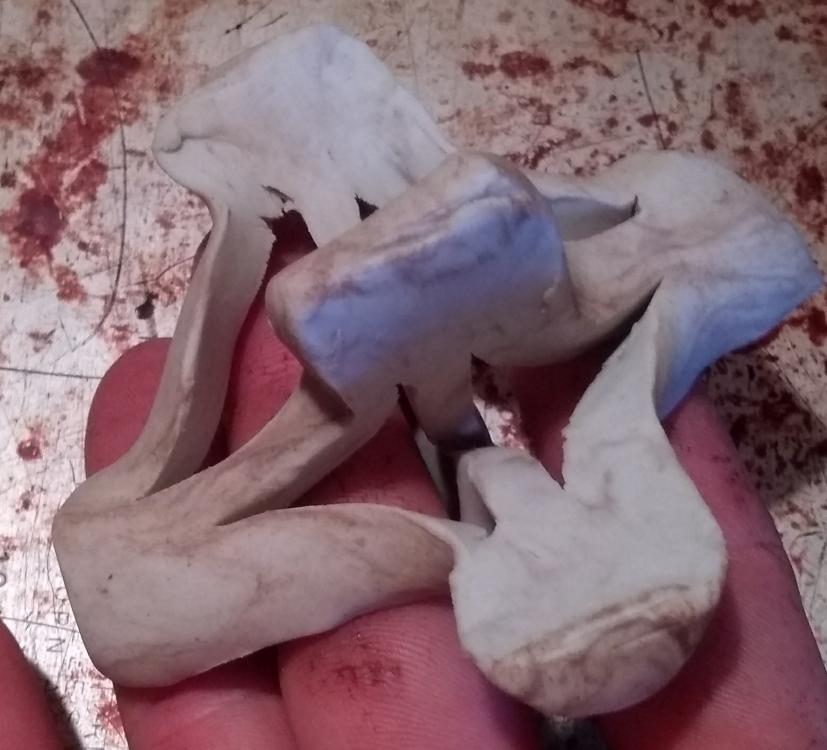
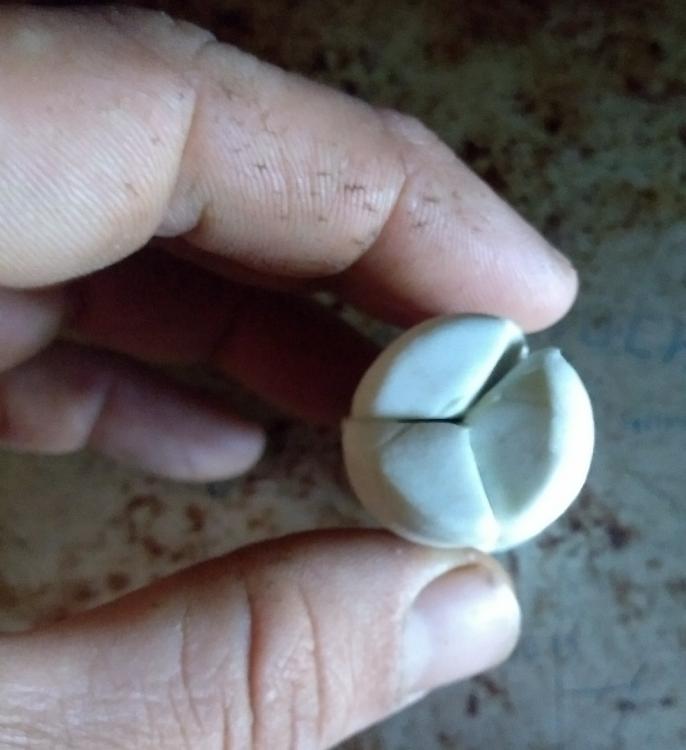
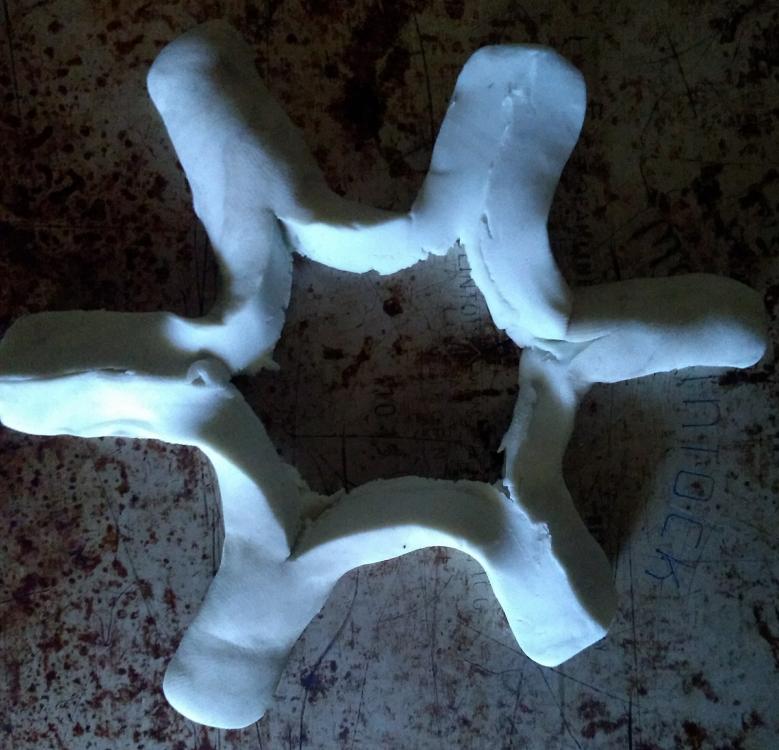
I haven't been able to make it to the shop lately, but my nephew came over and I pulled out the modeling clay. Here are a few variants I can see to the "cut and unfold" style that we associate with the Frederics cross (pic heavy, but I got them as small as I could on data) I'll start with a variant on the cross that I made into an ankh, i made the cuts almost all the way through so that shaping the head would be easier. Then I tried 2 cuts on each side and got this 3 cuts... I did an x cut and a # cut too, but the clay wouldn't hold well enough to hold it's form. The x cut gave me a 8 point star and I can see the # cut will be really cool, before it fell apart it was similar, but much more intricate than the 2 cut version.
-
This has been nagging me in the back of my mind for a couple of weeks, there are only two cuts so one had to be n/s and one e/w. I haven't been able to get to the shop lately, but I did pull out the modeling clay when my nephew was visiting and came up with this. It looks like the cut that comes from the top and separates the arms is the cut that makes the N/S cut. While the one that comes from the bottom and separates the head and feet makes the E/W cut. So to keep from having to draw out while shaping the head, I cut the arm cut almost all the way through, leaving a solid piece a little longer than half the starting dimensions to stretch a bit as it was shaped. I also did some other variants on the Fredericks cross, but that is for another post

-
You may have answered this in the other jbod post and I missed it as I was reading through, but why did you reduce the depth of the firepot down to ~2"? I had thought you wanted the fire depth to be 4-5" at working height to keep out of the oxidizing part of the flame
-
"I want to start blacksmithing"
Shabumi replied to Marc1's topic in Blacksmithing, General Discussion
So what everyone here is saying is that I won't be able to make an Odachi(+3 vs. dragons) after just 10 hours of practice on an anvil? I guess I wasted that all that time hunting dragons to get the 3 gallons of dragon blood for the quench. Maybe with a other 10 hours I might be able to make a 5000+ layer wakizashi that I'll quench in patchouli oil for an anti politician sword.lol. But seriously, as a "young" american (early 30s), I came I to blacksmithing from a landscaping purpose, I wanted to make arbors, gazebos and garden art that would actually hold up to the abuse that vines can put on a structure. I knew, even before I looked up anything on blacksmithing, that I would need to learn the basics before I could get to "the good stuff", just like any other craft. But hey, I'm old fashioned that way. I'm sure I will take a stab at a blade eventually, just as a learning experience, but I'm perfectly happy buying the knife I need