DavidF
-
Posts
162 -
Joined
-
Last visited
Content Type
Profiles
Forums
Articles
Gallery
Downloads
Events
Everything posted by DavidF
-

When do you finally throw scraps away
DavidF replied to Ranchmanben's topic in Blacksmithing, General Discussion
Thanks For the feedback SLAG. My plan is to only harvest the anode grids. I plan to neutralize the,contaminemts nefore I discard them. Smoking the grids in acid, prior to heating seems like it may address the issue, but I haven’t researched that process enough yet. If you have experience or examples you can share, I would be very thankful and will read anything and everything you have to offer. But keep in mind, I only want to harvest the anode grids to act as the nickel in my multilayer Damascus. It seems this can be achieved safely, but I am all ears for any input. If it becomes too involved, I may just substitute 15N20. From my simple mind, it seems like I can get the anode grids without exposure, but research will tell. Here is one example of a guy doing it. This gave me the idea for using the batteries. Please review this video and point out any concerns. The only thing I saw that I didn’t care for, was that he took the powders, where I believe we are agreeing this is the danger area, and simply working bare handed, unmasked, etc with those materials and then simply discarding them. If harvesting the anode grids is safe enough, and I can then neutralize these powders, I think I can find a process to harvest and discard leftovers in a safe manner. Anyway, I am very interested in feedback because I have not completed my research and I know we have some beaker heads here that can provide advice to NOT do it, do it, but follow these safety guidelines, or everything appears fine, no concerns. Here is the video which started my thoughts towards attempting a similar Damascus attempt. Let me know any and all thought. Thanks gentlemen -
Ok, the second video does confirm the play doh experiment. I wanted to attempt a summary and see if it is correct or if there are additional considerations. 1.) When the stock is heated, the hardened anvil face is less impactful for forging the softer stock (ie. You will have closer results from cast iron or a Vulcan at yellow heat, but will see more difference as the stock cools and hardens). In an extreme scenario, if the below surface is harder than the stock, by heating or otherwise, the majority of the energy will go towards deforming the stock. However, the harder surface will be more efficient for deforming the stock placed against the face. 2.) As the stock becomes harder and either closer to the hardness of the face or maybe even harder than the face, the energy will be transferred less to deforming the stock. And in fact, you could at some point have more energy transferred to the face resulting in undesirable changes to the anvil strike plate and also you will have less result and efficiency for forming the piece 3.) From the above points, a harder face will be more efficient for transforming the piece 4.) In addition to work efficiency in bullet 3, the life of the anvil and usability for a good surface will be increased from a harder material as compared to a softer material over time (although this may not necessarily be noticable for weekend hobbyists since the time for this to be observed may not be observed in the amount of time only weekend work would produce) 5.) This one I am not sure is correct, but I wanted to state this and hear opinions. The rebound theory for returning the hammer to striking position is not true. When the stock is softer than the hammer and anvil, the energy is transferred to deformation of the stock. And as the material hardens, you would not want to forge it anyway, because it will introduce potential issues with the integrity of the steel. Where smiths have experienced the harder anvil being more efficient, it is explained by the decreased energy needed or better deformation of the stock as opposed to rebounding the hammer back to a striking position. From experienced smiths, I definitely hear a consistent opinion that the better rebounding anvil is more efficient, but it is related to the faster deformation of the stock and less strikes required because of this efficiency and the rebound of the hammer is not a benefit when the stock is softer than the hammer and anvil (or the stock is softer than those two surfaces) Are the above 5 points accurate? Again, thanks for the feedback and dialogue. I have been looking into this for several months and this is the best dialogue and examples I have seen on this subject. It is extremely valuable for me to digest and I think others will also benefit tremendously with this repository. There are so many sources on this subject which are not well founded and confusing. For me, this is a definitive answer to this subject and has firmly established my opinion. It is also something I can now reference with confidence that I understand the principles and can talk intelligently (in my case, from a layman’s perspective) about the physics behind how and why to go with one solution versus another.
-
I love this thread. This is exactly what I was interested in hearing and reading about. I am going to go through these more and noodle it for a while. Joe’s videos and feedback provided me with what I wanted to look at more closely. Thank you for taking the time to provide your input. I am sure I will have questions, but I need to spend a little more time digesting everything.
-
When do you finally throw scraps away
DavidF replied to Ranchmanben's topic in Blacksmithing, General Discussion
I am only interested in the anode grid. If I understand your concern, it is related to the metallic powder. Is that correct? I am not interested at this point in working with the powders and trying to recover metals. I just want the simple grid which is already in the appropriate form for my purposes Pr3ssure, thank you for sharing. That is a great example using Tums. -
Here is the local coverage. https://www.ksl.com/?sid=46238745&nid=148 This guy is about five miles from me. They were detonating dry ice bombs. Pressure builds up from water on dry ice in a closed/sealed container and they are very powerful and extremely dangerous. They also had a bag of unknown chemicals which were harvested from an aerial firework. That is probably more frightening because of the fire hazard. I will see updates when his case moves forward and post updates when they are avaiable.
-
I love your setup Irondragon. I wish I had your handle on the top. And also the firebrick brackets. When it gets warmer, I will add some angle iron for fire brick
-
That is an incredible video. Thanks for sharing. It certainly debunks the play doh experiment! I was mesmerized and will probably watch this a few hundred times.
-
Very cool. I love the skeleton blade that slips in the sheath. The tanto is amazing. Incredible work
-
Those twisted bars look like they would be good handles to weld on to stock. The tubes could be used for projects like frames, etc. it may not be worth the effort of stripping the paint though.
-
Love it. Very very well done
-
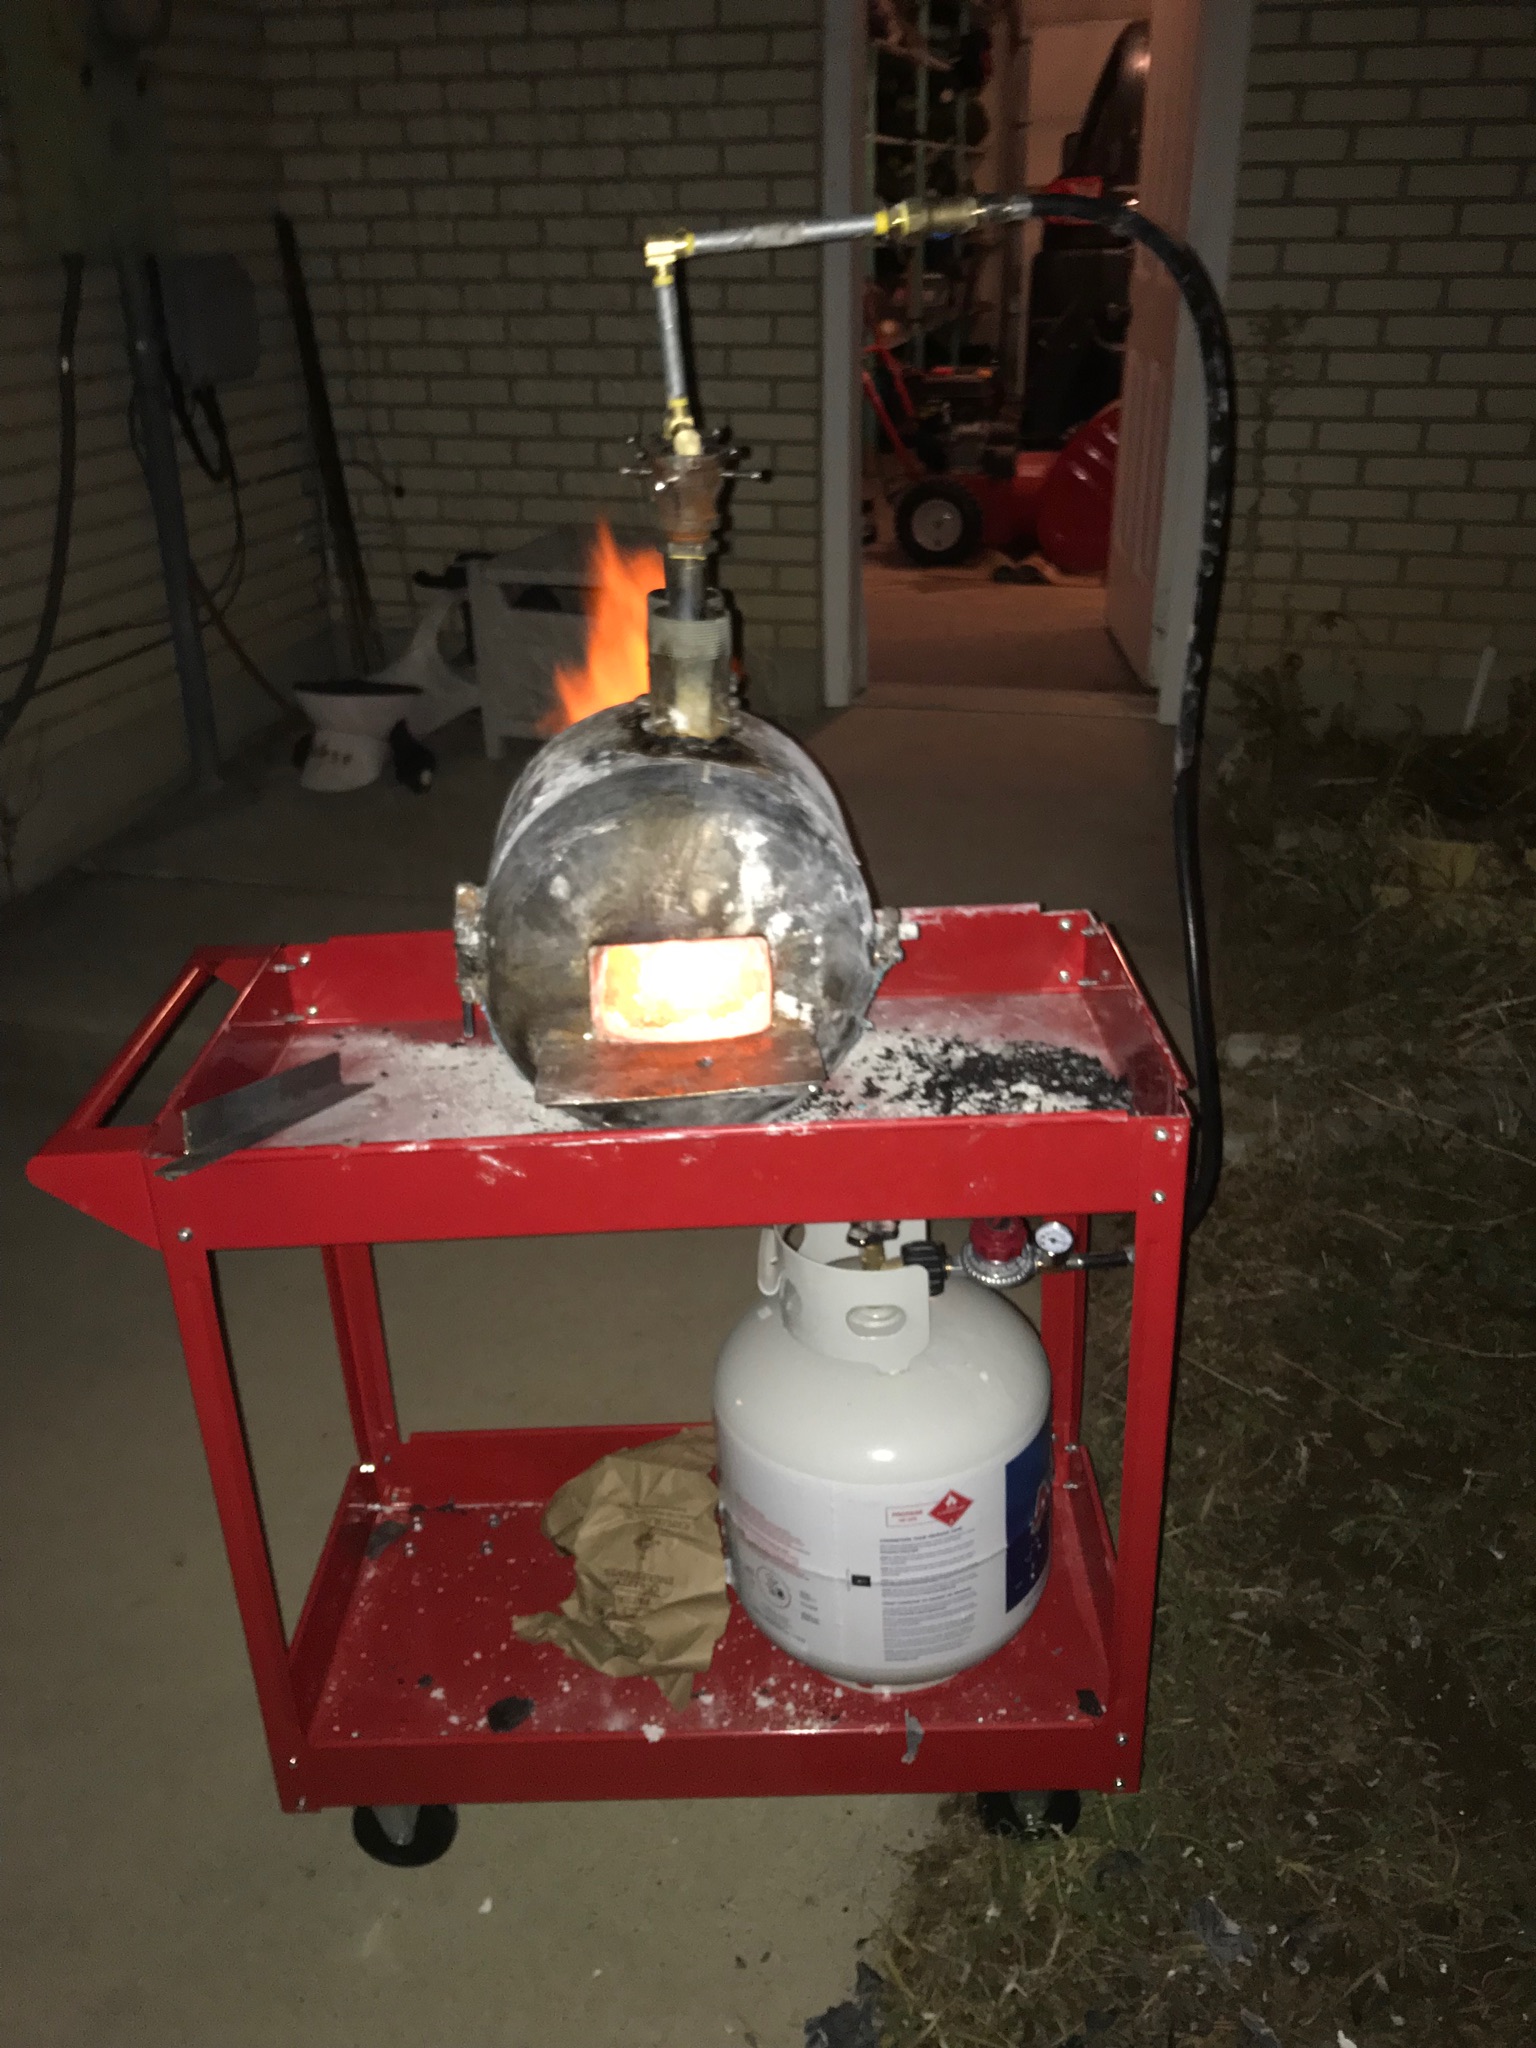
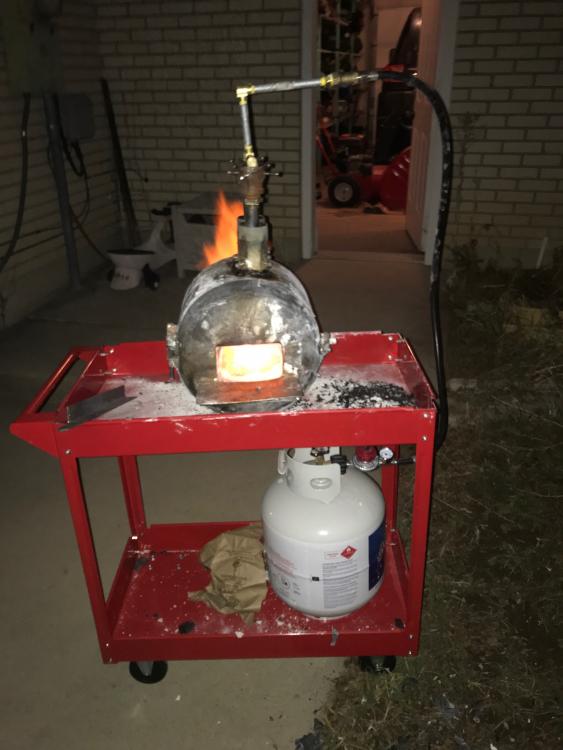
I picked up a steel service cart from Harbor Freight for under $30. I wheel my forge out in the open air when I use it and then back. It had a three inch lip and 16 inch width, so I made the forge with intent to sit above the lip (for the forge door) and the length it fit in the 16” width. It works well for me, even going over a door jam/weather strip. My propane canister sits on the lower shelf. I have a cast iron pan with Perlite on the side for annealing. And I keep my vise clamps (used as tongs) and welding gloves on the cart. I keep my quench in an ammo can which I transport on the bottom shelf as well, but remove when I use for a quench. It is pretty self contained allowing for use, cool down, and quick clean up. i may place larger casters on the bottom which lock, but the step works great for me.
-
When do you finally throw scraps away
DavidF replied to Ranchmanben's topic in Blacksmithing, General Discussion
I have been saving all scraps with the intent of flattening them and turning them into a Damascus at some point. My thought was to use hardenable steel in one bucket and pull nickel out of old batteries I have which are NiMH. So I can create layers of steel and nickel at a very small scale and it will be my first Damascus attempt on the cheap. I have also seen a guy use baking soda on weldable steel and increase the carbon to be able to use it for knives. His demo showed the baking soda only carburized a very shallow layer, so if you take the scraps and make them thin enough, you could theoretically have carbon all the way through a piece. None of this is practice yet for me, it is all theoretical, but that is my plan for my scrap heaps. -
I agree Charles. I think the harder surface allows for the better deformation, acting like a 90% strike (if a 90% rebound) on the side that is on the anvil. And I am sure with exposure to different surfaces, I will feel the same results that you guys all know. I know the difference in feel of cast golf clubs versus forged. When you hit the exact center, you don’t feel a lot of difference between the two. But when you hit outside of center, the feedback is entirely different. There are other considerations with the golf club example like MOI and mass placements that can expand the sweet spot, where they refer to it as more forgiving. I am sure some of the same physics are in play wit a hammer and anvil. Which would lead to a bigger surface being desirable, but the difference is the absorption of energy by the stock and the face plate. If the face is softer, it would take more energy away from the deformation and if your strike isn’t on a flat piece, like striking the tip to form a point, and only having the spine in small contact, I would expect to feel a substantial difference from a cast iron anvil to a Vulcan. I don’t know if the rebound for the next strike is considerable, but having blows that move metal more efficiently would result in less energy from the smith and quicker movement of the stock from less work. That is what I think is so noticeable, but I have such limited experience with good quality anvils and hammers, so I don’t have the experience to be able to form an opinion. I wish there were more members in my area to get exposure. There are a few guys around here, but I have only seen them from other exposure, not active guys on the forum. So I enjoy hearing from the guys here to try and make better choices as I am progressing.
-
Annealed file remained hard...why?
DavidF replied to arkie's topic in Heat Treating, general discussion
One thing I wanted to mention, I have seen a similar issue. As I looked into it, one idea that could be an issue for me was using the spring punch multiple times. I intended to create a deeper starting point, but after some research, the multiple punches probably hardened the steel and reacted the opposite of what I intended. I haven’t been able to test this theory yet, so I am not sure if what I outlined is correct, but based on what I described, are you punching multiple times and hardening the steel? For anyone else that has experience, is the theory correct that multi0le punches will harden the spot you want to drill? -
Lots of great opinions and dialogue. I will say that I will take the opinions (both 40 years and 6 months) where benefits are observed. I have heard these conversations in the past as well and I will absolutely take the benefit of others experience. But I was hoping to see a study cited or scientific process outlined. It isn’t necessary for me to be influenced, but because I do see other opinions, I was hoping that someone would have something tangible to point to more empirical results. Sometimes it becomes more faith based to make decisions which is fine and I do highly value the opinions of individuals on the forum. But if anyone sees something that might provide an experiment or similar, please share. I personally would love to see something that is a side by side comparison. Probably going to be my research product for the night if someone doesn’t post something in the next couple of hours. I will share if I find anything interesting.
-
Thanks for the feedback Thomas. I snorted when I read the heating of the clay. I am skeptical about his extreme choice of stock for the example. But it is on the Internet, so it must be genuine! That is why I wanted to hear from experienced practitioners. I have almost zero experience with anvils and plates. I have a cast iron model to experiment with and a 1” plate of A2 that I believe will be my go to surface. But I see damaged anvils and wanted to hear if it would be worthwhile to pick up one and do something similar to what is described on this post. Your described method makes a lot of sense for getting a good hardened surface welded back to the top of a damaged anvil. I see a lot of discouragement for a novice to do this type of repair, but would it be worthwhile to try if the price was low enough on a damaged piece? Could a rookie do a good enough job with some recommendations and a low end mig welder? I think I know what the feedback will be, but during my searches, I keep thinking it would be a fun project and could be done with a reasonably low investment. Any opinions would be greatly appreciated. It is not something I would do immediately, unless I saw a deal I couldn’t refuse
-
I haven’t attempted a project like this, but from my novice eye it appears like you are doing a great job of restoration on something that was not usable. I can’t wait to see the end product. I am curious, can you get a large piece of plate to weld on? Or is the preferred method to weld the top for a more complete weld throughout? My thought is that the plate would be better hardened quality for the steel, but I don’t know how you would weld the middle, so the build up process would be better for a uniform weld through out the striking surface. On the rebound theory, I watched a video the other day where a guy used modeling clay as an example of the stock he was hitting. He used it as an exaggerated example to show the anvil face is really used as the backing for the hammer strike and his point was that the rebound theory was debunked since the energy was absorbed by the stock and the rebound to transfer energy or save energy for returning the hammer to striking position was lost by the absorption from the stock material. I wasn’t convinced his example was good, since modeling clay or play doh was not equivalent to the energy that would be transferred through a metal. But I thought I would share another person’s perspective that anvil rebound is a blown up theory and hear what others with deep knowledge would share on this subject. I will go and look for that video so others can weigh in after viewing it. I will post it back here once I locate it. The entire reason I brought this second subject up, is it may influence others’ approaches to anvil repair and I personally would love to read informed opinions as it will influence my choices for an anvil down the road. And it may have an influence in approaches to your repair. Here is the video where the creator claims rebound theory is debunked: https://www.youtube.com/watch?v=e2nfHZcVHPo Language Alert Also, please update the post as you progress. I would love to see the end result and read about your experiences and opinions as you continue on this project. It looks great to me and I would be proud of the work you are doing once you have this in your shop for real use! Mod Note: Discussion on Anvil Rebound has been moved to another thread
-
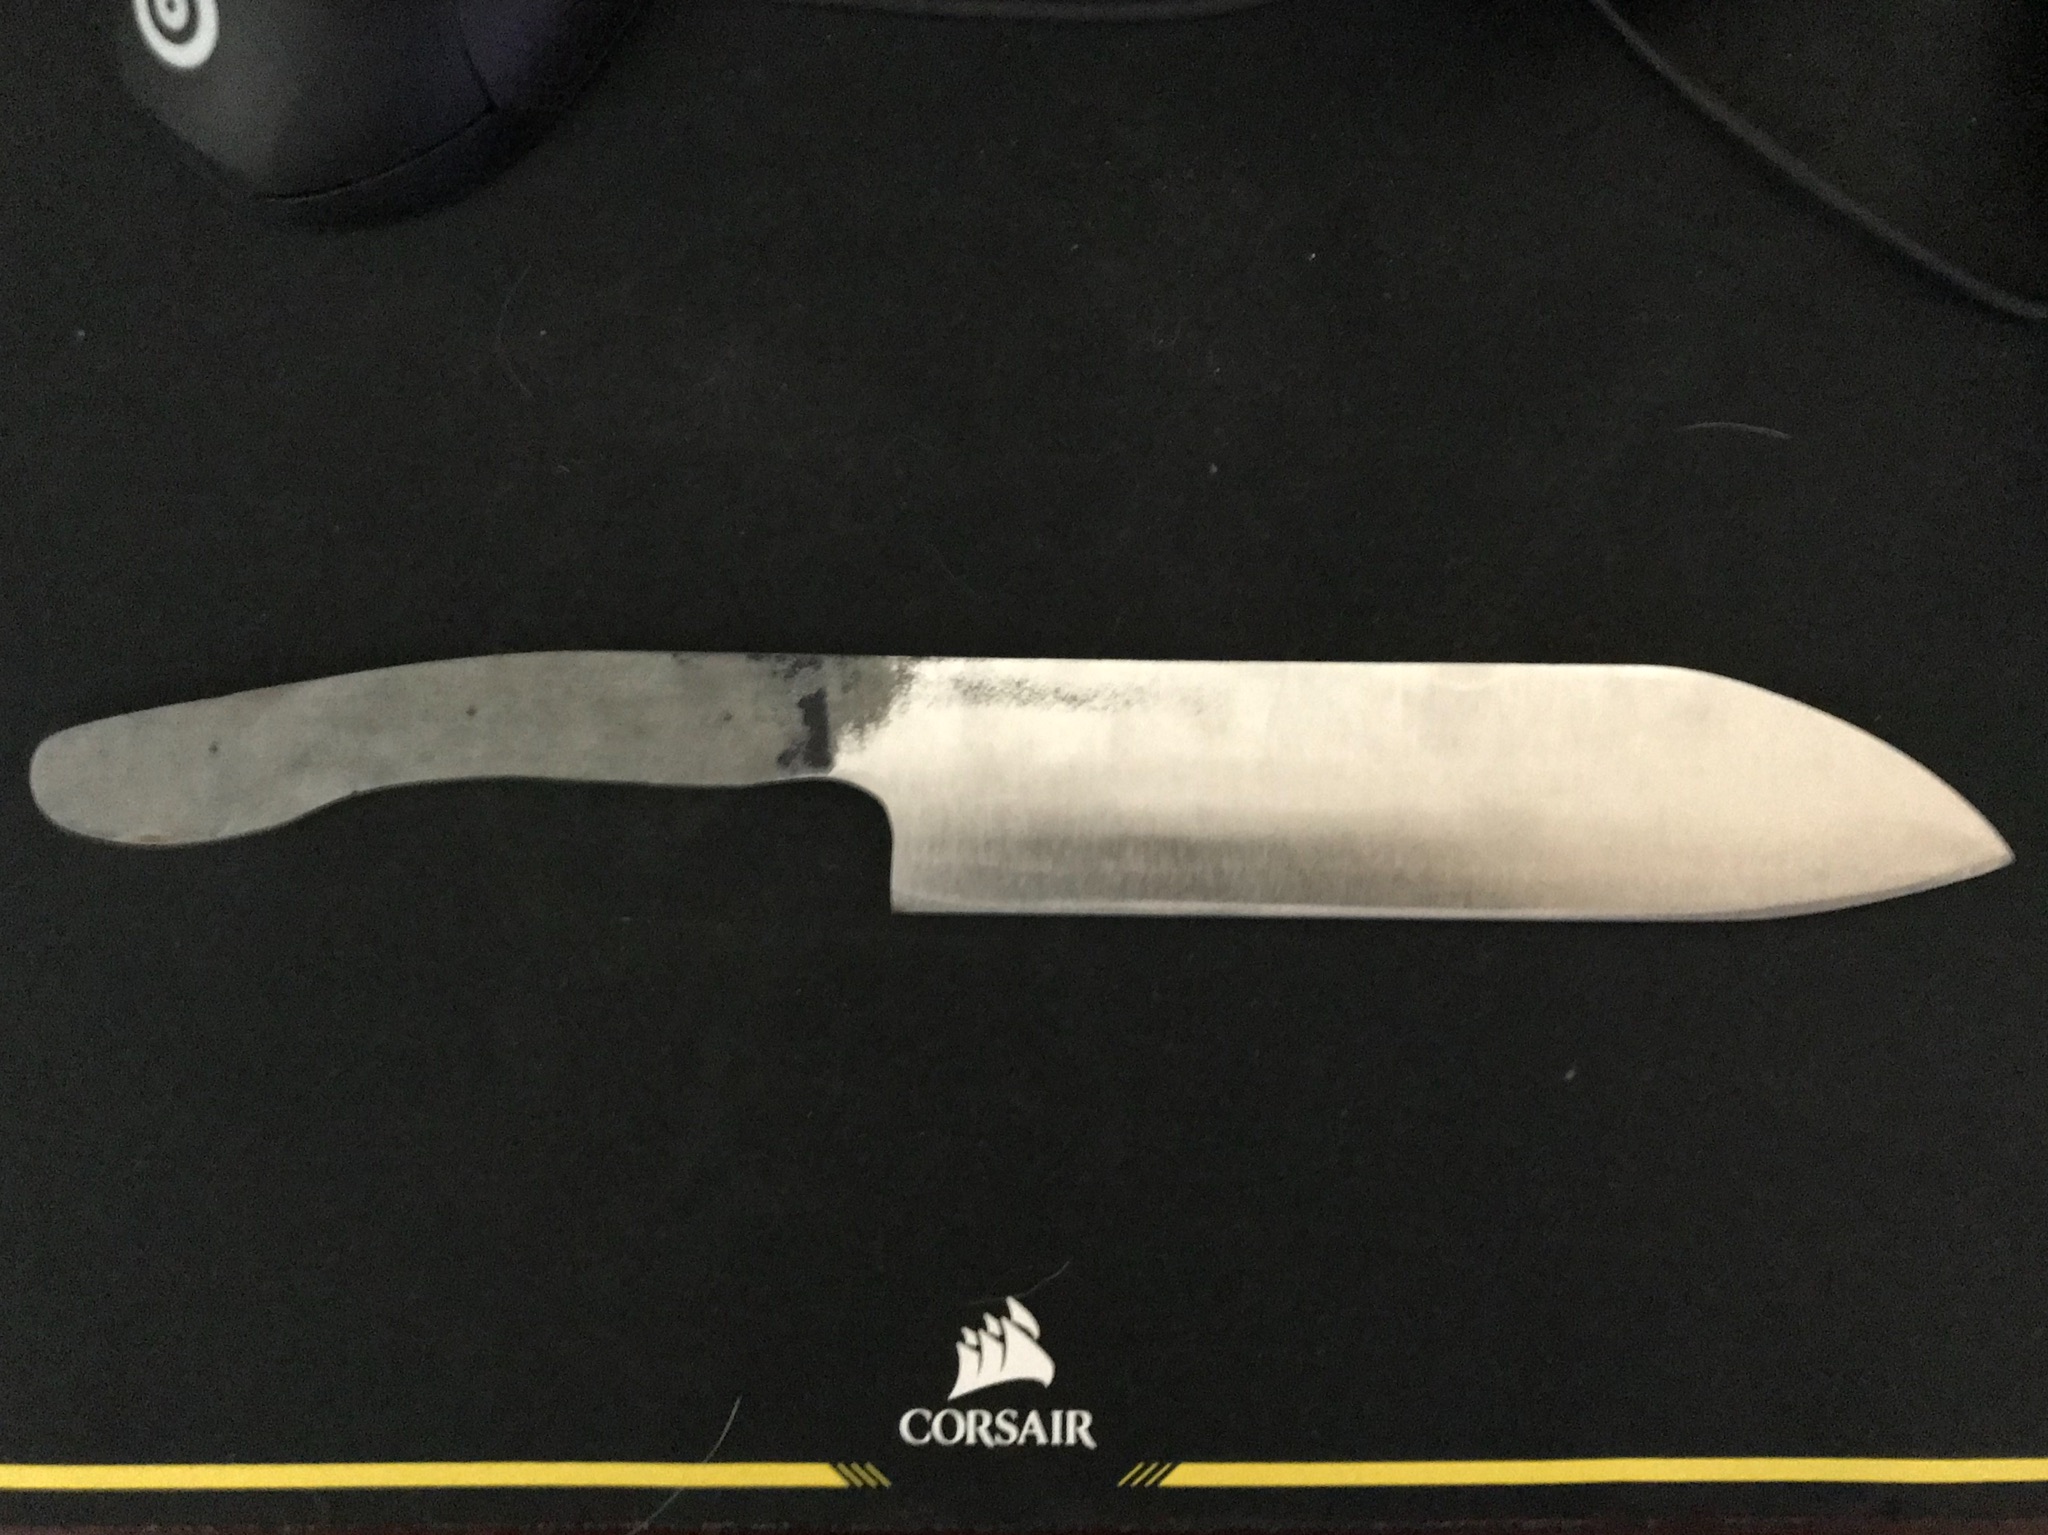
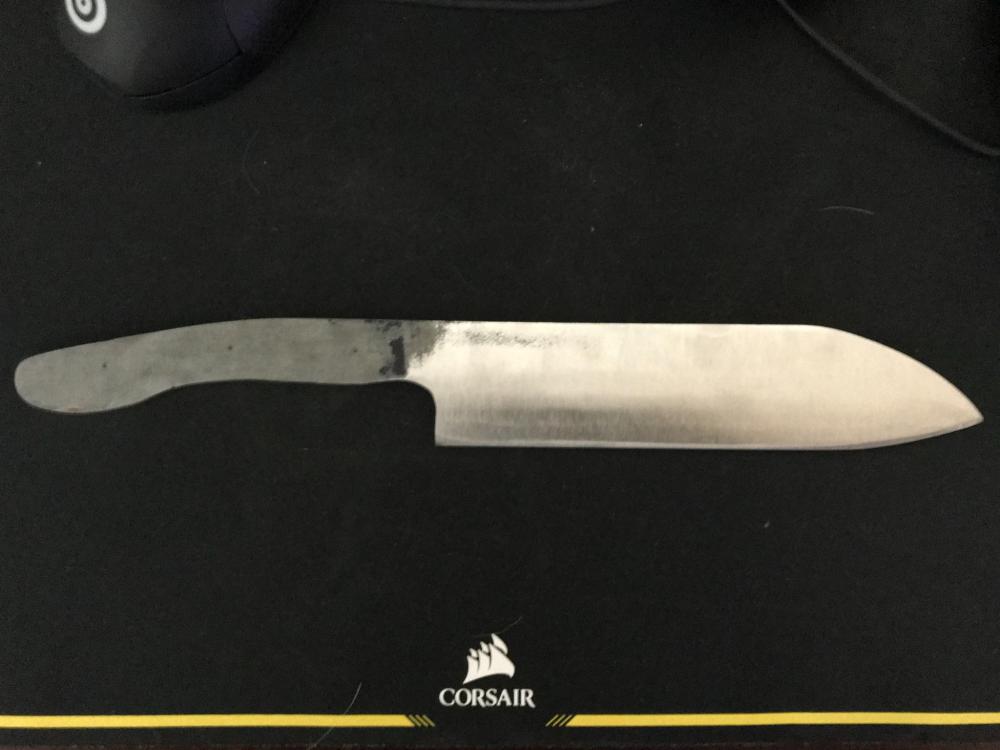
Just started on this knife for my mother. It is 1095 and this is the first grind. It is 5” handle and 7” blade. I am considering moving the handle up to allow for more clearance as I have seen this on some of the Santokus, but I prefer the handle to be aligned with the blade. If I do bend the handle, I would heat towards junction and move the entire handle up, maybe 1/4” to 3/8”. Since the end of the handle is already sweeping down, I may have to play with that a bit to fit this new angle. If you have opinions, let me know.
-
Based on what’s you described, I wanted to share a video of a guy (Slavik Telly) that does some great stock removal projects. In this video, which is part 2 of 2, he drills a depth for the fuller and files the fuller. If you want to do precise work and haven’t forged a fuller, this may be a great approach and may be something to consider. You may want to forge it and if so, you can disregard this share. But at least it gives you a visual of how someone creates a fuller with removal and it turns out pretty good. Good luck. Share pics when you get the project going. Sounds like fun!
-
At a quick glance of the pic, it appears there may be some space where the burners enter the forge. If you have some insulation blanket, you can fill that void and be sure to rigidize the fiber blanket. That would also help when using the burner in the forge environment. I am not sure if that is an issue, but looking at the picture, I wanted to point out a possible airflow issue in the forge environment. If that does make a difference, I would use some refractory cement to further improve that potential air flow issue. Thee would be a trade off with being able to adjust the burners based on the design, but with my vertical burners, I saw a huge difference when I set the refractory cement with the burners and did not yet have the burner ports insulated versus when I had them insulated and used the forge for actual metal heating. Once I plugged up the ports as I described, the environment worked much bett with airflow going down the burners and out the doors as it should. It is also an easy test if you have scraps of fiber blanket you can put in there. Hope that makes a difference.
-
Biggest carcass splitter so far
DavidF replied to Stormcrow's topic in Axes, Hatchets, Hawks, Choppers, etc
That is awesome! I watched the video before I really understood the size of that blade. It is amazing. You scared the hell out of me when you shaved with it and then twirled it around like a baton! I couldn’t do that with a dagger, let alone that splitter. I love the finish in the blade too. It matches well with the purpose of the tool. And the approach for handle seems like the best option, especially when you showed the state of the older one. Will the customer be using that for actual carcass splitting? I have a baby at the house, so I couldn’t listen to all of the audio. But I really hope that splitter is really used for the intended purpose. Even though it is a great show piece, it seems like it is screaming to be used daily. Great job. -
Daswulf, I agree on the tip. It is only knife #2 for me and for some reason I have had clip point on the mind. I was good with a clip because I use one knife most of the time in the kitchen and I wanted something for multiple uses. My next kitchen knife will be more of a Japanese style. A curved tip or possibly a veggie cleaver style. I like the idea of the blade being uniform for chopping from tip to drop, like the style of a Japanese veggie cutter. I already have two of the Japanese style chef knives, so I am leaning that way. But this one will get great use at my home. And I will have one of my first projects to see improvement over time. I will look up,the names of the Japanese styles I am referencing and add to the post. I can’t think of them right now. Santoku is the curved general Japanese chef knife. And nakiri is the veggie style
-
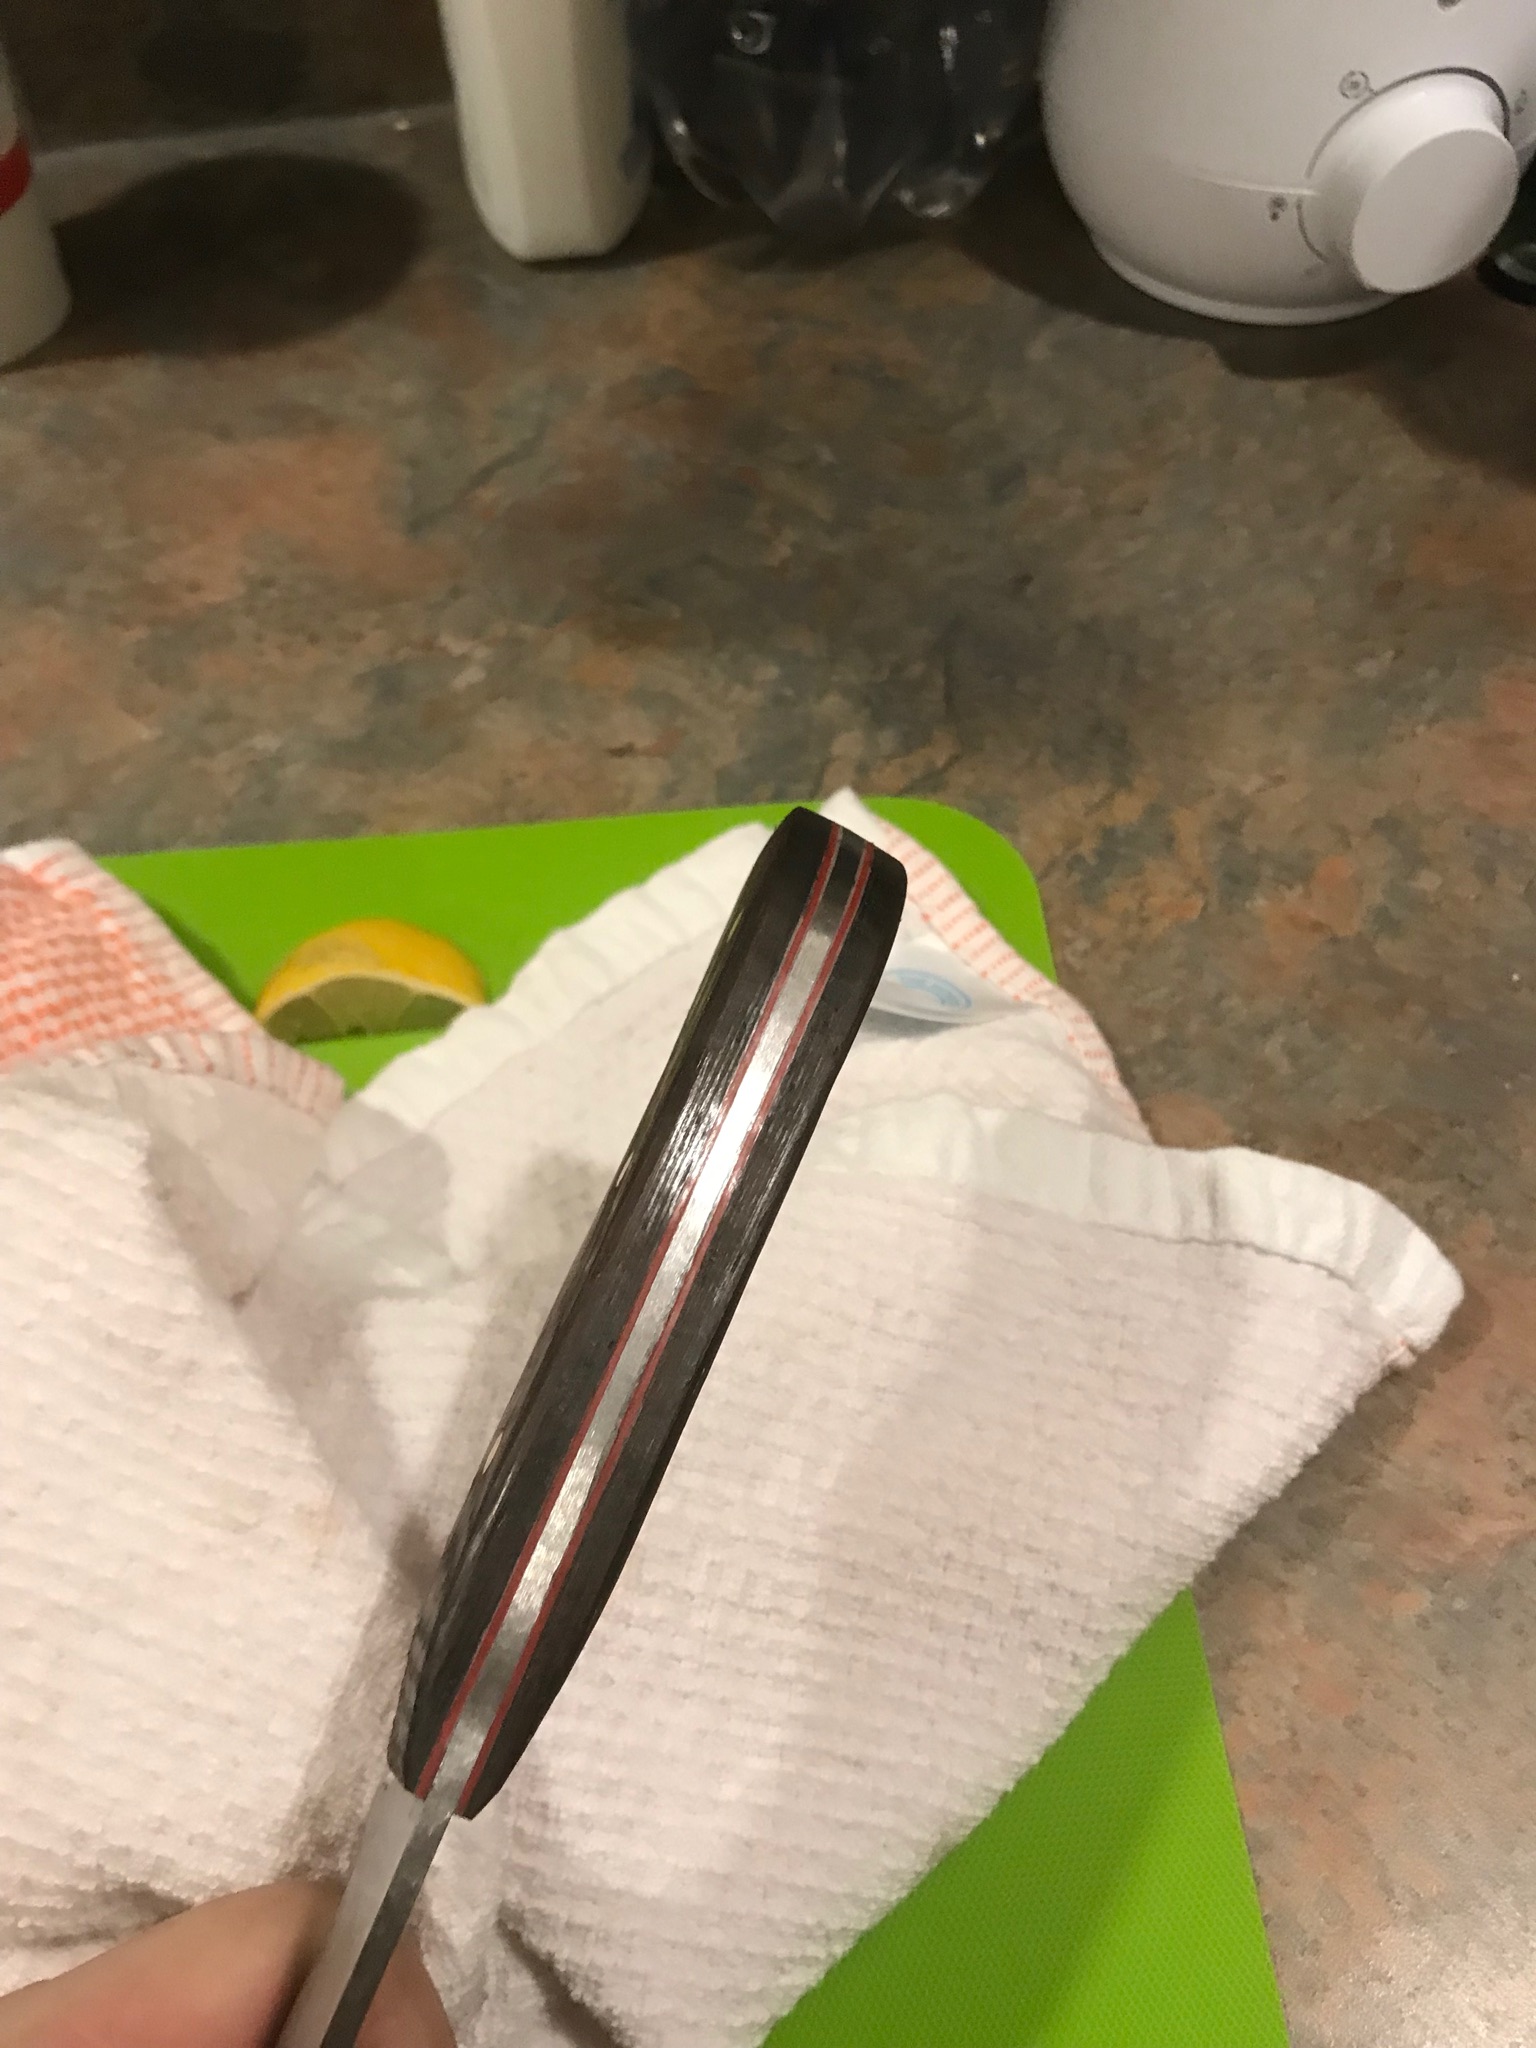
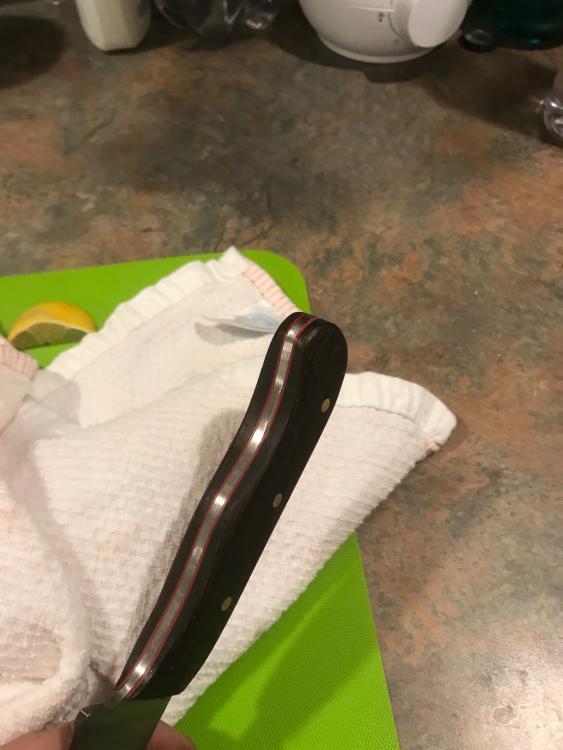
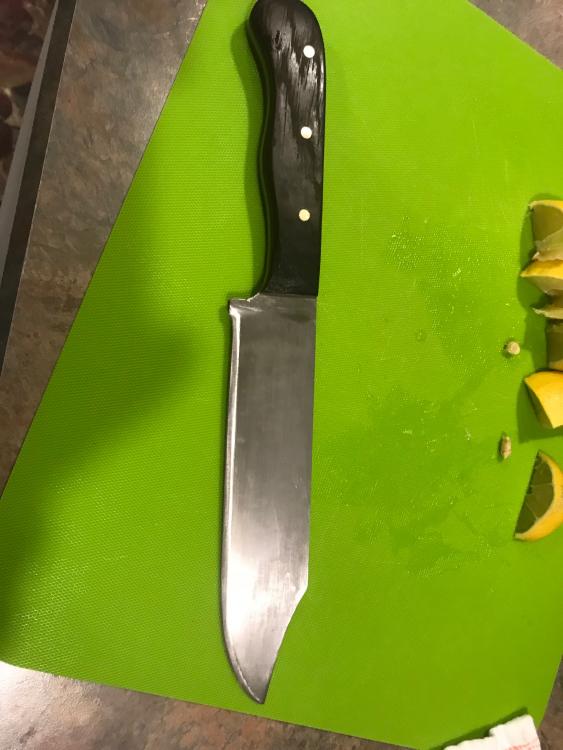
Finished my first kitchen knife tonight. Overall length is 12” with the handle ~5” and blade ~7”. The blade is 1095. The handle scales are wedge with a red liner. The grind was almost all freehand on the belt sander with a little work with a Dremel and some hand filing. Sharpened to 3000 grit on stones. This one is for multi-purpose so I put a clip point on it to do miscellaneous tasks. Next knife will be a more traditional French or Japanese style.


-
All of them are exceptional. Wow! And what an honor to craft those diplomatic gifts. And you knocked it out of the park on those
-
Good job! The green handle one is for the kitchen? Looks like it will work great for food prep. Good rocking shape on the front so you don’t have to lift the full blade off the cutting surface and the handle is good for finger clearance. I like it!