DavidF
-
Posts
162 -
Joined
-
Last visited
Content Type
Profiles
Forums
Articles
Gallery
Downloads
Events
Everything posted by DavidF
-
Super cool! When I worked in the golf industry, really good players would say that you need to be excited and confident with the club when you hold it. That was 80% of the game. Your hammer would accomplish this and make we want to do more forging. It is beautiful.
-
As Espen said about KingofRandom, here is the local story. This guy is probably five miles away from me. https://www.ksl.com/?sid=46238745&nid=148&title=2-men-face-felonies-for-science-experiment-explosions
-
This video scares xxxxxxxxxxx me. But it showed me a little bit on jet place,met as he unsafely moves stuff around. . Thought I would share so you can see first hand how NOT to do things, but as this guy nearly burns down his home, it does provide a visual for what the jet placement will do. His demo and opinion are that the depth has very little impact (at least what I took away from it). I am not sure how this changed once he placed it in the forge and had a different environment for the burner with backdraft, non open air, etc. but it will probably help you form an opinion since he is playing with placement and tube e tension, etc. I actually liked what I took from the video, but again, I would never do what he is doing
-
I am also new, but the Venturi design requires the end to flare and not reduce. By reducing, I believe it will constrict, but what you want is to constrict and then expand so it will pull air from the top. I will find a pic and post of what I am describing https://en.m.wikipedia.org/wiki/Venturi_effect if you use this model and compare to your design, the end flare is what I think you are missing. So if that nipple is 3/4” (sorry for imperial, but I am US), you want the reducer turned around to go from 3/4” nipple to a 1 1/4” or 1 1/2” outlet. The flame exits on the 1 1/4” outlet and that expansion is what is necessary for the effect to create pressure and extend the flame out the end. Hope that makes sense. I know there are expert level burner makers on this forum, but I wanted to share what I saw. One last thing. I am not suggesting you use this as your model. I just built this and it is my first burner. But if you look at the flare on the end, you can see an example of going from a 3/4” nipple to a 1 1/4” or 1 1/2” flare. The red threads indicate female. The black indicate male. A I am brand new to these builds and have only built one dual burner. What I am illustrating is the concept and not an optimal design. I am still tweaking mine to work optimally, but based on a lot of reading I completed prior to this fabrication, the experts show an expansion on the south end of the burner to create a Venturi effect. I hope that detail helps you chase down the right answers. Good luck, have fun, and stay safe
-
That is awesome! Congrats and happy banging!
-
I haven’t picked up new tips yet, but I did figure out one issue. I had a backdraft in the pipe that houses the burners. I took additional insulation blanket and stuffed them up. I have also had to “help” get the burner flame out the end by blowing forcefully down the opening. It takes off after that and burns pretty good. It is rich when it starts out, but goes to fairly neutral once it is warm and the burners are going. I am going to pick up some smaller, tapered tips and swap them out. But tonight I needed to anneal a blade and I can heat the forge and the entire 12” blade in about ten minutes. Really happy with how it works. And the IR radiator from Wayne is the best thing I could have added to this forge. I haven’t made any empirical measures, but I would bet the heat up time and time to heat a blade is about half of the time I saw prior to the Merikote layers. I may be “geeking” out a little, but I am really excited with this hobby. I am now creating a kitchen knife. It is my second blade, so I just did a flat grind from blade to spine. Even though it is only the second blade, my grinding is probably 400% better. I am going to keep it simple with just a blade and handle construction. No guard or pommel for the next few tries. I know I am preaching to the choir here, but I can’t wait to get off work from my day job so I can play in the shop. This has to be the most rewarding hobby in the world. After my night of work, I can hold up this work and see what I accomplished. I wish I could figure out a way to do this full time, because I am thinking about things all the time, dreaming about designs and uses, in bed watching forging on YouTube.... it goes on and on. I have the bug and I hope it doesn’t lose it’s luster for me in my lifetime.
-
Updated pics. I still have some more touch ups. But it is coming along.


-
I wanted to add something to this thread. Carpal tunnel is an issue that has flared up for me since working on metal. I work on computers all day long for 25 years for my profession. Never had an issue with carpal tunnel until I started working with small tools and rotary grinders. If the numbness is in the index, middle, and ring fingers, this can be carpal tunnel. Every time I wrap up, I ice my right hand and wrist for more than an hour. It may not be carpal tunnel, but I wanted to share this information in case it helps anyone else down the road. I spoke to a doctor about it this past week and ice, anti-inflammatory, and stretching helps.
-
Thx IronDragon. I looked for a board before posting, but I didn’t see it. It was right in front of me, but I missed it. Thanks for sorting this properly and pointing me in the right direction
-
Today I had to go get my eye drilled for metal and rust rings. This is the second time in my life I have had to have this procedure. And it is one of the most unpleasant experiences I have had to endure. I wear eye protection at all times, but I have been using glasses. I want to get a pair of goggles or similar since the metal had to slip underneath the glasses to get to my eye. I am looking for recommendations on eye protection that will provide the most enclosure. I am also considering a full face mask. Any opinions on what you use for the nest eye protection? I want to make sure I avoid a third occurrence. Any opinions are appreciated.
-
Good input Joel! I agree
-
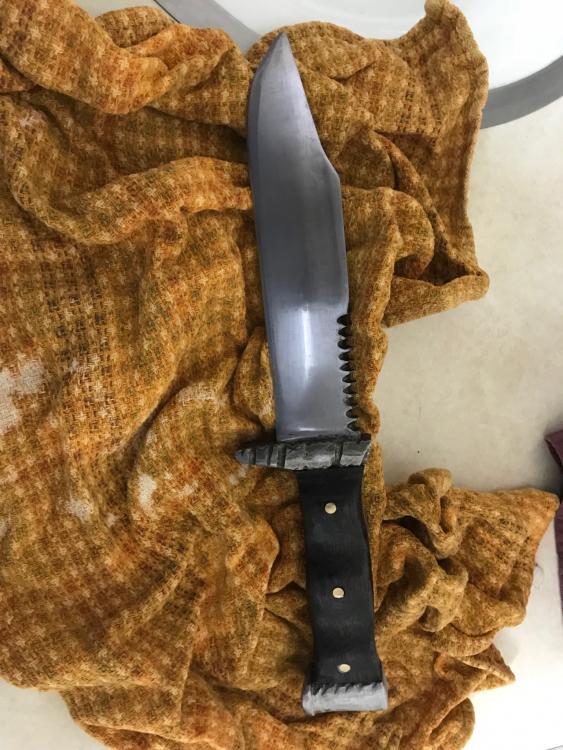
Will be. I have a couple of finishing touches and one is to seal the back part of the guard. But it will only be used “once” to clean a moose. The guy that I am giving it to uses the replaceable blade system for the work. He wants it as a show piece by his trophys. So I told him it needs to be utilized at least once and then he can hang it. He assure me it would “see blood”. So I will be finishing that work tomorrow (most likely) and the final detailing, polish, oiling, etc. I also have requests for some blades for charitable events already. I like that I am getting demand just by sharing on my social media pages. Once this one is complete and I can take some good pics, I will get them posted. My next few projects will be kitchen knives for the wife and me. It will get me some more practice. And I really want to do an art project for my wife to hang on the wall. Blades are a lot of fun, but I am excited to do some different things by tapping into my artistic passion
-
Not intentionally. But based on the quick search I just completed, I would say the serrations could make it fall under that definition. The knife will be used as a hunting knife. It will be used to clean and skin game. I always follow the double tap rule fo zombies, so no knife would be required Update: I read the legislation and without the word of violence on the blade or handle, it would not fall under the definition. Only meets two of the three criteria. So you would have to carve “undead slayer” on it after delivery if you want to break the law
-
Amount of fiber blanket for a 20# propane tank
DavidF replied to DavidF's topic in Insulation and Refractories
Those are incredible pics! Good question how NM ended up being the resting place. My state take in a lot of military and hazardous wastes. Could be some arrangement with a private company similar to what we have in Utah. Company in Utah is EnergySolutions. Interesting reading if you are like me. -
Updated pics. Still working on it, but wanted to share progress. Mostly detail work left.

-
Will, ummm... I wish I would have normalized again. In hindsight, I definitely should have thought it through and did that step. Thanks for mentioning it. As a newbie, it helps to hear things that should have been standard practice. I will normalize before repeated quenches in the future. I ended up gluing and securing everything tonight. Maybe I can do an edge treatment, or just test and see how it holds up. I have dropped the blade and it didn’t crack. So it may be OK without more HT. When I quenched, I placed th edge in before cooling the rest. The intent was to leave a softer spine. And since it is 1095, I immediately went to the temper. Maybe I will file test the spine tomorrow to see if the edge quench did what I attempted and go from there. I will also post pics once it is cleaned up. Thomas, that is exactly what happened. Second quench was heated and that most likely was the change. Again, newbie mistakes will prevent repeated mistakes. Thanks for sharing your expertise. I bet my next knife will have all new errors! But I am learning and enjoying myself.
-
Amount of fiber blanket for a 20# propane tank
DavidF replied to DavidF's topic in Insulation and Refractories
Lol! I tried to get in an Abrams to measure the radius, but it had a lot of right angles, blinky lights, and knobs. I got distracted and forgot why I went in there! But how cool would it be to reprovision a canon barrel into a forge? I know it is trouble to go by railroad property, but I haven’t heard any warnings about DoD sites. Maybe you just have to go to the gate and ask nice? Disclaimer: this was completely tongue in cheek... no federal visitors are required. -
Thomas, the oil was around up deg for the first quench. I am sure you hit the nail in the head Thanks Genesaika. I love that perspective
-
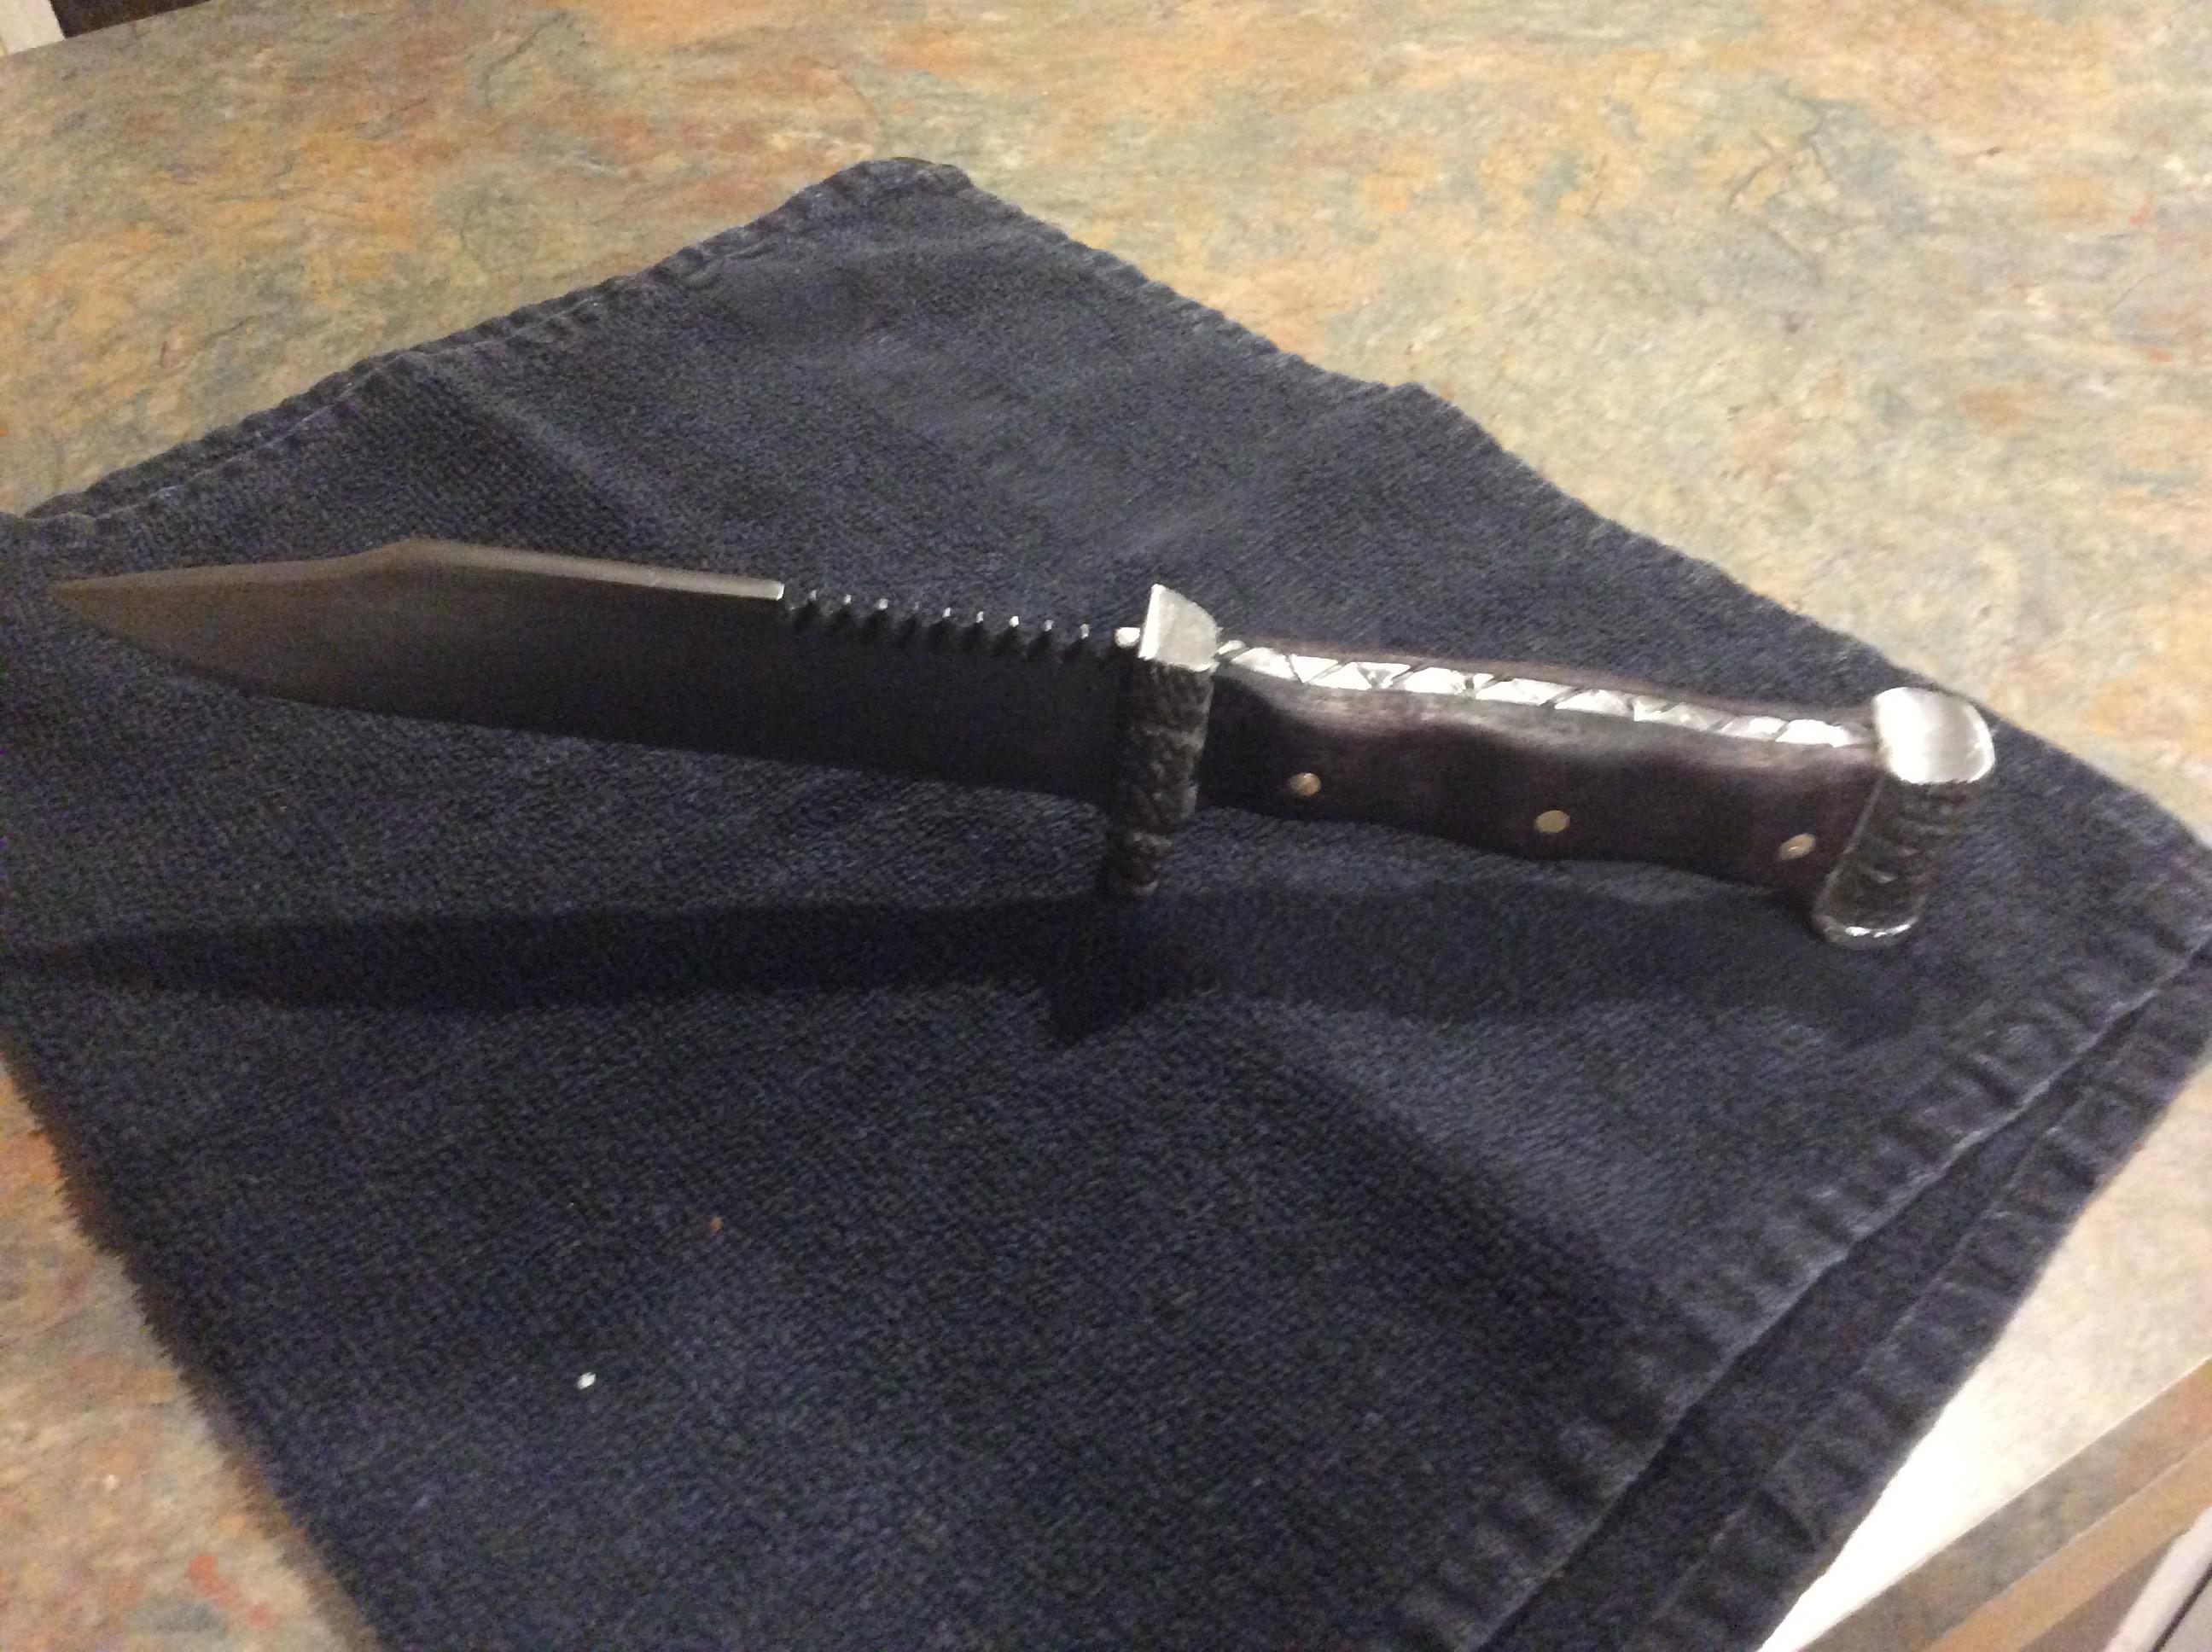
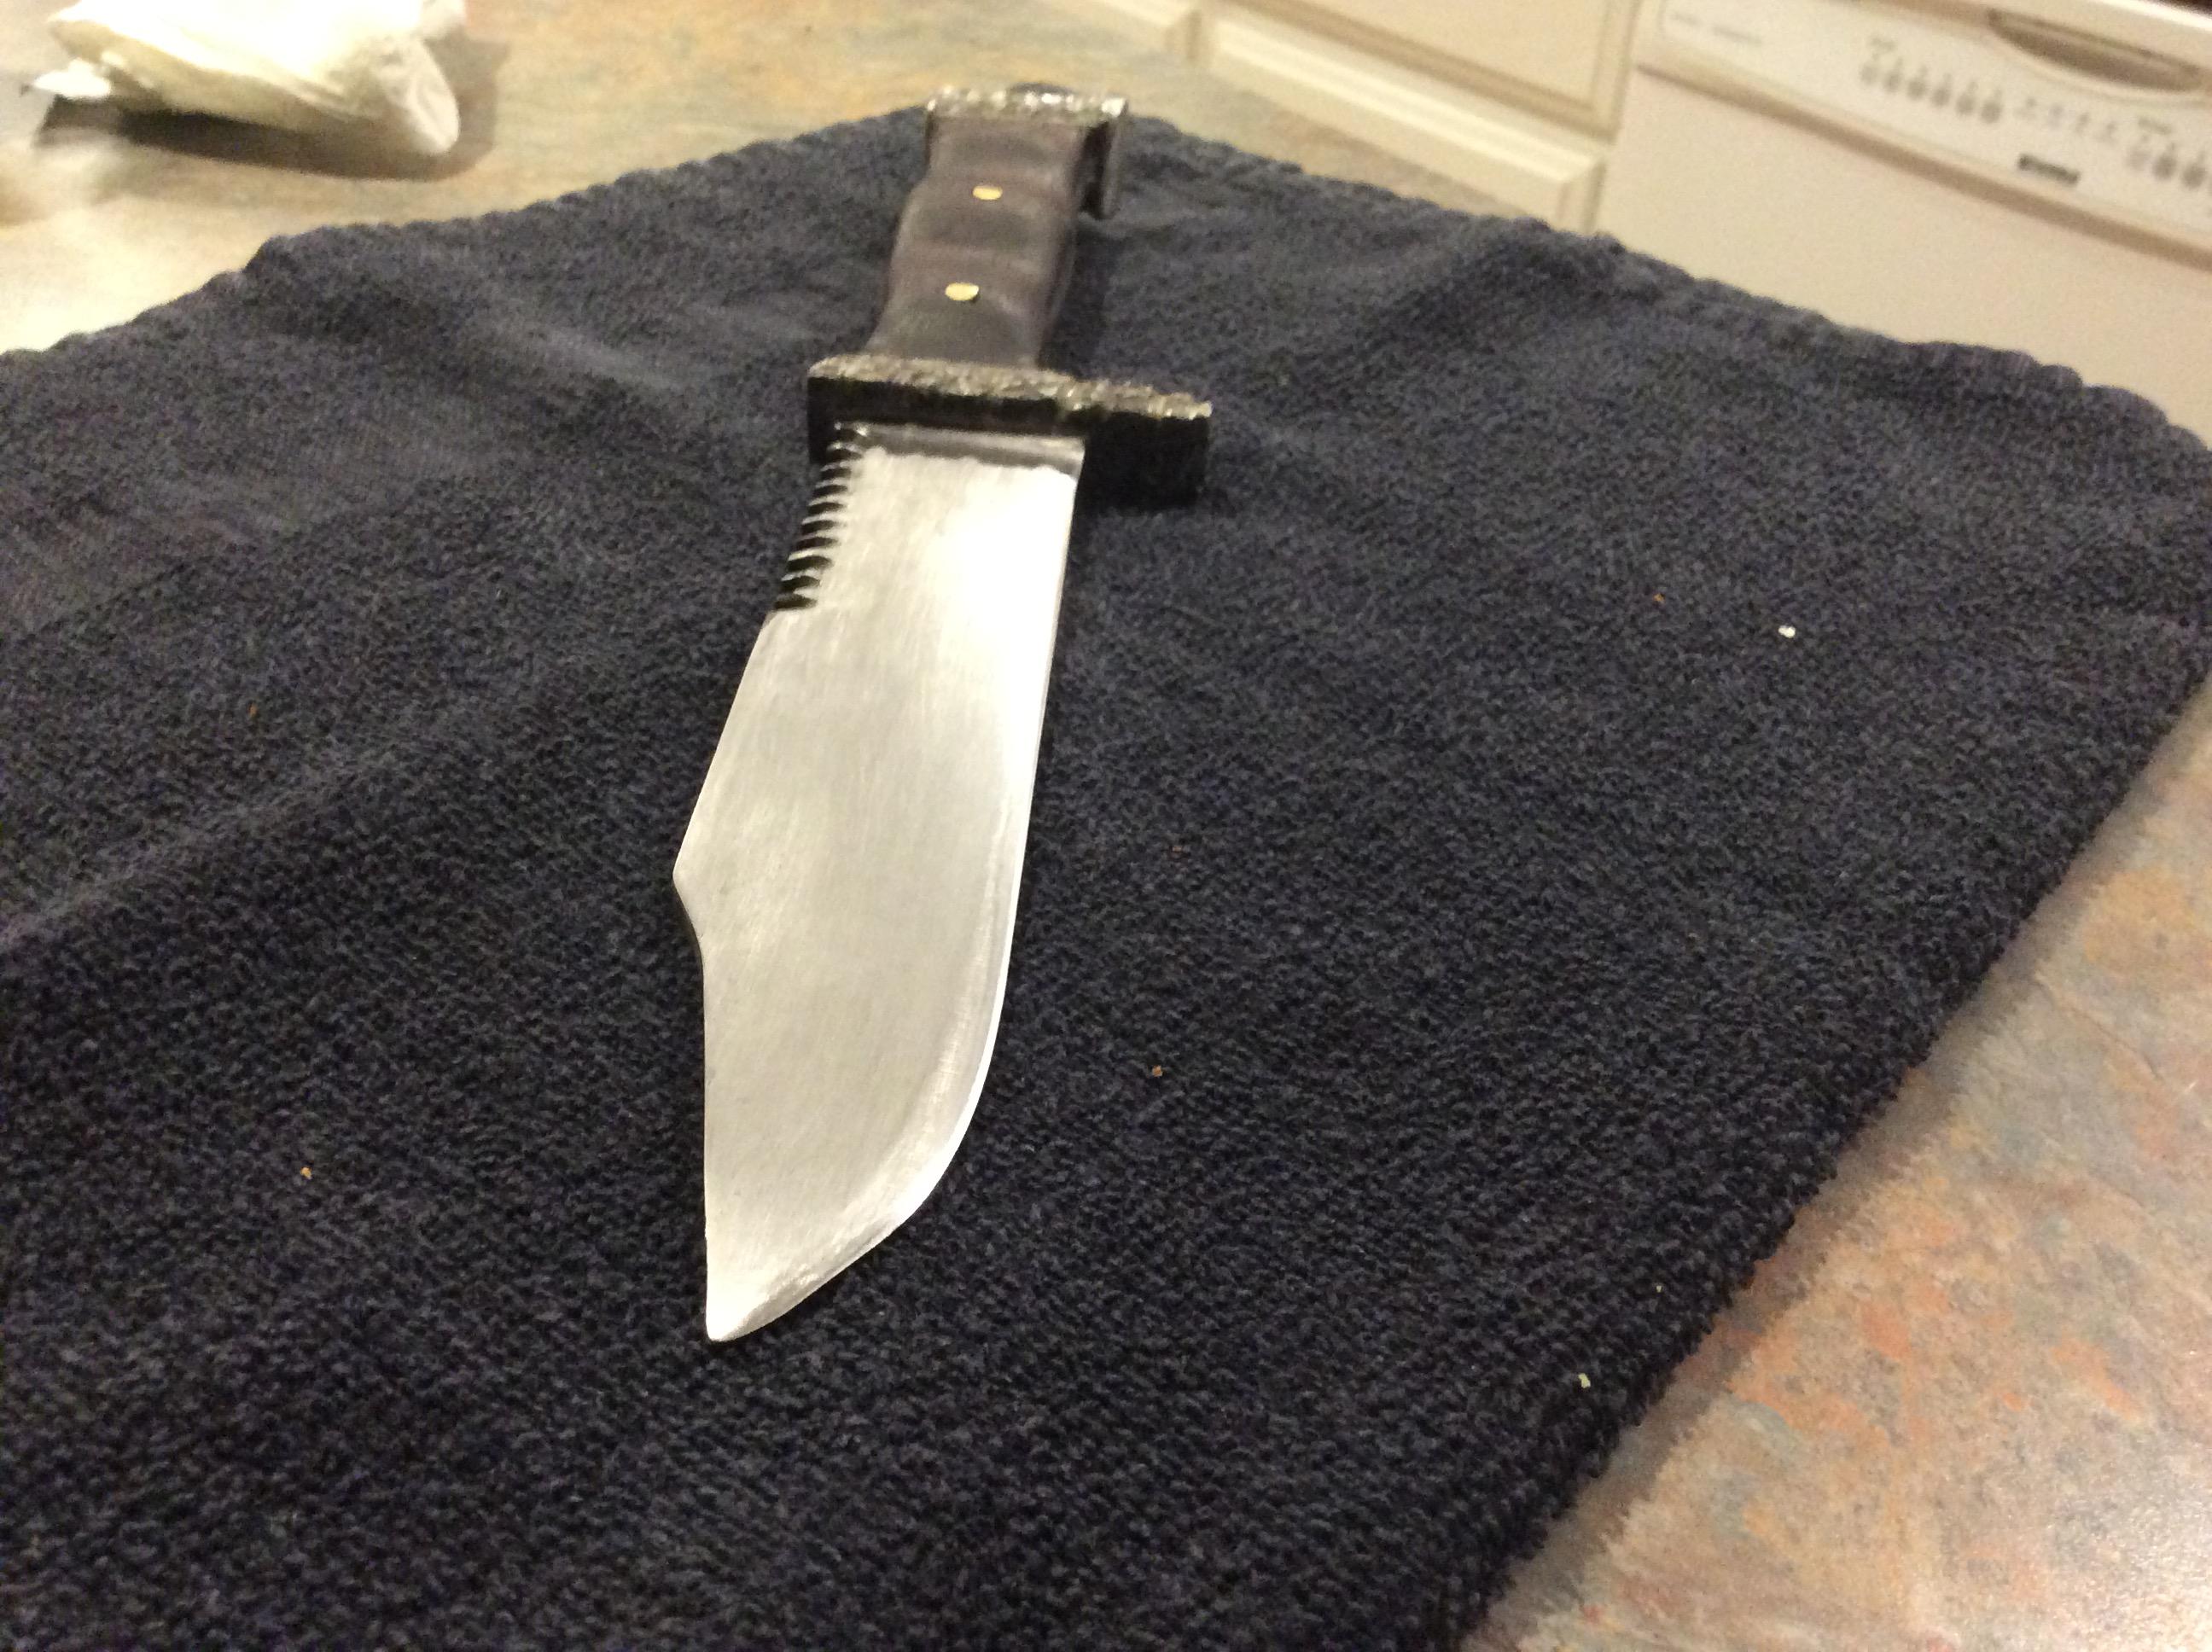
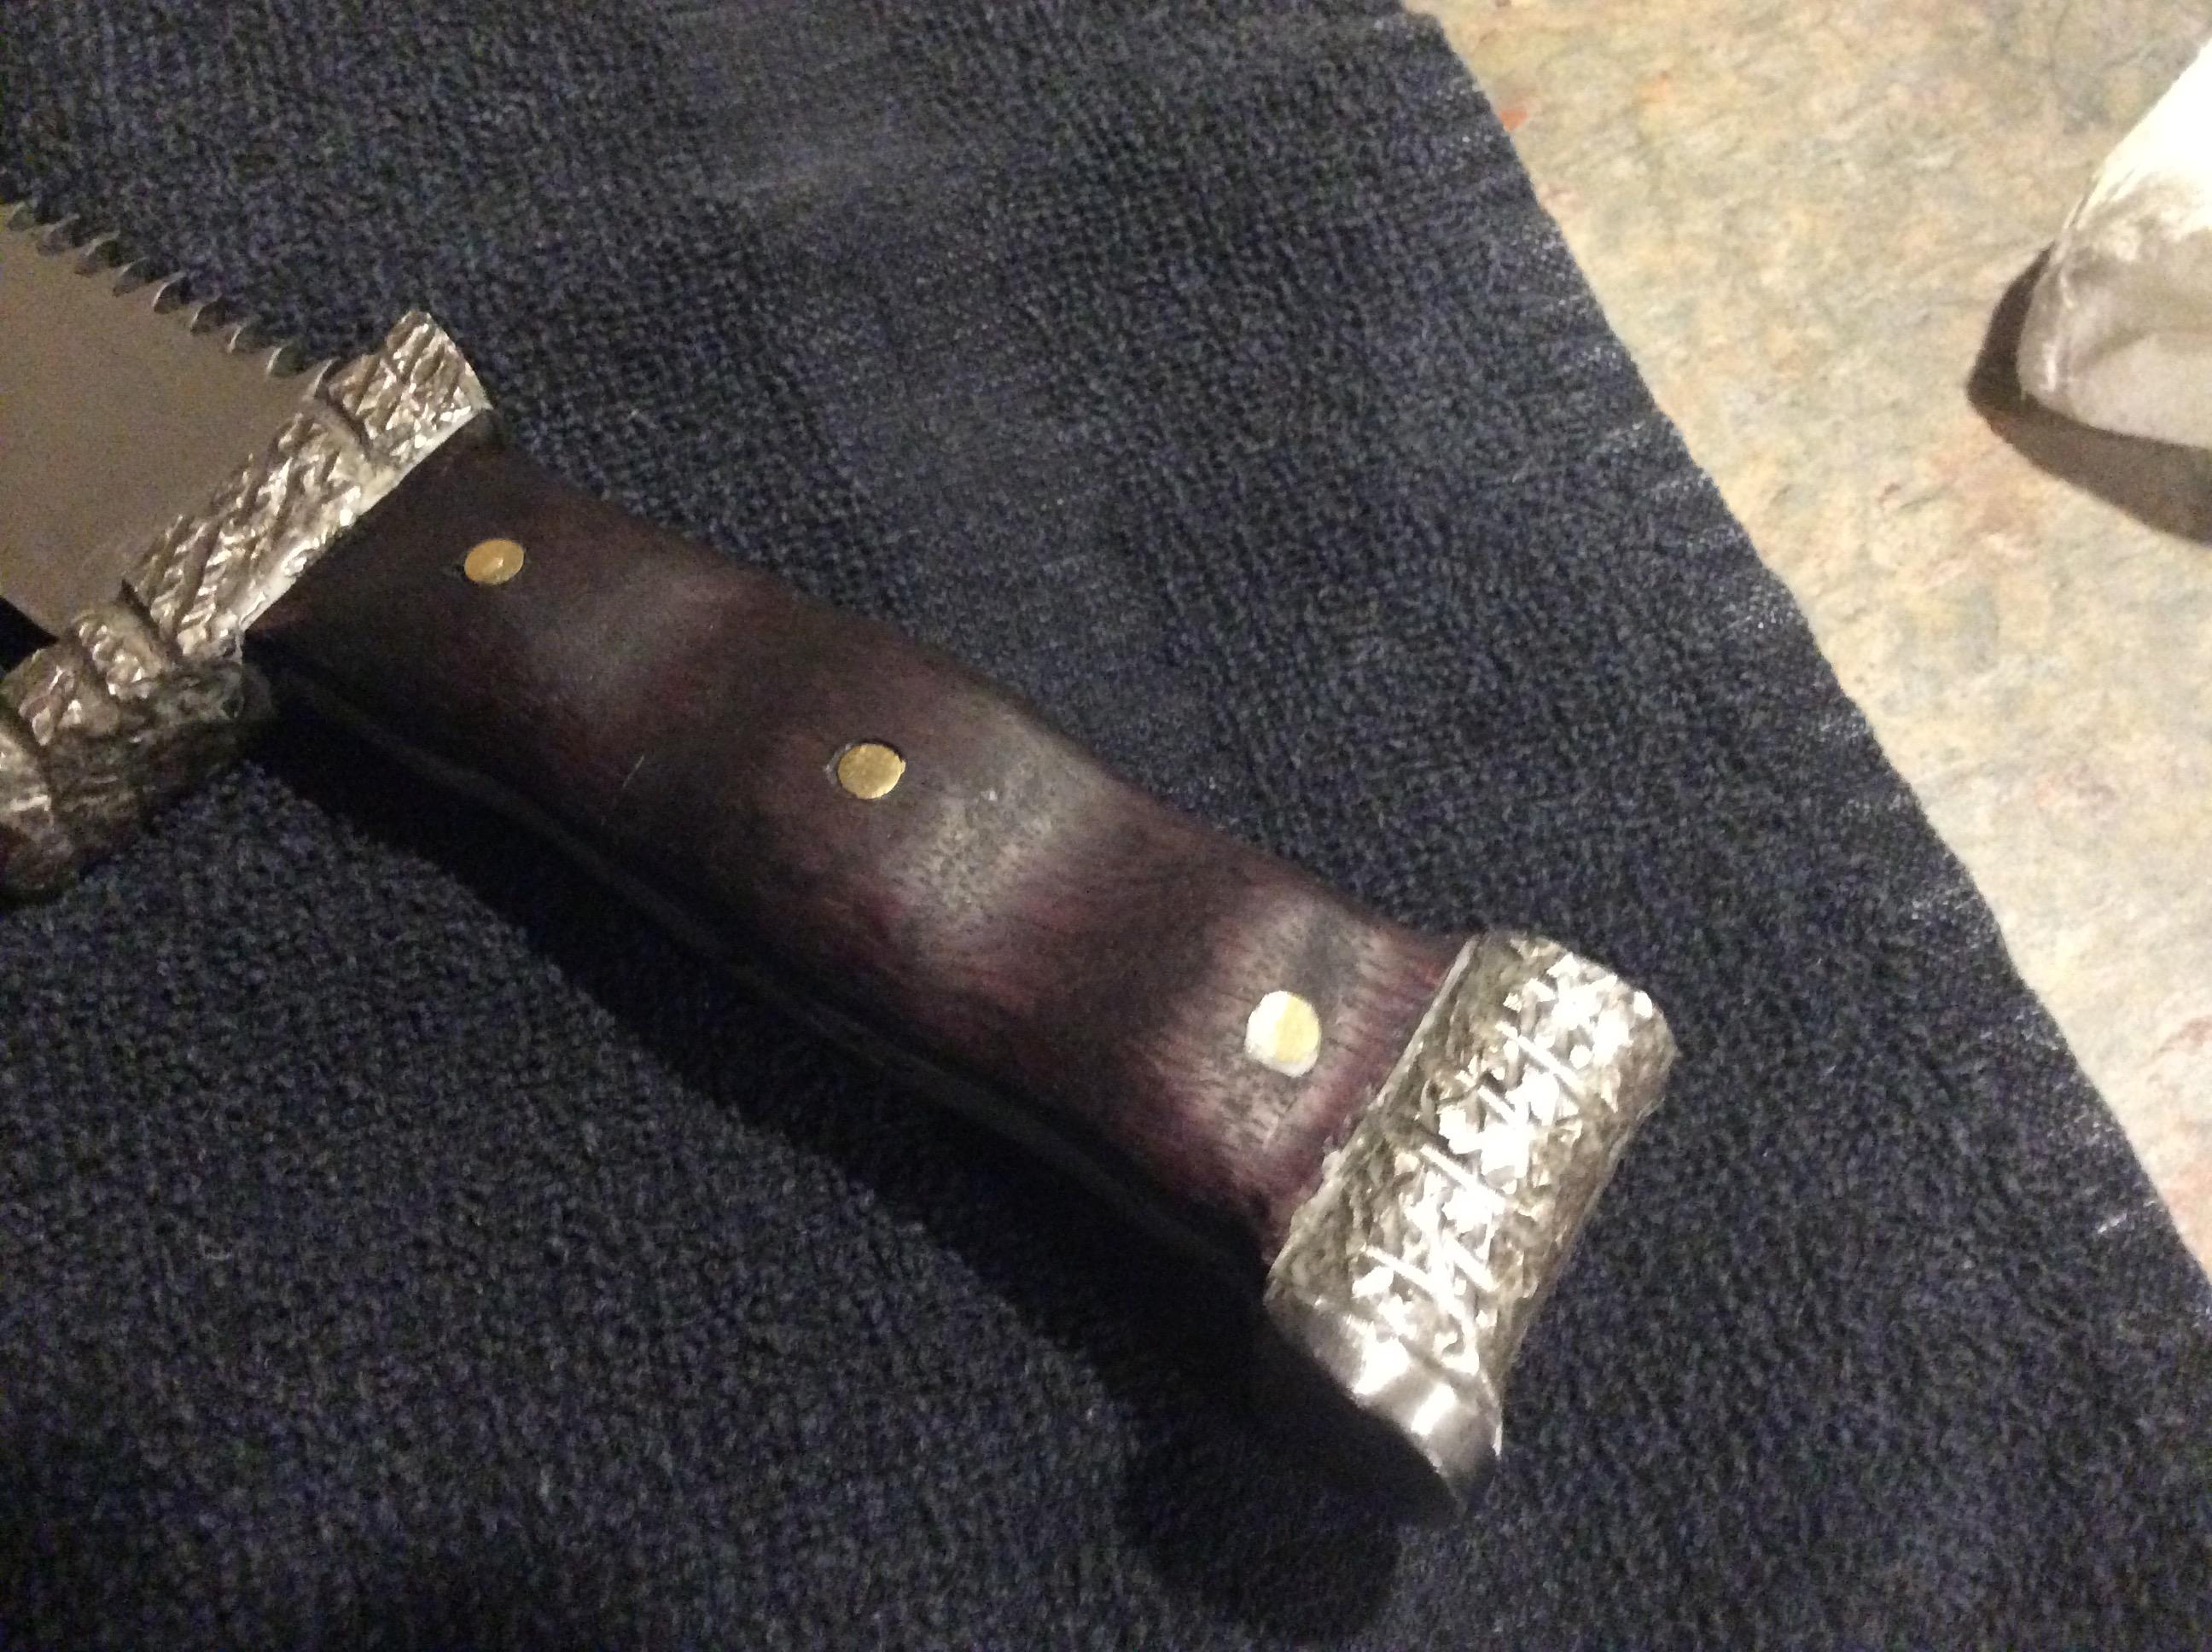
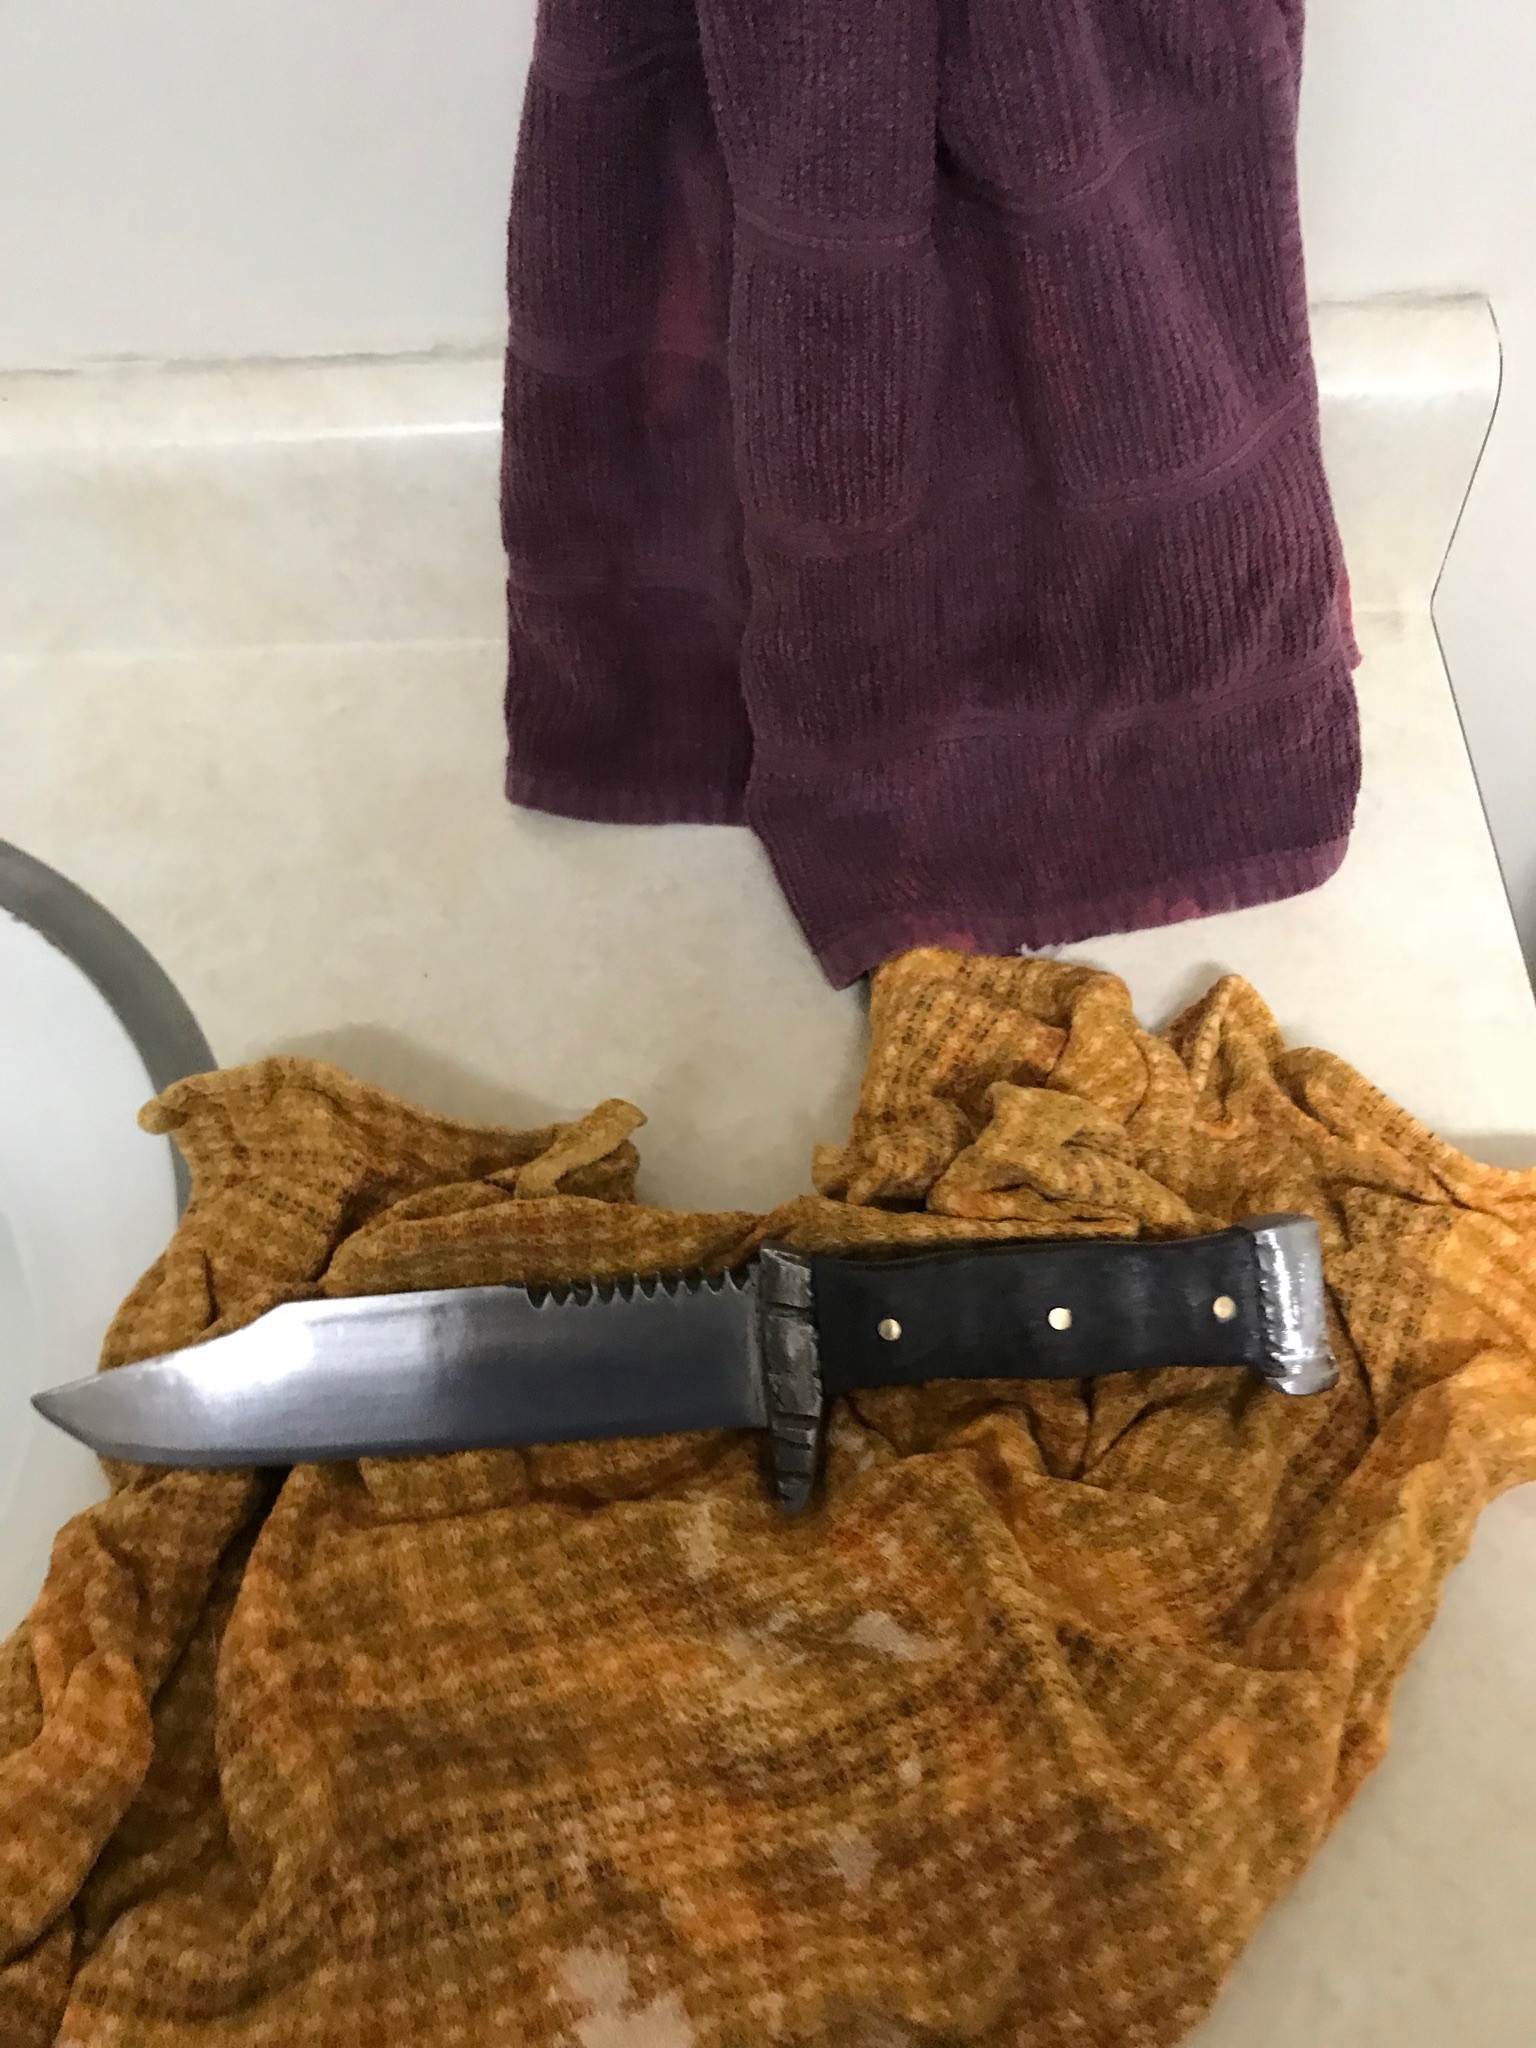
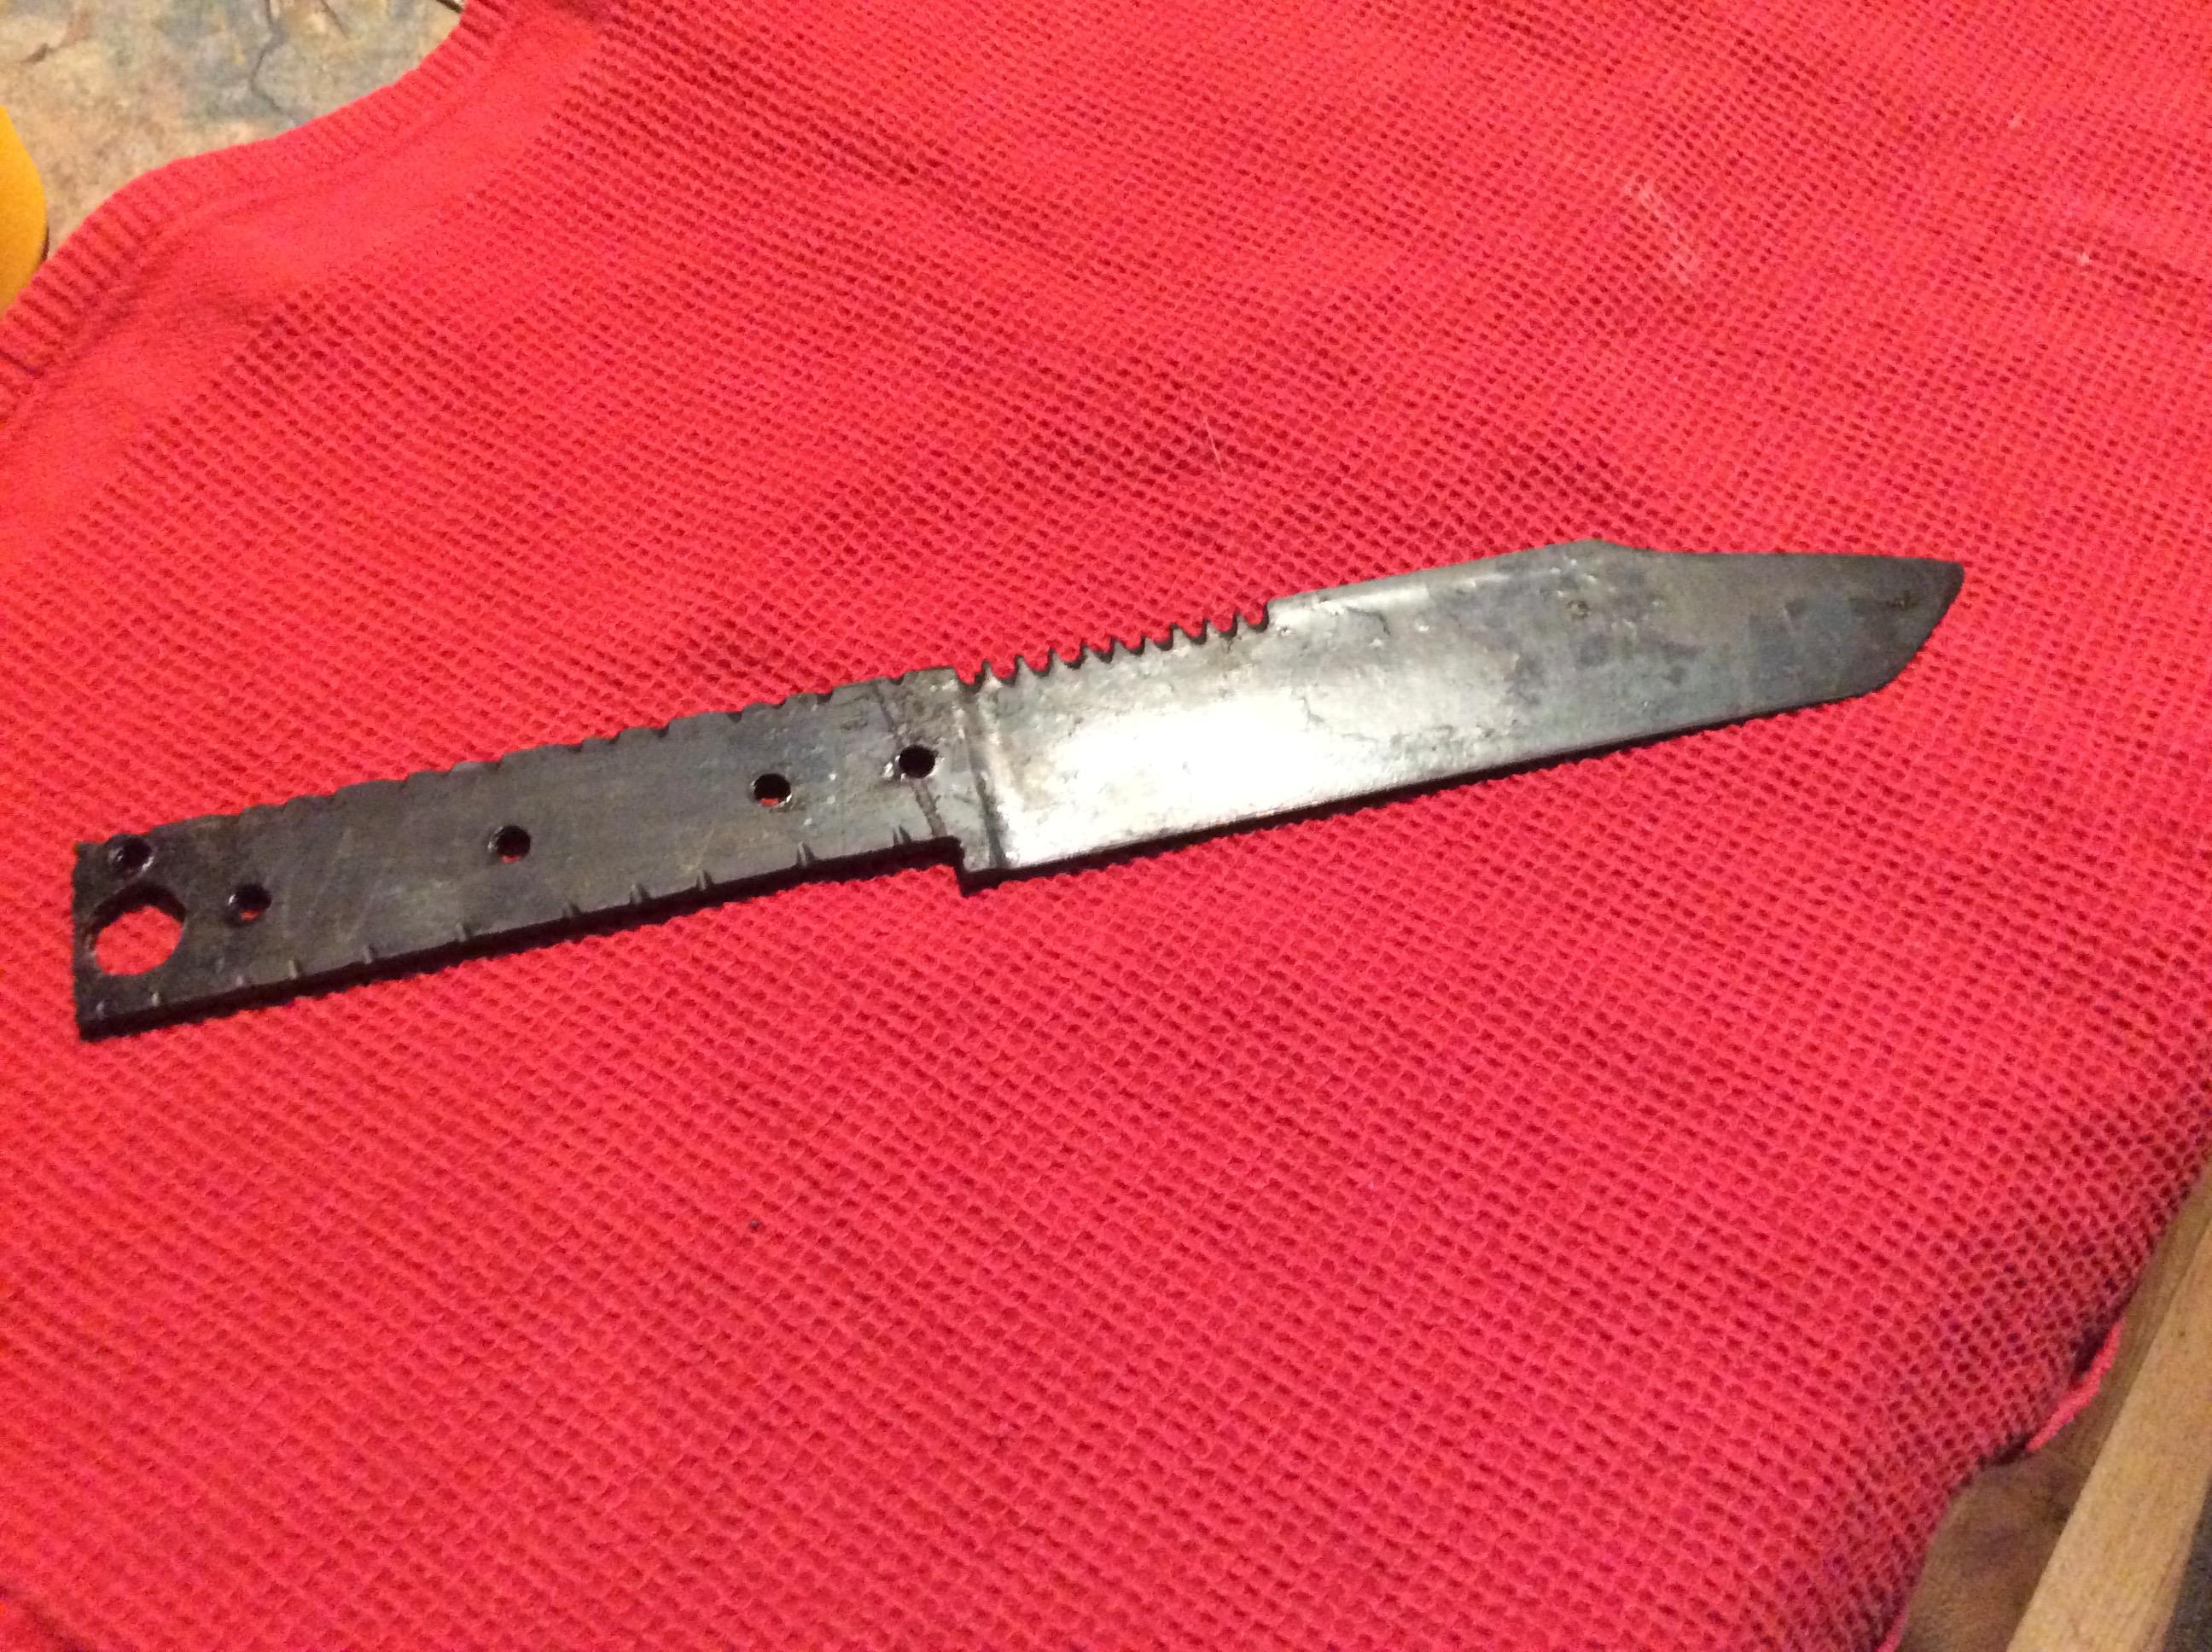
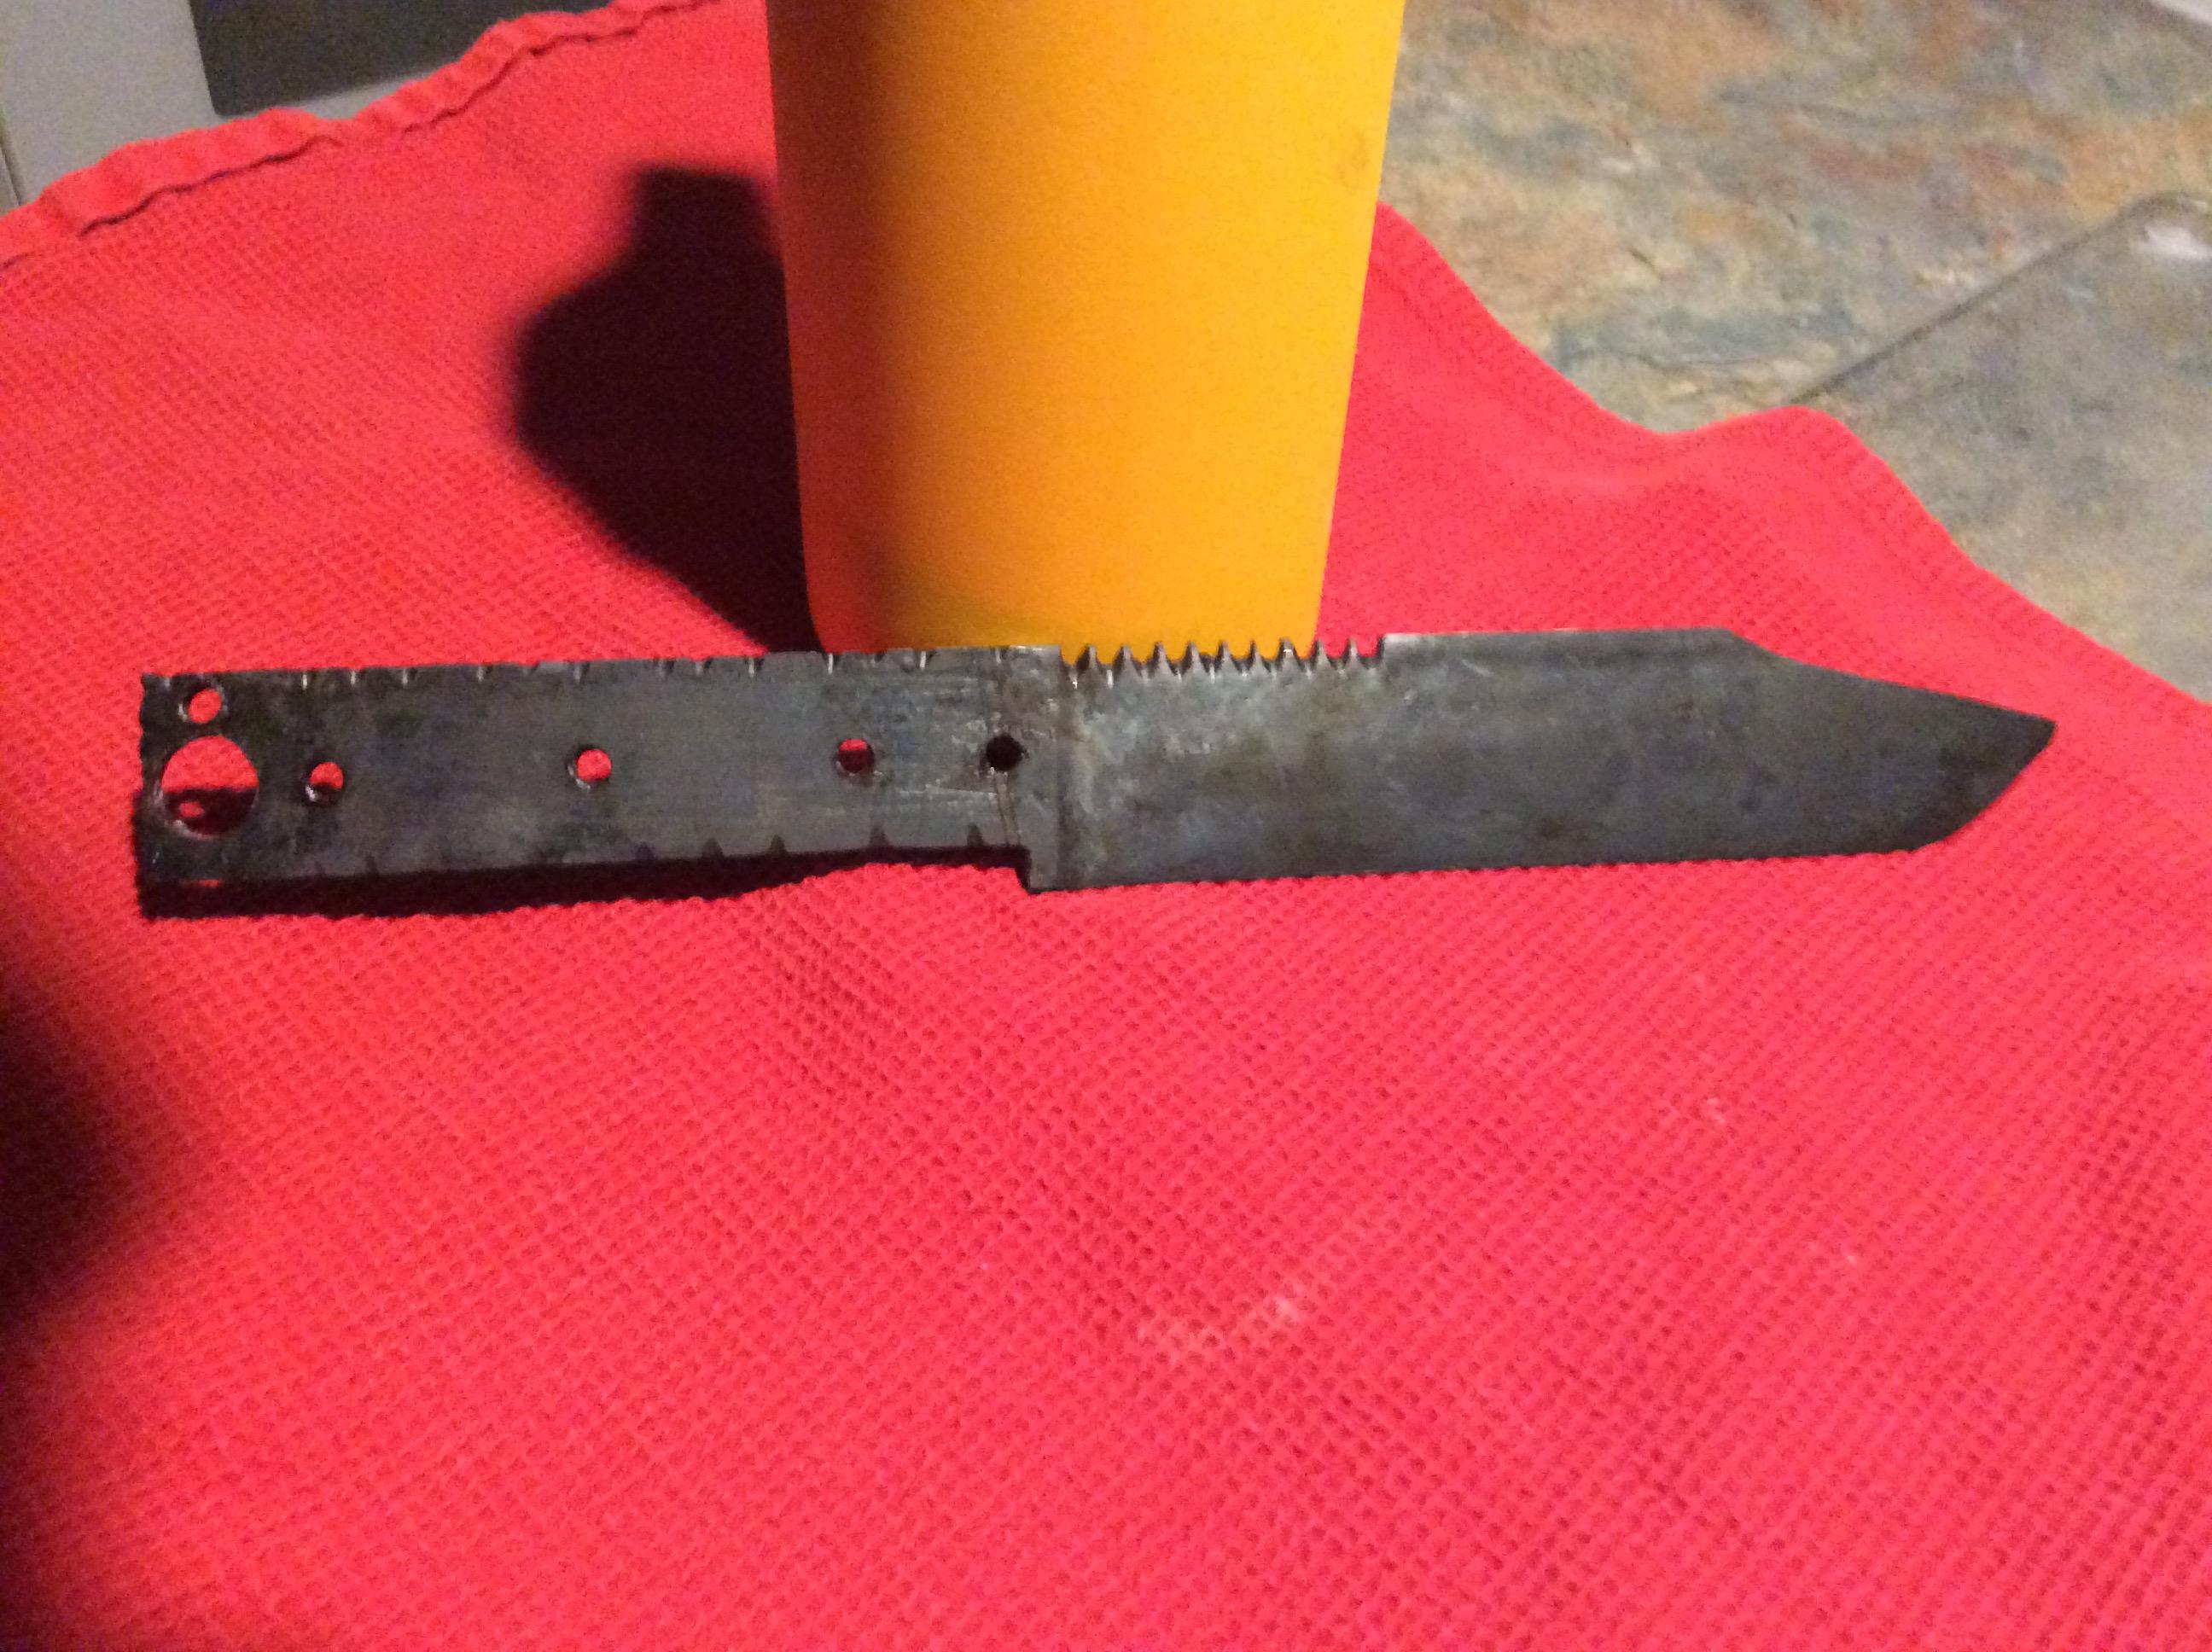
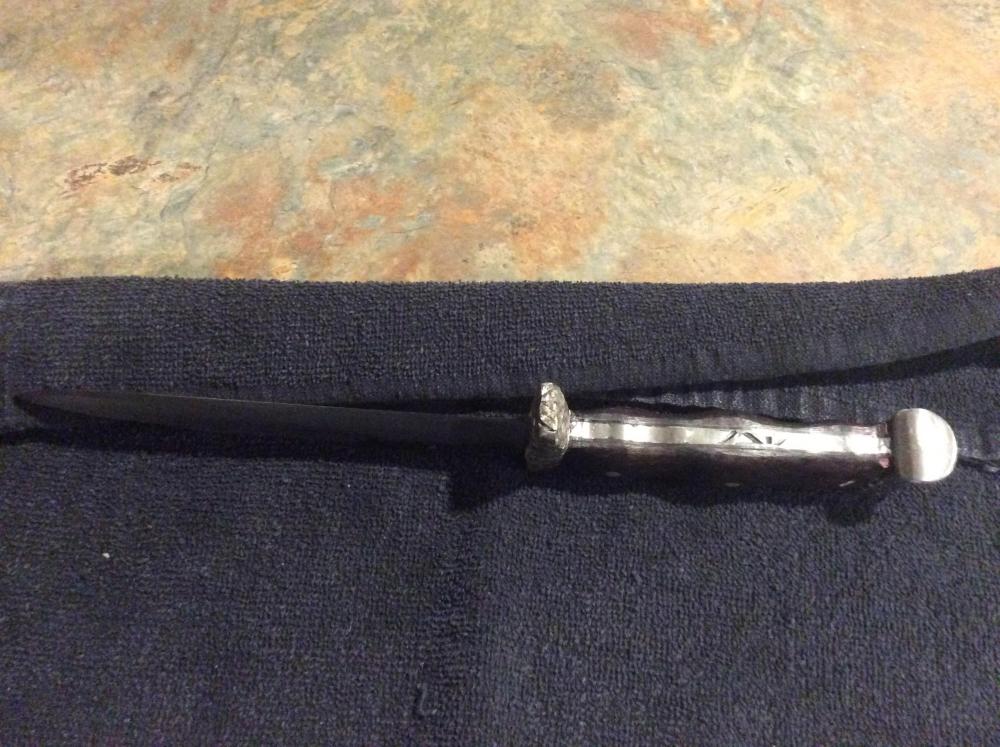
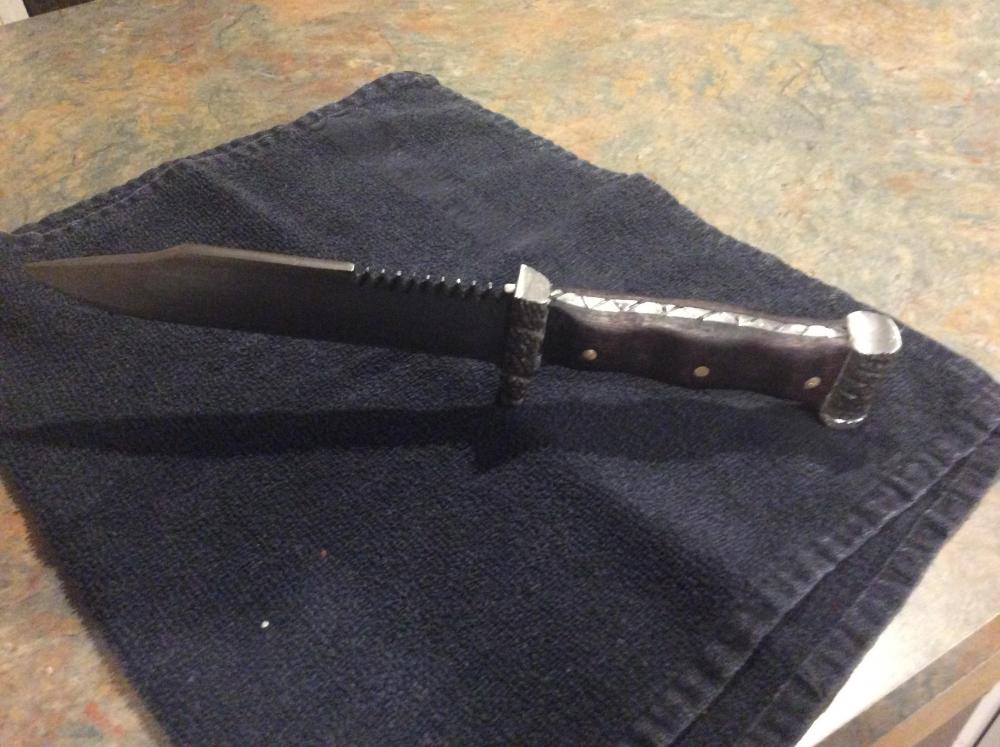
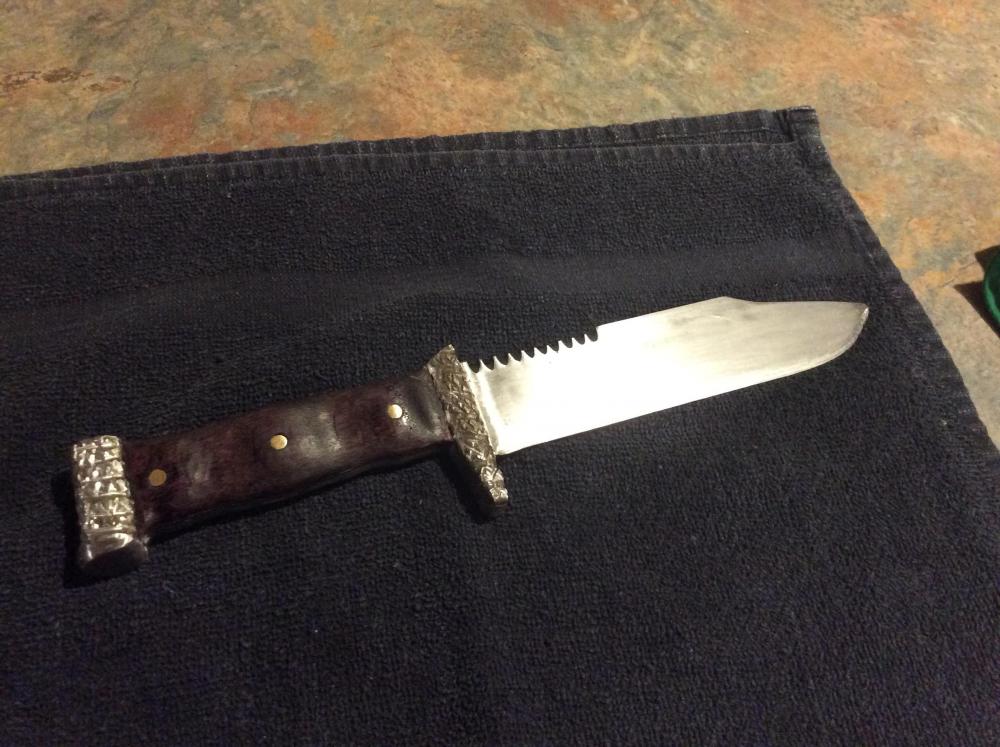
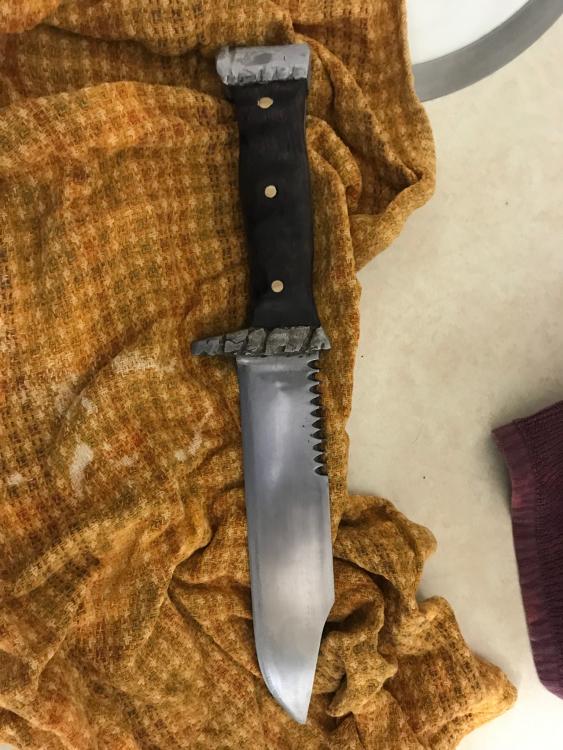
I have successfully HT my first blade. It is 1095, stock removal only, no forging since I just finished my forge and I have been working on this during the forge build. I have made this hunter for my niece’s husband. He is a an avid hunter and he also picked up a big hunk of 1” thick A2 for me to beat on. This is the blade after HT. I used my new forge to bring above non magnetic, gave it an extra but for the additional 100 deg needed and dunked in canola oil. The first go seemed to still have a little bite from the file, so I dunked it a second time and the file wouldn’t bite. So I placed in a 400 deg over for two hours and allowed to cool to handling temperature. I had read about saline dunks to get the 1095 down quick enough to harden, but I didn’t want to crack the blade and it is my first (and second) quench. Tomorrow night and over the weekend I will clean up and sharpen the blade, then put the guard and pommel along with the handle and liners on. I have kept things pretty simple, although I did a lot of pre carving on the guard, pommel, and handles. I should be able to post completed pics by the end of the weekend. Here are two pics after the hardening and tempering. As alway, any and all feedback is welcome. This is my first “real” blade, so I am sure there will be constructive comments. This includes any feedback on the process I shared, as well as design. The front and back holes are 1/4” tapped to 20 thread for the pommel and guard. The three center holes are to secure the handles which are Purple Heart wood. The liner will be black. The blade will be cleaned of all color and scale. The guard and pommel are SS and the bolts will also be SS. The handle pins are brass. I was going to use SS for those, but as I got closer to complete, I found the brass pins would work better when I complete the handle. The large hole in the back was put in to offset the weight of the pommel which is pretty big. Hopefully it will look good that way. One piece of feedback I would be interested in hearing, is if I should make the handle a little smaller. Initially I have planned to keep it the same height as the top of the blade. It will be a full tang. But looking at the pics, would it look and feel better to take an 1/8” or 1/4” of the top and bottom of the handle? This is one area I would love to hear opinions before I secure everything in the next couple of days. Thanks all!


-
Amount of fiber blanket for a 20# propane tank
DavidF replied to DavidF's topic in Insulation and Refractories
Excellent points. If your tank has tracks and/or a turret, please contact JHCC for recommendations. However, it should also be noted that if you are contacting JHCC about your “tank”, now would be a good time to give up on this endeavor since you lack the common sense to use sharpened tools and heat sources. -
Wayne, I am not familiar with T tips. Can your provide some more detail?
-
Cool. I will pick up some tips. I wondered if the .035” would work, but I needed them for my welder anyway.
-
Thanks Bines. Gas feed is Mig tip. It is .035. The nozzle is 1” to 3/4” reducer with threads drilled out. I also think my issue could be that the burner is not deep enough. In my case, it is probably not as deep as the burners are usually placed (based on your description). Thanks for the feedback. Btw, I appreciate you letting me know you aren’t poking fun. You won’t need to worry about that with me. I enjoy the banter. And I am new to this, so I am sure I will make mistakes and can learn more.
-
Thanks guys. I will move them up. I have a lot of room to bring them up. I will also get some air holes drilled. Once I make some tweaks, I will post back.
-
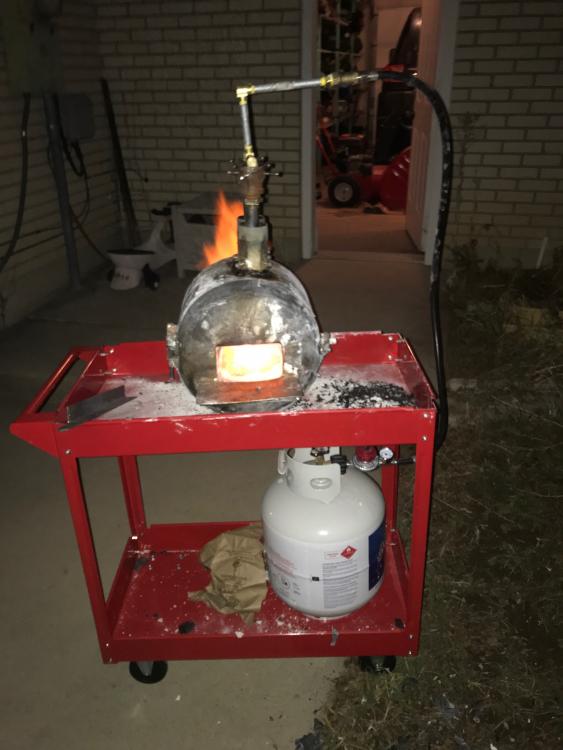
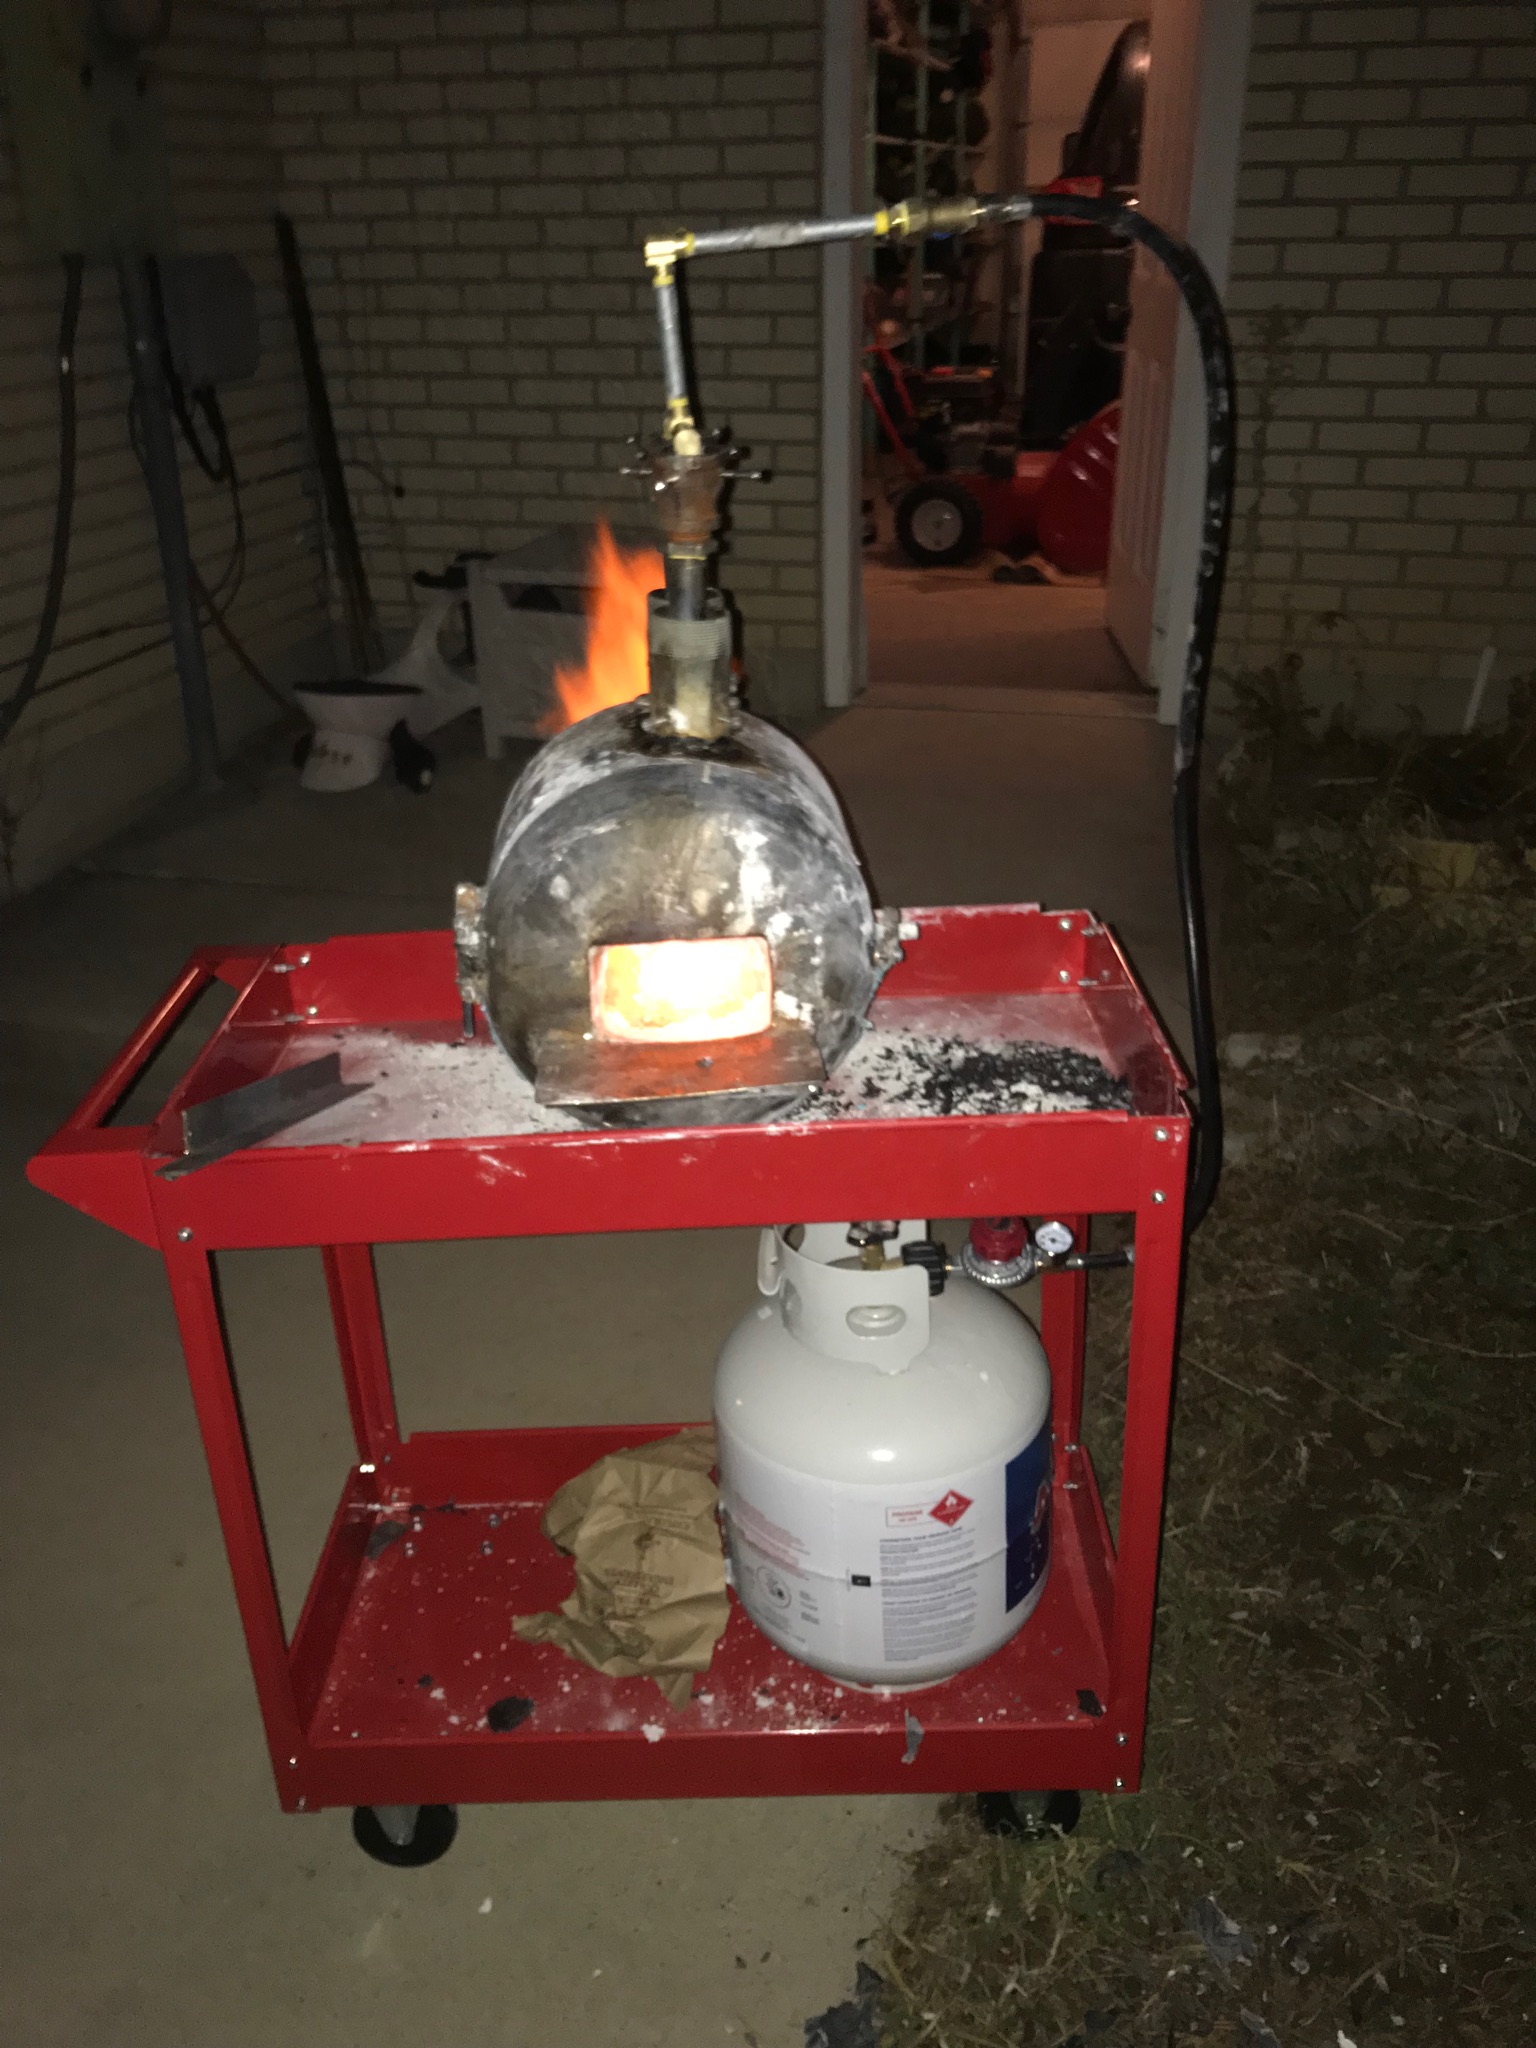
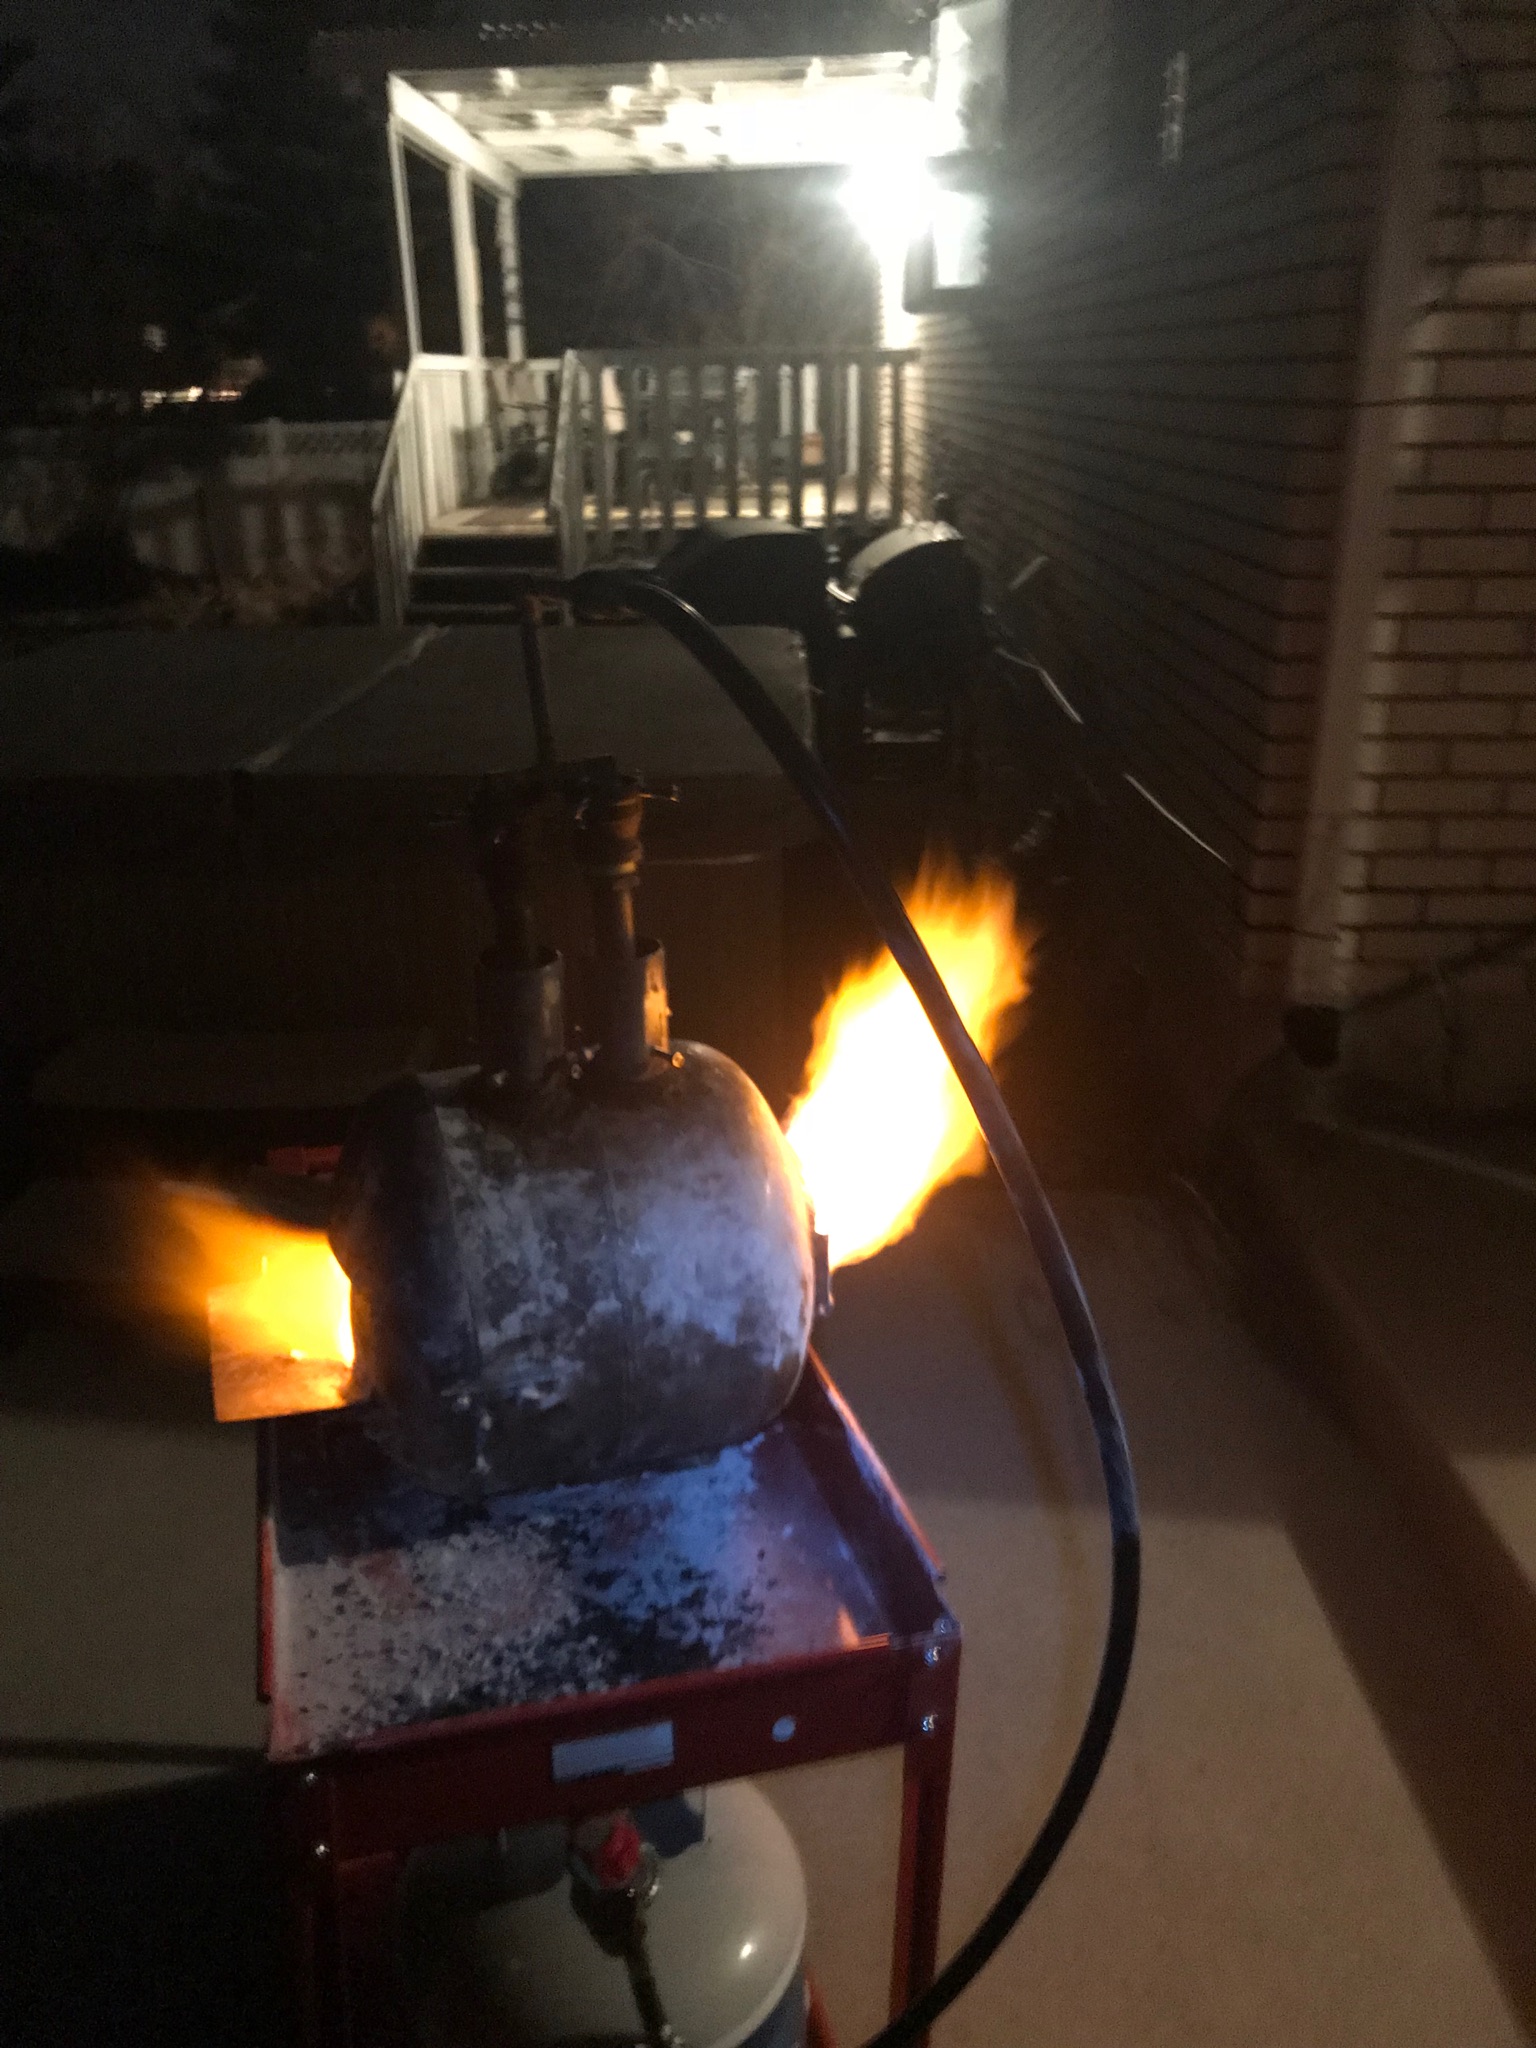
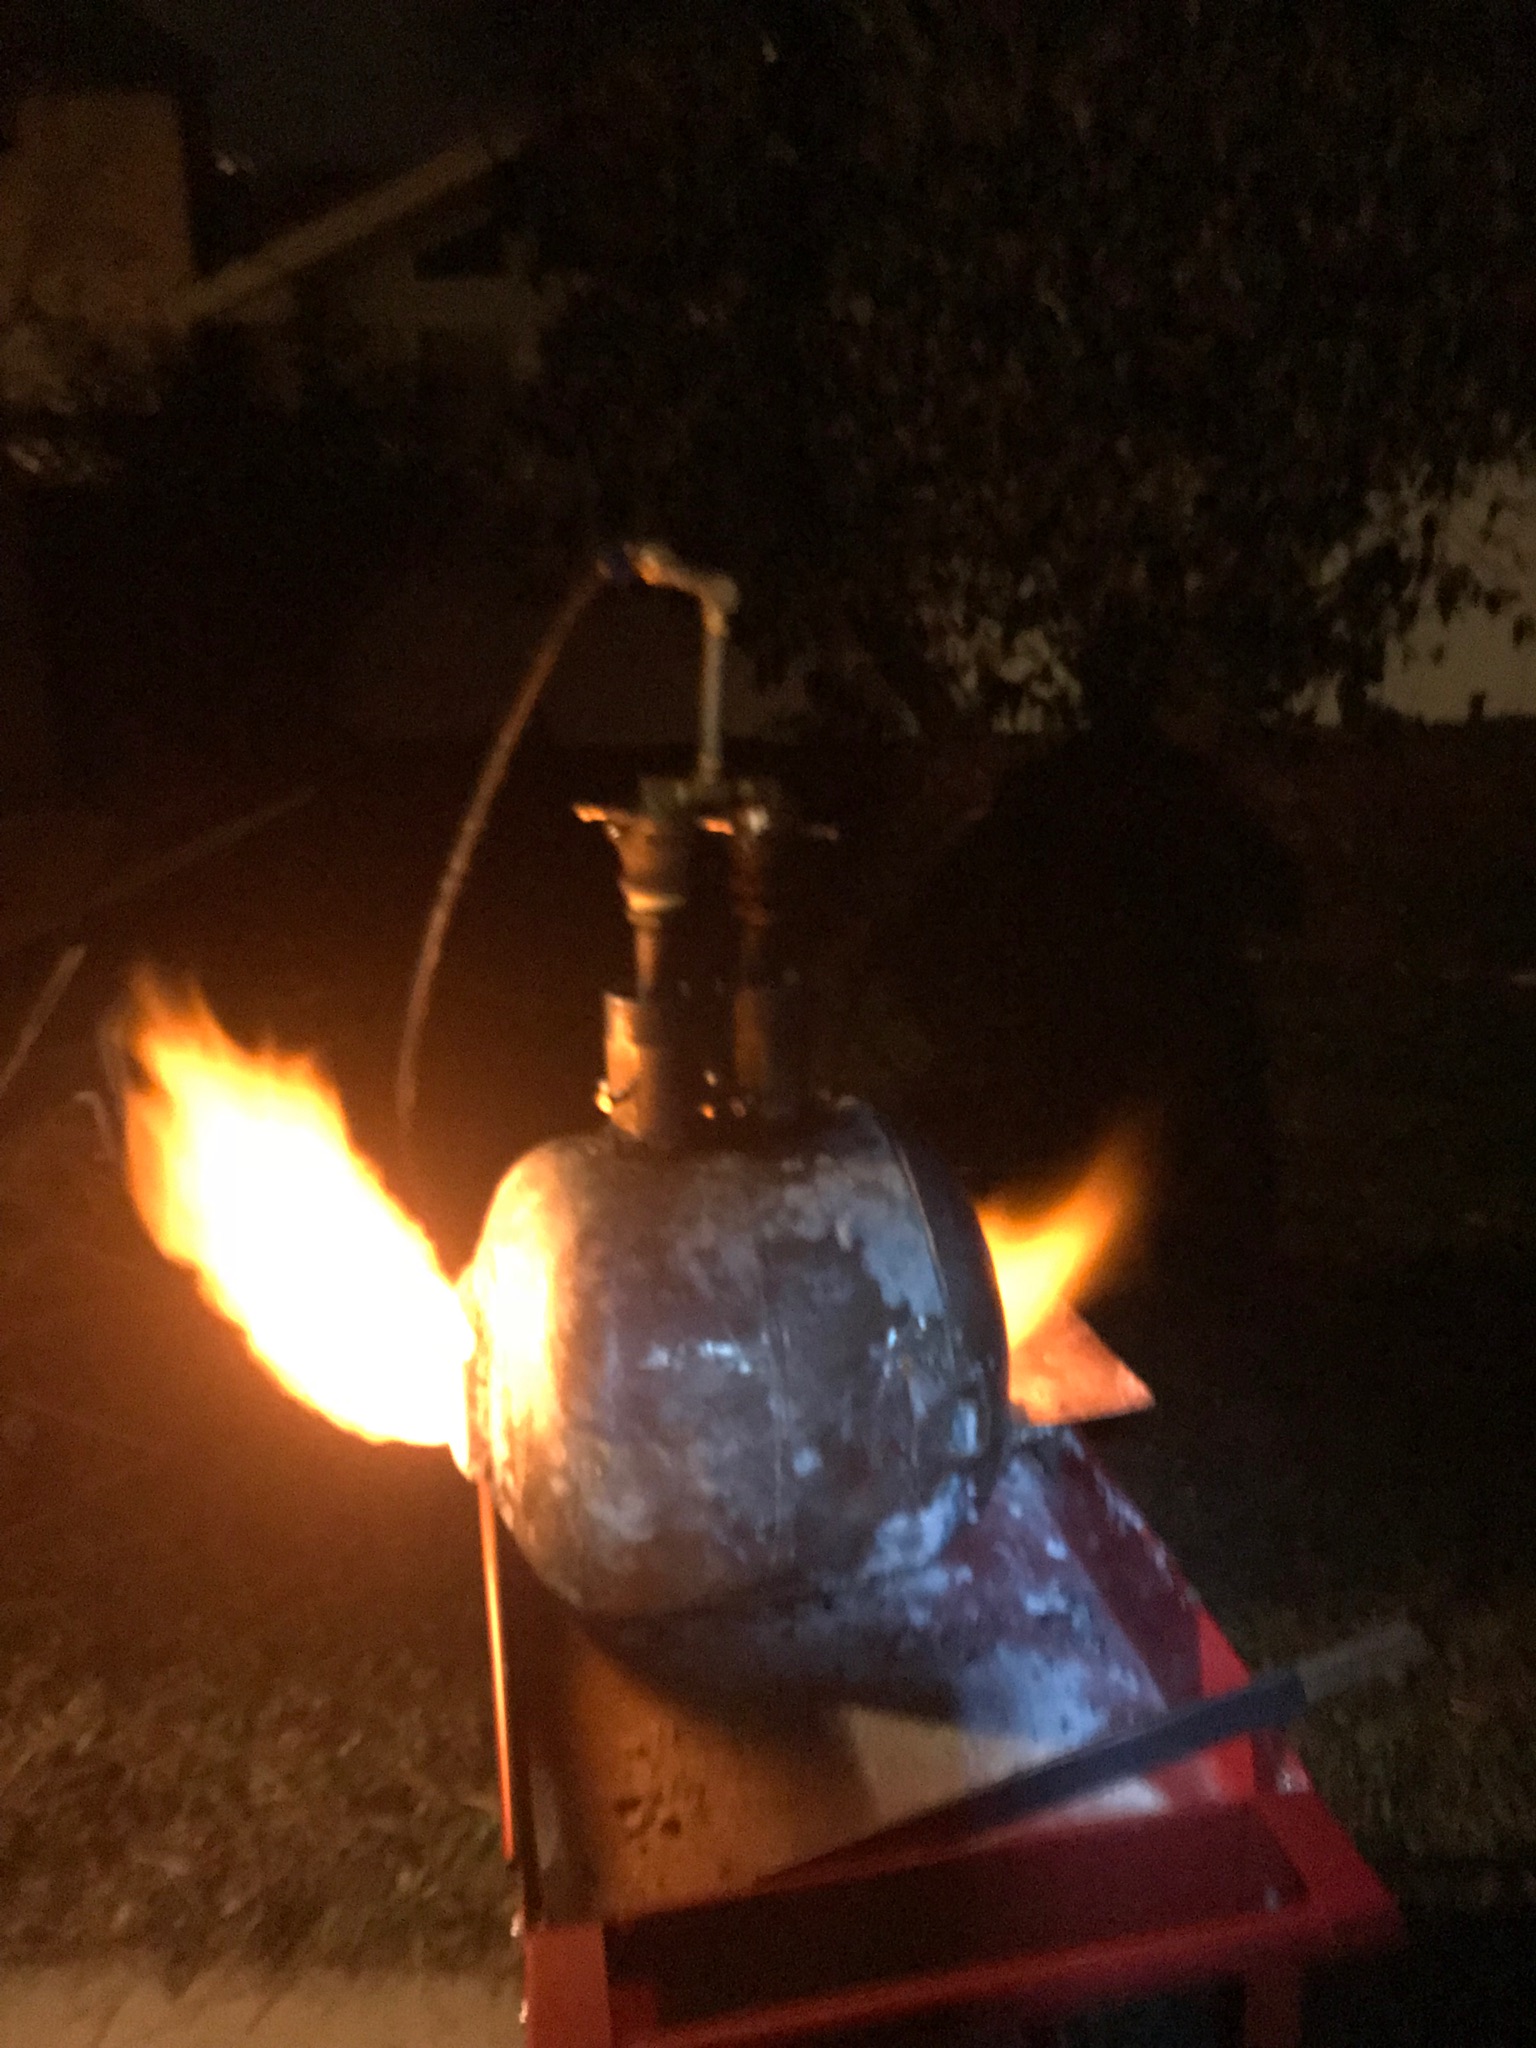
Here are some pics and a video of the first firing of the refractory before Merikote. I applied a first coating of Merikote after this and will apply one more tomorrow. Have some tuning to do on the burners. In these pics and video I am running at full 30 PSI. Let me know any feedback from pics of flame and video. The fire after the first Merikote ran very different. Before the Merikote, I heated that angle bar to orange in about five mins. But running below 10 PSI, I have an issue with backdraft. So I will be tuning more tomorrow. I may need some airholes in the pipe of the burner, but I will wait to hear back if someone has opinions on flame being rich vs lean. I have no idea yet what end of the spectrum I am at right now. Thanks for any feedback in advance. Also, I have some clean up to do on the cart. Forgive the debris and eye sore for now. 799A9E55-FB08-40D7-A4FC-D3AC6416508C.mov