WayneCoeArtistBlacksmith
-
Posts
1,048 -
Joined
-
Last visited
Content Type
Profiles
Forums
Articles
Gallery
Downloads
Events
Everything posted by WayneCoeArtistBlacksmith
-
Matt, I think that your horizontal cuts are just fine. You are well on your way.
-
belt sander question
WayneCoeArtistBlacksmith replied to bdm2254's topic in Finish and Polish for Knives
Try checking out www.WayneCoeArtistBlacksmith.com on the DVDs page. You can watch the videos there. Let me know if I can help you. Wayne waynecoe@highland.net -
Check out the attachments on the Forge Supplies page at www.WayneCoeArtistBlacksmith.com. Let me know if I can help you. Wayne waynecoe@highland.net.
-
help build a safe propane gas forge hobby works
WayneCoeArtistBlacksmith replied to angiolino's topic in Gas Forges
Thanks Forging Carver. angiolino Let me know if I can help you. Wayne -
Cutting the webs is a way to make it smaller. If you need a base (the top) as large as it is now and you will be welding a plate on top you would have plenty of surface to weld and have a good strong stand.
-
Looking for an Anvil in Georgia.
WayneCoeArtistBlacksmith replied to Malek's topic in Anvils, Swage Blocks, and Mandrels
Yup, just show up. You won't be a stranger long. When you get there come over and speak to me and we will get you involved. -
Looking for an Anvil in Georgia.
WayneCoeArtistBlacksmith replied to Malek's topic in Anvils, Swage Blocks, and Mandrels
Ianinsa, Ackworth, Georgia is outside of Atlanta, USA. Probably about 8,000 miles from the Black Sea. Malek, come to the Alex Bealer Blacksmithing meeting this next Saturday. It is at Tom Davenhall's shop in Marietta. While you are there ask people there and you may come up with something. Go to www.alexbealer.org scroll down to February 20 and click on February for directions. See you there. -
They are available commercially, google Pine Ridge Burners. They are expensive and it is so easy to build your own burner. See the attachments at the Forge Supplies page at www.WayneCoeArtistBlacksmith.com. I have questioned if you could use your compressor, but have not tried it. I don't know the volume of air that you would use and if you would be over working your compressor. if you try it please let me know what you learn. Let me know if I can help you, Wayne waynecoe@highland.net.
-
I do ship to Canada, you can contact me by sending an E-mail to waynecoe@highland.net.
I had posted this in the thread but I guess that the powers that be didn't like it and deleted the post.
Let me know how I can help you.
Wayne
-
Frosty, I am the honey hole, maybe just not as good as you have up there.
-
Check out my web site on the Forge Supplies page and specifically the Build a Gas Forge attachment. You can check www.hightemptools.com for burners and burner kits. If this URL gets purged send me an e-mail at waynecoe@highland.net. Let me know if I can help you,
-
The problem with buying locally, in general, is that if you need 2 foot of ceramic blanket you have to buy 25 foot. If you need 5 pounds of castable you have to buy 55 pounds. If you need a pint (less than 2 pounds) of either Plistix or Metrikote you have to buy 55 pounds. There are few sources for small quantities. No I don't sell burners, regulators or hoses. Those parts probably can be sourced locally. Let me know if I can help you. Wayne
-
Probably the easiest burner to build is Frosty's T burner. There is a lot of info on this forum, just search for it. Also Frosty is on here every day. Go to the attachments on the Forge Supplies page at www.WayneCoeArtistBlacksmith and check out the attachments there. That will show you how I like to build a forge. Let me know if I can help you, Wayne
-
Check out the attachments at the Forge Supplies page on www.WayneCoeArtistBlacksmith.com. Let me know if I can help you, Wayne
-
When you get it built lay down a bed of silicon calk and set the anvil on it. This will make the anvil and stand one piece and will increase the effective weight of the anvil. It will also dampen the ringing. I think that this last design will work well and as others have said, the parts fit well together and will weld into a really solid unit. Be sure and put feet on the bottoms of the legs. Since the legs are so big you might add a second smaller foot under the full foot, or weld a 1/2 13 nut on each foot and screw a bolt in to be able to adjust for level. Let me know if I can help you. waynecoe@highland.net
-
Don't over think it. Forges are quite simple, once you get the basics down. Volume and all of that stuff is more simple with a ribbon burner. If by Plenum you mean the area for the air and gas to mix that is covered in the attachment I referred you to.
-
Your second design is much better. Angle the two back legs out 22.5 degrees both to the back and the side. As was said in a couple of other posts, just because you have it doesn't mean you have to use it. You might find a better use for it sometime later. I build my stands with 2" square tubing and I have one that is made from 3" I beams. The height should be about your wrist when you are standing up straight. With the 3 legged stand your feet can be under the anvil with you closer and up straight with less back pain. A 3 legged stand always has all three legs firmly on the ground and is much more stable. Let me know if I can help you, Wayne
-
By blocking the back door, and maybe even restricting the front you can control the amount of oxygen in contact with the metal. Scale is formed by the presence of oxygen in contact with red hot steel. Restrict the oxygen in the forge and you can get a complete burn with little or no oxygen in contact with the steel, thus less scale. It will increase the dragon's breath. An air curtain can help reduce the heat in front of the forge. Let me know if I can help.
-
You may want to go back and look at the pictures of my forge on the Forge Supplies page at www.WayneCoeArtistBlacksmith.com. The burner is angled across the top of the forge so that the flame enters at the top where the refractory curves around. This sets the flame up to swirl around in the forge. As it is is ok and I would not go changing anything now. Plan making corrections as needed. At 350 cu in you should be able to get to forge welding temps, depending on your elevation above sea level. That is high gas pressure, you should be able to reach forge welding temps at about 10 PSI and general forging at about 5. If you had made the joint between the two portions smoother by screeding across from front to back while the casting was still soft you would not have the gap issue. As your flame is aimed at that joint you may get some flame exiting there but it is no more safety or efficiency issue than the flame coming out the doors. Over all a pretty good build.
-
Questions about forge insulation
WayneCoeArtistBlacksmith replied to Hunter Ray's topic in Insulation and Refractories
My dad always said, "If you have to ask is it good enough, it probably isn't." -
Gas forge and Kaowool coatings
WayneCoeArtistBlacksmith replied to CAE's topic in Insulation and Refractories
Go to the Forge Supplies page at www.WayneCoeArtistBlacksmith.com and study the attachments there. For the Propane Bottle forge you should only need about 2' of the ceramic blanket, 4 5# bags of Kast-0-Lite and one pint of Plistix or Metrikote. I suggest that you cast the floor with the ceramic blanket (to take up space) and cast over that. I cast about 1/2" thick. Let me know if I can help you. -
The reason you don't see a screw for fastening it is because it is a hand held vise.
-
Blademithing series on History channel
WayneCoeArtistBlacksmith replied to Frosty's topic in Knife Making
Frosty, most people who rent motel rooms for an hour aren't going to be watching TV. -
what can you make from a bolt?
WayneCoeArtistBlacksmith replied to ausfire's topic in Member Projects
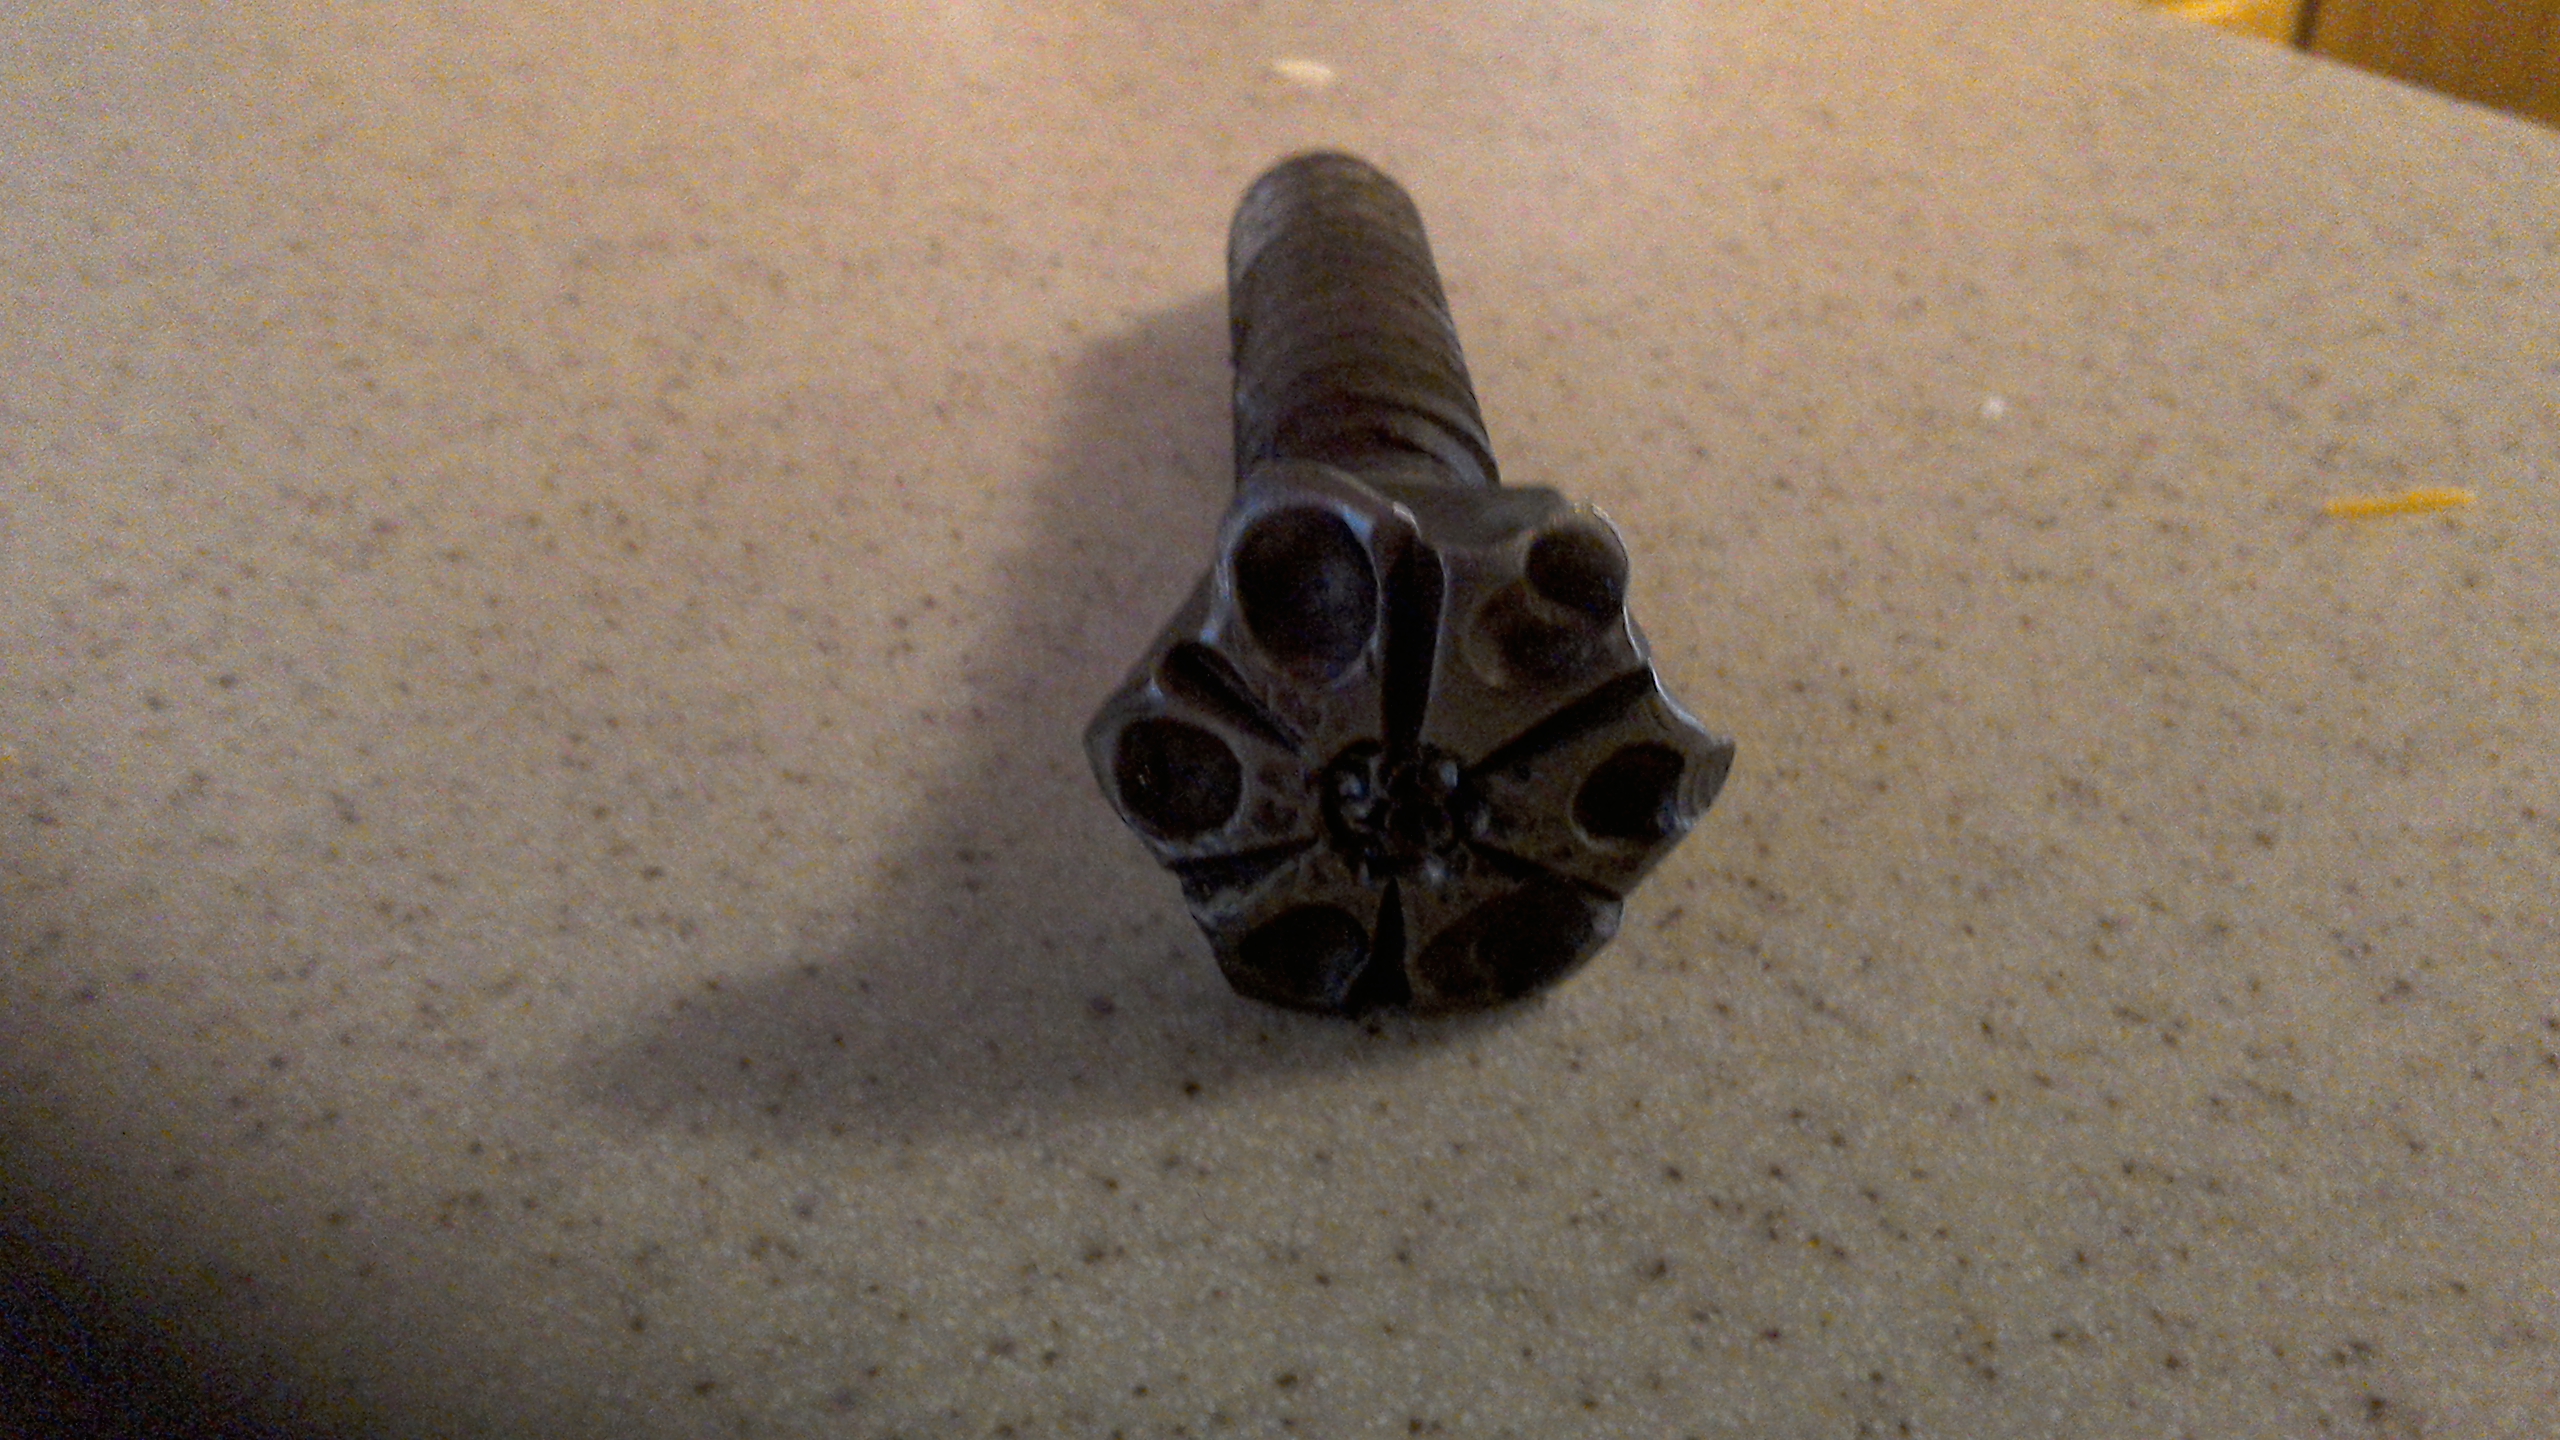
I haven't only because the post vises that I have are collectors items and I don't want to change them. Ernie Durrell makes the Fleur-de-lis for the Gothic vises he makes and conducts classes for. Here is another view of the large lag screw.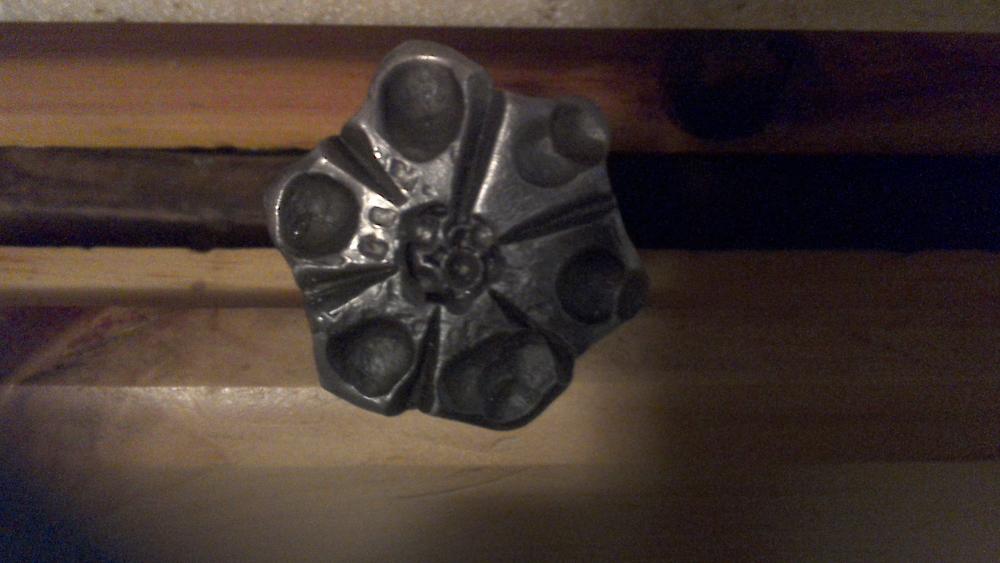
-
what can you make from a bolt?
WayneCoeArtistBlacksmith replied to ausfire's topic in Member Projects
Or how 'bout this one? I modify hex bolts like this for attaching hooks, etc. Much better looking than a dry wall screw or a simple hex bolt or lag screw.