jlpservicesinc
-
Posts
5,772 -
Joined
-
Last visited
Content Type
Profiles
Forums
Articles
Gallery
Downloads
Events
Everything posted by jlpservicesinc
-
That's awesome.. nice find.. How much?
-
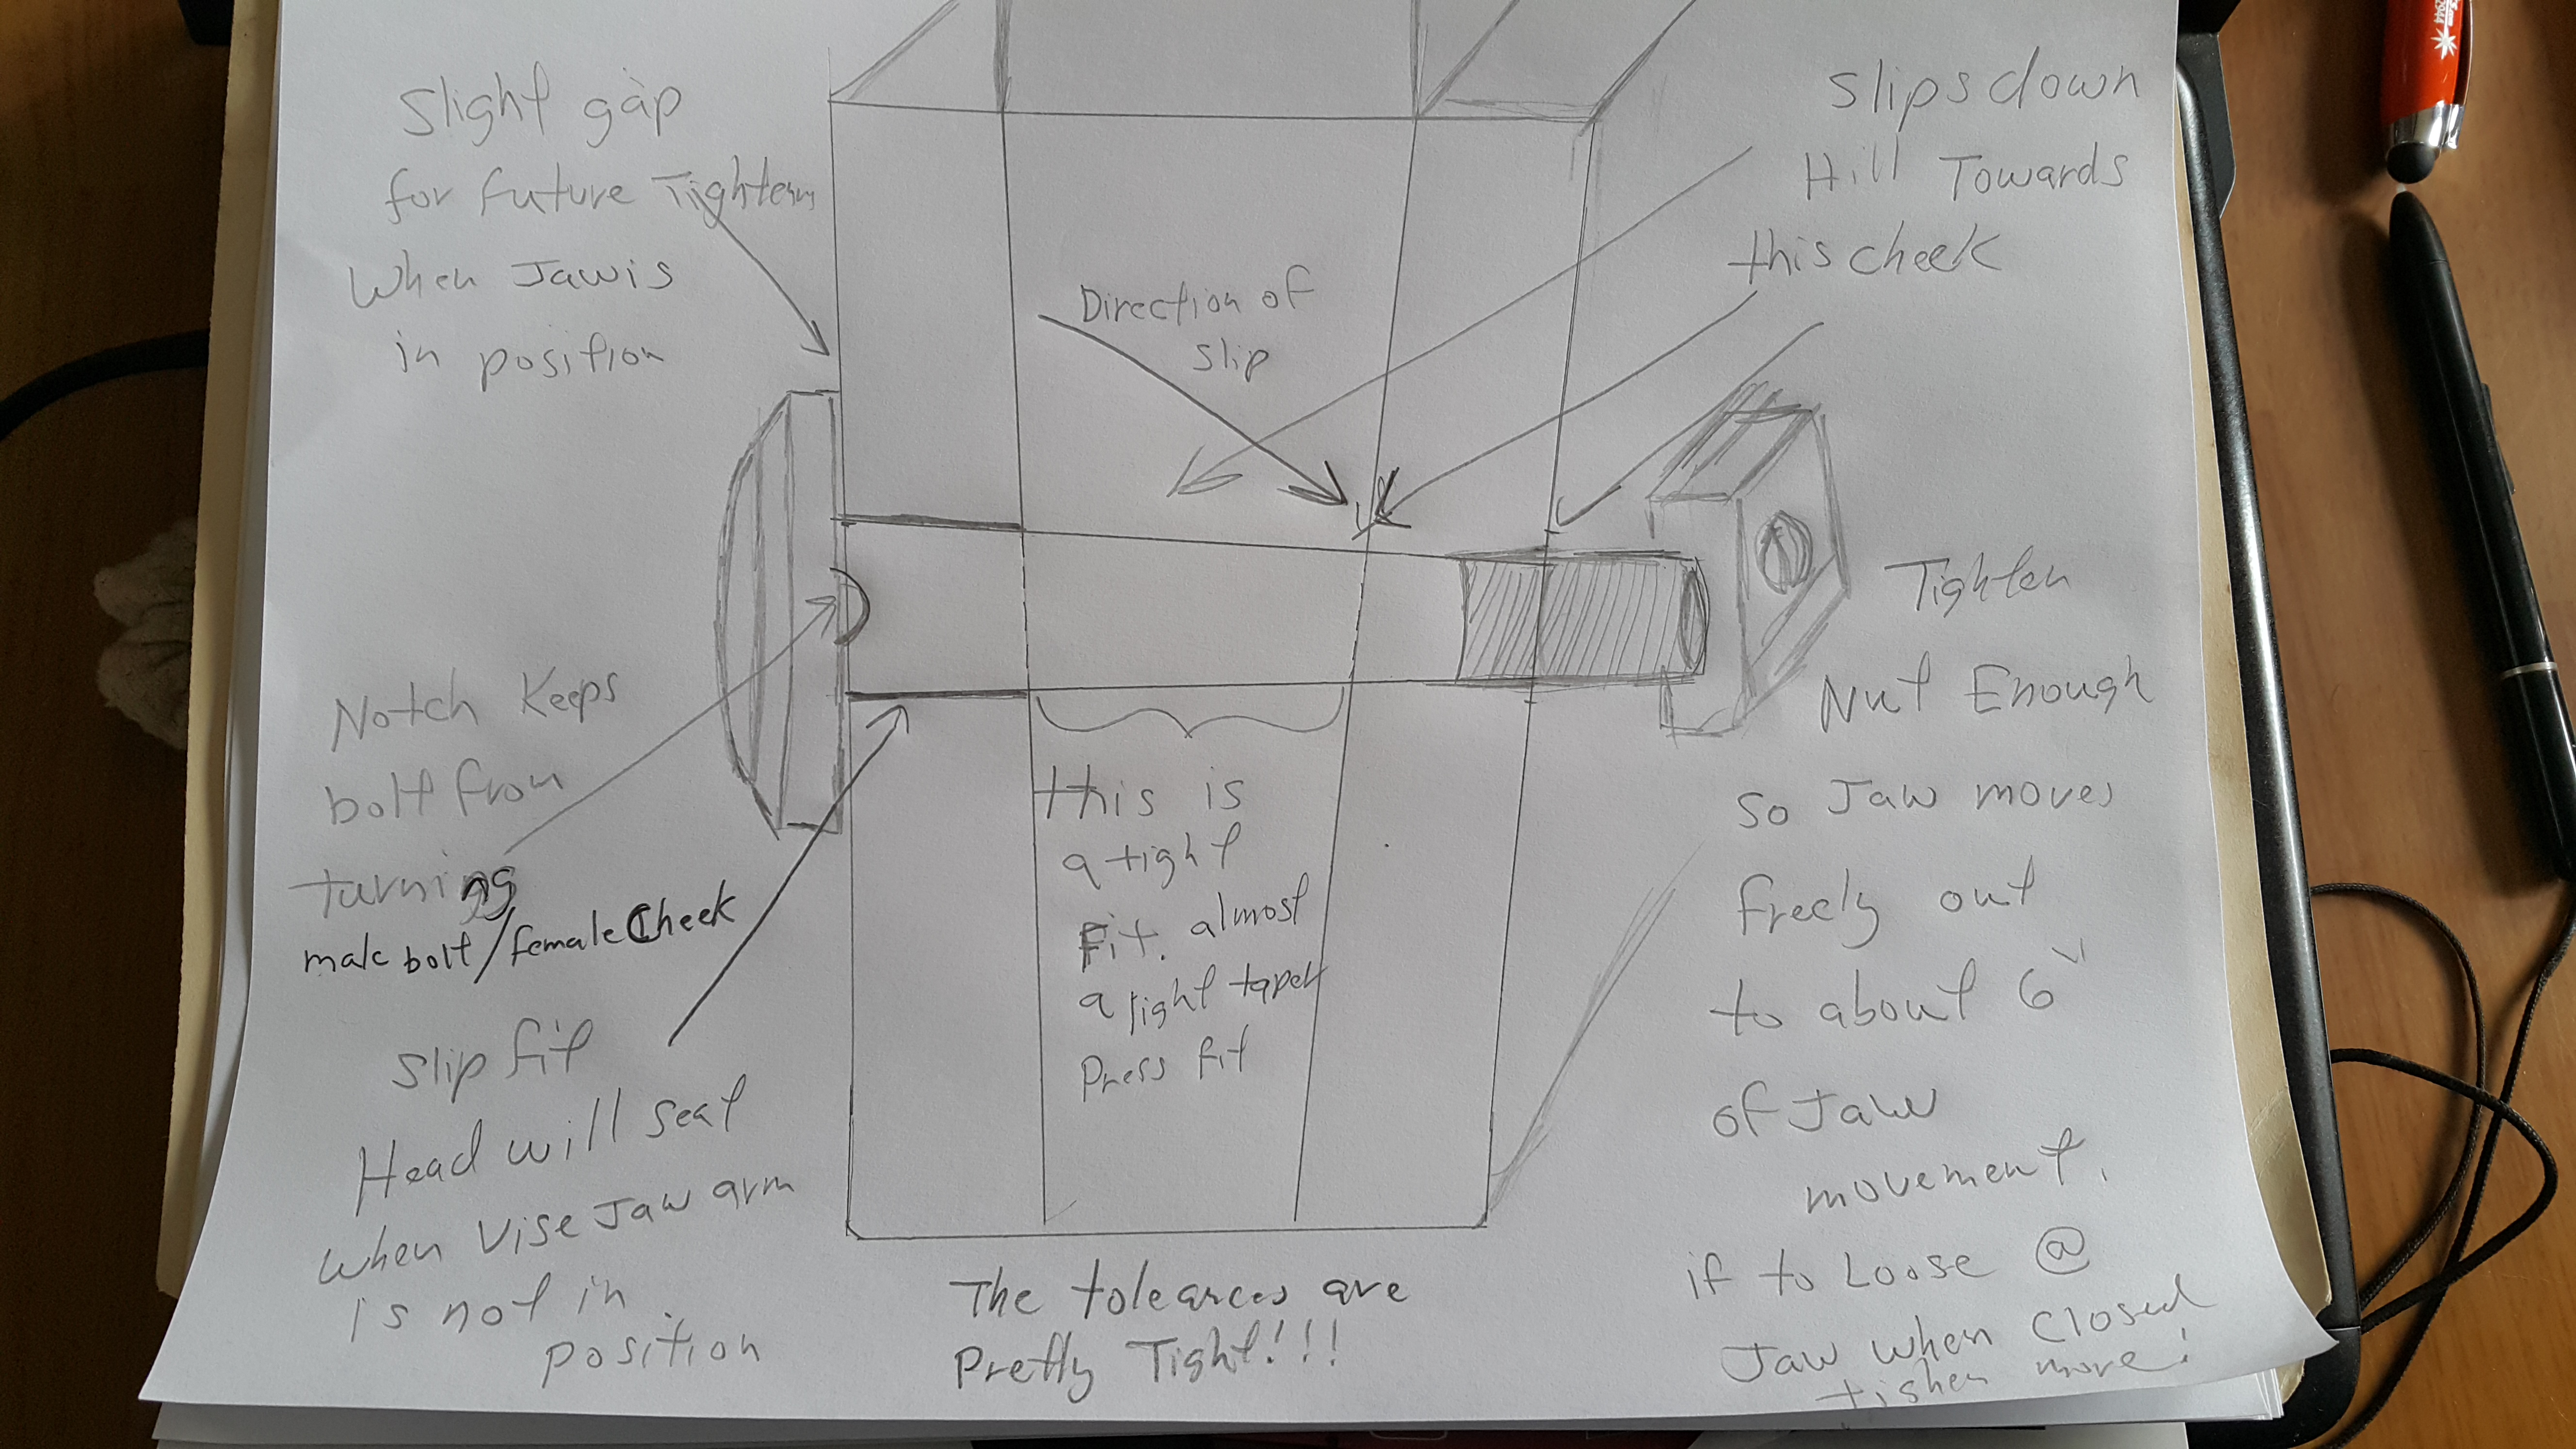
Look at the picture again.. The notch in the bolt head and the same cutout in the cheek keeps the bolt from turning.. Look at the pictures I posted earlier.of the newly made bolt. It shows these notches clearly.. I think in some way you guys over think this stuff.. The drawing it shows that the bolt to the vise jaw is "almost" a tapered press fit.. I didn't say it "IS" a tapered press fit (and pull the bolt in till it binds) that would bind like a "Morse taper" by the way a morse taper "Will Not Hold" very well or bind (which is how it really works) if there is ample oil, dirt or grease in the socket with no inward pressure.. Remember for a morse taper to hold properly it has to be clean or lightly oiled and then "Forced in" till the two sides (faces of the female and male socket) have pressure evenly placed (IE Jammed together).. This pressure inside the so called "almost tapered press fit" is controlled by how tight the nut is on the outside and hopefully you grease or at least oil the joints upon assembly. The bolt is not to support the jaw, the cheeks are to support the jaws,, The bolt is to add cheek pressure and it keep them from spreading as well as acting as the pivot for the jaw and keeping it located in the cheeks (pivot). It is a combination of all things.. Tapered cheeks, tapered jaw boss, tapered bolt.. . This makes the vise nearly indestructible and why they last so long.. without the tapered cheeks the bolt becomes the main weight bearing. It will fail in short order as the bolt is in a shear plane all the time.. (They did make the cheaper ones that way). German vises use the cheek plates as part of the weight bearing and supporting structure but in a somewhat different manner.. If your cheek plates are damaged or the receiver bosses in the jaw for the cheek plates are damaged.. Then the first culprit to make it straight will be the bolt most likely deformed.. means there is deformation at the bolt, the vise jaw boss and the cheeks or a combination of all 3.. The only fix for this is to make everything like it was brand new with the proper clearances.. Adding shims is not how this is fixed.. Fixing it the right way with adding materials (IE welding) or putting back the materials (peening back) that have been distorted, checking to make sure the bolt is not deformed, making sure the clearance in the vise boss is not egged out.. ETC, ETC.. For clearance you can make what every you want or find what works.. Your going to make the thing right... Just forge it out and then see what works.. (In regards to your question about bolt clearance under the head) for the clearance around the side cheek with the bolt head on it.. The shaft under the head can be the same taper as the rest of it with no clearance at all.. Problem is if you tell someone this who has never made one they make the head exactly at the cheek and this eliminates the ability for further adjustment in the future. and will actually make it so the contact area between the bolt and the jaw boss will be to small (it will be Sloppy). Then they come back and say I don't know what I'm talking about.. Because it didn't work for them and they spent all the time when they could have just drilled the hole out and put a regular bolt in.. So after a new bolt is made.. make it exactly to the tapered fit.. Just leave some clearance under the head.. Is that more helpful.. then I say figure it out on your own. The information is there. "It's correct for this type of vise pivot".. I've seen hundreds of examples and this design is the most robust.. I've also seen straight jaw bosses, straight bolts. I've seen lots with stripped threads because the jaws didn't align and the person just over tightened the bolt and as soon at they open the jaws which are now very tight at the 0-1" mark can barely be opened the rest of the way and they force it and the threads sheared off the bolt so no nut.. Give it some more thought and though it may seem frustrating and that its not understandable when the "Ah Ha" moment comes it will be crystal clear.. Just because something is made by hand via a blacksmith does not mean it can not be accurate and made to an exact size.. By the way.. I'm not an artist blacksmith.. I'm a trades blacksmith.. So, the simplest answer is to just fix what you find to be wrong.. If your vise doesn't have a tapered bolt forget all about what I wrote.. It's that simple.. Oh one other thing.. Some of the vises don't have a hotch to hold the tapered bolt.. since the taper on both cheeks has great area vs the pivot it still gets held against the pressure of the pivot to turn the bolt..
-
Ok, so just to clarify: It's the vise cheeks and taper that keep the jaws in alignment when under pressure.. The bolt limits the spreading and this keeps the outside jaw from sinking lower when impact is made. This downward force acts like gravity and pushes the bottom jaw boss more sideways then down... The thru bolt is not receiving all the pressure.. This side load transfers some of the forces to the cheek.. Since the cheek plates and the boss on the jaw are tapered as the jaws open it wedges the jaws deeper at the front of the wedge.. This keeps the jaws in alignment as the jaws open past a certain point.. The play is more than likely caused by either a worn bolt or a loose nut and worn bolt.. The cheek plates will flex some when tightened.. Think of a hill and a ball.. The ball will always roll down hill.. The tapered pin is the hill and the ball is the vise bottom boss.. The taper serves 2 functions: increases the contact area between the jaw lower boss (pivot) and the bolt vs a straight bolt and helps to shed the load sideways into the cheek when struck.. It also helps with shear loads since the sideway forces involved redirects the load.. I've attached a crude drawing but it should help explain some of it.. Them old workmen who made all this stuff really had it figured out.. More knowledge has been lost than has been gained in my mind. Also while a lot of this information applies to blacksmithing foot vises as a whole there are variations for any given maker and/or where it was made.. German made vises and the older italian made vises are beautiful and beautifully made.. American's simplified and expedited everything.. By the way all the new commercially available vises have done away with the tapered bolt and bottom cheeks.. Costs more to MFG..

-
In the years since I really looked into this stuff.30 years ago, I have forgotten more than I remember at this point.. Coal smoke is a heavy smoke.. It is heavier than air.. It will sink vs rise if given a chance.. So, pressure differential can be a friend,(have a tight shop and having a fan in the window blowing air in will pressurize the buldiing and make the stack draw better), and then a hot pipe. (we all know a hot fire draws a lot better). I paint the stacks black so in the summer sun they get a little hotter from the sun then the cooler air at the ground.. this helps with Draught/draft.. A proper stack/hood design is the next phase.. My recent trailer build I was asked why a tall stack.. The higher the stack up to a given length the more consistent the draw and the higher the velocity of the slower air which is not smoke and such as the air at the ground is cooler and as it's heated while going over the forge will pick up some heat and this will help the cycle continue.. Also a longer stack will handle pressure differential pulses better.. The secret to a smoke free shop is to design a stack/forge hood to catch the smoke before it has a chance to expand.. Cooler air being drawn into the heavier coal smoke will make it want to settle back on itself and starts to expand as it cools rapidly and separates out of the heat stream. The stack is about 15ft long.. 12"X12"..
-
the lever blowers were an early adaption away from bellows.. It still retained the pump, pump, pump like the bellows people were familiar with but had the blower.. some of the pump models worked very well even better than some of the lower billed hand crank blower models. Other nice thing is the pumping can be a lot easier on the shoulder if the lever is low enough..
-
Not clear on what you mean by " I do not really understand this. Of course a tapered pivot in tapered holes can be pushed in so that there is zero play but how do you do that if there is a head on the pivot?".... What head on a pivot???? The bolt does not center the jaw.. The pressure on the side forces of the taper force the jaw mount to one side.. This puts force onto one side of the cheek plate keeping the jaws in alignment at the the top.. Side pressure against only one cheek plate.. The bottom portion of the vise jaw boss has a taper the same as the cheek plates.. Narrower at the bottom than the top.. The bolt that goes through both cheek plates and the vise jaw leg boss has the same taper with a tapered hole.. The tapered pin (threaded bolt that goes through) takes up the cheek plates to keep them fairly tight and from spreading.. A tapered cheek vise will not open past a certain distance between the jaws because of the wedging effect of the cheek plates.. If you loosen the bolt it will open more because you are forcing the wedge into the cheek plates spreading them..
-

Wrought Iron Wheels/ rims
jlpservicesinc replied to BOB T's topic in Blacksmithing, General Discussion
Yes it is.. Lots of good information here on WI.. I regretfully gave away about a ton of it back when I quite smithing.. Was great quality.. Gave it to a blacksmith friend of mine who ended up with my 200lbs Myers.. If you have a chance to get the bridge.. It would be such a sweet deal.. Most that stuff goes to Scrap here without ever having a chance to grab any as the state projects frown on any civilian approaching a work site.. -
Wrought Iron Wheels/ rims
jlpservicesinc replied to BOB T's topic in Blacksmithing, General Discussion
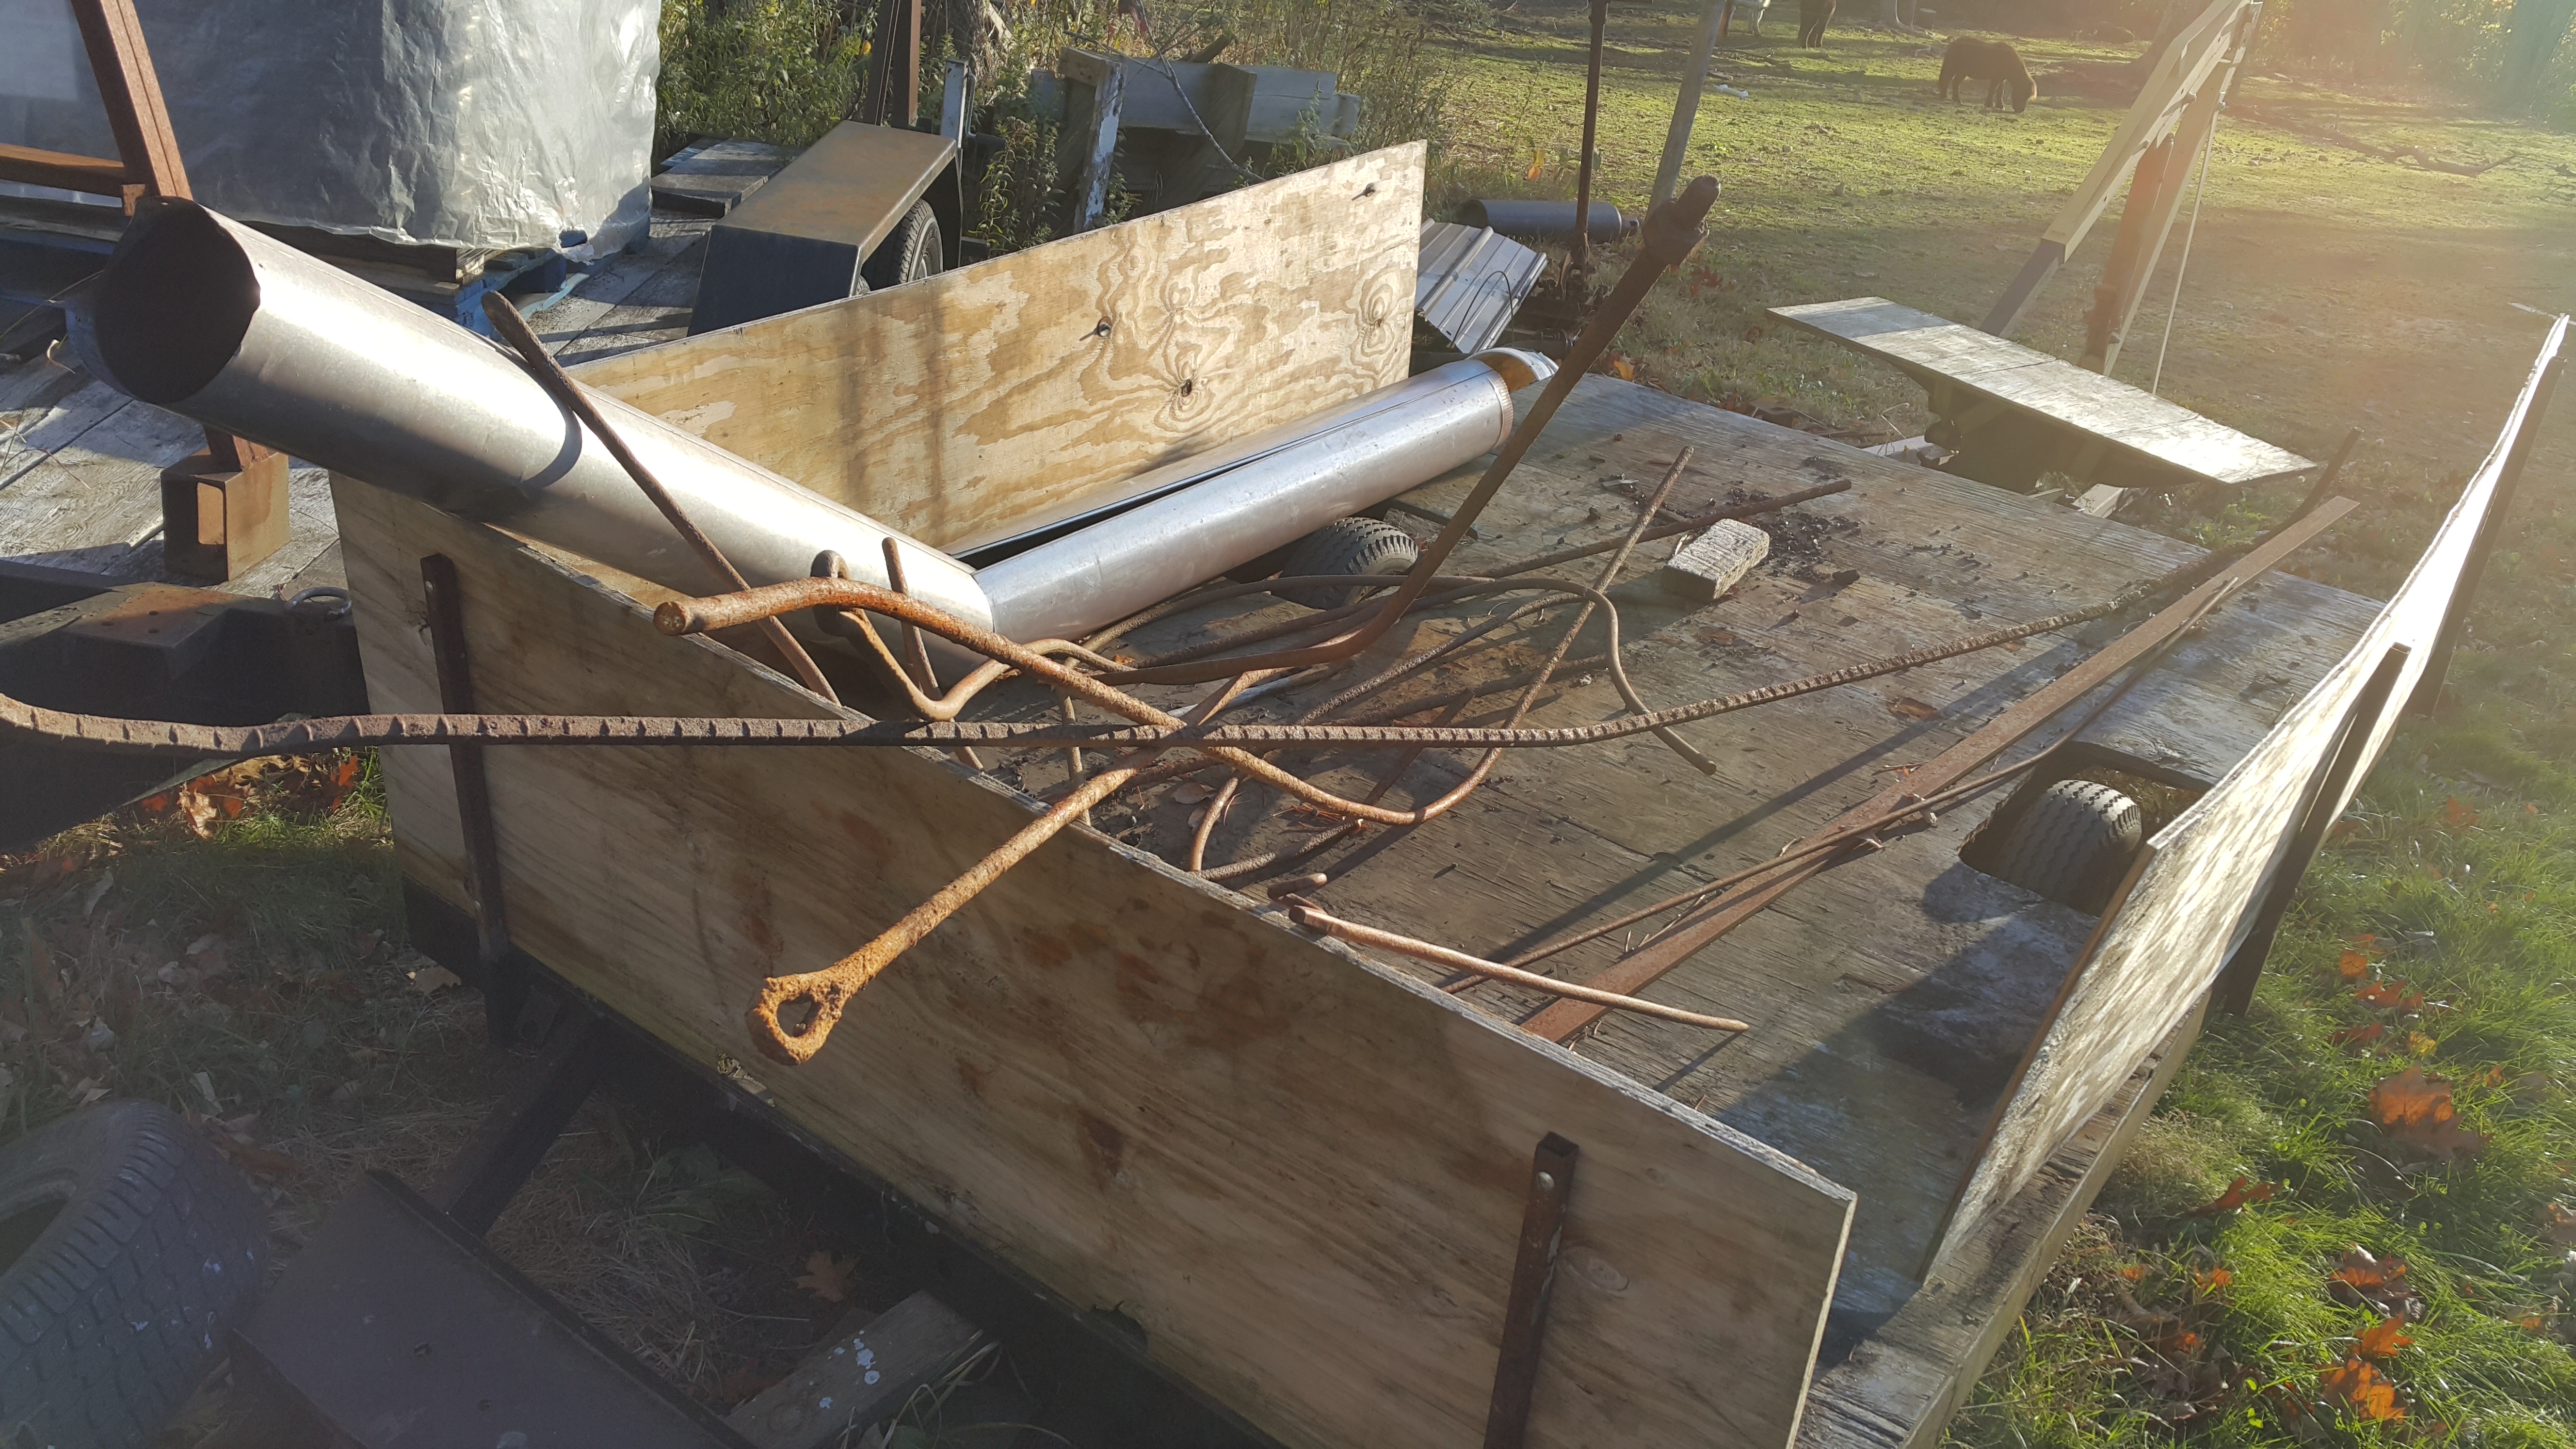
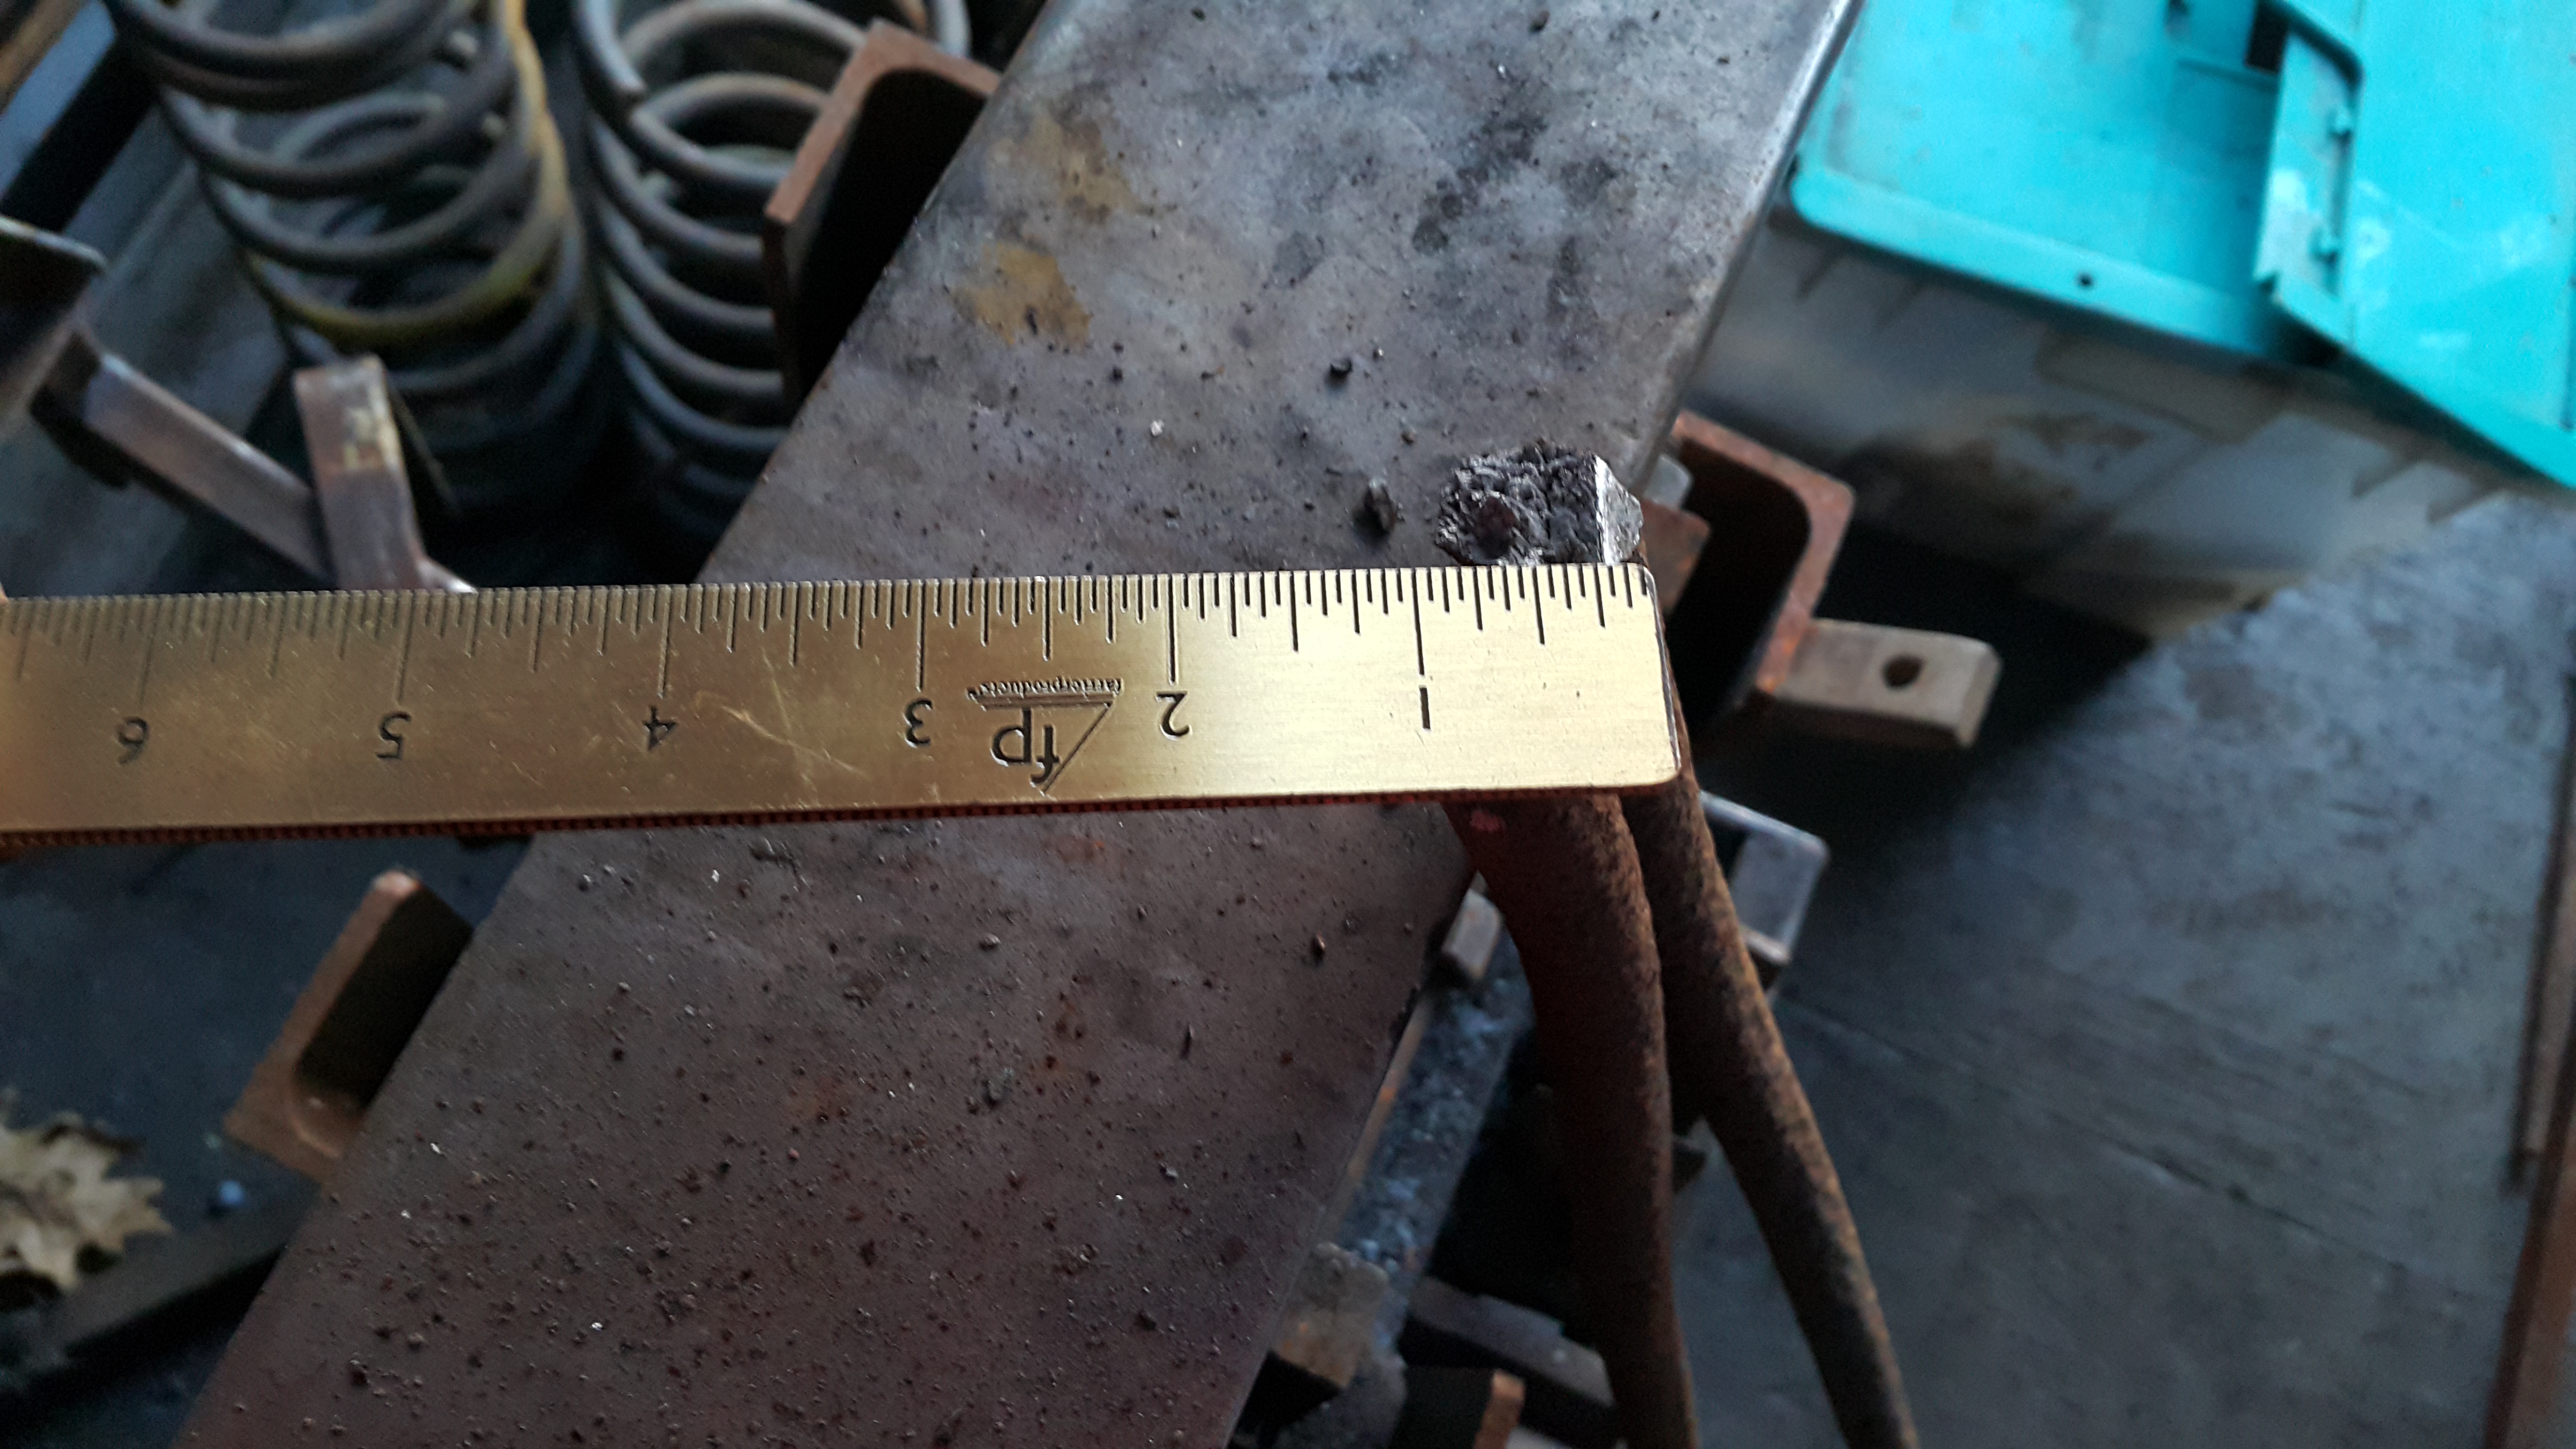
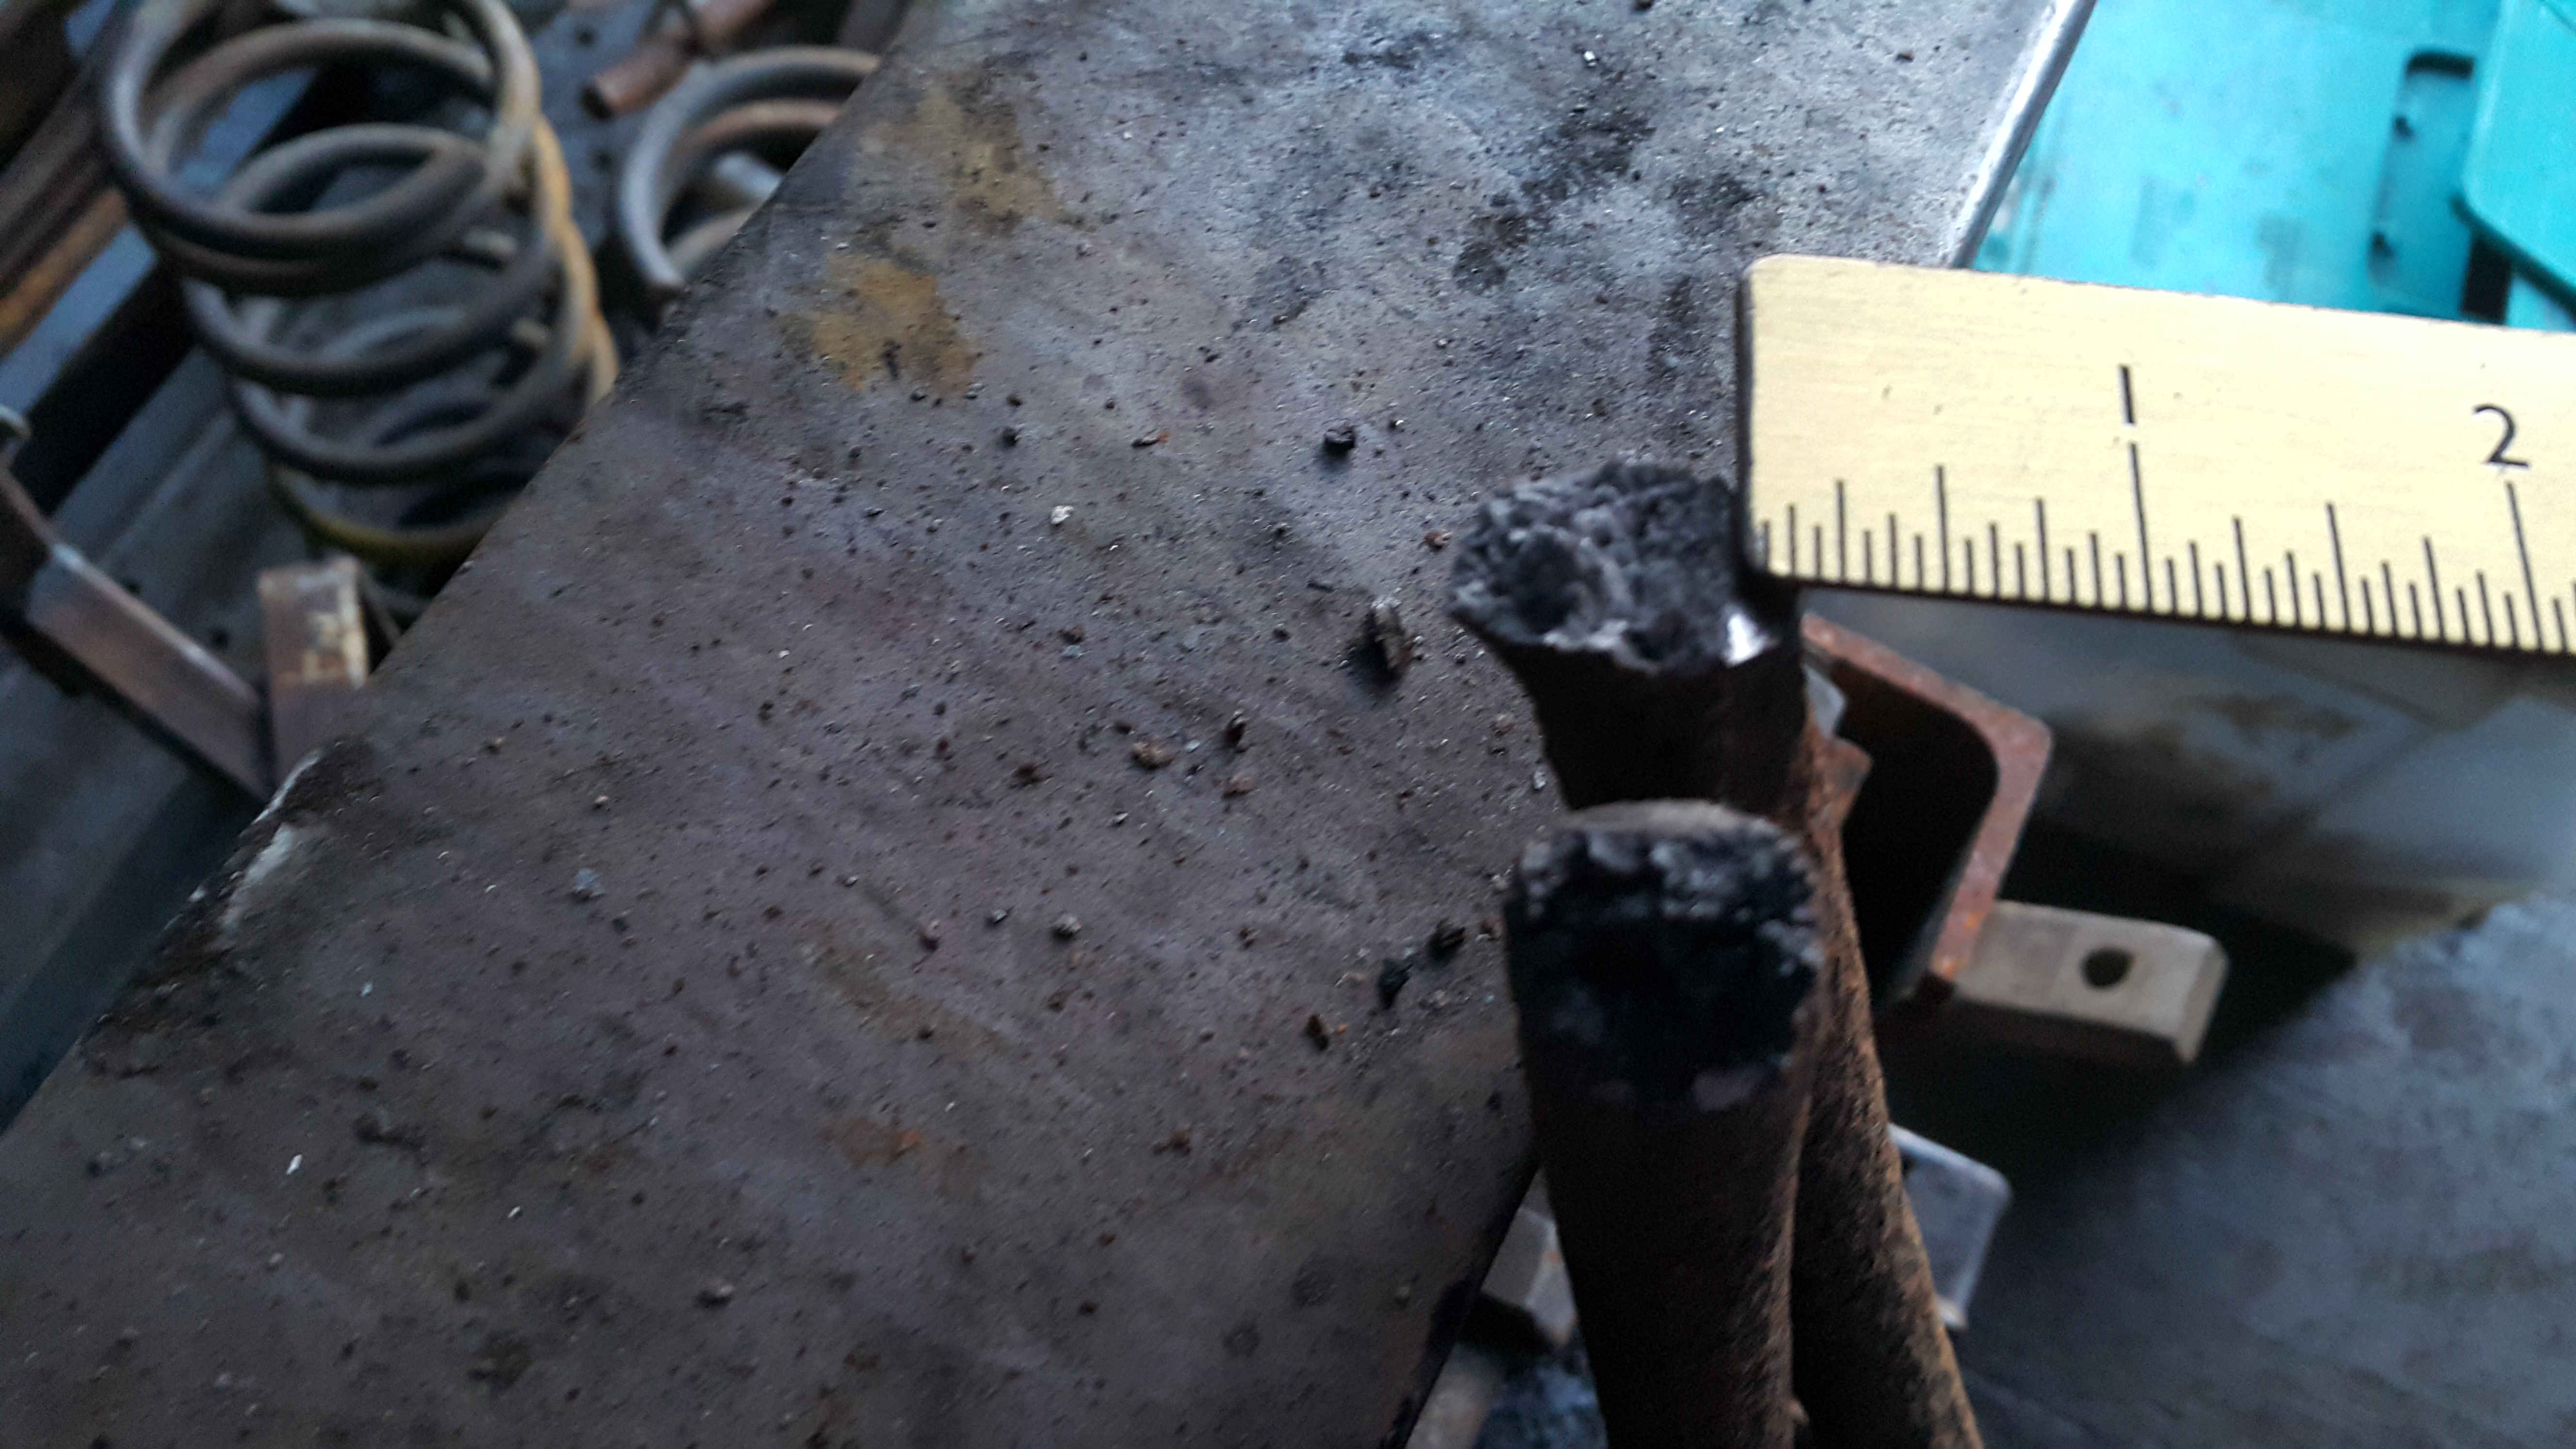
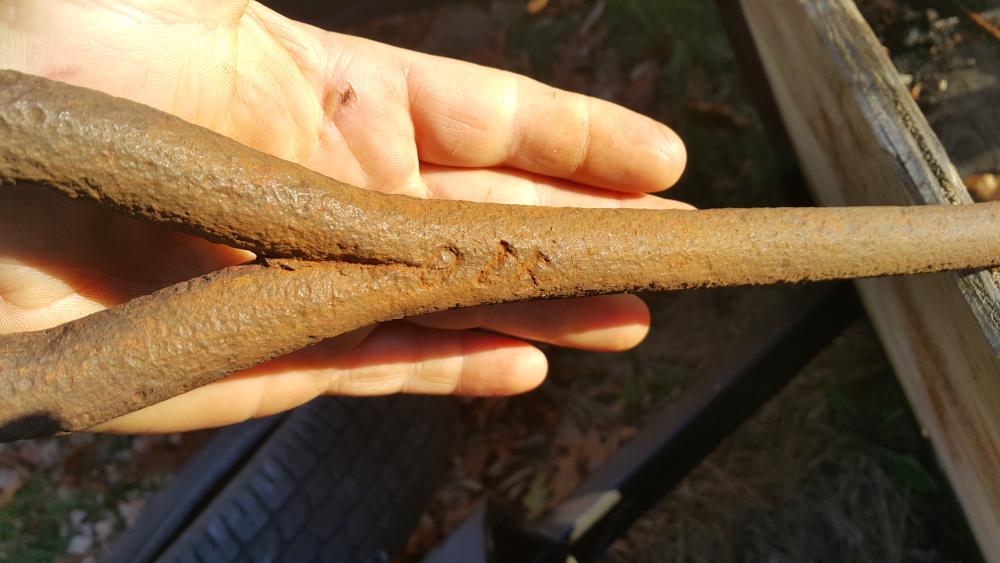
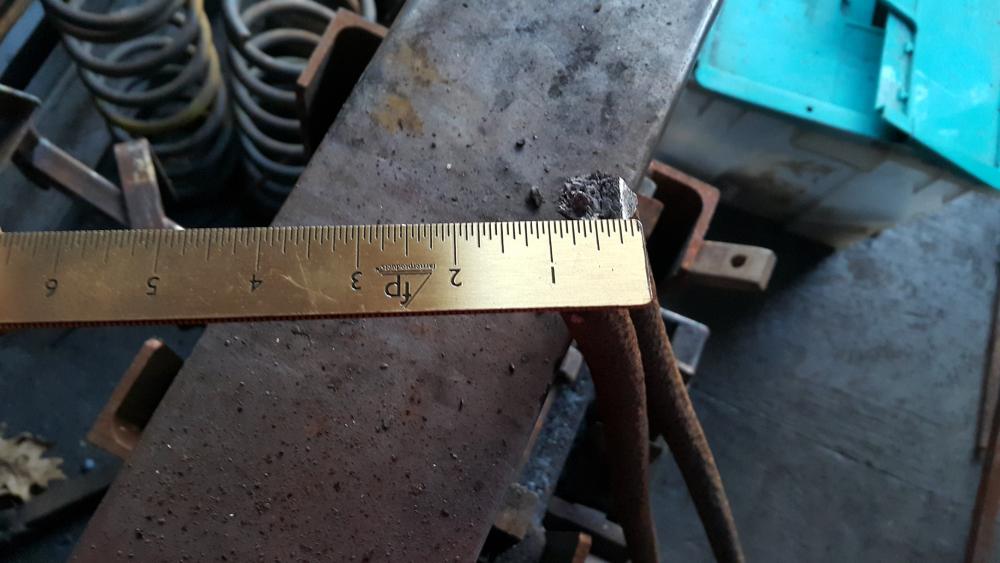
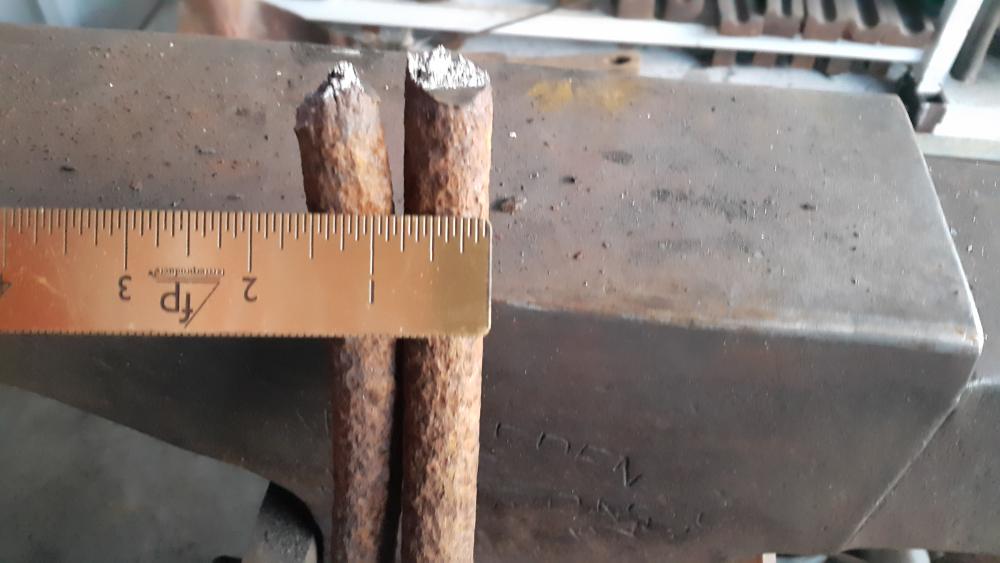
BobT, This thread probably turned into a whole different beast than expected?.. Here are some pictures of the wrought iron I stumbled across while out walking.. As mentioned before I believe they were used for rigging for cranes that worked on the Railroad as well as a watershed project by the state.. One other thing about wrought iron.. Overall it's not as strong as mild steel.. Tensions it's only ok. compression is pretty good. But any notch test and it will usually fail.. I had to cut a 3/4" bar to be able to straighten a section and with only an 1/8" notch I could easily break it in 2.. I was going to show some little videos on the difference between forging hot short and cold short as I had a piece that hated being worked hot so much so I think the guys who made it were happy to see it leave the shop.. It was originally used for a loading dock bumper.. Anyhow, after I was done with the majority of trailer making I had a scrapper helping me clean things up and the section (about 2ft long) must have gone with him.. Oh, well.. anyhow heres some pictures of the iron i found and the notch I cut in with the open break..

-
Slooks good to me.. besides ghat if anybody gives you any guff that B.O. would make a formidable weapon..:) A friend of mine came over for knife making day I was 15 and he was 14.. We made knives out of what ever was hanging around.. He ended up picking a bar of some low-medium carbon 1030. about 20" long.. He forged a blade on the end of it about 6" long.. I said it will never work, or hold and edge (low carbon) and since he burnt it would break in use.. That knife he made was such and excellent chopper.. only about 1/8" thick at the spine. the blade held a great edge, it never cracked or bent.. I used to water harden everything. Anyhow, the only explanation I could come up with is " Him burning the metal gave it just the right brittleness so as to offer all the attributes the blade had.. Maybe a 1 in a million shot, whos to say..
-
Wrought Iron Wheels/ rims
jlpservicesinc replied to BOB T's topic in Blacksmithing, General Discussion
go over to where there are any old mills and just look around.. or old farm silo's.. Before the chinese bought up all the scrap a few years ago you could find it just about everywhere.. Now it's slim pickens but still find a piece here or there if you look.. go over to abandoned farms.. In the olden days people would just stack the scrap up.. Today on my way home from feet duty.. I stopped by an old mill site which burnt and grabbed a few ends just laying in the dirt.. There were some 1"round rods about 12ft long but they were stuck in pipe filled with clay in a brick foundation and the nuts were still on the ends.. Can't make off with those on the down low.. I did just find 4) 3/4" rounds 20ft long that were used on the rail road for stabilizing crane rigging.. These had the stamped in numbers of the smith who made them.. Pretty awesome.. The forge welds were perfect.. I'll post pictures up tomorrow.. Also found some vintage rebar.. They were all just stacked up like someone forgot about them.. I had to dig them out from under trees and roots and about 6-12" of new soil/hummus.. -
Farrier tools Hand forged, not factory.
jlpservicesinc replied to jlpservicesinc's topic in Tools, general discussion
Yes old leaf springs.. the short one I made on my own and the long one I had a striker. Took like 15min with his help in the sledge. -
Farrier tools Hand forged, not factory.
jlpservicesinc replied to jlpservicesinc's topic in Tools, general discussion
huh. From the picture looked like horn to me.. -
Farrier tools Hand forged, not factory.
jlpservicesinc replied to jlpservicesinc's topic in Tools, general discussion
That is sweet.. Antelope handle? or deer -
What was the job that you turned down?
jlpservicesinc replied to Glenn's topic in Blacksmithing, General Discussion
Ah, are these blacksmithing jobs or any jobs? If I take out the time machine and go back 20years I'd say I'd do nothing different but understand people are people and they don't understand what it really takes to make something with your hands and have it come out looking so sweet you don't want to part with it, let alone sell it. If you make something look easy.. People assume it is easy and they aren't willing to pay you a premium for you expertise.. If you make it look difficult and can promote your expertise (though the work is not very good or is good) you will end up far better off.. I knew a guy who did very shoddy forge work, mig welded everything together and charged big money and was so busy it turned into a big success and retired with money in the bank.. I've learned over the years.. It's the self promoters, and networkers that do the best even if their work isn't as good as somebody else.. Some how they convince the people that the work is better though I wouldn't put it in my outhouse.. It's the human connections that get, keep and sell business.. People like the down trodden, the underdog as they can sympathize with them,. People have a hard time with talented people which either envy or fear keeps them from connecting with.. Or you have to make a product no one can find anywhere else.. But first and foremost its the human connections.. I took 12 years off from being a professional smith because of not one particular job but many particular jobs.. I was robbed of vision through my own misunderstandings.. Some people have it some don't.. I know where I stand.. -
Wrought Iron Wheels/ rims
jlpservicesinc replied to BOB T's topic in Blacksmithing, General Discussion
I hate to highjack threads.. I try to stay on point but there is just so much information.. the post I made earlier on Wrought iron and why it's a great material was posted from my car in-between jobs.. Rebar comes in all sorts of classifications.. There is high, medium and low carbon rebar.. One also has to remember what rebar does.. in layman speak "concrete cannot sustain elongation loads or tension.. only compression".. Rebar makes it so tension and elongation can be handled by the concrete If you find a good sample and can get some then go for it, I've made decent quality swords from it with differential heat treat.. Show nice hardening line with polishing.. Certain rebars can be tough to weld.. Anyhow, the rebar depends a lot on where it came from as well as when it was produced. there is some real garbage out there. but also some really nice stuff.. I found some rebar from way back that was carbonized wrought iron.. It was priceless for any knives or wood working tools.. Same can be said about rail road spikes.. depending on where they came from (high speed rails, heavy hauling rails) will dictate which kind of spikes they use.. Basically if the material is unknown to the user and does not have a spec sheet (even with spec sheet one should verify their heat treat methods to achieve the best results) with it then it should be tested as any good smith worth his or her salt should do automatically before they make something out of it.. Did I say I was old school.. Your welcome.. I love mystery metal.. just made a new hoof knife out of a lawn mower blade.. Wouldn't harden in oil.. LOL>> Water hardened only.. only took 3 times to figure it out. -
Wrought Iron Wheels/ rims
jlpservicesinc replied to BOB T's topic in Blacksmithing, General Discussion
Sorry I never answered your question. . It forges like butter 2-4× faster than 1018. It's extremely easy to forge weld (when not hot short), it's highly rust resistant. BUT , it won't put up with being forged badly.. proper forging techniques are a must. -
Wrought Iron Wheels/ rims
jlpservicesinc replied to BOB T's topic in Blacksmithing, General Discussion
I don't want to come off sounding tright or snippy.. but it's and educational learning lesson.. Today Pretty Much EVERYTHING Is a known entenduty. (1018 has specs within a certain range no matter where it's made) Back in the olden days you would get rough formed bars from the iron monger and then the smith would forge them to the required size. That was the real reason for swage blocks and the reason the holes are tapered.. Real wrought iron has characteristics all its own and it cannot be forged incorrectly where 1018 or 1020 it can be made a mockery of forging wise and not spit back at the smith.. Wrought iron was phased out for many reasons but the main reason is it can't be forged or shaped like modern steels. Towards the phasing out time the wrought iron produced was of the highest quality straight from the furnace and was on par with mild steels of the day, but then the amount of labor was excessive and to costly so by,by.. Anyhow, smithing today has been dumbed down in a few ways and made easier to partake in.. For starters you don't have to analyze through working or hardening any of the steels since you know what they are. This experimenting of each bar gives you a intimate knowledge of the properties of that bar , which forging methods are needed, which heat treatment for each bar etc etc.. Which you would have to figure out on your own.. While from today's standards it would seem like a waste of time all that testing makes you a better smith because you learn by what works and what doesn't via feedback of the material vs just being told.. Basically it's one of the abilities that gave blacksmiths as much lore as they had gotten and also why some smith's were famous for problem solving verses others.. Without real wrought iron the really fancy very intricate works would have never been made or have lasted as long.. -
You sound like we have lots in common.. I'm self taught and stubborn as a mountain.. When people ask me how I learned my trade, I respond I'm self taught, . they say good for you and then it must be really retained as I had to make the mistakes to learn the correct way.. . What it proves is I'm just not afraid of hard work.. With age has come a little more wisdom.. It's always easier to learn from others than from yourself and the learning curve is much faster with much better results.. I to always question and it used to make many mad.. So, if you can learn something like proper forging technique or proper coal fire management or making tongs, etc, etc from someone it will free you up to learn other things and put you that much further ahead learning it from someone else.. Sorry if it seems like a lecture.. Been there done that and I won the teddy bear many, many times.. Would have been much easier learning from someone else..
-
Farrier tools Hand forged, not factory.
jlpservicesinc replied to jlpservicesinc's topic in Tools, general discussion
Thanks, Upsetting.. No not at all.. It they work for you thats all that counts... Now if you said you did it to a rare tool then I might be remiss a little.. Thanks.. As you know.. Good tools certainly help make a good job but also good tools make a job easier.. -
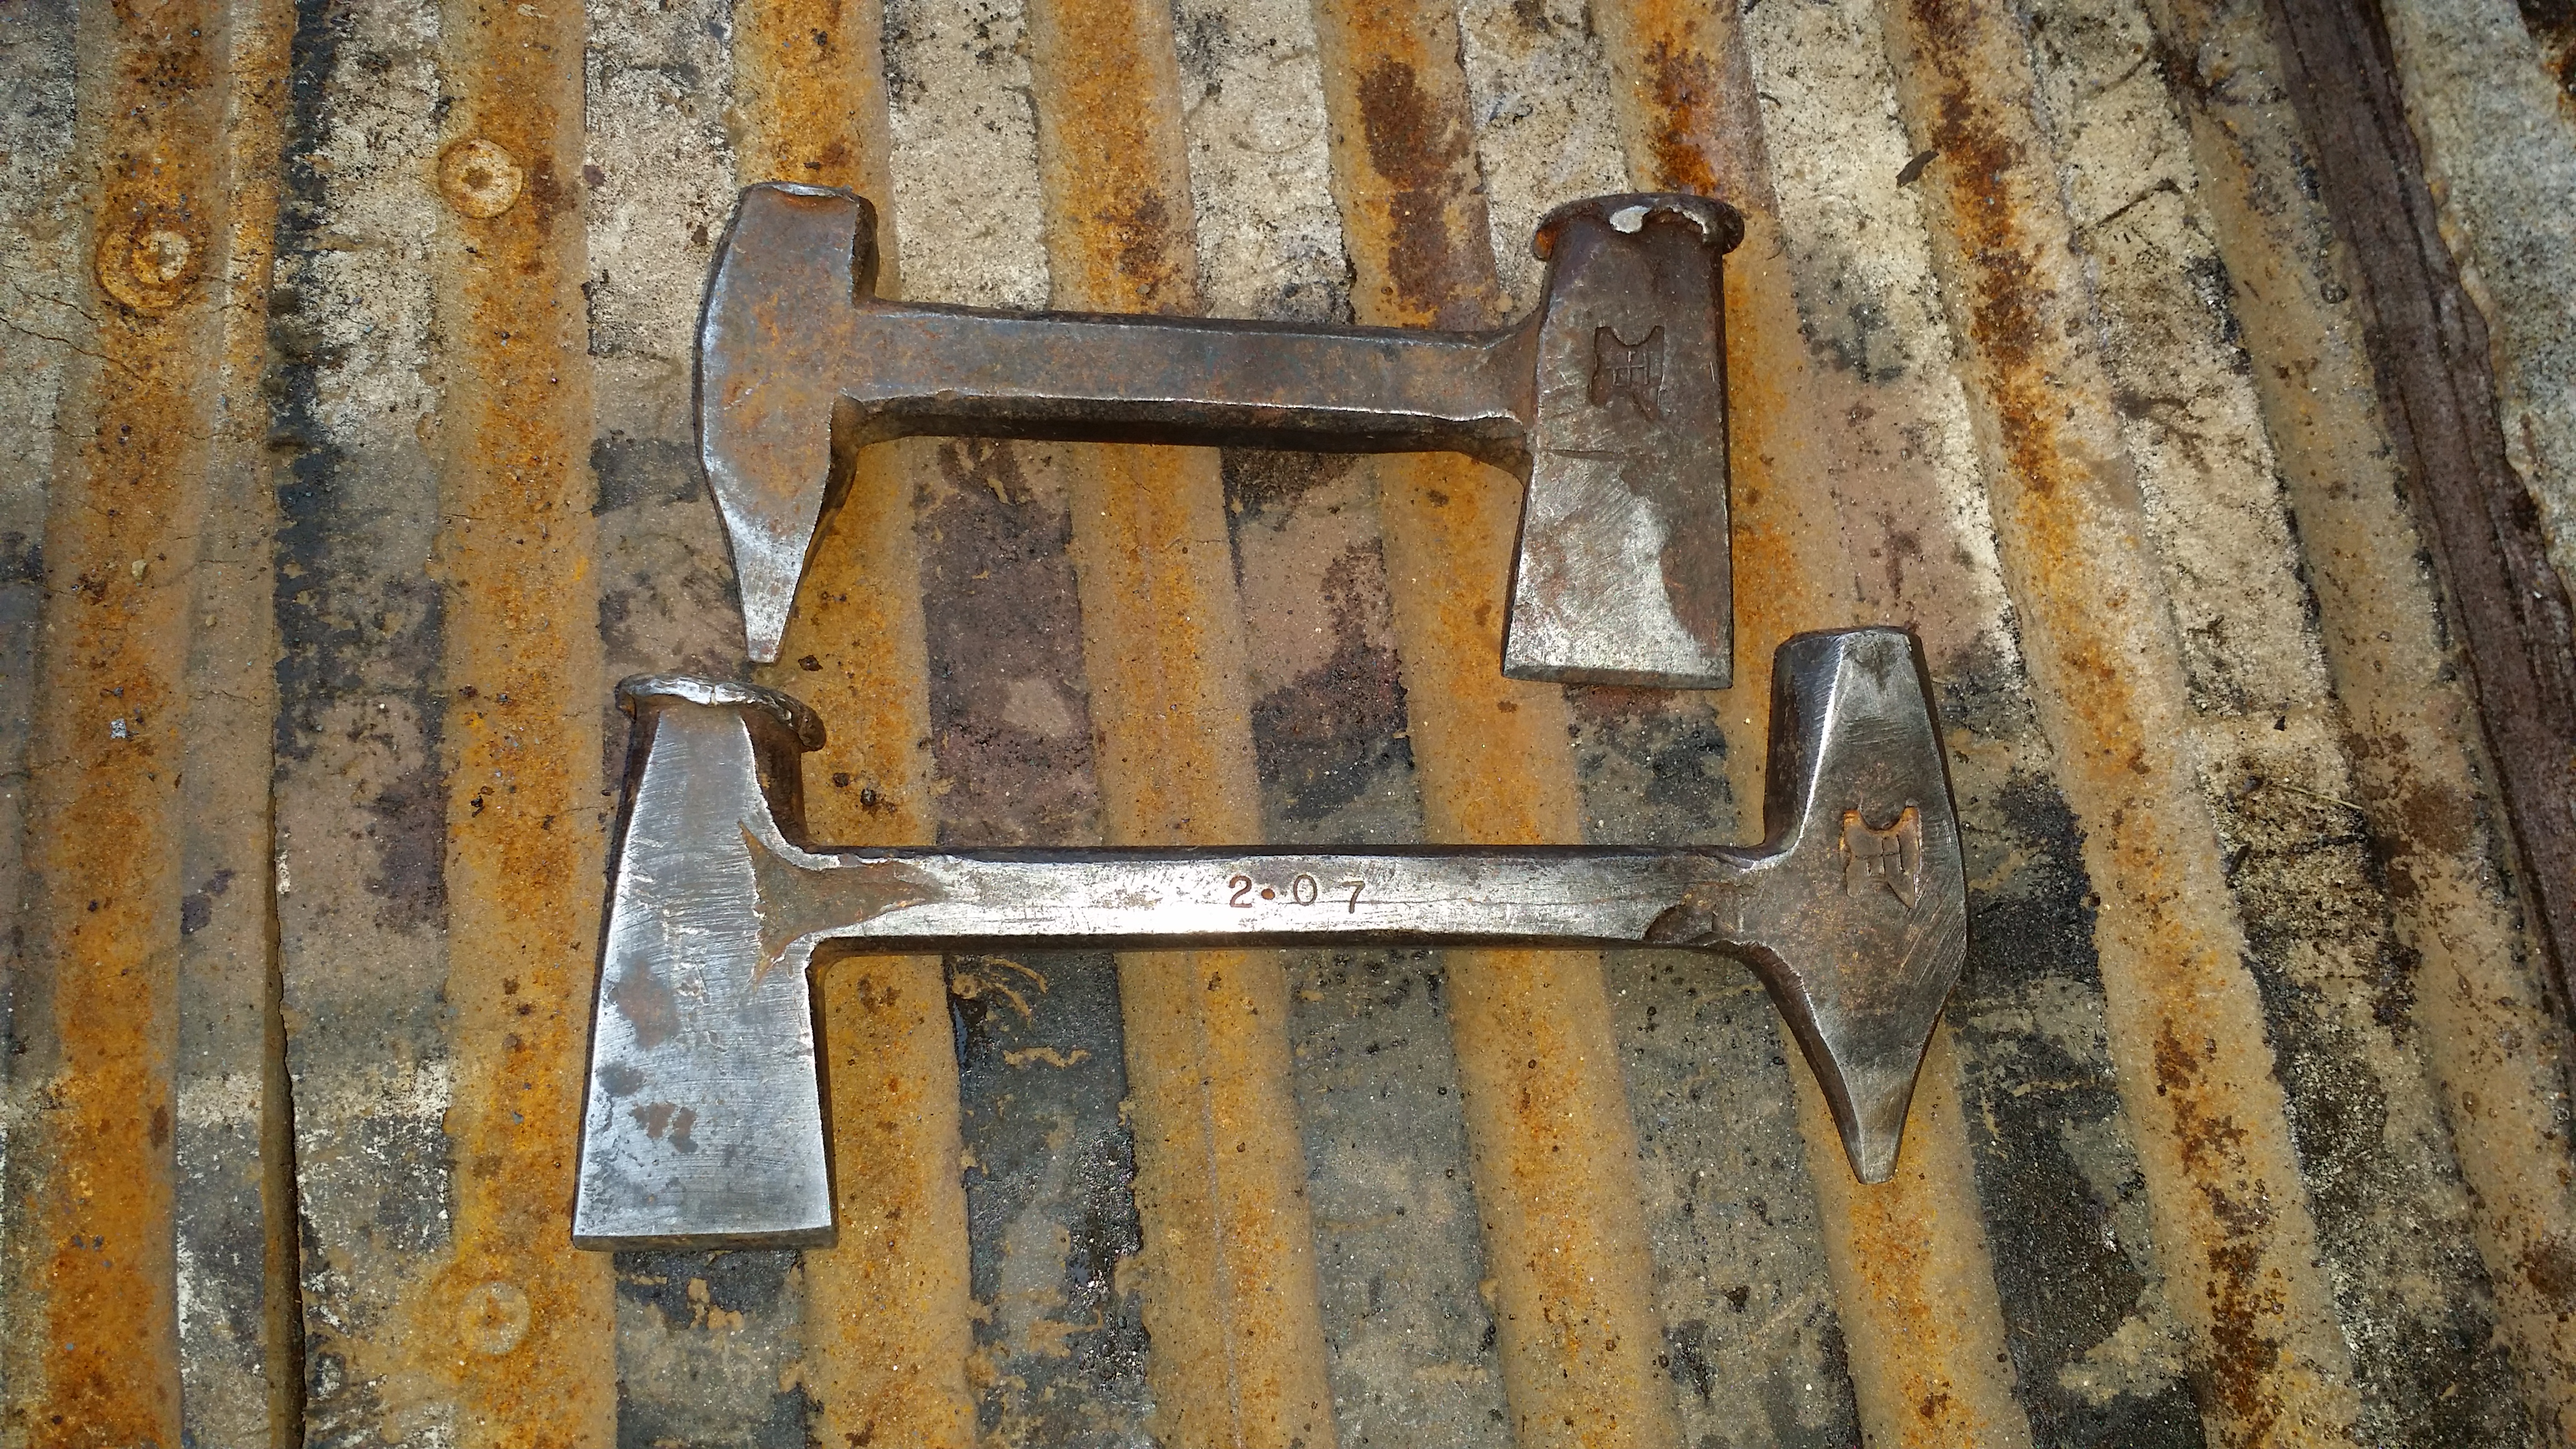
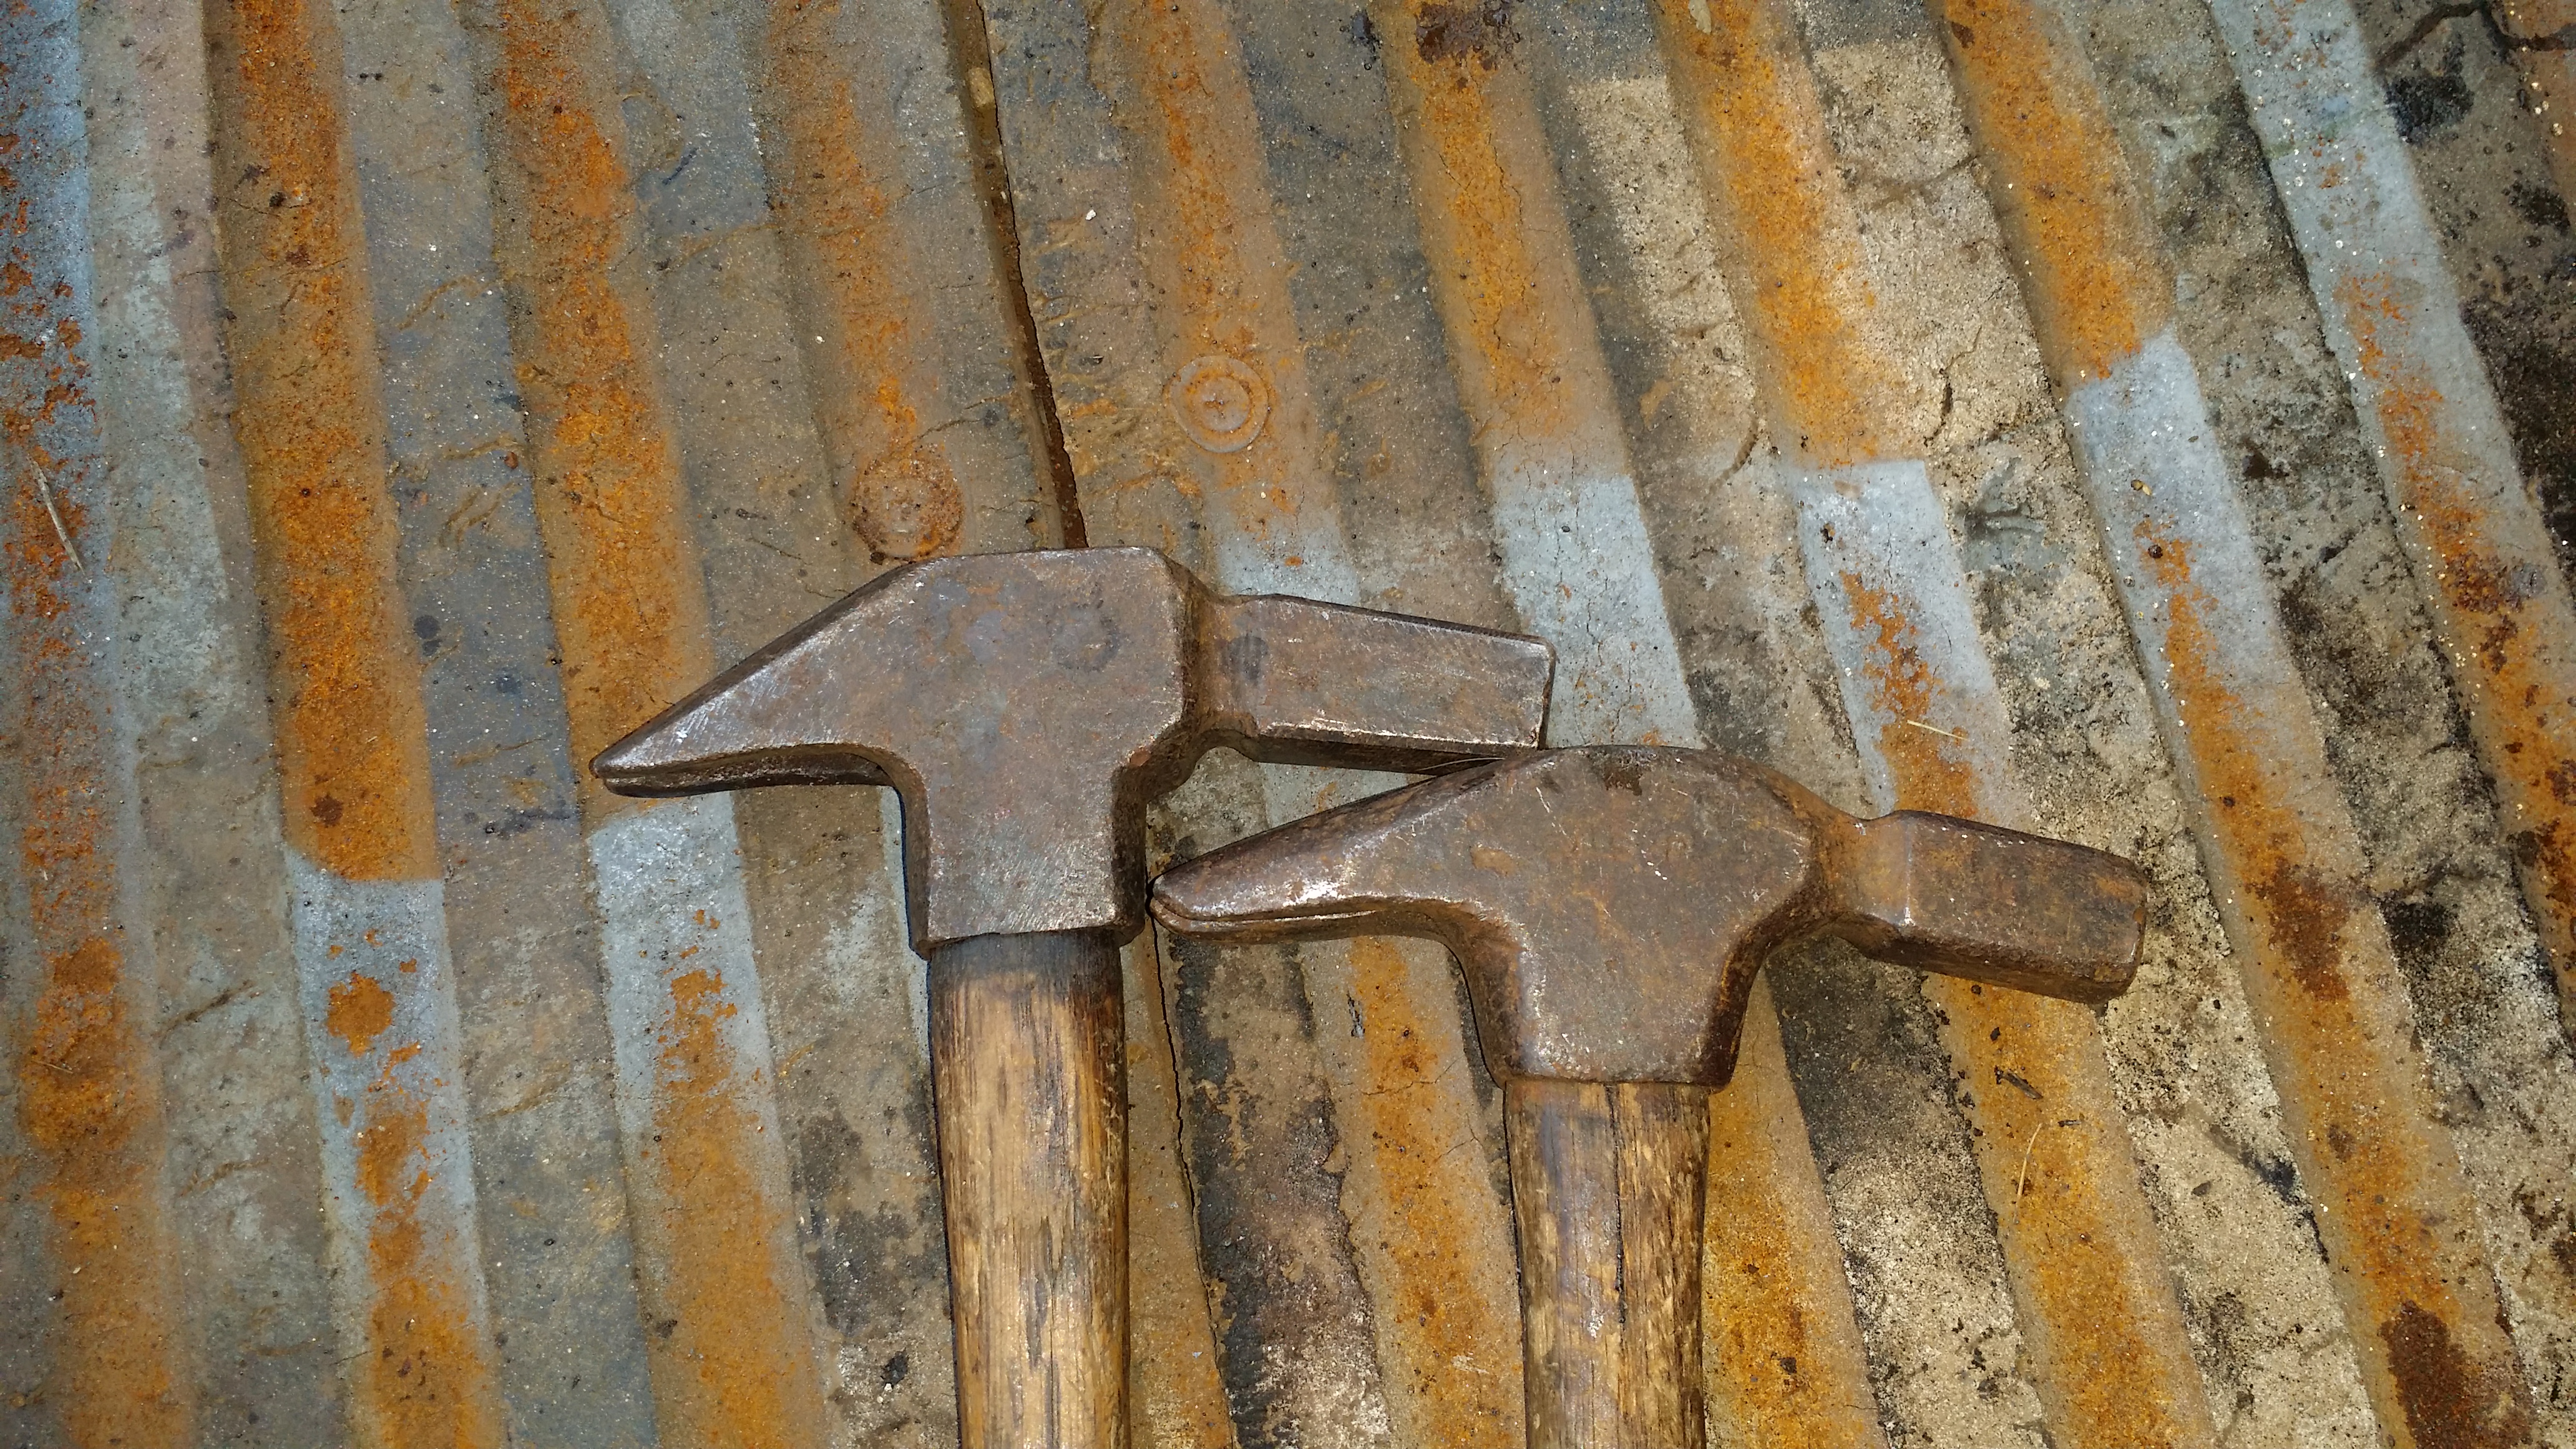
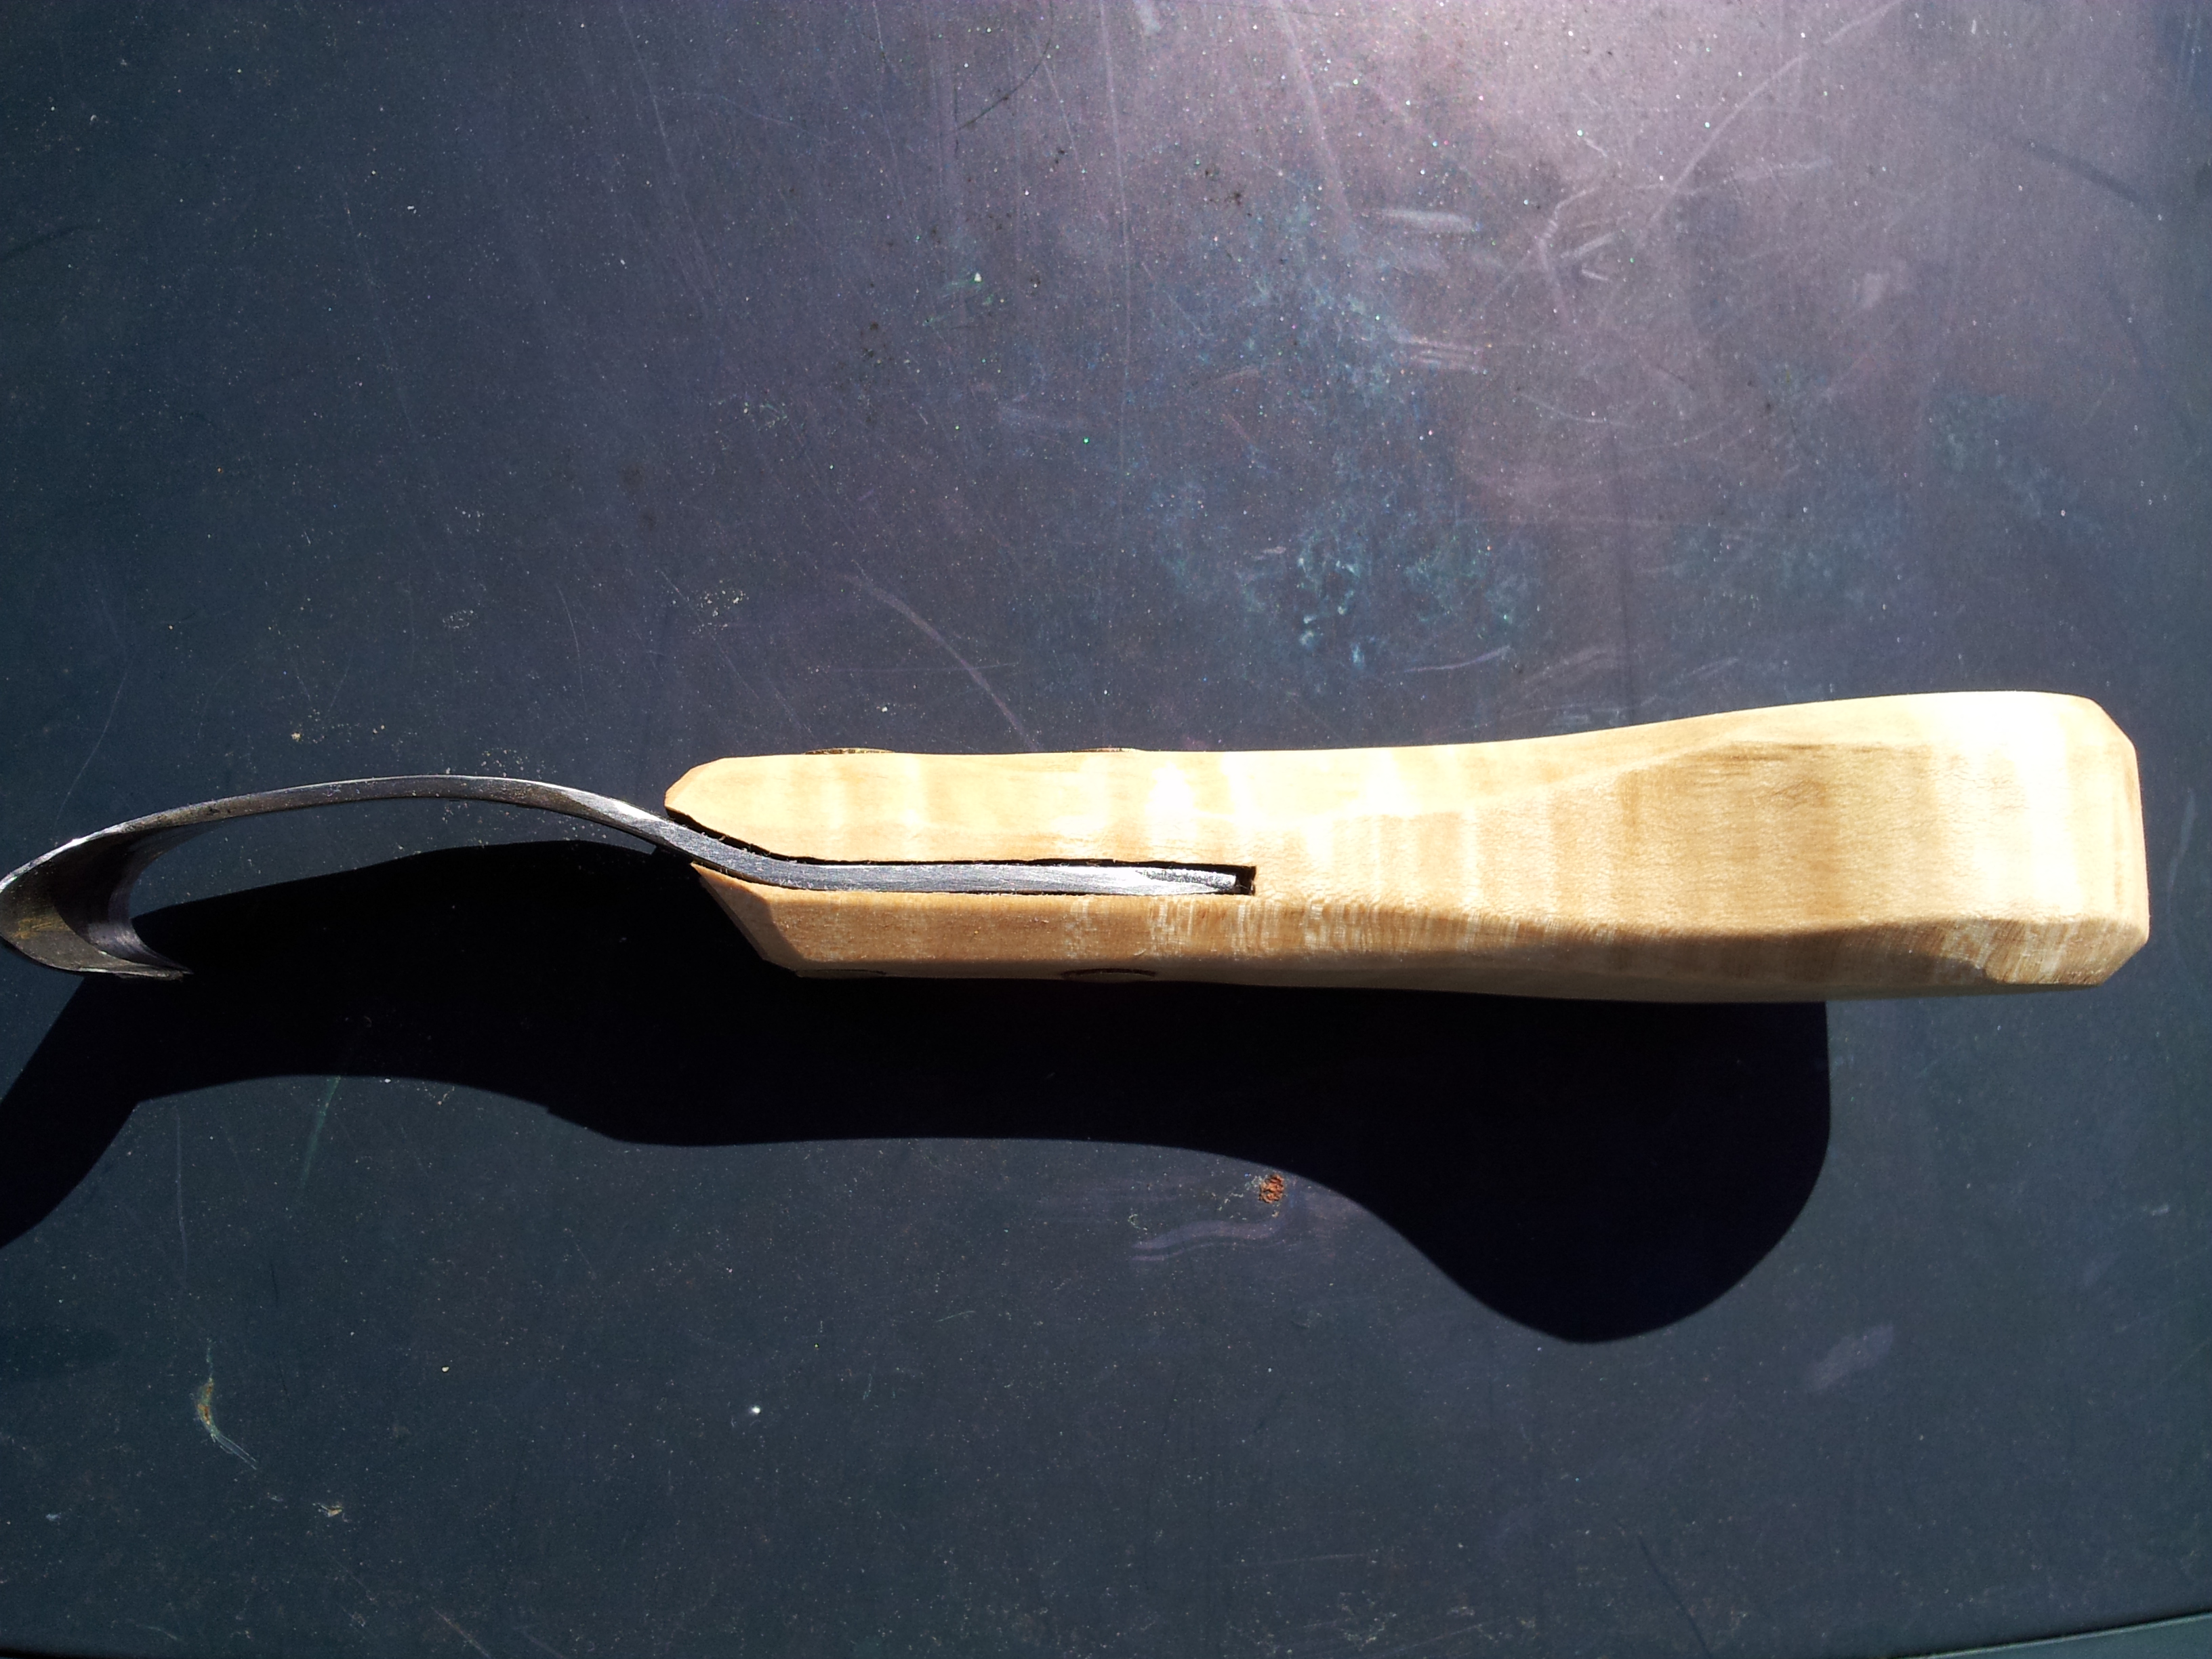
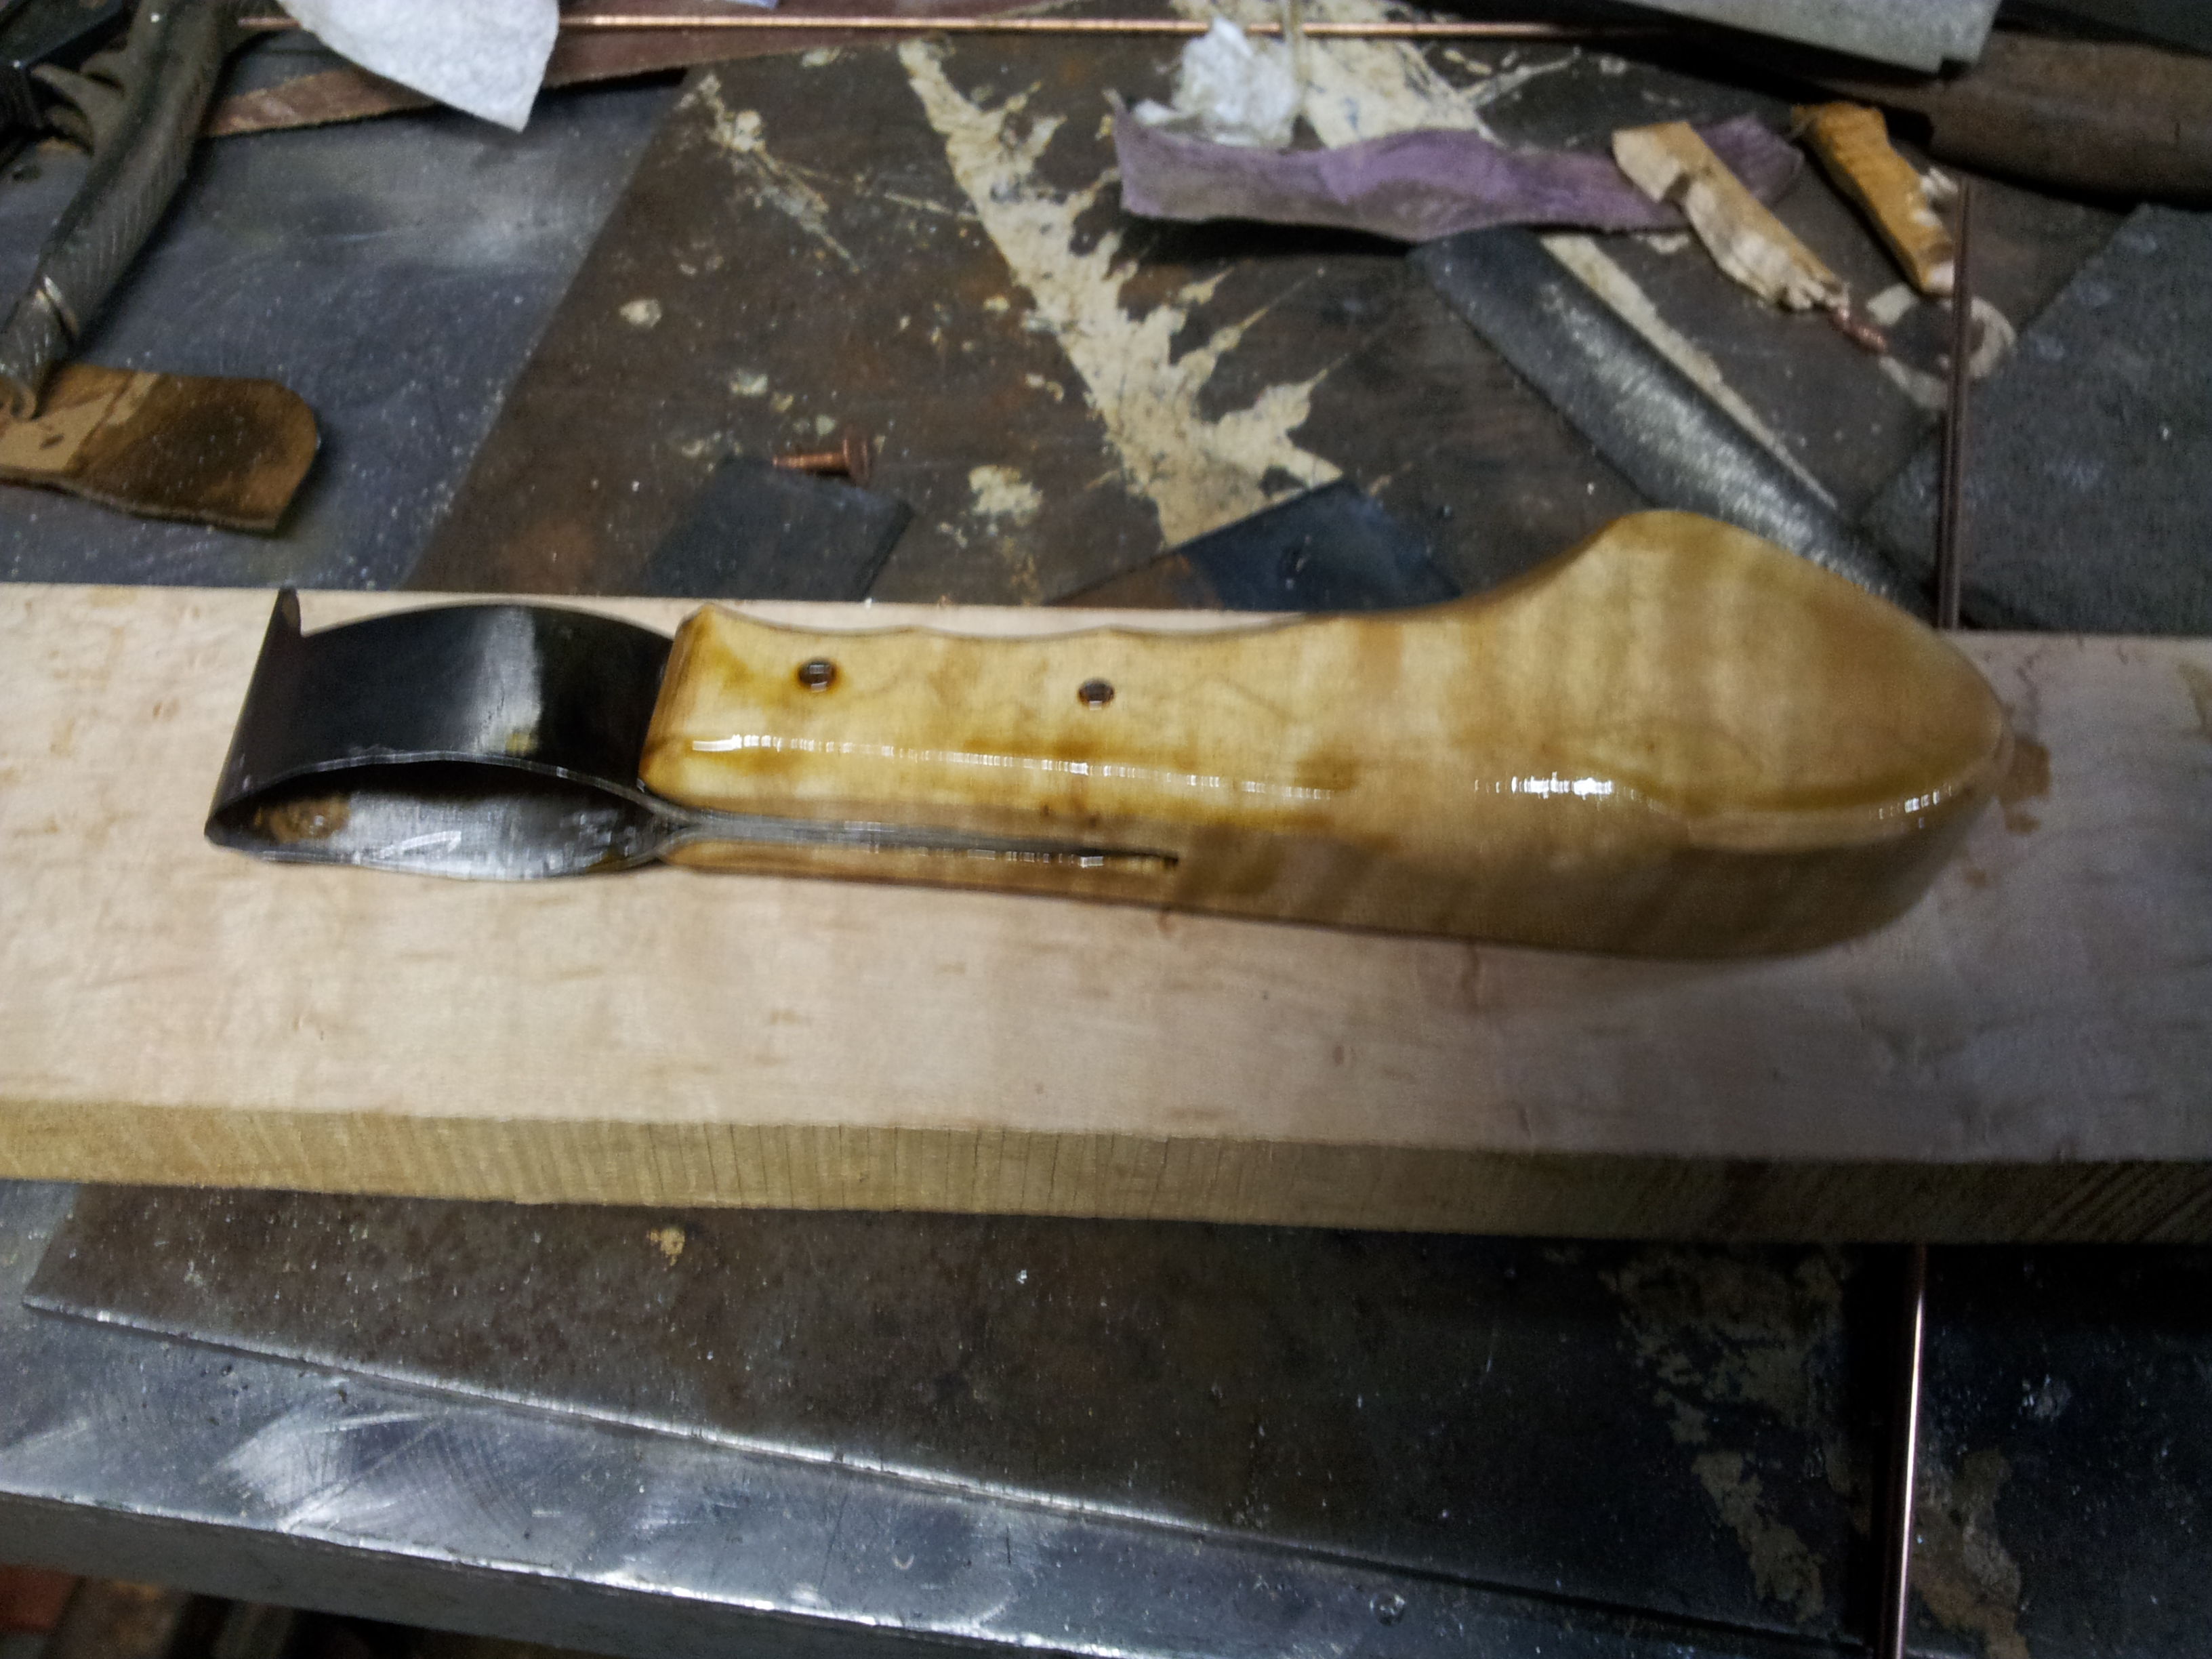
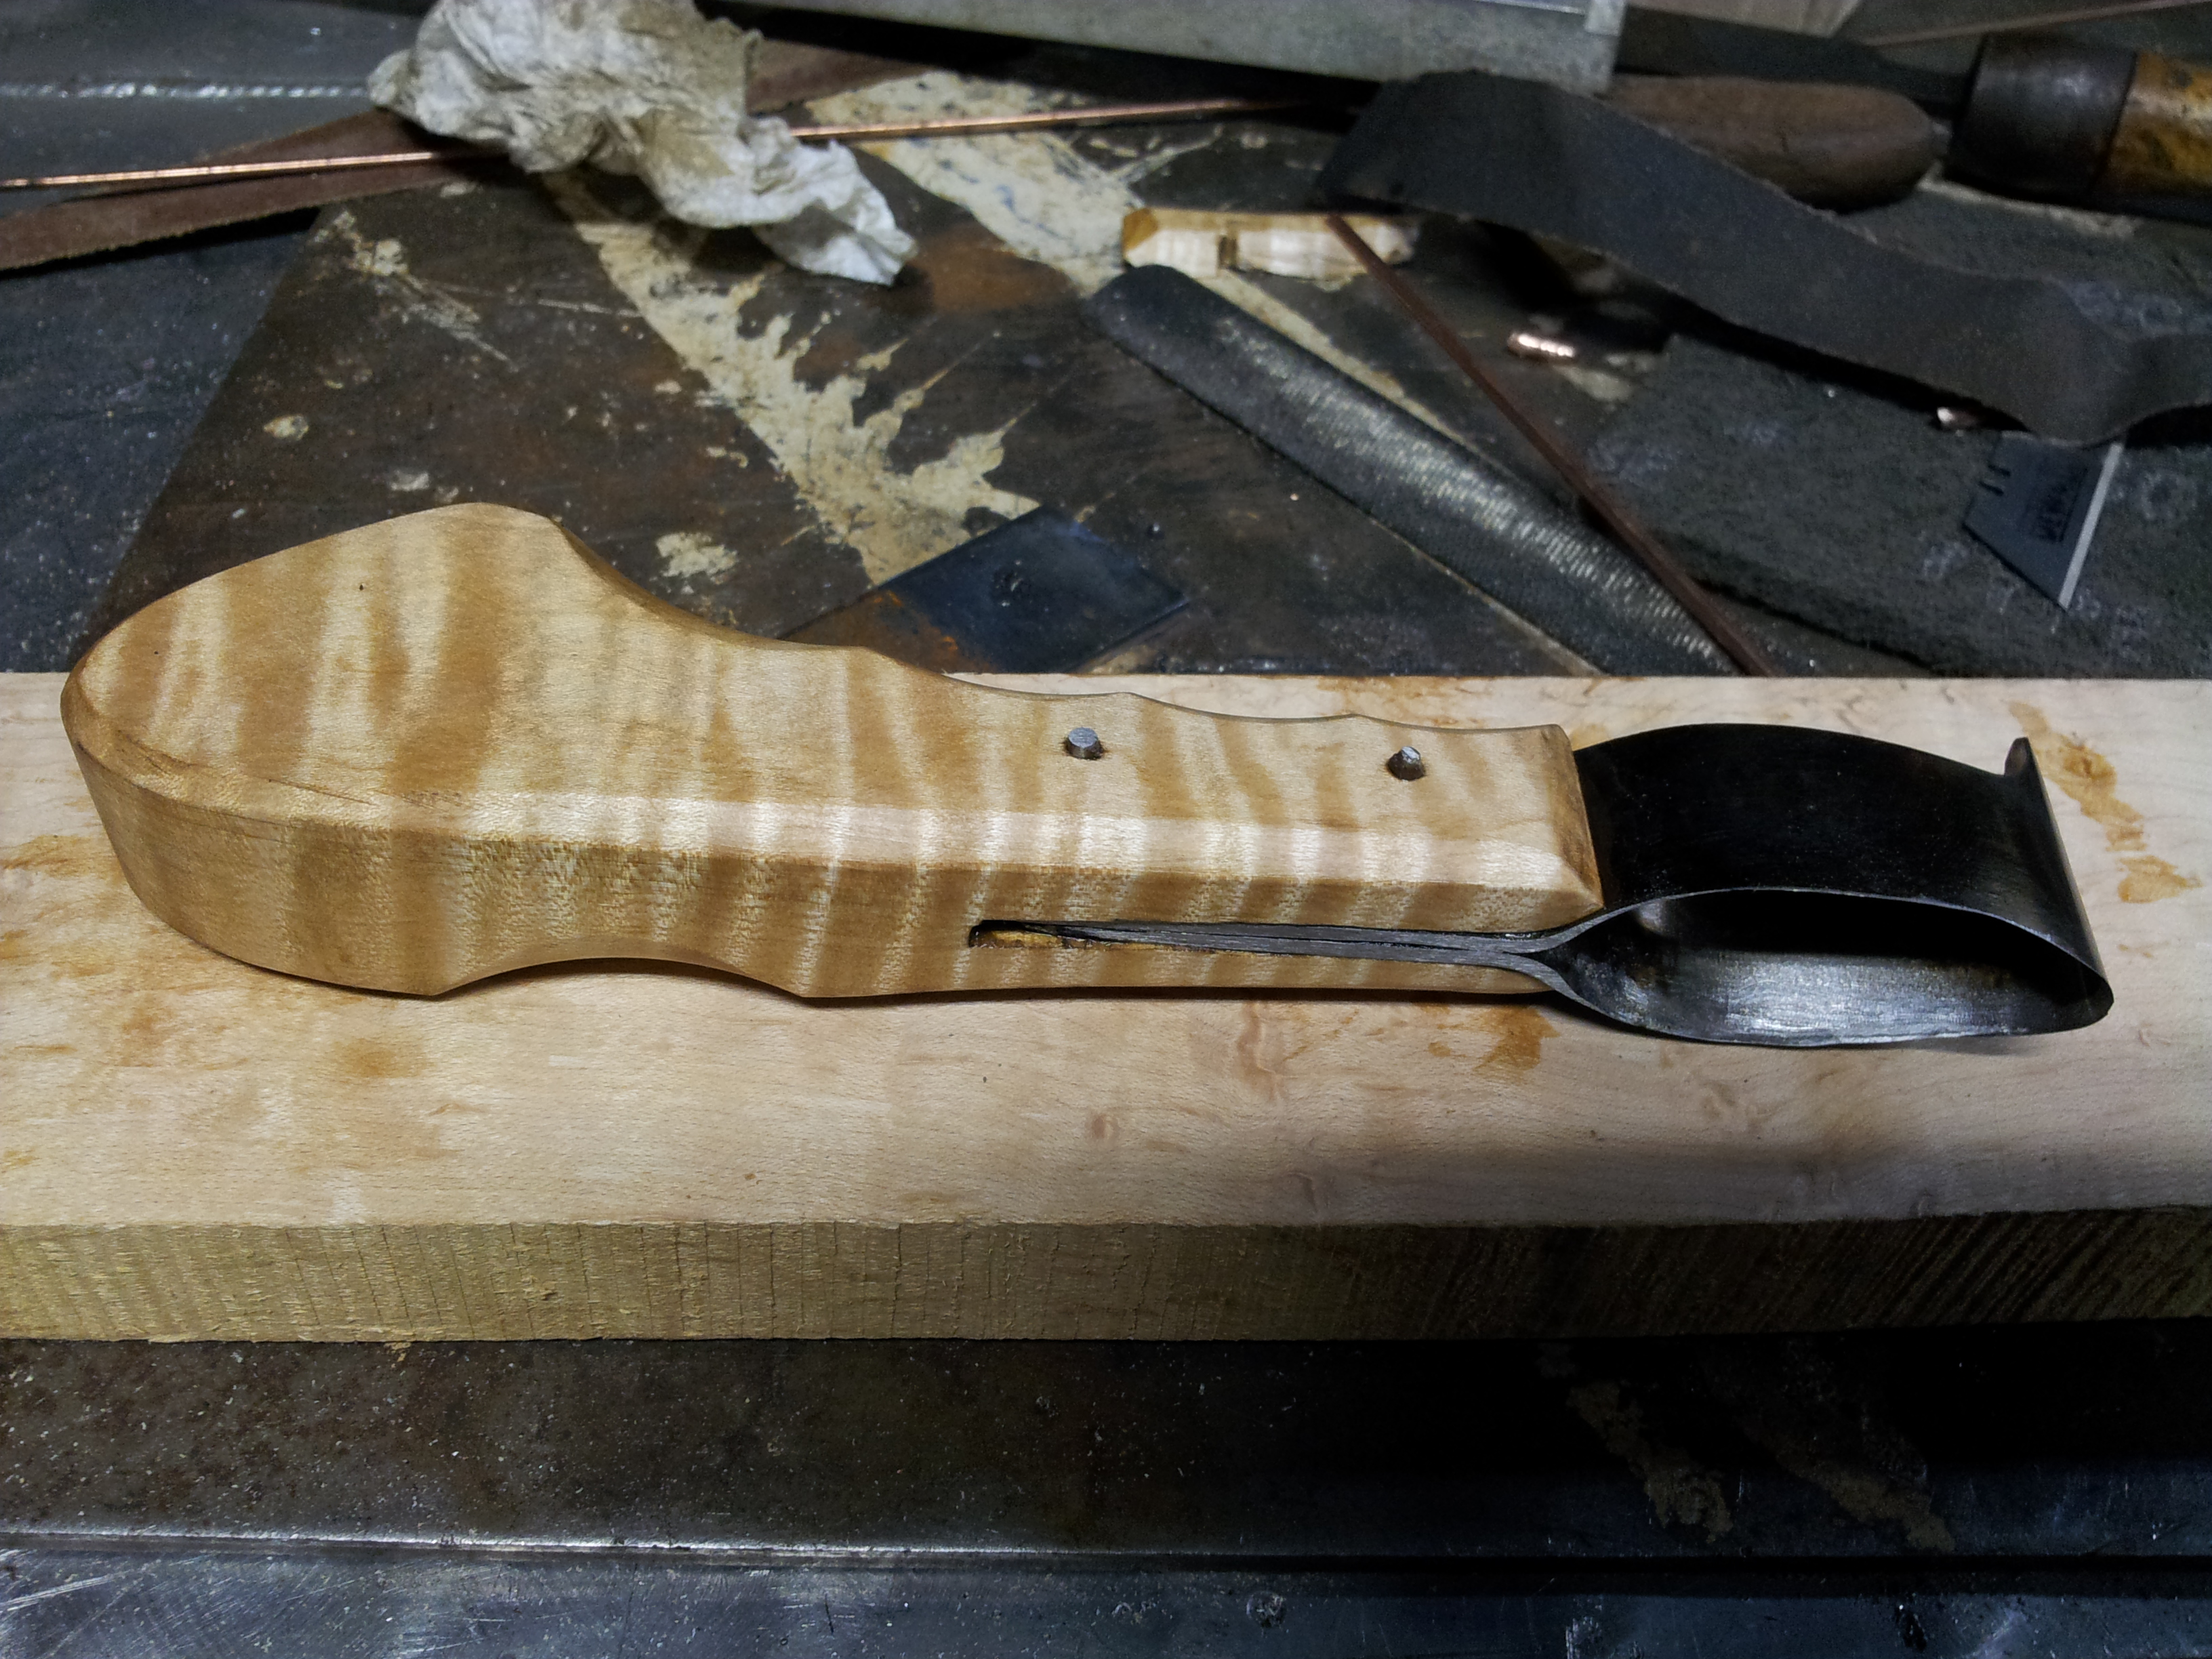
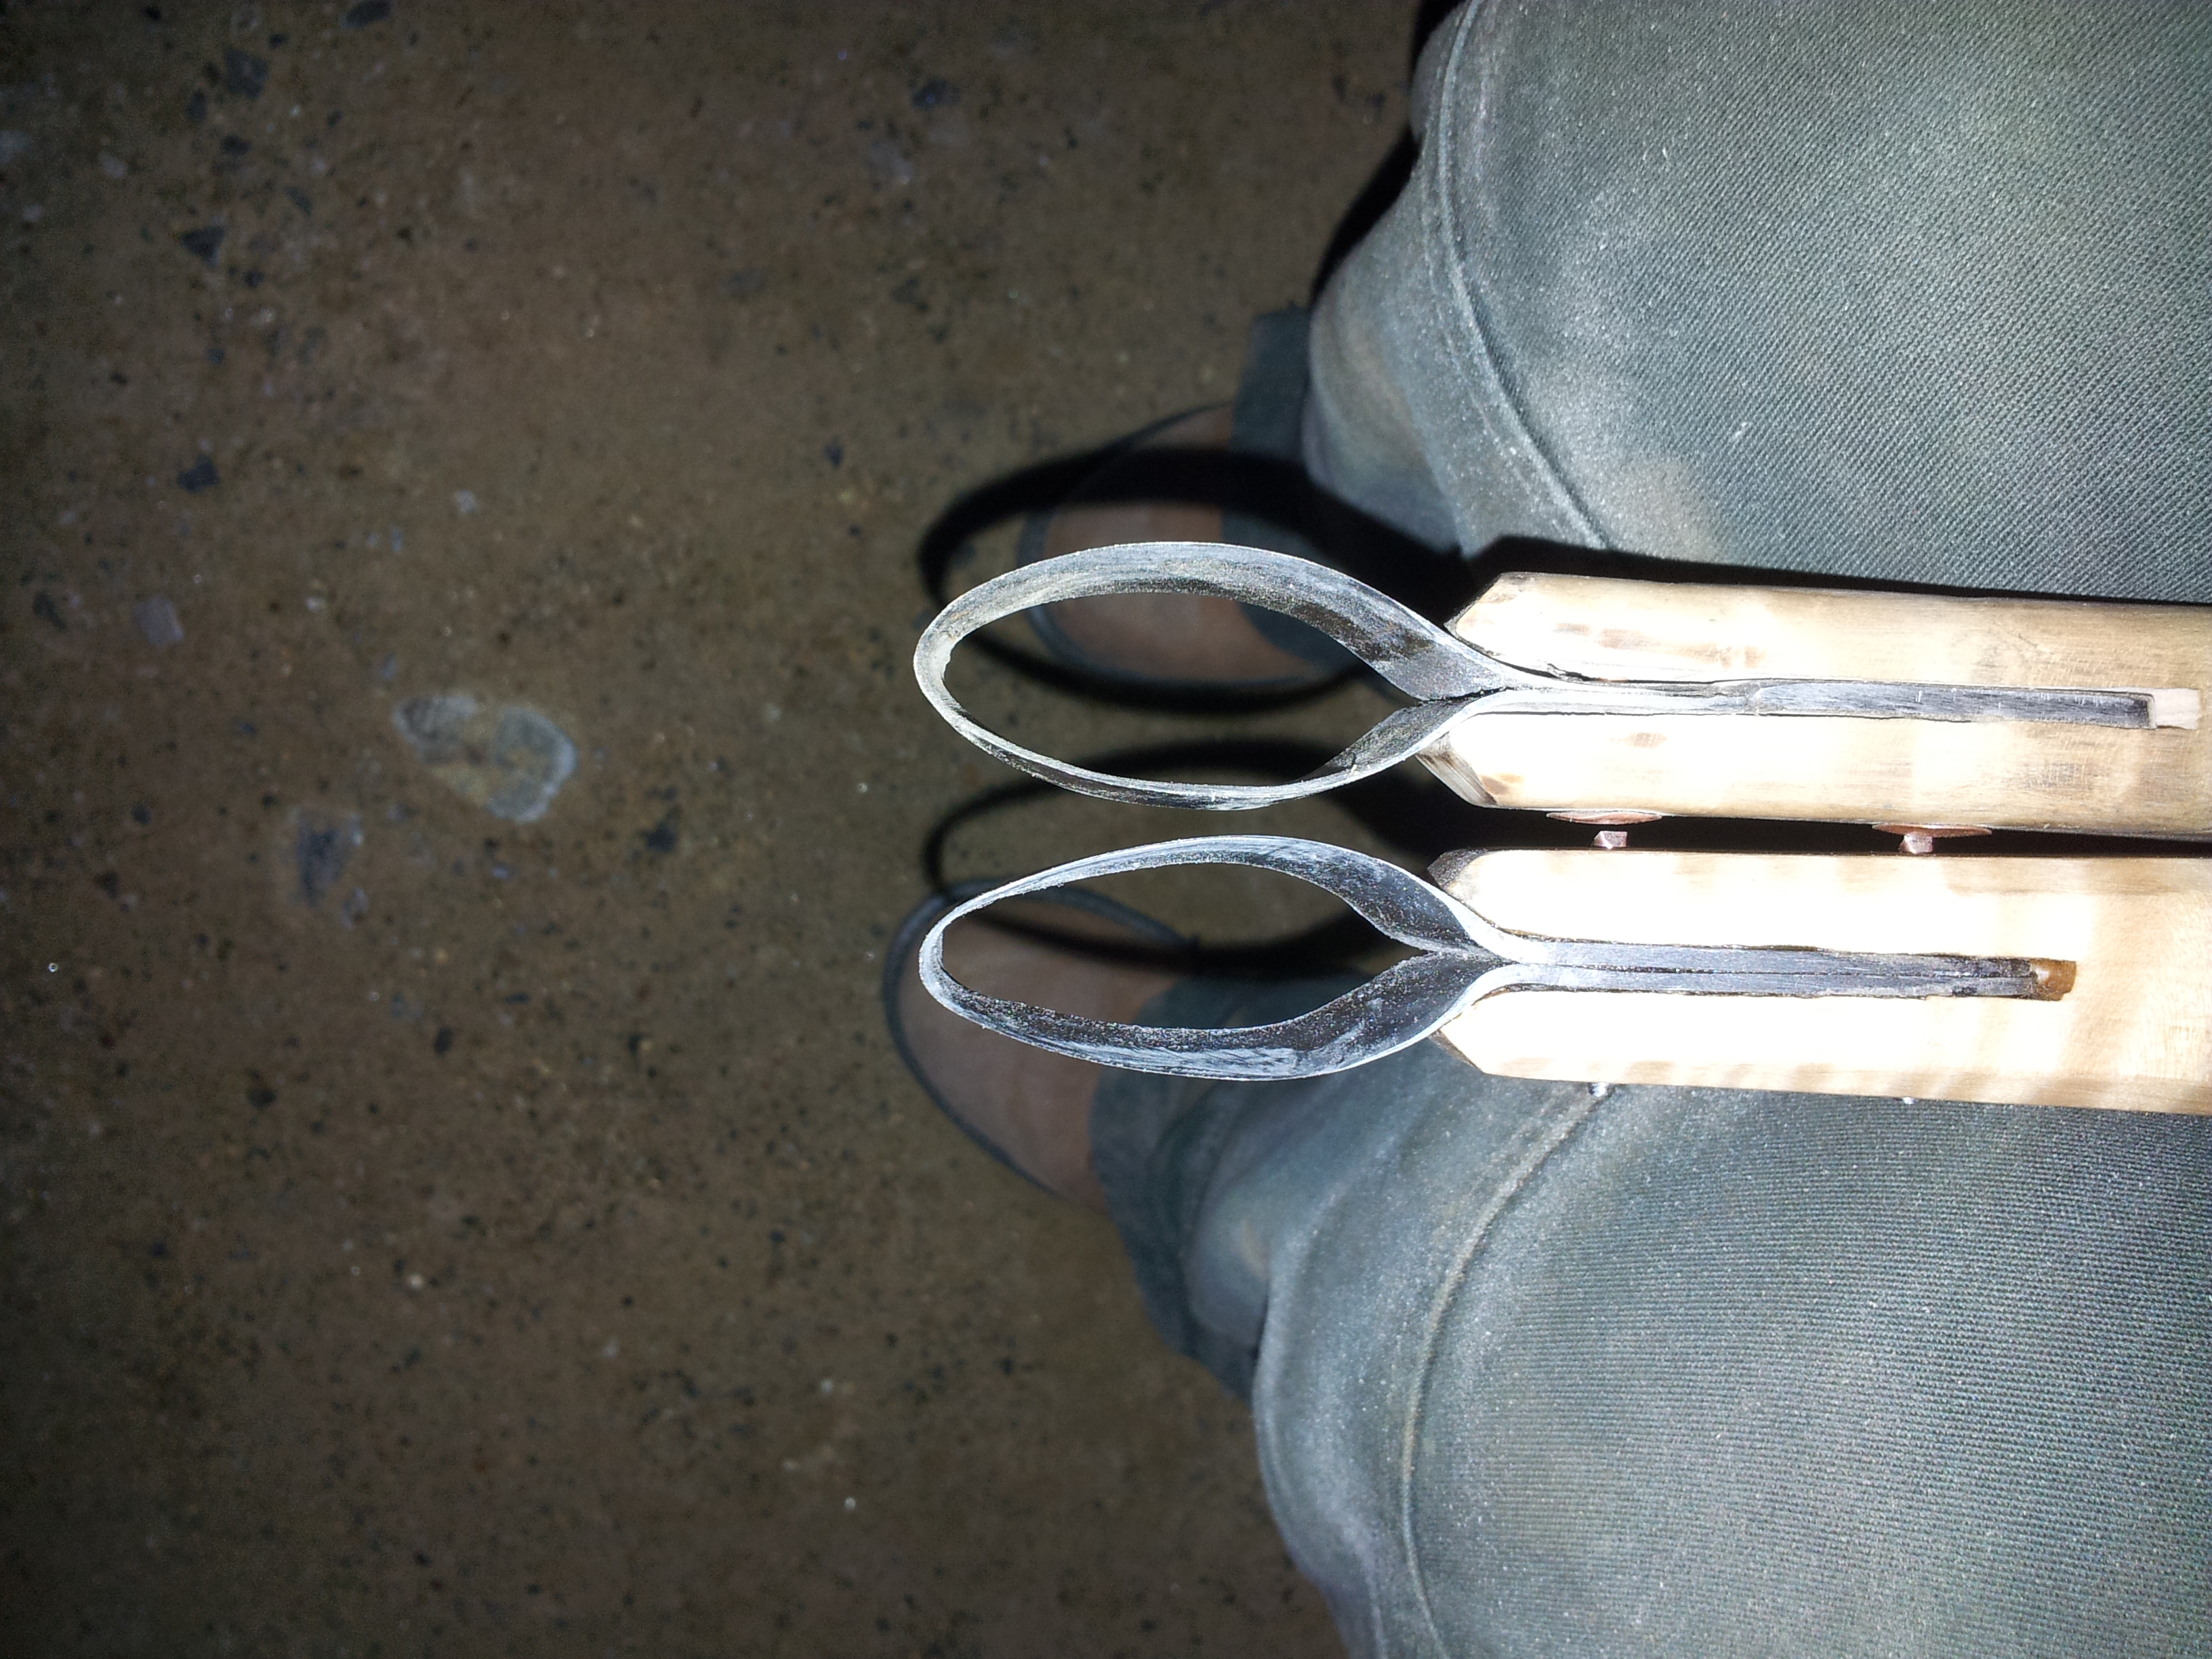
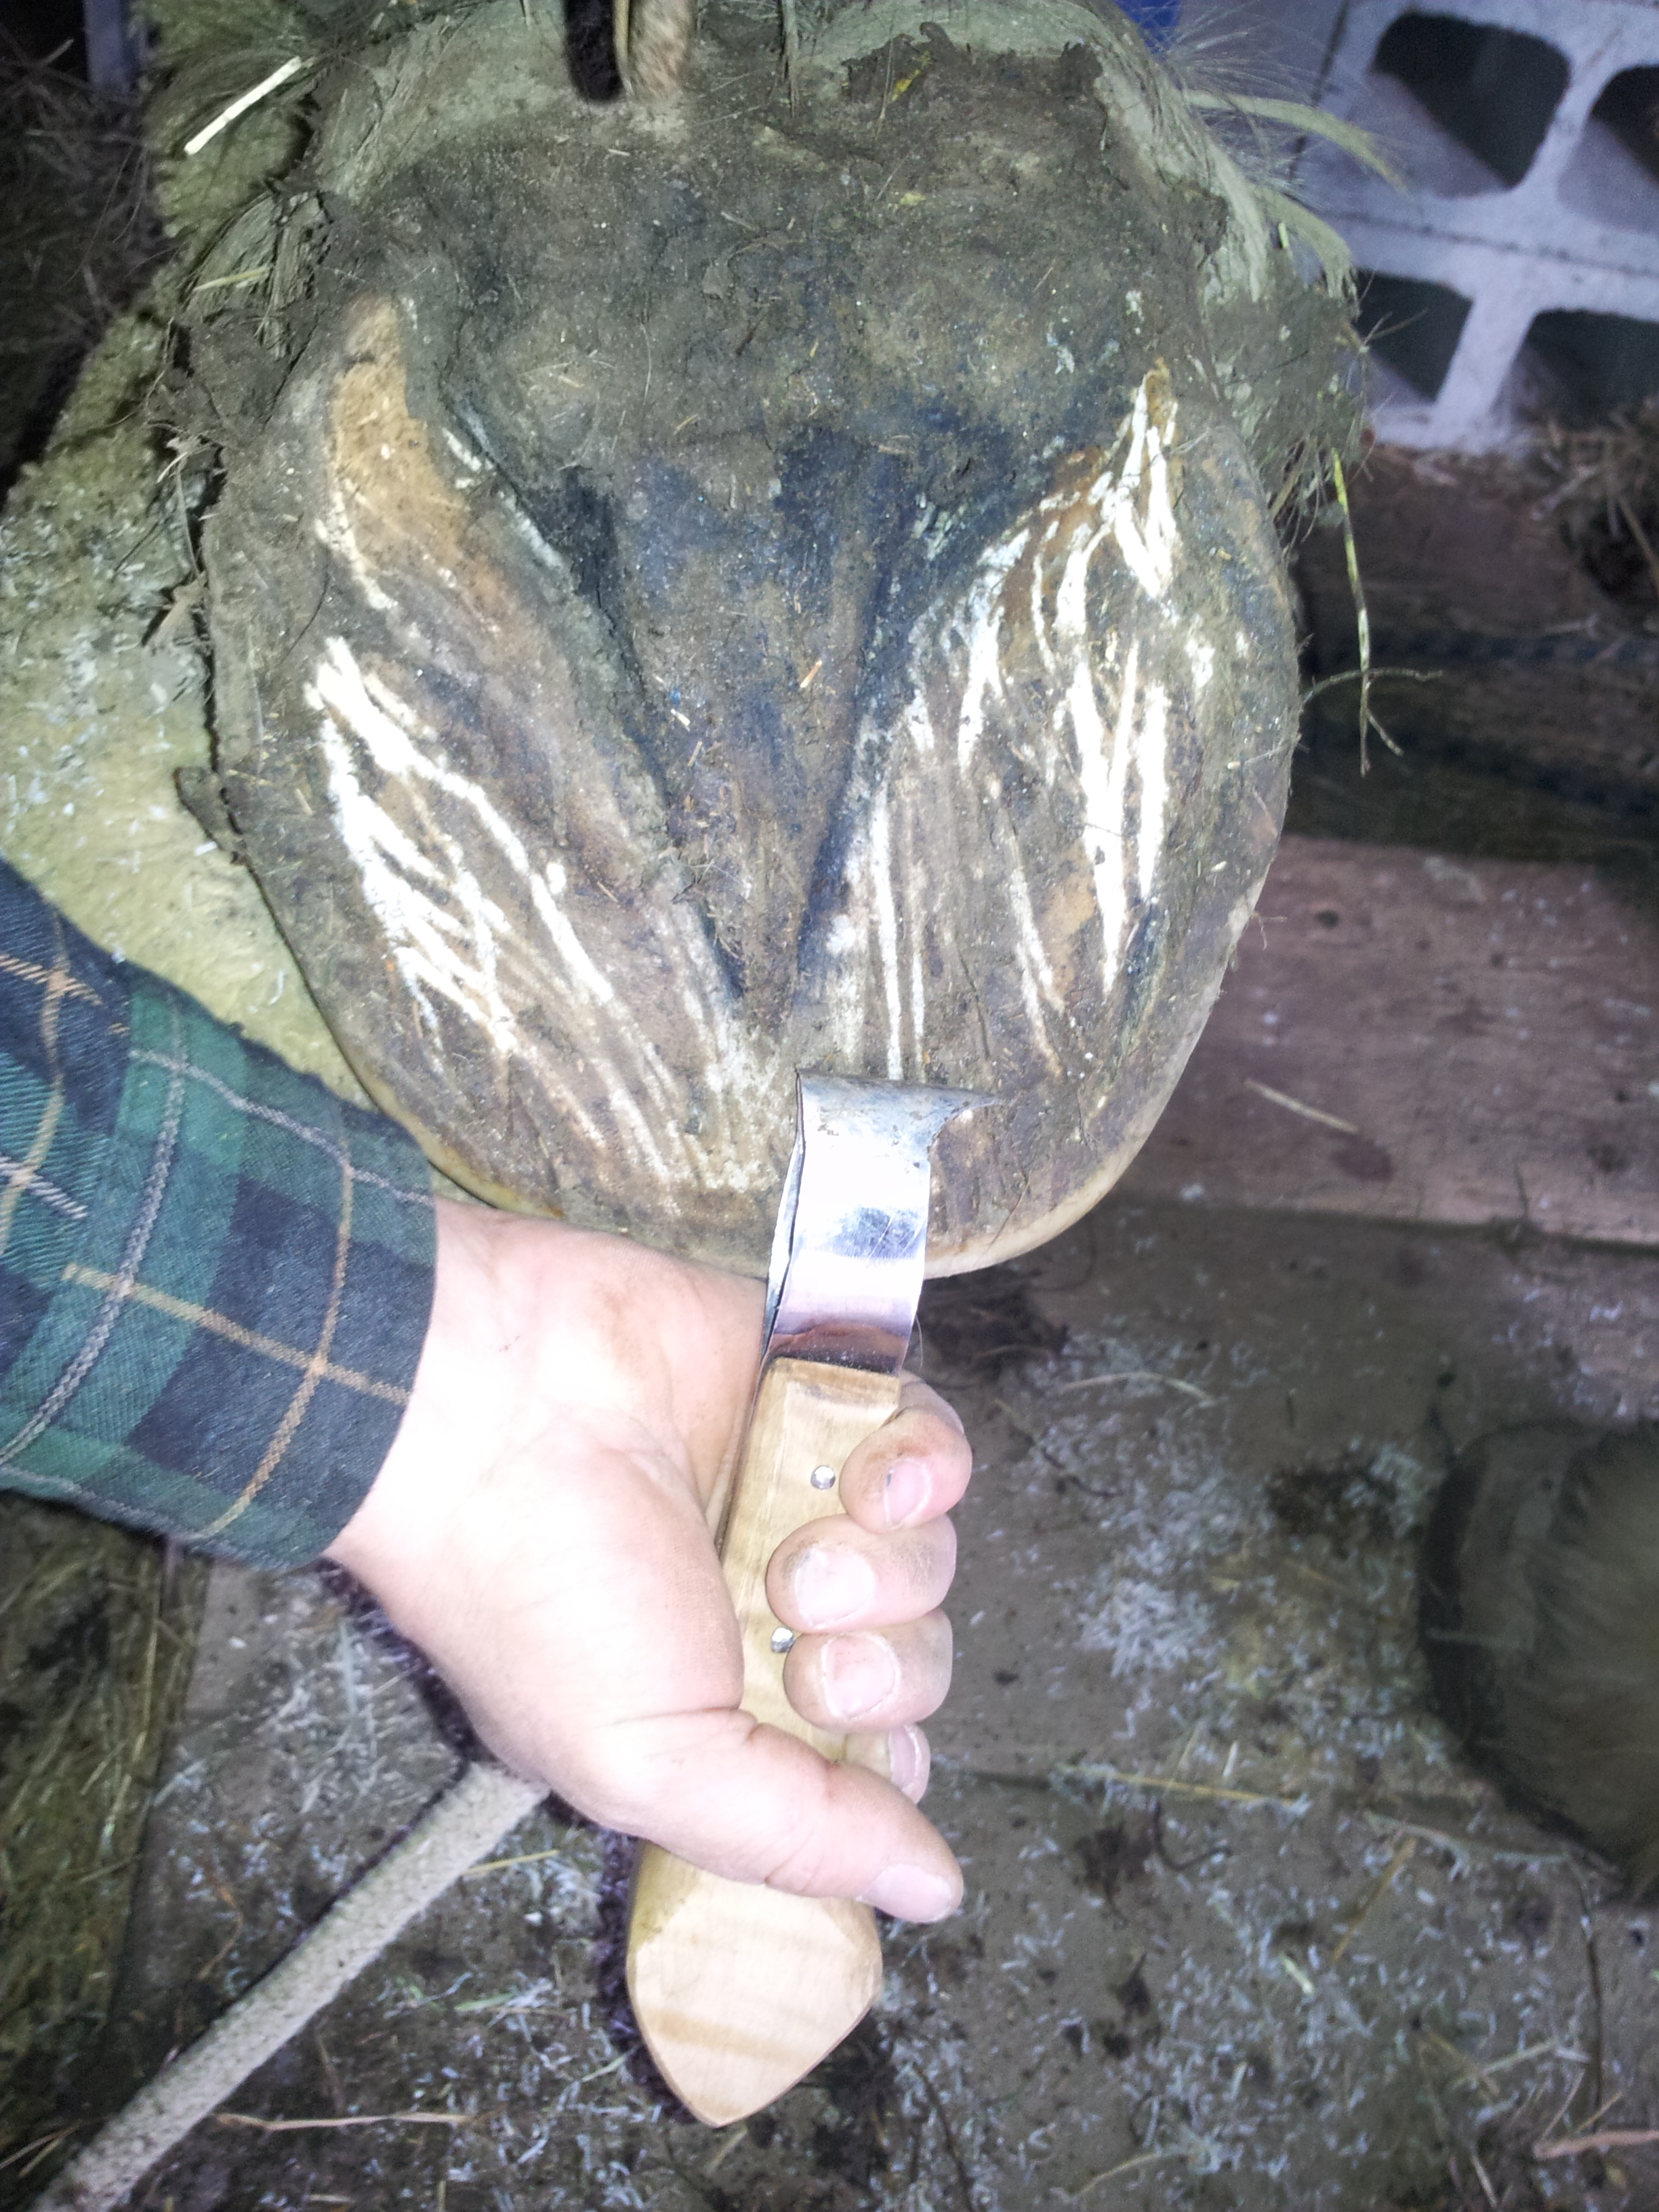
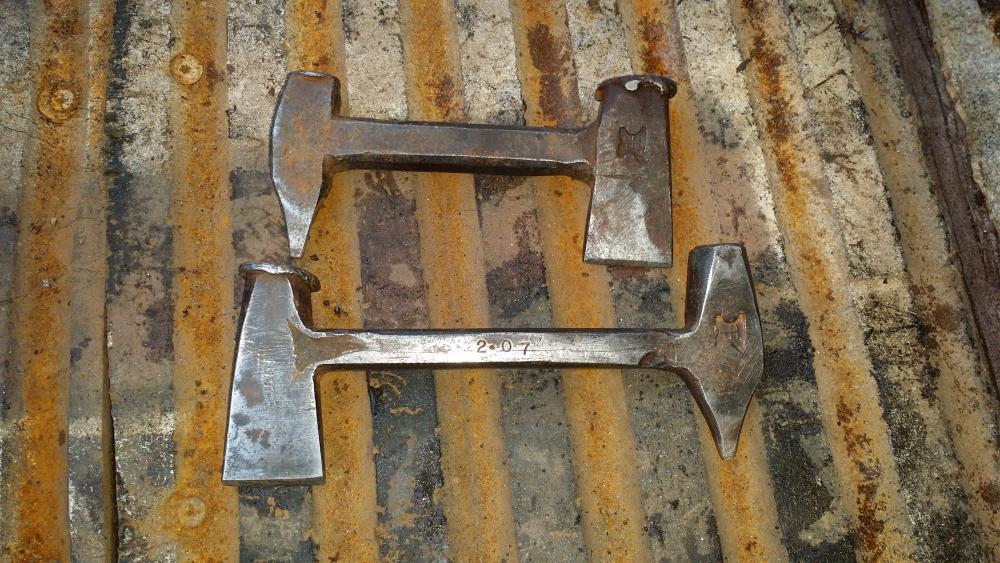
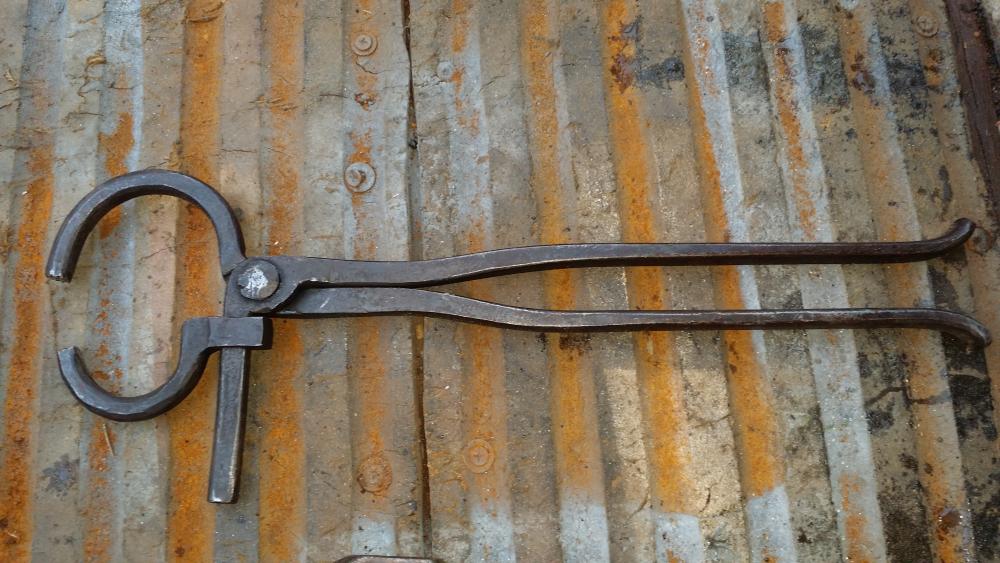
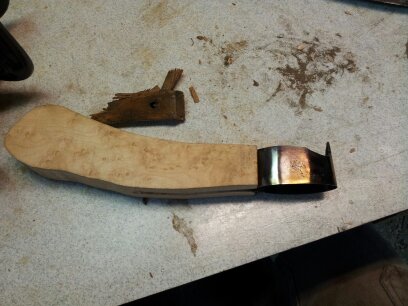
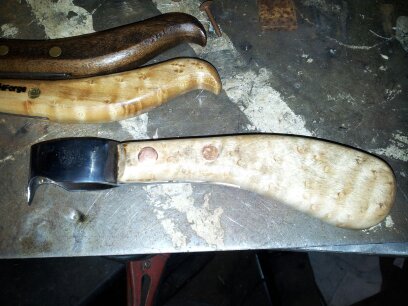
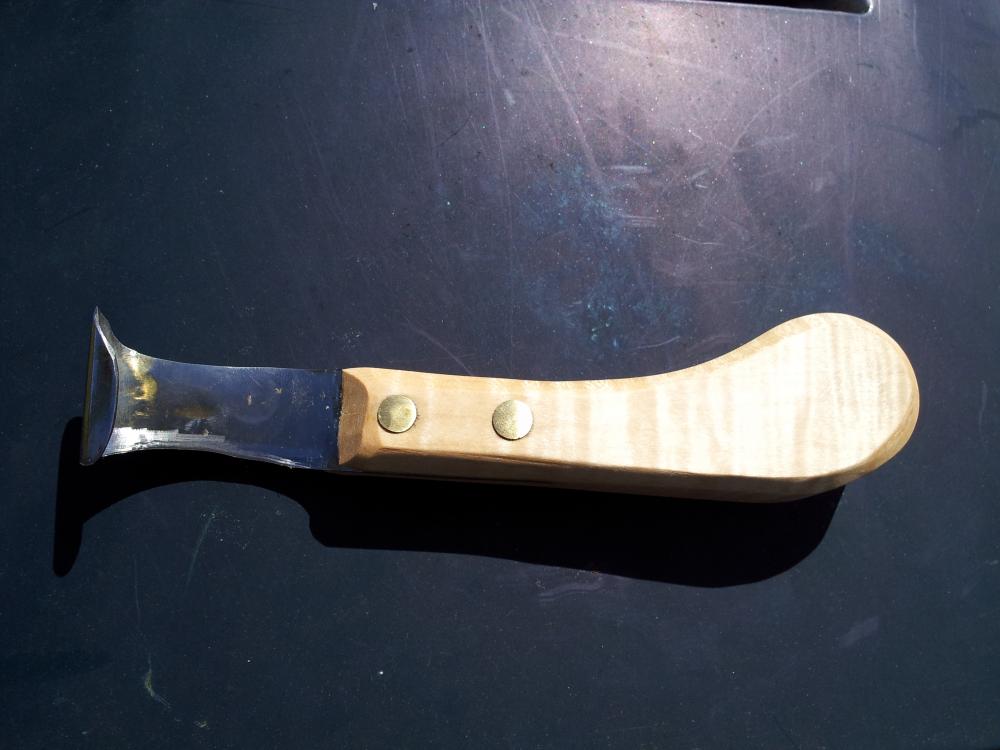
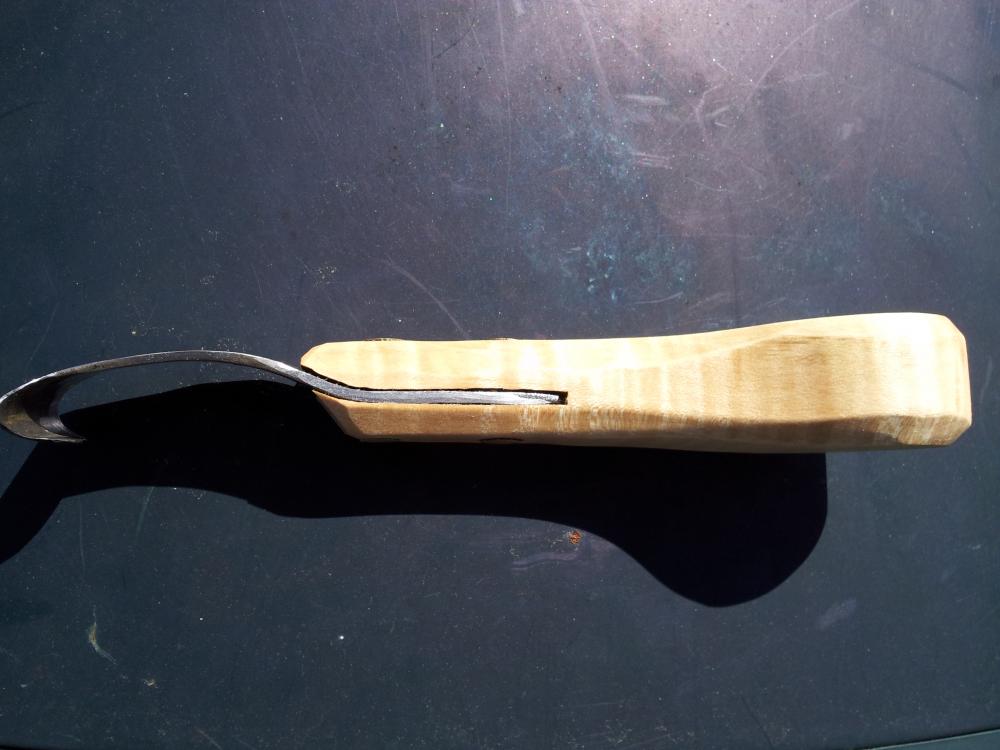
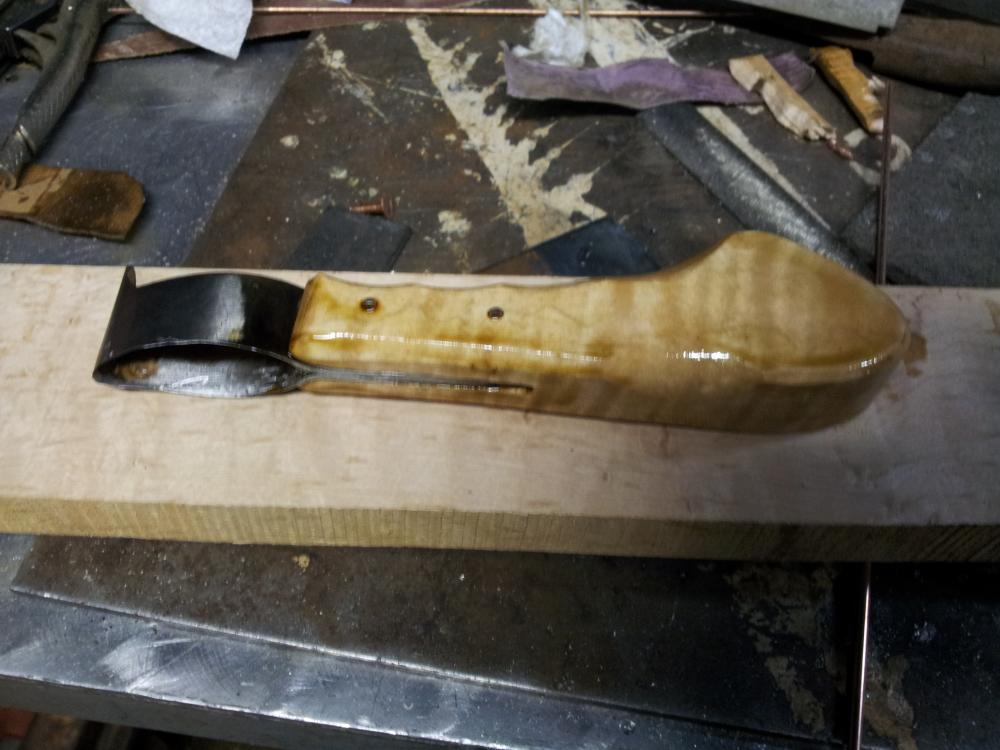
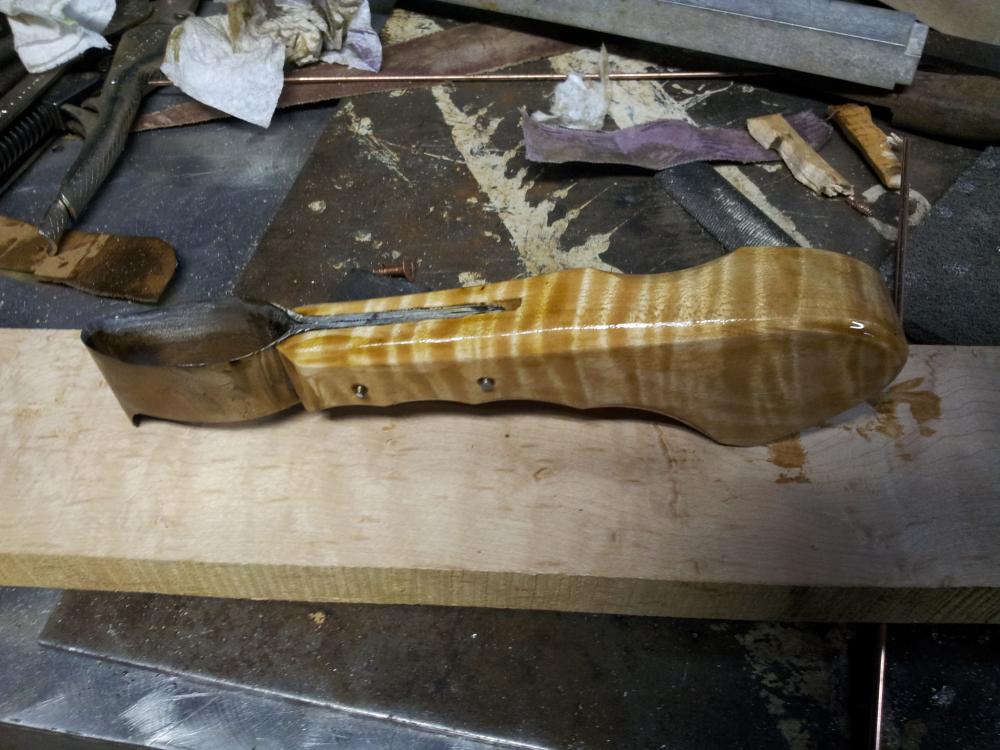
Well since i mentioned it in another post and someone said I should post up pictures.. Here are some pictures of the tools used in the Farrier trade I've made over the years.. One thing about the farrier trade is unless you abuse your tools they will last a very long time.. The hoof knife gets the most abuse and gets constantly sharpened.. Like 5-8 times a day or each or every other stop or if its dull. so depends on how much dirt is packed in the foot and how dry the foot is.. Hoof knives still last 6months to a year.. First are clinch cutters.. short one made in 96, long one 07. Then 2 different driving hammers. smaller one 89, larger one 90.. Then adjustable hoof testers. 1990. Then a few hoof knives of different designs.. And then a picture of how it is used..


-
Wrought Iron Wheels/ rims
jlpservicesinc replied to BOB T's topic in Blacksmithing, General Discussion
Wrought iron and quality can not be lumped into one heading.. Wrought iron in the hay day varied from batch to batch and some were cold short and some were hot short.. Cold short didn't like to be worked cold and hot short didn't like to be worked to hot.. I've worked with both types and have found that it is inconsistent with the quality that either has.. One rim maybe hot short the other cold short.. Where quality of wrought iron comes in is actually both of the hot/cold variety but also how many times it was heated and forged to get to the desired thickness.. The more it was heated and forged to size the tighter the grain structure and the better the material as most the impurities have been worked out of it. "This translates into higher quality" The highest quality anvils were made from scrap because it offered a better forged wrought iron than freshly made wrought iron .. If the tires have wear on them you will be able to see the grain structure and the level of unevenness in the face of it.. To test the wrought iron for both hot and cold and quality work, do a bend test.. it's it really low quality it won't like to bend without fracturing.. and work it at a white heat and again at a red heat.. do it at the end of the bar forging it down to say a square and as you work it it will start to unravel either at the hot or cold heat.. Kind of neat.. One other thing.. Wrought iron.. Real wrought iron is a pure delight and joy to work with.. Everything just forges that much better.. -
I love alloy steels and highly desireable.. For some reason there was a few sentences that were completely missing from what I had wrote.. for some reason my posts here have been cutting off pictures and now sentences.. ??????? I was referring to cutting alloy steels on your unhardened or mild steel hardies.. Alloy steels can have a very hard grain structure even at red heats unlike mild steels and the reason I wrote: You can even use mild steel for hot cutoff hardies as long as the cut isn't to deep or used on alloy steels.. If the mild steel hardie proves to be to soft for your hot cut hardie then you can try cold forging it to work harden the edge, or case harden it.. Cheap and easier to make and when your working with larger materials medium or high carbon steels are much more finicky.. mild steel hardies can work well on smaller stock up to about 1/2" as long as your cutting heats are high enough and your fast at your cuts.. . I probably made 6 or 7 mild steel hardies over the years when I was first learning as well as punches, and drifts and a hot chisels a time or 2 for something i was only going to use once.. just have to understand the limitations a tool made from low carbon steel offers..
-
Lou L. I absolutely love the fact you expressed if it doesn't work you'll just make another one.. thats how we get better with all this forging stuff.. it doesn't work.. Oh, well.. I'll just make another one.. I've made some unique tools over the years and thats always the thought I have.. if it doesn't work, it was a learning experience.. For hot cuts as long as they are not to deep and not on alloy steels they can work for sometime before the edges upset and create problems.. then if it does become a problem you can cold forge it to give it a little more hardness or surface harden it.. Or just make a new one..
-
Those are pretty neat.. Will we get to see them installed as well?
-
Coal or coke is a consumable fuel.. While yes a larger fire will consume more fuel a small fire or shallow fire while it can heat pieces of steel you never will get to achieve a fire that uses all facets of the heat/ fire zones.. The argument is raised now that a smaller, shallow fire can do the work of a larger fire.. I don't agree.. For most hobby smiths this might be the case as they don't mind hanging around waiting for a piece to reheat. I want as fast a reheat time as I can get as long as it's a fully heated piece and not just on the outside.. A shallow fire on anything over 1/2" the heat cycles become to long for my liking.. Ideally even up to about 2" I like about a 2minute reheat time.. I use a shallow fire only for tempering.. If you lower your air input the fuel won't get used up as fast as will proper fire management.. anyhow, If you really want to get the best of both worlds make an adjustable firepot.. make it out of thick plate with a telescoping side.. It can be messy to change all the time but can achieve what you are talking about.. If you really want to experiment.. You can make a coal ash and cinder lined pipe tuyere forge. The pipe has several hole on top of the pipe.. the clinker and ash is packed in around and above the pipe in the shape of the desired firepot.. Add salt to the cinder/ash mix as a binder helper.. You simply put the blower on one side and a plug on the other.. No reason to fill the holes on top as the only ones exposed at the ones not covered by the ash/clinker/salt mix though if you run a strong blast you will want to plug them.. . 3" pipe, space the 3/4" holes about every 2" IIRC.. up to the size of the firepot you think you would want.. FYI.. a firepots depth should put the Neutral atmosphere at or about the top edge of the firepot itself burning the air enough to make a stoichiometric fire zone at that height.. so, to much air will make it an oxidizing fire, not enough and it becomes a carbonizing fire zone. A shallow fire will mainly have an oxidizing fire as the fire has excessive 02 and the air above it adds to the effect.. One other thing.. Coke pieces inside the fire also dictate what kind of fire you are creating.. Soft coal fired forges are a skill set in their own right.. Fire management has a lot to do with the results achieved..