John in Oly, WA
-
Posts
932 -
Joined
-
Last visited
Content Type
Profiles
Forums
Articles
Gallery
Downloads
Events
Everything posted by John in Oly, WA
-
If you can, coat the whole blanket both sides and then put it into the shell wet. Then the second layer same way. And offset the seams. Also, forge welds and welds on a forge are two different things.
-
If you have some vinegar, you can soak your galvanized parts in it to remove the hazardous zinc.
-
New guy PID controller question
John in Oly, WA replied to partsproduction's topic in Heat Treating, general discussion
They do make high temp connectors for kiln elements. They're make of stainless steel, I think. A good crimper, like one of those electrical wire stripper/cutter plier-like tools and you're set. That's what I'd do, but I'm cheap. It'd be the simpler solution too. Save you from having to measure the length of the wire, determine resistance and all that. -
$519US for the printer. The resins can range from $25 to about $150 per 500ml depending on brand and type. FEP film can be bought in rolls for $15.22 per foot for 24" width. The printer needs a piece of FEP about 5" x 7", replaced about every 100 prints. I can't even guess how many prints per 500ml of resin. Too many variables.
-
The AnyCubic Photon. Mine works well. Others have had problems with theirs, so the suggestion is to buy one through Amazon for the easier return policy. And then keep in mind that it's not just plug and play. It took me a bit of experimenting to get satisfactory prints.
-
New Logo, feedback and help wanted
John in Oly, WA replied to Hans Richter's topic in Everything Else
Very nice logo Hans, Al! -
I guess there was more room in the world when these things were in common use.
-
A cute little hedgehog you have there, Das!
-
That sounds like a great event Glenn II. I love all that old steam power. Near Mt. Rainier, in my neck o' the woods, is an old train with a steam locomotive people can ride. It takes them up to Mineral Lake where they can get dropped off, have a picnic and then later in the day comes round again to pick everyone up and bring back to the station. Aus, sorry I dropped the ball there. I didn't see your question in your last post. That is a Case on the Steam Fiends logo. How goes the restoration project? I don't think my grampa's Russell had power to the steering, just the chain, but my memory is not clear on that.
-
You could hit the "Prohibited" link at the top of the ad and get it flagged for removal. That's what I would do if someone was using my photos. And then get all your friends to do the same. The more flags, the more likely it gets removed.
-
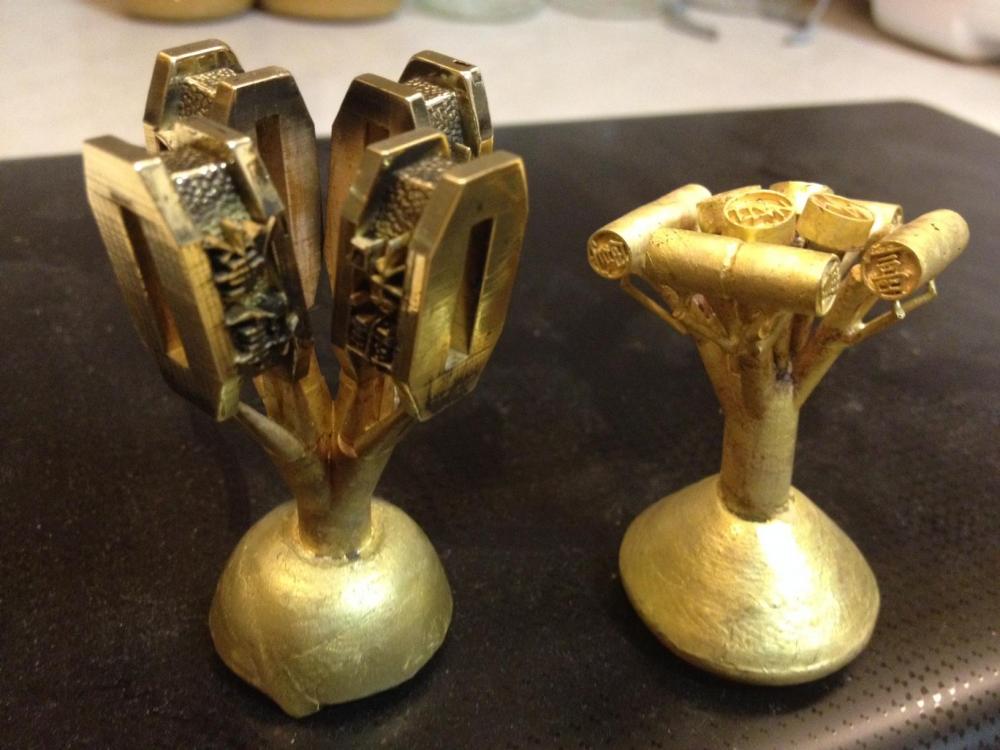
Thanks ! The 3D printing just amazes me every time I print something. And that resin printer has resolution to 2 microns, so it turns out nice smooth, detailed patterns "at home, in your spare time" LOL! On the pin sprue tree, you can see the vertical pins in the center. They are like the Corby rivets - one side threads into the other. My 3D printer was even able to print the threads, inside and out. I'll have to clean them up with a tap and die, but that's not bad for a home variety 3D printer. Stay tuned...more progress to come.
-
New guy PID controller question
John in Oly, WA replied to partsproduction's topic in Heat Treating, general discussion
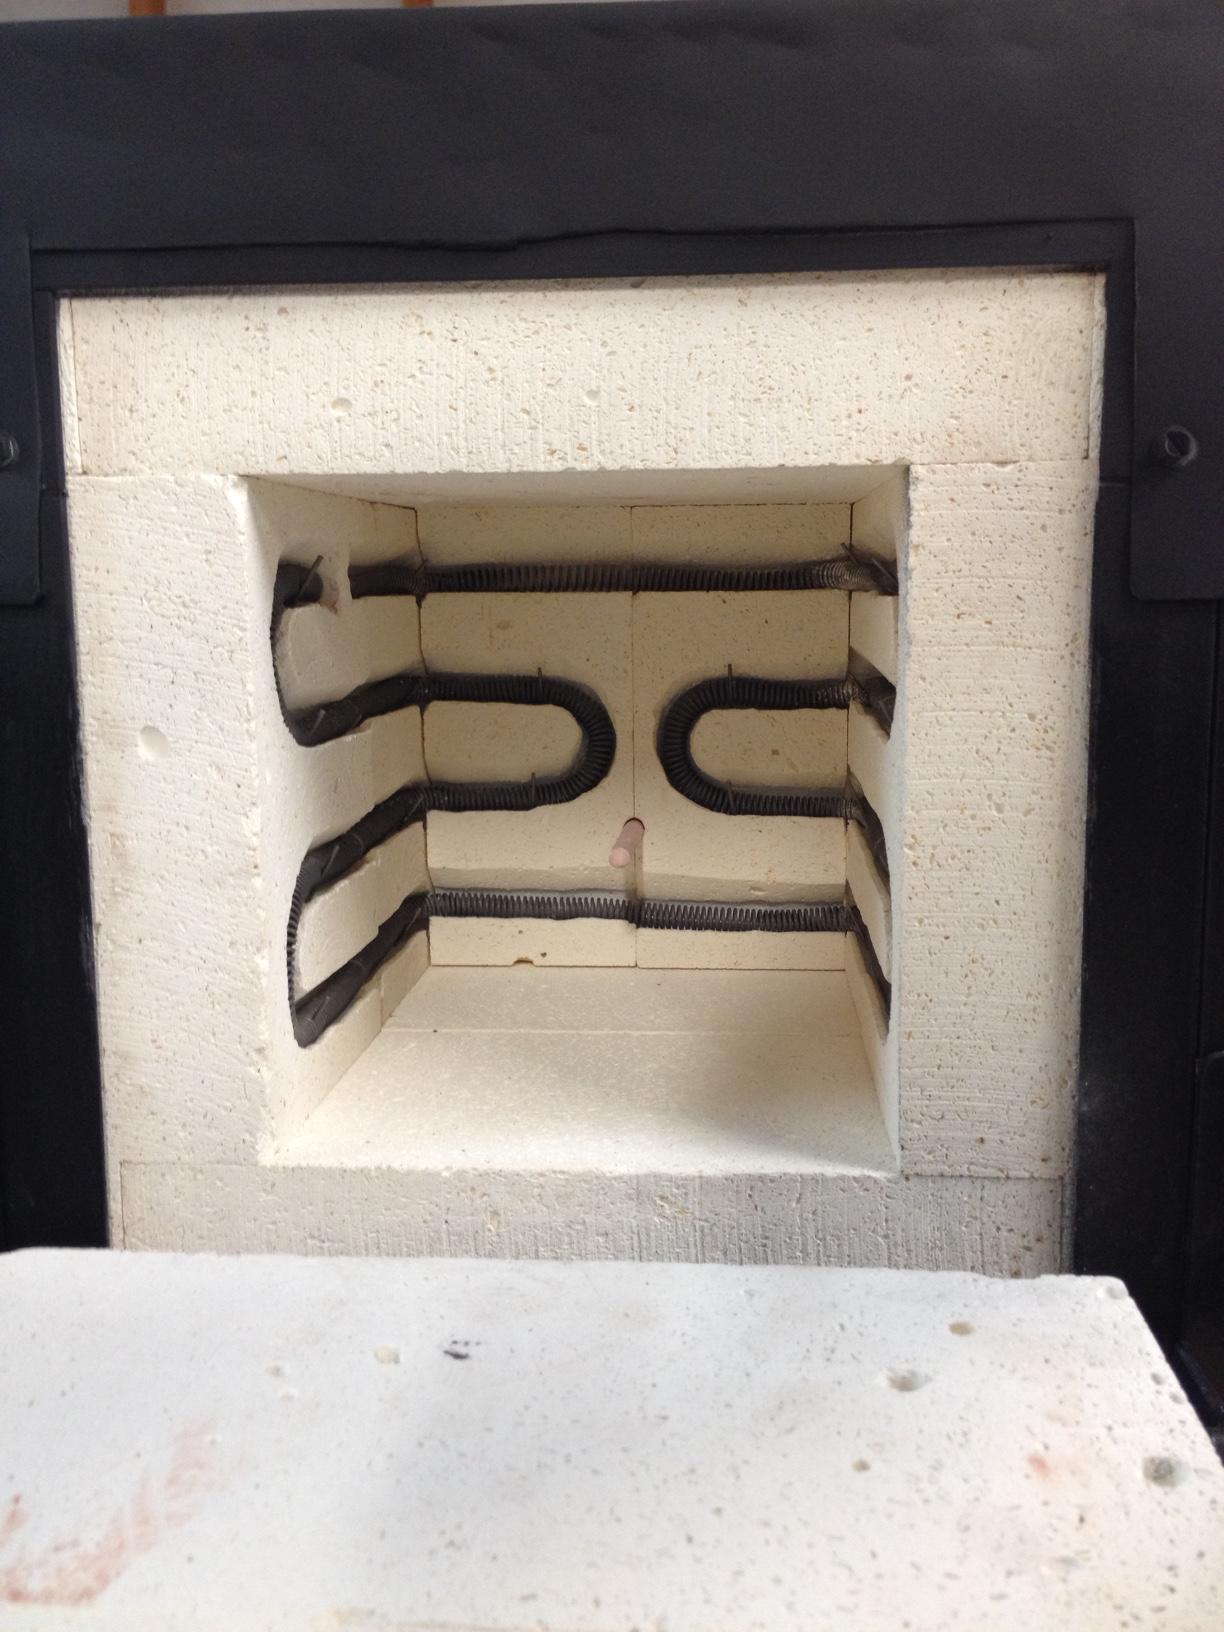
Well, with the Auber, I had to set the type of thermocouple in the parameters. The default is a K-type; I have an S-type. Then I set the display to Fahrenheit. Then to just get it started, you set a temp and it takes off. If you want to set a more complicated program of ramps and soaks, it takes some deciphering of the manual. What I've learned so far is it has 30 programmable steps and every change is a step. Each step has a start temp, a time, and a finish temp. So to ramp the temp up, you might set start temp=0, time=50(minutes), end temp=400. If you want it to stay at 400 for a soak period of, say 3 hours, the second step would be start temp=400, time=180, end temp=400. If you look up the Auber website, they have all their PID manuals for download (bottom left corner of their home page), so you could check it out before ever buying one. I bought the SYL-2352P model. It was the cheapest one I could find that has ramp/soak capability. For the controller/furnace you have, I'd just check all the electrical connections. Make sure you have continuity through the circuit. Don't know how to check the SSR, but they're pretty cheap on eBay. Also check the element for breaks. That happens sometimes. If you have a break in the element, and it's the coil type, you can just overlap the coils to make a connection and test it again. If that does it, you can make a more permanent connection with a high temp butt connector. -
Resurrecting this thread. Theo, I haven't put this blade project aside, though it may have seemed that way. I've been working on it steadily. The design I came up with has been a long steep learning curve to achieve, but I feel like I'm getting close. I had to build two high temp ovens - one for doing the wax (resin) burnout and the other to melt the brass for the guard and pins. Then I bought a 3D printer (filament type) with the idea of printing the guard and pins with a wax filament. Then I had to learn how to create the parts in a CAD program and get them to the printer. Had to modify the filament feeder and the firmware to print with the wax filament. Then it just wasn't high enough resolution for the details in the design. So I found a new kind of 3D printer that prints with resin and has the resolution to capture the details. Bought that. Then I had to learn how to operate it. Then I had to find a castable resin that worked with this printer, AND learn how to get successful prints with that (that alone took three months). Now I'm working on learning the sprueing of the patterns, investment casting, and burnout to get successful casts in brass. I'm getting there. I've been learning a lot and when I'm done I'll have my tools and the process in place to make more knives. So again, I thank you Theo for the opportunity to finish your knife and learn so much. Here are my latest castings - blade guard and pins. So now I'm on to getting the wood pieces fitted to the tang, solder the blade guard on, then drill the holes for the pins, and assemble the handle. Shouldn't take me much more than another year! LOL (Hopefully not that long.)

-
What did you do in the shop today?
John in Oly, WA replied to Mark Ling's topic in Blacksmithing, General Discussion
Thank you! It's been a long steep learning curve for me, but I feel like I'm getting close to getting successful casts. These two are blade guards and pins for a couple of chef knives I'm working on. -
New guy PID controller question
John in Oly, WA replied to partsproduction's topic in Heat Treating, general discussion
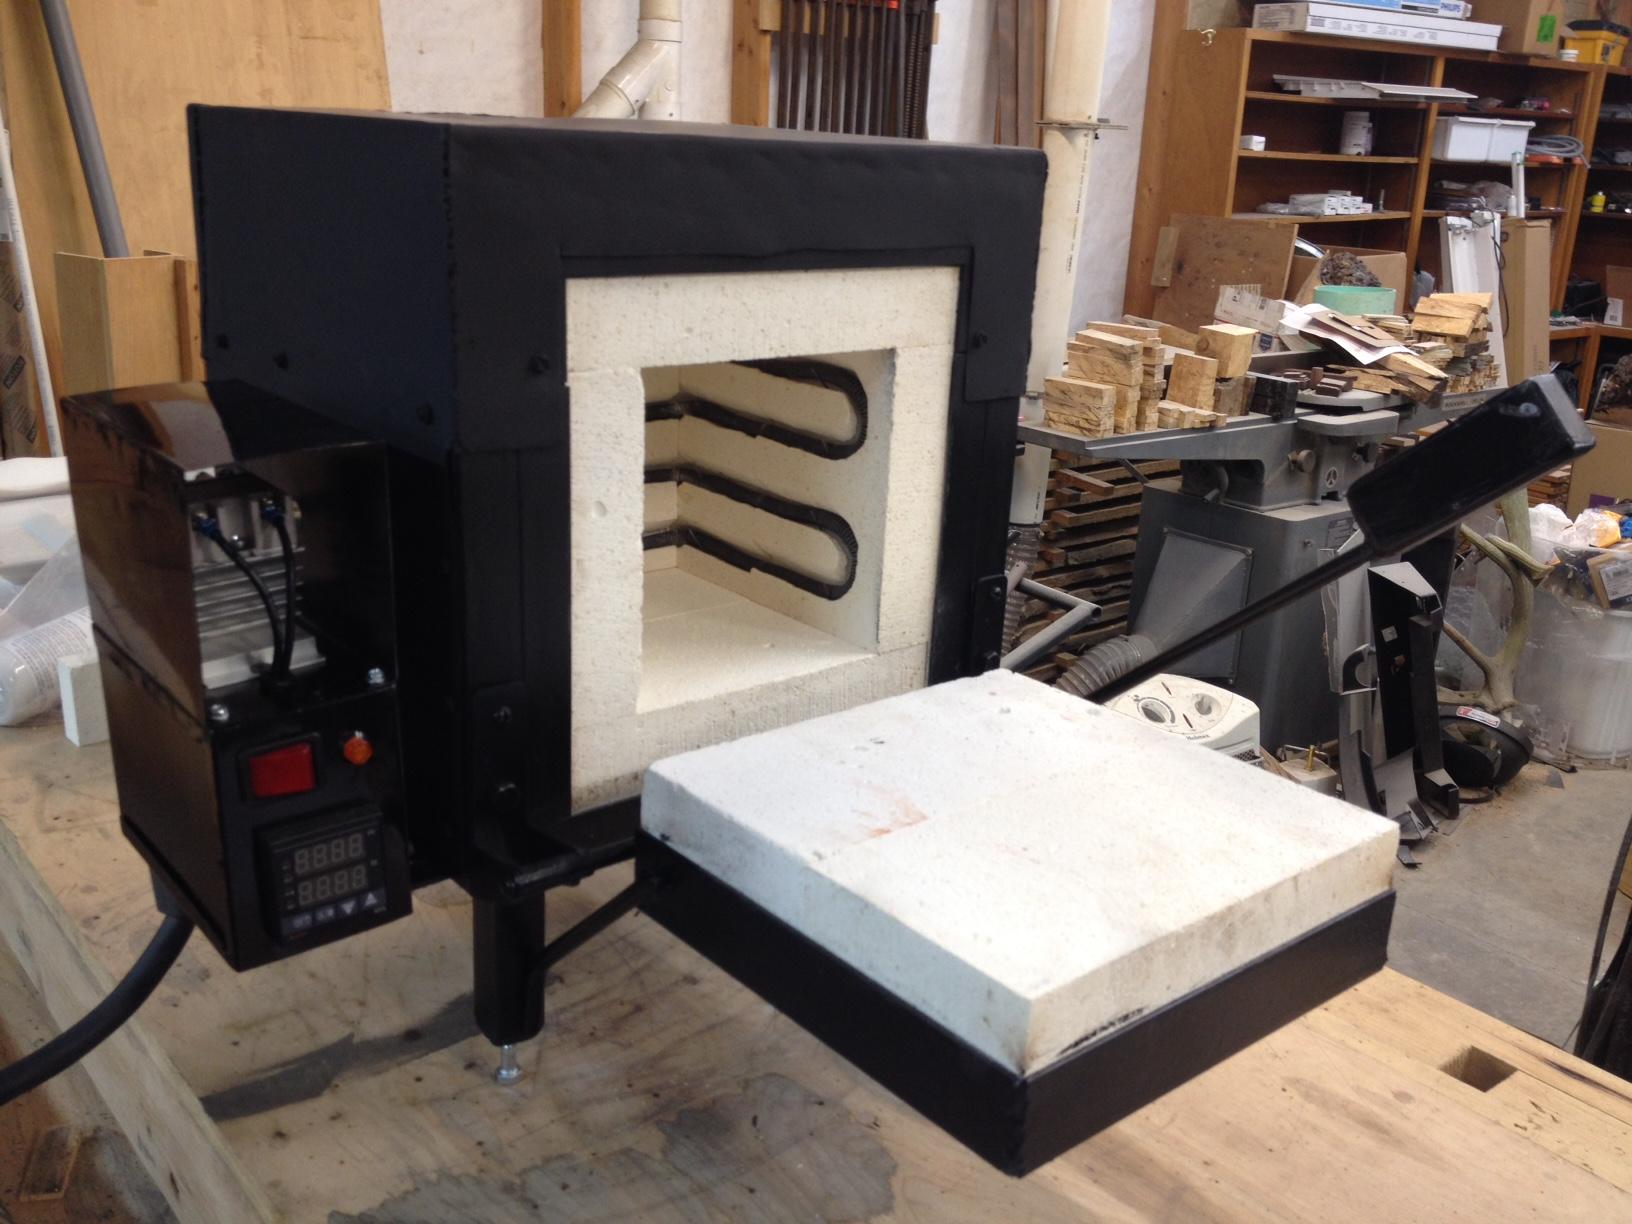
I'm learning to run an Auber brand ramp/soak PID with the little burnout oven I just built. The manual is barely decipherable to me, but I think I managed to program it with several steps for burning out my flasks for metal casting. I had to get into the parameters section to set the type of thermocouple and change the temperature read from C to F, and a few other things I can't remember now without the manual in front of me. But once the parameters are set, it looks like I shouldn't have to go back into that section again, so if yours worked once, I wouldn't think you'd have to mess with the parameters. Just the programming. But none of the PIDs I have (3) are as easy to program and run as the Bartlett V6-CF kiln controller. It's just a bit harder to wire up in the first place. -
What did you do in the shop today?
John in Oly, WA replied to Mark Ling's topic in Blacksmithing, General Discussion
Just finished up a burnout oven to improve my metal casting process. Still not happy with my casts, but they're improving.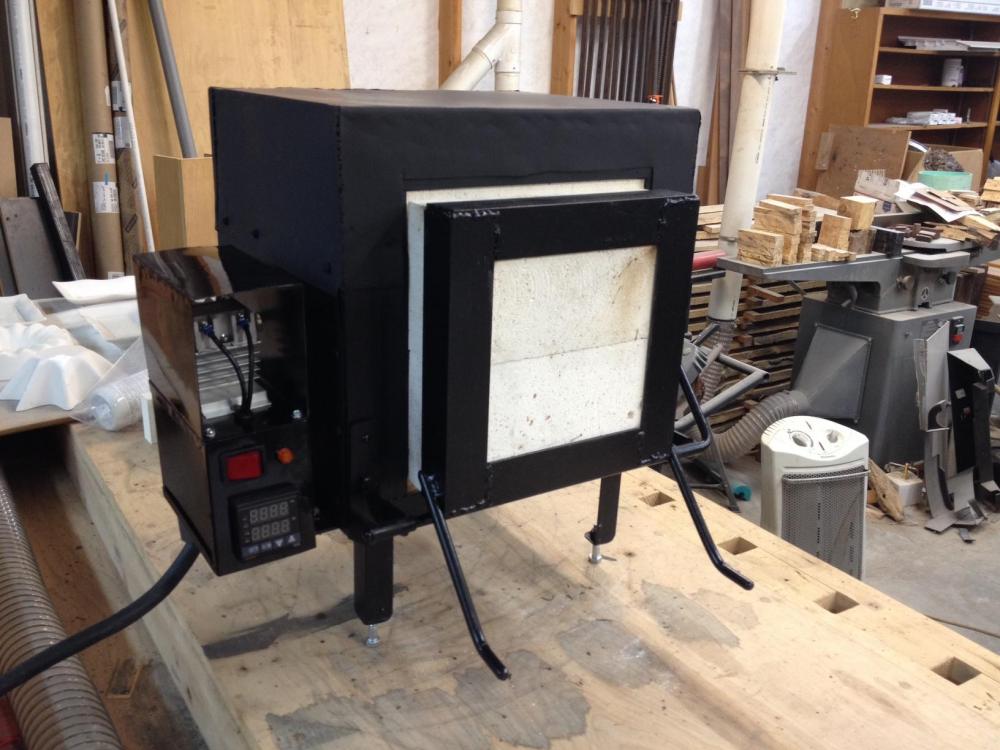


-
What did I bring home????
John in Oly, WA replied to KJack48230's topic in Anvils, Swage Blocks, and Mandrels
I wouldn't mill the face. Just hammer hot metal on it. It'll shine up and smooth out. -
School Guest Blacksmith Questions
John in Oly, WA replied to Steven511's topic in Blacksmithing, General Discussion
Where do you live/work? And can I come by after school and bug... uh, learn more from you? -
Show me your Bottle Openers!
John in Oly, WA replied to Arbalist's topic in Blacksmithing, General Discussion
Another tool to make - a sucker punch. That's just funny. -
Where to start? That is the million dollar question. And, I think, you've come to the best place on the web to ask it. An anvil is good to have. Look up the TPAAAT on this site (Thomas Powers' Applied Anvil Acquisition Technique) - and use the technique. Not just for anvils. Using TPAAAT, I found an 80lb Trenton for free. Hammers. Also good to have. Drilling hammer is a good starter. Cross or straight peen. Rounding hammer. Forge. Post your ideas and plans. There are a LOT of very knowledgeable people here who can help you tweak your plans so you end up with a good forge. And the list can go on and on... Welcome to the party.
-
Is the 2x72 belt grinder worth the upfront cost?
John in Oly, WA replied to Seabass's topic in Grinders, Sanders, etc
But bottom line for me with the value of a 2 x 72 belt grinder, much like my little MIG welder, I got along fine for a long time without one, but ever since having one, it's become one of the most used tools in my shop. Disclaimer: I fit into the "the more I weld (and forge), the better grinder I'm becoming" category." LOL -
Is the 2x72 belt grinder worth the upfront cost?
John in Oly, WA replied to Seabass's topic in Grinders, Sanders, etc
That is true Steve, just because a grit is made doesn't mean we have to use it, but I like to go up in smaller increments. I find it works better for my style -that's why I framed it in what "I would find useful." -
Is the 2x72 belt grinder worth the upfront cost?
John in Oly, WA replied to Seabass's topic in Grinders, Sanders, etc
In the "something we can make" category, you can make a 2 x 72 belt grinder. Many people have, including myself. I built one from a used treadmill I bought for $50 and two sizes of square tube - one fit into the other. Total cost was about $200 with the wheels, square tube, pillow blocks, pulley shaft and other odds and ends. Your belt deal is missing a few grits I would find useful - 80, 220, and 320 -
When testing your burner outside a forge, you NEED a flare on the end of the mixing tube to keep the flame from blowing off the end. The flare slows the gas/air mix down and helps keep the flame attached. Just slide a larger piece of tube or pipe onto the end of the mixing tube and you'll notice an improvement. Slide another even larger piece over the first larger piece and you have a stepped flare, and should see even more improvement. Everything you have so far looks good. Just need the flare.
-
I always wondered where I lost that thing. Had it the last time I left the tardis… on holiday, looking for an out of the way place/time to do a bit of hunting and gathering.