John in Oly, WA
-
Posts
932 -
Joined
-
Last visited
Content Type
Profiles
Forums
Articles
Gallery
Downloads
Events
Everything posted by John in Oly, WA
-
New forge from Romania - burner issues, lots of pics
John in Oly, WA replied to Onobeka's topic in Gas Forges
If you can get an 1/8" brass nipple, they fit well with the MIG tips. You can just thread the inside of the 1/8" nipple to fit the MIG tip threads and it's a nice smooth transition that doesn't block air flow. But the 1/8" nipple is not easily found either. -
New forge from Romania - burner issues, lots of pics
John in Oly, WA replied to Onobeka's topic in Gas Forges
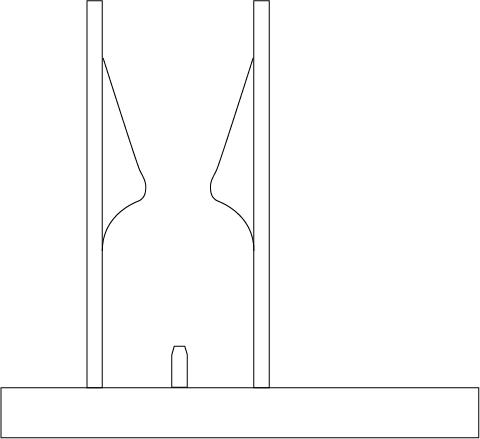
It seems to my non-expert eye that you have too much fuel, not enough air. In your first video when you put the grinder disk over the air intake and pull it back, you go from a large yellow secondary flame to a smaller blue secondary flame, but at full open you still have a lot of secondary flame. If you could have continued to pull the grinder disk back (if your air opening was bigger) until that secondary flame disappeared, then you'd have just a hot primary flame. The last video in the forge you have a large dragon's breath - extra fuel looking for oxygen to burn. And it looks like the fuel valve is only partially open. It would be interesting to see how the burner would perform if you made the head like a Frosty T burner with the reducing T and two air intakes. I wouldn't cut and rethread the nipples to move the flares up inside the forge. I'd just lift the burner and wedge a couple of pieces of metal between the pipes on top of the forge and the burner elbows. -
New forge from Romania - burner issues, lots of pics
John in Oly, WA replied to Onobeka's topic in Gas Forges
Does the burner run continuously outside the forge? If not, it might have something to do with the fuel tank or regulator. If it does, then... Do you have any ceramic blanket material you could pack around the top of the pipes on top of the forge that the burner tubes fit into to seal that off. That would eliminate one possible source of the problem. Then maybe stand up a piece of sheet metal on top of the forge between the front of the forge and the burners as a baffle to block any dragon's breath from entering the burner's air intake? Also, I would lift the burner up about 1-2cm to get the end of the flare up inside the brick. It'll help protect the end of the burner from burning up. -
I second Das' suggestion - plunge line jig - good thing to have.
-
That's what the crushed charcoal is supposed to help with.
-
If it were me, I'd make an attachment to mount on the sander that put a tool rest right in front of the lower wheel, then I could steady the blade while doing the hollow grind bevels. Another thing I did was make several blade shapes out of mild (read "cheap") steel and practiced with those. I just found freehand hollow grinds without a tool rest were too difficult for me to get as clean a grind as I wanted. Thomas is talking about the heating for hardening process, not the quenching part. You heat it inside a pipe that is sitting in your forge fire to get a more uniform, controlled heating of your blade.
-
New forge from Romania - burner issues, lots of pics
John in Oly, WA replied to Onobeka's topic in Gas Forges
I agree with your observation. I'm not one of the resident experts on burners, but the first thing I noticed, your air intake looks nearly completely blocked by fittings. Replacing the T piece with a cross (X) piece and moving the MIG tip back would certainly help. Gas won't slip out the air intake because the gas flow coming out of the MIG tip is pulling air in the intake. You notice in Frosty's T-burner the T does not have three equal diameter holes. I don't know if you can find a cross (X) piece with different sized holes. Might be better to find a reducing T and drill through it to mount the gas inlet like Frosty's T burner. -
Stump problems as an Anvil
John in Oly, WA replied to Strike's topic in Stands for Anvils, Swage Blocks, etc
As has been said, the stump is for mounting your anvil on. As has also been shown, there are many things (almost all of them metal) that can be used for an anvil. And from where you are at the moment, just about any piece of metal is going to be better than the stump. So, ASK AROUND, ASK EVERYBODY YOU KNOW, and even people you don't know (Look up on this site the TPAAAT method). Someone will have a piece of metal suitable for an anvil. And you might get lucky and find someone that actually has an anvil. I found my 80lb Trenton anvil this way, and I got it for FREE. They're out there! Got any scrap yards in your area? Junkyards? -
Very NICE! A high-tech forge press - bite switch! Wow! Wishing you success with it.
-
Need help getting a burner running (NOT for a forge)
John in Oly, WA replied to drewmyrtle's topic in Problem Solving
It's sounding pretty good. Should heat up some stir fry or carnitas really well. -
Soft Firebrick Retailer?
John in Oly, WA replied to Seirei's topic in Blacksmithing, General Discussion
Hi Billy, Clay Arts might have the K26 bricks, I don't know. I was on my way to Seattle Pottery Supply to pick some up and tried calling Clay Arts to see if they did, but they didn't pick up the phone, so I continued on to SPS. I know Clay Arts has Kastolite 30. Edit: I just checked Clay Arts website - they do have the K26 bricks. -
Need help getting a burner running (NOT for a forge)
John in Oly, WA replied to drewmyrtle's topic in Problem Solving
I look forward to seeing the latest version. Once it's in use ya gotta post pics of what you're cooking with it too! Mmmmmm carnitas! You'll probably have everyone here making their own bbqs with fancy blacksmithing scrollwork and custom burners. -
Need help getting a burner running (NOT for a forge)
John in Oly, WA replied to drewmyrtle's topic in Problem Solving
You coined a new term for a venerable problem solving process Frosty. "I just put my InGuinnessenuity to work and look what I came up with!" As contrasted with the opposite, Guinness induced stupidity, which I am completely failing to come up with a clever new word for. -
Electric Heat Treatment Furnace
John in Oly, WA replied to Buzzkill's topic in Heat Treating, general discussion
Your PID would be slowing down the heating as it nears the target temp too, trying to ease in to the target temp and not overshoot. That might play a small part in the timing. Overlapped with Latticino - what he said. -
Electric Heat Treatment Furnace
John in Oly, WA replied to Buzzkill's topic in Heat Treating, general discussion
After my surprising (to me) results it doesn't look like you're far off at all. If I remember correctly - I have a bad habit of doing all the research, learning what I need to know to build something, then once it's built and running properly, promptly forgetting all those details - I bought the 3000w, kanthal A-1, coiled wire elements from Duralite. -
Need help getting a burner running (NOT for a forge)
John in Oly, WA replied to drewmyrtle's topic in Problem Solving
Right. Extra fuel - secondary, even tertiary (quaternary?) flame. Unburned propane looking for oxygen to complete combustion. Or open up the area under the fuel pipe. Those wrenches the can is sitting on are blocking air from getting in. -
Oh yeah, they'll help you get in deep. Who knows what it'll lead to. And anvils and hammers are "gateway" tools - they'll cause you to acquire and make more - tongs, chisels, punches, hardies, guillotines, forge presses, flatteners, dies - the list is endless. LOL
-
That's okay. Just remember - blademakers don't make mistakes, they just make smaller knives.
-
Mini cast aluminium anvil
John in Oly, WA replied to Brasso's topic in Smelting, Melting, Foundry, and Casting
Nice mini anvil! I really like the pure tin idea too. -
Need help getting a burner running (NOT for a forge)
John in Oly, WA replied to drewmyrtle's topic in Problem Solving
Guinness induced ingenuity! Love it! The exhaust pipe might work. Set it on to see before mounting it permanently. And don't forget the tape the guy in the video added to the bottom of his mixing tube. You may or may not need it, but it just shows that the air to gas ratio does need to be dialed in, so you might play around with different amounts of baffling on the bottom of the mixing tube. Another thing to keep in mind - those yellow flames are a sign of carbon monoxide production. The cleaner you can get your flame (nice blue jet), the better the air around you will be to breathe. -
Electric Heat Treatment Furnace
John in Oly, WA replied to Buzzkill's topic in Heat Treating, general discussion
I fired up the oven last night and was surprised by the results. The oven's interior is 6.25" x 8.5" x 18". I set the control to heat it at max power to 1950f. It hit 1000f in 25 minutes. So I thought, gee, another 20-25 minutes it'll be at 1950. Nope! It took another hour and 50 minutes to get the other 950 degrees. Total time 2 hours and 15 minutes. -
Need help getting a burner running (NOT for a forge)
John in Oly, WA replied to drewmyrtle's topic in Problem Solving
You could put some kind of diffuser over the flame to make it spread out. -
Need help getting a burner running (NOT for a forge)
John in Oly, WA replied to drewmyrtle's topic in Problem Solving
So, you can't find 3" OD, sched. 40 pipe in your neck of the woods to copy the build in the video? What about taking some thinner sheet metal, like your piece of stove pipe/duct (preferably not galvanized), roll it up and wrap a couple of large hose clamps around it. Tighten them down to get it to the right diameter? Frosty's weed burner idea is a good one too. -
The suggestion to move the motor mount might not be difficult or could be next to impossible. I think I live right next to impossible. It was kind of a joke aimed at myself. People who know me laugh all the time because I'm constantly modifying just about everything I buy - but ONLY because it's just not quite right...I mean everyone should see that it's just not quite right and NEEDS to be modified. I can't be the only one that sees the obvious, can I?
-
Need help getting a burner running (NOT for a forge)
John in Oly, WA replied to drewmyrtle's topic in Problem Solving
The constrictor, I was thinking kinda like a rocket engine, but that gets a little complicated. I would think you'd need to reduce the diameter of your mixing tube whatever else you did. But you're making a cooking burner. And most cooking burners, BBQ's etc. have a lot of little flames. What if you cut a circle of flat metal slightly bigger than the diameter of the inside of your mixing tube (maybe your 3.25" ID one) and drill a pattern of small holes in it. Wedge it down into your mixing tube about an inch or so, and light the gas above it, so you'd have a lot of little flames? Or you get a piece of pipe like the guy has in the video and remember to tape off the bottom to reduce the amount of air coming in. It's all a balance of the air to gas ratio and the speed/pressure the gas comes out of the orifice.