Hofi
Deceased
-
Joined
-
Last visited
Everything posted by Hofi
-
Thomas Dean is speaking on a different rose made of ''one piece'' flat steell whice is the original 'rassian rose' the other rose that spikenife shows here is ''rob gunter rose'' I had students coming from Rassia and all of them new to demo how to forge a ''rassian rose'' here it meets with thomas story thomas I think you should send some information here hoe it is forged Hofi
-
Hello Mike You do not have to be ''sarcastic'' you could mail or call me and believe me I could answer you , now that you made it public and Jeremy is joining you I have to go public too without sarcasm. YES the Ozark anvil is similar to mine because I designed the anvil. when I started to built and teach the Ozark school I brought to late Tom the drawings of my anvil and agreed on the production of the anvil in the USA also agreed to shear the expenses of the mold that was 7500$ 50/50 % AND SPLIT THE PROFIT IN THE SAME PROPORTION. The first 20-25 anvils were called ''HOFI ANVIL'' and Tom had only his touch mark in small on the bottom right. Anvil no 2 is with me in Israel at my smithy. Anvil no 1 was caste from stainless steel and was broken from hammering, slowly my name ''Hofi Anvil'' was pushed down and later disappeared and the anvil became the Ozark anvil. Attached photo's of the ''writings'' on anvil no 2 For many reasons, Hofi Anvil, Hofi Hammer, Hofi dies for Sayha hammer, I terminated my relationship with him. Tom is gone now, and I am NOT going public again on this subject any more. If you have any questions, contact me directly. HOFI
-
Here are some pic's of my anvil johannes angele of ''angele maschinenbau'' is the world distrbuter of the anvil. He started to looke for re-sellers in the usa. Every anvil will come with a cd ''how to use the hofi anvil''
-
The best for basalt and granite are o1 and d2 steels ror basalt the d2 is tougher and you may get 60-62 hrc if properly heat treated and tempered. The forging temp' mast be acc to the ''book'' and one must olso normalise befor the treatmernt. The h13 will never come to hrc 60 . It is better to do all the heat treatment and normalising in a n electric furnece with good temp control. You may see the ''carving tools'' of noam angel in the membewr gallery they are made of d2 hofi
-
Safty glasses????????????????? Hofi
-
The photo's are of Hardie and Fork forged of rear lorry axle ,the same is done the jack hammer bits. They are all seat with the fuller HOFI
-
Frgot I have a small very importent improovment to the flue channel . The moment it will be instoled i''ll send you a photo. very importent on very colled wether !!! Hofi
-
VERYnice job Jr was nice for me also to see you first time in natueral size. Hofi
-
THANK YOU ALL for the interest in me !!!!!!!! I am VERY MUCH OK !!!! my place is 150 miles away from the rocket targets for now!! the smithy prodaction is going on as regularly ,now I''m working on a restoration of an old 200 years building that was an old wine factory and glass factory. LIFE IS GOING ON!!!!!!!!!! THANK YOU all AGAIN FOR YOUR INTEREST HOFI
-
Hello Mike First thank you for the compliment . Second my smithy is big and having many tools I think all togther more then 1000 so order must be maintained ,if a tool is not coming back to its place some times we look for it several month until by shear eccedent we find it . There fore all the tongs are pinted different and located on the wall in logic groups all the small tools are in cupbord sheves acc to the use the same with the hammers and different templates. this I started from day 1 if you delays this type of order it will be to late !!! this is my stat of mine .it saves lots of time and the smithy is allways under control. If I meet you one day in on of my classe I''ll just be HAPPY HOFI
-
I stor my chisels, drifts,punch in steel drawers onsheves . Every od is heving its drawer .when having a job take the drawer to the anvil when finish put it back in order all the tools are grind and resdy for the next operation.on this steel shelf i also stor all the small jigs and specil tools i forged to help production i have there drawers to acomulate tools from 5/16''-1 1/8'' hofi
-
The use of a press for upsetting and more 1032 1934 1020 1030 As for upsetting with the power hammer I recomend to upset O N L Y with the limit of the air hammer daylight !!!!!! If you''ll take the bottom die off you are endengering the hammer !!!!!!!!!! If by sjear mistake you 'll forge beyond the hammer daylight limit the hammer will hit the bottom holding flange and this is a dammege that is very hard to repair. please DO NOT FORGE BEYOND THE HAMMER DAYLITE. HOFI
-
Nice work There is another way to hold the fram in place by riveting in 4 places two down and two up light flat leaf spring a bit crowned and then push the fram in place and the 4 leaf spring will hold it in place. HOFI
-
IForgeIron Blueprints Copyright 2002 - 2009 IFORGEIRON, All rights reserved. BP1058 Punching Holes on the side by Uri Hofi Forging a 5/16 inch hole in flat 5/16 inch x 3/4 inch on the side. Forge the flat steel on the round bick of the anvile when the flat is *standing* until u get on the bottom the round shape of the anvil. And the width of the land is a bit more then 5/16 inches. Turn around and with the 5/16 inch punch, punch the hole to the anvil as deep as you can. . Turn around and punch out from the other side. The finished holes.
-
IForgeIron Blueprints Copyright 2002 - 2009 IFORGEIRON, All rights reserved. BP1057 Punching Holes on the Diamond This is part four of a five part series. by Uri Hofi Punching hole in 5/8 inch square on the diamond. Forge the square steel on the round bick on the diamond from on side and. Get the roun bick pattern on the bottom tns right line above until you have a land of a bit more then 3/8 inches . Turn around and on the center of the land punch dowen to the anvil. Turn around once more and punch out. One can see the punch out. The finished hole.
-
IForgeIron Blueprints Copyright 2002 - 2009 IFORGEIRON, All rights reserved. BP1056 Punches This is part three of a five part series by Uri Hofi More use Eye type punching. This form is used as 1) decoratin 2) joinery 3) the start of a human face (the eyes) Fritz Kuhn used it a lot as frame joinery. More agressive one.
-
IForgeIron Blueprints Copyright 2002 - 2009 IFORGEIRON, All rights reserved. BP1055 Punching Holes Part two of a five part series by Uri Hofi System two Punch the hole again as deep as we can. This time we do not turn around we go on from the same side on a suitable prichel hole of the anvil. This way we have very sharp knife like rim around the hole and the steel is bent out of the flat dimension. We have to hammer the steel and flatten. By this the hole is closing and get smaller. I personally prefer the former BP1054. We have to re punch again and clean the hole. One can see the piece of punch out. If we want to make the hole biggler heat again and on the right prichel hole hammer the punch deeper according to the need.
-
IForgeIron Blueprints Copyright 2002 - 2009 IFORGEIRON, All rights reserved. BP1054 Punching Holes Part 1 of a 5 part series by Uri Hofi Me near the anvil. The tools- hammer, anvil, 5/16 inch and 3/8 inch punches, chisel, double fuller. The steel-- flat 5/16 inch x 3/4 inch and square 5/8 inch x 5/8 inch. Gas forge. Smearing the tools with moly/graphite lube. The ''set'' is ready. System one The steel must be max heat because we posh in the steel to the anvil. With the punch the steel must be as soft as possible. The punch 3/8 inch. Punch from one side to the anvil as deep you can. Turn around see the dark mark. Put the punch on the certer of the mark hit one time as hard you can. Hit once more but this time the punch is a little tilted to get the clean cut. And you get the hole ׂ(the punch out is falling down)
-
IForgeIron Blueprints Copyright 2002 - 2009 IFORGEIRON, All rights reserved. BP1043 Curtain Rod or Bar Holder by Uri Hofi A curtain bar holder B roof nail C drawer handle This Blueprint has 3 sections Up the roof nail Middle the drawer handle Bottom the curtain bar holder We start with a ''curtain bar holder'' The three elements are based on the same form for different use Me. The steel in this case is 3/8'' round. The set--- anvil, cast hammer, forge, rosebud, hardie and vise Cut hit the hardie in a way to get a small point as shone above. The importance will be explained later. Flat 3-1/2 inch long on the anvil with the hammer to 5 mm (a bit more then 3/16 inch). Forge this form when the hammer is a the ired out of the anvil. Get a 5/32 inch neck. Pot the form ''standing'' on the anvil when the step is out and push the step to the edge of the anvil and forge with the pein of the hammer to get the for me (remember the small point when cut ,because of this type of cut ,when forging with the pein automatically we get the rounded form). Local heat with the rosebud. And hammer to wards the vise to get nice 90 degrees. Hold in the vise 1/8 inch out of the jaws. Correct the corner. Heat the corner in the forge. On the round bick with the hammer pein forge to get a nice corner. Form a hook on the point round bick of the anvil. Cut on the hardie and prepare for the next one. Forging the point. The finished ''curtain bar holder''.
-
Have a look at BP's 1022 1023 1024 1025 1050 1051 1003 even the last one on 1 3/4'' steel can be done by hand have luck and happy forging Hofi
-
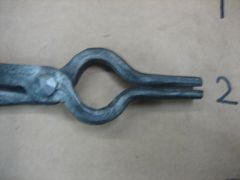
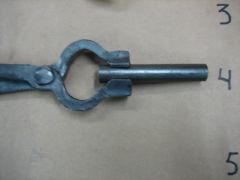
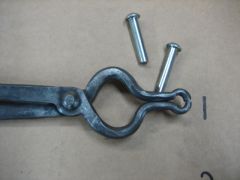 pickup tongs to hold small ellements (rivets) forged of 5/16x3/4'' flat steel
 -
-
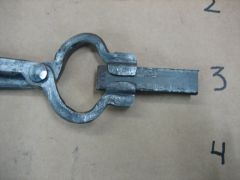 tongs to hold tlat 5/16x3/4'' forged from 5/16x3/4'' flat steel
 -
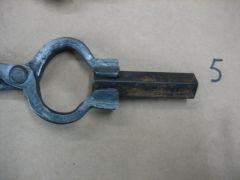
 to hold round steel forged from 5/16x3/4'' flat steel
 -