

Anachronist58
-
Posts
1,746 -
Joined
-
Last visited
Content Type
Profiles
Forums
Articles
Gallery
Downloads
Events
Everything posted by Anachronist58
-
Neat idea for the insulators. Cross looks very nice.
-
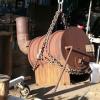
I believe Mr. Stevens is right. Before I read his post, I thought, 'Beam Holder for a Hoist'?
-
Only Blacksmiths will be happy on the day that it finally starts raining anvils! Ivan, you should know, eh?
-
Fantastic work. Nice build synopsis.
-
In our thoughts and prayers, Robert and Sheila Taylor
-
 how much is the seller asking? 'Rebound' is an important test. Welcome aboard - you have picked the right place - many others more knowledgeable than myself will be lining up to answer any questions you might have.... Robert Taylor
 -
Acquired some rail track.... Now what?
Anachronist58 replied to Everything Mac's topic in Blacksmithing, General Discussion
Just want to put my marker on this thread, til I can bring some 'meat and taters' to this subject. Was out in the 'shop' a few days ago, using a 6" section of 111# rail to swage and re-purpose some automobile tire chain links. Now I understand that some legacy rail in the UK may be of the 'Bullhead' configuration, where the foot is as mentioned by GNJC, above. Mine, is the wider, flat base (foot) type. The next thing I will do to my piece will be to follow GNJC's lead, but split the rail in half horizontally through the midpoint of the vertical web to make two 'T' shaped post vise anvils. Radiused the edge of the foot, and lying on its side in a vise, spreads links nicely. My Process evolved as I took the rail over to the 3 ton Famco rack and pinion press, flipping the rail to use its various profiles. It really can be the 'poor man's swage block'. The snow gripping section of this particular chain set is made from links that are hard as the hubs of Hades. Took several smart strikes to shatter a link (wear eye protection) on the rolling surface of the head. FYI, it left no mark whatsoever on that face. Each and every one of you who have posted here have inspired me to do a picture heavy project on 'Sectioned Rail Segments as Tools' - but for now, it's only bluster and braggadocio in the face of all the competing responsibilities of life. -
Very happy news. Ought to be tough to impossible to 'throttle' those last three knives out of the thief, but it's worth a try, eh?
-
Thanks for the Image/Info, Hillbilly. BIGGUNDOCTOR - Ouch! that hurts. I have three Walker-Turner drill presses that fell to the scourge of the blue tarp (I have no garage, they Will be restored). Sometimes it just gets away from us.
-
Beautiful Stand needs better fossil.
-
What make is that, Hillbilly? Looks Nice. Enjoy, and Work Safe. Post closeup of Head?
-
First day back in the Shop
Anachronist58 replied to Bad Creek Blacksmith's topic in Blacksmithing, General Discussion
Paul, may you steadily regain your strength and vigor, pace yourself, and you will be in our thoughts and prayers..... Robert and Sheila Taylor -
Beautiful work, divermike.
-
iconicmuffin - Your command of American English leads me to believe that you have completely understood every post laid down thus far. I think it is clear to you from the preceding posts that casting, or now forging your own anvil is nothing more than pie in the sky, and you are simply having fun toying with (me). As you have stated, you have absolutely no experience, and yet you are able to make "calculations" on the feasibility of your grand Quixotic aspirations. I am feeling somewhat dizzy from my several turns around the Mulberry Bush. In the event that I have misread and misinterpreted your intent, I apologize heartfeltedly (sic) to you and all who read this. After all you might well be a Genius Savant, in which case, I bow to you. Robert Taylor
-
Click on "Forums" (at the top of this thread). Look under the Section "Blacksmithing". Click on "Foundry and Casting".
-
There you have it.
-
One may grind tungsten carbide with silicon carbide, but I'd rather eat dirt (takes forever). I routinely used resinoid bond diamond wheels. One may purchase a Diameter 6" x 1/4" wide economy general purpose diamond wheel for ~ $100 from MSC Industrial Supply, ENCO, etc. the wheels require special care when mounting; I don't advise breathing carbide dust, and it is easy to ruin that $100 wheel by chatter when grinding off hand. A metal bonded wheel might mitigate that *a little*. Others here may know of alternate products? Yes, BIGGUNDOCTOR, I share your fascination with our inner workings, but I hope that will be your last look for a long, long, time. I somehow still have the use of BOTH trigger fingers.
-
BIGGUNDOCTOR, really sorry about your mishap. After handling solid carbide end mills, etc., for years, I know how that can happen in a blink, then you are trying to stuff your parts back in.... :o And you are so right - one cannot forge carbide inserts into a blade. Carbide powder is sintered (pressed) under high pressure (over-simplified) to form inserts. If one were to hammer on a red-hot Insert, I imagine it would shatter explosively, whilst possibly leaving a nice dent in the anvil.
-
I reckon those fellows could reduce my Soderfors 88#'er to rubble in a fourth the time it took them to decomm that "ASO". When I acquired it, the face and edges were blown out by much smaller mislaid hammers. I have yet to add another ding to the carefully salvaged face (4# hammer). I like how the striker in the foreground starts getting tired and smacks one to the camera at 1:59........
-
I don't recall it happening to me more than once, but has anyone out there had to throw a blanket over the Customer's head to keep Him/Her calm whilst you do the job? DSW, excellent picture and story.
-
Casting 9mm rounds
Anachronist58 replied to jok3reod's topic in Smelting, Melting, Foundry, and Casting
I have seen a study wherein the .50 slug being fired from a shotgun has the most potential for downrange (open air travel) "collateral" damage/wounding, as it will travel farther than most other rounds excluding, of course, .50 cal rifle, making it a poor choice for a home defense round. I have strongly advised against 00 Buck for apartment dwellers for the same concerns. -
Do you do models first?
Anachronist58 replied to Keganthewhale's topic in Blacksmithing, General Discussion
I am strictly an amateur at this, Yesterday, I made my daughter a heart-shaped garden ornament for her birthday. I made a chalk drawing on my big steel work table. after several tries and partial redraws, I got it to look 'just right'. I then laid a piece of heavy string (works like a 'tape' measure) on the pattern, so that I could transfer the lengths of the curved and angled features onto the straight 1/4" thick x 24" long squared bar that would become the ornament. It really helped, since once things get hot, the steel has its own ideas, and I could lay the hot work directly against the drawing to keep things going the right direction. Mark Aspery's Grille Project video explains one type of layout process very well, I think, -
A press in its most basic form consists of two parts: A Ram, and a stationary Anvil, or Die. One advantage to a normal press is its vertical orientation - you can set you work and/or dies on the Anvil, and they don't have the tendency to fall on the floor, as they would between the jaws of a horizontally oriented vise. So the main challenge to Vise Pressing is to keep your Work and Dies from falling on the floor. As illustrated in Mr. Hofi's BP1011, the Die holds itself in place, leaving two hands free to actuate the press (vise) and hold the work. This design is elegant and should be referred to, to maintain simplicity. Sometimes it's necessary to cradle the work as well. With 12 Ga. Electrical wire, or even baling wire, one may quickly fashion a "basket" or "cradle" that hangs off the vise jaws in the same manner as described by Mr. Hofi and Mr. Powers. But think of hanging from four points, as well as three. Center your work directly over or as close to the axis of your screw whenever possible. many times you will have to work off to the side, as in Mr. Hofi's illustration. Does your vise have removable jaws or is it a post vise? If you do offset work, will the operation force your Dies to shift out of position? now things can get hairy. Many operations can be handled, just by hanging pieces of metal on the jaws. I have done all sorts of press work in a nice, beefy vise. You can cut sheet metal with scissors, but tin snips work better, and an electric shear, even better. I love my three ton arbor press, and some day (sigh) I will have a nice fully powered hydraulic press. But I still find myself doing press-work in the bench vise. Keep it simple - the moving jaw is the Ram, the stationary jaw is the Anvil/Die.
-
Iron The Repair of Wrought and Cast Ironwork
Anachronist58 replied to John B's topic in Book Reviews
Mr. John B: a great pleasure to read, I hope to get back to it soon and take in every word. Thank you. Mr. Powers, I chopped the second link in my above post at the same spot as you did - a tantalizing Reading List worth looking at. -
Iron The Repair of Wrought and Cast Ironwork
Anachronist58 replied to John B's topic in Book Reviews
Try This. I tested it in Post Preview, and it worked. Long String Links are touchy and brittle some times. http://www.ahg.gov.ie/en/Publications/HeritagePublications/BuiltHeritagePolicyPublications/Iron%20-%20the%20repair%20of%20wrought%20&%20cast%20iron.pdf Alternatively, this may be sturdier, and it's a short hop to the PDF from here. http://www.ahg.gov.ie/en/Publications/HeritagePublications/BuiltHeritagePolicyPublications/ Robert Taylor