

anvil
-
Posts
3,246 -
Joined
-
Last visited
Content Type
Profiles
Forums
Articles
Gallery
Downloads
Events
Everything posted by anvil
-
 Me too.
 -
i think Wolf Creek Pass has been tamed a bit since C.W. Mcall and his chicken run,,, But it still will take your breath away as you come down from the continental divide. Now Red Mountain pass,,,

-
excellent!
-
Hardness and toughness are just opposite ends of the same beast. The same as hot and cold. There are a few tool steels that the specs indicate tempering twice. I don't believe any state temper thrice. Hardening more than once does nothing except take time and burn fuel. Normalizing is the step in heat treating where you deal with grain growth.
-
Lol
-
I call it a pretty picky personal choice. If I were doing the work I'd be glad to do either for a time and material bid.
-
A Way to Guesstimate Material Loss to Scale
anvil replied to 4575wcf's topic in Blacksmithing, General Discussion
If you are doing general blacksmithing, then the answer is yes, you can figure your starting material. You did it pretty well on your axe. Its called "equivalent weight", or equivalent volume. Theres a lot of folks that believe you can only gestimate your material. Not so, you can be close enough for any material bid, if not right on the money. Proper fire control and hammer control are important, but even so, if you practice this setup and use it as your guide for forging, your material bid will be correct. Works for railings and gates to trivets and "S"hooks. You need to know one term, besides equivalent weight, and that is "transition". Thats where one thing changes to another. Say you have a 1/2" square bar with a 2" taper at the end. Where the square ends and the taper begins is a transition. Take your drawing and locate each of the transitions. Now calculate the weight(pounds per foot, oz per inch, whatever) for each and add them together. You now have the total weight of the parent stock, the material needed for each piece, and can center punch your parent stock where each transition is. all ya need now is a little math. Heres a simple example. I have a drawing on my table. it is 12" long and has a 2" single sided taper on one end. What length parent stock do I need and where do I mark the transition on my parent stock? The taper is a triangle 1/2" high and 2" long. Now I go to my steel weights tables and find out what 2" of 1/2" square weighs and divide by 2. Since these charts are to 3 or 4 decimal points, I'm pretty right on the money on what my start length is to get my taper. 1". So my parent stock length is 11" and the center punch for my transition is 1" from the end. Mark 2" on the heel of your anvil and forge from the center punch until its 2" long. If you got your length, and were right on your centerpunch, you should be pretty close to right on the money. There is no compression and scale is not a factor that will change this setup unless it takes you 8 or 10 heats to forge out the above example instead of one or two. If you keep good notes on this,should say a hinge need to be replaced, your notes and layout drawing should enable to match the original. Heres a pic of a complex hinge. the parent stock layout,shop drawing and the nearly finished test piece.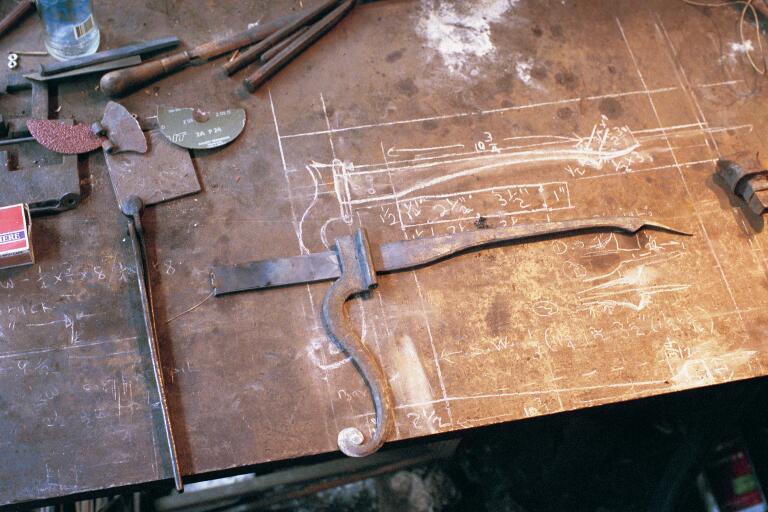
-
Using engine valve lifters in forging
anvil replied to The1RadFox's topic in Knife making Class General Class Discussion
Since you are new at forging, and these are free, Just go for it. one at a time. I bet by the time you are done, you will know a lot more than you know now. -
I figured out resize. Feel free to delete the one above. Heres What I meant to post. Sleeping Ute closeup. The other is Sleeping Ute and Mesa Verde on the left.


-
My sunrises are blocked by the San Juan mountains, but my sunsets are spectacular. Mesa Verde and the Sleeping Ute. Twice a year I take picw when the sun is setting at a particular place. No light pollution, so great stars as well. edit; seems my smarter than me phone and computer are acting up. not the pic i wanted to send, but hey...
-
How to forge a flanged mace without welding.
anvil replied to Azael's topic in Spears, Arrows, Pole arms, Mace/hammer etc.
No argument on my part. However I was only meaning this tool. The rivet head on the top and splitting wood by hand with a maul are the reasons for my comment. When I figured in the rivet, I thought a metal handle with a mortise and tenon joinery at the top would explain the rivet. Also I did a quick google which brought up some poor pics and the handles looked metal. Heres another possible solution. And in a sense, it's a reason for a double socket. Perhaps the fins are keyed into the outer socket. The inner socket is the lock and is a socket with a solid top and tenon. Slide the inner socket into the outer socket. Twist the inner socket to align all slots, then put the fins into the now open slots of both sockets. Now twist the inner socket back to lock in the fins. If the "studs" (locks) are tapered sorta like a cam, It would even "cam" the fins to the top. Peen the rivet to secure the whole shebang. If the bottom of the fin key had a hook on it, when drawn up to the top, it would lock the bottom of the fin into place. Insert and secure any handle of choice. From the pic, the fins don't look forge welded and if forged from a solid piece, the transitions look very prone to cold shuts. I can't figure a way to have each fin be one piece and extend out both sides, and I can't see any other reason for a double socket. It also means that if the fins got trashed in combat, you could pop the rivet and unlock the fins and replace them. Forged and filed and far simpler than a 9th century lock. No matter what, a cool puzzle. -
nice work
-
Forge them yourself out of 2" round or square. Make them from a tool steel you know how to heat treat. I've made acorns out of mild steel using 2" square.
-
How to forge a flanged mace without welding.
anvil replied to Azael's topic in Spears, Arrows, Pole arms, Mace/hammer etc.
This is a tough one. I think the mace/flanged part is forged and filed from a solid piece. Then it is drilled. I also don't think the handle was wood. It seems if it was, it would be a single use weapon. The truth is, for every solution I can think of, I can think of a dozen reasons why it wouldn't work. -
To repair the cut off face and the horn, a torch, bailing wire and a grinder works great. With care, you shouldn't mess up the heat treat on the face If you want to tackle the face, here's is what I consider the best procedure and proper rod https://www.anvilmag.com/smith/anvilres.htm
-
I'm curious what your situation is. Are you in a business situation, hobbiest,blacksmith, or machinist? Got employees or is this a one man operation? Are your tools made by you or are they purchased? What do you mean by heavy drop hammer and what is a "lighter handle with a hammer for control"? What kind of material are you working on? Steel, brass, wrought iron? What weight are you punching? 1/8",1/2",1"? What are you punching? Hot punching, cold punching? My daily driver is a 2-1/2" cross peen. I make my own struck hand held tools. Works for me for most situations. As a general rule, hammers are softer than anvils because it's easier and cheaper to dress a hammer. Hand held struck tools are softer than hammers because it's easier and cheaper to dress the struck end of hand tools than a hammer. This also prevents chipping of either tool. I temper my struck tools to a blue or grey. This protects my hammer, prevents chipping and minimizes mushrooming.
-
Stands stands stands!
anvil replied to TWISTEDWILLOW's topic in Stands for Anvils, Swage Blocks, etc
Thanks for the input. Frosty hit it on the head. I have a setup on my Willys pu that I thought might work. Its also the setup used for a pto driven front mount snow blower. This tractor stuff, and especially hydraulics, is all pretty new to me, so I'm in the planning stage. The willys pto mounts directly to the main driveline and is a chain drive that changes the direction to the front. Then I installed two carrier bearings(hope i got the correct name) that support the long drive shaft that connects to the winch. I'm guessing this will keep the driveshaft from trashing. I came across a pto driven snowblower a few daze ago on line, but I have not found any info on how it changes direction, nor an aftermarket bolt on unit to do what I want to do. I have a couple of pto driven willys winches that I used to do the log work on a log house, so I know they will do the job. I just need to connect it to the tractor.,,, just,,, Whenever I hear a client say "just", I triple the price and run for cover! My project is to build a gin pole setup run by pto and winch for lifting logs and a heavy duty come along to raise and lower the pole. I have a bobcat quick release for the loader and thought I could build an attachment with a swivel point that would support the pole. The attachment would have two manual outriggers. The heavy duty come along would be between a cable from the back of the tractor{backhoe) to the top part of the gin pole. With the outriggers and the cable I have 3 points for stability to secure the gin pole, the come along to raise\lower the gin, and the winch to raise and lower the log. I have forks, but I dont think the hydraulics are powerful enough to lift the logs, nor will they raise the log high enough as the walls grow in height if they have the power. I don't know how the pto output connects to the main driveline on my tractor. I'm guessing it is similar to my willys, but maybe not even close. I'm sure the engine has all the power I need where the hydraulics may not if thats where the pto connects. I did not know there was a hydraulic winch. Thats interesting. The loader has two sets of hoses. The ones for dumping the bucket could be used for the hydraulic winch. I understand the need for gear reduction, but never dealt with it in a situation like this. I dealt with this on my giant bandsaw. Basically I figure i need the pto rpm and the rpm used for my winch, then somewhere between the pto output and changing the direction to the front, I have a gear reducer. Ive seen right angle gear reducers available, and guess this is a solution. Perhaps there is a better one? My willys is pretty slick. With an over drive, high and low range, and the transmission, I have more gears than carter has liver pills. I dont think this is possible on the tractor. Lol maybe i can plumb in a t-90 transmission and transfer case and be on familiar ground. Its early in the winter, so this might end up in the scrap pile, but hey, its a long way to spring. What do you think, Frosty, Think it is doable? -
Blacksmith Basket twist poker challenge... Video
anvil replied to jlpservicesinc's topic in Blacksmithing, General Discussion
Nice. I like your twist! -
Stands stands stands!
anvil replied to TWISTEDWILLOW's topic in Stands for Anvils, Swage Blocks, etc
I'm thinking of adding a right angle gearbox to the rear pto + driveline in order to have a front winch. Any suggestions? -
Stands stands stands!
anvil replied to TWISTEDWILLOW's topic in Stands for Anvils, Swage Blocks, etc
I got one about a year ago. I put a bobcat type quick release on it and got a set of forks. Keeps getting better. Lol, and it matches my chainsaw... -
Stands stands stands!
anvil replied to TWISTEDWILLOW's topic in Stands for Anvils, Swage Blocks, etc
Lol, cant beat an orange tractor! -
Merry Christmas one and all!
-
Here's a suggestion if you have the new model LG with a removable sow block and a machinist neighbor willing to trade. Have your macchinist mill the key slots on the sow block and bottom die to match each other but be mirror images. Use two keys, both longer than your dies. Now you can tap one key loose and the opposite tight and you will move your die off center and still be parallel with the top die. Now you can do half face blows with your LG. And a Merry Christmas to you and yours!
-
I had my anvil face milled flat
anvil replied to Trilliumforge's topic in Repairing and Modification to Anvils
Altho I agree completely with not milling the face of a two part anvil, you can weld on a new face out of anything you choose. However, a perimeter weld is not a good solution. The reason is that no matter the material you use, with use, it will draw out. Perhaps not much, but it will. When it does, you begin to lose efficiency to vibration and your perimeter weld is put under lots of stress. You need a full weld between your new face plate and the anvil itself. A plug weld is the answer to this. No matter how you weld it, perimeter or plug, you will have to heat treat the new plate. Since time and material between any of the three methods, Gunther, plug, perimeter, are pretty similar, I'd go for the Gunther method hands down. Lol, it's never too late til you start the process. Altho I'm in 100% agreement with Thomas on repairing an anvil face, not so with rounding the anvil edges. I treasure "Practical Blacksmithing" as a source, but I do recognize that many of the "posts" must be taken with a grain of salt. Most likely, if I looked up this man's reason for rounding all edges, I would find a number of contrary responses. It's the nature of "social media", then or now. I radius my edges, both sides, from the step to about where the heel begins. I leave the rest sharp. I have any number of functions that I use these sharp edges for. I could do as Thomas suggests and make a hardy tool for these tasks, or not. Why make a tool when I can do it on just my anvil. I don't have to put it in or take it out, I just use my anvil. I do have a hardy tool out of 1" square, both for my anvil and my treadle hammer. However, I use this tool for other things than how I use the sharp edges on the heel. -
Isn't "The Great Resignation" just Baby boomers retiring?
anvil replied to rockstar.esq's topic in Everything Else
George, I'd call that cutting edge Boomer for sure! And I can't think of anything better to do On VJ Day but celebrate to the max!
