
Mike BR
Members
-
Joined
-
Last visited
Everything posted by Mike BR
-
Anvils with raised lettering are normally cast rather than forged, so the change probably relates to a process/material change. Of course, that doesn’t tell you when it happened.
-
Plainly the best solution -- I'm glad the gas company was able to oblige!
-
There really should be sufficient flow available. For example, I heat my house with a boiler fed through a 1/2" natural gas line. That's about twice the cross-section of a 3/8 line, but propane at 11" WC is around four times as dense as NG at 7" - so you should have about twice the flow available (or a lot more if you do get 12 PSI). If you are running one, you may need to look at converting it to blown. If you have a blown burner, the issue is probably that the plumbing is designed for a higher pressure. In that case, I'd look for the narrowest point in the system and open it up. You could start with eliminating the regulator (if you haven't already). You don't need that even if you're getting gas at 12 psi, but you would need to add a control valve of some kind if there isn't one in the circuit. And if you do have control valve, you might need to swap it our for a higher flow one. Finally, there may be an orifice you need to drill our or swap. (If there is a control valve, and the flame size increases steadily until it's fully open, the valve's likely the culprit. But if the burner tops out partway through the adjustment, the restriction must be somewhere else.)
-
-
Not sure about trouble, but it certainly caused embarrassment for my future grandmother-in-law when my 4-year-old-wife-to-be asked which great aunt was the real one. Happy Fourth!
-
I haven't found anyone who says they've done this, but it should be simple enough to add a switch in line with the capacitor so you could disable the start windings after the motor first comes up to speed. But it's hard to find a single-phase VFD at a reasonable price, and without trying it there's no to way to know whether a three-phase would shut down with an unbalanced load.
-
My favorite Chinese saying is "Overseas, the moon is rounder."
-
I have a 1hp VFD that has a voltage doubler and runs on 110, but I don’t think I’ve seen anything bigger that uses that voltage. It doesn’t sound like John’s electric arrangements could be easily upgraded to 220. . .
-
"True" is of Germanic origin, and I can't find anything that has a similar pronunciation and meaning in French.
-
If you made two slotted shims with a thickness equal to the distance between pulley grooves, you could lock the adjusting nuts in place and just move shim(s) when you change speeds. (If you haven't guessed by now, I'm lazy. )
-
Think I'd make a mini cauldron . . . . . . or add a gore or two, for that matter.
-
There is no mathematic formula that will pop out the complete shape of the gores, at least not unless the cauldron is a sphere or some other known geometric shape. But the width of the gore at any given height is equal to 1/9 the circumference of the cauldron at that height. (Keep in mind that due to the curvature, you can't simply measure along the length of the gore to determine the height above the bottom of the cauldron.) A simple way to do this would be to put a tape vertically against the side of the cauldron and make a mark every inch. Then measure the circumference at that point. Move to your stock, draw a horizontal line across the gore blank every inch, and mark a width equal to 1/9 the cauldron circumference at that point. Connect the widths with a smooth curve to determine the edge of the gore, and you're all set. If you don't have all the measurements, you could make a guess at the length of the gores (maybe 1.2 or 1.3 times the overall height of the cauldron, if that's all you know). Then guess the circumference of the cauldron at the top, bottom and middle, and divide by 9 (f you only know the diameter, multiply by 3.14 to get the circumference). Lay that out on a set of paper gores (you don't need to make a full set of 9) and draw in curves the best you can. Cut out a few, and tape them together at the edges and see what you have. Of course, the simplest way to do this with paper gores is to fold the paper in half, mark the width at 1/18 of the circumference of the cauldron at the relevant point, draw a curve, and cut through both layers together. Years ago I made a couple of TIG welded copper vases and pumpkin-shaped bowl using that method, completely guessing at what diameters and curves would look right (keep in mind that I couldn't draw my out of a royal flush). It was neat the way the shape came together when I assembled the gores, and each one came out in a way that pleased my eye
-
I wonder if you could let the whole motor float. For example, if you let the motor weight tension the belt, you could use a tube rotating (and sliding) on a longer rod as the pivot.
-
There's a nail station in the video in JHCC's May 30 post here: https://www.iforgeiron.com/topic/78536-how-do-you-draw-tapers/#comment-824617
-
Gorilla Glue used to be marketed as a gap-filing adhesive. Then one of the woodworking magazines pointed out that urethane foam has essentially no tensile strength. The stuff will work as a gap filler or as an adhesive, but not both at the same time.
-
You could probably seal the seam with solder fairly easily, at least if it’s clean.
-
I was in school in Boston in the early 90s when they closed down a big distribution center (with a clearance outlet) not far from me. The Amazon warehouse of its day, I guess.
-
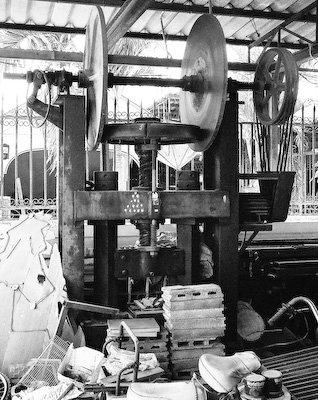
Looking at the picture I posted, it seems like a pretty clever design. As the flywheel moved down (and accelerated) the "gear" ratio would increase. Of course, bringing it back up would be like starting out slipping the clutch in fourth and then shifting down through the gears to first as you accelerated. But it wouldn't matter as much then.
-
Cool. This one is a little closer to what I was remembering (more obviously a flypress). .
-
I remember seeing drawings of a mechanical drive. There was a horizontal shaft centered above the flywheel, with rollers at both ends. The shaft could be pivoted so that the rollers contacted opposite sides of the flywheel, thus driving it in opposite directions (not at the same time of course). The biggest challenge might be allowing for the vertical travel of the flywheel — I can’t remember how that was done.
-
If the issue is specifically “rewinding” the flywheel/ram, rather than pulling it forward and down to strike the work, you might try an idea the late Grant Sarver once posted. He attached an eye on top of the ram, and added a cable and overhead pulley. At the other end was a counterweight about the weight of the ram and flywheel. He did it specifically so the ram would stay up on its own, but it should significantly reduce the force needed to raise the ram.
-
The wiper strips I've fooled with (not for anything as interesting as lock picking, unfortunately) seemed to be stainless steel of some stripe. Definitely stiff -- I'm guessing work hardened, but who knows. You could probably flatten a 1/16" filler rod cold and get similar dimensions and properties. But if you're like me, your wipers probably need changing anyway.
-
I ordered an assortment of belts when built my (very basic) grinder. All I use now is 60 grit belts and 400 grit Triact belts. The Trizact cuts fast enough that even 60 seconds for an additional belt change feels like a waste of time. Of course, I'm not making knives or finish sanding large batches of parts -- an intermediate grit or two might make more sense in that case.
-
Watching the Brazeal video again, I think the technique amounts to using the edge of the anvil as a fuller. You could do the same thing by fullering a groove in a bar, and then extending the groove by advancing the bar 1/2 the diameter of the fuller before each blow. After you made the initial groove, the radius on one side of the fuller would do all the work, so it wouldn't matter if the radius on the side were there (or if there were a big flat between the radii . . .). Of course, two edges come standard with every anvil, and they don't move around when you hit them. The Swedish video was neat. I liked the way he broke the nail free of the rod with the hammer. Might be hard to do with a hand-held header, though. And the caption at 0:55 said that to reach full competence, you need to learn smithing as a child!
-
Thanks! Makes more sense now that I see it.