
mike-hr
Members
-
Joined
-
Last visited
Everything posted by mike-hr
-
A while back, some folks approached me to build an explosive-resistant mailbox. Apparently some kids had been putting M-80 type firecrackers in their boxes and watching them explode. I built a nice mailbox that looked like a model of their house, but with a hinged back wall with a loose spring catch so the back door would fly open during a sortie, and vent the explosion. My plan worked, but the huns tired of not getting it to fly apart, so they came back with hammers and beat it to shreds. Their current model is a plain mailbox with potato digger chain links welded in a half arc over the top. It's been there 6 or 7 years now, maybe the huns got married, had kids, and now have mailboxes of their own. You could do some good re-enforcing by pouring your mailbox into a 14 inch sono-tube of concrete,and then mounting it with a good pipe post into the ground. Nothing like solid mass to promote tennis elbow in the hoodlums.
-
Howdy Chuck! Nice to see you here.. Mike in kfalls
-
Upset right angle corners aren't too bad with square stock. Put a punch mark where you want the centerline of the bend to be. Heat that area and bend to not quite 90 degrees, more like 80 degrees. Heat to near welding and put one leg in the vise, use a small hammer with quick beats, and drive the corner towards the vise. Your punch mark will now be somewhere else than where you want it, but don't worry. Heat the bend again, and put the other leg in the vise, same moves until the punchmark is back in the middle of the bend. While your doing this, the centerline of the hammer is towards the outside edge, meaning you are almost doing a half faced blow on the material while it's in the vice. Repeat this several times, and you can see material grow into the corners, filling up that radius you described. When you think you have enough, heat it up and pound it flat on the anvil to remove the thickness that has gained in the other axis. If it has enough mass to give a square inside and outside corner, then take it from the original 80 degree bend to a square 90 degree corner. There's several ways to do this process, this is the one that Mark Aspery taught us in one of his classes. After you do three or four and throw them in the junk pile, it gets pretty easy, and you can still see the punch mark in the center when it's done.
-
Sonicare electric toothbrushes have replacable heads. I take the wore out heads and pry off the two tiny,yet strong magnets off the bottom. They're great for holding notes on the steel shop door.
-
Howdy, Sorry, but what's BOA? Blacksmiths of Antarctica? Throw us a bone... There's lots of good stuff in the Blueprint section, and more to come once the upgrade get's fixed.
-
drill and tap a 1/4-28 tpi hole in a 1/8 pipe cap, then screw the cap onto the nipple, and the mig tip into the cap.
-
Are you going to arc weld the pickets in? How about with drilling a round hole and welding up the excess? I've also had good luck with drilling a hole and grinding a lathe bit to a 4-sided broach, cutting teeth with a slitting wheel, and H-Pressing through.
-
I've been hooked by The Gourds for the last 6 months or so, reviewed as 'Redneck party music for the well read, yet unwashed'. Got tickets for a show tomorrow in Bend, OR, 150 miles up the road, can't wait.. I also listen to a lot of James McMurtry. 'Can't make it here anymore' is a real good tune about the de-industrialization of America. Worth checking out.
-
Hey, I know that guy... How you doing Grigs, good to see you here. Say hi to all the gang in Clinkerville for me. You folks can stop sending all that smoke up here whenever you want. Mike in KFalls
-
 Memorial marker with various textured pieces and grainheads. Colored with guilders paste, and clearcoated.
 -
Howdy Lev, It's a great thing working with your dad on creative projects. My son helps me in the shop and it's some of the best times we have, outside of fishing.. A couple of things came to mind after reading your intro. Don't be frustrated at your current hammer control, just strive to get better and appreciate your time invested as you do. A day spent at a hammer-in might benefit both of you with techniques and ideas for your situation. Have you or your dad ever run a power hammer before? If not, I would strongly recommend finding someone with a hammer, and asking if you could see what it does. It took me a long time to feel confident running a hammer, and a while longer to start making things that didn't look like squished blobs of snot. Hammers can be very dangerous, even fatal. If the work is not hot enough, or not flat with the bottom die, it can teeter-totter out of your hands in one blow, and cause bad things to happen. Virginia has a wonderful blacksmith guild, go to some meetings , ask questions, and make sure of what you need.
-
I've started making slot punches and chisels from H-13. amazing stuff. It's important to remember that air hard tooling is most likely as hard if not harder than your favorite hammer. You can put all kinds of dings in the hammer face you spent an hour dressing and polishing . Have a 'consumable' hammer that you don't care about to use on air hard punches and drifts. The consumable hammer should be tempered way soft or annealed to keep from chipping.
-
I like Frosty's thought about cutting the die in half. When you hit something, it gets longer and fatter. The way the die is currently constructed, theres a problem with keeping crisp lines as the metal flows. I might also try making an adjustable stop for the far side of the dies to give you a positive place to hold against. You may also consider doing several pre-fullers to let out material before using the good die for just a few finishing blows.
-
At one of the first hammer-ins I went to, in Weaverville, CA, Dave Atwood was officiating the demonstrations. He announced the next demo in 20 minutes, and whilst folks were gathering up, he took a big hank of baling wire, like 40-50 pieces 4 foot long, convinced one end of the mess to sort of bundle up and stuck said end in the big forge. Slow fire, no flux, pulled it out and forged an eagle head out of the end, arranged the other ends (individual pieces) into a spread-out fan shape, showed it to the crowd, and tossed it on the floor just in time for the scheduled demo guy to go on. I felt bad for that guy, I have no clue what he did, but I remember about 30 folks walking over and gawking over the baling wire eagle.
-
I made a sliding stop for my gullotine tool similiar to ornametalsmith's getup, several months back. It's made the tool a 'league' handier, I would like to promote the idea as a good one. A lot of smithing is isolating material to a dimension, and then dealing with the material. The sliding stop makes for crisp corners without having to eyeball when rotating the stock, and also makes easier repeatable outcomes to dimension.
-
Crank up the forge before you clean the windpipe, then push the hot mass to the rear. It will stay hot long enough for you to clean it out, and should take off again when you rake the hot pile back over the pipe.
-
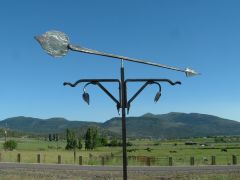 Hanging plant holder with breeze catching arrow. Arrow forged from 1/2 x 2 x 16 inch flat.
 -
Q: What's the difference between ignorance and apathy? A: I don't know and I don't care.
-
I made one just zactly like that, 'cept I drilled 3/16 inch holes through both pieces on the ends for lining up pins. It's got no choice but to be lined up with the pins guiding the way.
-
When you texture a bar, it becomes thinner, wider, and longer. Depending on the texture,and the hammer operator, it could become more thin and wide in one spot along a bar than another spot 6 inches away. Would a precision roller be able to deal with these irregularities without making a flat spot, or rolling a burr on an edge? I don't know, that's why i ask..
-
Thanks for the data, Hofi! I find this fascinating, I always thought that my mechanical hammer could throw a good thump, the numbers that you and J Gomez logged in show some serious metal moving. The last week, I've been mindful of how often I run my hammer 'flat out'. Turns out, it's quite often. Reminds me of riding my half-crazy Arabian horse. Once a person gets a feel for how an individual machine performs, it goes from, "Whats going to happen?", to "How soon can we get there?" Keep the results coming, folks!
-
For square and flatbar, I use this tool found at a yard sale. It's made from a large roller bearing with a round shaft welded off center to the inside bearing surface. A flat bar is welded to the outside surface. When the lever is pulled, it creates a cam motion. I can straighten 3/4 x 1-1/2 flat both ways with a 4 foot handle and a little effort. I've also used it to generate large curves for railings. Motorized hydraulic presses work good, also.
-
After reading and responding to Yesteryears thread on hammer performance, I feel kind of bad posting my opinion, because that's all it is... I did some thinking and came up with a test where we can all post out results, and maybe get a better idea of the hammers out there. I took 8 inches of 1 inch mild steel square, marked each end at 2 inches. Use flat dies. Heat to near welding, put the 2 inch mark on the near edge of the dies, and hit 5 times real hard. Heat the other end to near welding heat, same thing, but hit 10 times. Wire brush, cool and measure how thin each end got with dial calipers. Anyway here's my results: Hammer: 1909-ish MacGowan and Finnigan 'Perfect', 80# mechanical 5 hits: .825/inch 10 hits: .630/inch Please try this and lets see what happens, Mike
-
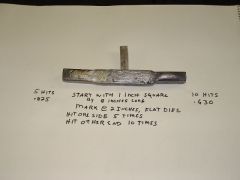 I'm trying to think of a way to quantify how hard a hammer hits. I came up with this, it's easy to try, Metric folks could use the closest size and report results in MM's. Start with 8 inches of 1 inch sq bar, mild steel. Mark both ends at 2 inches. Use flat dies. Heat one end to near welding, put the mark on the edge of the die, hit 5 times real hard. Heat the other end, hit 10 times. Wire brush, cool, and measure how thick both ends came out.
 -
I've run a 50kg SayMak for maybe 40 hrs total at a buddies shop, you turn it on and it runs all day, hits hard, excellent control. Has a real nice oiler. I've got a few hrs on Anyang 88 and a few more on the 33. They work good when they want to. Trouble with getting the oiler to work good, we went over that in a previous post. Some need more warm up time than convienient, and the head assembly gets too hot to touch after a couple hours. I recently got to watch the hammer techniques series by Amit Bar-Lev. (sp?) He's an accomplished smith, and did a dvd set working on the Big Blue hammer. I don't want to get anyone angry, but I could see his frustration with working large stock. He was making a cone hardy, and pulled a set of fish lips off the end that were at least an inch long. I started watching the hammer more, and it just pecked away, not much harder than a 25 LG. I would have to assume that the hammer was tuned to full potential as it was also an advertisement for the Blue, but I would want to run one for a day to be sold on it.