mike-hr
Members
-
Joined
-
Last visited
Everything posted by mike-hr
-
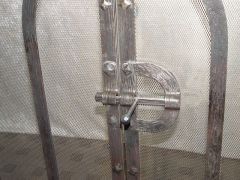
I'm making a few hatchets for birthday presents, and I'm having trouble with squishing my eye drift when I pull the cheeks down from the eye, I've been slot punching the eye, pounding the drift in almost to size, leaving the drift in whilst taking a quick refresher heat, and fullering the cheeks on the power hammer. The drift always gets compressed and deformed in this process. There's got to be a way to do this without making a new drift each time. APman is going to try to put in a picture for me .. Thanks, Mike
-
I've been mulling this same issue in my shop for a long time. I have a 10 ft high overhead door that would get in the way of an overhead trolley. I'm currently thinking of fabricating a telescoping lift arm (gin pole?) for my Ferguson 35 tractor 3 point hitch with a chain hoist at the end. Has anybody tried this kind of set-up? I'm a little concerned about how much weight I'd need to put on the front end to keep the Fergie from doing wheelstands with a 1000 # load.
-
I learn a lot by confidently telling a customer 'No problem, have it done in no time at all', and then evolving mistakes until it comes out clean. I learn a lot by teaching. I signed up as an instructor with the Calif. BSA. I think it's a well structured program, and is some of the most worthwhile volunteer time I've spent. (By the way, congrats to McraigL on his recent Basic I cert!) I try to take at least 1, maybe 2, 5-day classes a year with folks that are way above my league (not hard to find). I can see my caliber jump a pin or two being around instructors who can evaluate my posture, design techniques, planning, etc. I learn from IFI's Blueprint program, I've done a few, but am always getting more from the BP's than I put in.
-
I've had this recurring thought about Wile-E-Coyote standing at an ACME anvil, forge welding a length of chain, sparks flying, and an almost finished trebuchet in the background.
-
There's a shop in north CA who sells just hand smithed items. He buys them outright from the smith, at 50% of retail, doubles what he paid, and everybody does good. He has, for example, hooks from $5 to $150, having product from different smiths with different personalities adds to the diversity of the shop. I think its a fine idea, as I tend to go crazy sitting at an art fair or street fair sifting through the one or two folks out of a hundred who are really interested in what I do. You should decide if you want to buy outright, or commission stuff. A few of my buddies tried commissions in galleries, and were always whining at the owners that their pieces weren't displayed correctly, or promenently enough. I'm glad I don't work in a gallery or sell retail. I applaud you for being interested in this, the more folks that see what we're doing, the better the whole public awareness is of non-Walmartian craftwork.
-
A 3400 rpm motor is going to need some serious jackshafting. On my mechanical hammer, I was able to just get by without a jackshaft by making my own small motor pulley, and because I found a rare 1100 RPM motor. I helped get a friends 35# Champion hammer running with his 1725 RPM motor. We used flat belt pulleys he had scrounged, plus one I made (see Blueprint BP0245), with the formula Irnsrgn posted, and got the hammer to run 275 BPM. I'll try to stick on a pic of the Champion jackshaft set-up.
-
Thanks JWB, those are fun to make. Consider making some round hardy swedges if you don't have a swedgeblock. The nifty thing about them is you can preheat them in the forge and get more welding time.
-
Two thumbs up! When were you sitting in 'my' shop?
-
Howdy Jim Nice to see you here. The grille you posted in the gallery is great! Mike
-
Our local Airgas handles Radner.. I bought two things, some 7018 welding rod, made in Mexico, and some welding cable twistlocks, made in India. I threw the rod away, and have been fighting the twistlocks because they wont stay locked. I'd spend a bit more and get a Victor torch.
-
 Legs forged from 3/4" square, Arm forged from 1" square. The customers family brand is 'Quarter Circle over H', I did some splitwork to reference the brand in the joinery.
 -
We're working on a couple sets currently, using .500 thick sawmill planer blades for dies. A buddy ended up with a modest pile of these blades, this is our first experiment with them. Woody's Junkyard steel BP suggests they are made from M-2 tool steel, and they are behaving similar. I plasma cut the blanks, and grinded to shape. I'm able to drill a hole for a mild steel striking bar, slotted and held in with a roll pin, after annealing in vermiculite with a good sized chunk of hot mild steel thrown in to slow the cooling process. I'll post some pictures in a few days if the whole thing works out.
-
Pack the tube with dry sand, weld on endcaps with a 1/8" hole in each to let expanded air escape, heat and bend. If you need a really tight radius, mitre and weld.
-
Congradulations! Be careful playing in that water stuff, it can snuff out your forge fire is mis-used..
-
I try to not look into the fire very much, it seems hard on the eyes. I watch for a few dandelion seed looking sparks coming up, turn the piece over if I can while slowing down the blast, watch for a few sparks again, and go to the anvil. Some things to watch for, can you get from the fire to tapping the piece in 1-2 seconds? Is the hammer already in your hand when you leave the fire? Is the anvil chilly? I keep a chunk of 2" round on the forge, I heat it to spit-bubbling hot, and use it to get the first weld set. It's only 8 inches from the fire, and saves time. After the pieces are stuck, I move to the anvil. If you're using flux, the dandelion sparks may be subdued, and hard to see until it's too hot. Everyone has their own method of knowing when it's hot enough, I started to get a feel for it after many tries and a big pile of scrap.
-
IForgeIron Blueprints Copyright 2002 - 2007 IFORGEIRON, All rights reserved. BP0195 Riveting Tenons by Mike-hr I decided to build a 'traditional' railing sample, so I could have an idea how many hours/foot to bid on such a thing, were it to come up. Everything went okay, more or less, until it was time to put the whole thing together. I soon realized i'd need 'more power' to hold the pickets steady while I riveted them to the rails. I came up with this idea. The two 1/2" bolts seem to give enough holding force without slipping for me to form the rivet head. The holding dog is made so the railing is suspended 1/8" above the table. I shimmed the other corners up with scraps to the same height. It's clamped down tight, ready to heat and head. What it looks like when ready to hit. The setup works pretty good. The tennons are 3/8" diameter, and stick through 1/2". The heading punch is half of a 1/2" ball imprint. The punch is also long enough that it clears the edge of the table, so i could get a solid hit with a 4 pound hammer. The finished sample. Once I got going, I did all the tennons in under an hour, and they are stuck really tight. Another shot of the ball rivets. View full article
-
IForgeIron Blueprints Copyright 2002 - 2007 IFORGEIRON, All rights reserved. BP0194 Mini Anvil by Mike-hr Cutting a slice of RR track 1 inch thick. I use light feed on the saw, takes about 15 minutes. We're going to make the anvil from the foot of the track, and some of the web. Cut the 'rail' part off leaving about 2 3/4" of web, making an upside down 'T'. Cut 5 inches of 1" square or what ever size fits your hardie hole. Split the square stock about 2 1/2" deep, and use a rounded punch to radius the bottom. Cut the track to match the height of the 'Y'. �I marked the radius of the punch on the track with a felt pen, and ground to shape. Hot seating the track into the 'Y' Getting ready to cleft weld the two pieces. �A little MIG weld at the bottom helps keep the two pieces from squirting apart during the forge weld. Finishing the cleft weld . Sticking the piece in the hardy hole helps contain it. After it cooled, i migged around the cleft weld for added security. Forming the bicks using Dick Sargent's taper refining attachment on the power hammer. (see Blueprint BP0081 Tapers Refined) After forging, I heated to bright red, and annealed in vermiculite over night.� The next morning I ground the tool to shape, and hardened it in oil. After hardening I finished polished and used hot blocks on the body to temper until the bicks turned brown/purple. The finished mini Anvil. View full article
-
I've been using a 50+ year old 8" Wells horizontal cut-off bandsaw for 15 years now. It just keeps going and going with no complaints. I'm getting a year and a half out of one blade, it cuts tubing, angle, flat, railroad track, etc. I paid $900 for it in 1990, it's been a very reasonable saw thru the years. I know a couple guys with the little import saws, the guide wheels don't guide very well, and the blades like to pop off when the see a load. I've never used an abrasive cutoff wheel in a drill. I buy SAIT .045" wheels for the 4-1/2" grinder at the welding supply and use them a lot in the shop, and portable fabricating
-
We were discussing this a few weeks back, while re-hydrating after an evening forge session. The idea was postulated that hardware store bought hammers are most likely tempered way down to be so soft they won't chip very easily. Maybe you should try re-hardening and tempering the test hammers.
-
I'd look into having those cut by waterjet. The computer can nest the pieces together for best efficiency, and you won't get a heat affected zone around the barbs like plasma or oxy-fuel would.
-
I'm confused.. Do you have a forge to heat the Gigs to critical temperature and quench? The oven you describe will temper, after you harden. You could also temper by placing the gigs on hot steel blocks, taken from the forge and watching the colors run, or by using the kitchen oven (while the wife is out bowling), or an electric frypan full of sand. Are you going to cut the gigs from plate, or forge and weld round bar, like a pitchfork...
-
I have a 275 peddinghaus double bick with upsetting block. I haven't used the upsetting block very much, but I'm real happy with the anvil. I strapped it to the stump with some rubber belting material as an interface. The ring quieted down quite a bit, but it's still pretty loud out on the bicks.
-
I buy kasenite #1 in a 1 LB can from MSC tools. Heat the piece to a good red, sprinkle on the powder, back in the forge to bright red and hold for a minute, and then plunge into water and swirl around.. nifty stuff. Also works good for eye drifts, etc. made from mild steel.
-
I really like those! I'm gonna have to do a lot of chiseling on the F-250 to make one fit in the cupholder.... but it would be worth it!
-