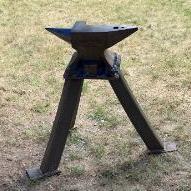
October 29, 20223 yr I happened upon this “anvil like object”, CF Rail Road Track anvil, while looking up prices on anvils on the CF website. It looks neat and may be good enough to mess around with in the back yard, but I wanted to see what the general opinion was on it. I attached a photo and the description below is from the CF website. The Track Anvil is made from a 12” long piece of 115 RE Relay rail. The good news is that this steel is hard as hard could be. You can hammer away and the surface will endure incredibly well. The bad news is that machining the top surface flat is very costly. Hence the price charged. In addition there is a hardie hole, a pritchel hole and four anchoring holes added. Weighs 37 lbs. Overall length: 13-3/4" Flat Face Dimensions: 6-3/4" x 2-7/8" Bowed Face Dimensions: 5-1/4" x 2-7/8" Anvil Face is 1-1/4" thick by 12" long Base (footprint): 12" x 5-1/4" Overall Height" 6-5/8" Hardie Hole: 7/8" 3/8" Pritchel Hole 1-1/4" Extension for the Hardie Hole Note: the Hardie Hole Extension is not heat treated The Hardie Hole Extension is welded on and should not be used as part of the striking surface. Because the Track Anvils are made from used railroad tracks, the non-machined faces will vary. Forging your future, from America's past.
October 29, 20223 yr Actually, a piece of RR track makes a pretty decent improvised anvil. But, unlike the illustration and various videos it is much better if mounted vertically and the end used as the striking surface. That seems a bit counter intuitive but that orientation puts more steel under the work and the end is large enough to strike on for up to medium sized work. Some folk will also put a cutting edge on the web of the rail to act as a hot cut hardy and cut other useful shapes into the base of the rail. A point of resistance to this use is that it doesn't "look" like a "real" London Pattern anvil even though it works pretty well. I suggest that you try to find a length of rail and use it vertically or another large piece of metal with a flat surface and befin on that. I think that would be a more economical option than what you are looking at and would work as well or better. But you know your own needs and economics best. So, just make an informed decision. You might want to look at the improvised anvil threads here on IFI to get some ideas. "By hammer and hand all arts do stand."
October 29, 20223 yr 37 pounds is pretty light. I'm super new to this hobby but I do know that solid mass weight is important. I started with a 50lb-ish (never weighed it) railroad rail, 16 inches long. On advice from this forum, I mounted it on its end so there was more mass under each hammer hit. I used an angle grinder and shaped a tiny horn-like shape from one side of the foot, then cut the other side of the foot into a sharp edge to use as a cutoff. I mostly used the head of the rail as the striking area but would sometimes use the web as well. I had also received advice for using a length of square tubing as a hardy hole and a long length of chain as a hold down. I never got around to making any hardy tools before I scored my 109lb Peter Wright anvil, but the chain worked just fine. All that said, I did not have a machined top plate so it was just a titch soft. Perfectly fine for starting out while I kept looking & saving for a different anvil.
October 29, 20223 yr If you use it to hammer iron/steel on it IS an anvil, not anvil "shaped" or "like." That just isn't a very good bang for the buck, even IF they didn't grind off the "Induction hardened" rail face or did a good job of hardening and tempering after grinding it, it appears to have sharp edges. A rail anvil mounted flat WILL flex under the hammer and lose energy return of elastic rebound, to flexing the anvil. Mounting rail on end provides good elastic rebound through depth of rebound and lots of potential bottom tools ground on the web and flange. If you run out of bottom tools it's easy to turn it over while the stock is taking a heat. A pritchel hole is easily replaced with a or as many as needed bolster plates and a 7/8" hardy hole ASSUMES you have 7/8" or are going to buy bottom tools from Centaur. A portable hole is as easy as cutting a piece of heavy wall square tubing and mounting it in the stand with a vertical rail anvil. Reinforcing the portable hole with a little welded angle iron or plate is cheap and easy. Frosty The Lucky.
October 29, 20223 yr Also some of the hardness of the face of RR rail may be due to work hardening and so machining the face makes it SOFTER! I try to find chunks of worn rail---they have a flatter face and are work hardened to the max! My local scrapyard usually has dozens of feet of used rail in it at 20 USCents a pound. In various lengths too.
October 29, 20223 yr "The good news is that this steel is hard as hard could be." Does hard as hard could be have a Rockwell number? "The Hardie Hole Extension is welded on and should not be used as part of the striking surface." Can we hit metal on the hardie tool with a hammer?
October 31, 20223 yr Author Since I’m going to do some practicing before I take a class, I decided to get an Acciaio anvil — I read HojPoj’s post on them — and a Mr. Volcano single burner gas forge. I watched a few YouTube videos of a class that Uri Hofi gave, so I’ve been getting a feel for my hammer, a 2 lbs. “Czech” pattern from Blacksmith Depot, by doing some “striking drills” on a 2x4 to develop technique. I’m going to sand the handle down a little bit, more to get the sealant off the handle than anything else. I read through Lorelei Sims’ book, which is a great addition to the first of Mark Aspery’s book. And I recently added GSTongs to my YT subscription list. I find toolmaking very interesting. Okay… time to walk the boys around the neighborhood and collect some candy!
October 31, 20223 yr I suggest you NOT sand your hammer handles, the increased friction will cause blisters. You won't need to worry about losing it after you've thrown your hammer a few times, it's sort of a club initiation thing. A good grip without squeezing is an acquired skill, varnish, wax, bare wood, etc. doesn't make any significant difference. Try to remember much of what you read in books is personal preference of the author, not THE way to do things. When I make my tapered hickory slab handles I sand them to remove splinters and sharp edges, warm them in the shop toaster oven set at low and wipe them down with Trewax, a carnuba paste wax I like for finishing iron. Bowling alley wax is a very similar product. Normally carnuba wax makes a slick surface but on my hammer handles you discover the only way to prevent stick to your hands blisters is to rub your hands with dirt to add a little slicktion. Remember, that's just how I do it and as much as I like it there are issues. Frosty The Lucky.
November 1, 20223 yr Author Thanks, Frosty! I figured that for some things in blacksmithing there isn't a "one and only way" to do them. The quantifiable knowledge is established and easily accessible: steel types, forging temperatures, etc. I am working on building a base of qualitative knowledge so that I can build my experience on it. From reading through posts here on the forums (and advice from experienced blacksmiths like you and others), books, and quality YT videos from reputable blacksmiths, I'm trying to get those bits of knowledge and lessons learned moments so I can apply them myself when I move metal for the first time.
November 1, 20223 yr There are very few one ways and even those have exceptions. It's very much a what works kind of craft. It's the results that matter. Frosty The Lucky.
November 1, 20223 yr I find that removing the factory coating, or any handle coating, is a good start. The next item in the process, is contouring or adjusting the handle to comfortably fit YOUR hand. Adjust a little at a time then go to the forge and try it out. Once the handle fits your hand you need to protect the wood from water, dirt, etc. The protective coating should not be so slick that you can not comfortable hold the handle, and it should not cause blisters during use. Everyone has their favorite coating, and if it works for them great. But it is YOUR tool and it is in YOUR hand so you may have to try a couple of different protective finishes to find which one that works best for you. Boiled Linseed Oil has been my go to finish for several years. Lightly sand the wood and apply BLO with a rag until it no longer soaks into the wood. Give it a couple of days to dry, or wipe it dry, and put it to use. While your at it, give the metal a wipe too.
November 1, 20223 yr I noticed a good increase of hammering comfort after my previous (store) handle came loose and I made a thinner and longer one with a thinned out spring near the top. I sanded to 120 grit and boiled linseed finish and it's perfect for me. I really noticed the decrease in shock transmitted due to the thinned part of the handle. I can't find a picture of the handle. I can make one tomorrow if needed. ~Jobtiel
November 2, 20223 yr Author Thanks for the replies, gentlemen! The handle shape and size feels comfortable in my hand. The only odd thing about it is that the finish on it feels a little bit sticky, like it's not completely dried. Otherwise, no complaints.
November 2, 20223 yr Sticky means you don't have to grip it very tightly for safety! I sometimes rub a bit of real bee's wax on handles and warm them in the dragon's breath to get them sticky...
November 2, 20223 yr A wooden handle in one hammer is 9 inches (229 mm) from end of the wood to touching the metal. Thin circumference is 3-1/2 inches (89 mm), and at the grip is 4-1/4 inches (114 mm). A wooden handle in another hammer is 11 inches (280 mm) from end of the wood to touching the metal. Thin circumference is 2-1/2 inches (64 mm), and at the grip is 3-1/2 inches (89 mm). A wooden handle in another hammer is 14 inches (355 mm) from end of the wood to touching the metal. Thin circumference is 3-1/2 inches (89 mm), and at the grip is 4 inches (102 mm). A wooden handle in another hammer is 16 inches (406 mm) from end of the wood to touching the metal. Thin circumference is 2-3/8 inches (60 mm), and at the grip is 3 inches (76 mm). Each hammer handle has been adjusted to fit my hand and the way THAT hammer swings. It is all about what is comfortable in YOUR hand.
November 3, 20223 yr Author I didn't think of it that way, Thomas. That makes sense now. As for the handle size, Glenn, it's whatever the folks at BS Depot put on. It "feels" good in my hand. I don't feel the need to squeeze it to hold on or anything like that. On the topic of anvils, though, I noticed that the Amazon vendor is a higher price than Vevor.com -- which is having a sale on some of the Acciaio anvils it offers. I need to talk to The CFO. Hahaha!
Join the conversation
You can post now and register later. If you have an account, sign in now to post with your account.