John B
-
Posts
3,598 -
Joined
-
Last visited
Content Type
Profiles
Forums
Articles
Gallery
Downloads
Events
Everything posted by John B
-

Heavy swing gates support posts
John B replied to Noble's topic in Blacksmithing, General Discussion
For traditional gates the allowance for sag was 1/8" per foot length if that helps -
What did you do in the shop today?
John B replied to Mark Ling's topic in Blacksmithing, General Discussion
If I have problems, I use this old blacksmith glove, made from an used welder's glove that has holes in on the seams and fingers. Left hand or right hand, and quick to remove. May be of use.LeatherpalmfromoldglovePlacefingersthroughslit.thumb.JPG.aa80bd205db68821e26ef4c483ec990b.JPG)
LeatherpalmfromoldgloveSlideontowristrightorlefthand.thumb.JPG.e5e75b86b9016eabf72632451a8dc2d0.JPG)
LeatherpalmfromoldgloveReadytouse.thumb.JPG.1a0f2acf086062049ae748f6d58082c5.JPG)
LeatherpalmfromoldgloveFilletremoved.thumb.JPG.6a04a29f163588b5c53b65c1e5b84aa0.JPG)
-
What did you do in the shop today?
John B replied to Mark Ling's topic in Blacksmithing, General Discussion
Here's a portable one I used for shows as well as in the workshop which illustrates how useful they are With regard to the pipe for a tue iron, the refrectory bricks shold be a close fit and come to the front of the pipe (Clay it in ito get it snugif you wish) and this should keep most of the heat away from the steel so it doesn't melt rapidly away.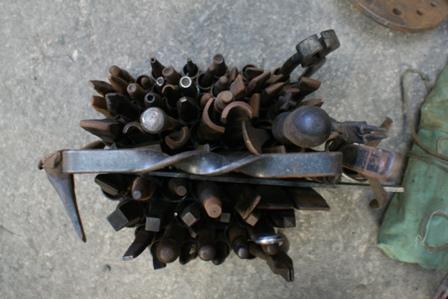
.jpg.ef64b6f8240254cb86f309ac5b709fa8.jpg)
-
What did you do in the shop today?
John B replied to Mark Ling's topic in Blacksmithing, General Discussion
Flanges are usually used to spread the load when the top tools are in use instead of relying on the pin diameter to take full thrust, as this could allow mushrooming on the end and causing it to jam in the socket. A point to remember is that the original use for fly presses was not for blacksmithing, but for punching, blanking and forming metal items. Blacksmiths tend to use them because they are so handy, and lend themselves to adaptation to what we want to use them for. -
What did you do in the shop today?
John B replied to Mark Ling's topic in Blacksmithing, General Discussion
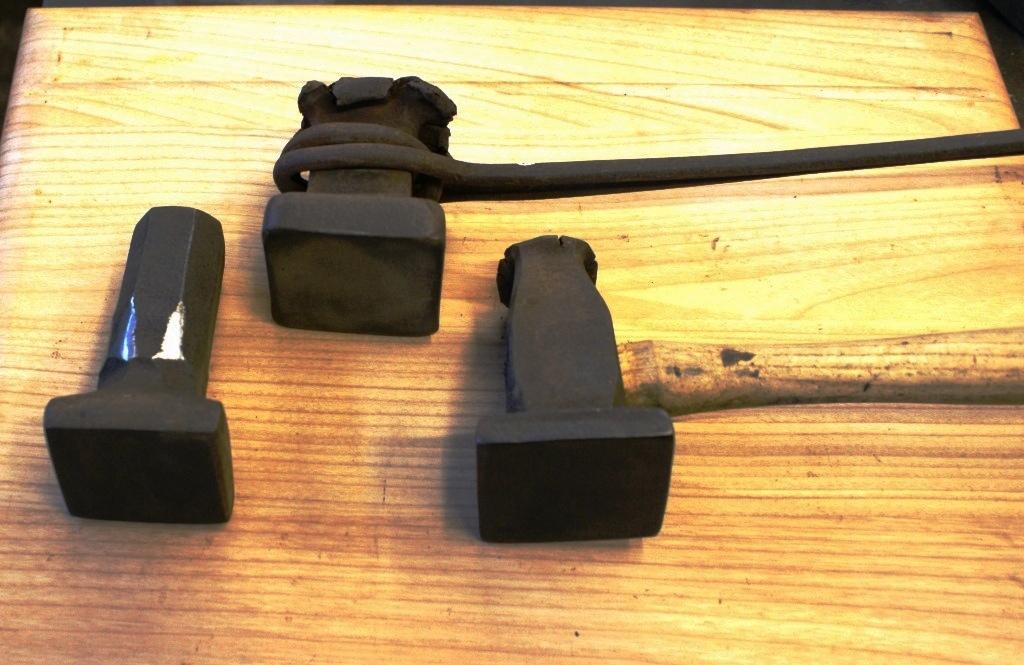
With regard to flatters, I would like to add to comments about " floating" . I n practice I used to have these illustrated ones, my preferred one, as you can tell from the split top (which should be ground off for safety) is the wire wrap handled one, the reason being you can just place it on the metal and it levels itself on the meaterial when it is struck without jarring the wrist as when using the wooden handled one which can act like a set hammer if held too tightly The third one I also prefer to the wood handled one, and use it when I am out and about as it does not take as much room up in the toolbag, but also it only has to be held loosely over the workpiece ansd so has the floating effect too. Faces should be polished for best finish on workpiece. May be of interest, decide for yourselves.
-
Advice to newbies from a newbie
John B replied to Jack-O-Lantern's topic in Blacksmithing, General Discussion
Hi Thomas, just because they are demonstrating, does not mean they are expert, I don't know who the demonstrator was but if he is demoing and treating MS like HC then that is a problem in itself If it is cracked, then you were right to point it out, and unless it was annealed after and before it was ready for using on a job, then it was in a potentially dangerous state, was this pointed out by him/her? If the "job" was a wall mounting or static not to be handled item, then maybe in their opinion "It would do" was valid, but a bit of a cop out for doing a job to be proud of, I could not envisage a customer being happy with an obviously flawed item, smacks of lack of pride in one's work. If its HC then forge it for its structure, if its MS then same applies, and also for WI. Each has its own composition and should be worked accordingly, difficult to know on uknown metals, but that's why we test sample potential workpieces. -
Advice to newbies from a newbie
John B replied to Jack-O-Lantern's topic in Blacksmithing, General Discussion
True Thomas, I should have qualified the statement by adding the "someone who knows what they are doing" unfortunately I was not thinking of via internet or TV programmes, My Mistake. -
Advice to newbies from a newbie
John B replied to Jack-O-Lantern's topic in Blacksmithing, General Discussion
The phrase "All the gear, and no idea" springs to mind. Get it HOT and Hit it, and learn from there. Different degrees of Hot, and different amounts of Hit, it's in there somewhere, you just have to find it. Watching helps, Doing will get you there. Guidance will help, -
What can you make from a spanner?
John B replied to ausfire's topic in Blacksmithing, General Discussion
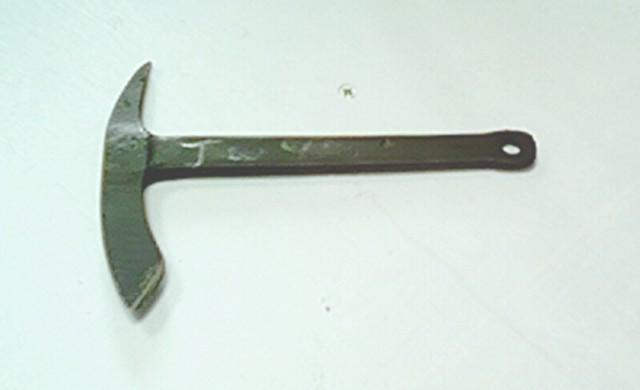
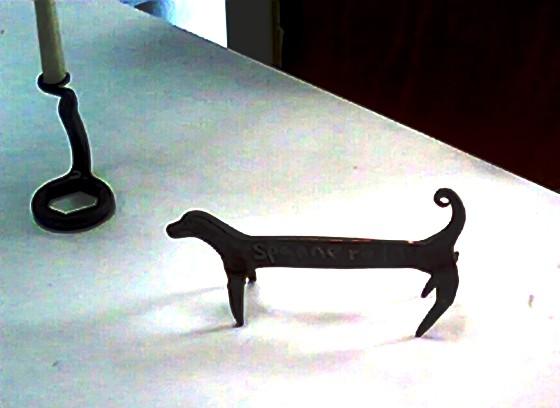
We Had a weekend playing with old spanners back in 2004, sorry about the picture quality. This one started aas a single ended spanner, and finished as a Twybil, used for making willow hurdles for fences or animal pens A selection of the items made An large ring spanner made int a candleholder, and a double open ended one made into mini bootscraper. Found a great difference in materials used when the spanners were made.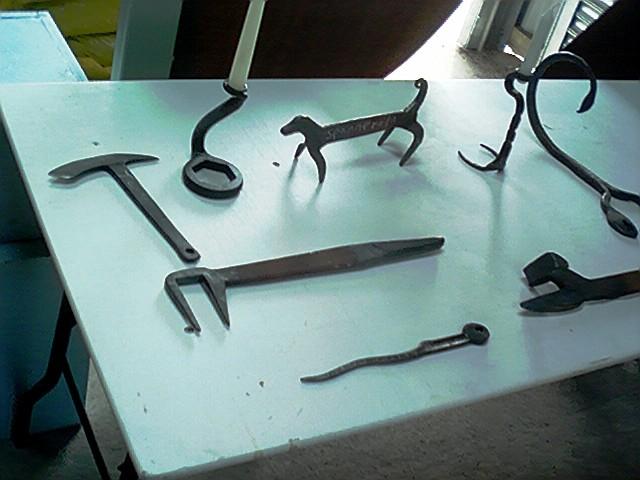
-
I have no experience of gas firewelding, (Don't want to damage my gas forge's lining) but from the appearance in the pictures, they were not hot enough right through, you have to allow the welding heat to soak completely through the joining areas. Patience is the key, bring it up to welding heat slowly to allow the heat to penetrate/permeate right through, turn over if needed during the process. This is relevant to both gas and solid fuel forges.
-
Please help identify this material
John B replied to TruebloodLowery's topic in Blacksmithing, General Discussion
My take on this would be that it is not cast iron, that is inappropriate for a struck object and would have not mushroomed at the struck end. You could try heating above critical and then quenching the edge and testing it with a file to see if it will harden, you can then continue to make a qualified decision on what is needed for the edge you require. If you want to put a steeled edge on then you can do so, or maybe you just want to try that for practice. Whatever you choose, enjoy and let's see the end result. -
Also IMHO proper fitting tongs would help, you seem to be holding it on the twist rather than at right angles to the anvil face and it looks awkward. It will also put stress on your wrist.
-
Due to the coronovirus precautions, a lot of the participating shows have been postponed or cancelled. Some have already been rescheduled, and the current situation is that the results from the shows that do go ahead will be used as normal to establish the Champion Blacacksmiths. A lot of participants rely on these shows to market themselves and source new clients, so I hope that these circumstances do not adversely affect anyone who usually enters exhibits or competes. Whoever you are, and wherever you are, stay safe and take care of yourself and others.
-
What did you do in the shop today?
John B replied to Mark Ling's topic in Blacksmithing, General Discussion
Thanks Jennifer, there is so much more to this craft than people realise, having come from an industrial background, most of my abilities were originally based upon these books. I had so much trouble trying to get good information forty something years ago, which is why I carry on and support passing on the information so passionately. -
What did you do in the shop today?
John B replied to Mark Ling's topic in Blacksmithing, General Discussion
Great videos Jennifer, interesting to see your methods. This comprehensive list may be of use as to variations on what they are and where to use them References are from the CoSIRA Books, The Blacksmiths Craft and Wrought Ironwork 1. Faggot welds 2. Bolt end scroll RDC WI Lesson 5 3. Chain link RDC BC Lesson 10 4. Straight Scarf Weld (Drop tong) RDC BC Lesson 30 5. Collar weld (as ball or cube or head for bolt) RDC BC Lesson 20 and 21 6. Balls on bars (eg doorknockers, infil bars) SDC WI Lesson22 7. Water Leafs RDC WI Lesson14 8. Top scarf welded ring (Tyre) RDC BC Lesson 14 similar to straight scarf weld 4 9. Running Scrolls RDC WI Lesson19 10. Finials, Dog bars (1+2) RDC WI Lesson 25 (1+2+2) as sample 11. Round bars RDC BC Lessons 5 with glut for radius and 7Barb end as log roller 12. Welded and drawn down point RDC BC Lesson 9 13. Side scarf welded rings a) square bar and b) round bar RDC BC Lesson 13 14 Turned Eye weld RDC BC Lesson 15 Hinge eye weld 15. Cleft Weld RDC BC Lesson 31 16. Glut weld square corner RDC BC Lesson32 17. Eye welded to shank RDC BC Lesson 33 18. Scarf and Cleft T weld RDC BC Lesson 34 19. T shaped pocket weld RDC BC Lesson 35 20. Diagonal and Straight Corner welds RDC BC Lesson 36 -
Forge welding: Coke vs. Coal vs. Charcoal
John B replied to Jon Kerr's topic in Solid Fuels: Coal, Coke, Charcoal, Wood, etc
We can arrange a forge welding day(s) for you at Westpoint if you are interested, we ar near Exeter in Devon.there are other courses available, some may be nearer -
Blacksmith quote? An edge keen...
John B replied to SJS's topic in Blacksmithing, General Discussion
IMHO I would interpret it to be, File it lean , because. Most working/cutting tools were wrought iron edge steeled with blister steel, so filing/wet grinding on stones, exposed the welded edge. "Lean" meat in butchery terminology has little or no fat, the fat showing up in a "marbleing" effect, (That gives the meat flavour) it also reveals differences in composition. Filing removes the inclusions at the edge of a working surface, and exposes the actual structure and integrity of the weld, Lean also does not mean thin, different cutting edge thicknesses are required for different purposes and materials. eg Scythes or axes -
Hi Daniel, we may be a little away from you, but can offer a comprehensive intensive basic blacksmith skills course. https://www.google.com/search?q=https%3A%2F%2Fwww.iforgeiron.com%2Ftopic%2F50457-westpoint-forge-three-day-course-content%2F&ie=utf-8&oe=utf-8&client=firefox-b will give you some idea of what we do., we also have back up betyond this course. Good luck wherever you choose to learn.
-
What did you do in the shop today?
John B replied to Mark Ling's topic in Blacksmithing, General Discussion
Must be whats called a "megnetic prersonality" Rumour has it you can't scar a scar, but it still hurts when its hit with hot stuff. -
How high should my anvil be roughly?
John B replied to 0Dustin0's topic in Anvils, Swage Blocks, and Mandrels
Anvil is 75kg, and they are relatively easy to adjust, Just tilt the unit on two legs (if you have a helper they can hold it,) if you don't have a helper, I manouver it around so I can tilt it and rest the anvil's relevant edge against something relatively immovable, then pull out the clip, remove the pin, adjust to required setting, replace pin and clip, repeat on other legs until you are satisfied with its height. -
Best place to source known steel in the UK ?
John B replied to KingAether's topic in Blacksmithing, General Discussion
Just google tool steel suppliers, if you want known quality tool steel expect to pay for it, some delivery charges may add to costs, West yorks may seem pricey but I like their excellent service and approachability if you have a problem. Apologies to the site administrators for including a commercial link -
Don't know whereabouts in Dorset you are, but you could try looking at glass makers in the area and see if they can help, Alternatively go to a solid fuel centre and see if they sell firebricks, Log burners use them and they need renewing, I also purchase vermiculite sheets from my local logburner and flue installation shop to make gas forges with.
-
Best place to source known steel in the UK ?
John B replied to KingAether's topic in Blacksmithing, General Discussion
Their are a number of tool steel suppliers who will deliver small lengths to your door also their websites will give detail comparisons on UK and other countries steel nomenclature for comparison, as well as the metals appropriate charecteristics for forging and heat treating, I would suggest trying here for starters Commercial link removed Or if you can get to Westpoint, we have some stock of EN 24, EN 46, D2, and H13 that we use for toolmaking courses -
How high should my anvil be roughly?
John B replied to 0Dustin0's topic in Anvils, Swage Blocks, and Mandrels
They have proved useful, the inside support legs also have holes drilled in which give a height adjustment in 1/2" increments. Also made some portable leg vise stands to use at shows or in the workshop, bottle screw at rear allow adjustment if floor not flat.-Copy.JPG.74af60accb906f5ce40374ae1f671da8.JPG)
-
How high should my anvil be roughly?
John B replied to 0Dustin0's topic in Anvils, Swage Blocks, and Mandrels
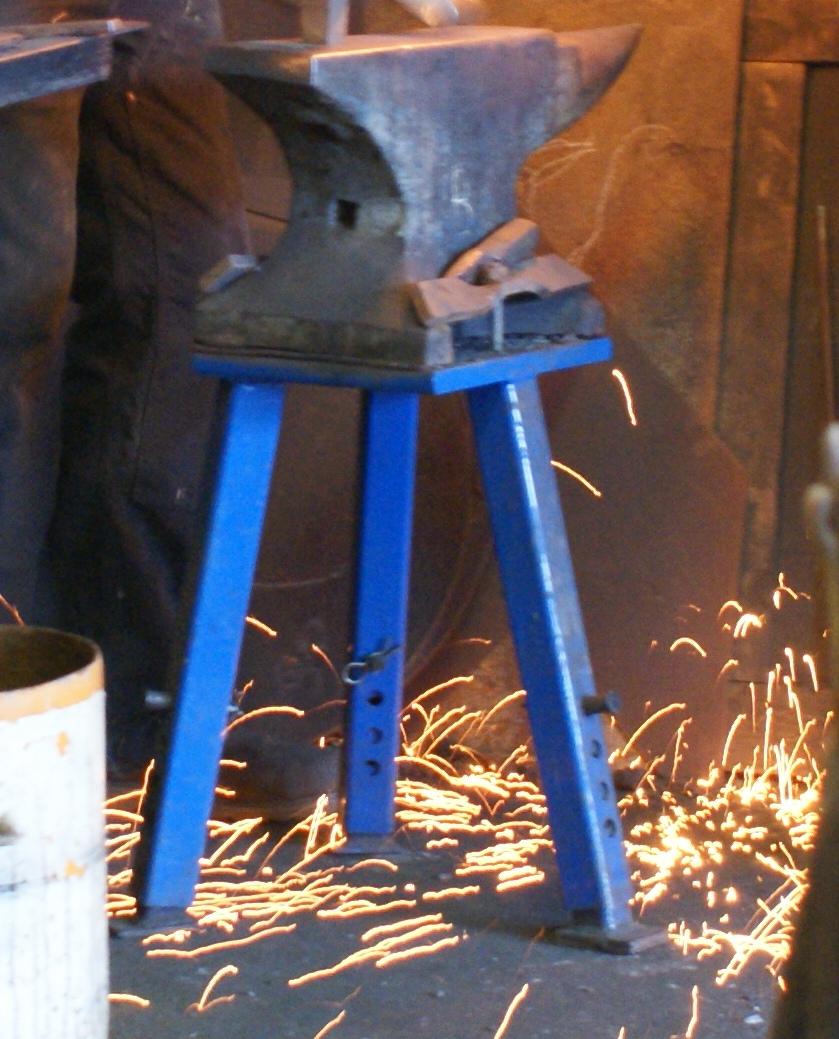
Here is one we use, this was a prototype, better if two legs were facing to rear, and one under the horn
LeatherpalmfromoldglovePlacefingersthroughslit.JPG.5a6f7e841e1e35724232468de3fde8ee.JPG)
LeatherpalmfromoldgloveSlideontowristrightorlefthand.JPG.0e19b02b5532ad267f3123cb8f6b5ac3.JPG)
LeatherpalmfromoldgloveReadytouse.JPG.0fa2fe0a18edf8b1ce5ad3effd8e7e9e.JPG)
LeatherpalmfromoldgloveFilletremoved.JPG.910ae000cb59d800f4e898d806867cf1.JPG)