Work With Nature
Members
-
Joined
-
Last visited
Everything posted by Work With Nature
-
It really is a great food, like the taste as well and gives a lot of strength. Am sure now it was jack fruit wood. Asked the local carpenter shop down the road. Also he recons teak would be a good wood. He also told me etti tree. Did a search and it is the strychnine tree, from what I can tell. Have my doubts about it as it is very poisons and I read even breathing in the dust can kill you. But don't hold me to it. There is often also a problem with language barriers. My lack of Malayalam. India has a lot of languages. One has to be extra careful here as the cycling of soil nutrients is very fast near the equator. That makes for tons more bugs, which in turn has a lot of plants evolve quite some nasty poisons. Even burning the wood for my forge could end up not great Edit: OK did some more searching and the spelling he gave me was Etti, but is actually Eeti - Indian rose wood.
-
Nice axe, looks like you enjoyed making it. Am new to this myself. But you could forge weld at some point a bit made from carbon steel into a purposely cut slot at the cutting part. Is very difficult to pull of but then you will be able to harden it me thinks. David.
-
-
Hi ThomasPowers, ha yes, know exactly what you mean. Am working on a post vise at the moment from two truck leaf springs and an old car jack. The leaf is already mostly the shape I need them to be. It has some hinge like sockets where the bushings were. But I think they are more suited to become the jaws of the vice and they would be to big for the pin. Planning to hammer them square and make the hinges on the open end. But hear you I could not believe how hard the stuff really is.
-
Thanks, Those are good tips. So I think not to change it much from its intended use. Make it into a cross peen on one side and a round peen on the other. Might be handy for smaller jobs. Also will give flattening the sides of the hammer a go. Just something new to try out and did notice some of the hammers I got have small eyes. Might make one drift and in time re-widen them all to the same dimensions. Probably use rebar. That's all I have available for now that is thick enough. Went out to the farm today to grind some of those hammer heads from the scrap yard. Also started shaping a handle from a dry branch. Got it into a good shape using a machete and then remembered the sand paper disk I had for the angle grinder. Wow only a few minutes later and a huge amount of material gone. This was totally new to me, there is a first time for everything. John in Oly, WA, That is very true for many things. Sometimes it is just good to get started.
-
Cool, Thanks for getting back to me on it. Well I will soon find out. Hope that stuff is easy to bend, might need to get it really hot. Just prepping the fuel in the next few days and then it's of to giving it a go. Thanks again. David.
-
Hi, Have this small hammer head I found at the scrap yard. Liked the look of it and it does look hand forged, but if for a specific task I do not know. It sparks at least medium carbon, lots of fireworks, even though it has mushroomed on each end a bit. Any thoughts on that. Could I reshape it to do something else like punch holes. Any ideas. Cheers David.


-
Cheers, am of now this evening back to the farm to start grinding on the heads and that is good to know about the heat amount before the temper is ruined. Had a go this morning for a few min and was surprised at how little the hammer heated up if I moved the grinder even just a bit around. The thing about the flatter, it would be fun to make one but if a piece of steel is enough for the amount I probably would actually use it. Then there is plenty of other things to try. All the best David.
-
JHCC, ThomasPowers, Ha - Yes, good answer. Yeah all that makes a lot of sense. Was wondering about the need of a flatter but have no idea. As a beginner you toy around with lots of ideas as well as make lots of trail stuff. well at least is how I learn anyways. Great will get started now on the heads and put up a new thread. Again many thanks. David.
-
You know you are right, Just to say I would have been as happy with it, as with this anvil. Just the mass thing convinced me. Plus it had a 5 mil hole in the center going all the way through. Don't know if that makes it good or bad, but was not sure.
- 34 replies
-
- angle grind
- jcb axle
- pin
- heat treat
-
Tagged with:
-
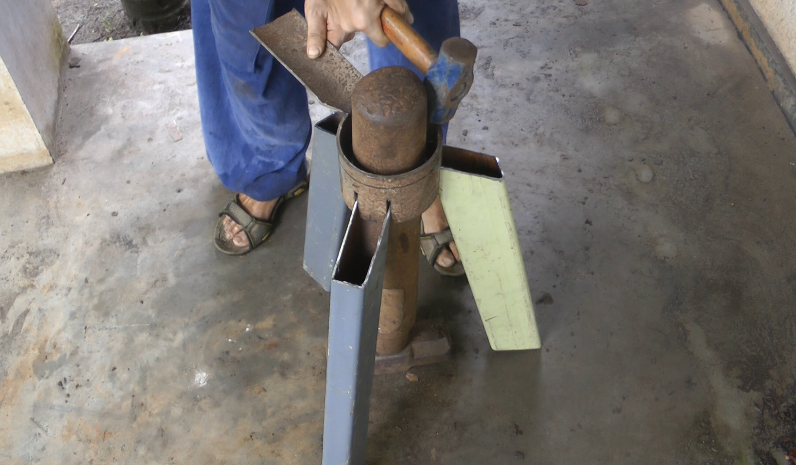
Hi those hammers look really good. Checked out this post because I was thinking in the last few days of grinding a medium sized lump hammer flat and then round on the other end. It has no handle. If one had a copper pipe would that take the heat out, by sticking it into the eye of the hammer? Am just thinking by the way, don't have a copper pipe. But will try by putting it between two lumps of cast iron, See what happens. Also got a good few old junk yard hammers now. What do you think if I am to take a big sledge hammer (have two) and cut the two sections where the eyes are, but to one end. Sides are 1.2 cm thick. These could then be bent outwards to make a flatter (maybe) and the other half with no sides could be made into a hammer. Is this a mad idea? Apart from having to make new holes for the eyes , maybe there is a better way to do it. Also got a hammer head that looks like no hammer I have ever seen and would like to post it here somewhere. Maybe someone knows what it is. It also looks like it could be made into a punch with little effort. Where should I best post it. Cheers David.
-
Ha yes Frosty, Not in the steel selling business A stand like that would be great alright. Maybe some kind of pivot point, so you could turn it in one easy motion with a half way locking point. It takes me about 3 min. to put it together. Just tried it out today. Was forging on an old bolt and nut. Plan was to make a box tongs and forge weld the nut to the bolt and then draw out the nut. Did not work out with some of the rust left behind, must give the vinegar a try. Did clean it a lot though (wire brush WD40 and coconut fiber rope). Even inlaid some steel wire in the thread and managed to get the nut on. Was thinking it might weld easier, what do I know. Anyways the anvil works really well, way different to my first anvil and the stand, there was no movement what so ever for the hole time forging. Charcold, That was me 2 month ago as the guys from the junk yard there sold me a big blob of cast iron. An old trade weight. So even worse than the mild steel. They thought they were doing me a favor and I was happy to except. This time around I expressed myself better to what I was after and knew a little more. There were two options apart from some very long thick axles. The other was a 6 inch thick shaft of a gear and to be honest it looked to me to be even tougher. But then what decided it for me in the end was the length it being 8 inches long. Cheers David.
- 34 replies
-
- angle grind
- jcb axle
- pin
- heat treat
-
Tagged with:
-
OK I'm game, edit: just noticed that people reply with there finished project. David. .
-
I was having the same question and found your post here. I did a search on the flash points of different liquids. Found two that may be suitable but at least one that I think could actually work. Would be great for people like me who could just heat a small pot with a thermometer for tempering. No oven. Guess which one Glycerin - celsius 290 / fahrenheit 554 Linseed Oil - celsius 287 / fahrenheit 548 Source: http://www.engineeringtoolbox.com/boiling-points-fluids-gases-d_155.html
-
Joel OF, Great video, You make it look easy. Can imagine it being a bit of a challenge. Having seen this done now, will help me hopefully do the same with the end of two smaller truck leaf-spring. The cut off ends where the mid holes used to be are 6 mil thick. Very hard stuff. A high carbon steel, usually but not always 5160, If I may ask you a question. My plan is to make two hinges. One the way you did except a slot cut out the middle. The second one would be at the end also but in the middle maybe 2.5 cm wide. I would have to cut out maybe 2.6 cm out of the middle of the first one for them to fit together. I know leaf springs come with ready made hinges but I need those as well. Here is the question. Can this all be hammer forged by hand without using jigs. Maybe just a bar as you did? It is a once off thing and my resources are limited. Would be great to know. David.
-
BIGGUNDOCTOR, ThomasPowers, Thanks guys for the great tips and ideas. So no forge welding the two together then for "damascus" Will give an etch a go to see if it has the nickel, I think Walter Sorrels made a video on how to make a sen. Will have a look. Thanks again.
-
I can appreciate now that I got lucky. Also did check what they are made of. The source said usually S - 6 & S - 7 steel, but am new to this so no idea. They mentioned air hardening. Apart from that, was thinking there would have been a certain amount of cold work hardening gone into the piece as it probably had large amounts of work done with it. Tried the angle grinder on the rounded end (the used side) for a bit today and it is pretty unyielding. The other end is softer. Could be work hardening or maybe quenching or may have had a harder tip added. But again new to this. Cheers David.
- 34 replies
-
- angle grind
- jcb axle
- pin
- heat treat
-
Tagged with:
-
Charles R. Stevens, ThomasPowers, That is what it is, I knew it reminded me of something but could not figure it out. A kango hammer insert was what I was thinking but just way bigger. The two indentations are for locking it into place. Did a search now I knew what to look for and here is the link. If links are OK? I know who cares, well I do for some reason. Maybe it make a good story in years to come. Thanks for letting me know. David. https://www.indiamart.com/proddetail/rock-breaker-chisels-3529986530.html
- 34 replies
-
- angle grind
- jcb axle
- pin
- heat treat
-
Tagged with:
-
Wow quite a lot of different designs, So here one that I just build and has it's own post here too.
-
Hi Buzzkill, You know might it be of the stabilizing arms of a JCB. Maybe someone might know. Don't think it is an axle either. As for what I will make with it, will let you know as soon as I forge an item, will stick it up here. Am trying to source more fuel at the moment and next project is a post vice from more scrap.
- 34 replies
-
- angle grind
- jcb axle
- pin
- heat treat
-
Tagged with:
-
Hi Glenn, I did get your earlier posts about the safety precautions 100 % and how to implement them. But thanks for rechecking and sharing your ideas. The only reason I have not done any changes yet is because I had not read your posts about them by the time I had put up the last pictures. Ah well for another day. Nice bit of info cheers for putting the time in for sharing. Best wishes David. Hi VaughnT, Wow actually like that stand a lot. So got a lucky find then with that anvil The other day was thinking about how the hammer moves around a big anvil much more and the steel stays put. With a smaller one the steel needs to move more and the hammer blows stay the same. Might this prevent faster cooling of the steel if one uses a smaller area?
- 34 replies
-
- angle grind
- jcb axle
- pin
- heat treat
-
Tagged with:
-
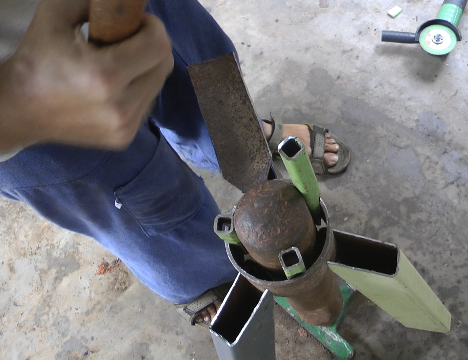
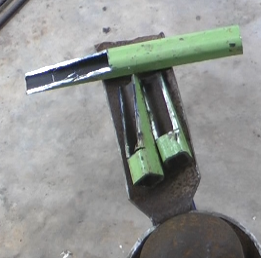
JHCC, Charles R. Stevens, Glenn, Frosty, Hope this is a better way to reply to posts now as the quotes apparently clog up the forum. Did not know. Was going to just grind those sharp edges but that is a very good idea and I do have plenty of old hose pipe. It probably would be quite dangerous to not deal with them. Might need to mention, that the legs are far enough and out of reach of a missed blow though. The picture does not show that that well. The hole thing was a bit over kill Frosty and also do prefer over building. But then that is what I had available and the main issue was not having a welder. There were moments were I was thinking just that. You know I can appreciate having that rounded end on one of the faces and can't wait to try making such a hammer as you mentioned. I added 3 more wedges, I better put some pictures up just in case someone would like to build one similar. Here is the reason. After putting it together this morning and trying it for more than 20 min it kept getting loose and I had to re-tighten. After adding the additional wedges the thing became so solid that it just wont budge. It's clamped to the ground. Just to mention, I did notice that the wedges and leg clamps, by themselves would probably not be enough. To be honest I am very surprised and extremely happy with it now. Will cut down the one wedge seen in the picture, noticed that as soon as I made it and add the hose for safety reasons, but other than that, am good to go Cheers David.

- 34 replies
-
- angle grind
- jcb axle
- pin
- heat treat
-
Tagged with:
-
Ah did not know JHCC, makes sense. Thanks for letting me know
- 14 replies
-
- borax
- wd40
- alternative
- decarb
-
Tagged with:
-
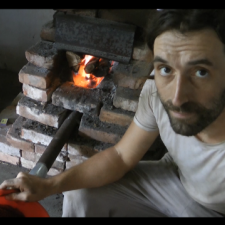
Ha true Smoggy, We have coconuts here as far as you can see and then some. Thanks for your feedback about the video. You know it is much harder to find things here, especially if you you don't know your way around. You are right was only thinking the other day that using one hammer would have worked way better too and the face of the sledge would have given more energy back out than the flat side. But just got a 2 foot long JCB (excavator) axle I think and am standing that on end. Just today build a stand for it. Started a thread here on this forum about it and got some great advice prior to the build. Thanks Smoggy appreciate it. David.
- 14 replies
-
- borax
- wd40
- alternative
- decarb
-
Tagged with:
-
Frosty, Wow, great very helpful. What I really meant was rust and maybe even scale when I said gunk. I was having a hard enough time forge welding when I cleaned everything and leveled it all out Would like to be able to forge weld old cable and old bolts and nuts. Tried making a pair of box tongs using an old bolt and nut. But when I quenched it to cool it, it came loose on the thread. There was a lot of rust and I do not think I managed a weld. Will use a bolt with an already attached head next time for the box tongs ( OK a wee bit of cheating maybe) but could be handy to weld it into one piece using a loose bolt too. If you don't mind, could you explain the charcoal recipe a bit more and the how it works. Would be very interested to find out more. Have a lot of charcoal. Do you mean a type of case hardening? Soak it in fire water? Sorry new to this Good tip, never occurred to me that soaking it in a bath of derust solution as it cools would help it penetrate deeper into the core. If I were to put it into hot vinegar over night and then neutralize it the next day with the backing soda, would I need to be quick about the forge weld as soon as it is out of the vinegar? What about scale formation does borax stop that or must I hit it all into one mass in the first go. Thanks am happy to do experiments, in fact do tons of those already, but usually need more info before I try. All the best David. BIGGUNDOCTOR, Very easy to get here, will give it a go. Cheers Once saw a video of someone etching a blade using vinegar, if I remember rightly they boiled it for an hour to get the pattern out.
- 14 replies
-
- borax
- wd40
- alternative
- decarb
-
Tagged with: