Graham Fredeen
Members
-
Joined
-
Last visited
Everything posted by Graham Fredeen
-
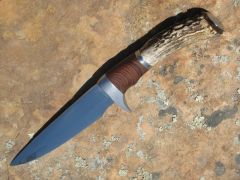
 New sheath for w-1 dagger I did around Christmas time
 -
-
-
Thanks all. Mark, I agree, yet disagree with you about the flow of the handle. I disagree about the materials, but agree that there is a detraction from the flow. I quite like the two contrasting handle materials and I think that they add to the overall character of the blade. However, that being said, I was hoping for a little smoother transistion between the two, which I think would have improved the flow. I was originally thinking of doing complete stag for this blade, but the antler section that I was given for this specific piece (going to a hunter who wanted the antlers off the deer they shot to be used) would not accomidate it, so I went with the cocobolo with stag rear. And like I said, I was hoping for a nice smooth transition, but the antler had its own idea . The bottom cooperated fine but the top dipped in a bit. But I still think it turned out alright. But hey, everyone has their own tastes/styles. Glad you like it though. I do love the design of this blade too, I almost dont want to give it up . It has a great feel in the hand. Sometime I suppose I will have to make another something like it for me to keep.
-
Also, while I am at it. I did a sheath for one of the daggers I did about Christmas time and got some pics of it as well.
-
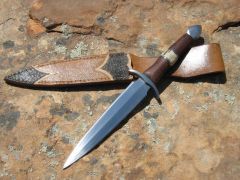
Hey folks. Just finished this one up last night. Blade is 5160 11.5" OAL 6" Blade Wood is cocobolo steel spacer Stag Steel buttcap Dont know if I am completly happy with this one, but then again I never am . I am currently working on the sheath for this one. Just bought some leather working tools a few days ago and started messing around. I will post some pics when I get the sheath done. As always, comments, questions, and criticisms please. Graham
-
Sounds and looks like a bad weld in the billet. It would be difficult to shear an entire good, sound weld along the length of the blade, especially without shearing others in the process. And even harder on a thinner billet with a bit higher layer count like you buy from manufacture. A weld is more likley to come apart when drawing out the billet and striking along the edges of the welds, especially right after a weld is made, but even then, a good weld shouldnt have any issues, unless temp is too cold. But once drawn out where the layers are more numerous and thinner, its pretty hard to shear them, unless you are working way too cold. And even then, I would doubt that a single weld would shear the entire length of the blade. Seems more like a delamination due to a poor weld in the billet. And splitting down the middle like that I would guess it would have been in the last weld made. Hard to say exactly what caused it though, one can only speculate. Just one of those things that is dissapointing after putting in so much work, not to mention money for the stock.
-
Feukair, no problem, easily made mistake. Afterall, Sam is usually the one to bang out the biger ones around here . Norseman, I have yet to HT it, so right now here singing is a little out of tune . Still rings pretty good, but you can tell that it is in an annealed state. Once heat treated, it should ring most beautifully. Unfortunately I haven't made much further progress on the sword from where it was last time. I broke out with a Damascus rash that I couldnt help scratching, so the past couple of weekends have been spent working on a 1095/ pure nickel billet instead of this sword. Have the billet up to about 60 layers currently, and will probably fold either once or twice more to give 120/240 layers. Have to see how much of the billet is left after the next fold however. Ran out of propane on my last weld, so had to stop until this next weekend. But, I promise I will post the progress of this sword as it comes along.
-
Pete, try this: Ellis Custom Knifeworks Looks like Sam forgot an l
-
Definately interested in hearing some more about this. I was under the impression that I would be looking like way more than $500 (probably closer to $700 all said and done) for a set up like I would need. Was looking like about $300 for just the stainless steel pipe, $200-$300 for the PID controler, plus solenoid, burners, and all the plumbing, not to mention the salts. If I could get a salt set up for the price you are talking, I will most definately go for that. If Garey would be willing to give me some schooling on his setup, total cost, etc, it would be greatly appreciated.
-
Sam, I was thinking of just going with a multi-burner that I can tune down really low. I would love to do a salt set up, but don't have the funds. I don't agree on the expense of a salt setup being the same for a multi-burner either. I already have the kaowool to line a multi-burner (ordered extra when I did my forge), and would make the burner's myself, for little expense. Overall, maybe $100 out of pocket (not including what I already have part-wise). A salt setup would push me way over that. Unless you have some sources that I don't know about. Unless I could do a salt setup for $250 or less, probably not going to happen for awhile.
-
Thanks everyone. Sam, firstly... I am not little Secondly... don't start something you can't finish (like a knife or sword ). Heheh, just kidding. I have a similar problem when it comes to forging something out and letting it sit in the shop for a long long time. This sword was like that, had it about half way rough forged out almost a year ago, then didn't touch it. Finally thought it would be a good idea to try and finish it up. As to fullering tools, spring fullers work alright, but I think that a guillotine type tool is a better idea, and probably what I will make in the future. Something like the one Mike donated on the first page would work perfectally. The guillotine style is more versitile, you can use it on more than one sized stock and dont have to worry about things not lining up when you drop the hammer on it. Plus, more efficient. The spring on the spring fuller can absorb some of your blow, but not with the guillotine. After I get this beast rough ground I am going to set it aside and build a much needed long HT furnace. After I get that up and going I will probably try and shift my focus more towards swords and less towards knives... or, better yet more towards swords and knives. Nick, the fuller was forged in, then cleaned up by hand with a file, and then some on the grinder (had to devise an attachement speciffically for cleaning up the fullers after I did one of them by hand). Thomas, not sure on the current weight. I still have to do a decent amount of grinding which will probably lighten it up a bit, so havent bothered checking yet. I can tell you however, it weighs quite a bit less than the 4 lb sledge I drew it out with though .
-
Hey everyone, Thought I would drop in and post some pictures of the progress made on my latest piece. Its a 48" longsword/hand-and-a half sword, 36" blade. 5160 spring steel. About 1 3/4" wide near the tang (might thin it up some however). Here are some pictures of it rough forged, and some part-way through the rough grinding. I would say I am about 50%-65% done with the rough grinding (depending on if I adjust the profile or not). I still have to thin up the edges a bit and get the fuller running completly straight and uniform and grind out a few gouges and mis-shapen areas here and there. But its comming along nicely. Anyway, let me know what you all think. Graham
-
Actually, It is highly unadvisable to use "new" files for blades. Most new files are case-hardened, not the good old highcarbons of the past. You really have no idea of whether or not the new file was case-hardened or not. The only safe files to assume are still 1095 are Nicholson files. Plus, for the cost of a new "good" file, (that is a good file and would be better put to use as its intended function, a file) you can purchase new steel stock of known alloy, which for making blades is the best choice. Also, "Make sure it doesn't have any nickel or valedeim, or chromium as the expensive files do or it will melt at forging temps, " is just not true. Alloy steels such as 5160, which as chromium for extra hardenability, are completly forgable, even forge-weldable, and do not "melt." 15N20 has nickle in it, and it doesnt "melt" at forging temps, or forge-welding temps for that matter. Do some research before posting incorrect information. Alloys can be harder to work with, and can require some alloy-specific techniques when working them (regarding temperature control in the working ranges) and especially in heat-treatment, but they do not "melt" and are completly usable and produce very good blades. Old files are a safer bet for blades, as far as chances of not being case-hardened. The best choice is of course to buy new stock. But an old file can still produce a darn good knife. As always, a close inspection is necessary before using an old file for a blade, and when working with old files or junkyard steels, always keep it in the back of your mind that the blade might fail due to some unknown/unforseen flaw/crack somewhere. But, might as well use them if you have them, I do on occasion.
-
Sam, the new KMG is starting to show . Looks really good, and the plunge cut as well. I bet you are really enjoying having a professional grinder. The hammered texture on the spine should provide for some interesting contrast. What are you thinking for finish on the blade? You should mount that sucker up soon and get it finished so we can see what it will look like (you could probably pay for that 10" contact wheel with it too.) Anyway, looks good, keep us updated.
-
Looks good Robert. Can't wait to see it all finished up and mounted. Is that a little section about 2/3 rds of the way down the blade that didnt harden at the edge and a little bit at the tip (or does the hamon just drastically cut in, it almost looks like the edge hardened in the las photo, just not very deep)? That water hardening article has made me rethink and reconsider water hardening on alloys and all highcarbons in general. Someday when I get more time I will definately have to give it a try.
-
Richard, I would say that your answer is the best, dead on, exact answer there could be.
-
Josh, Without being able to watch you work or see an example of the problem I can't determine exactly the cause of your problem. However, here are some general tips that I find helpful when I do double edged blades. Firstly, (I always work from the tip back, some smiths do the opposite) when drawing out the stock, always try to work each of the sides and edges uniformly, don't favor one over the other, this can cause the blade to become bent/ curved as you draw it out, and requires more work and adjusting to correct the problem. It can also cause one edge of the blade to become thicker than the other, which will cause problems with the beveling. Secondly, after you drop below proper working temperature and can no longer move lots of metal, make light adjustments and straighten the blade before the next heat. Thirdly, try and establish the exact profile shape (or get it really close) before beveling (granted it will be smaller all around), make sure that both edges are of the same thickness (not flared out or stacked up on one side). When hammering in the beveling I usually work in sections, starting at the tip. Work both sides of the bevel and both bevels evenly and the blade should remain straight. Also, try and finish the beveling on the section you are working before moving on to the next section, this will also help keep things straight as well. Finally, you can always (and it is a really good idea) oversize your edge out past your desired profile, that way if there is any unconformity or problem areas you should (hopefully) have enough material there to fix the problems up on the grinder (or file by hand, depending on your equipment). And specifically on leaf shaped blades, when you start working on the section of the blade where it begins to taper back in towards the tang (after the flared out section of the point, if that makes any sense), make sure you work the side of the edge at the same position along the length of the blade as the other. Make sure your hammer blows connect exactly across from the section of the anvil where the other edge is in contact. Otherwise you could have mishapen curvature in the blade. And again, work both edges evenly and gradually. Dont try to completly hammer in the profile of one edge and go back and work the other, work them both the same and keep eveything even and straight. And always make fine adjustments at the low heat before the next heat (straighten everything out, true up any edges, true up any off blows, etc). Hope this helps some. If you have any more questions I will try my best to help out, and if you run into the same problem, try to determine where it is occuring durring the forging process. Graham
-
Thanks. No, thats not hamon, it is some kind of reflection from something. But oddly enough, the W-1 dagger I did a little earlier has a faint hamon that runs nicely from the tip and semetrically down the edges. I tried a light etch, but it wouldnt pop, so I gave up and re-sanded the blade. I didnt do a differential heat treat on it and there was not a great contrast in the hardened and unhardened boundaries of the blade since the spine hardened as well, just not to the degree of the edge. But you cant really tell from the pictures of it, especially with my camera.
-
Happy New Year everyone. I just finished this one up Newyears morning. I spent all of Newyears eve in the shop finishing it up. Forged 5160, heat treated Cocobolo grip wood Teak spacers steel spacers with filework Mild steel guard and pommel Overall length: 12.75" Blade length: 7.75" I am not very happy with these pictures, and out of the 50 or so I took theses were the only usable ones, the rest were all fuzzy. I need to get a better digital camera, my little 1 or 2 mega pixle with no optical zoom just isnt cutting it anymore. Anyway, let me know what you all think, comments, questions, and as always any criticism is more than welcome. Have a safe and productive New Year Graham
-
Hey folks, and Happy New Year. I saw my woodworker friend today, who gave me the material for the grip and I was just going to give you all an update on what species of wood it is. It is actually cocobolo. I havent had much opportunity to work with many exotic woods as I am limited on money, so I havent developed the eye for what wood looks like what quite yet. Anyway, just thought I would give an update in case anyone was wondering. And I also finished up another dagger last night, I have yet to take pictures of it, but as soon as I do I will post them. Graham
-
Thank you all kindly. This one did have some issues when making it, particularly with the hilting and tweeking everything to fit, and it is still slightly off in a couple of places. The antler spacer also split in half on me when I was doing the final assembly (luckly before I had peened the pommel on good, and even better that it did it before I welded it over) and I had to make another and re-fit it. Its always something it seems. But every little mistake and challenge teaches you something and helps make you better. Patience is the key with this sort of work. I love forging out blades, and I even think grinding them is alright, but its the fittings that are the most challenging for me. Trying to get them to fit up right, look good, and be solid is a pain. This one is solid though, everything had to be tapped into place on the tang (thats why the antler split on me), almost didnt need the pommel to hold it on. Sam, its good to be back. I thought I better bring something good with me when I came or you all might not want me back You have been turning out some good work recently yourself. I have more blades in the works, and will show you all when I get them done.
-
Hey everyone. Merry Christmas! It has been awhile since I have been around here, and since I have had time to do much bladesmithing. Been excessivly busy with college and such. But I am off on break and have been back in the shop. Anyway, just finished up this dagger last night (probably around 12:00 am or so). Thought I would post it here and see what you all think. Blade is W-1, hardened and tempered, somewhere around HRC 60. 11.25" over all 6.25" blade Mild steel guard and pommel Antler and steel spacers I am not sure on the species of hardwood I used on the grip, it was given to me by a woodworker I know, I am going to take the dagger and show him what I did with his gift and I will find out then. Comments and criticism are welcome, dont worry about hurting my feelings, I am a man and can take it like one. And I know that my work is far from perfect, but criticism can help me focus on what I need to work on and help improve my work. Graham
-
What size of sander are you looking for? If you want cheap, you can always check out Harbor Freight. They stock a couple of 1" x 30" (one with a 5" disc attachment, the other without), and they also have a couple of 4" x 36" sanders. The 1" x 30" go from $40 for the standard and $60 for the one with the disc. Both 4" x 36" are about $90. I dont know exactly how reliable they are per say, after all you get what you pay for, and its not the $$$$ professional equipment. I have/had a couple of their 4" x 36" grinders (for linear grinds on long blades). I burnt the motor out of one of them due to heavy use (grinding 3-4 hours straight, every day). What happened was the upper roller got cloged and jamed with a bunch of grindings, and when I turned it on, the belt wouldnt move, rather than shutting it off immediatly, I grabbed some WD40, and tried to loosen things up, and as a result of the motor not turning and circulating air for awhile, the motor overheated. I got a new one, which I oil often, and I havent had any problems since. Dont know if that would be what you are looking for, but I thought I would throw it out there. And if you need abrasives, I get mine from Abrasives, buffers, grinders, handle material, knife making suplies and more They have a good selection of belts for just about any sized grinder, and in the higher grits as well, and they are fairly reasonable price wise. Personally I am hoping to build myself a grinder soon, one with more versitility and design specifications for blade work. Just need the time, and to wait for the budget to loosen up a bit.
-
Thankyou all. Ezra, it verywell could be. I am no expert in japanese weaponry. I just know the standard broad classifications. I just made what the client wanted. He expressed a desire for a short "katana" that could be wielded in close quarters, with a straight blade. The resulting design was that of a wakizashi length blade, but straight like that of a ninjitsu blade. Then he e-mailed me pictures of the Aikido symbols to be engraved on the blade. And then I made it. I appologize for the quality of the pictures, being so dark and all. I am no professional photographer. Normally I try to take the pictures outside where there is plenty of light, but that blizzard Colorado had a week ago prevented that.